Microsoft Azure Vnet: Multi-NIC F5 BIG-IP Virtual Edition
This guide demonstrates a minimal deployment of a Multi-NIC F5® BIG-IP® Virtual Edition (VE) in Azure Vnet.
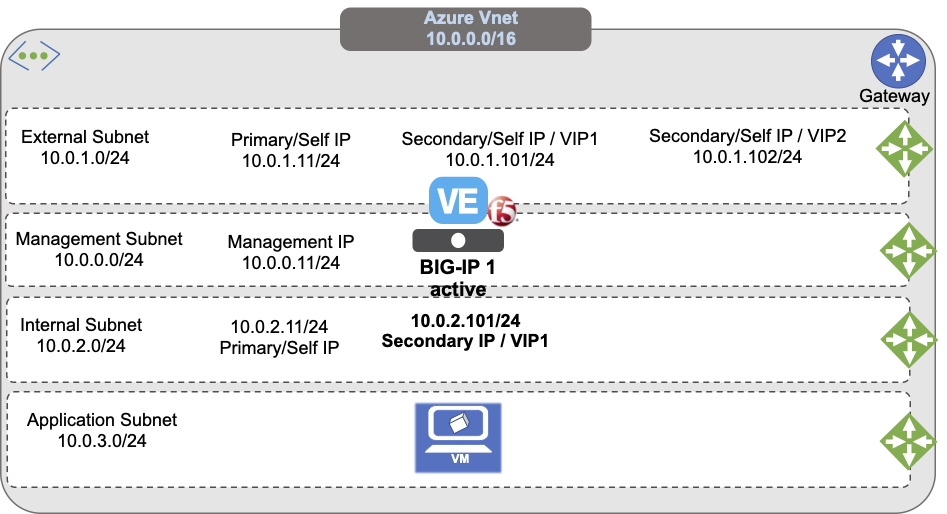
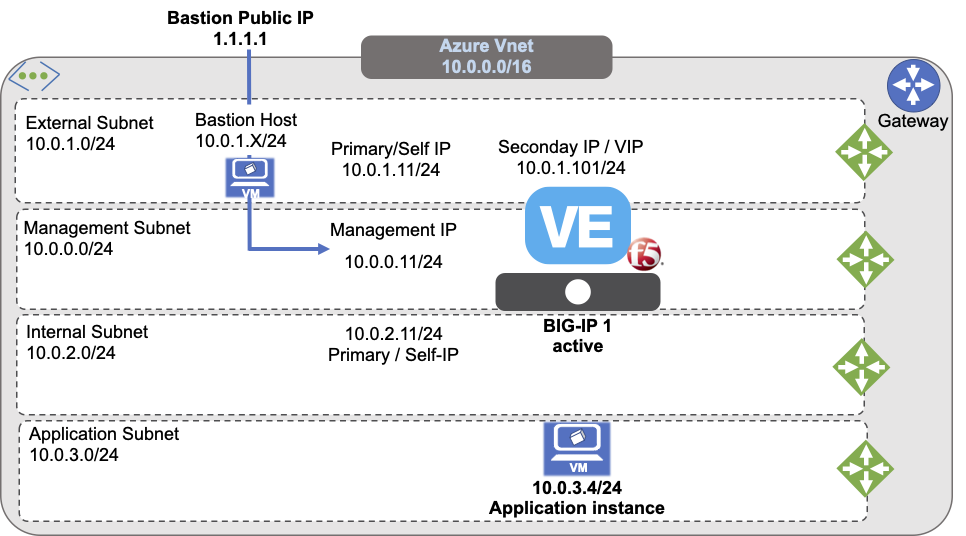
The previous diagram illustrates a standalone BIG-IP with three NICs and multiple IPs:
- Map primary IPs to unique IPs (Management/Self-IPs)
- Use secondary IPs for additional or floating addresses like, Virtual Services
This demonstration deployment uses four subnets:
- An external, public subnet, used to create a virtual server to accept application traffic
- A management subnet, used to access the BIG-IP Configuration utility, which you use to configure BIG-IP VE
- An internal, private subnet used for egress traffic to the application servers
- An internal, private subnet, used to host your application servers
Traffic flows from clients through your BIG-IP VE to application servers.
Deploy BIG-IP VE with multiple NICs
Create all the cloud resources in Azure, such as: vnets, subnets, NICs, IPs, and VM in Azure Vnet, then use the F5 BIG-IP VE Configuration Utility, to create the corresponding IPs to match those cloud resources.
Prerequisites
OPTIONAL: Create an SSH key pair. In Azure, you can configure a username and password to access the BIG-IP; however, SSH access is the more common method used in cloud computing. This guide will demonstrate the SSH key method.
Create a Resource Group to deploy the Virtual Network and BIG-IP.
Create a Virtual Network with at least two subnets, a management subnet for administrative access, and an external subnet for application access. For example:
- Management subnet: 10.0.0.0/24
- External subnet: 10.0.1.0/24
- Internal subnet: 10.0.2.0/24
- Application subnet: 10.0.3.0/24
Caution
You MUST ALWAYS restrict management access to trusted resources and networks, accessed from Bastion or Jump Boxes, and other similar services. For illustration and evaluation purposes, this guide includes instructions to create public IPs to provide temporary access to the management interface, but production deployments MUST NEVER provide such access.
Create the following security groups to determine which traffic can travel in and out of the virtual network:
- Management traffic group
- External traffic group for virtual server traffic
- Internal traffic group for config sync or internal traffic
Create an SSH key pair
Optional: To access the Azure virtual machines, leverage an SSH key. You can create an SSH key in Azure (see Azure documentation) or provide a public key if you already have one. Windows users, will use an SSH tool like PuTTY to access the Azure instance, which may require PuTTYgen to convert the .pem file to .ppk format.
Create a resource group
To create a resource group to contain your Azure virtual network and BIG-IP virtual machines, do one of the following (for complete steps, see Azure documentation):
In the Azure portal, navigate to .
In the Azure CLI type:
az group create -n example-rg -l eastus.
Create a Virtual Network with multiple subnets
A BIG-IP VE instance must be in an Azure virtual network. Use the Azure Portal to create a virtual network with the desired number of subnets. At a minimum, create management and external subnets. For complete details, see Azure documentation.
In the Azure Portal, navigate to .
Select the IP Addresses tab, update the default network CIDR, and then click the Add Subnet to add the additional subnets using the following example information:
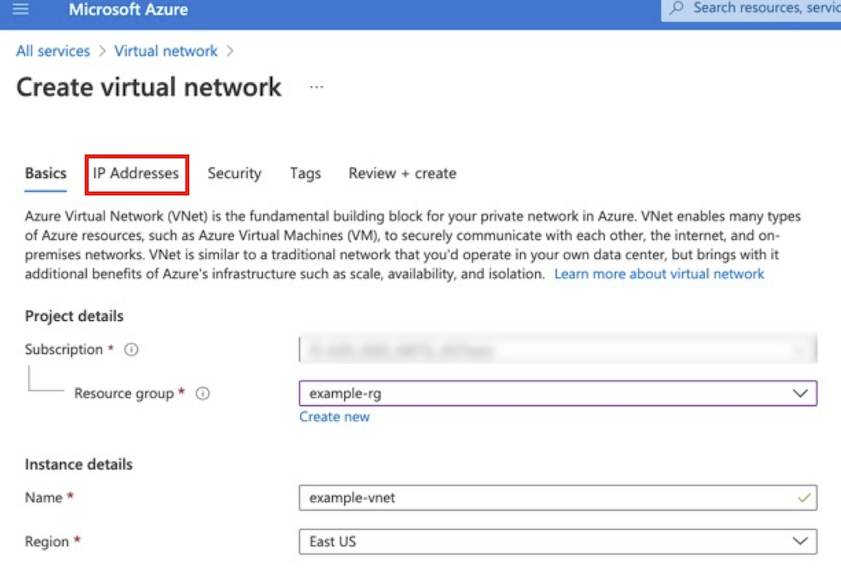
Type Name CIDR Virtual Network Example-vnet 10.0.0.0/16 subnet Management 10.0.0.0/24 subnet External 10.0.1.0/16 subnet Internal 10.0.2.0/16 subnet Application 10.0.3.0/16 Note
The example in the following screenshot a modified default network address space,
10.0.0.0/16to match the previous diagram.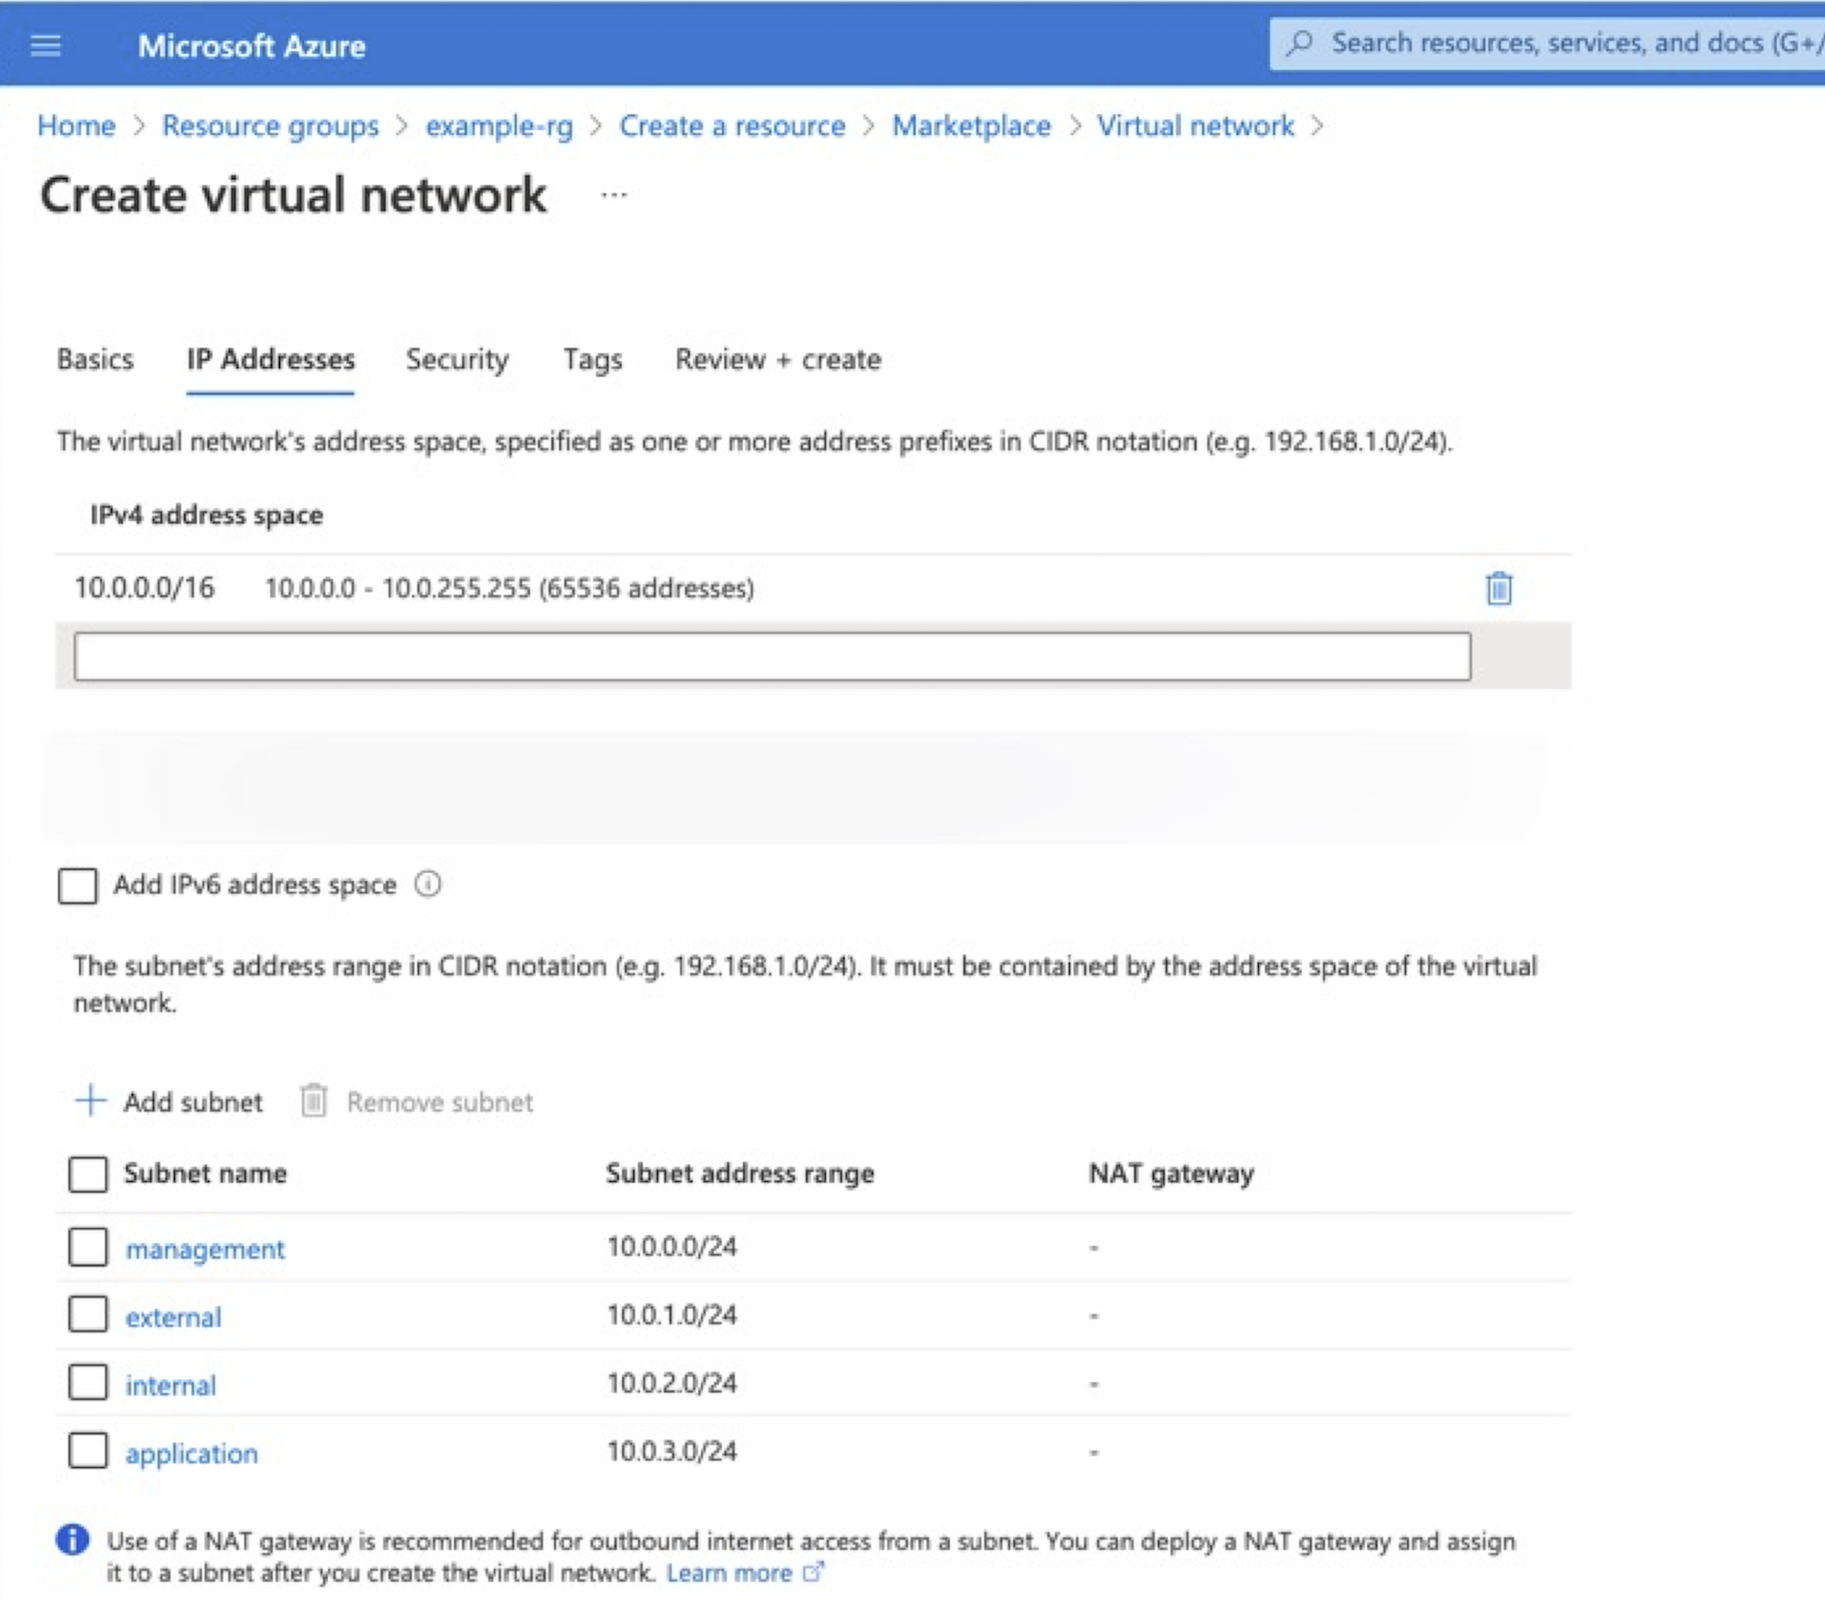
To create virtual subnets using the Azure CLI, type:
az network vnet create --name example-vnet -g example-rg -l eastus --address-prefixes 10.0.0.0/16
az network vnet subnet create --name management -g example-rg --vnet-name example-vnet  --address-prefixes 10.0.0.0/24
az network vnet subnet create --name external -g example-rg --vnet-name example-vnet --address-prefixes 10.0.1.0/24
az network vnet subnet create --name internal -g example-rg --vnet-name example-vnet --address-prefixes 10.0.2.0/24
az network vnet subnet create --name application  -g example-rg --vnet-name example-vnet --address-prefixes 10.0.3.0/24
Create security groups
Create Network Security Groups to control the inbound and outbound traffic allowed by the Virtual Machine (see Azure documentation for complete details). You can create security groups based on your needs. This specific configuration uses three security groups for the following:
- The BIG-IP Management UI
- Virtual server traffic
- Internal traffic
Create three groups with inbound security rules based on the following information. Leave outbound traffic for each group as the default (all).
Purpose Name Type Protocol Source Management management-nsg SSH and HTTPS 22 and 443 Administrator’s IP address on a secure network. Virtual Server external-nsg HTTP and HTTPS 80 and 443 Clients’ IP address range. Internal Traffic internal-nsg UDP, TCP, and TCP 1026, 4353, and 6123-6128 For Internal traffic restricted to intra-vnet and/or inter-BIG-IP communication, for example 10.0.0.0/16. BIG-IP VE uses UDP 1026 for Failover Heartbeats, TCP 4353 for Config Sync, and TCP 6123-6128 for ASM Policy Sync. For more information, see K13946. In Azure Portal, navigate to .
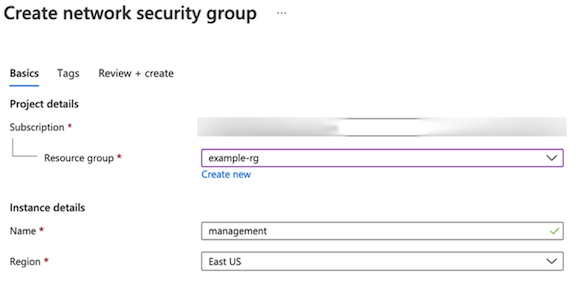
Select the management security group just created in Step 2, and then select Inbound Security Rules.
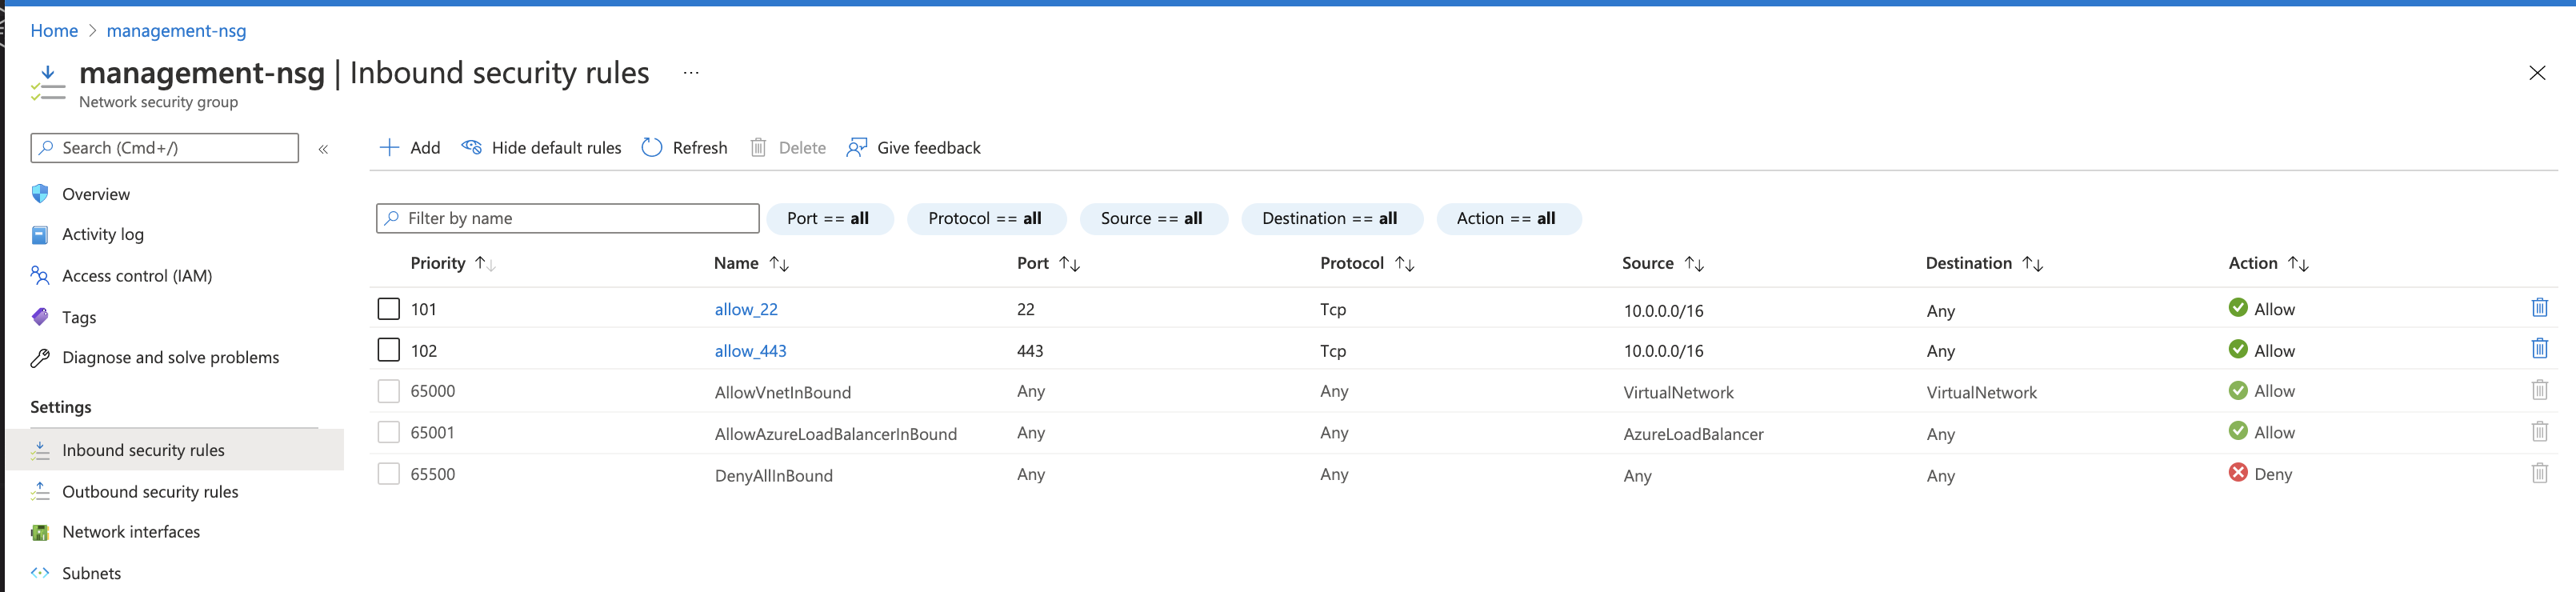
Repeat the previous steps for the external and internal security groups using the rules outlined in the previous table.
To create network security groups using the Azure CLI, type:
# Management Security Group
az network nsg create --name management-nsg -g example-rg -l eastus
az network nsg rule create --name allow_22  -g example-rg --nsg-name management-nsg --priority 101 --access Allow --description 'allow port 22' --destination-port-ranges 22 --protocol Tcp --source-address-prefixes "<YOUR-CLIENT-NETWORK>"
az network nsg rule create --name allow_443 -g example-rg --nsg-name management-nsg --priority 102 --access Allow --description 'allow port 443' --destination-port-ranges 443 --protocol Tcp --source-address-prefixes "<YOUR-CLIENT-NETWORK>"
# External Security Group
az network nsg create --name external-nsg -g example-rg -l eastus
az network nsg rule create --name allow_80 -g example-rg --nsg-name external-nsg --priority 101 --access Allow --description 'allow port 80' --destination-port-ranges 80 --protocol Tcp --source-address-prefixes "*"
az network nsg rule create --name allow_443 -g example-rg  --nsg-name external-nsg --priority 102 --access Allow --description 'allow port 443' --destination-port-ranges 443 --protocol Tcp --source-address-prefixes "*"
# Internal Security Group
az network nsg create --name internal-nsg -g example-rg -l eastus
az network nsg rule create --name allow_failover  -g example-rg --nsg-name internal-nsg --priority 101 --access Allow --description 'allow udp port 1026' --destination-port-ranges 1026 --protocol Udp --source-address-prefixes "10.0.0.0/16"
az network nsg rule create --name allow_config_sync -g example-rg  --nsg-name internal-nsg --priority 102 --access Allow --description 'allow tcp port 4353' --destination-port-ranges 4353 --protocol Tcp --source-address-prefixes "10.0.0.0/16"
az network nsg rule create --name allow_config_sync_asm  -g example-rg --nsg-name internal-nsg --priority 103 --access Allow --description 'allow tcp port 6123-6128' --destination-port-ranges '6123-6128' --protocol Tcp --source-address-prefixes "10.0.0.0/16"
Access BIG-IP VE
Restrict all access to the BIG-IP Management UI (GUI and SSH) to trusted sources/networks; for example, using Bastion Host/Bastion Service/Jumpbox, and other similar services. See the following example:
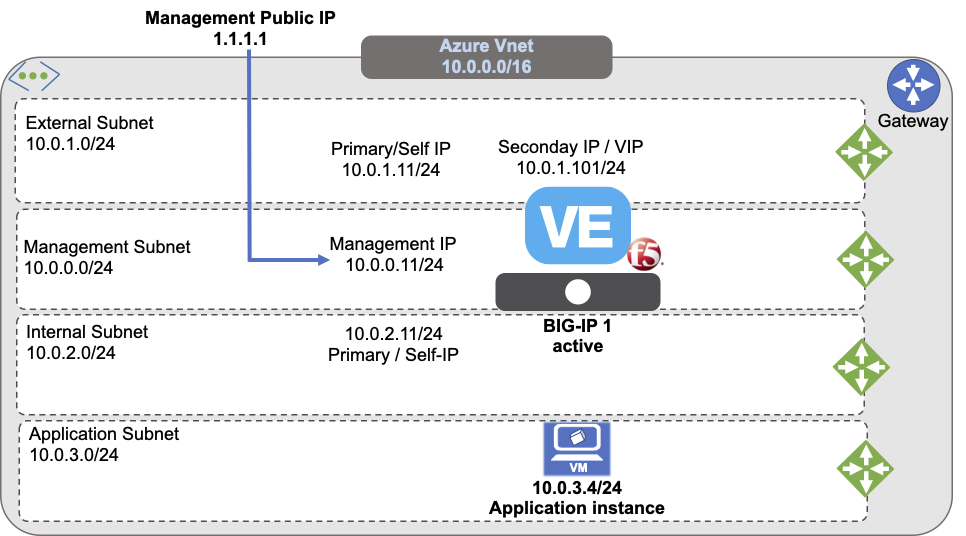
Consult Azure documentation for instructions on selecting and deploying an appropriate access solution. For simplicity and evaluation purposes only, the following steps describe provisioning a public IP address to access the management UI.
The previous diagram illustrates an evaluation-only deployment of a standalone BIG-IP VE with three NICs.
Deploy BIG-IP VE
To deploy the BIG-IP VE instance, do the following:
- Create additional network interfaces:
- External interface: 10.0.1.11
- Internal interface: 10.0.2.11
- Deploy the BIG-IP VE instance.
Create additional network interfaces
By default, when deploying the BIG-IP virtual machine through the Azure Portal, it creates one NIC. To create a multiple-NIC BIG-IP, you must create additional NICs and attach them to the BIG-IP VE after initial creation.
Note
For multi-tenant, multi-service deployments, F5 recommends leveraging static IPs in order to help recreate Azure network configurations that match network configurations in your BIG-IP UCSs (BIG-IP’s backup files).
For complete details, see Azure documentation.
In the Azure Portal, navigate to .

Create the external NIC, using the following information:
Textbox Value Resource Group example-rg Name external-nic Region East US Virtual network example-vnet subnet external (10.0.1.0/24) Private IP address assignment Static Private IP address 10.0.1.11 Security groups external-sg 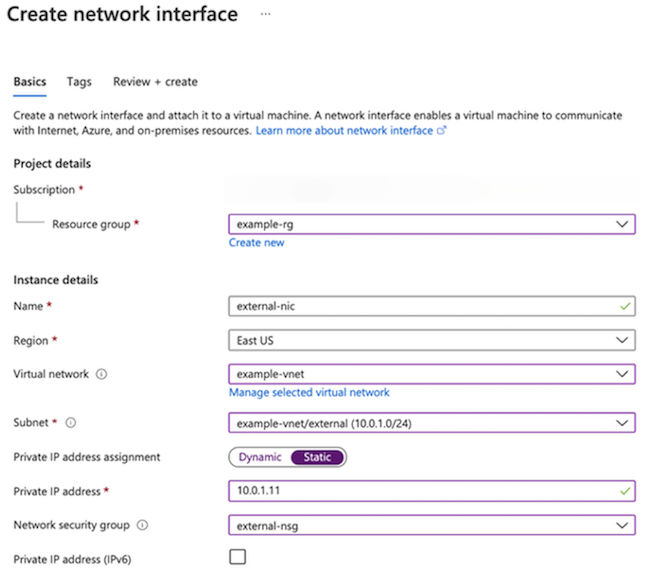
At the prompt, click Yes, Create.
Repeat the previous steps to create an internal NIC:
Textbox Value Resource Group example-rg Name internal-nic Region East US Virtual network example-vnet subnet internal (10.0.1.0/24) Private IP address assignment Static Private IP address 10.0.2.11 Security groups internal-sg
To create network interfaces using the Azure CLI, type:
# External NIC
az network nic create  --name external-nic -g example-rg --vnet-name example-vnet --subnet external --ip-forwarding --private-ip-address 10.0.1.11 --network-security-group external-nsg
# Internal NIC
az network nic create --name internal-nic  -g example-rg  --vnet-name example-vnet --subnet internal --ip-forwarding --private-ip-address 10.0.2.11 --network-security-group internal-nsg
Note
If deploying through the CLI, you can also create the management NIC.
# Management NIC
az network nic create --name management-nic -g example-rg  --vnet-name example-vnet --subnet management  --ip-forwarding --network-security-group management-nsg  --private-ip-address 10.0.0.11
If accessing management interface using a Public IP, do the following:
Create a public IP:
# Public IP
az network public-ip create --name management-public-ip -g example-rg --allocation-method Static
Create the NIC with public IP attached:
# Management NIC
az network nic create --name management-nic -g example-rg  --vnet-name example-vnet --subnet management  --ip-forwarding --network-security-group management-nsg  --private-ip-address 10.0.0.11 --public-ip-address management-public-ip
Deploy a BIG-IP VE instance
For complete details, see Azure documentation.
To create a virtual machine of BIG-IP VE, you deploy a version of it from the Azure Marketplace.
Visit the Azure Marketplace.
Search for, “F5 BIG-IP”.
Select the offering you want to deploy, and then click Get It Now.
Complete the Account Information, and then click Continue.
Click Create.

On Configure Virtual Machine Settings menu, complete the following information accordingly:
- Select the Resource Group previously created.
- Enter the Virtual Machine Name.
- Select the Region.
- Select the appropriate Size (for example, a select an option with at least 2 cores, 8 GB of memory like DS3_v2). See the BIG-IP VE Support Matrix for more information.
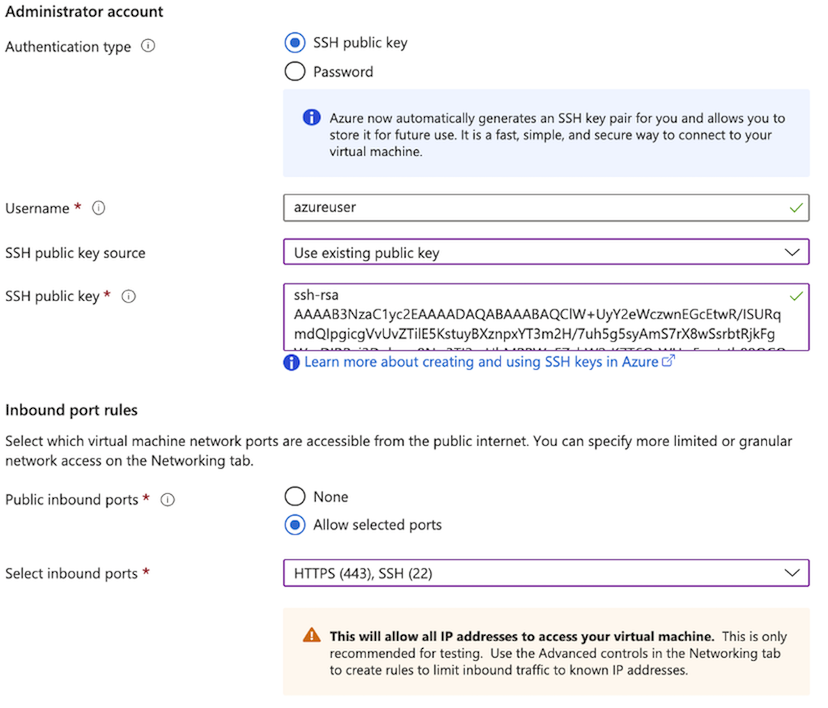
For Authentication Type, select SSH, and complete the following information:
Textbox Value Username Enter username. For SSH public key source Select Use existing public key option (see previous requirements). For SSH public key source Enter your SSH Public Key. Public Inbound Ports Select Allow Selected Ports, and enter SSH (22) and HTTPS (443) 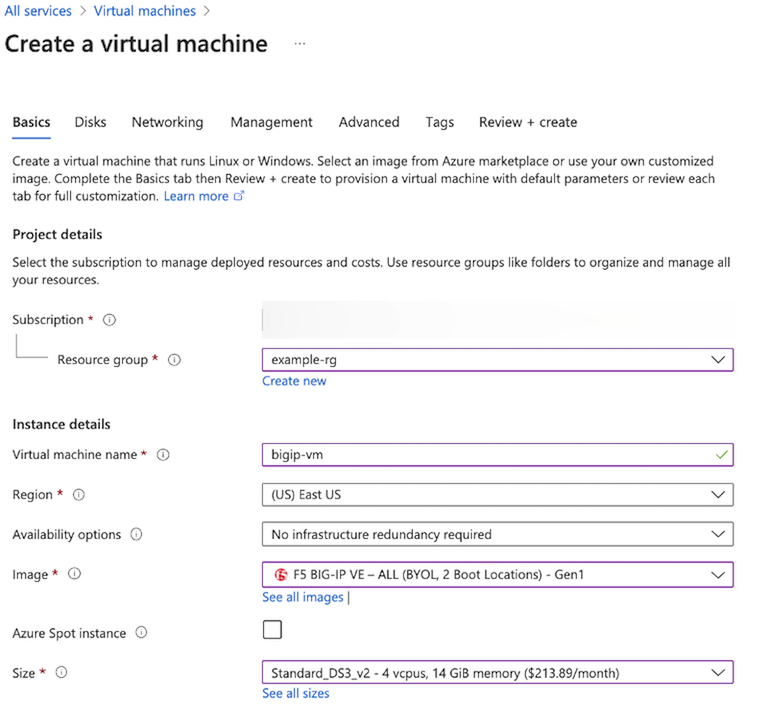
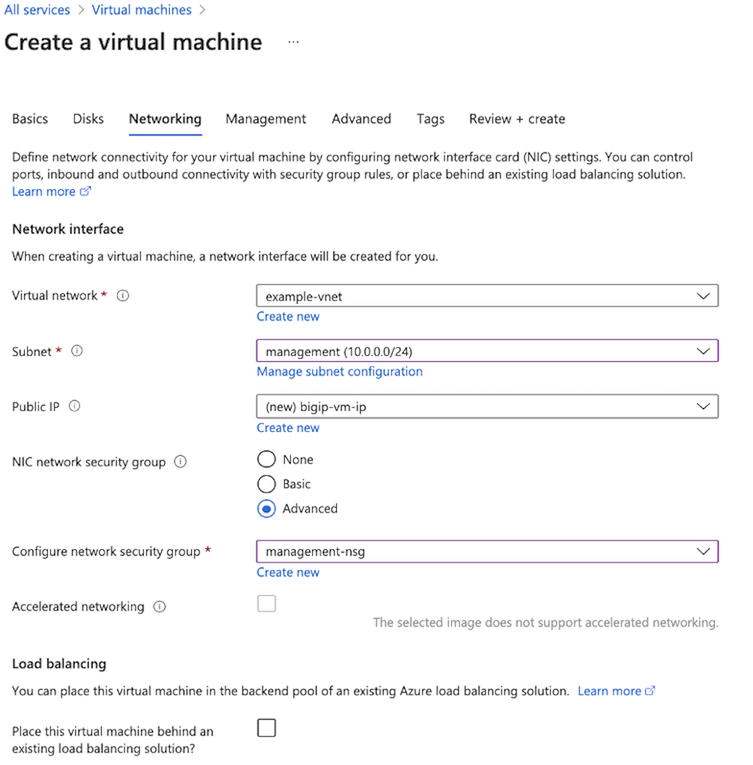
Select the Networking tab and complete the following:
- Expand the Virtual Network list, select your Virtual Network.
- Expand the Subnet list, select the management subnet: 10.0.0.0/24.
- In the NIC network security group, select the Advanced option.
- In the Configure network security group list, select the management-sg security group.
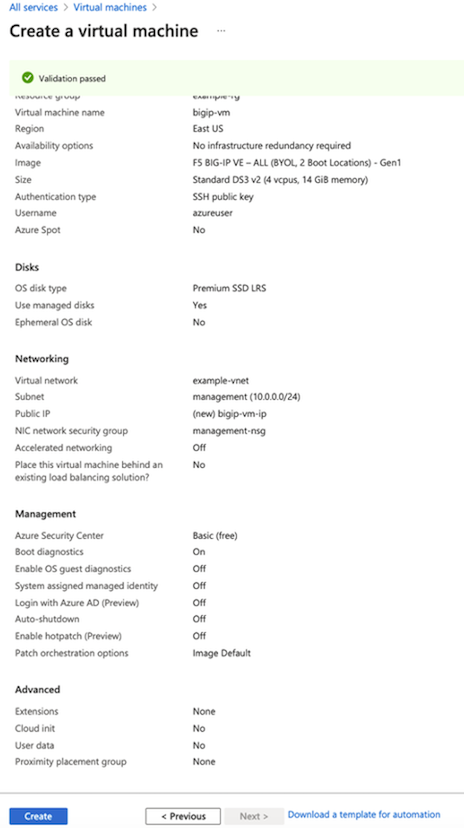
Click Next on the remaining tabs and complete all information as directed.
Once finished, on the Review + create page, review the summary, and then click Create.
After the “Your deployment is complete” message appears, select Go to resource.
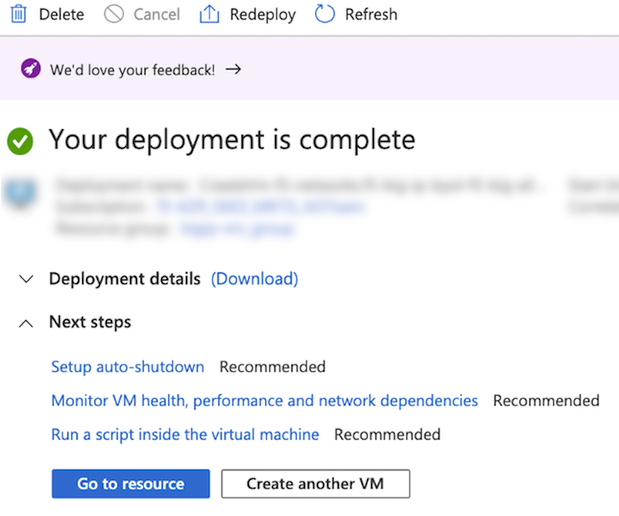
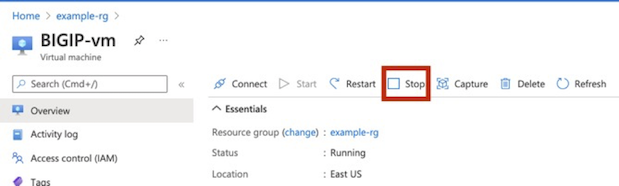
Stop the virtual machine. Select the Overview menu, and then select Stop. IMPORTANT: Before logging in or making any changes, you must stop the BIG-IP VE. Doing so, enables you to attach the additional NICs.
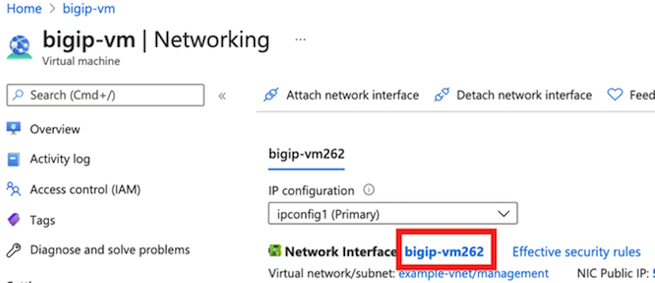
Do the following to change the Management IP to Static.
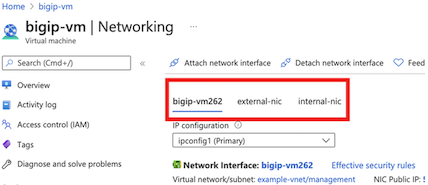
Under , select a NIC (for example, bigip-vm262).
Under , select ipconfig, and then change Assignment to Static.
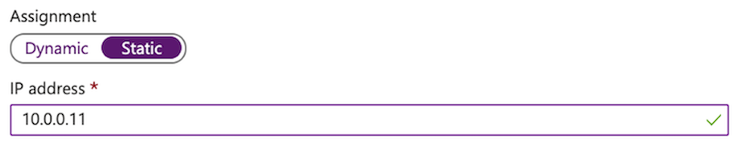
Enter the Management address: 10.0.0.11.
Click Save.
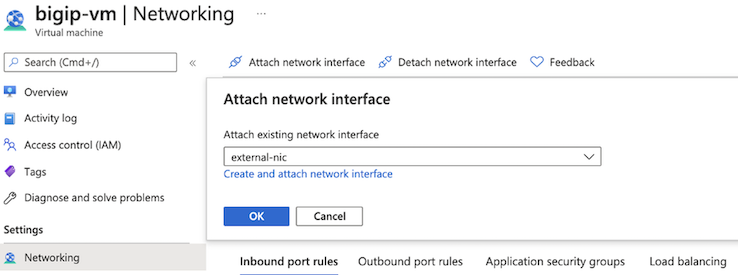
Do the following to attach the additional NICs (external-nic and internal-nic):
Navigate to the .
Click Attach network interface.
Select the external-nic, and then click OK.
Repeat these steps for the internal-nic.
You will now see three NICs attached to the virtual machine.
Re-start the virtual machine.
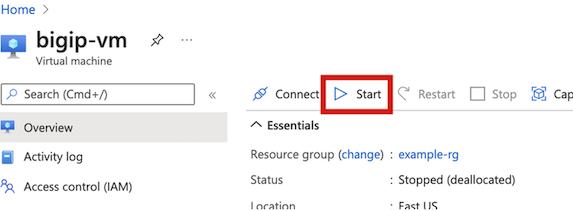
Once the virtual machine Status displays, “Running,” log into the Management IP.
To deploy the BIG-IP VE using the Azure CLI, type:
az vm create --name BIGIP-vm -g example-rg  \
 --image f5-networks:f5-big-ip-best:f5-bigip-virtual-edition-25m-best-hourly:16.0.101000  \
 --size Standard_DS3_v2 \
 --nics management-nic external-nic internal-nic \
 --admin-username azureuser \
 --ssh-key-values "ssh-rsa AAAAB3NzaC1yc2EAAAADAQABAAABAQClW+UyY2eWczwnEGcEtwR/ISURqmdQIpgicgVvUvZTilXY…."
Create a virtual service
Do the following to create a virtual service:
- Add a secondary private IP address for the virtual server. This is the address BIG-IP VE will use for the virtual IP address; for example, 10.0.1.101.
- Create a public IP for the virtual server and associate an
ipconfig. Optionally, you can create a public address and associate it with the secondary private IP address of the external NIC. This will make the virtual server accessible from the Internet; for example, PIP: x.x.x.x.
Add a secondary IP address for the virtual server
Before you can create a virtual server, you must assign a secondary IP address to the external network interface. You will associate this secondary IP address with the BIG-IP VE virtual server address. For complete details, see Azure documentation.
Using the Azure Portal, under , click the external NIC.
Under , click Add.
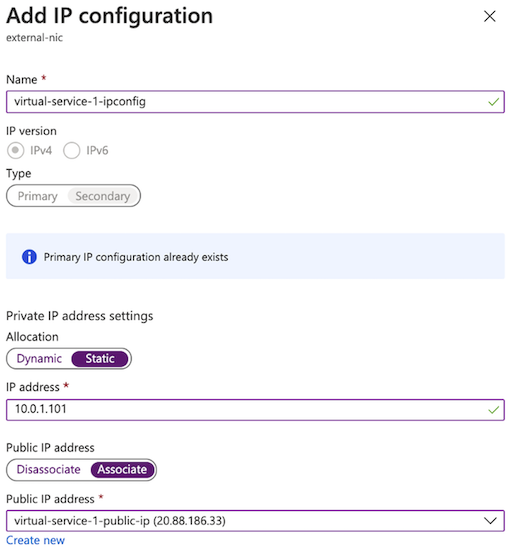
Enter a name (for example, virtual-service-1-ipconfig in the following screenshot).
Set the , select Static.
Enter 10.0.1.101 for the address, and then click Save.
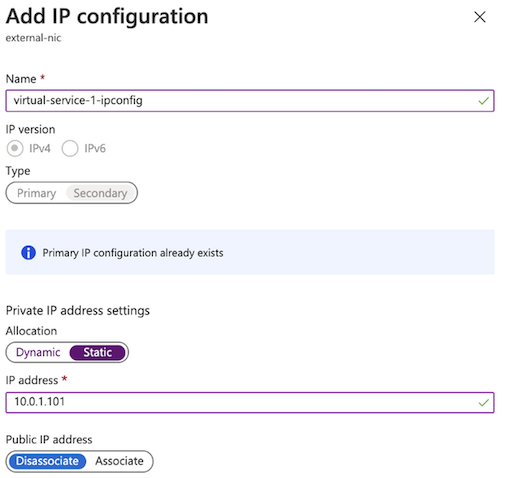
The new IP address is in the ipconfig column on the Network Interfaces menu. Later, you will enter this IP address in BIG-IP VE as the virtual server address.
To create a secondary IP address for the virtual server, using the Azure CLI, type the following:
# Ipconfig
az network nic ip-config create --name virtual-service-1-ipconfig -g example-rg --nic-name external-nic --private-ip-address 10.0.1.101
Create a public IP address for the virtual server
Optionally, do the following to create a Public IP for the virtual service (see the Azure documentation for complete details):
Navigate to , and then click Create.

Enter a name (for example, virtual-service-1-public-ip in the screenshot).
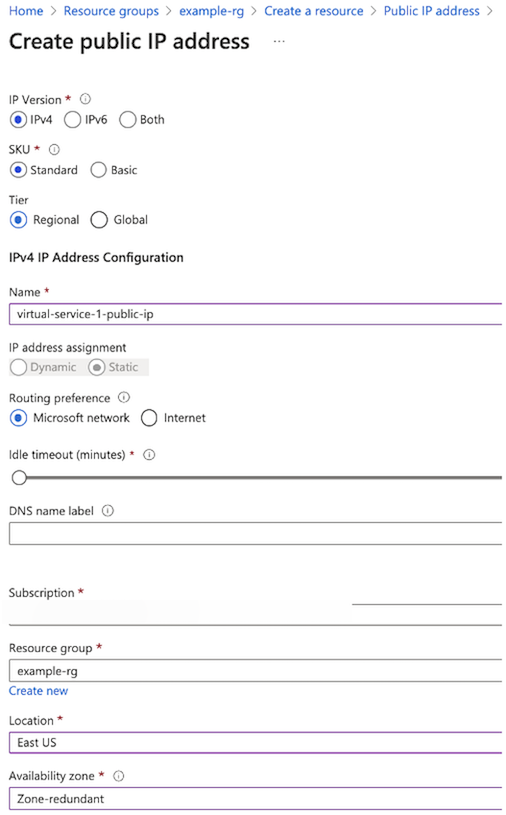
Under , click Add.
Complete the information like the following screenshot, and then click Save.
Navigate to , and then select virtual-service-1-ipconfig.
Set the Public IP address option to Associate with
ipconfig, and then click Save: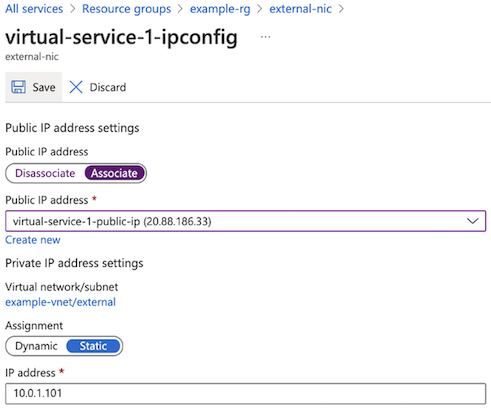
To create a public IP address and associate it with an IP config using the Azure CLI, type:
#CREATE PUBLIC IP
az network public-ip create --name virtual-service-1-public-ip  -g example-rg --allocation-method Static
# ATTACH TO IPCONFIG
az network nic ip-config update --name virtual-service-1-ipconfig --nic-name external-nic  --resource-group example-rg --public-ip-address virtual-service-1-public-ip
Configure BIG-IP VE
Depending on how you have configured access to the management port, you will now login and do the following to configure BIG-IP VE, so that traffic passes through BIG-IP VE to your application servers.
- Set the admin password for BIG-IP VE. Before you can license and provision BIG-IP VE, use SSH and your key pair to
connect to the instance and set a strong password. Using
tmsh, type:modify auth password admin. - License BIG-IP VE. Use the admin account to log in to the BIG-IP Configuration utility (
https://<PublicIP>). If you have trouble accessing the BIG-IP Configuration utility, check the Azure security groups to ensure that they allow the appropriate traffic. - Provision BIG-IP VE. Enable the modules you need.
- Create internal and external VLANs. These VLANs and their interfaces directly correspond to the Azure external and
internal subnets and their interfaces:
- external VLAN interface: 1.1
- internal VLAN interface: 1.2
- Create internal and external self IPs. These static IP addresses provide a way for application traffic to reach the
BIG-IP system. These addresses must match the private IP addresses you assigned to the external and internal subnets in Azure:
- External self IP: 10.0.1.200
- Internal self IP: 10.0.2.200
- Create a pool and add members. Create a pool with pool members on the internal VLAN.
- Create a virtual server. The virtual server provides a destination for your inbound web traffic and points to the pool
of web servers. The destination IP address must match the secondary private IP address you assigned to the external
subnet in Azure. Virtual IP:
10.0.1.202.
Set the admin password for BIG-IP VE
When you first boot BIG-IP VE, you must connect to the instance and create a strong admin password. You will use the admin account and password to access the BIG-IP Configuration utility. If the management interface can access the Internet, ensure the password is secure.
Connect to BIG-IP VE using one of the following options:
From a Jumpbox or similar service that has access to your management network, at the command prompt, navigate to the folder where you saved your ssh key and type:
ssh -i <YOUR-PRIVATE-KEY> azureuser@<MANAGEMENT-IP>If you have configured a public IP, type:
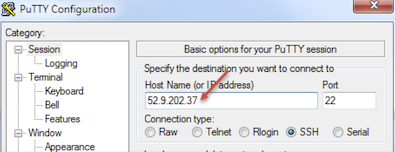
ssh -i <YOUR-PRIVATE-KEY> azureuser@<MANAGEMENT-PUBLIC-IP>Open PuTTy and do the following:
In the Host Name (or IP address) text box, enter the external IP address, for example:
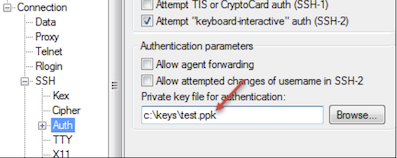
In the Category pane, click .
In the Private key file for authentication text box, choose your .ppk file.
Click Open, if a host key warning appears, click OK, at the terminal login screen, type:
admin, and then press Enter.
Change to the
tmshprompt, type:tmsh.Modify the admin password, type:
modify auth password admin.At the New Password prompt, enter the new password, and then press Enter.
At the Confirm password prompt, re-enter the password, and then press Enter.
To ensure that the system saves the changes, type:
save sys config, and then press Enter. You will see the following message:Saving Ethernet mapping...done.
License BIG-IP VE
You must enter license information before you can use BIG-IP VE.
Open a web browser and log in to the BIG-IP Configuration utility by using
httpswith the external IP address, for example:https://<external-ip-address>. The username isadminand the password is the one you set previously.On the Setup Utility Welcome page, click Next.
On the General Properties page, click Activate.
In the Base Registration key field, enter the case-sensitive registration key from F5.
For Activation Method, if you have a production or Eval license, choose Automatic and click Next.
If you chose Manual, complete these steps:
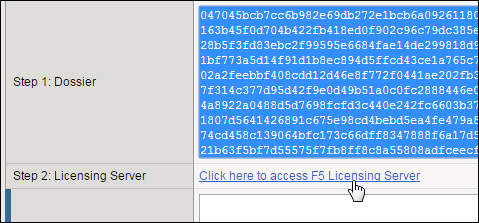
In the Step 1: Dossier field, copy all of the text and then click Click here to access F5 Licensing Server.
A separate web page opens.
On the new page, click Activate License.
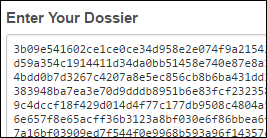
In the Enter your dossier field, paste the text and click Next.
Accept the agreement and click Next.
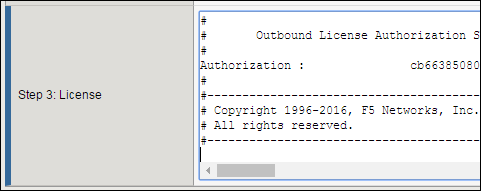
On the Activate F5 Product page, copy the license text in the box. Now go back to the BIG-IP Configuration utility and paste the text into the Step 3: License field.
Click Next.
The BIG-IP VE system registers the license and logs you out. When the configuration change is successful, click Continue to provision BIG-IP VE.
Provision BIG-IP VE modules
You must confirm the modules you want to run before you can begin to work in the BIG-IP Configuration utility.
Open a web browser and log in to the BIG-IP Configuration utility.
On the Resource Provisioning screen, change settings if necessary and click Next.
On the Device Certificates menu, click Next.
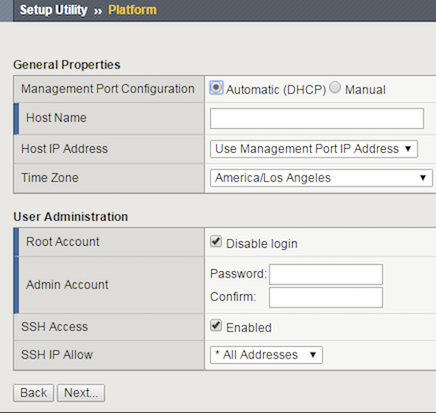
On the Platform menu, in the Admin Account text box, re-enter the password for the admin account and click Next.
The Configuration Utility logs you out.
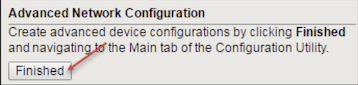
When you log back in, on the , in the Advanced Network Configuration pane, click Finished.
Create internal and external VLANs
In BIG-IP VE, you must create an external and internal VLAN that corresponds to the Azure VPC subnets.
In the BIG-IP VE Configuration utility, on the Setup Utility Network menu, under Advanced Network Configuration, click Finished.
On the Main tab, navigate to .
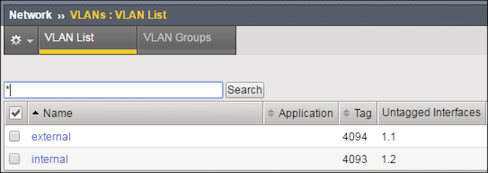
Click Create and complete the following information for the external VLAN.
- Name: external
- Interface: 1.1
- Tagging: Untagged
Click Finished.
Click Create again and complete the following information for the internal VLAN.
- Name: internal
- Interface: 1.2
- Tagging: Untagged
Click Finished.
The screen refreshes, and the two new VLANs are in the list.
Create internal and external self IPs
Before starting these steps, in Azure, note the primary private IP addresses for the external network interface (device index 1) and the internal network interface (device index 2). Then in BIG-IP VE, create an external and internal self IP address, based on these private IP addresses.
In the BIG-IP VE Configuration utility, on the Main tab, navigate to .
Click Create and complete the following information for the external self IP address.
- Name: ExternalSelfIP
- IP Address: 10.0.1.11
- Netmask: 255.255.255.0
- VLAN/Tunnel: external
- Port Lockdown: Allow None
Click Repeat and complete the following information for the internal self IP address.
- Name: InternalSelfIP
- IP Address: 10.0.2.11
- Netmask: 255.255.255.0
- VLAN/Tunnel: internal
- Port Lockdown: Allow Default
Click Finished.
The screen refreshes, and the two new self IP addresses are in the list.
Create a pool and add members
Traffic goes through BIG-IP VE to a pool. Your application servers must be members of this pool.
Open a web browser and go to the BIG-IP Configuration utility, using the public IP address on the management network, for example:
https://<external-ip-address>.On the Main tab, navigate to .
Click Create.
In the Name text box, type web_pool. Names must begin with a letter, be fewer than 63 characters, and can contain only letters, numbers, and the underscore (_) character.
For Health Monitors, move https from the Available list to the Active list.
Choose the load balancing method or retain the default setting.
In the New Members section, in the Address text box, enter the IP address of the application server.
In the Service Port text box, enter a service port, for example, 443.
Click Add.
The list now contains the member.
Add additional pool members as needed, and then click Finished.
Create a virtual server
You must create a virtual server for the secondary private IP address that’s associated with the external network interface. Application traffic goes to the public IP address associated with this BIG-IP VE virtual server.
- In the BIG-IP Configuration utility, on the Main tab, navigate to .
- Click Create and complete the following information:
- Name: A unique name
- Destination Address/Mask: 10.0.1.101
- Service Port: A port number or a service name from the Service Port list
- HTTP Profile: http
- Source Address Translation: Auto Map
- Default Pool: web_pool
- Configure any other settings as needed, and then click Finished. Traffic to the virtual server public IP address will now go to the pool members.
Azure CLI summary
The following code sample contains all Azure CLI commands referenced in this topic:
#!/bin/bash
 ### CREATE RESOURCE GROUP
 az group create -n example-rg -l eastus
 ### CREATE NETWORK AND SUBNETS
 az network vnet create --name example-vnet -g example-rg -l eastus --address-prefixes 10.0.0.0/16
 az network vnet subnet create --name management -g example-rg --vnet-name example-vnet  --address-prefixes 10.0.0.0/24
 az network vnet subnet create --name external -g example-rg --vnet-name example-vnet --address-prefixes 10.0.1.0/24
 az network vnet subnet create --name internal -g example-rg --vnet-name example-vnet --address-prefixes 10.0.2.0/24
 az network vnet subnet create --name application  -g example-rg --vnet-name example-vnet --address-prefixes 10.0.3.0/24
 ### CREATE NETWORK SECURITY GROUPS
 # Management Security Group
 az network nsg create --name management-nsg -g example-rg -l eastus
 az network nsg rule create --name allow_22  -g example-rg --nsg-name management-nsg --priority 101 --access Allow --description 'allow port 22' --destination-port-ranges 22 --protocol Tcp --source-address-prefixes "10.0.0.0/16"
 az network nsg rule create --name allow_443 -g example-rg --nsg-name management-nsg --priority 102 --access Allow --description 'allow port 443' --destination-port-ranges 443 --protocol Tcp --source-address-prefixes "10.0.0.0/16"
 # External Security Group
 az network nsg create --name external-nsg -g example-rg -l eastus
 az network nsg rule create --name allow_80 -g example-rg --nsg-name external-nsg --priority 101 --access Allow --description 'allow port 80' --destination-port-ranges 80 --protocol Tcp --source-address-prefixes "*"
 az network nsg rule create --name allow_443 -g example-rg  --nsg-name external-nsg --priority 102 --access Allow --description 'allow port 443' --destination-port-ranges 443 --protocol Tcp --source-address-prefixes "*"
 # Internal Security Group
 az network nsg create --name internal-nsg -g example-rg -l eastus
 az network nsg rule create --name allow_failover  -g example-rg --nsg-name internal-nsg --priority 101 --access Allow --description 'allow udp port 1026' --destination-port-ranges 1026 --protocol Udp --source-address-prefixes "10.0.0.0/16"
 az network nsg rule create --name allow_config_sync -g example-rg  --nsg-name internal-nsg --priority 102 --access Allow --description 'allow tcp port 4353' --destination-port-ranges 4353 --protocol Tcp --source-address-prefixes "10.0.0.0/16"
 az network nsg rule create --name allow_config_sync_asm  -g example-rg --nsg-name internal-nsg --priority 103 --access Allow --description 'allow tcp port 6123-6128' --destination-port-ranges '6123-6128' --protocol Tcp --source-address-prefixes "10.0.0.0/16"
 ### CREATE NICS
 # Public IP
 az network public-ip create --name management-public-ip -g example-rg --allocation-method Static
 # Management NIC
 az network nic create --name management-nic -g example-rg  --vnet-name example-vnet --subnet management  --ip-forwarding --network-security-group management-nsg  --private-ip-address 10.0.0.11 --public-ip-address management-public-ip
 # External NIC
 az network nic create  --name external-nic -g example-rg --vnet-name example-vnet --subnet external --ip-forwarding --private-ip-address 10.0.1.11 --network-security-group external-nsg
 # Internal NIC
 az network nic create --name internal-nic  -g example-rg  --vnet-name example-vnet --subnet internal --ip-forwarding --private-ip-address 10.0.2.11 --network-security-group internal-nsg
 ### CREATE VIRTUAL MACHINE
 az vm create --name BIGIP-vm -g example-rg  \
     --image f5-networks:f5-big-ip-best:f5-bigip-virtual-edition-25m-best-hourly:16.0.101000  \
     --size Standard_DS3_v2 \
     --nics management-nic external-nic internal-nic \
     --admin-username azureuser \
     --ssh-key-values "ssh-rsa AAAAB3NzaC1yc2EAAAADAQABAAABAQClW+UyY2eWczwnEGcEtwR/ISURqmdQIpgicgVvUvZTilXY…."
 # CREATE VIRTUAL SERVICE
 # Ipconfig
 az network nic ip-config create --name virtual-service-1-ipconfig -g example-rg --nic-name external-nic --private-ip-address 10.0.1.101
 # CREATE PUBLIC IP
 az network public-ip create --name virtual-service-1-public-ip  -g example-rg --allocation-method Static
 # ATTACH TO IPCONFIG
 az network nic ip-config update --name virtual-service-1-ipconfig --nic-name external-nic  --resource-group example-rg --public-ip-address virtual-service-1-public-ip
More help