BIG-IQ Centralized Management > F5 Agility 2022: ADC Automation with BIG-IQ 8.1 Source | Edit on
Lab 5: Visibility for Legacy applications in the Applications tab
New Feature introduced in BIG-IQ v7.1
Starting in BIG-IQ v7.1, an admin can now add “legacy” (or “brownfield”) applications into the Application dashboard without having to re-deploy the application using a template. The Legacy applications will provide the same analytic views as those applications deployed via a template, however the configuration sections are read-only, except for enable, disable, force-offline operations for Pools and Virtual Servers.
For more information about requirements and recommendations for creating a BIG-IQ Application Service with existing device configurations, please consult K02142132.
Lab environment access
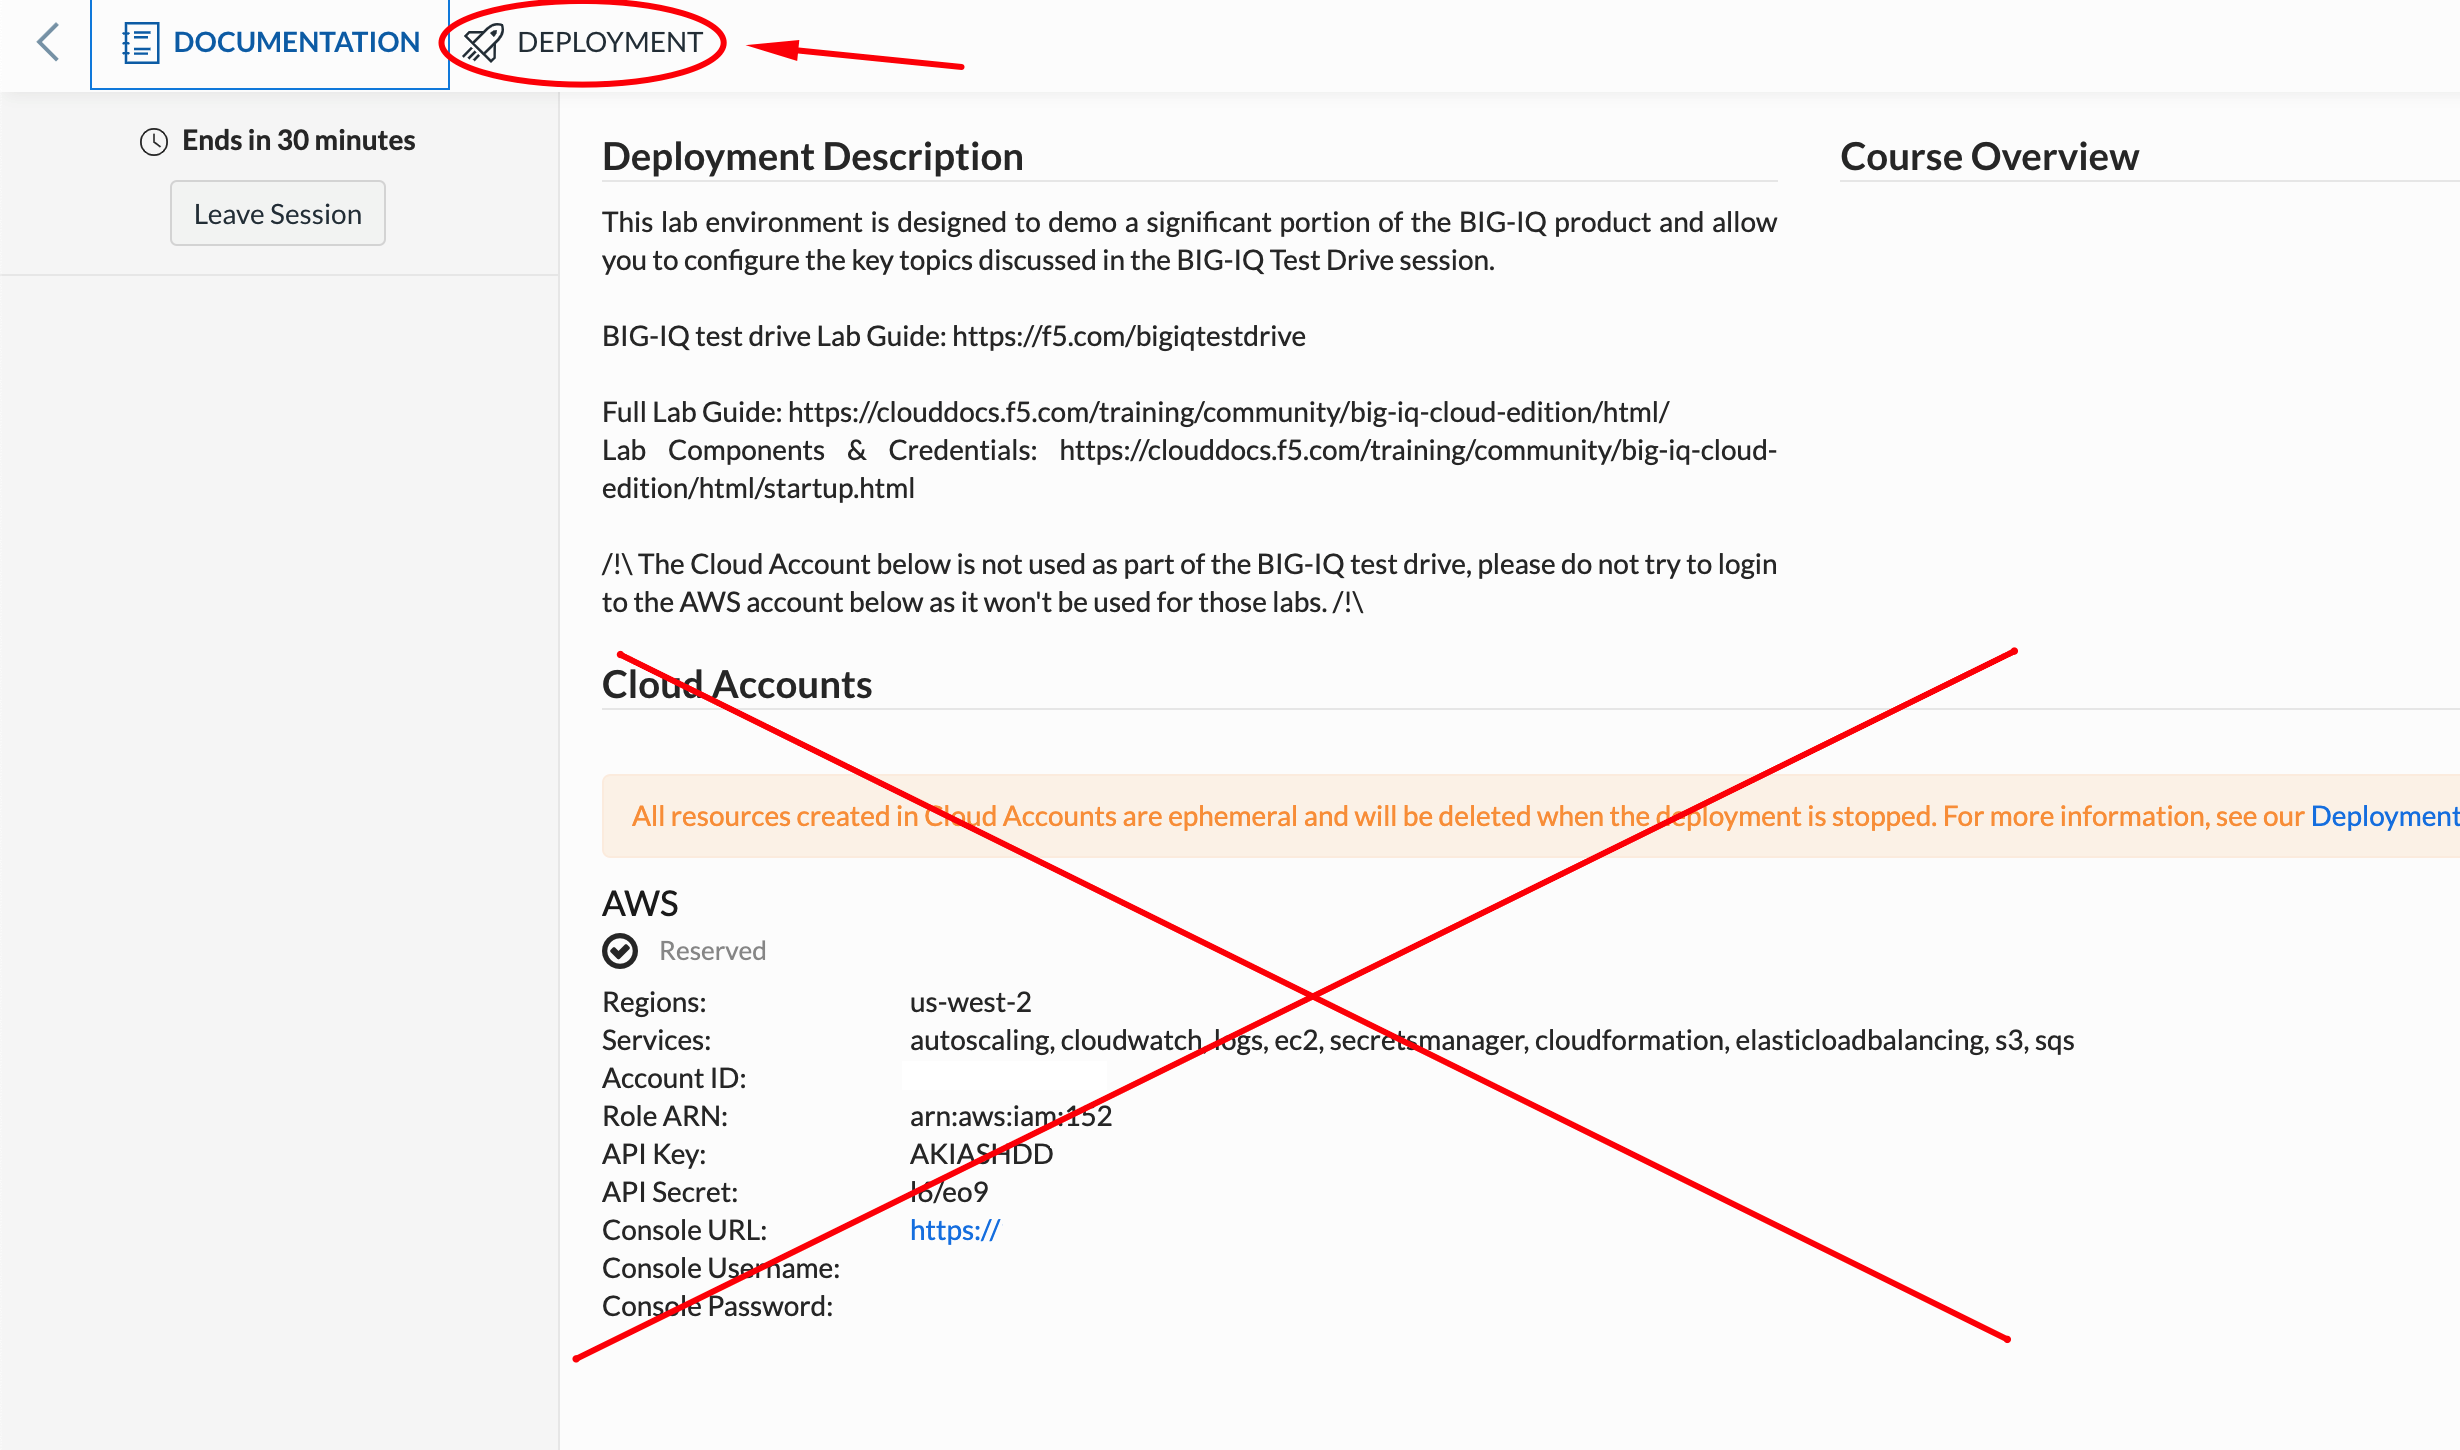
Once you connect to the UDF course portal, you will land on the Documentation tab where you can find the link to the lab guide.
Once you have the lab guide open, click on the Deployment tab to access the various systems in the lab.
In order to complete this lab, you will find 2 ways to access the different systems in this lab.
Going directly to the BIG-IQ CM or BIG-IP TMUI or WEB SHELL/SSH (RECOMMENDED).
To access the BIG-IQ directly, click on the ACCESS button under BIG-IQ CM and select TMUI. The credentials to access the BIG-IQ TMUI are
david/davidandpaula/paulaas directed in the labs.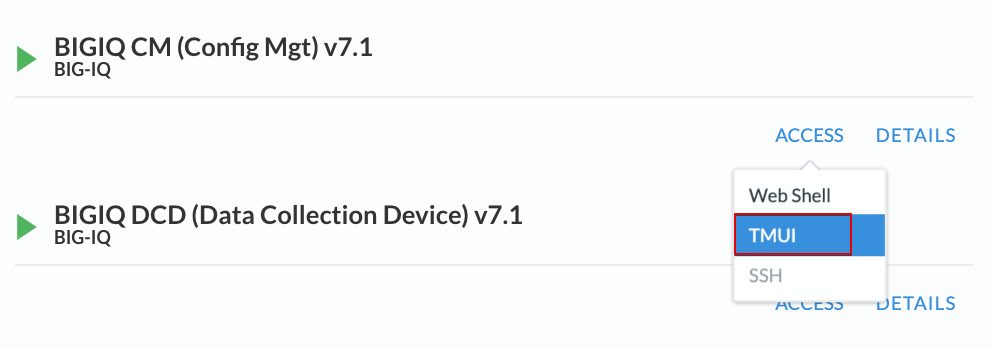
To ssh into a system, you can click on WEB SHELL or SSH (you will need your ssh keys setup in the lab environment for SSH).
You can also click on DETAILS on each component to see the credentials (login/password).
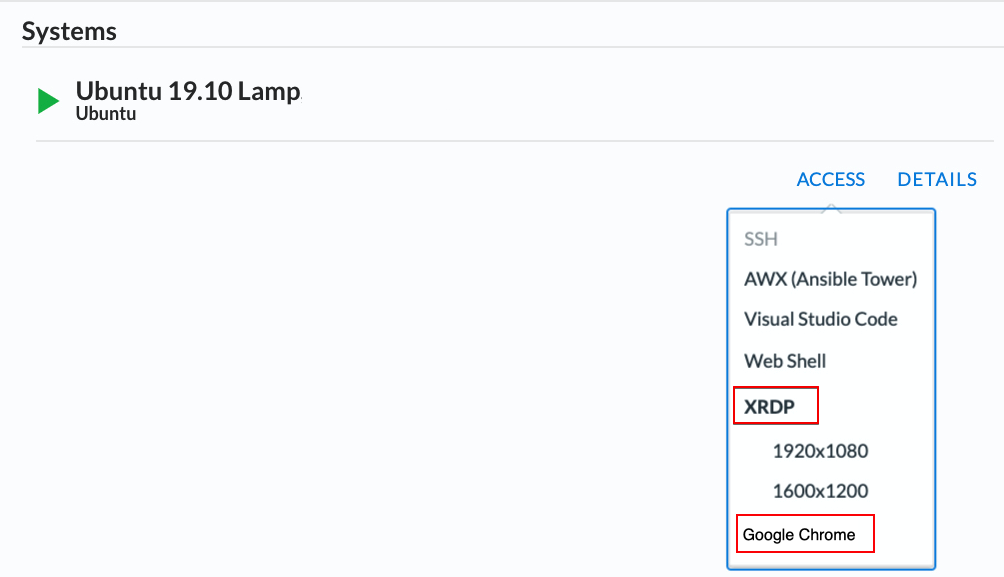
From the lab embeded Google Chrome browser.
In your lab deployment, click on the ACCESS button of the Ubuntu Lamp Server system and click on Google Chrome.
You can also use XRDP as an alternative, click on the resolution that works for your laptop. When the RDP session launches showing Session: Xorg, simply click OK, no credentials are needed. Modern laptops with higher resolutions you might want to use 1440x900 and once XRDP is launched Zoom to 200%.
Exercise 5.1 – TCP Legacy Application Creation
In this lab you will add an existing legacy application (by choosing the virtual server(s) representing that application) to the Application dashboard. Note this will not “re-deploy” the application or change anything on the BIG-IP itself. Rather this will take the virtual server and all its child objects and group them together as an Application within the Application dashboard of BIG-IQ.
- From within the LAMP server RDP/noVNC session, logon to BIG-IQ as david (david\david)
by opening a browser and go to:
https://10.1.1.4or directly via the TMUI as shown above. - Navigate to Applications > Applications. Click on Create to Create an Application Service:

Fill out the necessary fields.
| Application properties: |
|
| Application Service Method properties: |
Select: Using Existing Device Configuration |
| General Properties: |
|
Virtual Servers: vip134 |
Move vip134 over to the Selected column and then scroll down.

Note
You can add up to 5 Virtual IP addresses to a single Legacy Application Service.
Note
A warning will show if there is no analytics profile attached to at least one of the VIP selected. An analytics profile is required to collect HTTP analytics data on BIG-IQ. You will create the application without the analytics profile, and then go back and add it later in the lab.
- Click on View Sample API Request in the right upper corner to see the API call which could be used to create this legacy application service on BIG-IQ using automation.

- Go back to the list of objects and click on Profile HTTP Analytics. Notice the the Analytics profile is attached to the VIP.

Warning
Review carefully K02142132: Requirements and recommendations for creating a BIG-IQ application service with existing device configurations
- Click Create.
- Check the application
LAB5has been created. Click on it to see the application. You should see an application calledlegacy-app-service. Notice the label LEGACY is showing on the applications grid/tile. This is an indication that this application was not created with a template, and will be treated as a legacy application.

Drill down into the application dashboard and notice no analytics are showing on the dashboard. This is normal, since the VIP does not have any analytics profiles attached to it. Hover over the warning icon in the Traffic Management box under F5 Services to see the error.

Exercise 5.2 – HTTP Analytics Profile Creation
In this exercise, we will now create an HTTP analytics profile and attach it to the VIP for the legacy application we just created. This will enable the BIG-IP to send HTTP analytics to BIG-IQ which will populate the dashboard.
- Go to Configuration > Local Traffic > Profiles and look at all existing analytics profiles available in this BIG-IQ. You can use the filter to look for a specific profile.

- Let’s create a new HTTP analytics profile. Click Create
- Name: Lab5_analytics_profile
- Type: Profile HTTP Analytics
- Collected Statistics Internal Logging: Enabled

- Max TPS and Throughput: Enabled
- HTTP Timing (RTT,TTFB,Duration): Enabled
- URLs: Enabled
- Response Codes: Enabled
- User Agents: Enabled
- Methods: Enabled

Click Save & Close.
- Go to Configuration > Local Traffic > Virtual Servers and filter on vip134

- Edit one of the VIPs and update the HTTP Analytics Profile to use the newly created Lab5_analytics_profile
Note
You only need to update one of the 2 VIPs as the VIP is located on a BIG-IP HA cluster. BIG-IQ will update the other VIP (on the other BIG-IP) automatically.

Click Save & Close.
- Once completed, select the 2 VIPs and click on Deploy under the More button. Here we will be deploying the change to the virtual server(s). We are deploying to both virtual servers as they are within a cluster.

- The deployment window opens up. Type a name, and select Deploy immediately for the Method. Under the Target Devices(s) section, click on Find Relevant Devices and select the BOS-vBIGIP01.termmarc.com and BOS-vBIGIP02.termmarc.com and move them over to Selected.
Note
You do not need to select the new HTTP analytics profile we created, only the VIP. By having Suppporting Objects option enabled, the deployment will automatically include all objects that the selected object(s) depend on.

- Click Deploy, and then click Deploy in the Deploy Immediately* warning. Wait for the deployment to complete.

- Back on the Applications tab > Applications, bo back to the legacy-app-service app. Under F5 Services, Traffic Management > Configuration > Profile HTTP Analytics, notice the warning has disappeared, and are newly created HTTP Analytics profile is showing up.

- There should already be some traffic being sent to the VIP. You can view the analytics data (after waiting a few minutes) in the dashboard. To view the analytics data, click on the Analytics tab, and select one of the metrics to view. You can also see details like the requested URLs by expanding the URLs section on the right.

Exercise 5.3 – Legacy Application and RBAC
- We will now add RBAC to the newly created legacy application. Go to System > User Management > Users and select Paula.
Add Lab5 Manager Role as seen below.

Next add the legacy-app-service Manager role and then Click Save & Close.

- Now logout from the david session and Login to BIG-IQ as paula using credentials paula/paula.

- Select
LAB5Application.

Then click on legacy-app-service Application Service.

- You are now on the Paula’s Application Services dashboard. Click on Servers on the right side of the screen.

- Select Configuration and try to disable one of the Pool Member.

- Confirm the pool member is disabled. The disabled pool member will show up with a grey dot for State and Availability, as opposed to the green dots for the active (enabled) pool members.

Congratulations! This is the end of the labs for ADC Automation with BIG-IQ 8.1