dSSM Database
Overview
The Cloud-Native Network Functions (CNF) distributed Session State Management (dSSM) Pods provide centralized and persistent storage for the Edge Firewall and Traffic Management Microkernel (TMM) Proxy Pods. The dSSM Pods are Redis data structure stores that maintain application traffic data such as NAT translation mappings. The dSSM Pods bind to Kubernetes persistence volumes to persist data in the event of a container restart.
This document describes the dSSM Pods, and guides you through configuring and installing the f5-dssm-sentinel and f5-dssm-db containers.
Sentinels and DBs
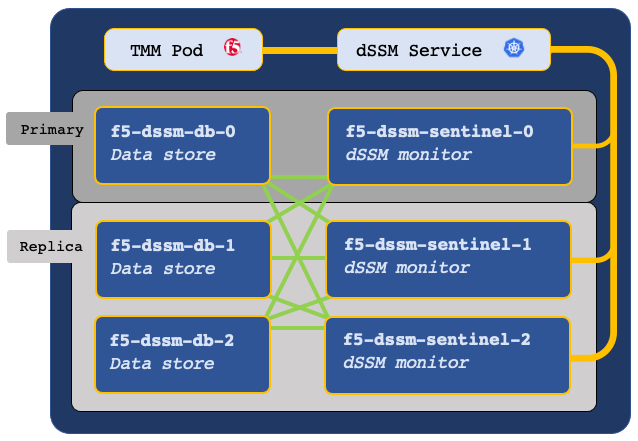
The dSSM Pods integrate as a StatefulSet, containing three dSSM Sentinel Pods and three dSSM DB Pods to maintain high availability. The Sentinel Pods elect and monitor a primary dSSM DB Pod, and if the primary dSSM DB Pod fails, a secondary DB will assume the primary role.
Additional high availability
The dSSM Pods also use the standard Kubernetes node affinity and PodDisruptionBudget features to maintain additional levels of high availability.
Affinity
Each dSSM Sentinel and DB Pod schedules onto a unique cluster node by default. The dSSM scheduling behavior can be modified using the dSSM Helm affinity_type parameter:
| Setting | Description |
|---|---|
| required | Ensures the target cluster node does not currently host a Pod with the app=f5-dssm-db annotation (default). |
| preferred | Attempt to schedule Pods onto unique nodes, but two dSSM Pods may schedule onto a single node when no schedulable nodes exists. |
| custom | Scheduling behavior may be tuned specifically to the cluster admins requirements using the dSSM values.yaml file. |
Helm parameter examples:
sentinel:
  affinity_type: "required"

db:
  affinity_type: "required"
 Kubernetes Assigning Pods overview.
PodDisruptionBudget
A minimum of 2 dSSM Pods remain available at all times based on the dSSM Helm pod_disruption_budget parameter. This parameter blocks voluntary interruptions to the dSSM Pod’s Running status. For example, if three schedulable nodes are available, and the admin runs oc adm drain on two of nodes in quick succession, the second action will be blocked until another schedulable node is added to the cluster.
Helm parameter examples:
sentinel:
  pod_disruption_budget:
    min_available: 2

db:
  pod_disruption_budget:
    min_available: 2
Kubernetes Disruptions overview.
Sentinel Service
The dSSM Sentinel Service receives data from TMM on TCP service port 26379, and forwards to the dSSM DB Pods using the same service port number.
Example dSSM Service:
Name:              f5-dssm-sentinel
Namespace:         cnf-gateway
IP:                10.106.99.127
Port:              sentinel  26379/TCP
Endpoints:         10.244.1.15:26379,10.244.1.20:26379,10.244.4.3:26379
Example dSSM deployment:
Secure communication
The TMM, dSSM Sentinel and dSSM DB Pods communicate over a mesh of secure channels. These channels are secured using SSL/TLS keys and certificates stored as Secrets in the cluster. When deploying dSSM, the first step involves creating the SSL/TLS keys and certificates, and installing them as Secrets. Ensure you understand the key points in the following subsections:
Certificate Validity
SSL/TLS certificates are valid for a specific period of time, and once they expire, secure connections fail when validating the certificate. When creating new SSL/TLS certificates for the secure dSSM channels, choose a period of one year, or two years to avoid connection failures.
Example Certificate Validity:
Validity
    Not Before: Jan 1  10:30:00 2021 GMT
    Not After : Jan 1  10:30:00 2022 GMT
Updating Secrets
If you plan to replace a current set of Secrets with a new set, you must restart both the dSSM and TMM Pods to begin using the new Secrets. It is important to understand that restarting the TMM Pods causes a brief interruption to traffic processing, and should be performed during a planned maintenance window. To restart dSMM and the TMM Pods, refer to the Restarting procedure.
Procedures
Install the Secrets
Use the following steps to create the required SSL/TLS keys and certificates, and install them as Secrets in both the TMM and dSSM Namespaces:
Note: The commands used to generate the Secrets can be downloaded here.
Change into the local directory with the CNF files:
cd <directory>
In this example, the CNF files are in the cnfinstall directory:
cd cnfinstall
Create a new directory for the dSSM Secret keys and certificates, and change into the directory:
mkdir <directory>cd <directory>
In this example, a new directory named dssm_secrets is created and changed into:
mkdir dssm_secretscd dssm_secrets
Create the dSSM Certificate Authority (CA) key and certificate:
In this example, the CA signing certificate is valid for one year.
openssl genrsa -out dssm-ca.key 4096
openssl req -x509 -new -nodes -sha384 \
    -key dssm-ca.key -days 365 \
    -subj '/O=Redis Test/CN=Certificate Authority' \
    -out dssm-ca.crt
Create the dSSM client key and certificate:
In this example, the dSSM client certificate is valid for one year.
openssl genrsa -out dssm-key.key 4096
openssl req -new -sha384 -key dssm-key.key \
    -subj '/O=Redis Test/CN=Server' | \
    openssl x509 -req -sha384 -CA dssm-ca.crt \
        -CAkey dssm-ca.key -CAserial dssm-ca.txt \
        -CAcreateserial  -days 365 \
        -out dssm-cert.crt
Create the mTLS certificate for the TMM and dSSM communication channels:
Note: The mTLS certificate can take up to a minute to generate.openssl dhparam -out dhparam2048.pem 2048
Encode the keys and certificates:
cat dssm-ca.crt | base64 -w 0  > dssm-ca-encode.crt
cat dssm-cert.crt | base64 -w 0 > dssm-cert-encode.crt
cat dhparam2048.pem | base64 -w 0 > dhparam2048-encode.pem
cat dssm-key.key | base64 -w 0 > dssm-key-encode.key
Create the Secret certificate object file:
echo "apiVersion: v1" > certs-secret.yaml
echo "kind: Secret" >> certs-secret.yaml
echo "metadata:" >> certs-secret.yaml
echo " name: dssm-certs-secret" >> certs-secret.yaml
echo "data:" >> certs-secret.yaml
echo " dssm-ca.crt: `cat dssm-ca-encode.crt`"  >> certs-secret.yaml
echo " dssm-cert.crt: `cat dssm-cert-encode.crt`" >> certs-secret.yaml
echo " dhparam2048.pem: `cat dhparam2048-encode.pem`" >> certs-secret.yaml
Create the Secret key object file:
echo "apiVersion: v1" > keys-secret.yaml
echo "kind: Secret" >> keys-secret.yaml
echo "metadata:" >> keys-secret.yaml
echo " name: dssm-keys-secret" >> keys-secret.yaml
echo "data:" >> keys-secret.yaml
echo " dssm-key.key: `cat dssm-key-encode.key`" >> keys-secret.yaml
Install the Secret key and certificate files:
kubectl apply -f keys-secret.yaml -n <namespace>
kubectl apply -f certs-secret.yaml -n <namespace>
In this example, the Secrets install to the cnf-gateway Namespace:
kubectl apply -f keys-secret.yaml -n cnf-gateway
kubectl apply -f certs-secret.yaml -n cnf-gateway
The command response should state the Secrets have been created:
secret/dssm-keys-secret created
secret/dssm-certs-secret created
Install the Pods
Use the following steps to deploy the dSSM Pods with persistence.
Change into local directory with the CNF TAR files, and ensure the Helm charts have been extracted:
In this example, the CNF files are in the cnfinstall directory:
cd cnfinstall
ls -1 tar
In this example, the dSSM Helm chart is named f5-dssm-0.22.14.tgz:
cnf-docker-images.tgz
f5-cert-gen-0.3.0.tgz
f5-dssm-0.22.14.tgz
f5-toda-fluentd-1.9.6.tgz
f5ingress-6.0.37.tgz
Create a Helm values file named dssm-values, and set the
image.repositoryparameters:image: repository: <registry> sentinel: fluentbit_sidecar: image: repository: <registry> db: fluentbit_sidecar: image: repository: <registry>
In this example, Helm pulls the f5-dssm-store images from registry.com:
image:
  repository: registry.com

sentinel:
  fluentbit_sidecar:
    image:
      repository: registry.com

db:
  fluentbit_sidecar:
    image:
      repository: registry.com
Optional: If you installed the Fluentd Logging Pod, you can send logging data to the f5-fluentd container by adding the following parameters to the dssm-values.yaml values file:
sentinel:
  fluentbit_sidecar:
    fluentd:
      host: '<fluentd hostname>'

db:
  fluentbit_sidecar:
    fluentd:
      host: '<fluentd hostname>'
In this example, the Fluentd container is in the cnf-gateway Namespace:
sentinel:
  fluentbit_sidecar:
    fluentd:
      host: 'f5-toda-fluentd.cnf-gateway.svc.cluster.local.'

db:
  fluentbit_sidecar:
    fluentd:
      host: 'f5-toda-fluentd.cnf-gateway.svc.cluster.local.'
Install the dSSM Pods:
 Important: The string f5-dssm is the Helm release name. If a different release name is used, ensure the name is added to the privileged SCC.
helm install f5-dssm <helm chart> -f <values>.yaml -n <namespace>
For example:
helm install f5-dssm tar/f5-dssm-0.22.14.tgz -f dssm-values.yaml -n cnf-gateway
All dSSM Pods will be available after the election process, which can take up to a minute.
Important: DB entries may fail to be created during the election process if TMM installs prior to completion. TMM will connect after the process completes.kubectl get pods -n cnf-gateway
In this example, the dSSM Pods in the cnf-gateway Namespace have completed the election process, and the Pod STATUS is Running:
NAME                              READY   STATUS
f5-dssm-db-0                      1/1     Running
f5-dssm-db-1                      1/1     Running
f5-dssm-db-2                      1/1     Running
f5-dssm-sentinel-0                1/1     Running
f5-dssm-sentinel-1                1/1     Running
f5-dssm-sentinel-2                1/1     Running
The dSSM DB Pods should be bound to the persistent volumes:
kubectl get pvc -n cnf-gateway
In this example, the dSSM Pod’s PVC STATUS is Bound:
NAME                STATUS   VOLUME
data-f5-dssm-db-0   Bound    pvc-c7060354-64d2-456b-9328-aa38f19b44b5
data-f5-dssm-db-1   Bound    pvc-8358b993-bf21-4fd7-a0fa-ee84ec420aac
data-f5-dssm-db-2   Bound    pvc-de65ed0f-f616-4021-a158-e0e78ed4539e
Next step
Continue to the BIG-IP Controller installation guide. To securely connect the TMM and dSSM Pods, add the following parameters to the Controller’s Helm values file:
Important: Set the SESSIONDB_EXTERNAL_SERVICE parameter to the Namespace of the dSSM Pod.
tmm:

  sessiondb:
    useExternalStorage: "true"

  customEnvVars:
  - name: REDIS_CA_FILE
    value: "/etc/ssl/certs/dssm-ca.crt"
  - name: REDIS_AUTH_CERT
    value: "/etc/ssl/certs/dssm-cert.crt"
  - name: REDIS_AUTH_KEY
    value: "/etc/ssl/private/dssm-key.key"
  - name: SESSIONDB_DISCOVERY_SENTINEL
    value: "true"
  - name: SESSIONDB_EXTERNAL_SERVICE
    value: "f5-dssm-sentinel.cnf-gateway"
Restarting
This procedure assumes that you have deployed the dSSM Pods, and have created a new set of Secrets to replace the existing Secrets. The new Secrets will not be used until the dSSM and TMM Pods have been restarted.
Important: Restarting the TMM Pods impacts traffic processing.
Obtain the name and number of TMM Pods:
In this example, the CNF Pods are in the cnf-gateway Namespace:
kubectl get deploy -n cnf-gateway | grep tmm
In this example, there are 3 TMM Pods in Namespace:
kubectl get deploy -n cnf-gateway | grep f5-tmm
f5-tmm 3/3 3 3
Scale the number of TMM Pods to 0:
kubectl scale deploy/f5-tmm --replicas=0 -n cnf-gateway
Wait 15 or 20 seconds for the TMM Pods to terminate, and scale the TMM Pods back to the previous number:
In this example the TMM Pods are scaled back to 3:
kubectl scale deploy/f5-tmm --replicas=3 -n cnf-gateway
Restart the dSSM Sentinel and DB Pods:
The dSSM Sentinel and DB Pods run as StatefulSets, and will be restarted automatically.
kubectl delete pods -l 'app in (f5-dssm-db, f5-dssm-sentinel)' -n cnf-gateway
pod "f5-dssm-db-0" deleted
pod "f5-dssm-db-1" deleted
pod "f5-dssm-db-2" deleted
pod "f5-dssm-sentinel-0" deleted
pod "f5-dssm-sentinel-1" deleted
pod "f5-dssm-sentinel-2" deleted
Verify the dSSM Pods STATUS is Running:
kubectl get pods -n cnf-gateway
NAME                              READY   STATUS
f5-dssm-db-0                      2/2     Running
f5-dssm-db-1                      2/2     Running
f5-dssm-db-2                      2/2     Running
f5-dssm-sentinel-0                2/2     Running
f5-dssm-sentinel-1                2/2     Running
f5-dssm-sentinel-2                2/2     Running
The new Secrets should now be used to secure the dSSM channels.
Feedback
Provide feedback to improve this document by emailing cnfdocs@f5.com.
Supplemental
- The list of commands used to create the Secrets.
- Redis
- Redis Sentinels
- StatefulSet Basics