Creating an iApps LX block instance from the BIG-IP GUI
You can easily create an iApps LX block instance from the BIG-IP GUI. The first step in building an iApps LX block instance is to either create or import a JSON template. With a built-in wizard, a desired template configuration is easily deployable to multiple devices within a BIG-IP system.
Note
For more complex and flexible configurations, it is recommended to create an iApps LX using REST APIs.
Prerequisites:
- Access to a BIG-IP version 14.0
- Familiarity with the iApps LX concept documentation, with an understanding of iApps LX templates and block instances
Note
In the BIG-IP GUI, Application Services refers to the block instance. For more information about the iApps LX feature terminology, see iApps LX Glossary.
Creating an iApps LX template using the BIG-IP GUI
The BIG-IP GUI presents a user-friendly wizard to build an iApps LX template with a unique name, ID, and input properties. The template ID is generated automatically. You can also configure the processors from the Configuration window. You can create an iApps LX template from the Basic or Advanced view. From the Basic view, you input the values into the fields and from the Advanced view you use a JSON file. These views are synced in real-time.
Tip
Using the Advanced view makes it easier to view the block structure and configure the template’s default parameter values.
- On the Main tab, click Main > iApps > Templates > Templates LX.
- Click Create… or select the Templates LX + sign
- In the Properties window, under Name, enter a unique name for the template.
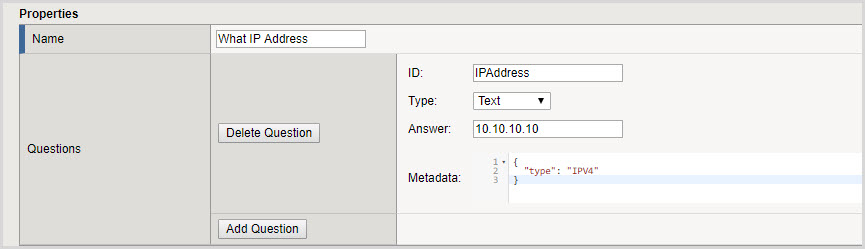
- Click Add Question, add then fill in the following fields for the input properties:
- Id:
- Type:
- Answer
- Metadata
Example of Template Question
- Click Save.
| Results: | Your new iApps LX template appears in the Main > iApps > Templates > Templates LX list. |
|---|
Importing an iApps LX RPM package from the BIG-IP GUI
Instead of creating a template, you can create an iApps block instance from an imported template contained in an iApps LX RPM package. For information about iApps LX Packaging, see What is iApps LX? and Working With iControl LX/iApps LX RPM Packages.
- On the Main tab, click Main > iApps > Templates >Templates LX.
- Click Import…
| Result: | The imported iApps LX package is saved in /var/config/rest/iapps/< name of iApps LX template> |
|---|
Note
You can also import a package from Main > iApps > Package Management LX. All iApps LX templates are installed under /var/config/rest/iapps/<appName>. iApps LX packages saved in another location are not supported and content may be lost during upgrades or during a restore activity.
Creating an iApps LX block instance from the JSON template using the BIG-IP GUI
From an iApps LX template, you create the block instance, which becomes the deployable application. This transformation is done by giving the template a unique name and from changing its state from TEMPLATE to UNBOUND/BOUND.
- On the Main tab, click Main > iApps > Application Services >Applications LX > + or from the Applications LX page click Create.
- Under Name, enter a name for the block instance.
- Under Template, select from the drop-down list the template from which you want to create a block instance.
- Click Save to change the state from TEMPLATE to UNBOUND or click Deply to change the state from TEMPLATE to BINDING.
Note
A BINDING state will resolve to either a BOUND or ERROR state. For more information on the potential block states, see iApps LX State Engine.
| Result: | The iApps LX is now converted into a block instance and can be deployed. |
|---|
Deploying an iAppsLX block instance using the BIG-IP GUI
Once your iApps LX block instance is created and saved, you can access it and apply it to multiple iApp LX instances. In the BIG-IP GUI, from the Application Services page, is where block instances are deployed. Templates cannot be deployed.
Note
iApps LX block instances should initially be deployed on a lab environment.
- On the Main tab, click Main > iApps > Application Services >Applications LX > +.
- Select the iApps LX application.
- Click Deploy.
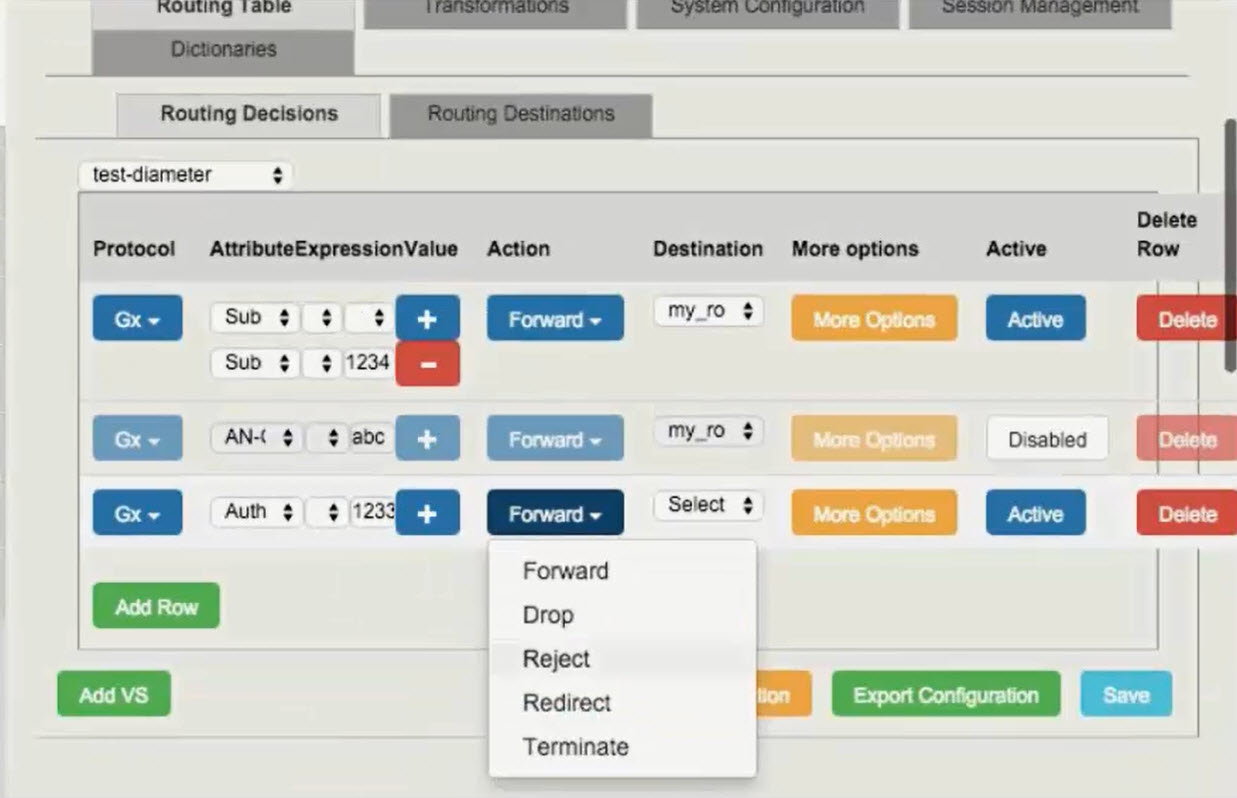
This iApps LX example shows a decision table for configuring routing rules, with an Action drop-down (Forward, Reject etc).