F5 BIG-IP Next > Class 1: Introduction to BIG-IP Next > Module 4: Migration from Classic BIG-IP to BIG-IP Next Source | Edit on
Lab 4.2 - Migration from BIG-IP to BIG-IP Next
In this lab you will create a UCS archive from a classic BIG-IP instance and import it into BIG-IP Next Central Manager. Then you will analyze applications to determine their eligibility for migration to BIG-IP Next. Post analysis, you will import shared objects, select individual applications to migrate, save them as a draft migration, and migrate them to a BIG-IP Next instance.
In the UDF Blueprint there is a BIG-IP running version 15.1 which has a number of applications defined.
Go to the UDF blueprint Components page and look for the item labeled BIG-IP 15.1.x under the F5 Products column.
Select the drop down menu next to Access, and then select TMUI.
Log in with the following credentials:
Credentials
Username:
adminPassword:
admin

4.2.1 Create BIG-IP UCS File
In order to migrate the classic BIG-IP configuration to BIG-IP Next, you’ll need to create and export a UCS archive file. You will then import the UCS into Central Manager to view, analyze, and migrate applications.
Central Manager performs migrations at the application level which allows customers to gradually migrate to BIG-IP Next. This differs from the traditional UCS based migration where an entire BIG-IP device, vCMP guest, or Virtual Edition are migrated all at once.
Since features are being iteratively incorporated into BIG-IP Next, it may not be possible to move all applications initially. The per-app migration capability allows customers to identify which applications are ready to migrate, and provides workflows to move individual applications. If all applications are eligble for migration, then they can all be migrated at one time. For many customers, it is expected the migration to BIG-IP Next will be gradual, and classic BIG-IP and BIG-IP Next will co-exist for some time during the migration process.
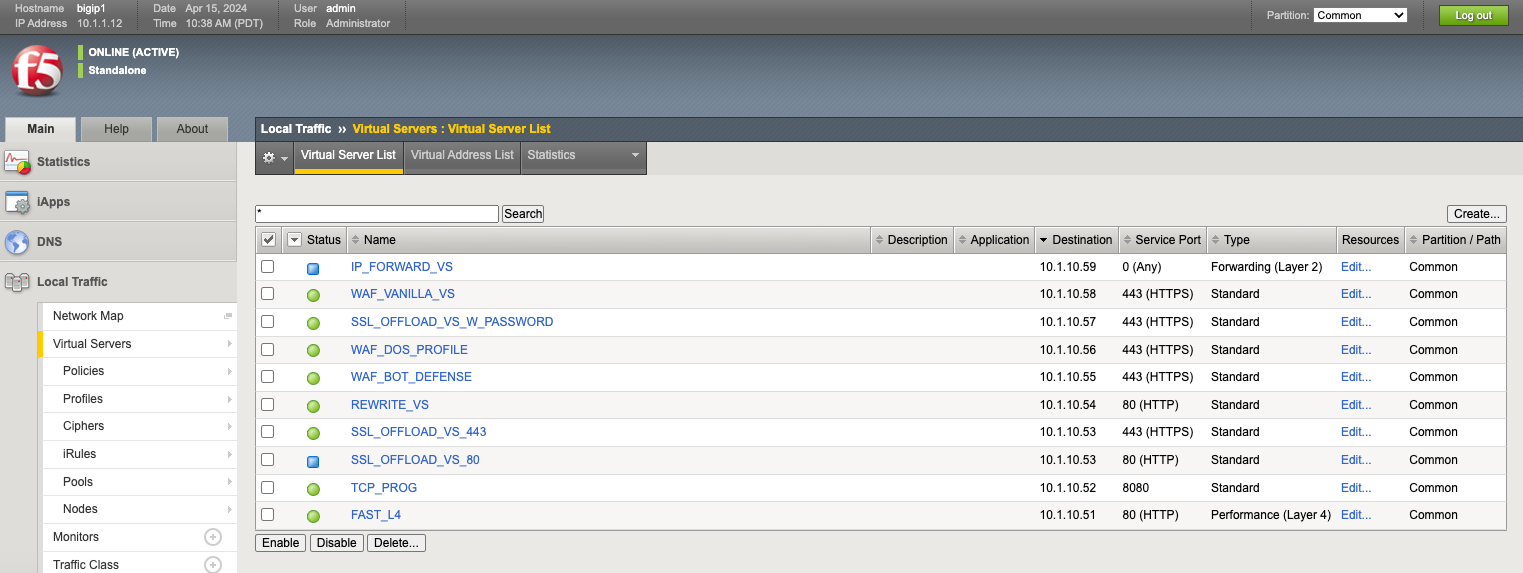
Review the current configuration of the classic BIG-IP by navigating to the Local Traffic -> Virtual Servers page and observe the different types of virtual servers and their configuration. There is a mix of virtual server types, and each is using different types of profiles; some have iRules, some have certificates, and others have WAF policies. Because of the limited resources within UDF, these virtual servers will all use the same pool on the backend.
Since the archive file may have sensitive information such as certificates/keys, it is recommended that you use the Master Key functionality in BIG-IP to allow for a secure export of this type of information. In this lab, we will retrieve the Master-Key on the BIG-IP instance before creating an archive file. You’ll then need to supply this information to Central Manager so that it can decrypt sensitive information and migrate it to a BIG-IP Next instance.
Some background information on Master-Keys on the BIG-IP is provided below.
K13132: Backing up and restoring BIG-IP configuration files with a UCS archive
To obtain the master-key from the source BIG-IP system, go to the main UDF screen and go to the F5 Products column and select the drop down menu for Access under the BIG-IP 15.1.x item. Select Console to attach the the BIG-IP console.
Alternatively, if you have loaded your ssh keys into UDF, you can attach via SSH so its easier to copy the master key.
When using the embedded console in UDF, there is no copy capability so you will have to write down the master-key and enter it manaully when importing the UCS into Central Manager.

Log in with the following credentials:
Credentials
Username:
rootPassword:
default
Enter the command f5mku -K to get the BIG-IP’s master-key. Now, copy or write down the master-key, as you will need this when importing the UCS into Central Manager.
Note
the value “cgGaYTNid4Gvqdelf/85cw==” is the same key that is used in the lab environment. You can copy the value from the lab guide.
[root@ce6e127b-032e-496c-afb5-b303545907ef:Active:Standalone] config # f5mku -K
cgGaYTNid4Gvqdelf/85cw==
[root@ce6e127b-032e-496c-afb5-b303545907ef:Active:Standalone] config #
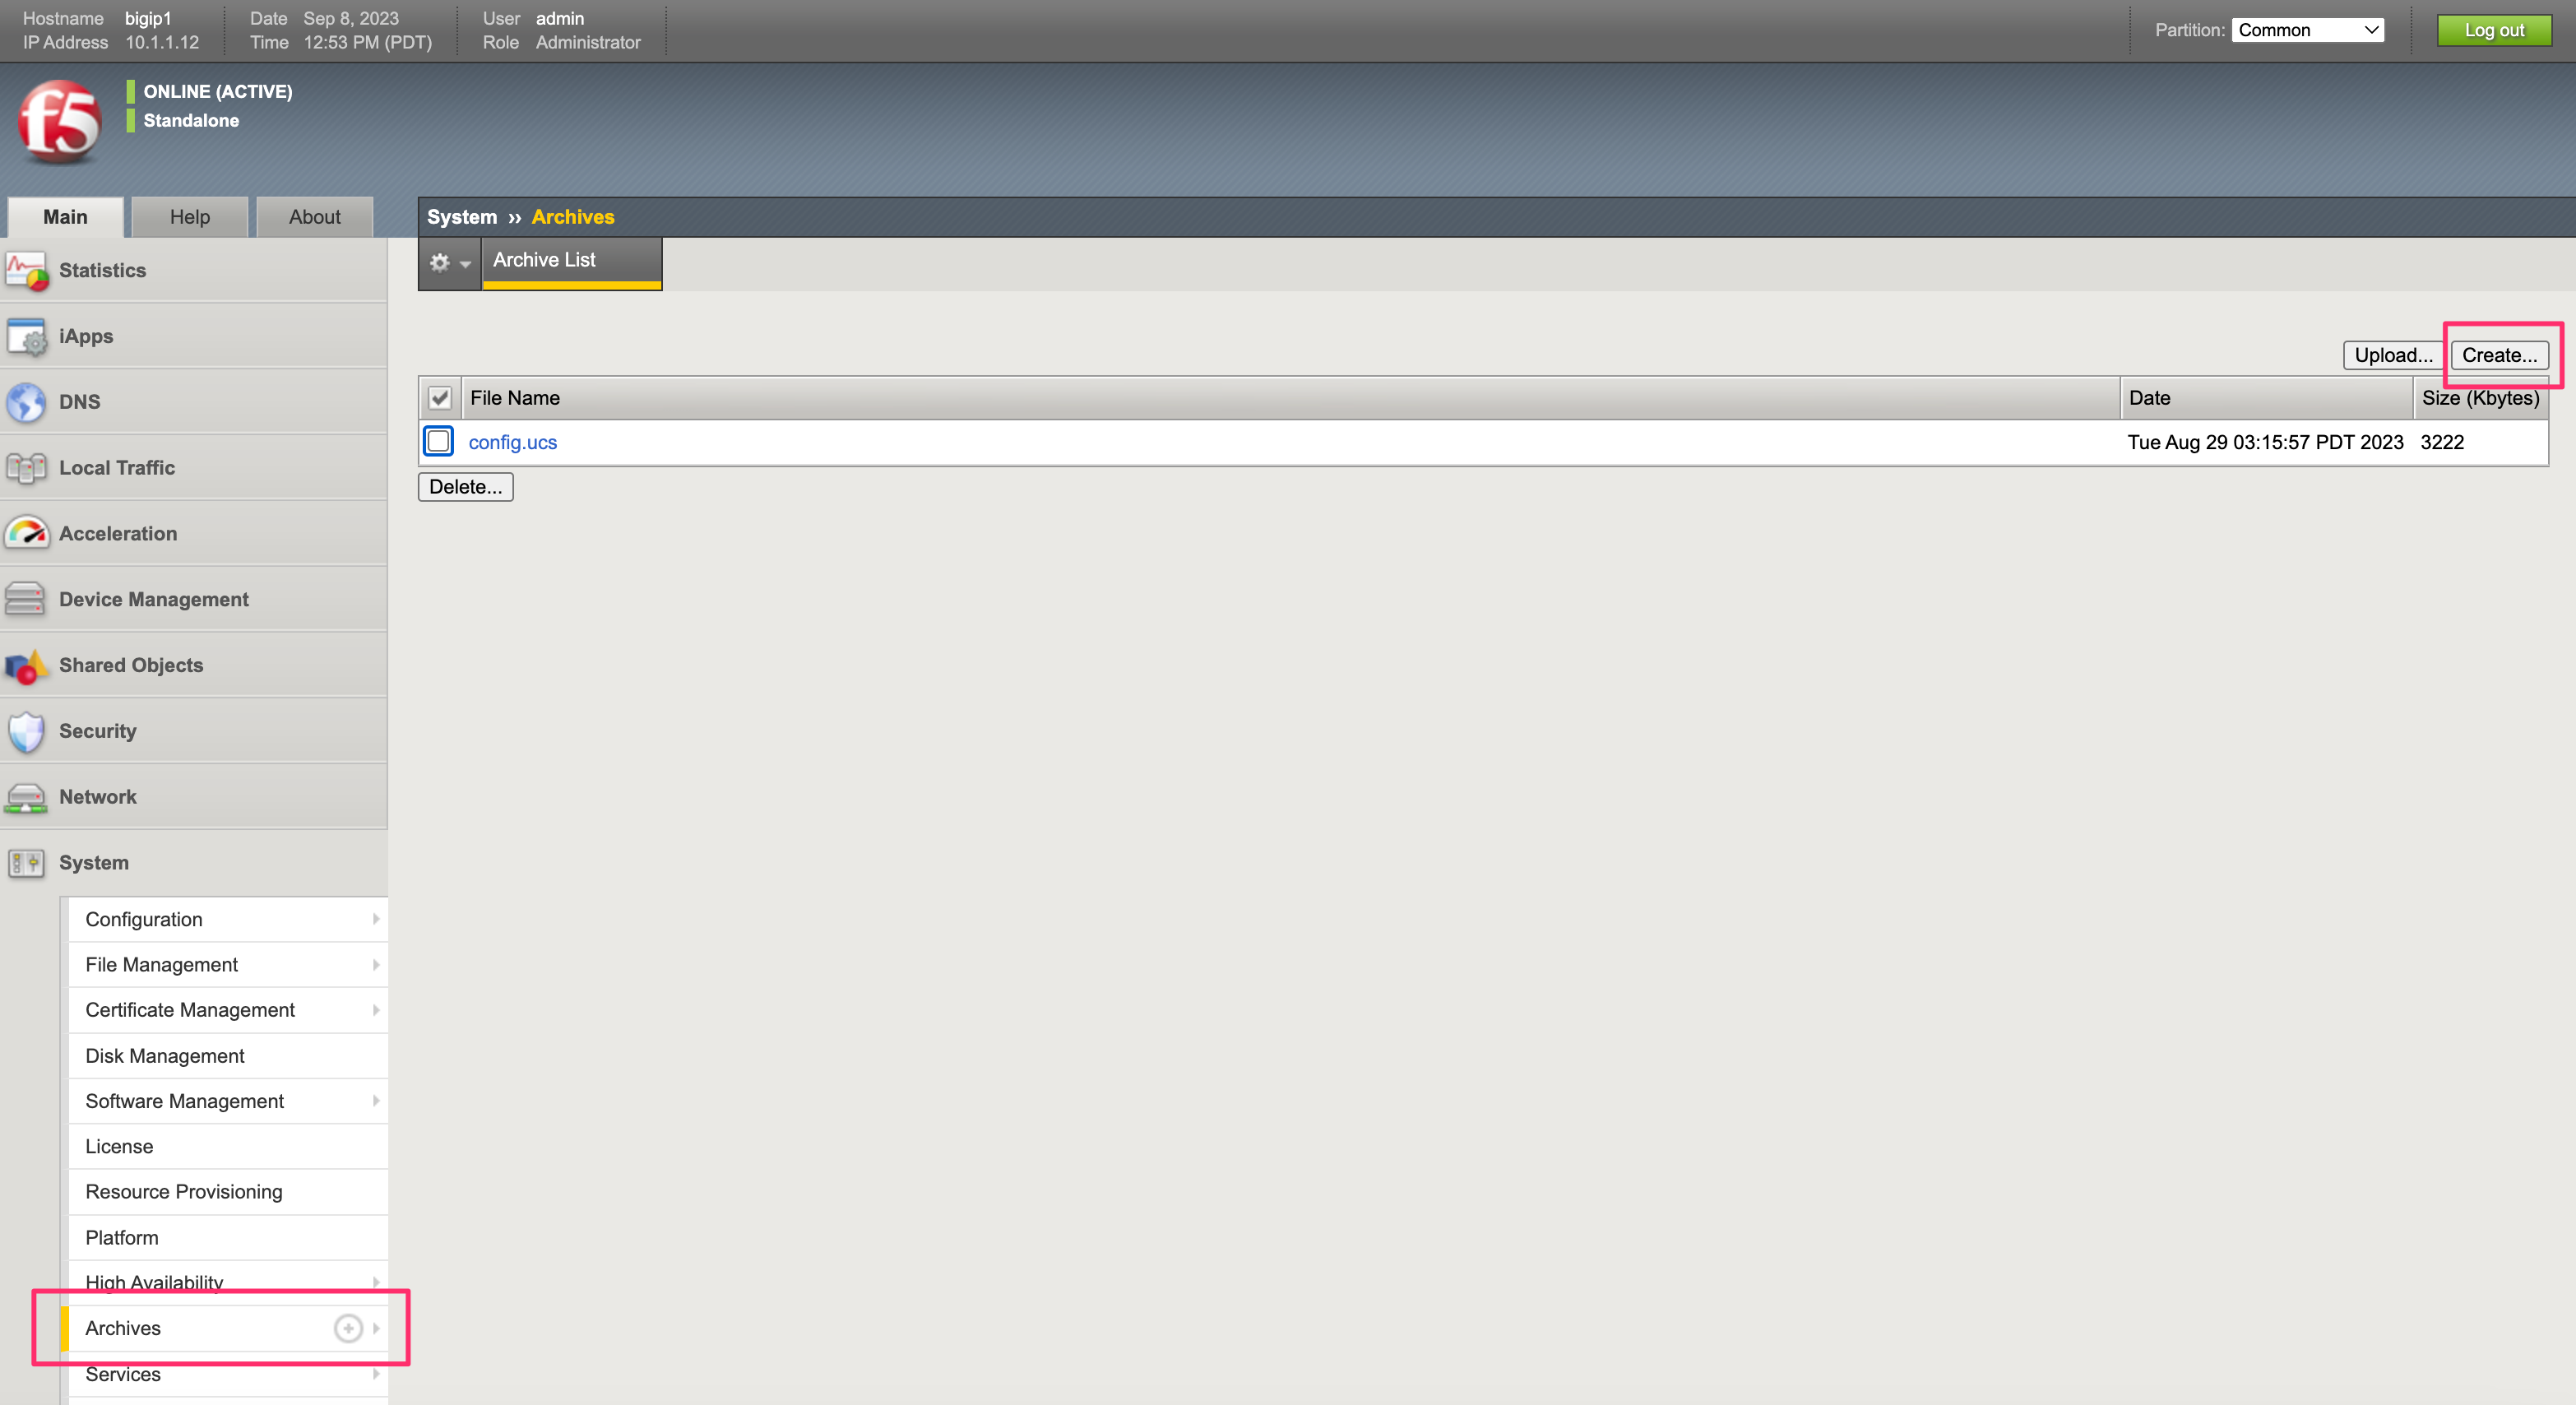
In the BIG-IP webUI, go to the System -> Archives page and click the Create button to create a new UCS archive file.
When creating the UCS archive supply a Name, enable Encryption, then supply and confirm a Passphrase. Please take note of the passphrase, as it will be referenced later. Then click Finished. Click OK after the archive has completed.

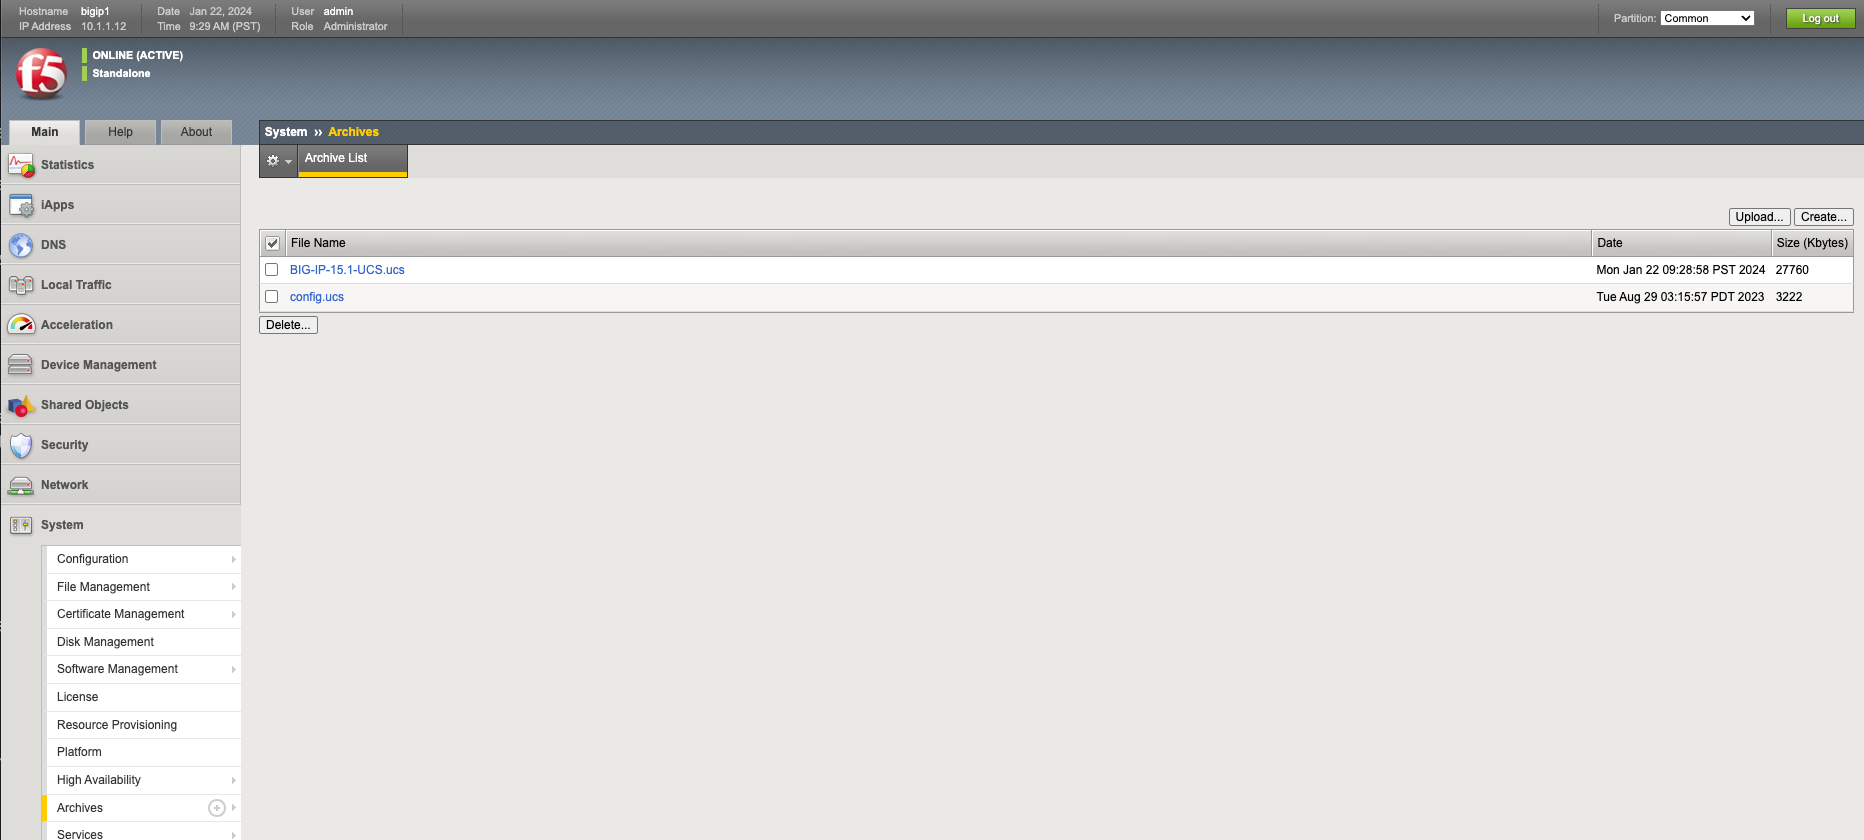
Your achive file should be displayed in the summary. Click on it.
You should see something similar to the output below. Click the Download option to download the UCS file to your local machine.

4.2.2 Import UCS into Central Manager
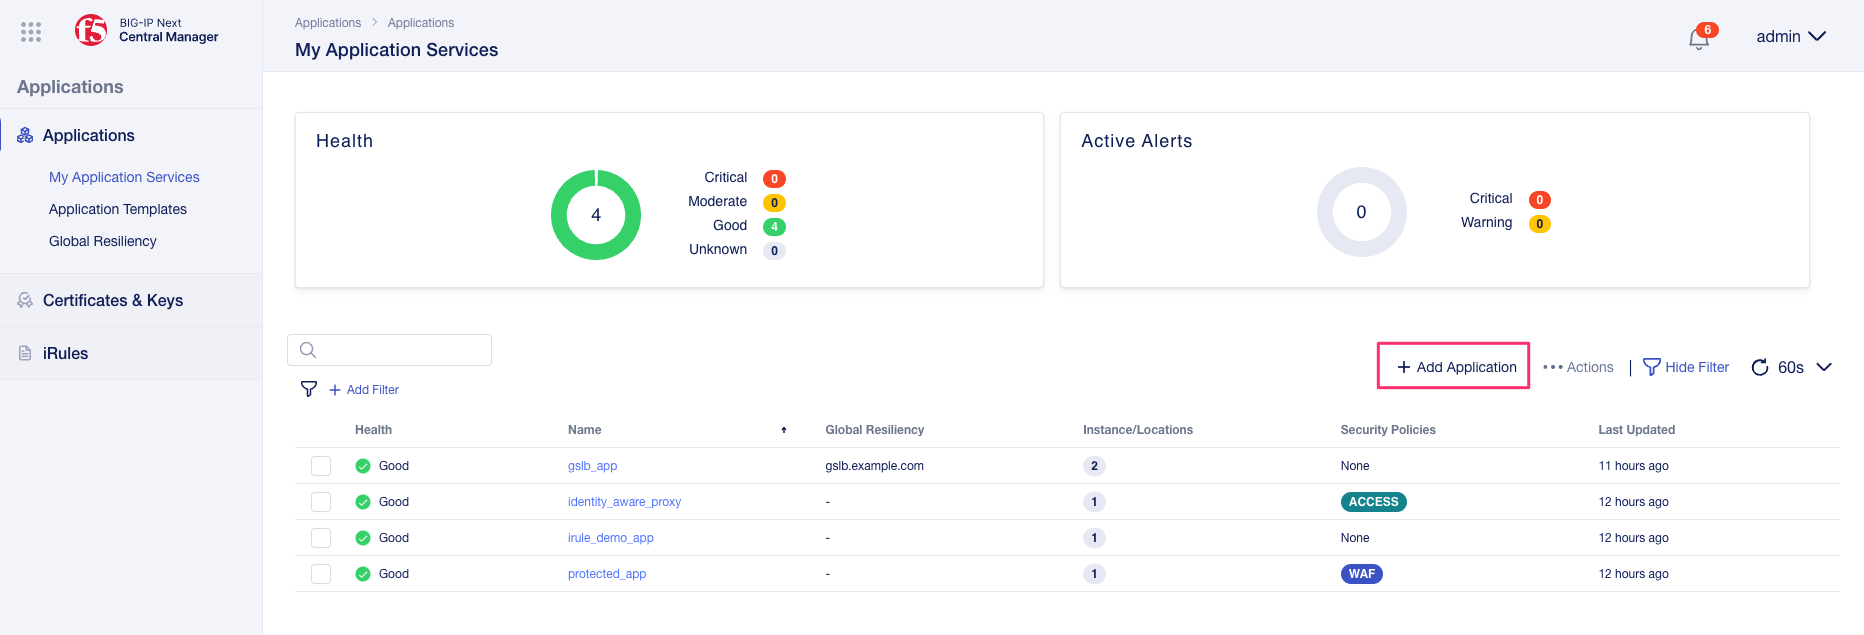
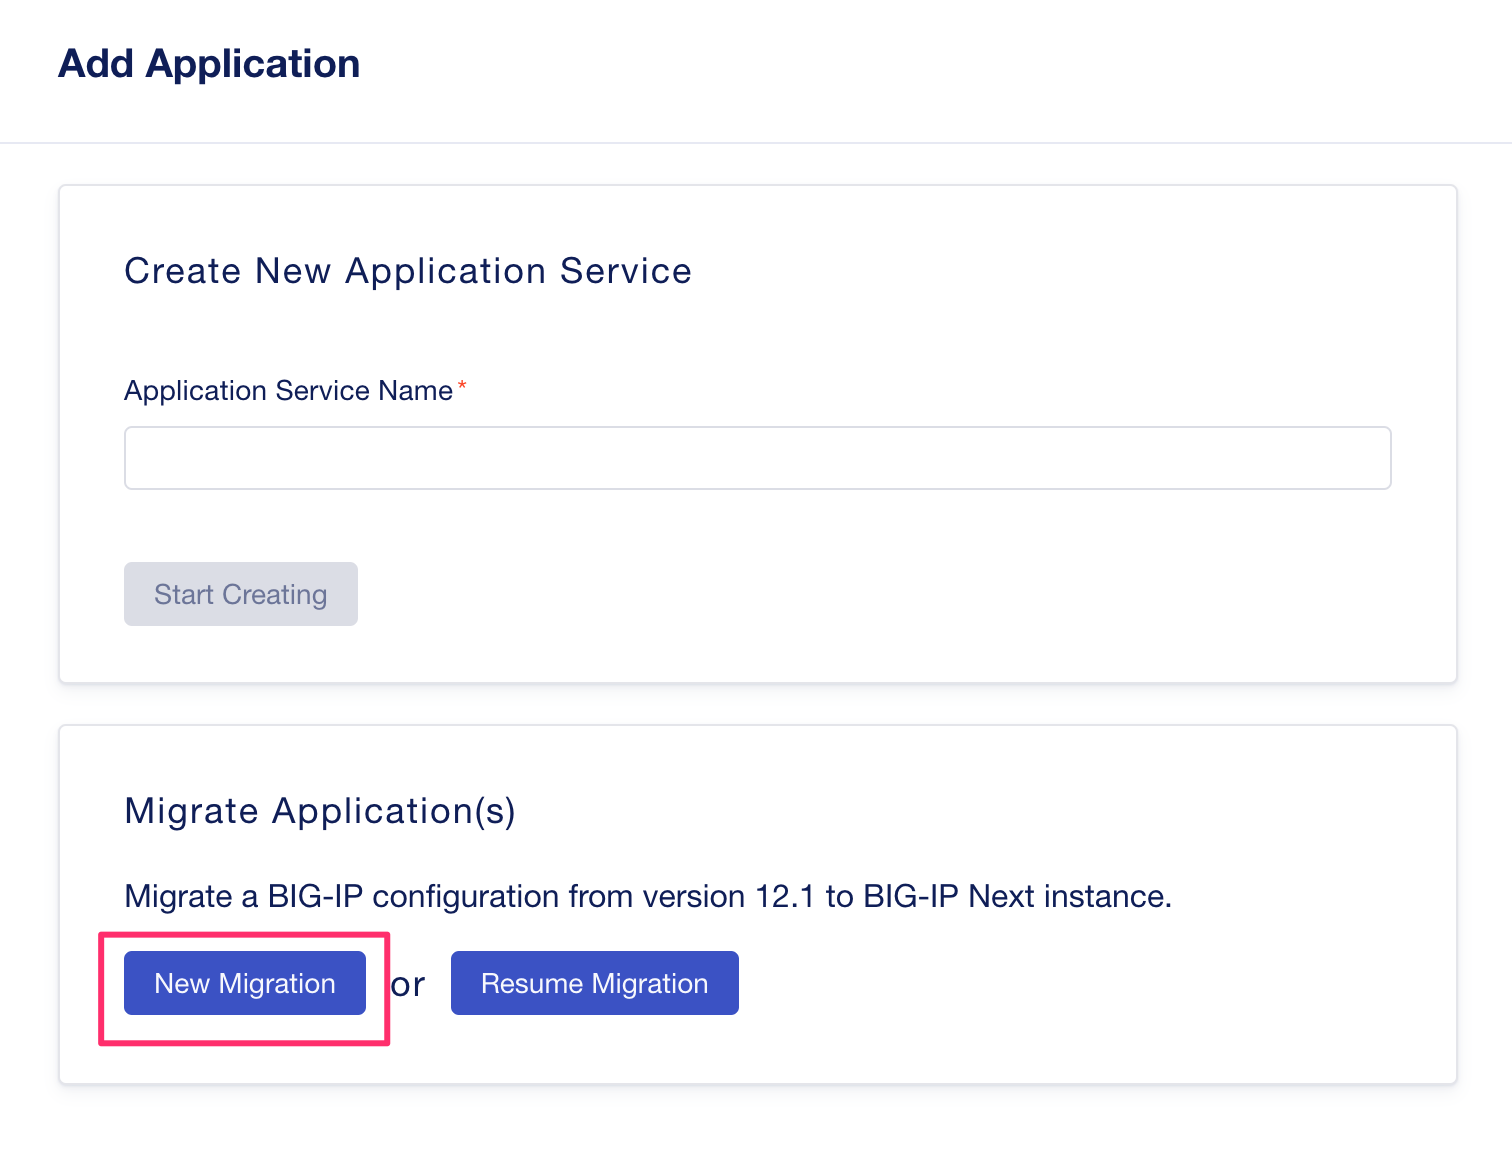
Log into Central Manager using the account admin/Welcome123! and click on the Go to Applications Workspace button. You will be taken to the Applications main page, where you can then click the Add Application button.
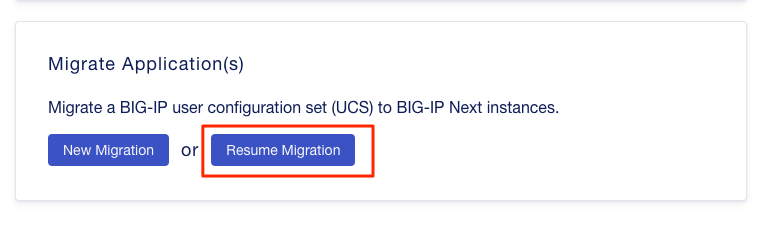
Here you can either create a brand new application, create a new migration, or resume an existing migration that you have started previously. Under the Migrate Application(s) section select New Migration.
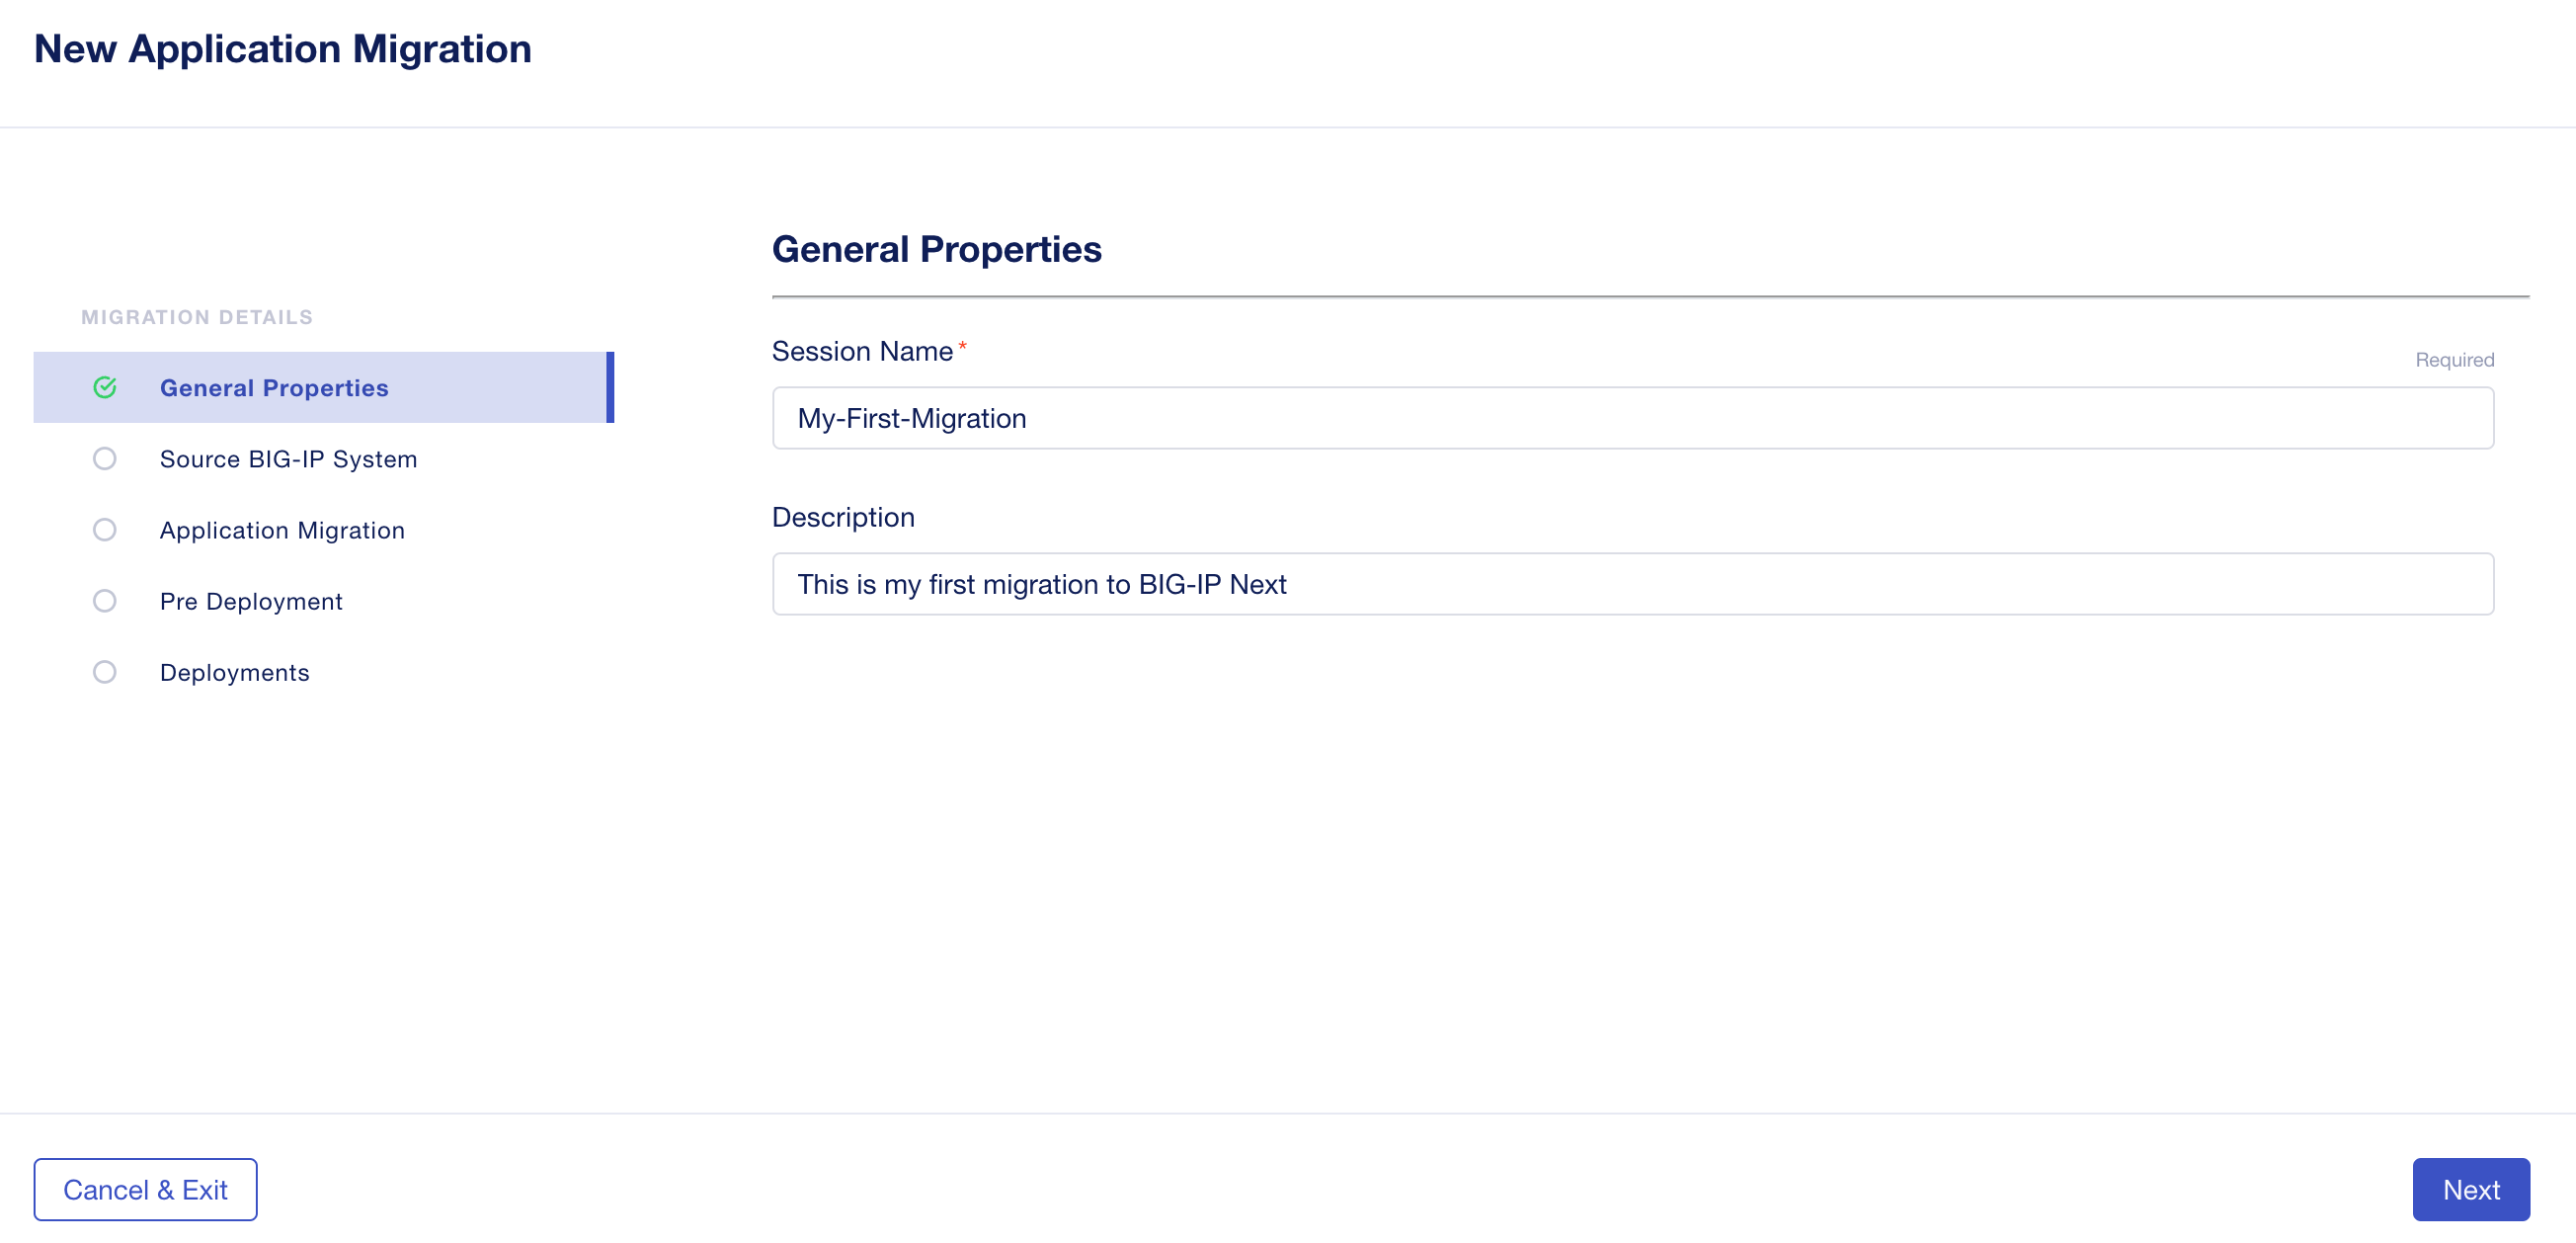
Give the migration a Session Name and Description as seen below, then click Next.
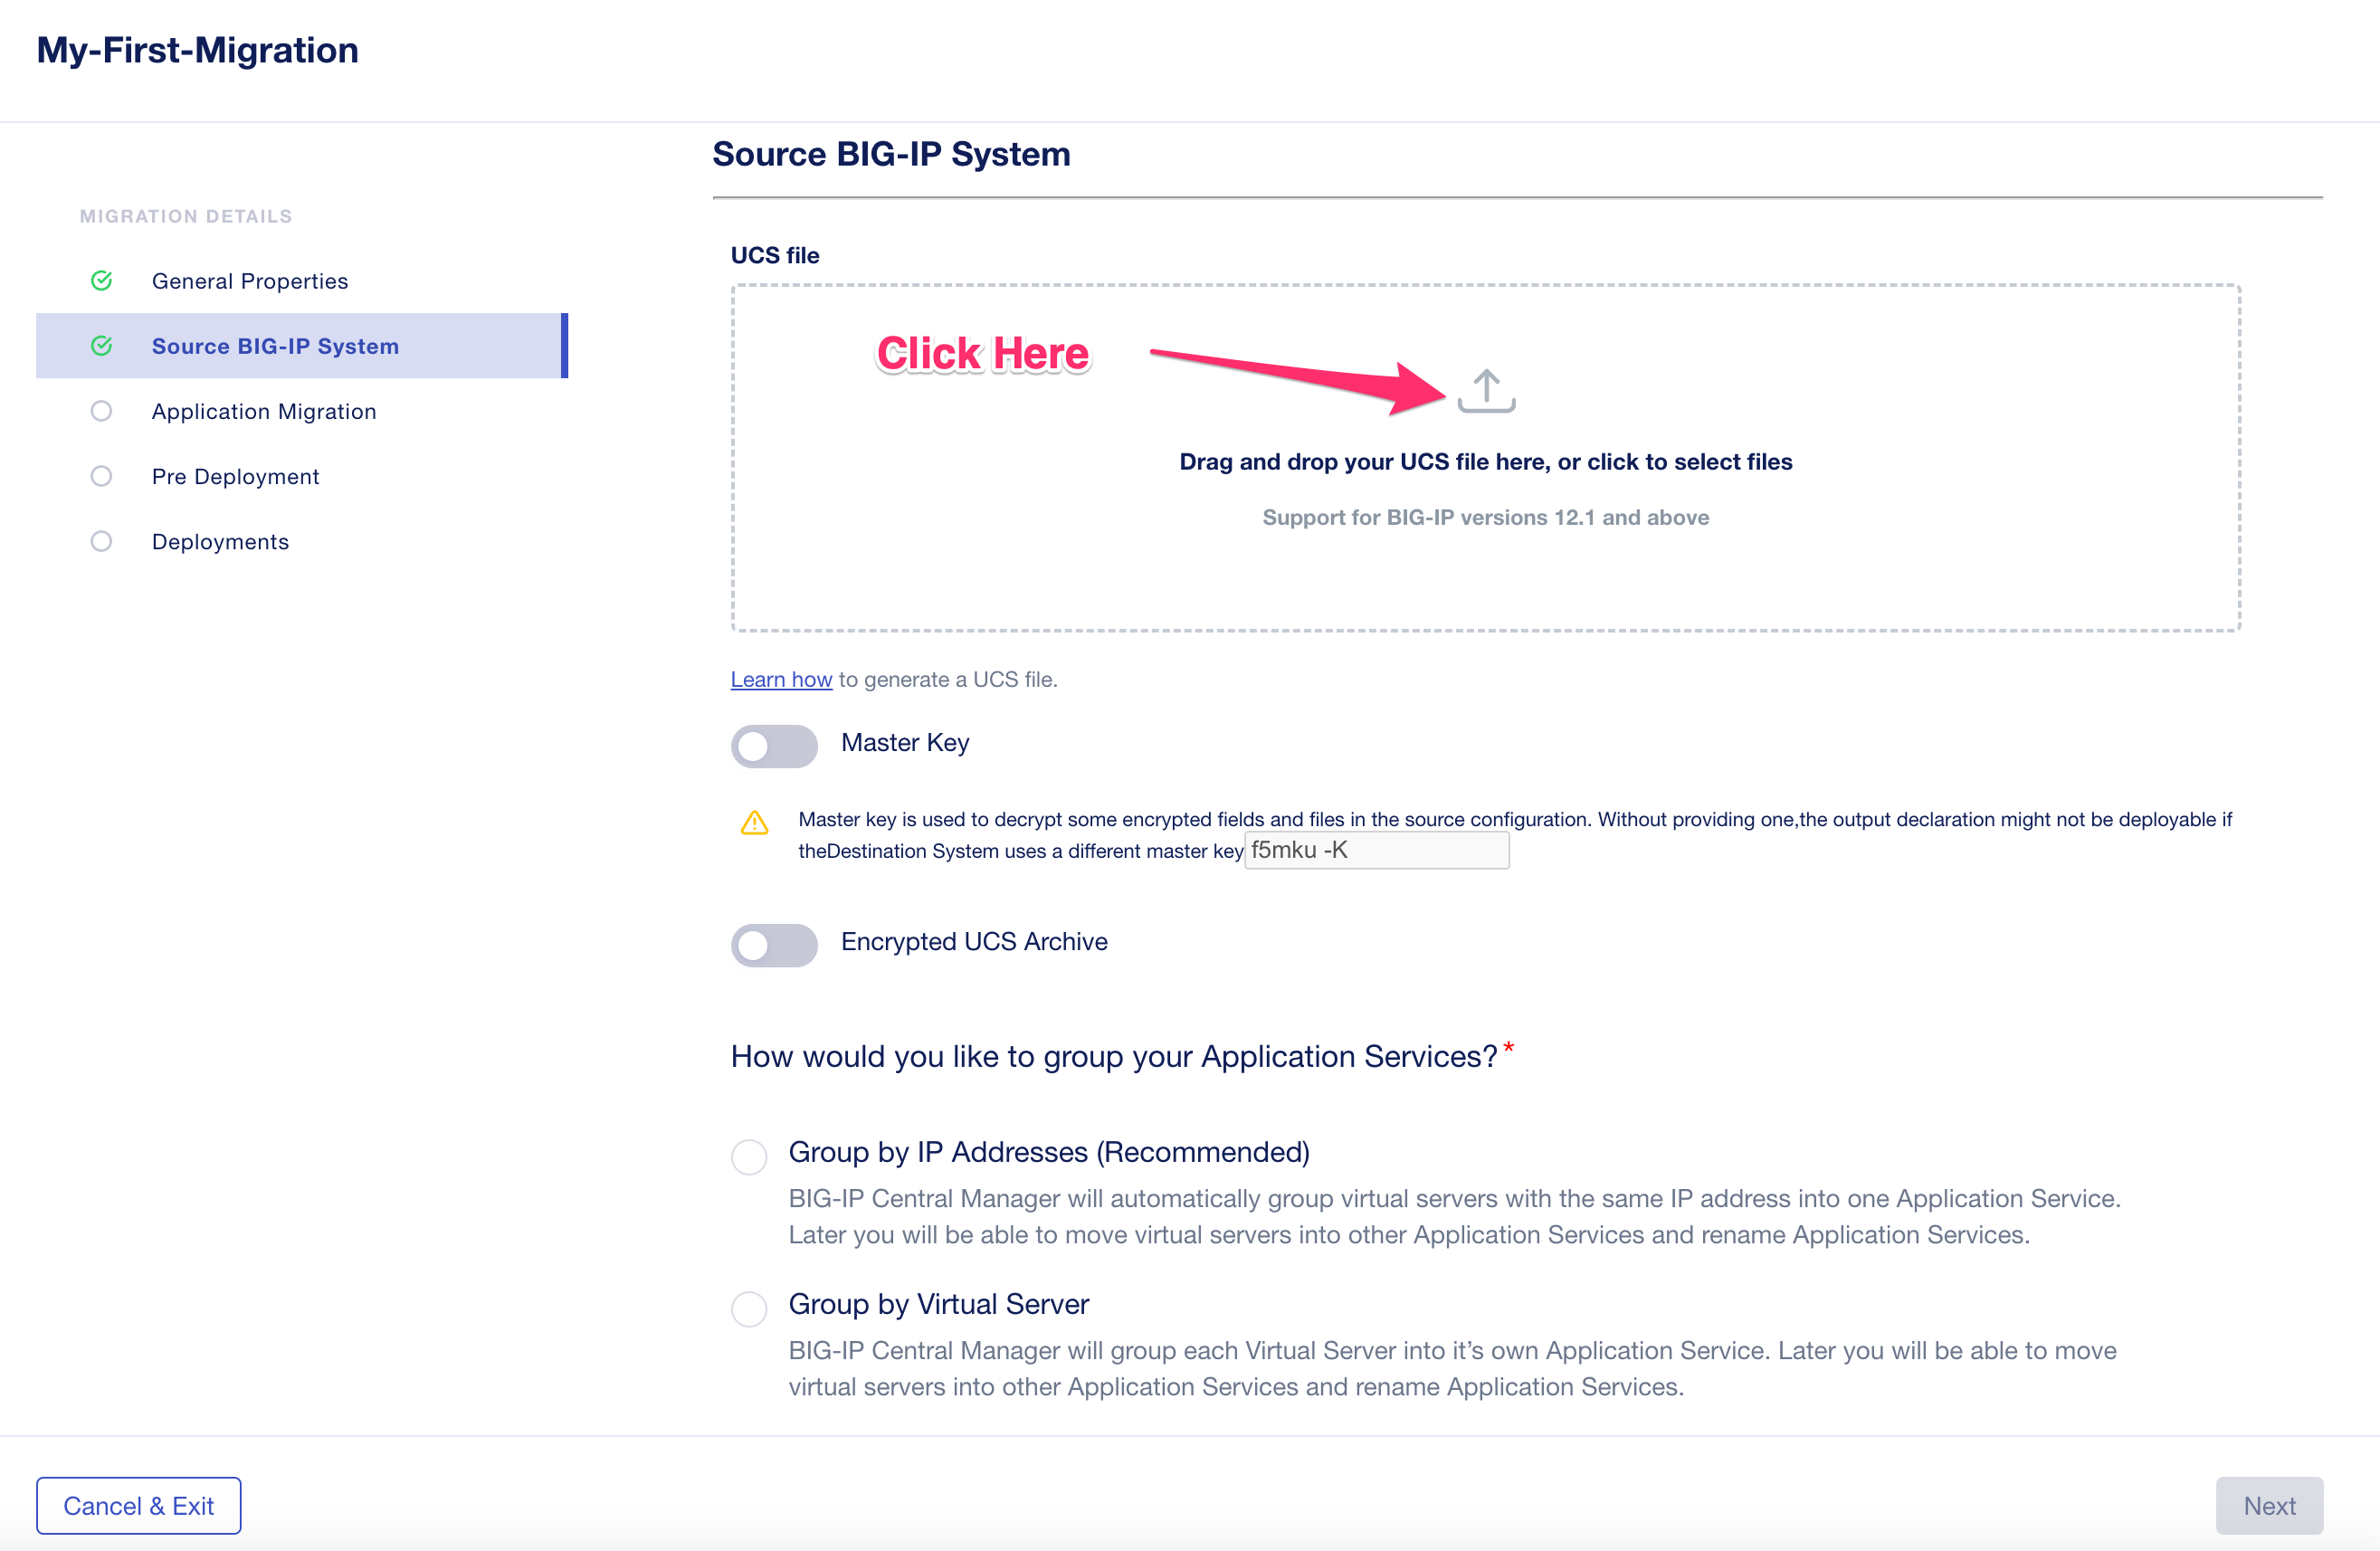
Here you’ll need to upload the UCS archive file you exported from your BIG-IP system. Click on the area noted below and a screen will pop up allowing you to select the UCS file from your local computer.
4.2.3 Master Key and Passphrase
Enter the Master-Key that you obtained from your BIG-IP, and then enable Encrypted UCS Archive enter the Passphrase you entered when creating the UCS archive in the Password field.

4.2.4 Grouping of Application Services
Central Manager provides two options for grouping application services. You may group them by IP Addresses (Recommended) or by Virtual Server. Grouping by IP addresses is recommended because it will group and migrate all services that use the same virtual IP address together. It would be very difficult to migrate services that use the same IP address but separate ports at different times, because typically the IP address will move from the source device to the target device during the migration. Choose Group by Addresses (Recommended).

Click Next and the UCS file will be uploaded and analyzed.
4.2.5 Analyze Configuration
After filling in the source BIG-IP information and loading the UCS file, an Application Migration page will be displayed. Click Add Application.
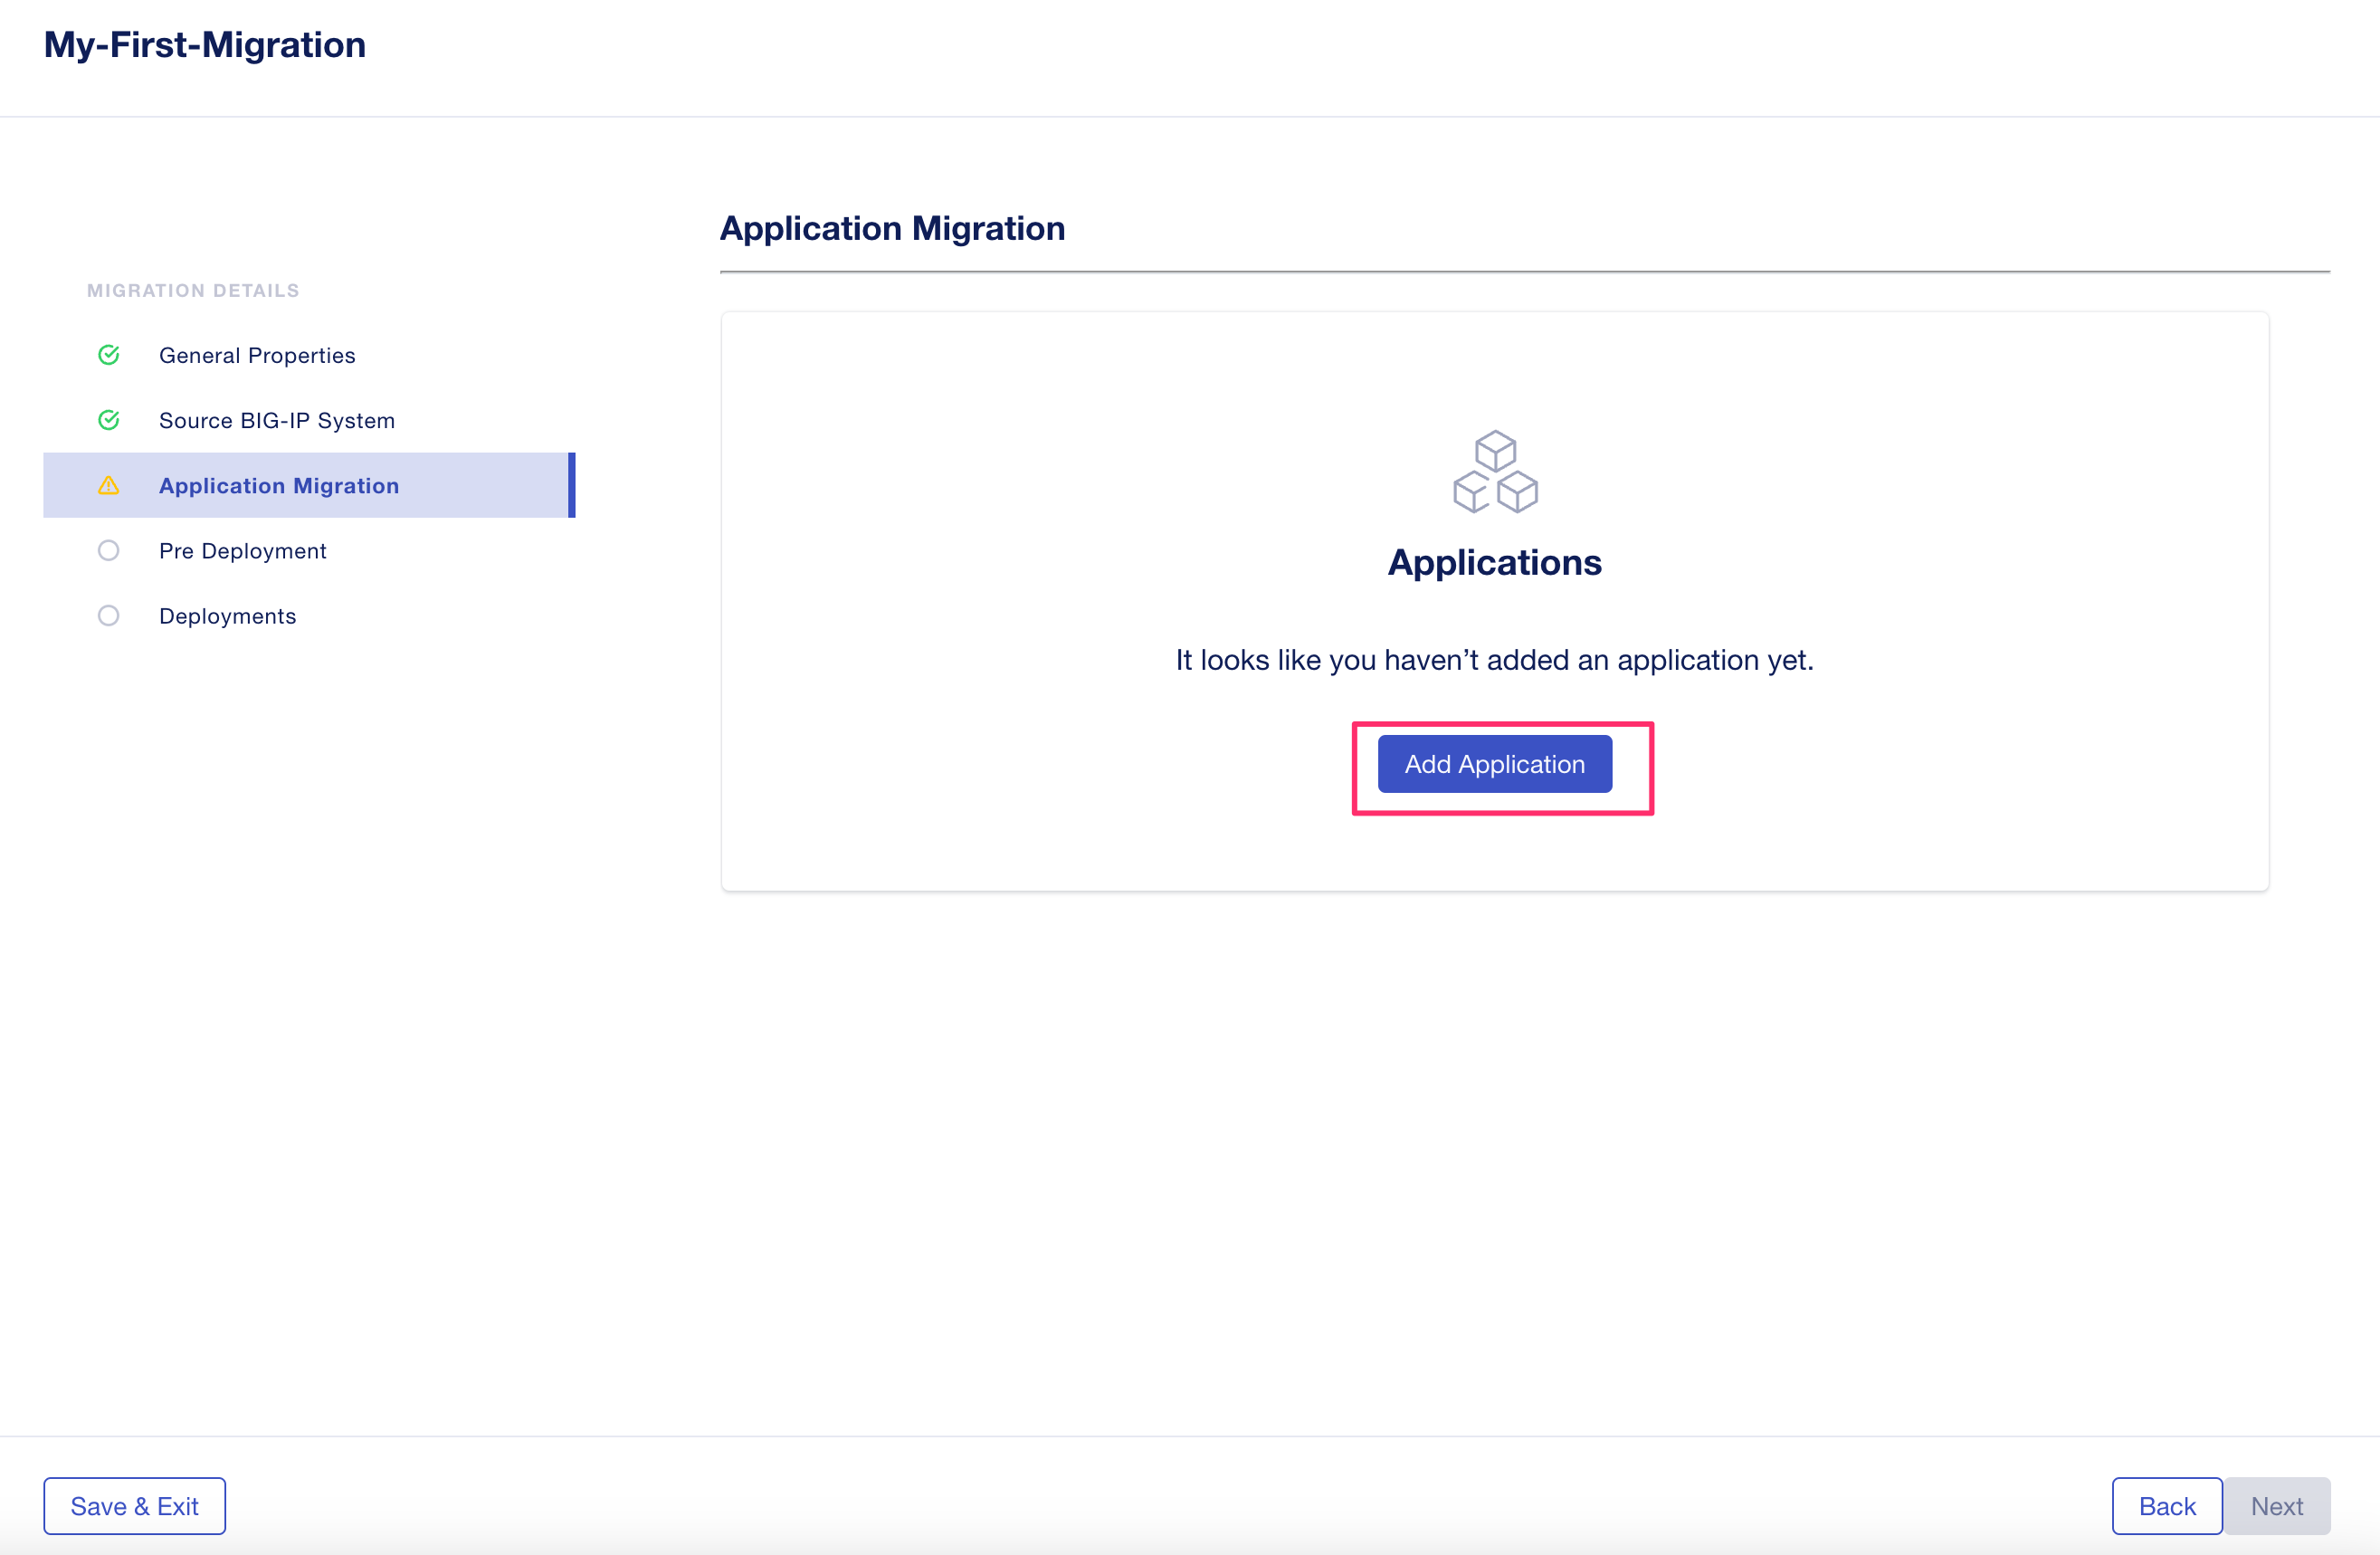
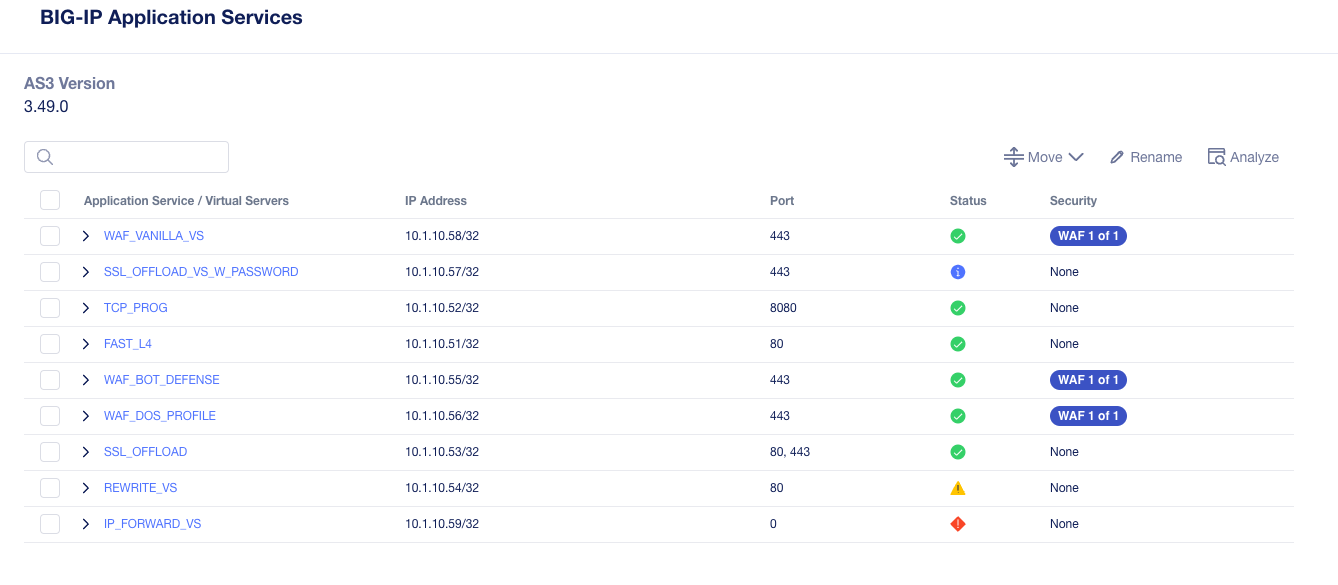
The applications from your BIG-IP will now be displayed as Application Services.
Note
The application numbers may vary in your lab vs. the examples provide below.

Depending on the type of grouping selected, and how the applications are configured, you may see a single virtual service per application, or you may see multiple virtual services if grouping by IP Addresses was selected and an application has more than one port. Each application service will display the virtual server address, port, a color coded status indicating its eligibility for migration, and a security status column. You can hover over the Status icon for each application to get more detail on its migration eligibility.
Note
The application numbers may vary in your lab vs. the examples provide below. Please browse through the applications if needed to find the examples that match the lab. Or you can use the IP address to match the examples below with your lab.
Here you can select individual applications to analyze and see if they are eligible for migration to BIG-IP Next. Not all BIG-IP features are currenlty supported on Next. There will be a phasing of support for some configuration objects, so it is expected that some applications cannot migrate at the current time or need modifications in order to migrate.
To see if an application is eligible for migration, click the application name as well as the virtual service underneath it and then click the Analyze button in the top right-hand corner off the screen.
Note
You can only analyze one application service at a time.

This will open the Configuration Analyzer page and you will see the BIG-IP configuration display from different files such as bigip.conf, or some of the default profile and monitor files. Each file will have a status associated with it indicating if there is a migration issue or not.
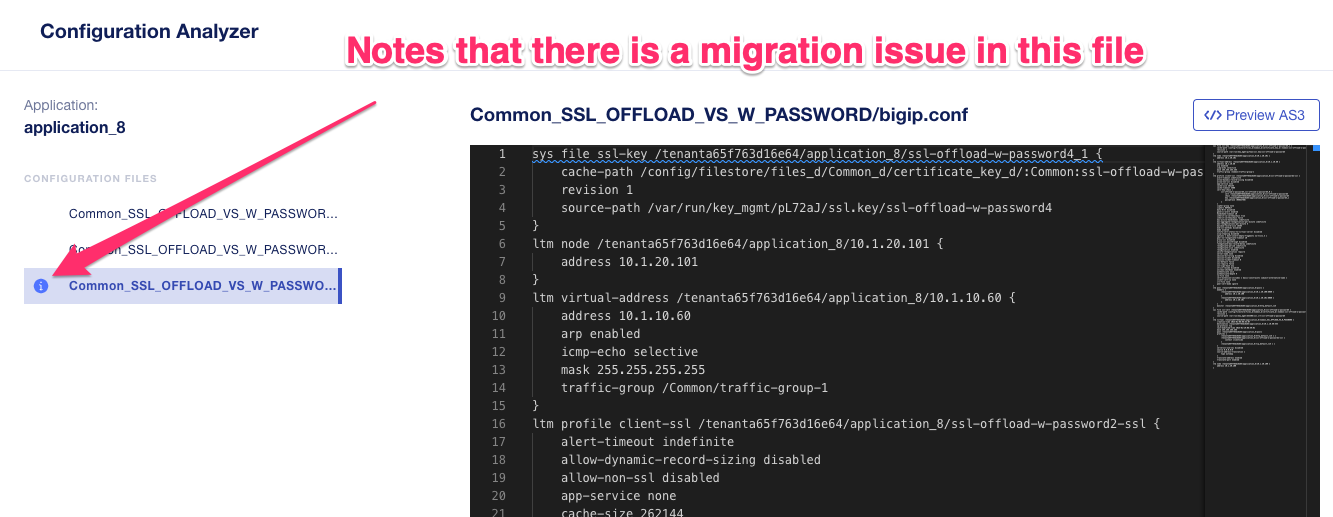
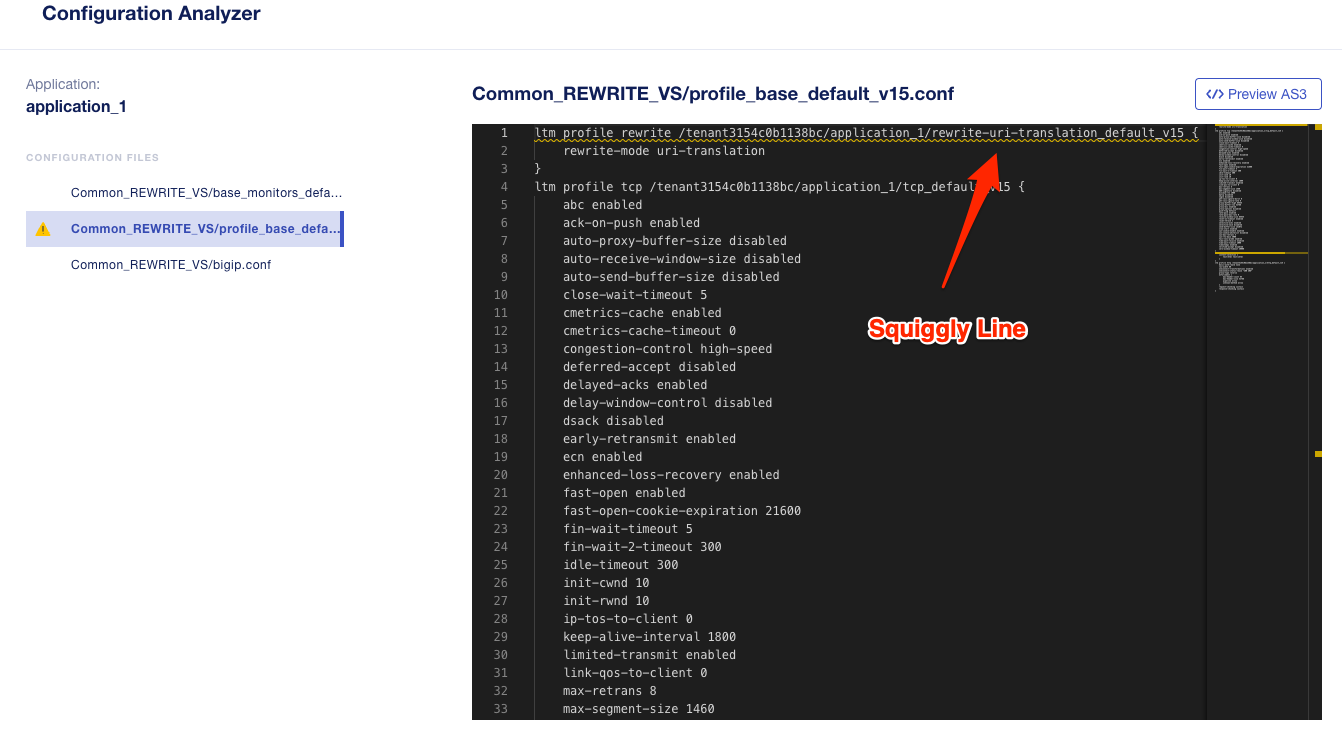
You can browse the configuration of each file for any unsupported items or items that may need adjusting. They will be highlighted with a squiggly yellow, red, or blue line. You can also see this within the summary preview on the left-hand side of the display, which allows you to quickly navigate to where the problem may be in the file. Below is an example of a file with a migration issue and the squiggly yellow line notes where the issue is in both the summary and in the scroll bar.

You can click on the yellow line in the scroll bar and it will take you to the part of the file that has the migration issue. The squiggly yellow line will note the configuration object that is not supported.
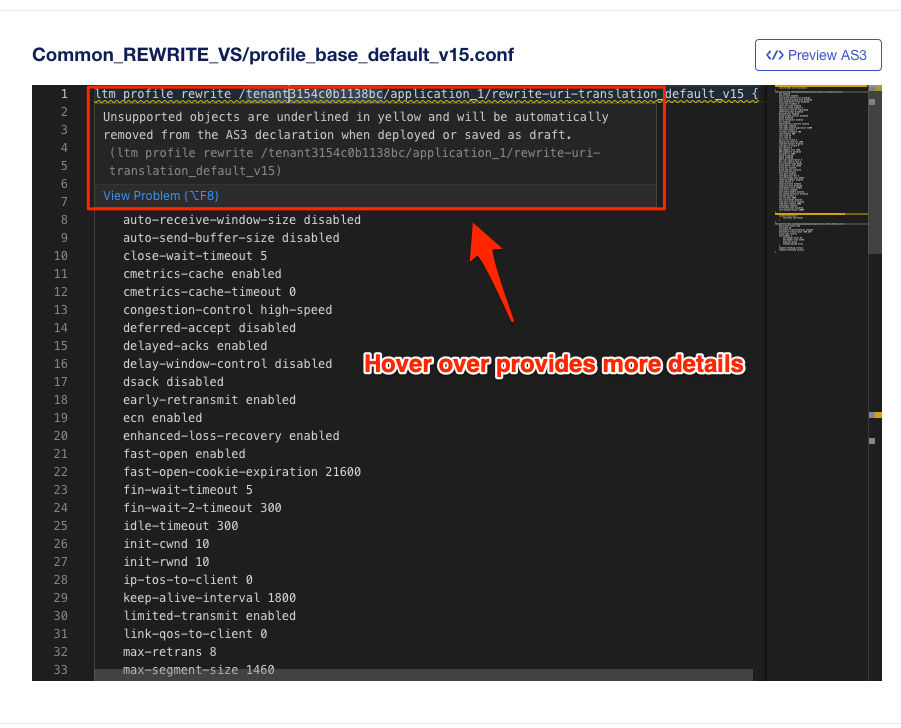
You can hover over the squiggly line to get more details about the unsupported object. You can also click the View Problem message for addtional details.
Using the Configuration Analyzer, you can make a determination if an application service is ready for migration, or if you may have to wait until additional functionality is integrated into BIG-IP Next. BIG-IP Next is on a much more rapid release schedule than TMOS, so new features are being integrated on regular invtervals.
4.2.6 Migrate Applications to BIG-IP Next
Applications with status indicating a yellow triangle or blue information icon may not be ready for migration, or may need some changes to fully migrate to BIG-IP Next.
A red icon is an unsupported object and cannot be migrated to BIG-IP Next at the current time.
For this lab, we will first attempt to migrate all the green application services to BIG-IP Next. Before migrating the applications, it is a good idea to rename each application service to use a name that better represents the application instead of the generic, auto-generated names (application_1, application_2, etc…).
Go ahead and rename each application, using the name nested underneath the application service name, so it’s clear what the applications are configured for, as the names are descriptive of the use case.

Below is an example of the pop-up that will appear when you renaming an application service. Please use underscore instead of dashes when renaming the application for the current release.

After renaming the application services, the new names should be reflected in the output as seen below. Do this for every application.
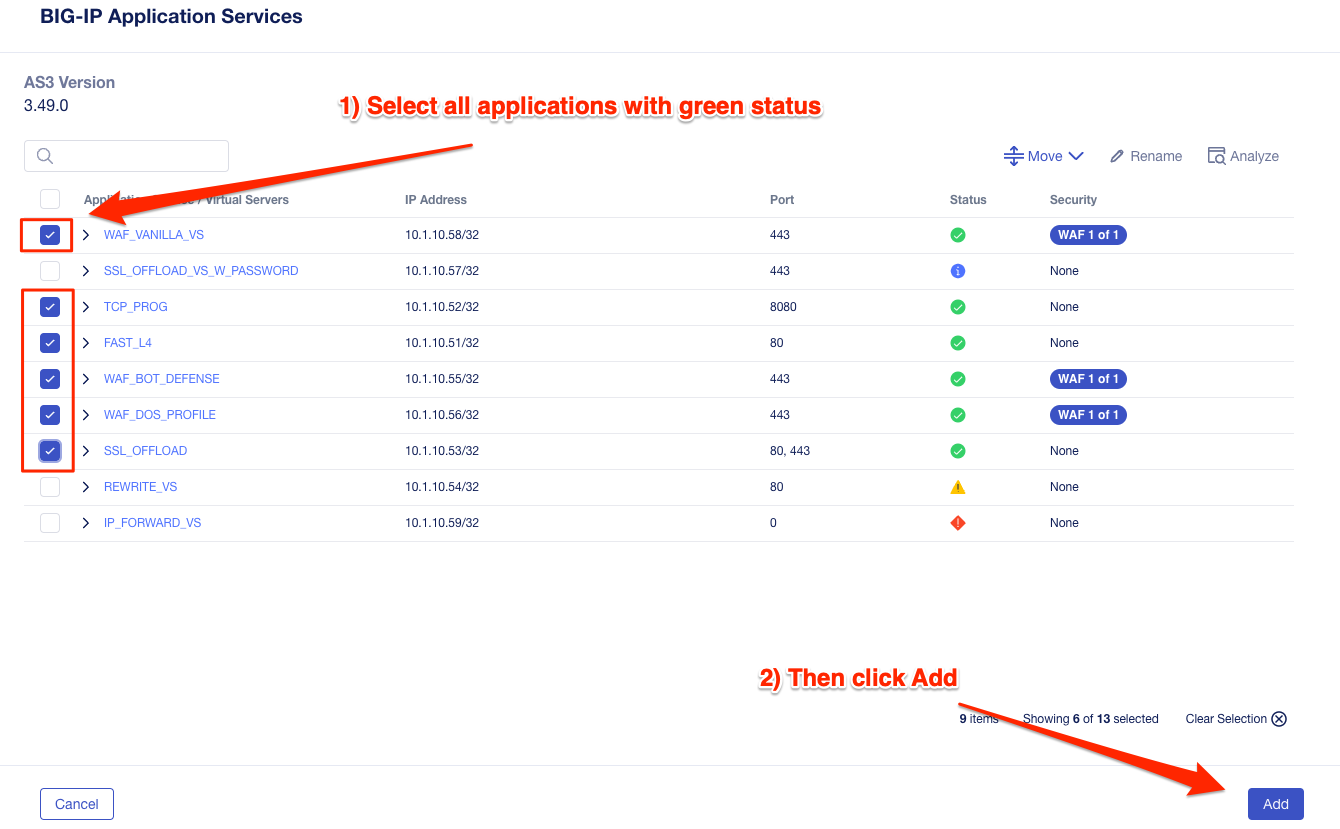
After all the application services have been renamed, select all the green status services and then select the Add button. This will indicate that you are either ready to migrate these services, or that you are going to save them as a draft application service. After adding these applications you’ll have more options on the next screen before making a decision.
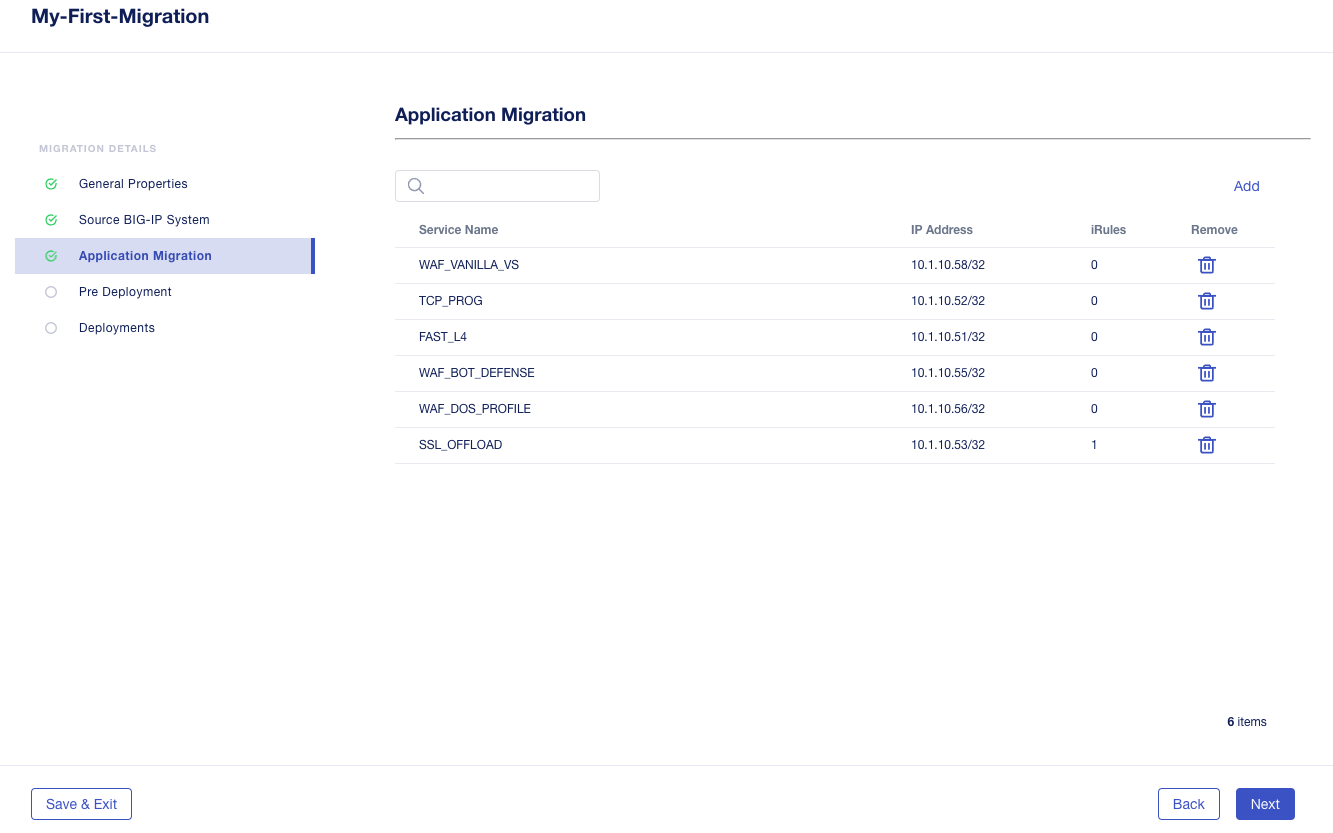
The next screen will present an Application Migration summary. Here, you can review the applications that you wish to move forward with, or you can remove an application from the migration. This doesn’t delete the application; it is still in the UCS and you can go back later and add it again. If you forgot an application, you can click the Add button to go back to the remaining applications and add other apps. Once you are satisfied with the summary of applications, click Next.
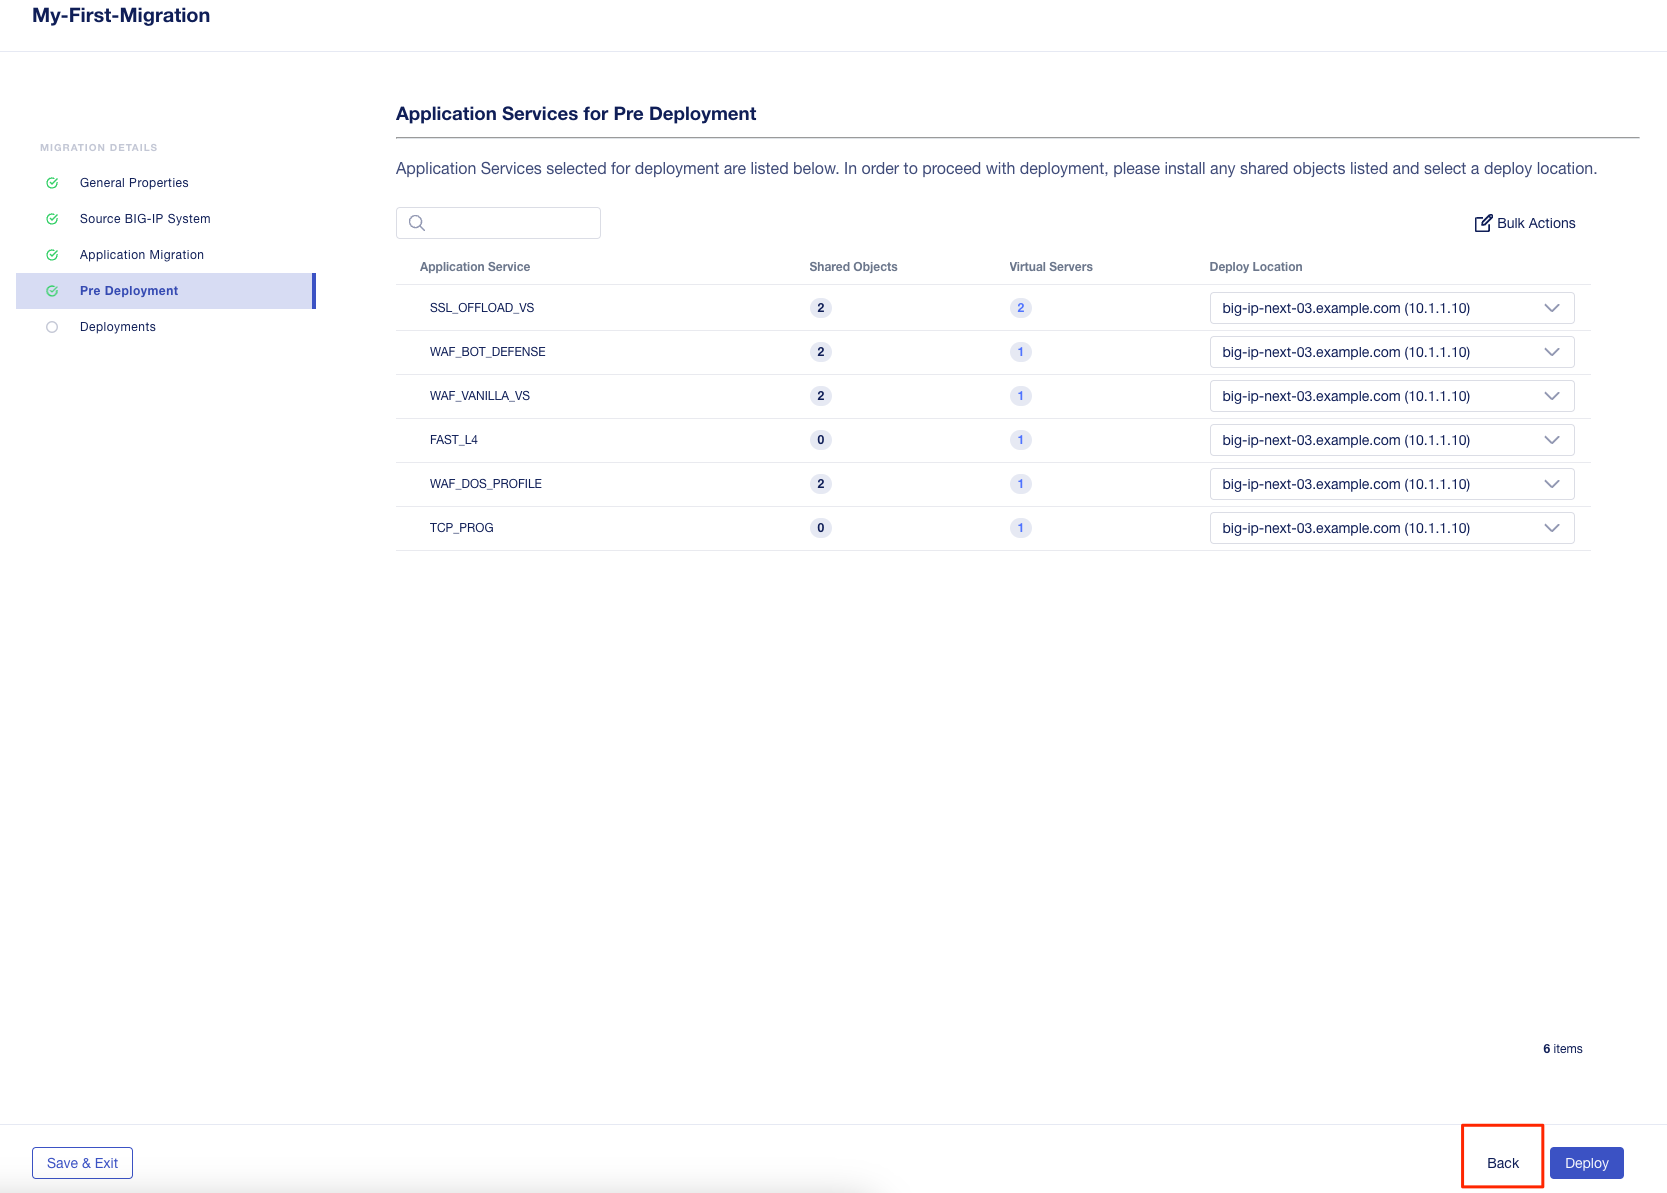
The next phase is the Pre Deployment. Here, you can Import shared configration objects associated with the application into Central Manager. Examples of shared objects would be iRules, WAF policies, Certificates etc. These objects are treated differently than the rest of the configuration because they are managed centrally and not specific to any one device, or in the case of certificates, Central Manager is managing those centrally.
As an example, in traditional BIG-IP management, iRules are managed on a device-by-device basis, there is no central iRule management. Central Manager addresses this issue and allows iRules to be imported and treated as shared objects, meaning they can be shared and deployed to more than one device. Central Manager manages the entire iRule lifecycle including deployment and versioning. This is huge improvement over traditional BIG-IP iRule management.
Other shared objects such as WAF policies enjoy similar benefits of centralized mangement, versioning, and full lifecycle management.
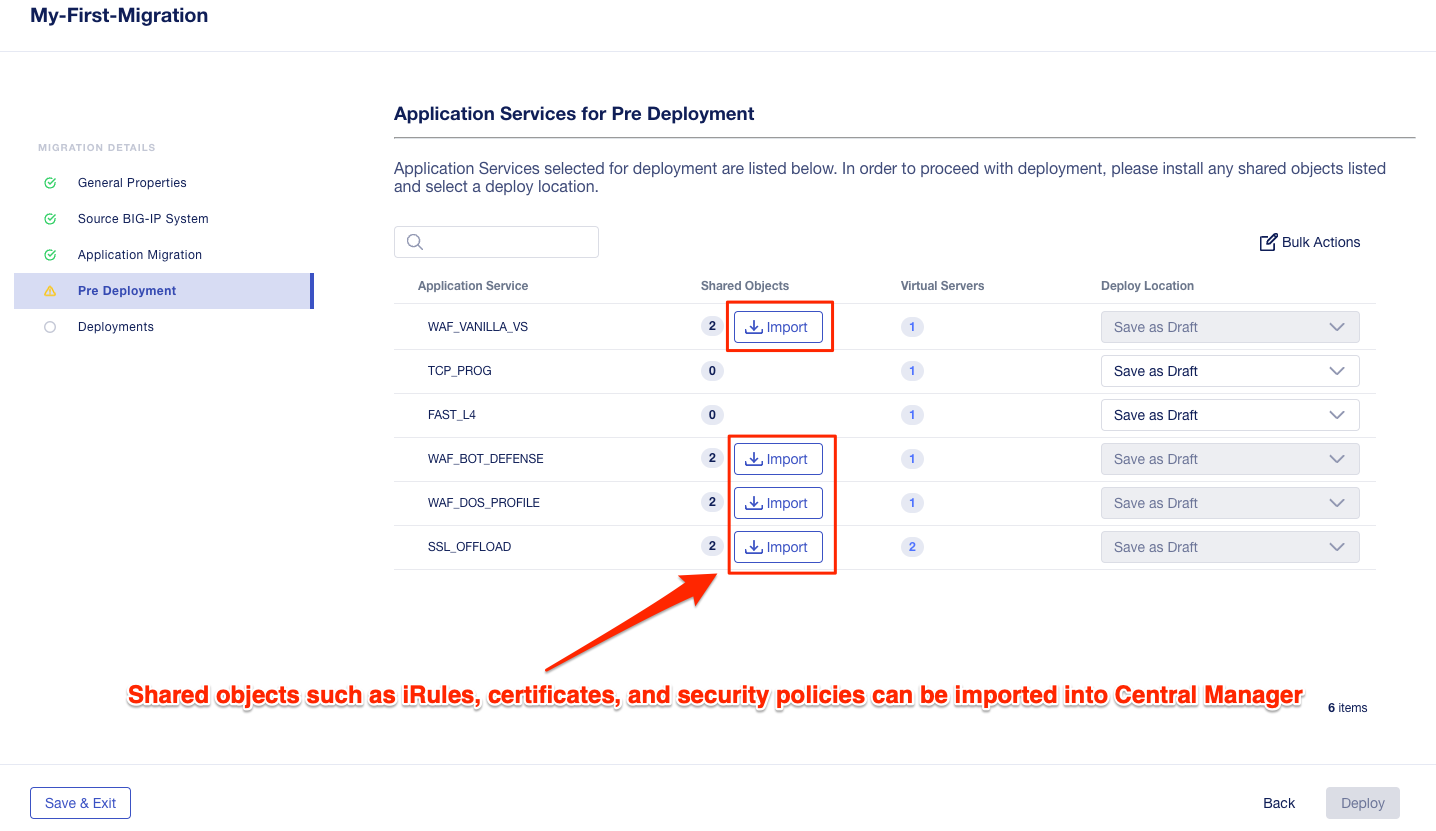
To understand what the shared object is, click on the number under the Shared Objects column. A flyout window will appear with more information about that shared object.
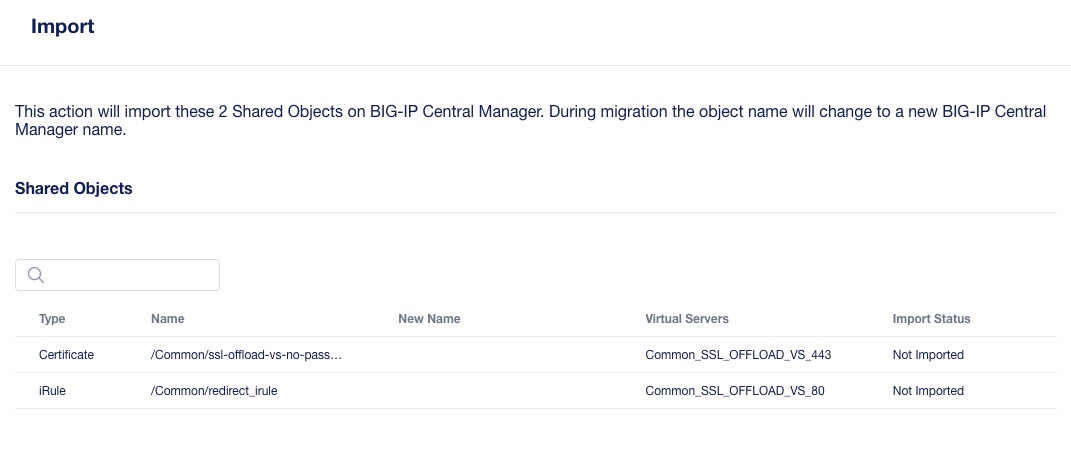
Click the Import buttons for the applications that have shared objects. You’ll also have the ability to select on a per-application basis whether the migration is saved as a Draft application and completed later or whether it is deployed to a specific BIG-IP Next instance. You will come back to this page momentarily.
Before migrating the applications to BIG-IP Next, let’s ensure that each application is working on BIG-IP from a client. There are two choices for clients that can be used, as not all attendees will be able to use Remote Desktop.
1.) Log into the Windows Jumphost using the RDP option in the main UDF screen.
2.) Use the Guacamole HTML-based RDP client on the Ubuntu Jumphost (recommended for those that cannot install RDP).
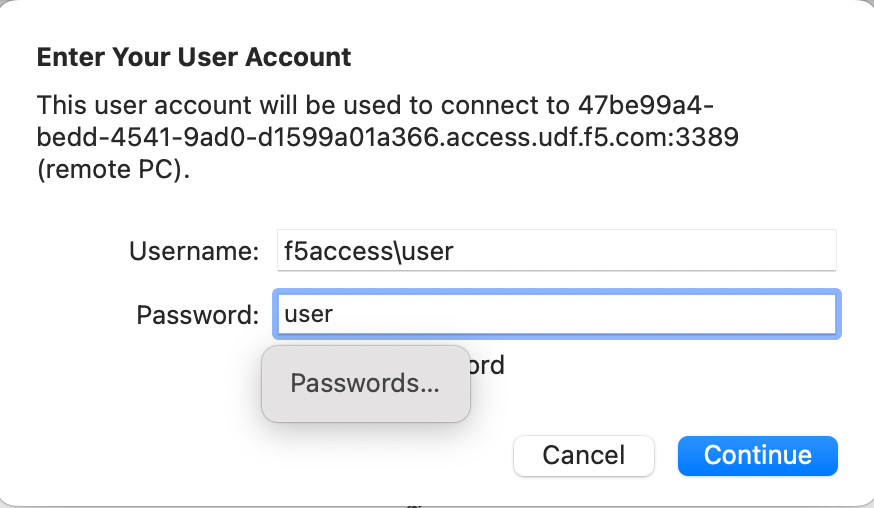
For Windows RDP users:
Go to the main UDF screen, and select the Window Jumphost. Then select the Access dropdown and select RDP. This will download an RDP shortcut to your machine.

Open up the RDP shortcut to connect to the Windows Jumphost.
Log in with the following credentials:
Credentials
Username:
f5access\userPassword:
user
For Guacamole (Non RDP) users:
Go to the main UDF screen, and select the Ubuntu Jumphost. Then select the Access dropdown and Guacamole. This will launch the HTML-based RDP client.

Log in with the following credentials:
Credentials
Username:
userPassword:
user

Select the Windows Jumphost option.

Test the connection to the applications
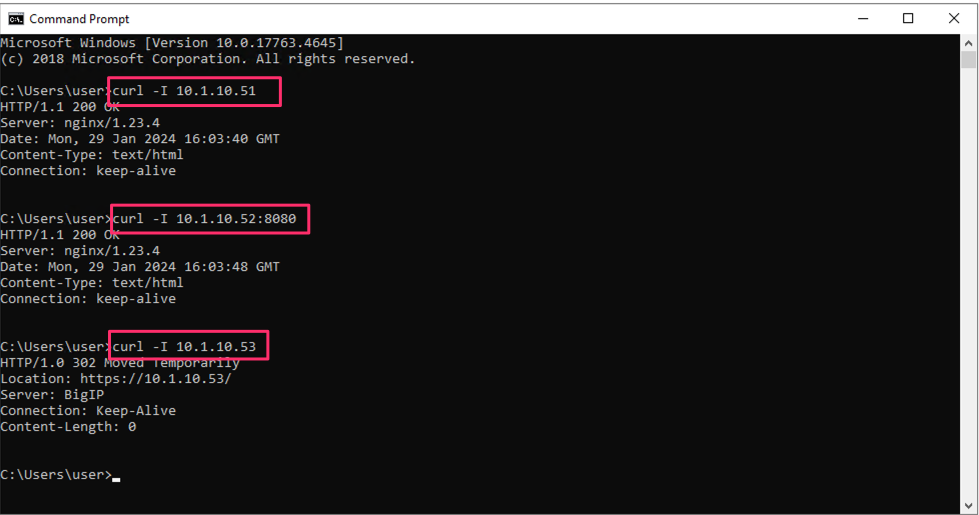
On the Windows jumphost open a cmd window (click on the start menu in the lower-left corner (it looks like a white four-pane window), type “cmd”, and click the item called “Command Prompt” from the menu that appears). You will now test to ensure that some of the source BIG-IP virtual servers are responding.
- FAST_L4
curl 10.1.10.51 -I
- TCP_PROG
curl 10.1.10.52:8080 -I
- SSL_OFFLOAD_VS
curl 10.1.10.53 -I
- REWRITE_VS
curl 10.1.10.54 -I
- WAF_BOT_DEFENSE
curl https://10.1.10.55 -k -I
- WAF_DOS_PROFILE
curl https://10.1.10.56 -k -I
- SSL_OFFLOAD_VS_W_PASSWORD
curl https://10.1.10.57 -k -I
- WAF_VANILLA
curl https://10.1.10.58 -k -I
The first two virtuals should respond with a 200 OK message, and the 3rd virtual will respond with a 302 Moved Temporarily message indicating a redirect as seen below. All the other virtuals should respond with a 200 OK message.
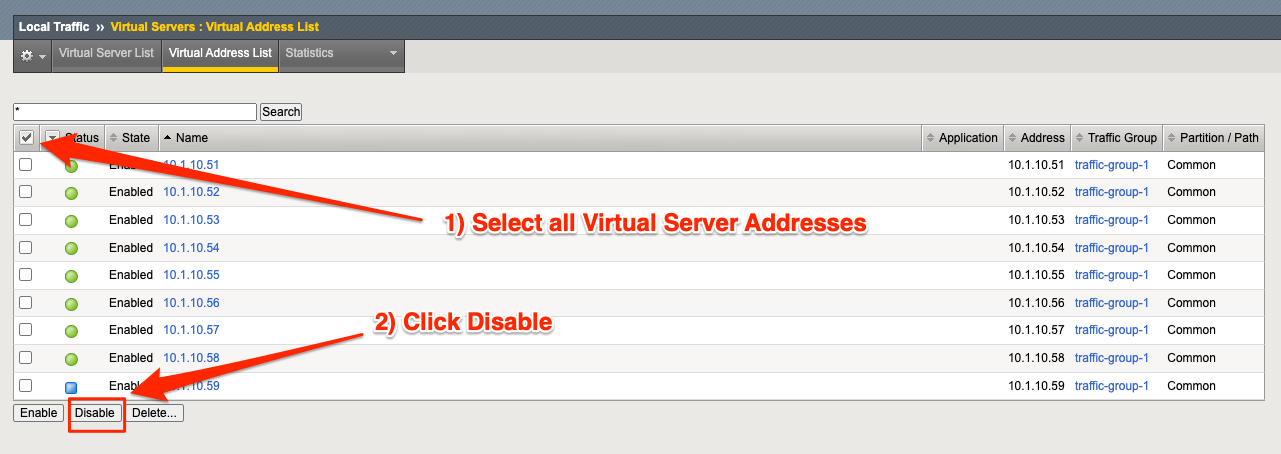
Because you will preserve the BIG-IP virtual server address as part of the migration, you will need to disable all the source BIG-IP virtual servers to prevent duplicate IP address conflicts.
Access the BIG-IP TMUI from the UDF deployment.
Login using the credentials below:
Credentials
Username:
adminPassword:
admin
Go to the Local Traffic -> Virtual Servers -> Virtual Address List page.

Select all Virtual Addresses, then select Disable.
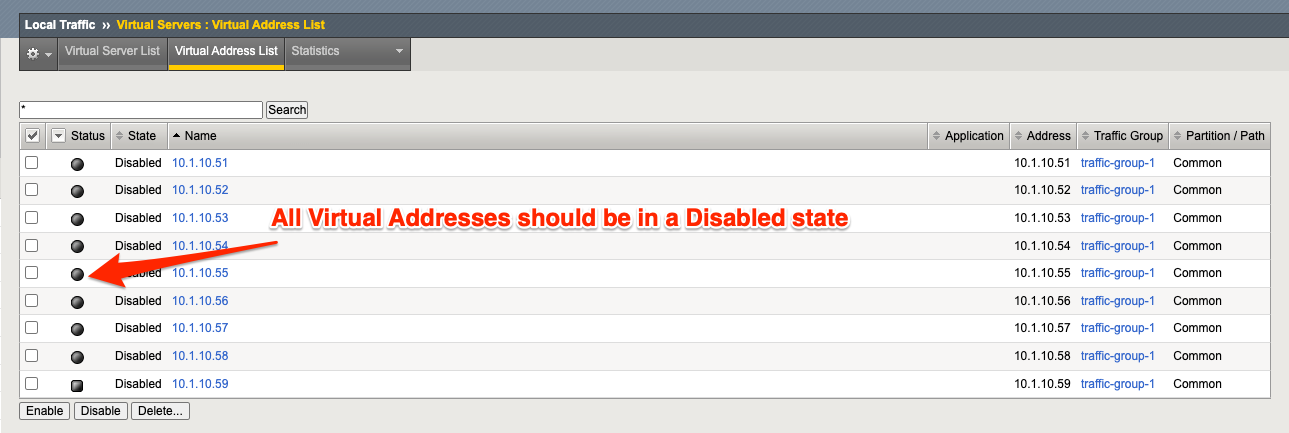
All Virtual Addresses should now show in the Disabled state.
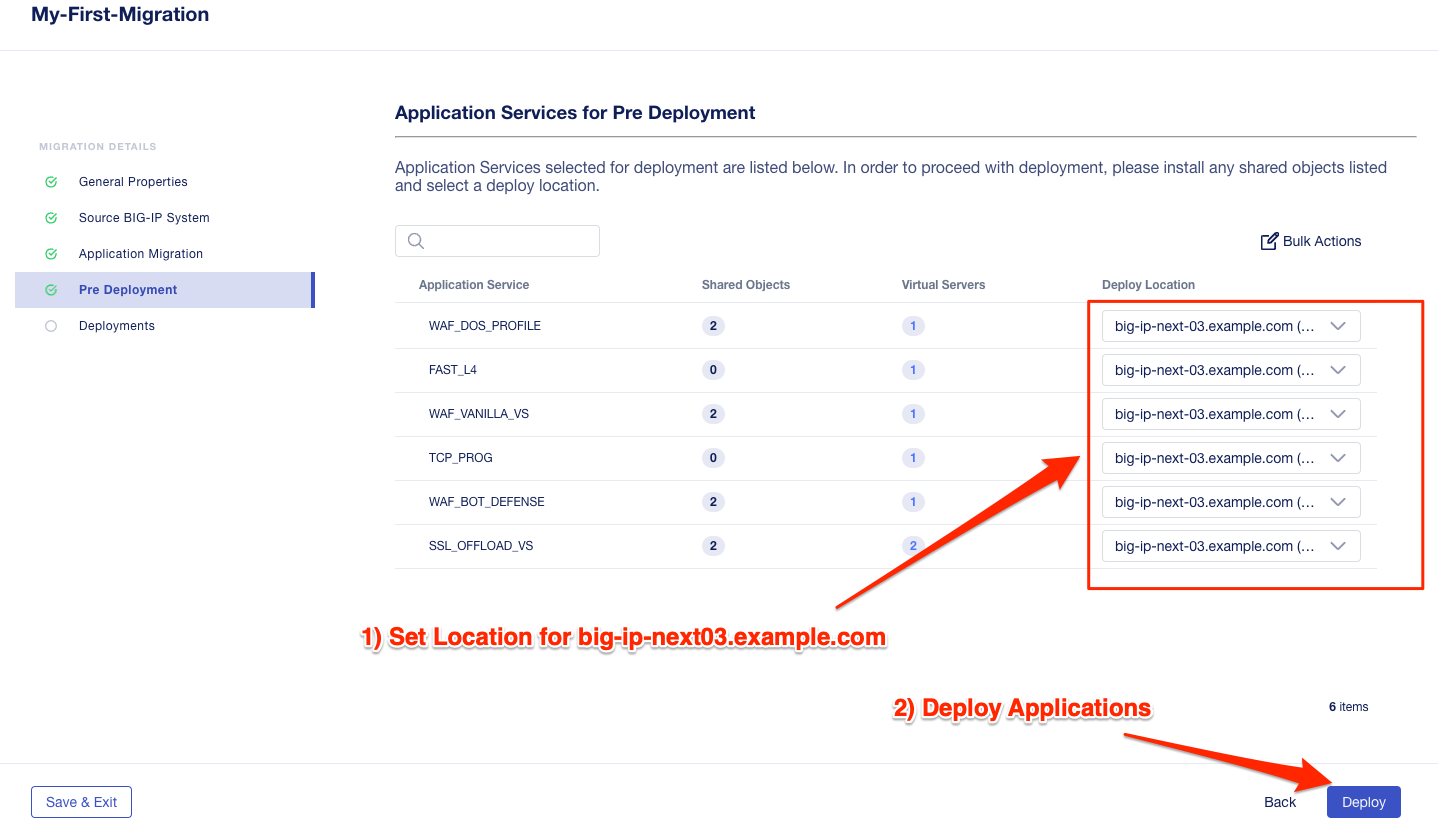
You can re-run the curl commands on the Windows jumphost to ensure the virtual addresses are unresponsive. Go back to the Central Manager pre-migration screen. For now, we will set all Locations for the green applications to big-ip-next-03-f5demo.com.
Click Deploy.
You can monitor the status of the applications as they are migrated.
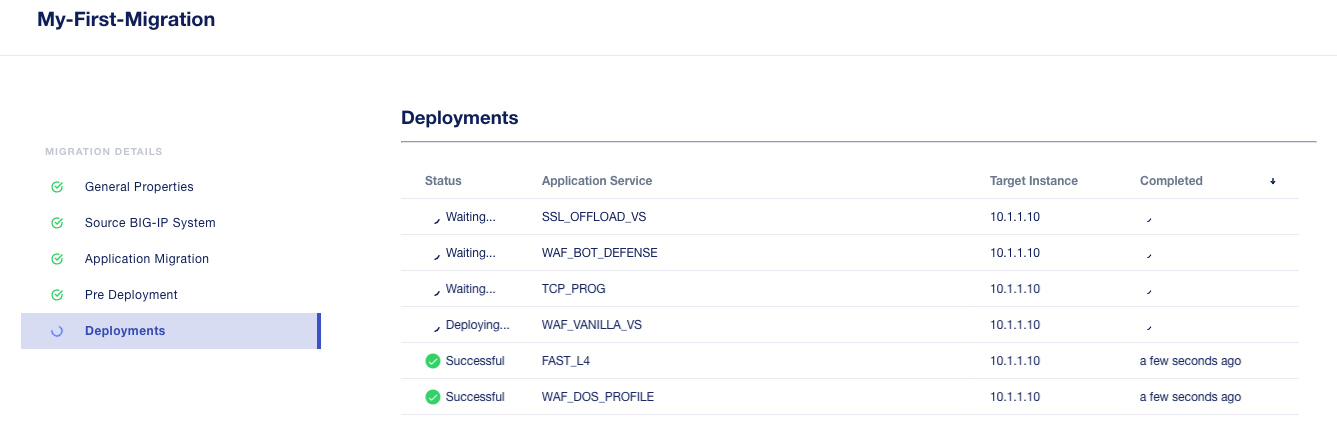
After a bit of time the migration of the applications to BIG-IP Next should complete.
You have now migrated your green applications to BIG-IP Next!
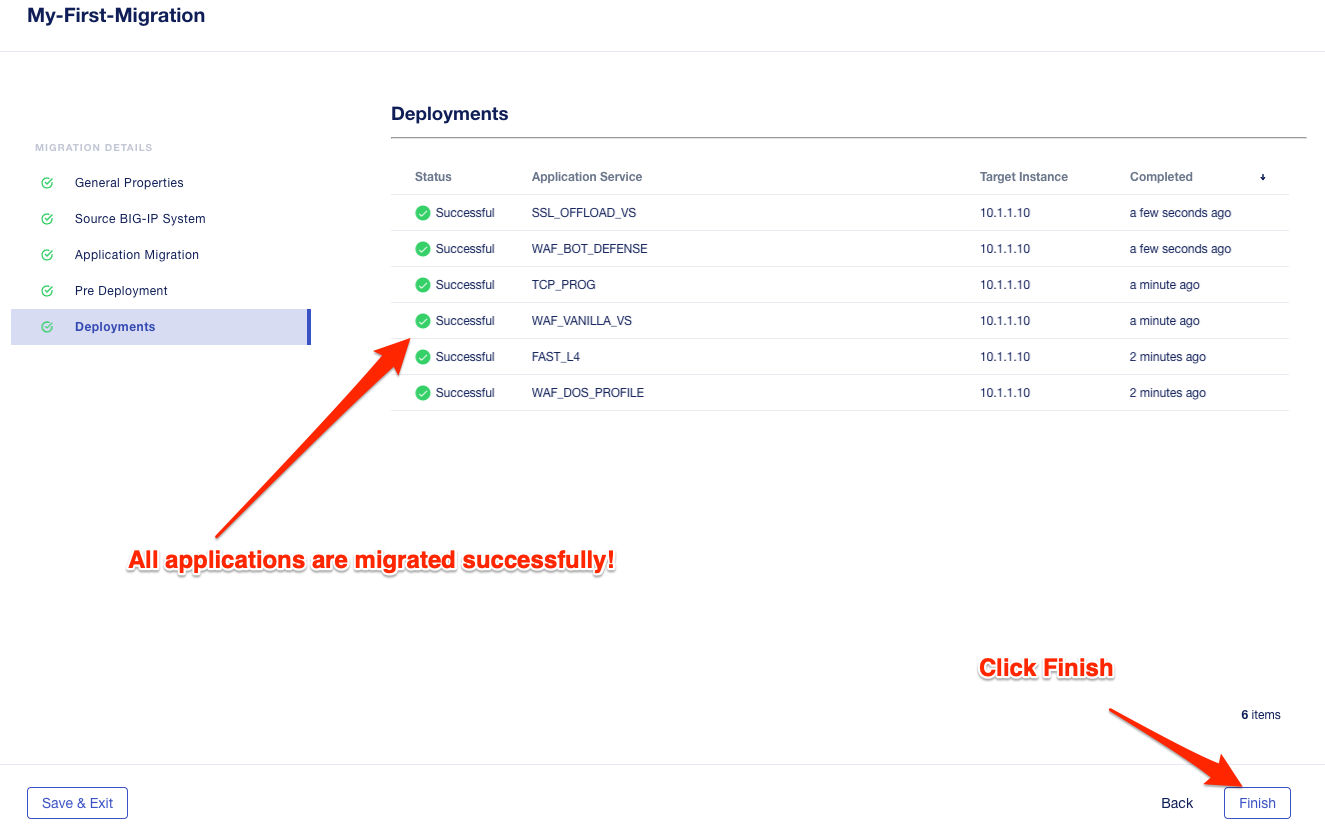
Click the Finish button.
If you have issues connecting to a virtual address or pinging a virtual address after migrating to BIG-IP Next, there is likely an ARP issue on the Windows host in the UDF environment. To address this issue, you’ll need to clear the ARP cache on the Windows host and then try to reconnect. To clear the ARP cache, you’ll need to go to the Search bar on the Windows host and type cmd. You’ll then see the Command Prompt, right-click on Command Prompt and Select Run as Administrator. When the cmd window opens, run the command arp -d to clear the ARP cache.

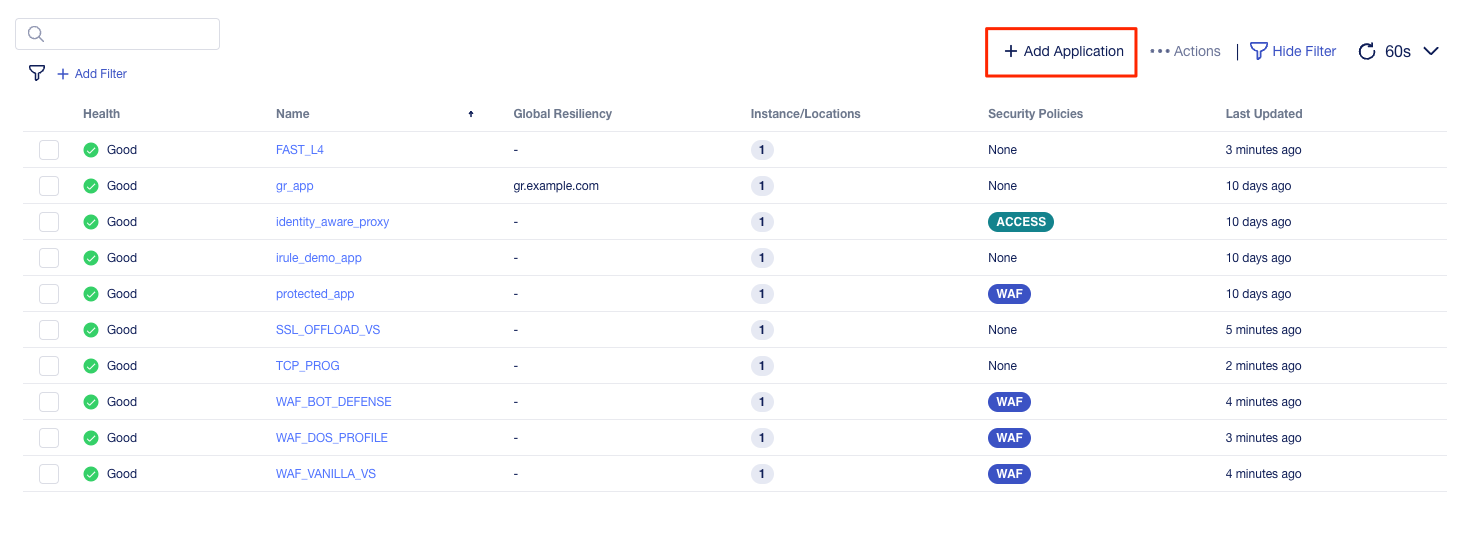
To verify the applications migrated successfully, go back to the Windows jumphost and re-run the curl commands to ensure the applications are live again, but only for the green applications that have just migrated.
- FAST_L4
curl 10.1.10.51 -I
- TCP_PROG
curl 10.1.10.52:8080 -I
- SSL_OFFLOAD_VS
curl 10.1.10.53 -I
- WAF_BOT_DEFENSE
curl https://10.1.10.55 -k -I
- WAF_DOS_PROFILE
curl https://10.1.10.56 -k -I
- WAF_VANILLA
curl https://10.1.10.58 -k -I
Next, you’ll go back to the saved migration and move some additional applications.
Click the Add Applications button on the Applications Summary screen.
Then, select the Resume Migration option to go back into the migration you saved previously.
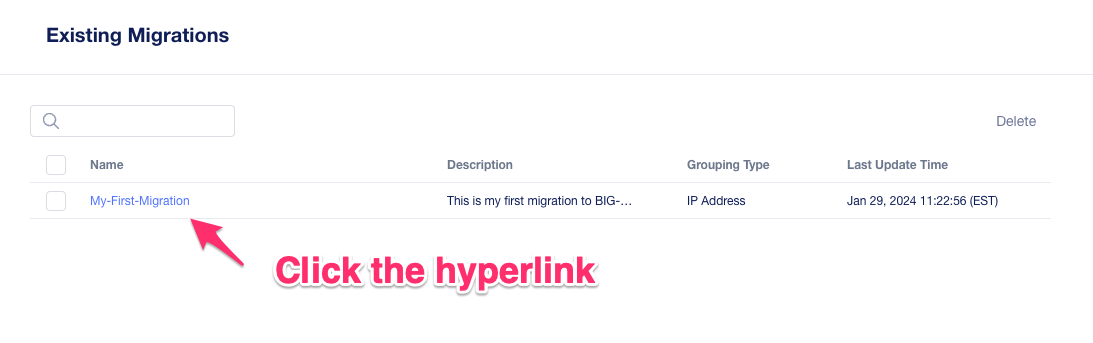
Click on the UCS Name hyperlink to open the migration back up. Here, you will see the list of applications that have already migrated from this saved session.
Click the Back button to see the remaining applications.
Select Add to see all the apps.
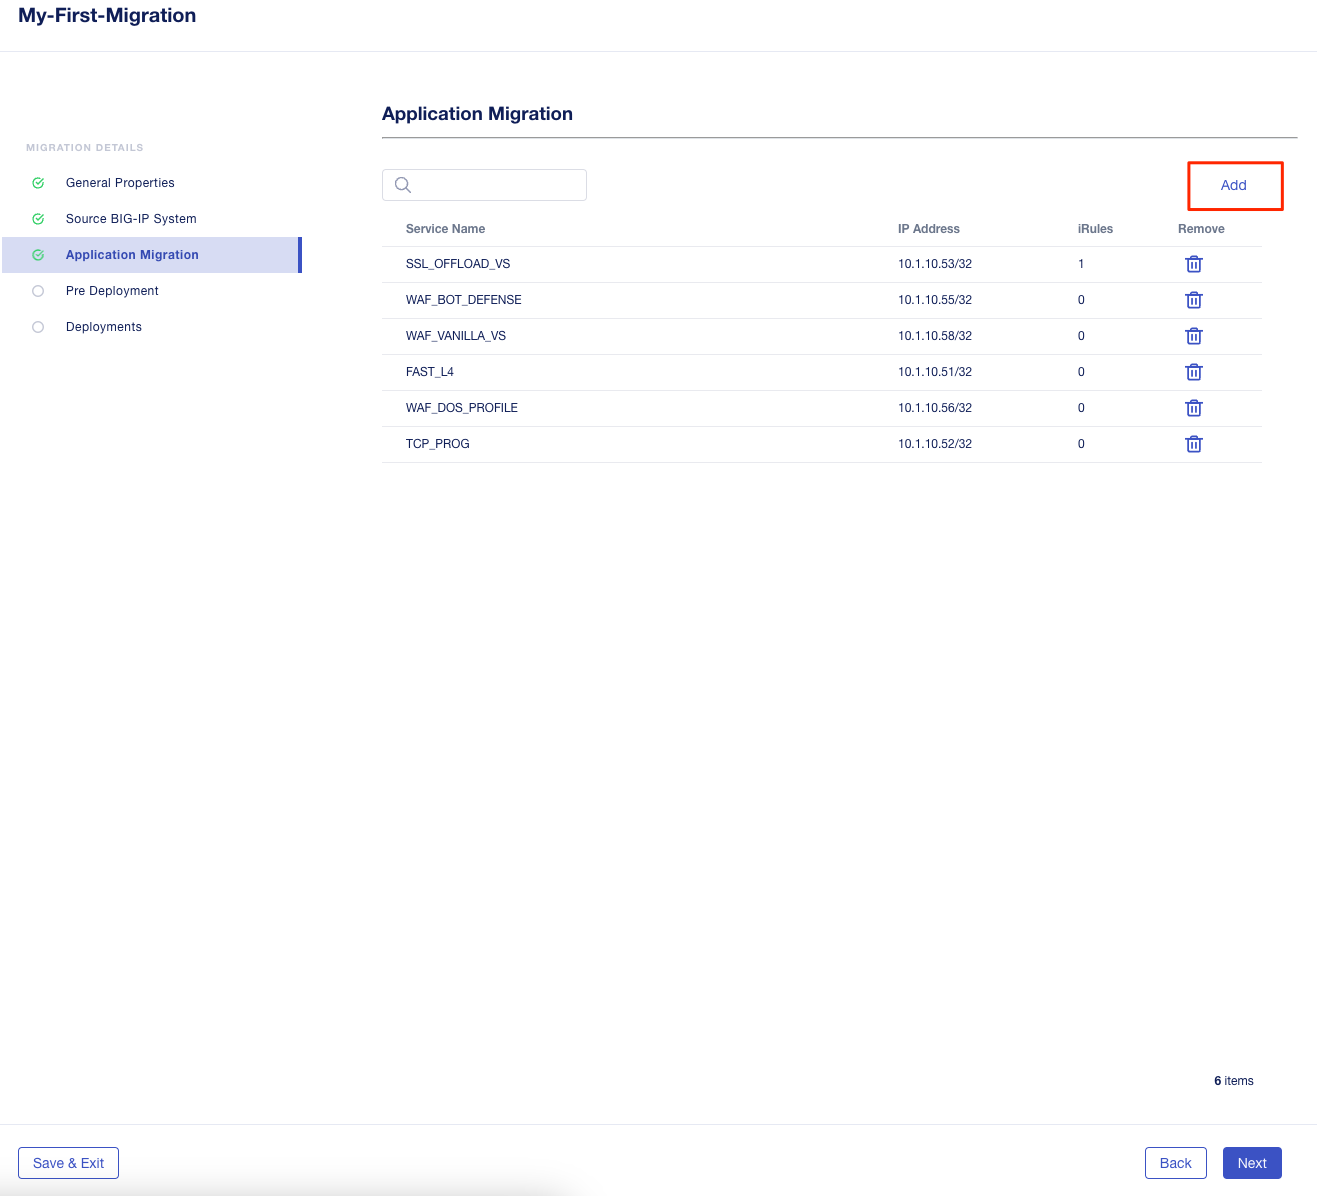
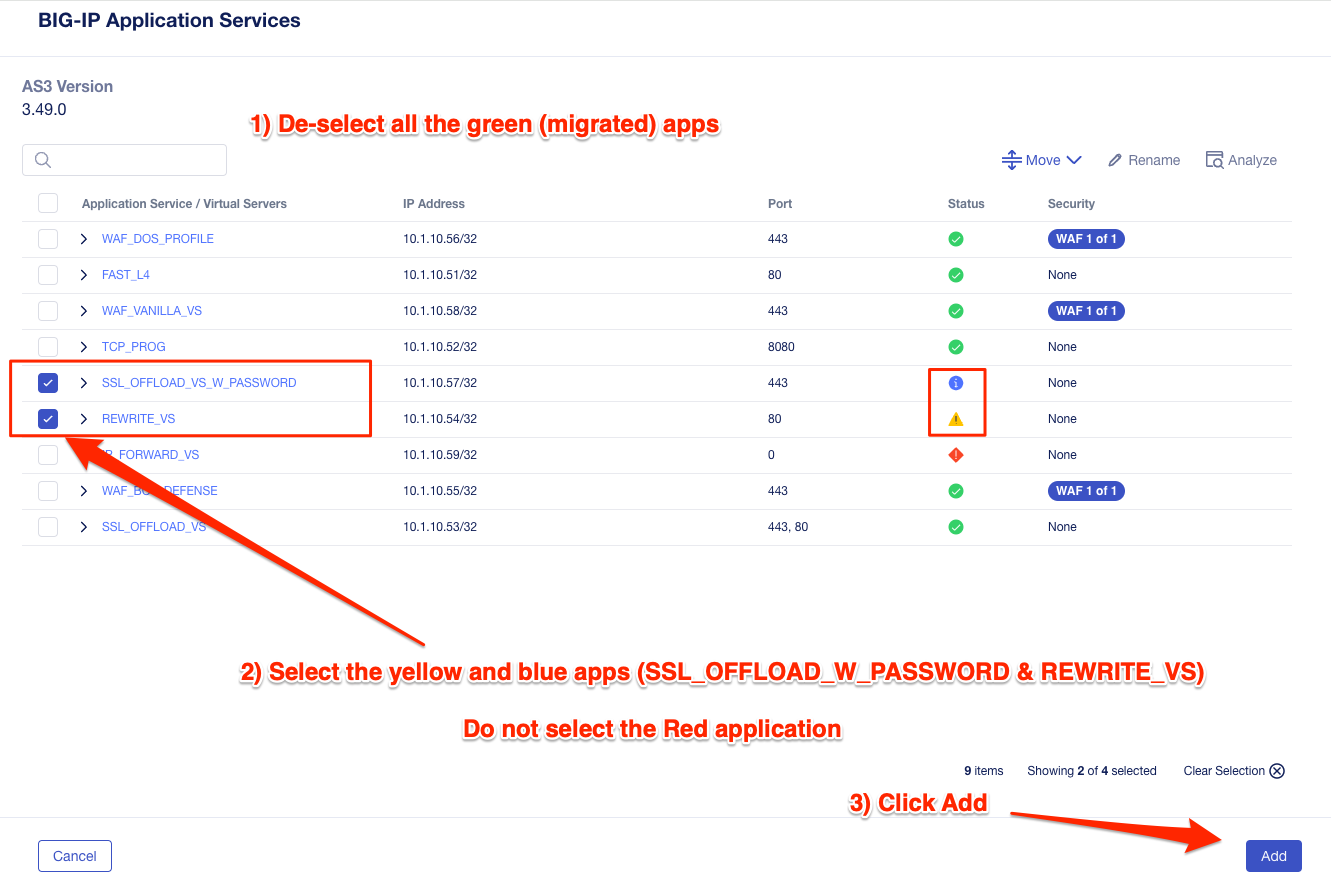
Next you will stage a draft migration and demonstrate the capability of editing the configuration before migrating. Deselect all the green apps that have migrated to BIG-IP Next already, then select the blue and yellow status applications (SSL_OFFLOAD_W_PASSWORD and the REWRITE_VS).
Click Add.
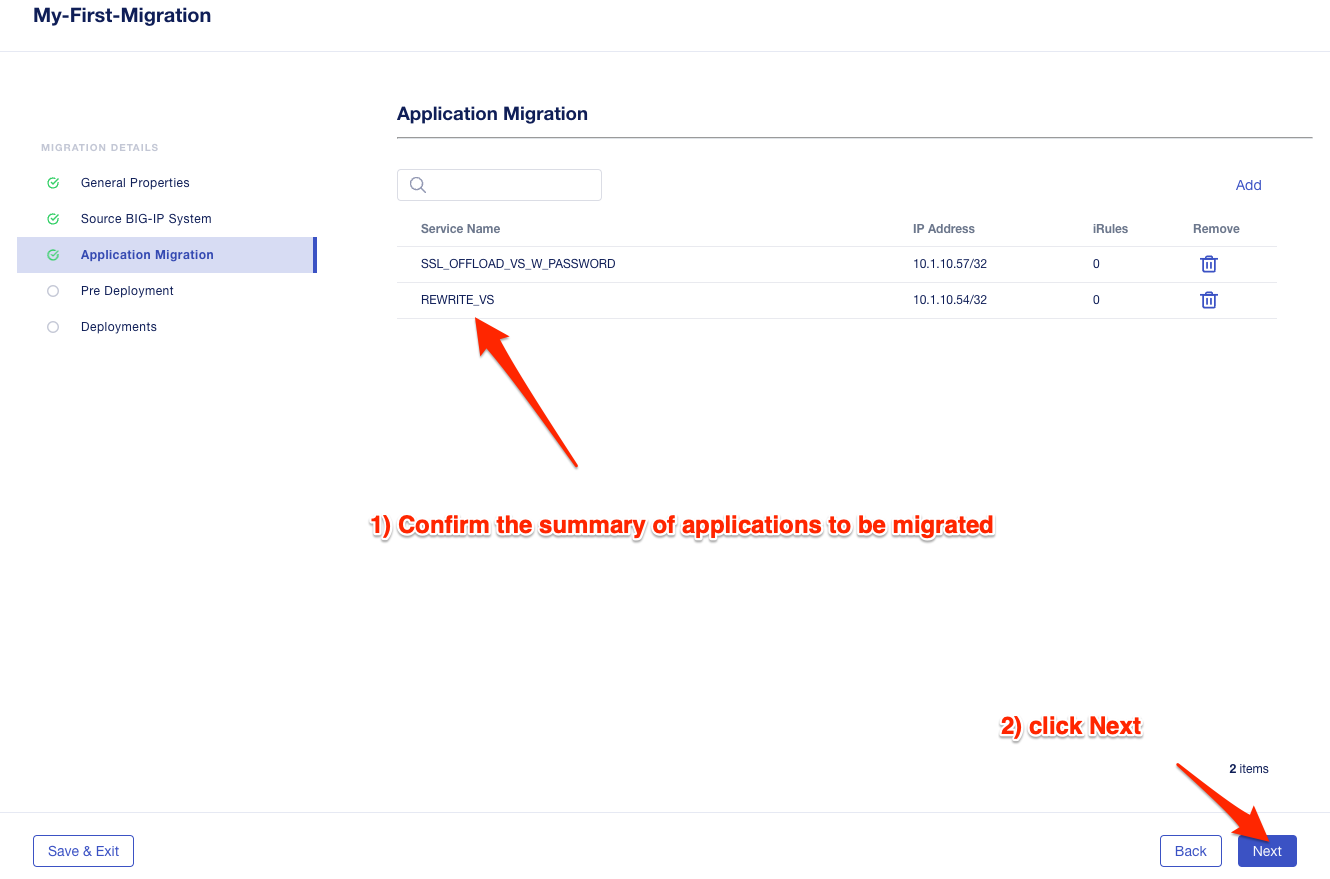
Confirm the summary of applications, then click Next.
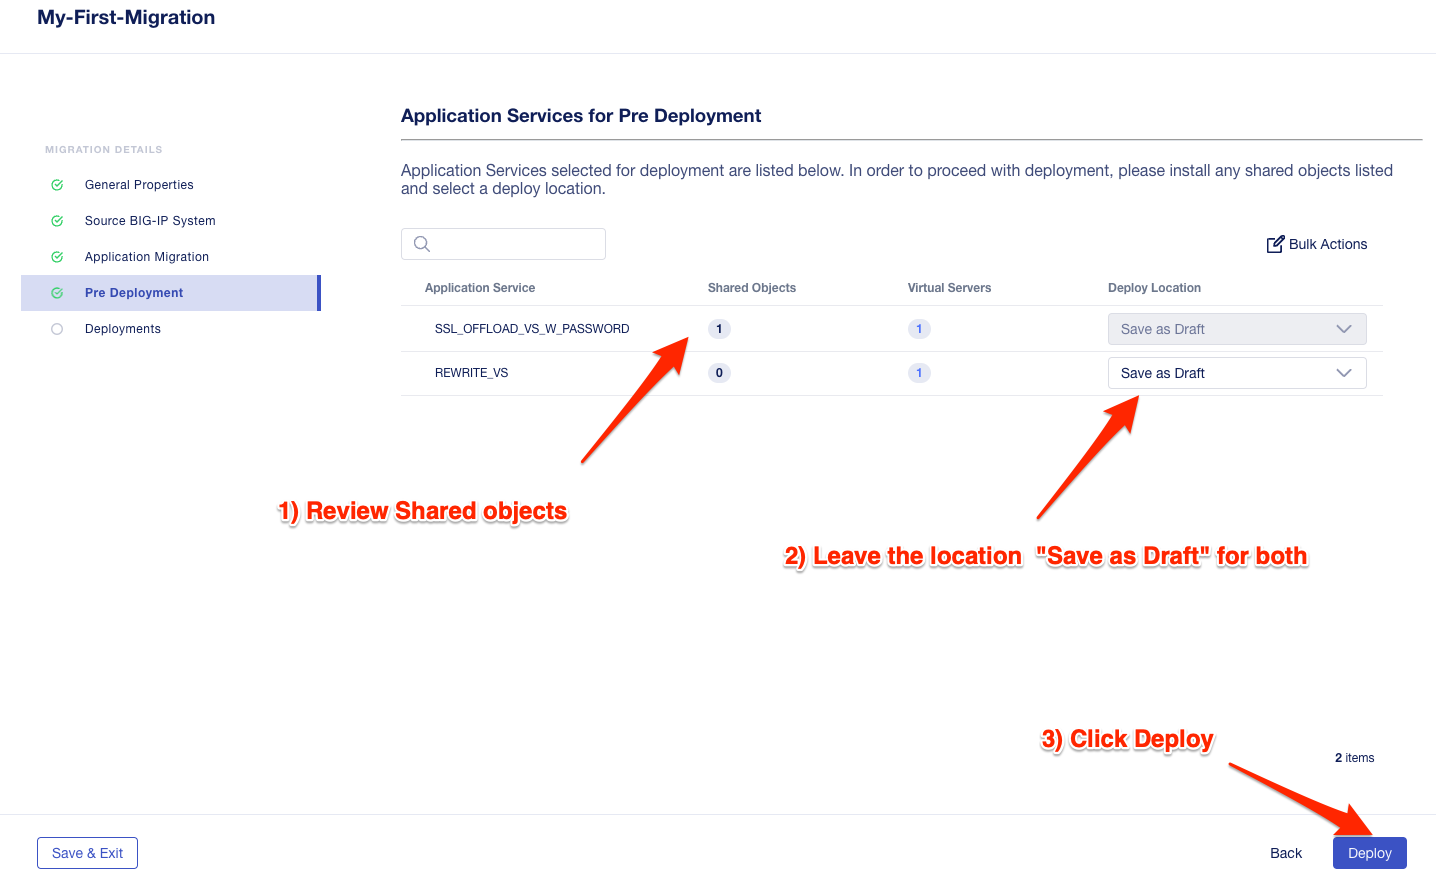
Review the shared objects either already imported or that need to be imported by clicking on the number under the Shared Objects column.
Leave all Locations as Save as Draft, meaning they will be staged so that changes can be made, but not actually migrated yet.
Click Deploy to stage the draft changes.
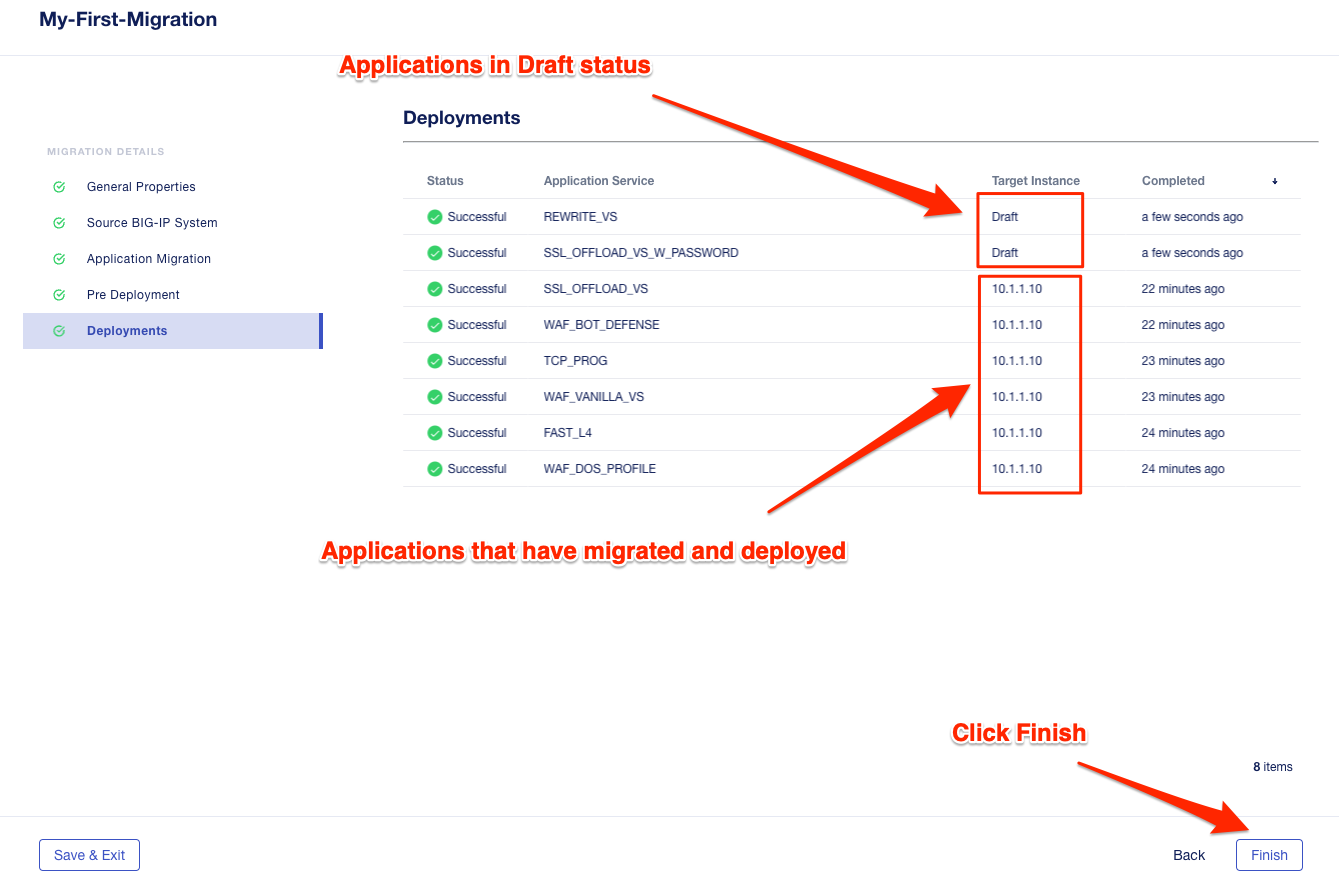
You can monitor the status of the save as draft migrations.
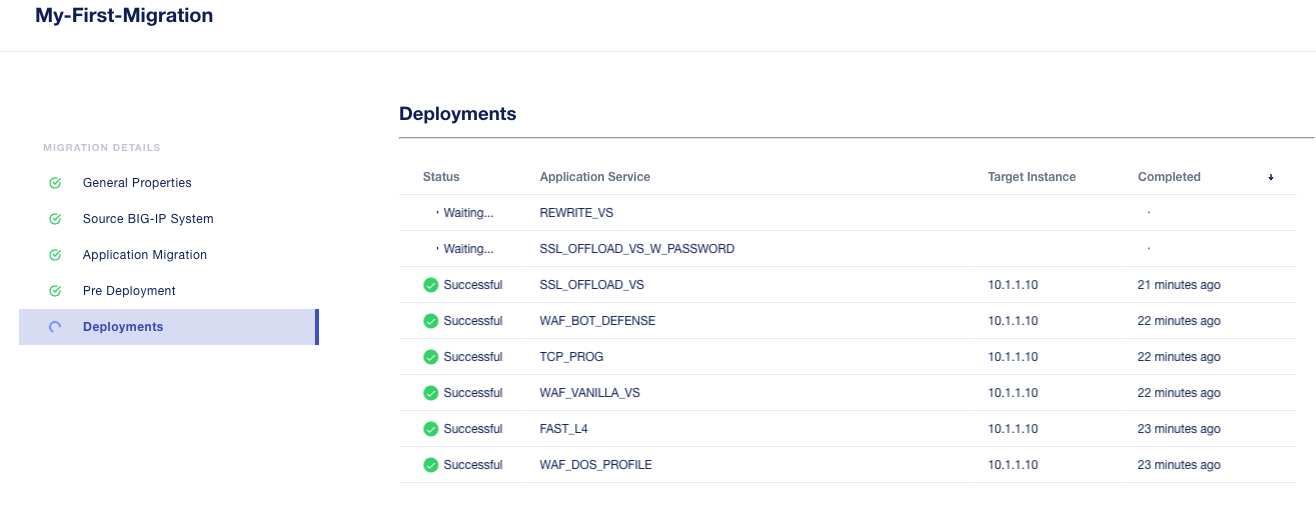
Here, you can see the apps that are in Draft status as well as the applications that have been successfully migrated.
Select Finish.
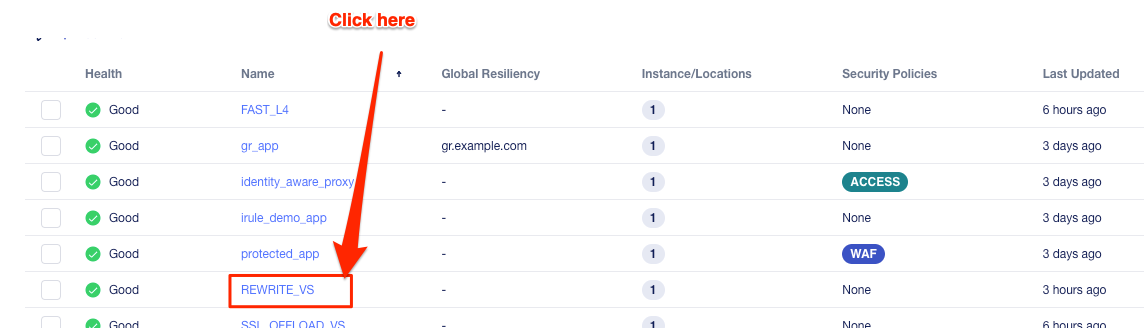
On the application dashboard you will now see both the migrated and Draft applications.
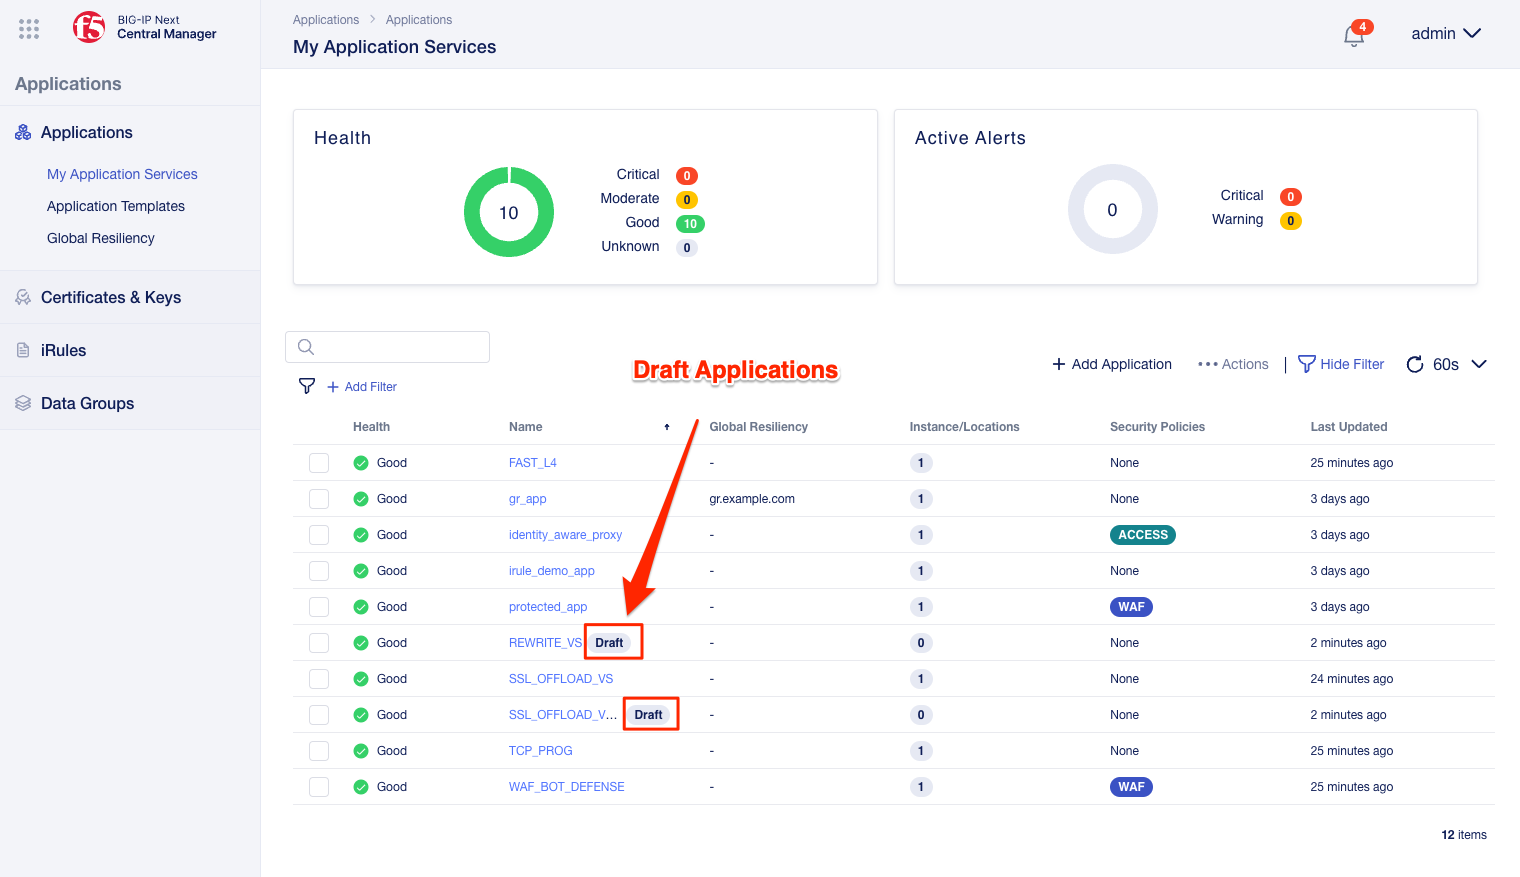
Click on the Draft application REWRITE_VS application.

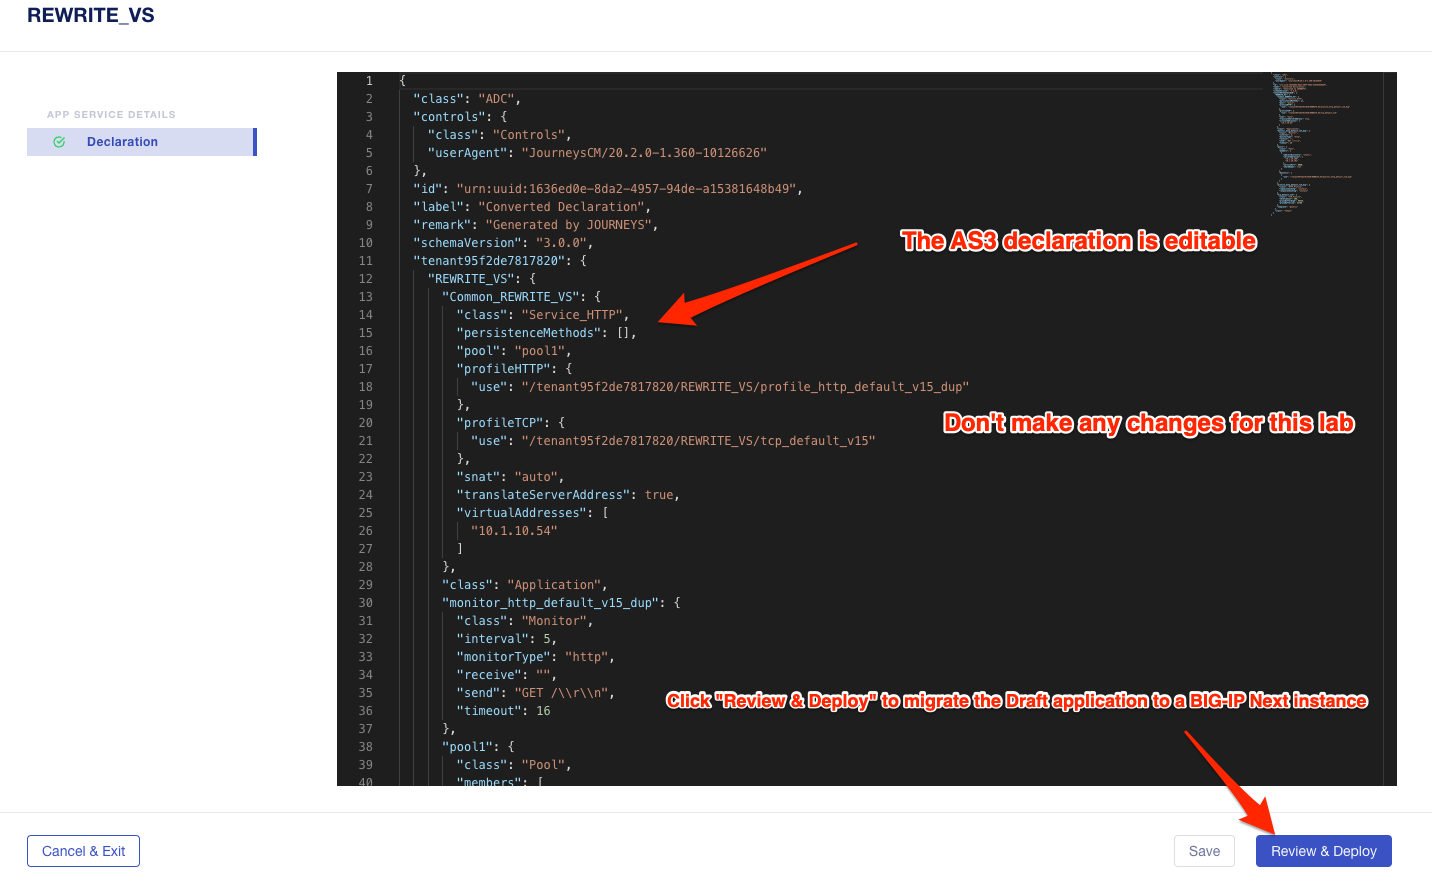
This will bring up the AS3 Declaration that is used to migrate the application.
Note that here you can review the configuration that will be deployed to BIG-IP Next, and you could also make edits (don’t do that now). As an example, maybe you want to change the Virtual server address before migrating, which could be done here if needed.
For now, just review the application, take note of the virtual server address, and then click the Review and Deploy button.
On the next screen click Start Adding, and then select big-ip-next-03.example.com then click Add to List.. Then click Deploy.

The REWRITE_VS application should now show up in the application dashboard, and will no longer be in Draft status.

Now test that the REWRITE_VS application has been migrated over to BIG-IP Next. You can either utilize the Windows jumphost and open a Chrome browser window, then enter in the following links to ensure you reach the back-end application.
- REWRITE_VS
curl 10.1.10.54 -I
Or, if you are unable to run RDP, you can use the built-in HMTL-based RDP client, Guacamole, in UDF. Go to the main UDF page, and select the Access dropdown under the Ubuntu Jumphost. Then Select Guacamole as seen below. Login with the same credentials previously used, and select the Windows Jumphost.
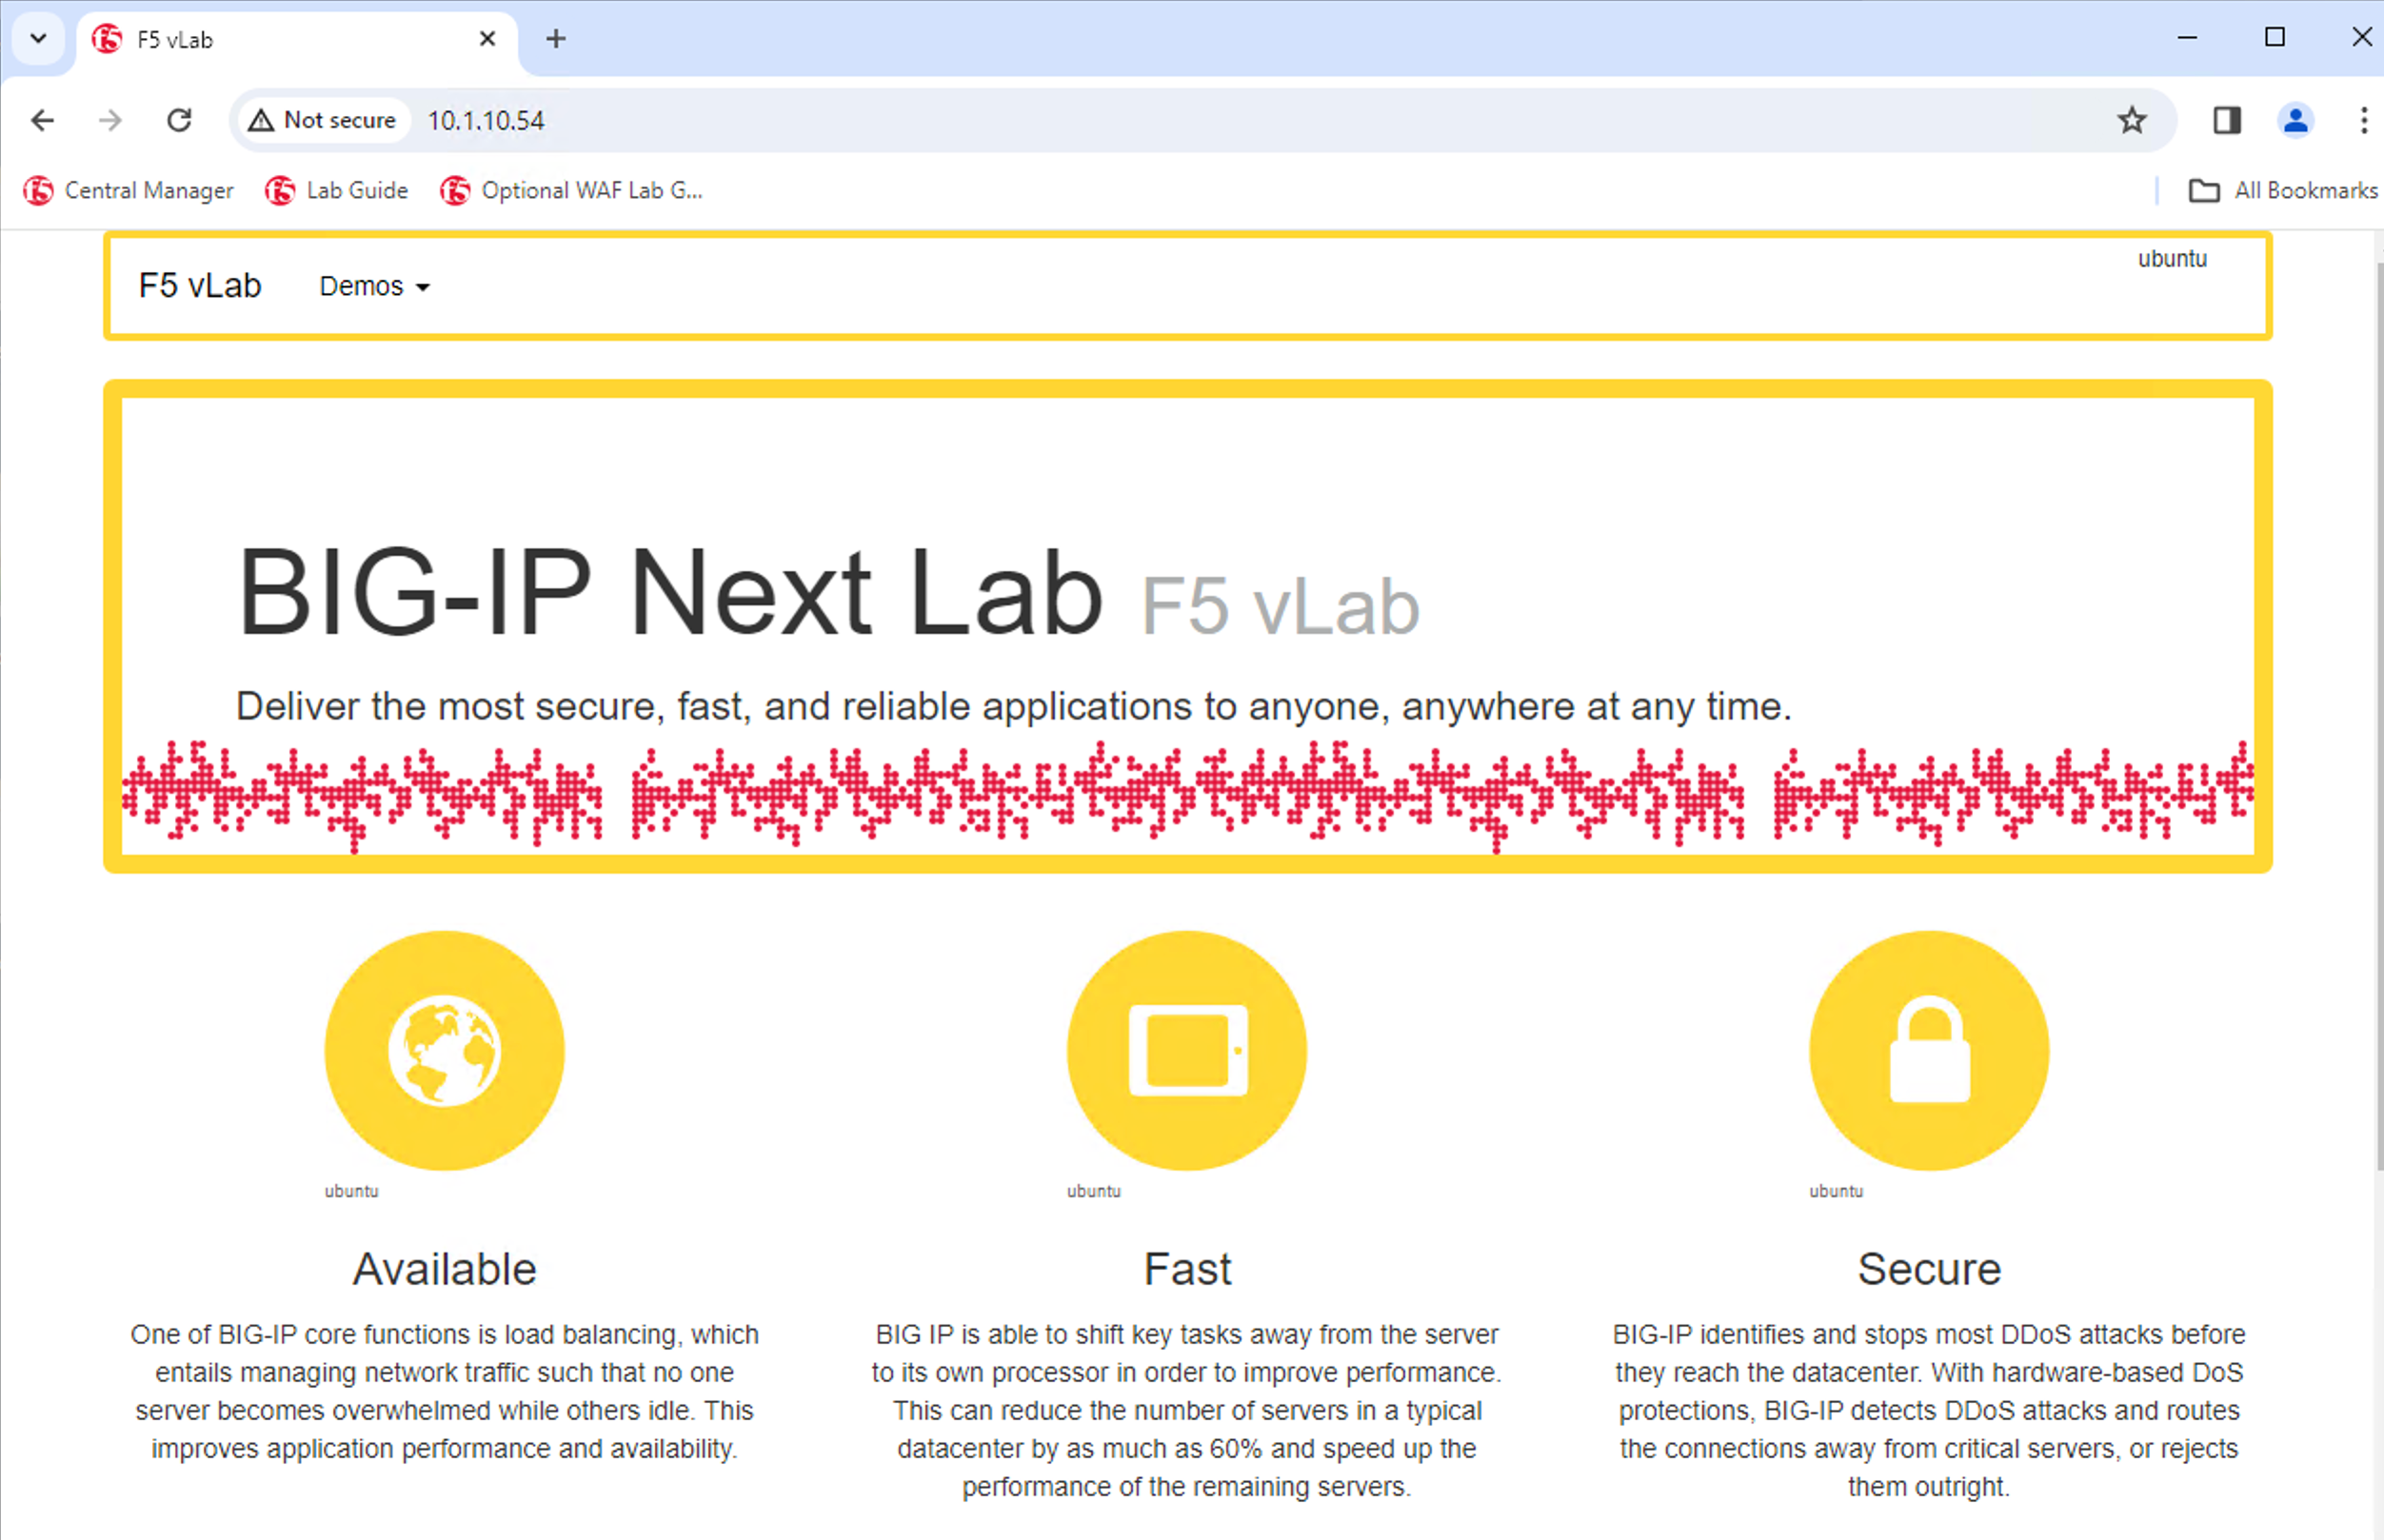
From here you can open a Chrome browser window and enter in the following links to ensure reachability to the back-end application.
- REWRITE_VS
curl 10.1.10.54 -I
After connecting you should see the Next Lab page in the browser indicating successful connection to the app, and a successful migration of the REWRITE_VS apps to BIG-IP Next. Because this app was yellow, the objects highlighted in the initial analyzer will be removed as part of the migration.
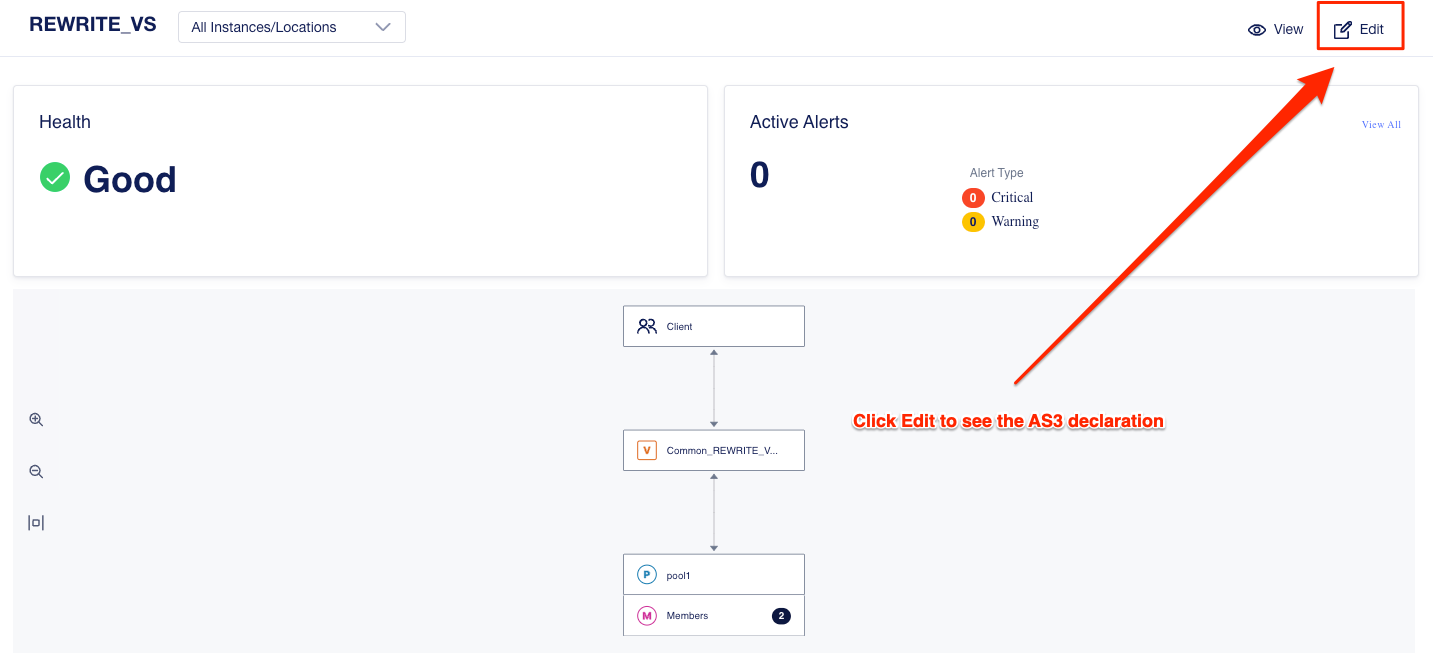
The REWRITE_VS application was flagged as yellow because the rewrite polices are not currently supported in BIG-IP Next. Click on this application to review the AS3 declaration, and notice the application will be deployed without the rewrite policies in the current release.
Click on Edit to see the AS3 declaration.
Click on Cancel & Exit and then Exit to get back to the main applications screen.
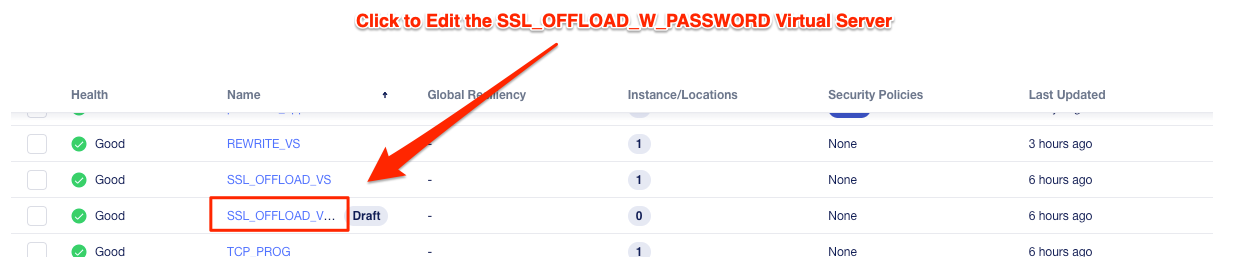
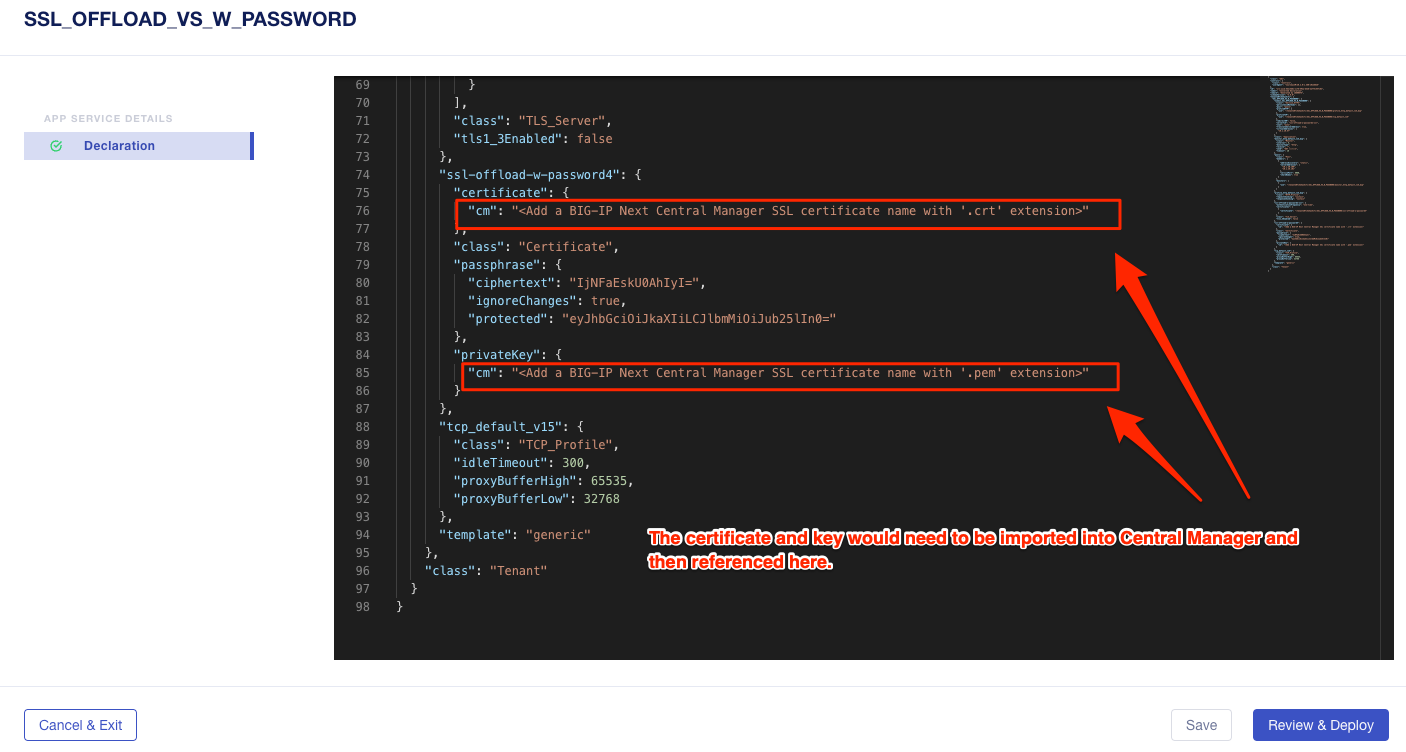
Lastly, click on the SSL_OFFLOAD_W_PASSWORD Draft application and review the AS3 declaration.
Note that the certs and keys that are password-protected are not currently migrated automatically. You would need to add those certs and keys into Central Manager manually, and then reference them here as part of the AS3 declaration.
This completes the migration lab.