Deploy F5 Insight Services on OpenStack Instance
Contents
- Overview
- Prerequisites
- Architecture overview
- Download the F5 Insight qcow2 image
- Launch the OpenStack instance
- Initial instance configuration
- Access F5 Insight Services
- Post-installation configuration and licensing
- Configure AI provider API keys
- Add BIG-IP devices to F5 Insight
- Configure BIG-IP for additional application telemetry
This guide walks you through the process of creating and deploying an F5 Insight Services instance from a qcow2 image on an OpenStack platform.
Overview
F5 Insight Services is a comprehensive monitoring and analytics platform designed specifically for F5 BIG-IP devices. It delivers powerful capabilities to help you manage and optimize your infrastructure:
Benefits and key features
- Real-time device monitoring - Continuously monitors F5 BIG-IP devices at configurable intervals.
- AI-powered insights - Uses artificial intelligence to analyze metrics and provide intelligent recommendations.
- Advanced data pipeline - Built on OpenTelemetry with Prometheus for metrics collection and ClickHouse for high-performance data storage.
- Modern UI - Features a React-based dashboard with customizable visualizations.
- External Grafana integration - Integrates with external Grafana instances for advanced dashboards and analytics.
By following this guide, you deploy F5 Insight as an instance on your OpenStack infrastructure using the pre-built qcow2 image. This gives you immediate access to monitoring and analytics capabilities for your F5 BIG-IP environment.
Prerequisites
Before you begin, confirm the following requirements are in place.
OpenStack environment specifications
Configure the instance with these minimum resources:
| Resource | Minimum specification | Sizing / planning notes |
|---|---|---|
| CPU | 12 vCPUs | 8 vCPUs are dedicated to analytics and data processing workloads. An additional 4 vCPUs are allocated for BIG-IP management functions such as upgrades, patching, and maintenance. |
| CPU scalability | +6 vCPUs per additional 50 BIG-IP instances | The base 12 vCPU allocation supports approximately 50 BIG-IP instances. Add 6 vCPUs for every additional 50 BIG-IP instances to maintain analytics and management performance. |
| Memory | 16 GB RAM | Standard minimum memory requirement for F5 Insight deployment and operation. |
| Memory scalability | +4 GB RAM per additional 50 BIG-IP instances | The base 16 GB RAM allocation supports approximately 50 BIG-IP instances. Add 4 GB RAM for every additional 50 BIG-IP instances to accommodate increased analytics workload and data processing requirements. |
| Disk storage | 650 GB total | Includes 500 GB for the initial F5 Insight installation and 150 GB for the operating system, upgrades, and updates. |
| Storage scalability | +500 GB per additional 50 BIG-IP instances | The initial 500 GB allocation supports approximately 50 BIG-IP instances. Plan for an additional 500 GB of storage capacity for every subsequent group of 50 BIG-IP instances. |
Network and connectivity requirements
Make sure the following network connectivity is in place:
| Category | Requirement / Rule | Direction |
|---|---|---|
| External access | Connectivity from F5 Insight to product.apis.f5.com:443 for “connected” license activation and updates (optional if using disconnected mode licensing).
See Licensing and entitlement for disconnected mode licensing for environments that do not allow outbound internet access. |
Outbound |
| External access | Connectivity from F5 Insight to us.edge.df.f5.com:443 for F5 AI Data Fabric (AIDF) (optional). |
Outbound |
| External access | Connectivity from F5 Insight to an OpenAI-compatible or Anthropic server for large language model (LLM) insights (optional). | Outbound |
| Internal access | Connectivity from F5 Insight to BIG-IP devices. | Outbound |
| Internal access | Connectivity from F5 Insight to an OpenAI-compatible server for LLM insights (optional). | Outbound |
| Firewall (SSH) | Port 22 | Inbound to F5 Insight |
| Firewall (HTTPS) | Port 443 | Inbound to F5 Insight |
| Firewall (management) | Port 443 | Outbound to BIG-IP management port |
Access requirements
- Valid my.f5.com credentials
- Admin credentials for your BIG-IP device
Architecture overview
F5 Insight operates as a collection of containerized microservices orchestrated by K3s, a lightweight Kubernetes distribution designed for resource-efficient deployments.
Key components
Kubernetes platform:
- K3s - Lightweight Kubernetes distribution (automatically installed).
- Helm - Package manager for Kubernetes (pre-installed).
Application services:
- Container images - All service images are pre-loaded during image build.
- Persistent storage - F5 Insight stores data in persistent storage.
Download the F5 Insight qcow2 image
Log in to my.f5.com with your credentials.
At the bottom of the page, download f5insight-<version>.qcow2.
Launch the OpenStack instance
Using the OpenStack Horizon GUI
Open the Horizon dashboard:
Navigate to your OpenStack Horizon URL:
https://<your-openstack-hostname>/project/instances/
Import the qcow2 image in Horizon:
Reference: Create and manage images in Horizon
- In Horizon, open the project where you plan to launch the instance.
- Go to .
- Select Create Image
- Complete the image fields:
- Name: for example,
f5-insight-<version> - Description: optional
- Image Source:
Image File - Image File: select the downloaded
f5insight-<version>.qcow2 - Format:
QCOW2 - QEMU Emulator - Architecture:
x86_64 - Minimum Disk (GB) and Minimum RAM (MB): We recommend 650 GB and 16384 MB respectively, but you can adjust based on your needs.
- Public: select only if the image should be shared across projects
- Protected: optional, prevents accidental image deletion
- Name: for example,
- Select Create Image.
- Wait until image status changes from
QueuedtoActivebefore launching the instance.
Launch a new instance:
- Navigate to .
- Select Launch Instance
- Enter an instance name (for example,
f5-insight-01). - Select Next.
Specify the disk image:
- Select Boot Source as
Image. - Search for your
f5insight-<version>. - Select the Image.
- Select Next.
- Select Boot Source as
Configure CPU and memory:
Select a flavor that meets the minimum requirements (for example, 12 vCPUs, 16 GB RAM, 650 GB disk).
Select Next.

Configure Network:
- Configure your settings
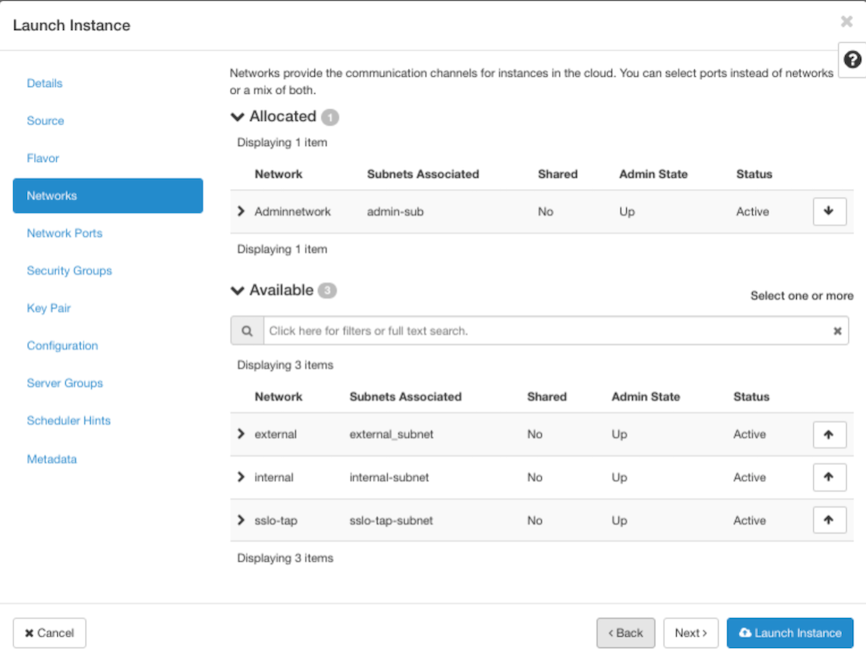
Add Cloud-Init:
Note
Cloud-init is optional. If you don’t plan to provide credentials through cloud-init, skip this step and select Next. After first boot, follow Get started to log in with the console-generated one-time password, then return here and continue from Post-installation configuration and licensing.
Only skip cloud-init if you have console access to the VM (not SSH). If you don’t have console access, you must use cloud-init to provision credentials.
Select Configuration.
Input the Cloud-Init. For example, the following config sets an initial admin password.
Do not remove
#cloud-configfrom the Cloud-Init file.Select Next.
#cloud-config

users:
- name: admin
   lock_passwd: false
   shell: /bin/bash
chpasswd:
   expire: true
   users:
   - name: admin
      # in this example the user would be required to change password after first login
      # this is a different example than the 1.0.0 Insight release
      # password requirements: https://clouddocs.f5.com/products/insight/latest/get_started/get_started.html#password-requirements
      password: "F5ChangeM3"
      type: text

Important
Change this password immediately after first login. Don’t use this example password in production environments.
Launch the instance:
- Select Launch Instance.
The VM starts and boots into F5 Insight
Initial instance configuration
Wait for first boot to complete.
The F5 Insight instance runs an automated first-boot setup script that:
- Initializes the K3s cluster.
- Deploys all services through Helm.
- Configures persistent storage.
- Sets up secrets and certificates.
This process takes approximately five to 10 minutes.
Monitor the first boot progress:
# SSH into the instance (use the IP address shown in Horizon instance details)
ssh admin@<INSTANCE_IP>

# Watch the first boot logs
sudo tail -f /opt/f5insight/logs/f5insight-startup.log

# Check systemd service status
sudo systemctl status f5insight-first-boot.service

# When complete, you should see:
# f5insight-first-boot.service - F5 Insight First Boot Setup
# Loaded: loaded (/etc/systemd/system/f5insight-first-boot.service; enabled)
# Active: inactive (dead) since ...
Note
You can find the instance IP address from the OpenStack Horizon instance details page ( → select the instance name) or from the instance console after boot.
Verify services are running.
# Check K3s status
sudo systemctl status k3s

# Check all pods in f5-insight namespace
sudo kubectl get pods -n f5-insight

# Expected output (all pods should be Running or Completed):
# admin@f5-insight-xx:~$ sudo kubectl get pods -n f5-insight
# NAME                              READY   STATUS      RESTARTS   AGE
# backend-xxxx                      2/2     Running     0          45s
# cacher-xxxx                       2/2     Running     0          45s
# clickhouse-0                      2/2     Running     0          44s
# f5-insight-node-exporter-xxxx     2/2     Running     0          45s
# f5-insight-postgres-0             2/2     Running     0          44s
# f5-insight-postgres-init-xxxx     0/1     Completed   0          44s
# f5-insight-vault-0                3/3     Running     0          44s
# frontend-xxxx                     2/2     Running     0          45s
# otel-collector-xxxx               2/2     Running     0          45s
# system-manager-xxxx               2/2     Running     0          45s
# victoriametrics-0                 2/2     Running     0          44s
# vmagent-xxxx                      2/2     Running     0          45s
# vmalert-xxxx                      2/2     Running     0          45s

# Check services
sudo kubectl get svc -n f5-insight
Verify network connectivity.
# Test external connectivity
curl -I https://www.google.com

# Check if the instance can reach your BIG-IP devices
ping <BIGIP_IP_ADDRESS>
telnet <BIGIP_IP_ADDRESS> 443
Access F5 Insight Services
Once the instance is fully initialized, you can access the following services.
Web interface
| Service | URL | Default credentials |
|---|---|---|
| F5 Insight UI | https://<INSTANCE_IP> |
Credentials provisioned through cloud-init |
First-time access
- Open the F5 Insight UI:
https://<INSTANCE_IP>:443 - Log in with the credentials you configured in cloud-init.
Post-installation configuration and licensing
- Log in to F5 Insight at
https://<INSTANCE_IP>:443with your credentials. - Once you log in, select Get Started
- Input JWT and select Validate & Activate License
Configure AI provider API keys
Select your large language model (LLM) provider, enter the corresponding credentials, and select Save & Continue.
Enter your F5 AI Data Fabric (AIDF) credentials. You can get the credentials from your account team.
Note
If AIDF is not yet available for your deployment, select Skip for Now.
Add BIG-IP devices to F5 Insight
After you select Skip for Now, you will see a page to start fresh or import configuration from an existing Application Study Tool instance.
If you choose Start Fresh, you can add a certificate authority (CA), add devices through YAML, or add individual devices manually. You must also choose which module or data type you want to populate.
Note
We recommend using a CA when adding devices, but that configuration is optional.
Note
Organize your BIG-IP devices by datacenter. Tagging devices to a specific datacenter is important for timely alerts, cross-comparison of performance, and other features.
Add devices through YAML
If you choose to go the YAML route, paste the following configuration.
After you add your devices, select Finish to proceed to the F5 Insight homepage.
Configure BIG-IP for additional application telemetry
F5 Insight OTEL Syslog receiver will be listening on 30514 port for SSLO logs / iRule Telemetry
On BIG-IP (through TMSH or GUI):