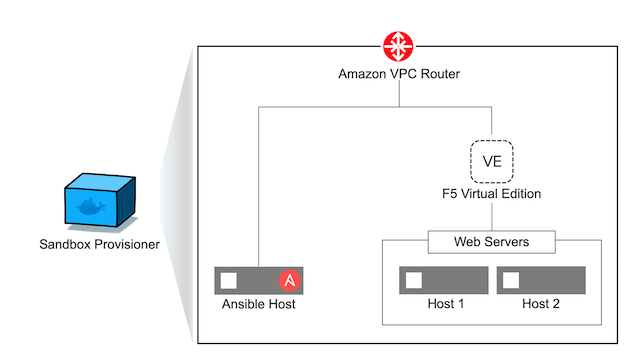
Ansible Provisioner
The Ansible/F5 provisioner is an opensource provisioning tool. It is a collection of Ansible playbooks packaged to build and tear down F5 and application infrastructure. It can also be used to scale the infrastructure as needed by the user.
The provisioner is made available as a Docker container to avoid environmental dependencies. In order to run the provisioner you will need the Docker Community Edition.
This version of the provisioner can be used to deploy the following components into AWS. To run the provisioner you will need - An account on AWS
F5 BIG-IP
Ansible node
2x Web servers
Installing the Provisioner
Clone the Repository
Clone the workshop repository on the docker_host. In our example we use /git/ as our directory.
cd /git/
git clone https://github.com/ansible/workshops.git
Install Docker
Using your local machine or a dedicated host, install Docker.
Elsewhere in these instructions we will refer to the machine with the docker installation as docker_host.
Create DockerFile and Build the Container
The docker build command builds an image from a Dockerfile. This image will be used to run the Ansible playbooks for the provisioner. From the directory containing the Dockerfile, we will run the build command.
Create a Directory to store your docker file. In our example we use /git/docker/ and VI as our editor.
cd /git/docker/
vi dockerfile
Insert the the code below in the dockerfile, save and exit.
FROM python:alpine
RUN set -ex \
   && apk --update add rpm openssh-client openssl ca-certificates wget \
   && apk --update add --virtual build-dependencies python3-dev libffi-dev openssl-dev cargo build-base \
   && pip3 install --upgrade pip pycrypto cffi \
   && pip3 install setuptools wheel \
   && pip3 install cryptography \
   && pip3 install ansible \
   && pip3 install jinja2 \
   && pip3 install netaddr \
   && pip3 install pbr \
   && pip3 install hvac \
   && pip3 install jmespath \
   && pip3 install ruamel.yaml \
   && pip3 install boto \
   && pip3 install boto3 \
   && pip3 install passlib \
   && pip3 install paramiko \
   && pip3 install urllib3 \
   && apk del build-dependencies \
   && rm -rf /var/cache/apk/* \
   && mkdir -p /etc/ansible \
   && echo 'localhost' > /etc/ansible/hosts

ENV ANSIBLE_GATHERING smart
ENV ANSIBLE_HOST_KEY_CHECKING false
ENV ANSIBLE_RETRY_FILES_ENABLED false
ENV ANSIBLE_ROLES_PATH /ansible/playbooks/roles
ENV ANSIBLE_SSH_PIPELINING True
ENV PYTHONPATH /ansible/lib
ENV PATH /ansible/bin:$PATH
ENV ANSIBLE_LIBRARY /ansible/library

WORKDIR /ansible/playbooks

ENTRYPOINT ["ansible-playbook"]
Build the Docker Container
First you must build the dockerfile into a docker container. Make sure you are in the directory where the docker file was created then run the command (this could take a few minutes to complete) Take note that the “period” (.) at the end of the command line is necessary to execute properly.
cd /git/docker/
docker build --no-cache -t "ansible_workshop:dockerfile" .
Assuming that the build was completed it should look something like this at the bottom of the code
Successfully built e1ce736ec3fd
Successfully tagged ansible_workshop:dockerfile
AWS Setup
Create an Amazon AWS account
Create an Access Key ID and Secret Access Key. Save the ID and key for later.
New to AWS and not sure what this step means? Click here
Make sure you have subscribed to the right marketplace AMI (Amazon Machine Image).
F5 BIG-IP Click here to subscribe
Setup the F5 Ansible environment
Now you can start to provision your application environment in AWS.
As we are using Ansible for provisioning the environment, you will need to configure a variable file ‘f5_vars.yml’, that will be used by the Ansible playbook. The variables in this file reflect your AWS environment.
Our preference is to create a f5_vars file outside of the github repository for future pulls/updates can be done without hiding the file also incase of forking the environment your variables are not captured and stored in the cloud. in our example we use /git/vars/ as the directory to store the ‘f5_vars.yml’ file and VI as our editor
cd /git/vars/
vi f5_vars.yml
Here is an example of our ‘f5_vars.yml’ file feel free to edit sections that are required
# Region (Change to your desired EC2 Region)
ec2_region: us-west-2

# Prefix (This is how the machines will be named and provides ease on identification in the AWS Console)
ec2_name_prefix: MyUsername-TESTWORKSHOP1

# Student total is how many labs you wish to create (Default is 1 - if changed it will deploy each VM (F5, Ansible, 2x Web Servers) by the amount of whatever this student number is)
student_total: 1

# Identifies F5 Workshop (DO NOT CHANGE)
workshop_type: f5

# Admin Passwords on All Machines including the F5 (It is recommended to still use a secure password with Upper/Lower/Special Characters/Numbers and is recommended that it shouldnt conform to any Password used in your working/home environment.
admin_password: Ansible123!

#These Variables We are uncertain of their use but are required to be called out during the provisioning of the Ansible Workshop
doubleup: no
dns_type: aws
workshop_dnz_zone: "myRoute3Domain.fqdn"
create_login_page: true
autolicense: false
towerinstall: false
ibm_community_grid: false
Run the Ansible playbook
To run this code for provisioning update the directories (provisioner and variables), AWS ID and KEY saved during the AWS Setup above. .. code:
cd /git/workshops/provisioner
docker run \
-e AWS_ACCESS_KEY_ID=ABCDEFGHIJKLMNOP \
-e AWS_SECRET_ACCESS_KEY=ABCDEFGHIJKLMNOP/ABCDEFGHIJKLMNOP \
-v $(pwd)/../provisioner:/ansible/playbooks \
-v /git/vars:/ansible/vars \
ansible_workshop:dockerfile provision_lab.yml -e @/ansible/vars/f5_vars.yml
This command will take several minutes to complete.
The command mounts the repository’s
provisionerdirectory inside the container (-v) and passes AWS credentials as environment variables (-e) to the container (the-eon the last line passes env variables to ansible itself and is not part of the docker command).Docker supports multiple methods to pass environment variables to a container
If the environment variable already exists, the
-e VARIABLEconstruction prevents sensitive information from appearing in bash history or the running proc.
Alternatively, if using an AWS CLI credential file a mapped volume could be used. For example: .. code:
cd /git/workshops/provisioner
docker run \
-v ~/.aws/credentials:/root/.aws/credentials \
-v $(pwd)/../provisioner:/ansible/playbooks \
-v /git/vars:/ansible/vars \
ansible_workshop:dockerfile provision_lab.yml -e @/ansible/vars/f5_vars.yml
Note
If the provisioning is not successful, please teardown the lab by running the teardown playbook as described below.
cd /git/workshops/provisioner
docker run \
-e AWS_ACCESS_KEY_ID=ABCDEFGHIJKLMNOP \
-e AWS_SECRET_ACCESS_KEY=ABCDEFGHIJKLMNOP/ABCDEFGHIJKLMNOP \
-v $(pwd)/../provisioner:/ansible/playbooks \
-v /git/vars:/ansible/vars \
ansible_workshop:dockerfile teardown_lab.yml -e @/ansible/vars/f5_vars.yml
Alternatively, if using an AWS CLI credential file a mapped volume could be used. For example: .. code:
cd /git/workshops/provisioner
docker run \
-v ~/.aws/credentials:/root/.aws/credentials \
-v $(pwd)/../provisioner:/ansible/playbooks \
-v /git/vars:/ansible/vars \
ansible_workshop:dockerfile teardown_lab.yml -e @/ansible/vars/f5_vars.yml
Note
Correct the issue and run the provision playbook again (Step 2).
Login to the AWS EC2 console and you should see instances being created like:
MyUsername-TESTWORKSHOP1-studentX-ansible
MyUsername-TESTWORKSHOP1-studentX-f5
MyUsername-TESTWORKSHOP1-studentX-node1
MyUsername-TESTWORKSHOP1-studentX-node2
Accessing your Environment
Once the provisioner has run successfully and infrastructure has been spun up.
All the workbench information is stored in a local directory named after the workshop (e.g. MyUsername-TESTWORKSHOP1/instructor_inventory.txt).
Example: Make sure to go to the provisioner directory
cd /git/workshops/provisioner
cat MyUsername-TESTWORKSHOP1/instructor_inventory.txt

[all:vars]
ansible_port=22

[student1]
student1-ansible ansible_host=34.219.251.xxx ansible_user=ec2-user  #Ansible host/control node
student1-f5 ansible_host=52.39.228.xxx ansible_user=admin           #BIG-IP
student1-node1 ansible_host=52.43.153.xxx ansible_user=ec2-user     #Backend Web application server1
student1-node2 ansible_host=34.215.176.xxx ansible_user=ec2-user    #Backend Web application server2
Note
If there are more students configured there will be more entries to represent each student
Login to Ansible control node (IP from inventory file above) using the studentID (e.g. student1) and the password mentioned in the f5_vars.yml earlier
ssh student1@34.219.251.xxx
student1@34.219.251.xxx's password:
Run the ansible command with the –version command. The latest version of ansible will be installed
[student1@ansible networking-workshop]$ ansible --version
ansible 2.9.11
   config file = /home/student1/.ansible.cfg
   configured module search path = ['/home/student1/.ansible/plugins/modules', '/usr/share/ansible/plugins/modules']
   ansible python module location = /usr/lib/python3.6/site-packages/ansible
   executable location = /usr/bin/ansible
   python version = 3.6.8 (default, Dec  5 2019, 15:45:45) [GCC 8.3.1 20191121 (Red Hat 8.3.1-5)]
Note
The version of ansible you have might differ from above (the latest ansible version gets installed)
Use the commands below to view the contents of your inventory
[student1@ansible ~]$ ls f5-workshop/
[student1@ansible ~]$ cat lab-inventory/hosts
The output will look as follows with student1 being the respective student workbench:
Output from (ls f5-workshop)
[student1@ansible ~]$ ls f5-workshop/
1.0-explore    1.3-add-pool            1.6-add-irules           2.1-delete-configuration  3.1-as3-change     4.1-tower-job-template  README.ja.md
1.1-get-facts  1.4-add-pool-members    1.7-save-running-config  2.2-error-handling        3.2-as3-delete     4.2-tower-workflow      README.md
1.2-add-node   1.5-add-virtual-server  2.0-disable-pool-member  3.0-as3-intro             4.0-explore-tower  4.3-tower-workflow2     turn_off_community_grid.yml
Output from (cat lab-inventory/hosts) .. code:
[all:vars]
ansible_user=studentx
ansible_ssh_pass=<password_from_file>
ansible_port=22

[lb]
f5 ansible_host=52.39.228.xxx ansible_user=admin private_ip=172.16.26.xxx ansible_ssh_pass=<password_from_file>

[control]
ansible ansible_host=34.219.251.xxx ansible_user=ec2-user private_ip=172.16.207.xxx

[webservers]
node1 ansible_host=52.43.153.xxx ansible_user=ec2-user private_ip=172.16.170.xxx
node2 ansible_host=34.215.176.xxx ansible_user=ec2-user private_ip=172.16.160.xxx
Note
The IP’s in your environment will defer.
The values from the inventory file will be used in subsequent playbooks
Using your text editor of choice create a new file called bigip-facts.yml in the home directory ~/
The BIG-IP input values are taken from the inventory file mentioned earlier
---
- name: GRAB F5 FACTS
  hosts: lb
  connection: local
  gather_facts: no

  tasks:
  - name: Set a fact named 'provider' with BIG-IP login information
    set_fact:
     provider:
      server: "{{private_ip}}"
      user: "{{ansible_user}}"
      password: "{{ansible_ssh_pass}}"
      server_port: 8443
      validate_certs: no

  - name: COLLECT BIG-IP FACTS
    bigip_device_info:
      provider: "{{provider}}"
      gather_subset:
       - system-info
    register: device_facts

  - name: DISPLAY COMPLETE BIG-IP SYSTEM INFORMATION
    debug:
      var: device_facts

  - name: DISPLAY ONLY THE MAC ADDRESS
    debug:
      var: device_facts['system_info']['base_mac_address']

  - name: DISPLAY ONLY THE VERSION
    debug:
      var: device_facts['system_info']['product_version']
Run the playbook - exit back into the command line of the control host and execute the following:
cd ~/
[student1@ansible ~]$ ansible-playbook bigip-facts.yml
The output will look as follows. This playbook is grabbing information from the BIG-IP and displaying the relevant information.
[student1@ansible ~]$ ansible-playbook bigip-facts.yml

PLAY [GRAB F5 FACTS]
****************************************************************
TASK [Set a fact named 'provider' with BIG-IP login information]
****************************************************************
ok: [f5]

TASK [COLLECT BIG-IP FACTS]
****************************************************************
changed: [f5]

TASK [DISPLAY COMPLETE BIG-IP SYSTEM INFORMATION]
****************************************************************

ok: [f5] =>
device_facts:
   ansible_facts:
      discovered_interpreter_python: /usr/libexec/platform-python
   changed: false
   failed: false
   queried: true
   system_info:
      base_mac_address: 06:07:82:7f:d9:09
      chassis_serial: 46fc25ec-50a7-269e-edc8ae8cd962
      hardware_information:
      - model: Intel(R) Xeon(R) CPU E5-2686 v4 @ 2.30GHz
      name: cpus
      type: base-board
      versions:
      - name: cache size
         version: 46080 KB
      - name: cores
         version: 2  (physical:2)
      - name: cpu MHz
         version: '2299.968'
      - name: cpu sockets
         version: '1'
      - name: cpu stepping
         version: '1'
      marketing_name: BIG-IP Virtual Edition
      package_edition: Point Release 4
      package_version: Build 0.0.5 - Tue Jun 16 14:26:18 PDT 2020
      platform: Z100
      product_build: 0.0.5
      product_build_date: Tue Jun 16 14:26:18 PDT 2020
      product_built: 200616142618
      product_changelist: 3337209
      product_code: BIG-IP
      product_jobid: 1206494
      product_version: 13.1.3.4
      time:
      day: 17
      hour: 18
      minute: 15
      month: 8
      second: 12
      year: 2020
      uptime: 3925


TASK [DISPLAY ONLY THE MAC ADDRESS]
****************************************************************
ok: [f5] =>
device_facts['system_info']['base_mac_address']: 06:07:82:7f:d9:09

TASK [DISPLAY ONLY THE VERSION]
****************************************************************
ok: [f5] =>
device_facts['system_info']['product_version']: 13.1.3.4

PLAY RECAP
****************************************************************
f5                         : ok=5    changed=0    unreachable=0    failed=0
You have been successful in logging into the BIG-IP and grabbing/displaying facts. Your access to the BIG-IP is verified.
Congratulations, your lab is up and running!
In the next section(s) you can explore Ansible use cases and the 101 lab that can be run on the environment you just built.