BIG-IQ Centralized Management > F5 Agility 2022: ADC Automation with BIG-IQ 8.1 Source | Edit on
Lab 4: LTM conflict resolution: Silo in BIG-IQ
New Features introduced in BIG-IQ v7.1
BIG-IP configuration naming conventions are not consistent within many customer environments. It is common to find similar names reused across different BIG-IP’s for shared configuration objects such as Profiles, Monitors etc.
When shared objects have the same name but different configurations this creates a conflict within the centralized management system, and BIG-IQ will raise an error and fail to import the BIG-IP device. In previous releases you could either choose to override and rewrite what was on the BIG-IP being imported with the configuration that was already in BIG-IQ, or you could override the configuration that was in BIG-IQ with the newly imported BIG-IP’s configuration.
Starting with BIG-IQ 7.1, you can now import devices with object naming collisions into a temporary “silo” on BIG-IQ. This will allow you to rename the configuration objects on BIG-IP using BIG-IQ. Once all of the conflicting objects that need to remain unique have been renamed, the device can be re-imported fully into BIG-IQ without the need for a silo.
In this lab, the Seattle device was imported first, and it has an object named silo-lab-http-profile. The device’s profiles were imported into the default Silo. Any update to that profile would be pushed out to all devices that share the profile of the same name.
The San Jose BIG-IP device fails import due to a naming collision because of a profile named silo-lab-http-profile (same name) but has different configuration items within the profile. If you want to keep the different configuration items for this device, you can now import it into its own temporary silo to avoid conflict. You may then review the configuration differences from BIG-IQ and push out naming changes to resolve the conflict. The device can then be re-imported into BIG-IQ’s default Silo because the naming conflict will have been removed.

Lab environment access
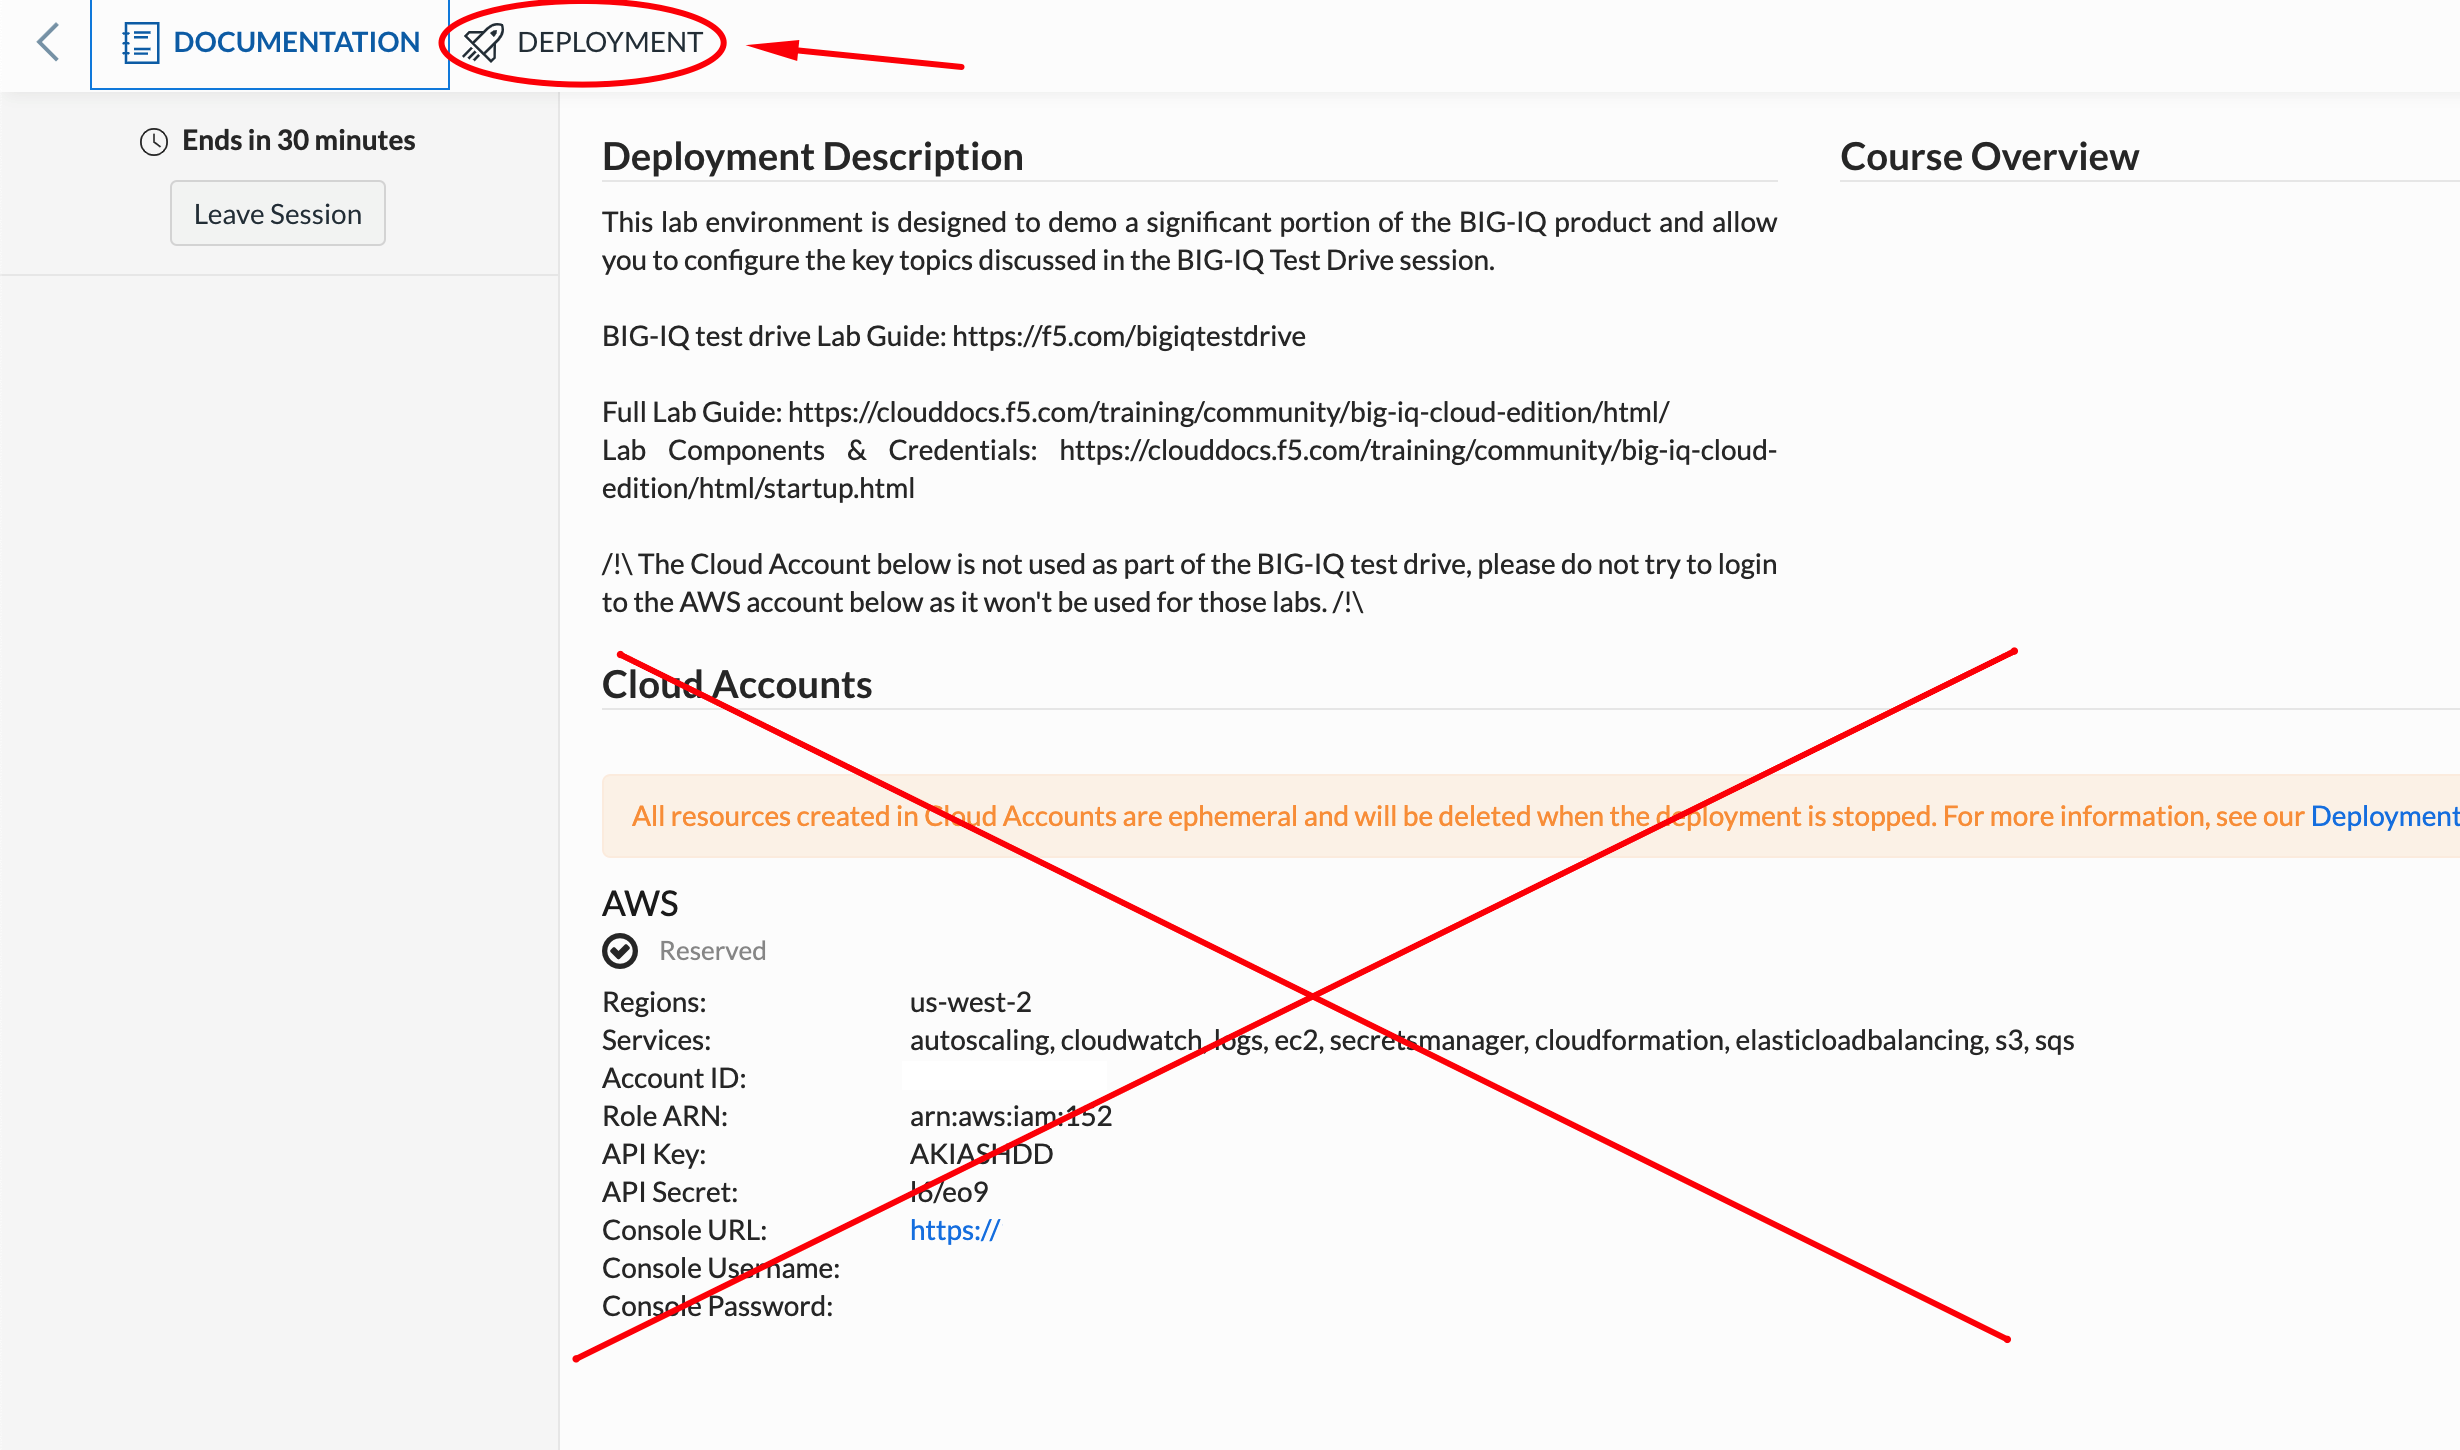
Once you connect to the UDF course portal, you will land on the Documentation tab where you can find the link to the lab guide.
Once you have the lab guide open, click on the Deployment tab to access the various systems in the lab.
In order to complete this lab, you will find 2 ways to access the different systems in this lab.
Going directly to the BIG-IQ CM or BIG-IP TMUI or WEB SHELL/SSH (RECOMMENDED).
To access the BIG-IQ directly, click on the ACCESS button under BIG-IQ CM and select TMUI. The credentials to access the BIG-IQ TMUI are
david/davidandpaula/paulaas directed in the labs.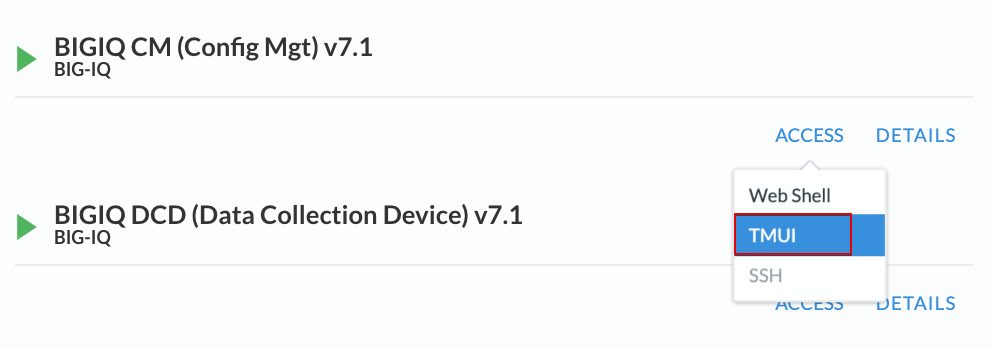
To ssh into a system, you can click on WEB SHELL or SSH (you will need your ssh keys setup in the lab environment for SSH).
You can also click on DETAILS on each component to see the credentials (login/password).
From the lab embeded Google Chrome browser.
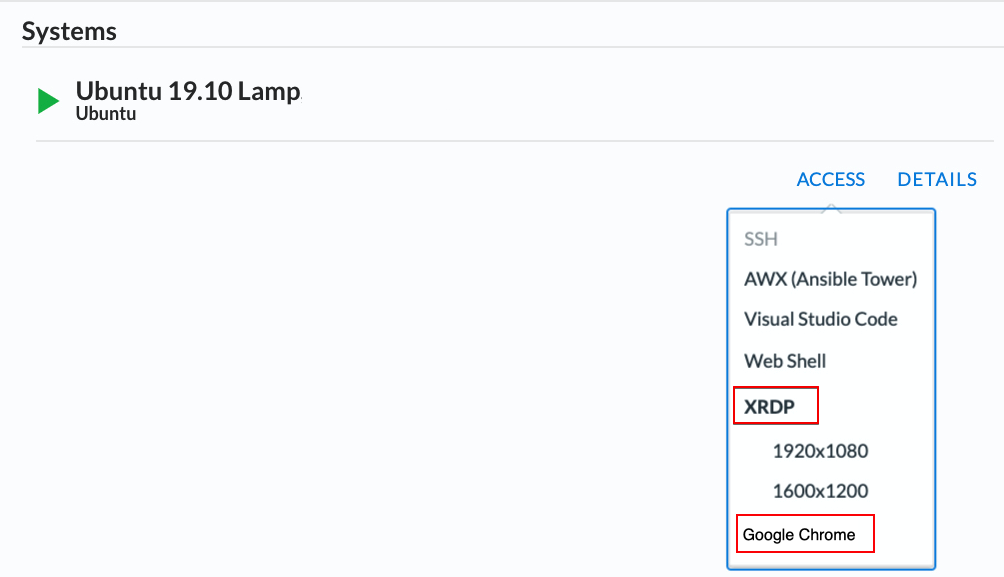
In your lab deployment, click on the ACCESS button of the Ubuntu Lamp Server system and click on Google Chrome.
You can also use XRDP as an alternative, click on the resolution that works for your laptop. When the RDP session launches showing Session: Xorg, simply click OK, no credentials are needed. Modern laptops with higher resolutions you might want to use 1440x900 and once XRDP is launched Zoom to 200%.
Exercise 4.1 – Import a device into a Silo
- From within the LAMP server RDP/noVNC session, logon to BIG-IQ as david (david\david)
by opening a browser and go to:
https://10.1.1.4or directly via the TMUI. - Navigate to Devices > BIG-IP Devices. You can hide some columns you don’t need for this lab such as Stats Collection, Data Collection, Stats Last Collection by clicking on the wheel to the right of the Filter… field.

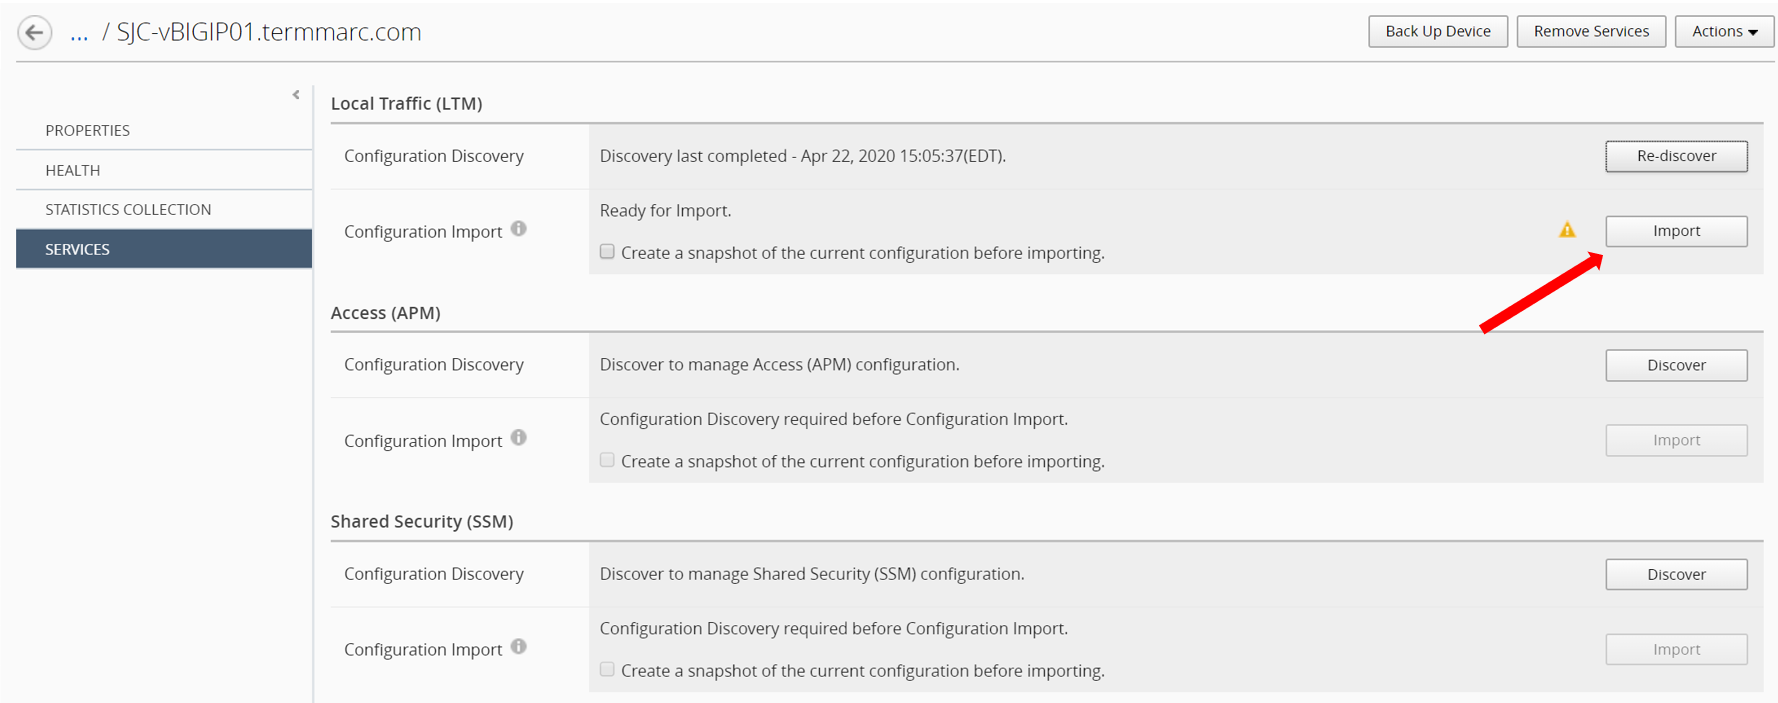
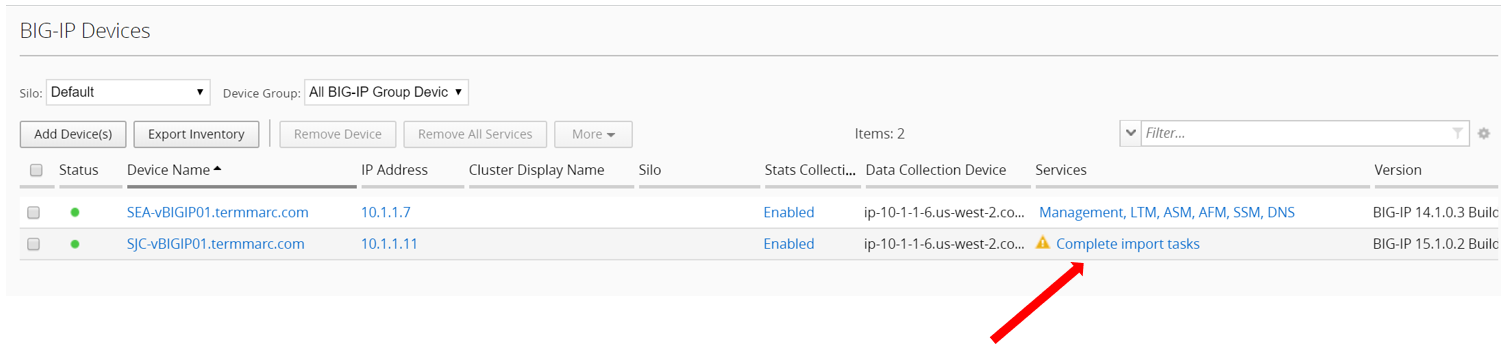
- Click on Complete import tasks under SJC-vBIGIP01.termmarc.com Services.

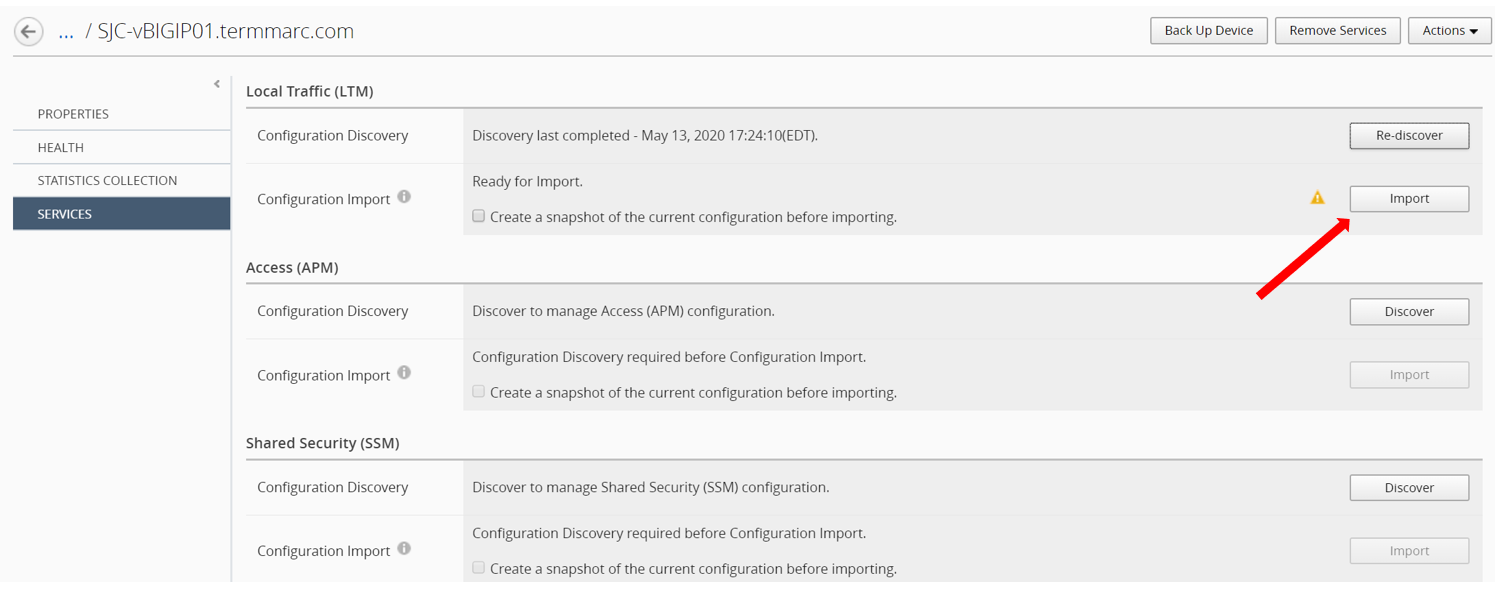
- Click on Import to start the device configuration import into BIG-IQ. If prompted to re-discover the device before importing, go ahead and complete that step first, then Import.
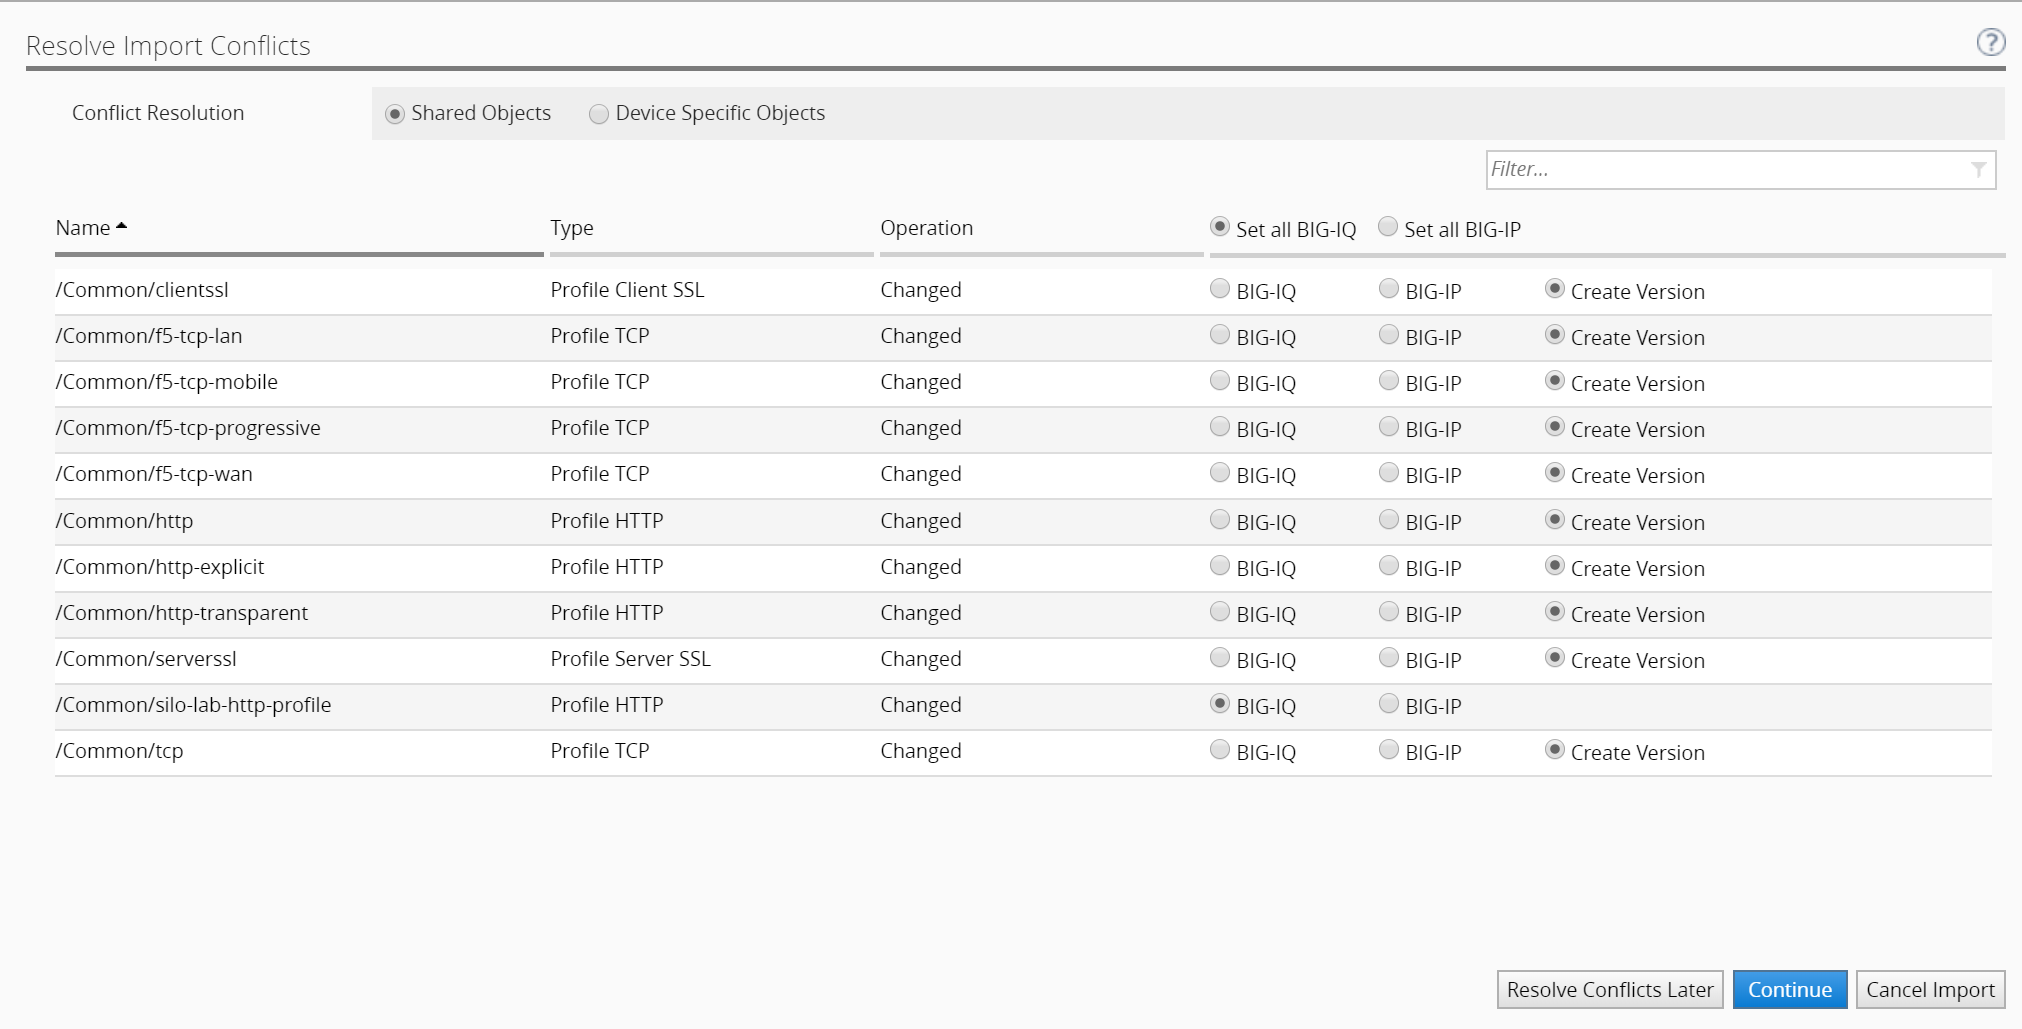
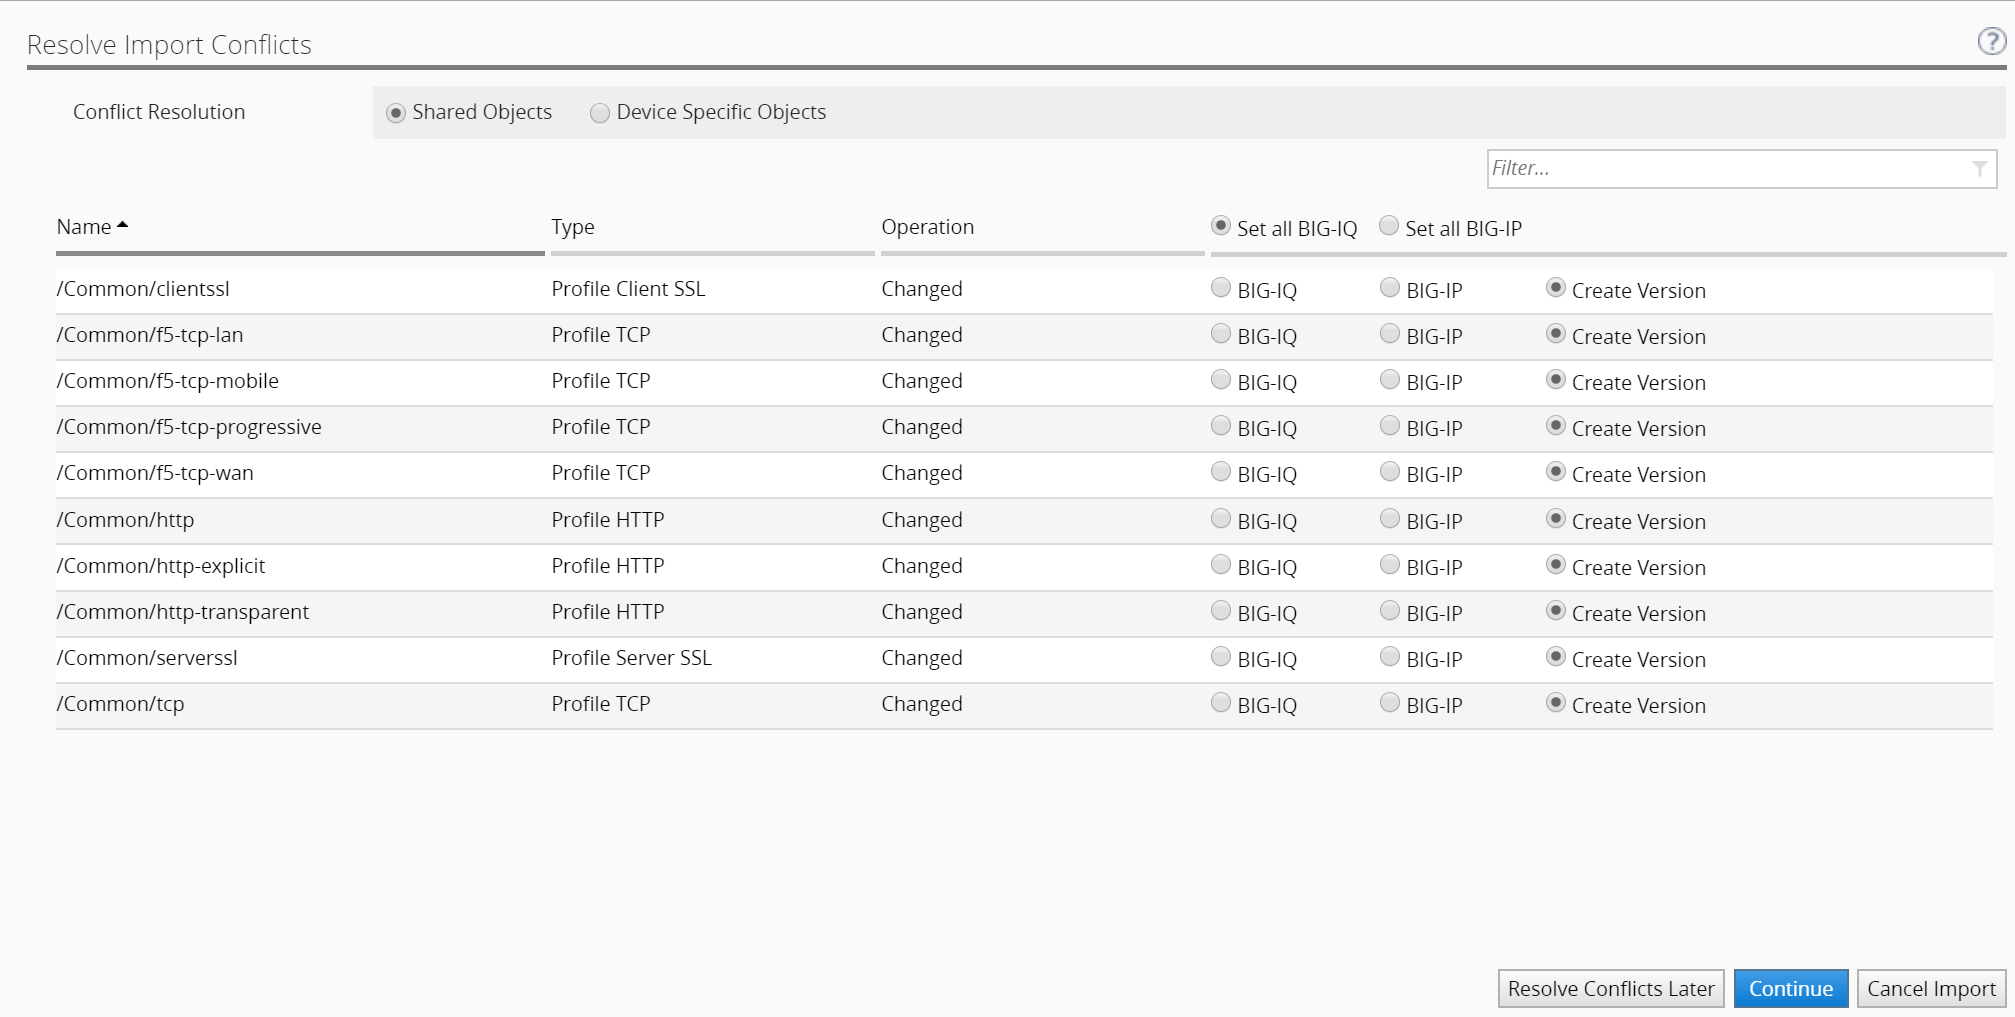
- The conflict resolution window opens. All the objects are given one of the following options, Set all BIG-IQ, Set all BIG-IP or Create Version with the exception of 1 object silo-lab-http-profile which only has the 2 first options.
The HTTP profile silo-lab-http-profile already exists in BIG-IQ and is tied to one or more of the BIG-IP’s discovered & imported into BIG-IQ. In this case the Boston BIG-IP Cluster or the Seattle BIG-IP.
If you choose BIG-IQ, the contents of this profile on the SJC-vBIGIP01 BIG-IP will get overwritten by what is already on BIG-IQ. This is likely not a preferred behavior because this is a working configuration and changing the content of the profile will likely break something.
Choosing BIG-IP will overwrite the contents of this profile on BIG-IQ with what is being imported from this BIG-IP. This would then overwrite the configuration of the other BIG-IP’s that use this same shared object with the contents of the SJC-vBIGIP01 BIG-IP profile on the next deployment. This is also not a desired outcome as it will change working configurations on those devices.
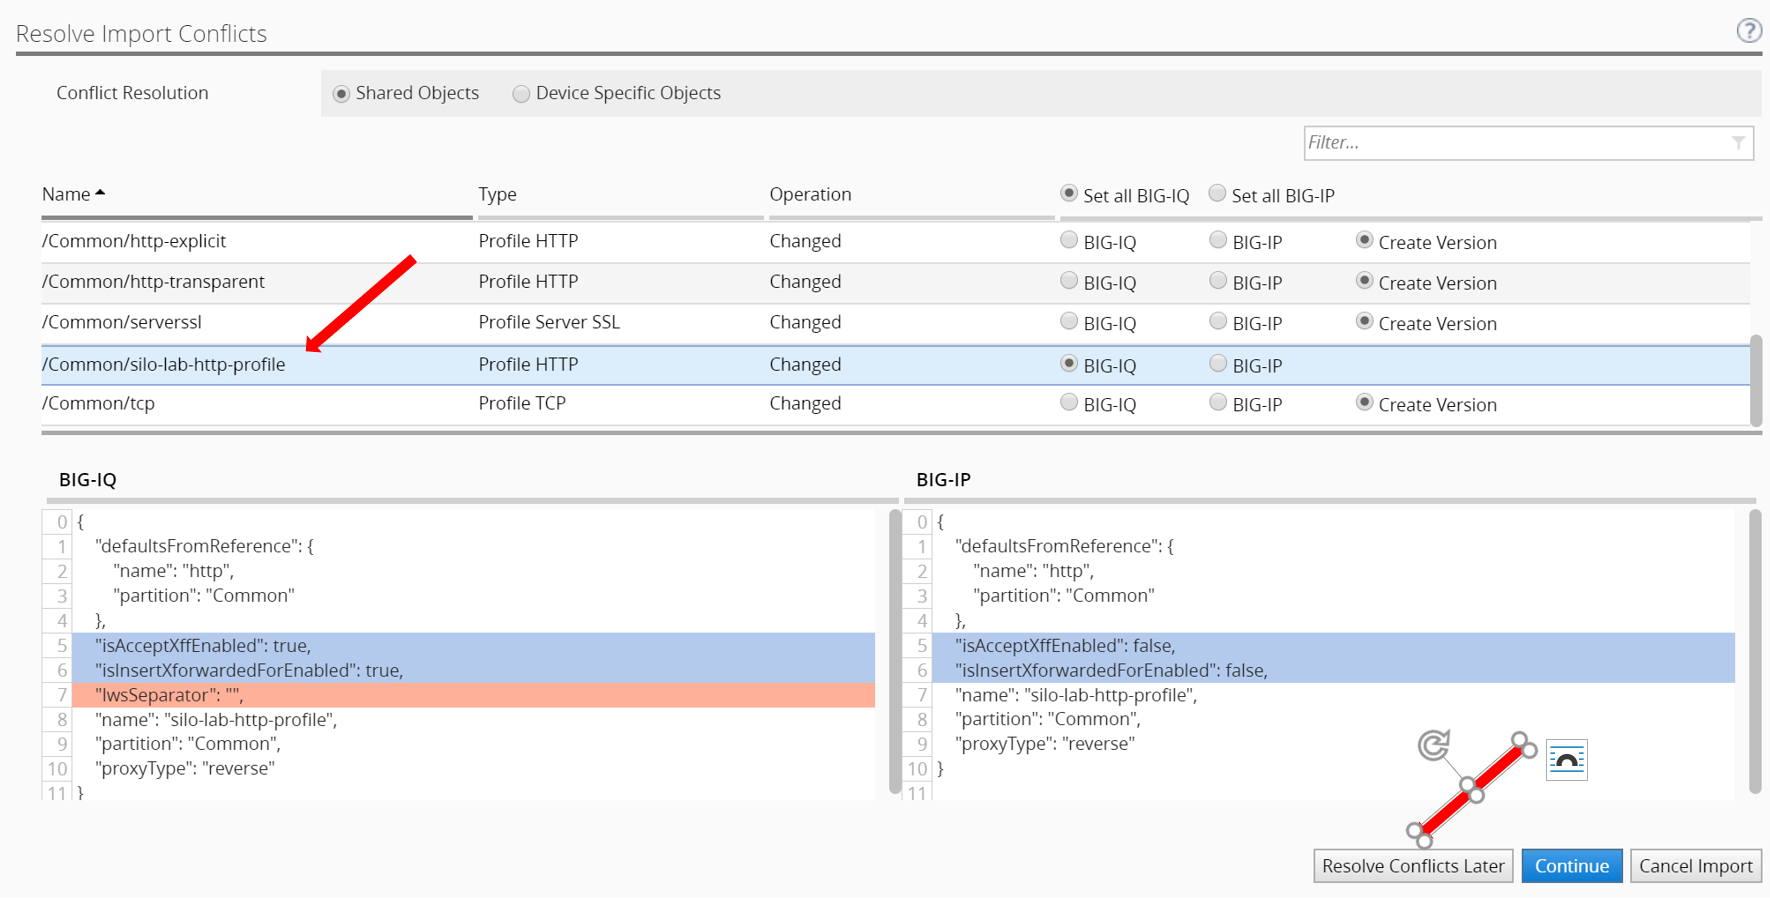
- Select the silo-lab-http-profile profile HTTP and note the difference between BIG-IQ and the BIG-IP device profile.
- BIG-IQ
| Accept XFF | Enabled |
|---|---|
| Insert X-Forwarded-For | Enabled |
- SJC-vBIGIP01.termmarc.com
| Accept XFF | Disabled |
|---|---|
| Insert X-Forwarded-For | Disabled |
What you are noticing is a conflict between what BIG-IQ has stored for a profile named silo-lab-http-profile and what a profile of the same name has on the SJC-vBIGIP01 device. They share the same name but have different configuration options enabled as highlighted in the display. Because we want to preserve both configurations and not overwrite BIG-IP or BIG-IQ for the conflicting HTTP profile, click on Resolve Conflicts Later.
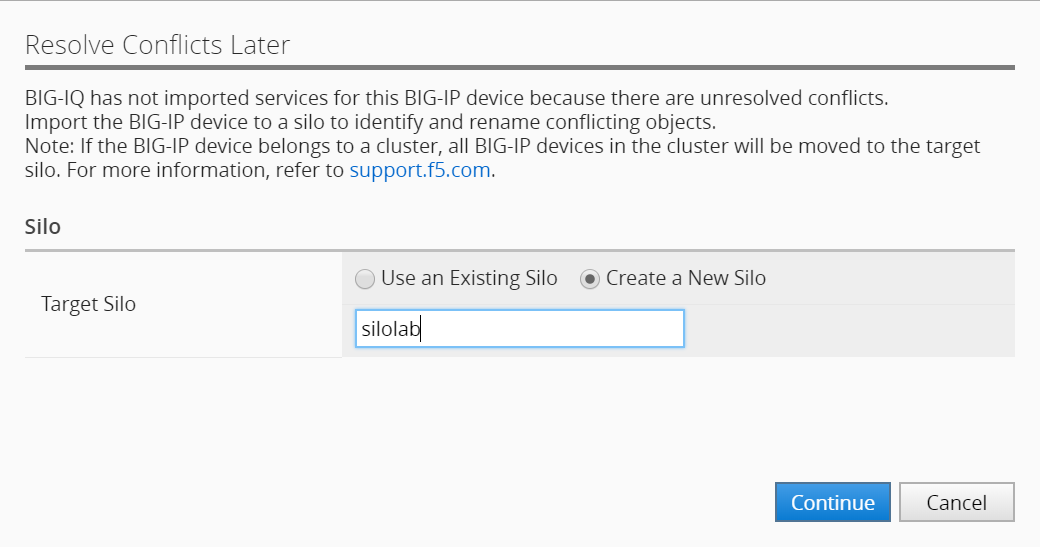
- Select Create a New Silo and name it silolab then click Continue
The device is now imported into its own Silo named silolab. Note the object naming collision has not been resolved yet. Click Close.
Note
If you know all the devices from 1 data center have the exact same conflicts, you can put all of them in the same Silo rather than put each one into its own Silo.

- Once the device is added to the Silo, import the device configuration.

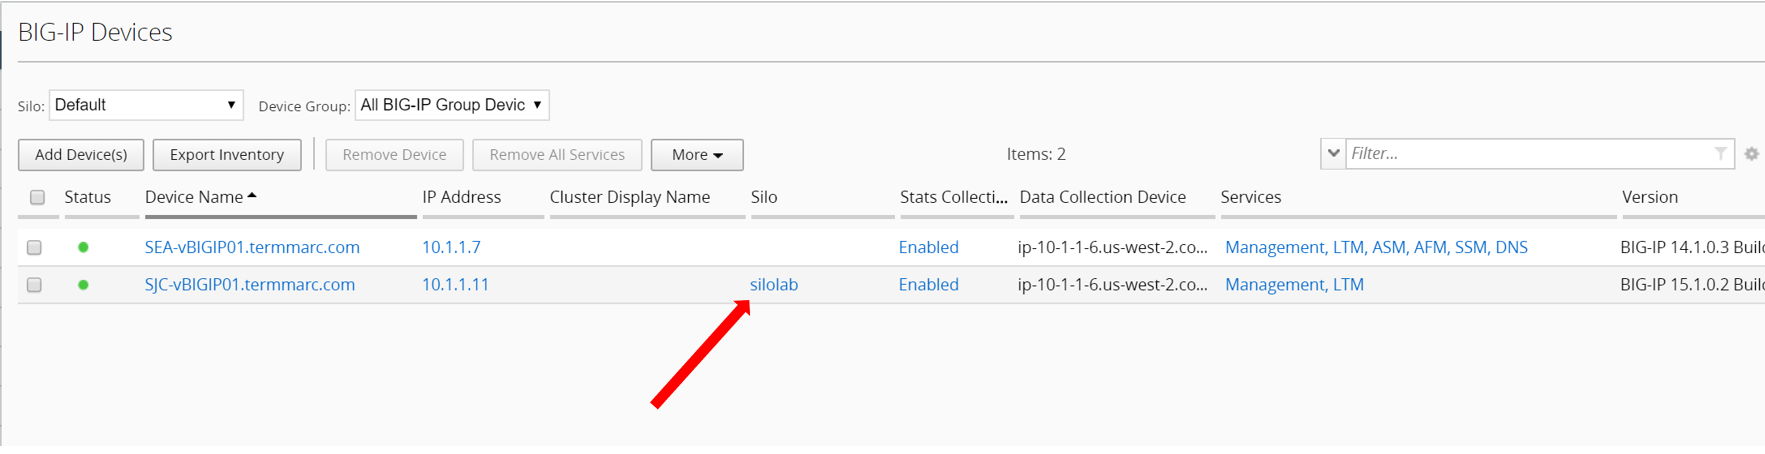
- After the Import has completed, go back to the BIG-IP Devices grid, you can see now SJC-vBIGIP01.termmarc.com has been imported into a Silo named silolab.
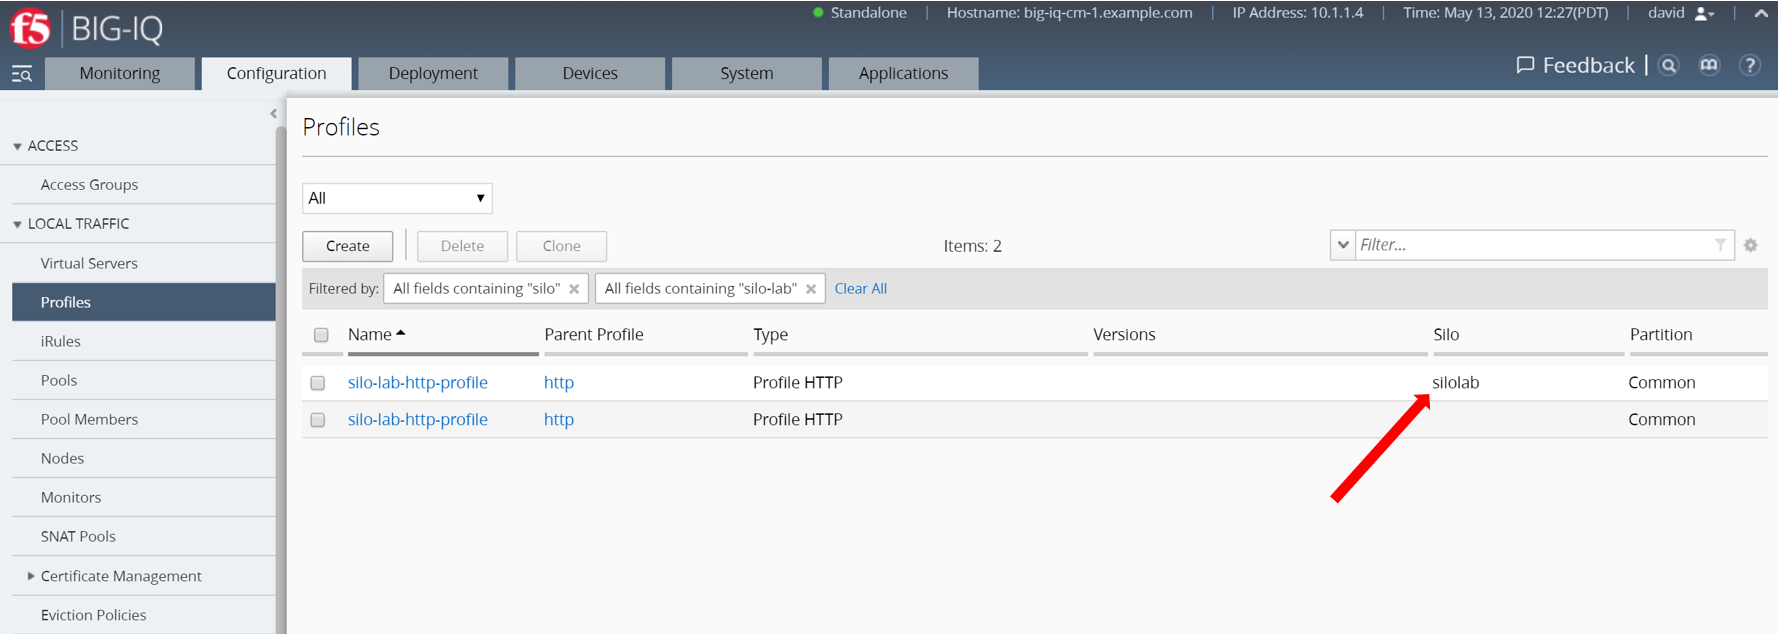
- If you navigate to the Configuration tab > Local Traffic > Profile and filter on silo-lab-http-profile you will see the 2 different instances of the same HTTP profile. One which is part of the default Silo and the newly imported profile from the SJC BIG-IP device which is in the Silo called silolab.
Exercise 4.2 – Resolve conflicts in the Silo
- Navigate to BIG-IP Device Silos under the Devices menu and click on the silolab.

- Select Target Silo: Default, then click on Compare Silos.

- The comparison window opens. You can adjust the diff window with your cursor.
- Scroll down and select Profile HTTP silo-lab-http-profile and look at the differences.
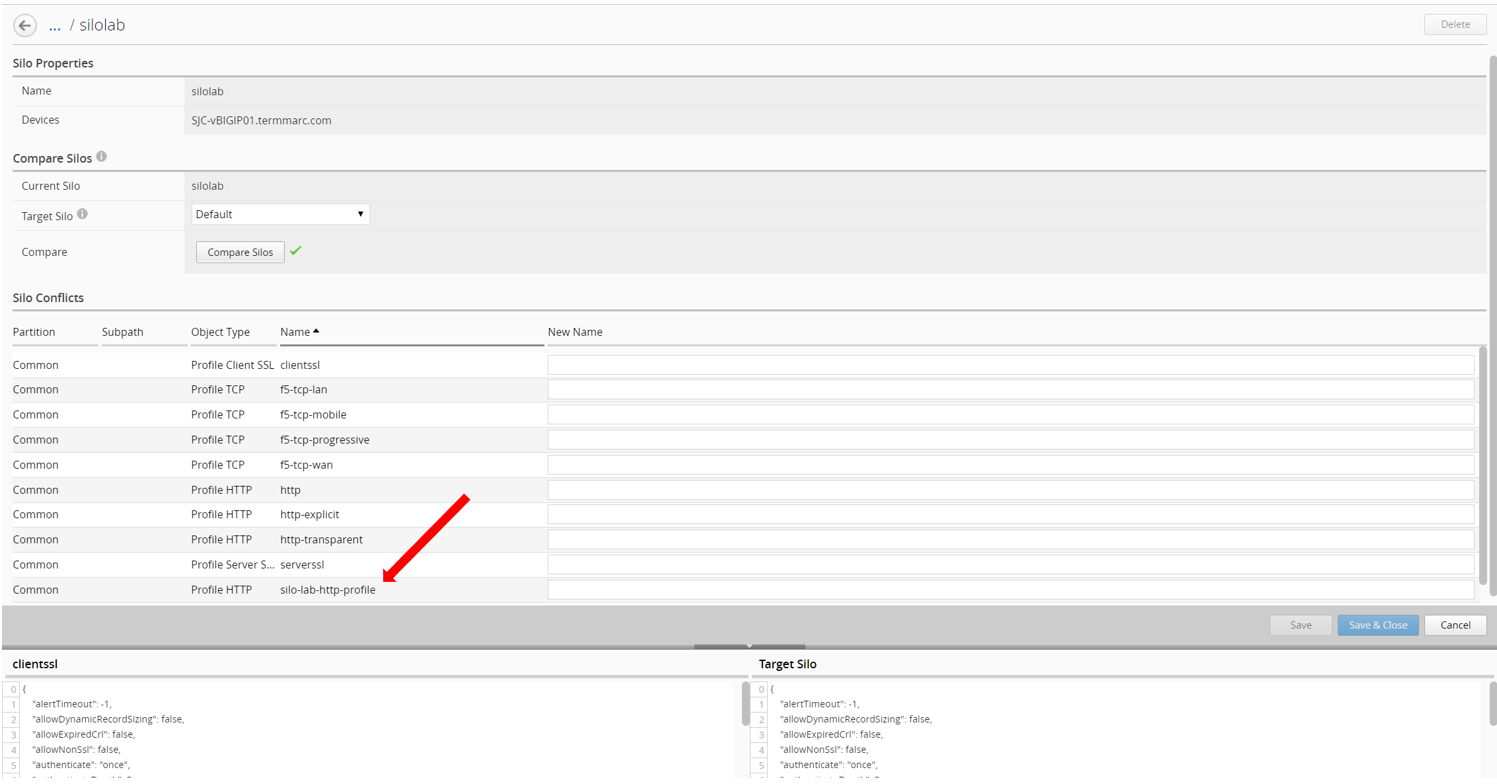
The values of the Accept XFF and Insert X-Forwarded-For are different. This is why the original import before adding to a Silo failed.
Silos are meant to be temporary so that an Admin can view and then resolve conflicts. The ultimate goal is to be able to resolve any conflicts from BIG-IQ and then remove this device from its Silo, and eventually re-import back into the default Silo.
Let’s resolve the conflict by renaming the offending profile from silo-lab-http-profile to silo-lab-http-profile2.
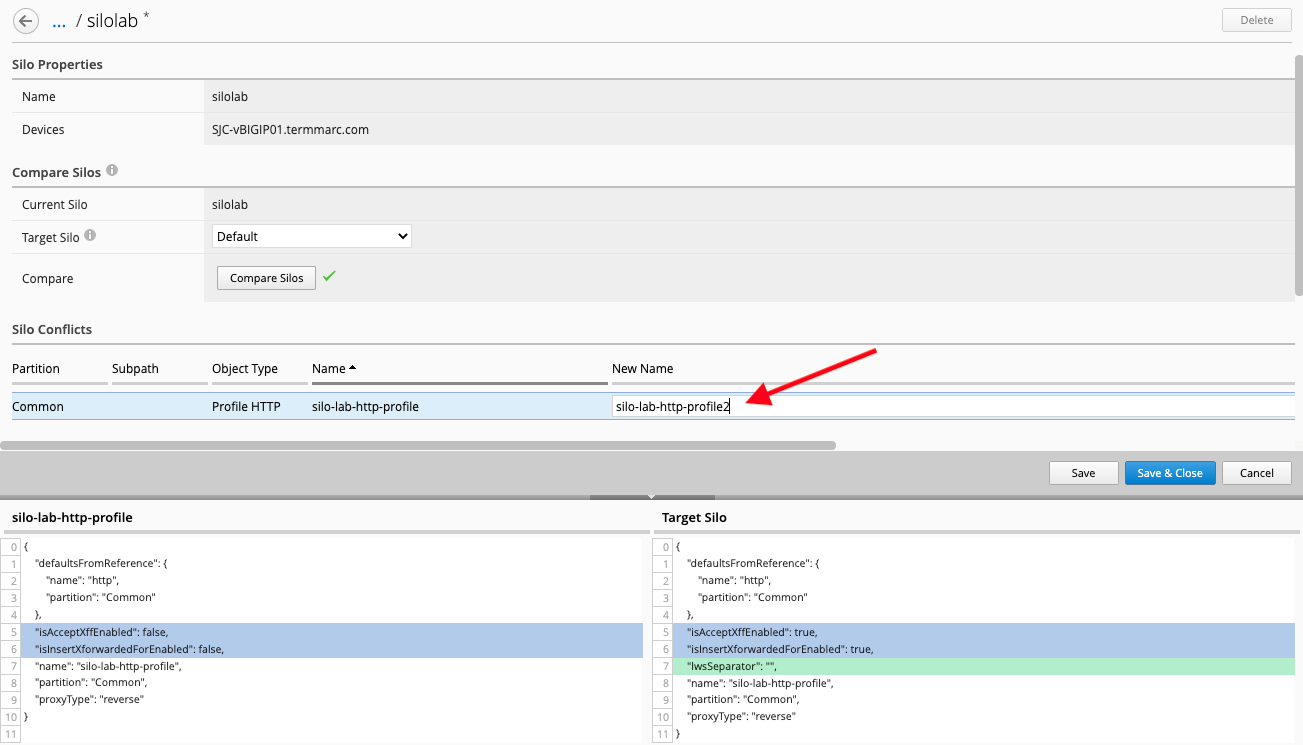
Click Save & Close.
- Wait for the renaming operation to complete. Then click Close.

- The previous step only made changes on BIG-IQ. You must now deploy the changes to the BIG-IP device. Navigate to the Deployment tab > Evaluate & Deploy > Local Traffic & Network.

- Create a new Evaluation, select the Silo silolab and set a name. Next move the SJC-vBIGIP01 device from the Available box to the Selected box.
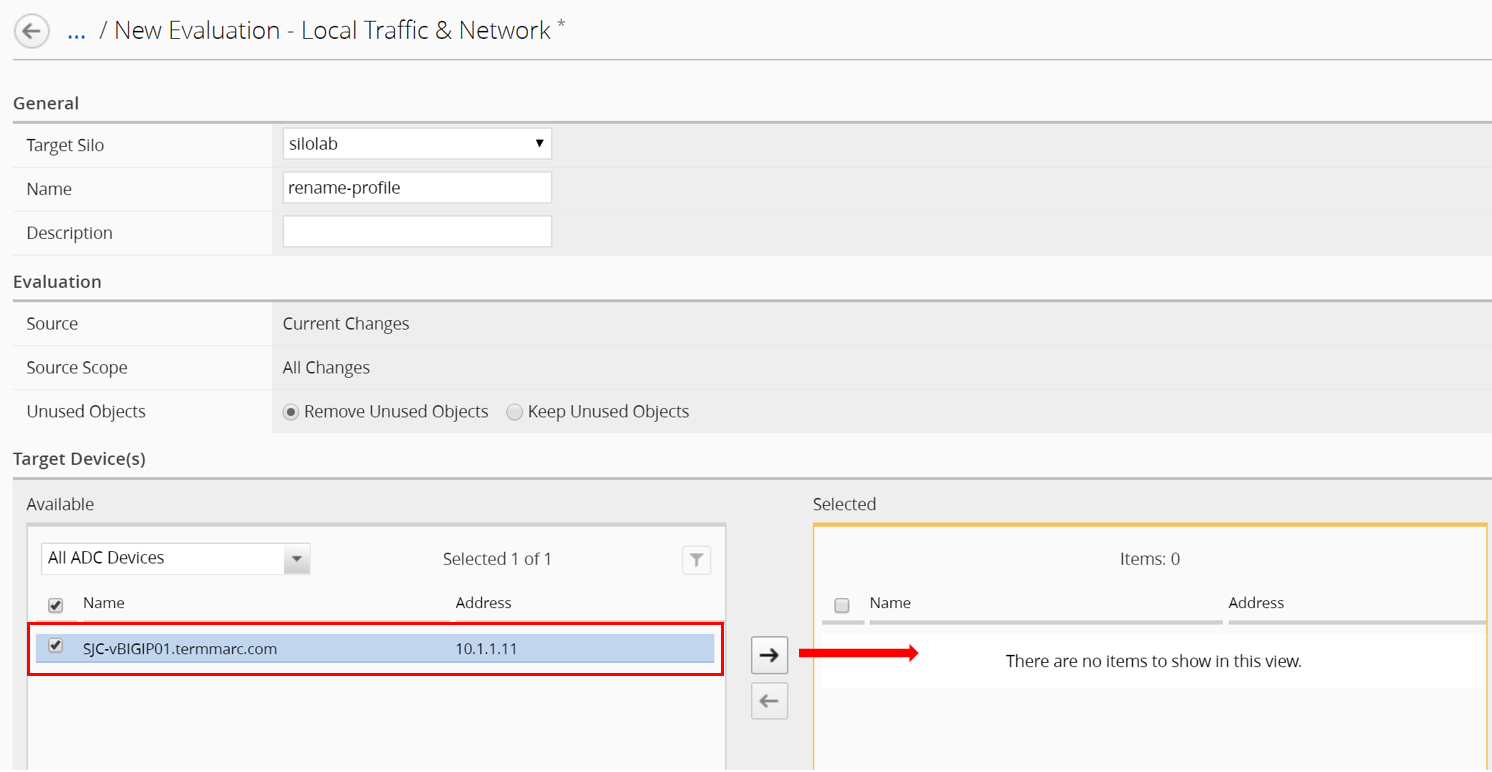
Click Create.
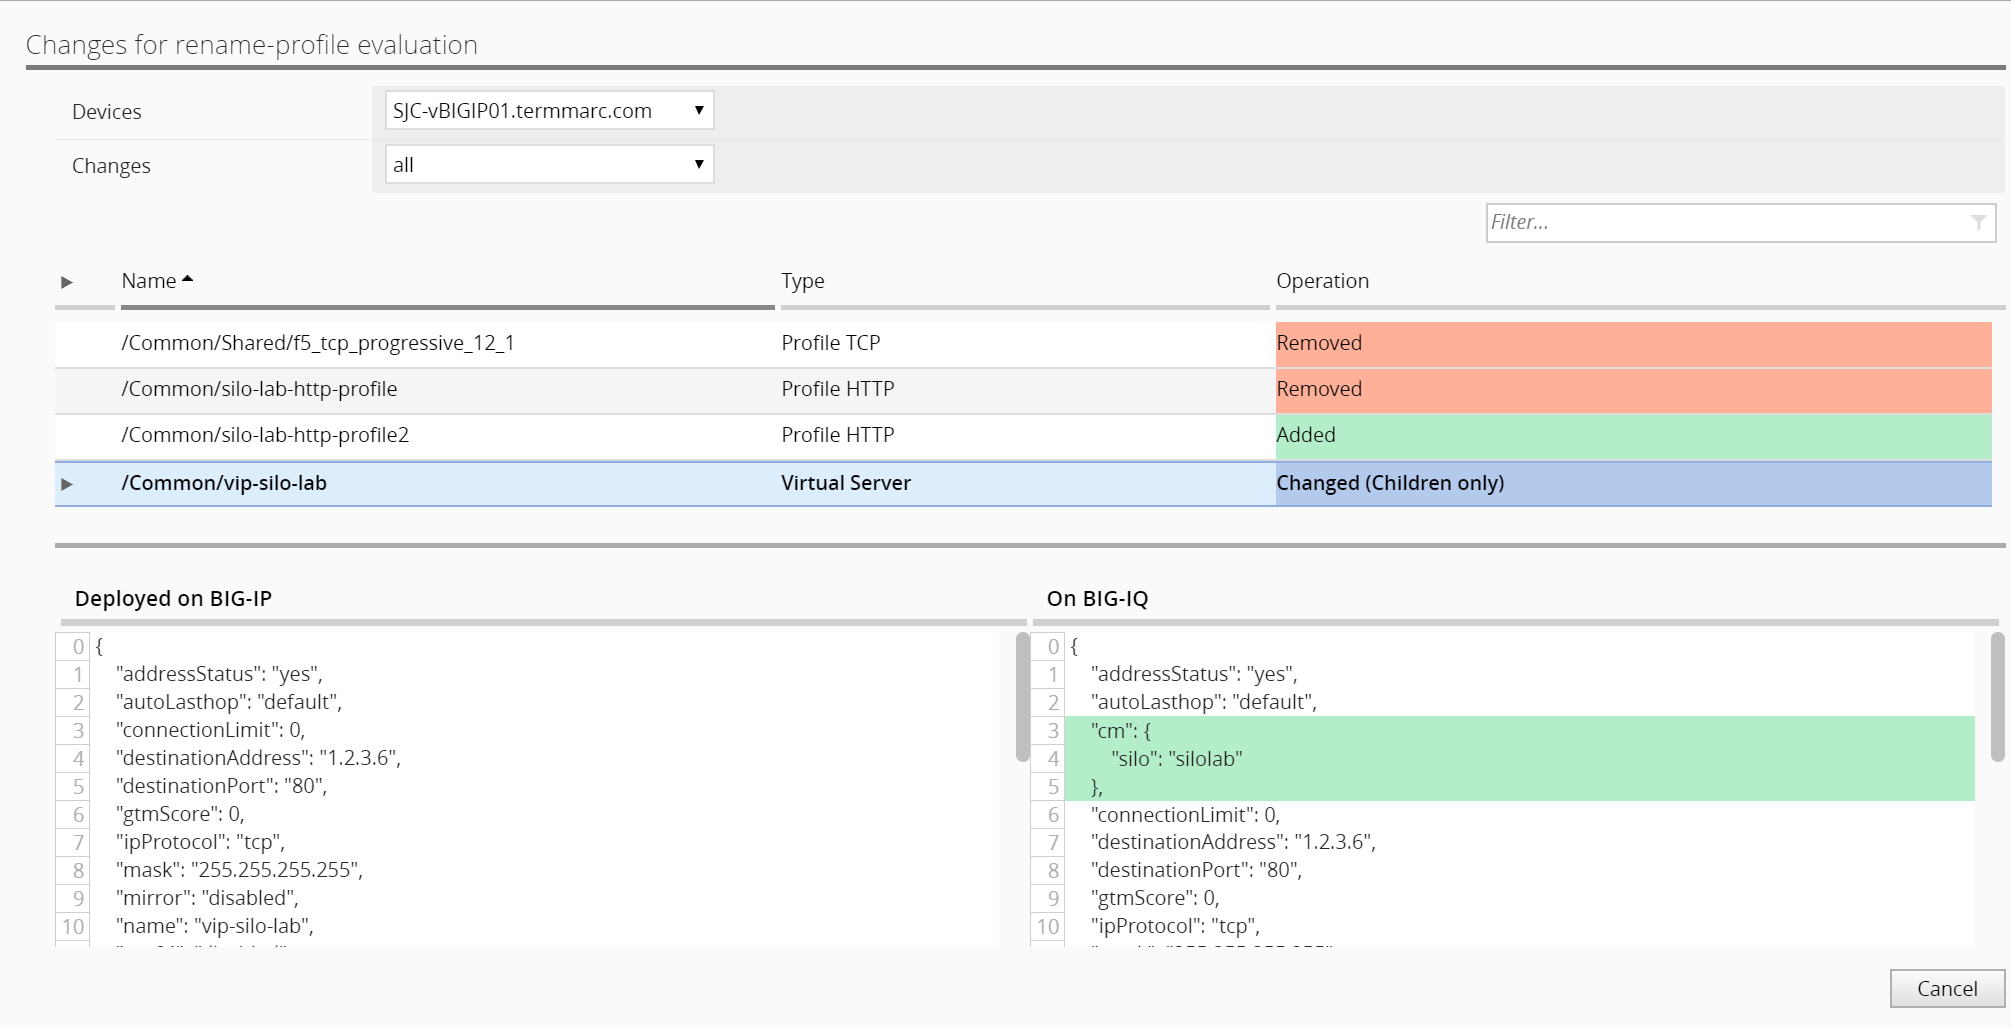
- After the evaluation completes, review the differences by clicking on View. BIG-IQ is going to deploy the new renamed profile and re-deploy the VIP with the new profile attached. Then, remove the old profile with the old name.
- silo-lab-http-profile is removed
- silo-lab-http-profile2 is added
- silo-lab-http-profile is removed from the VIP vip-silo-lab
- silo-lab-http-profile2 is attached to the VIP vip-silo-lab
- Now Deploy the changes to the BIG-IP.

- Navigate to the Configuration tab > Local Traffic > Profile and filter on silo-lab-http-profile to confirm the HTTP profile was renamed. The original conflict that prevented import into the default Silo has now been fixed, however the SJC BIG-IP device is still in its own Silo. The Next steps will remove the device from its own Silo and re-import into the default Silo.

You can eventually go to the BIG-IP SJC-vBIGIP01.termmarc.com to verify the profile has been renamed correctly.
Exercise 4.3 – Remove device from a silo and re-import it in BIG-IQ
Now the necessary objects have been renamed on the BIG-IP, let’s remove the device from its own Silo and re-discover and re-import it into BIG-IQ.
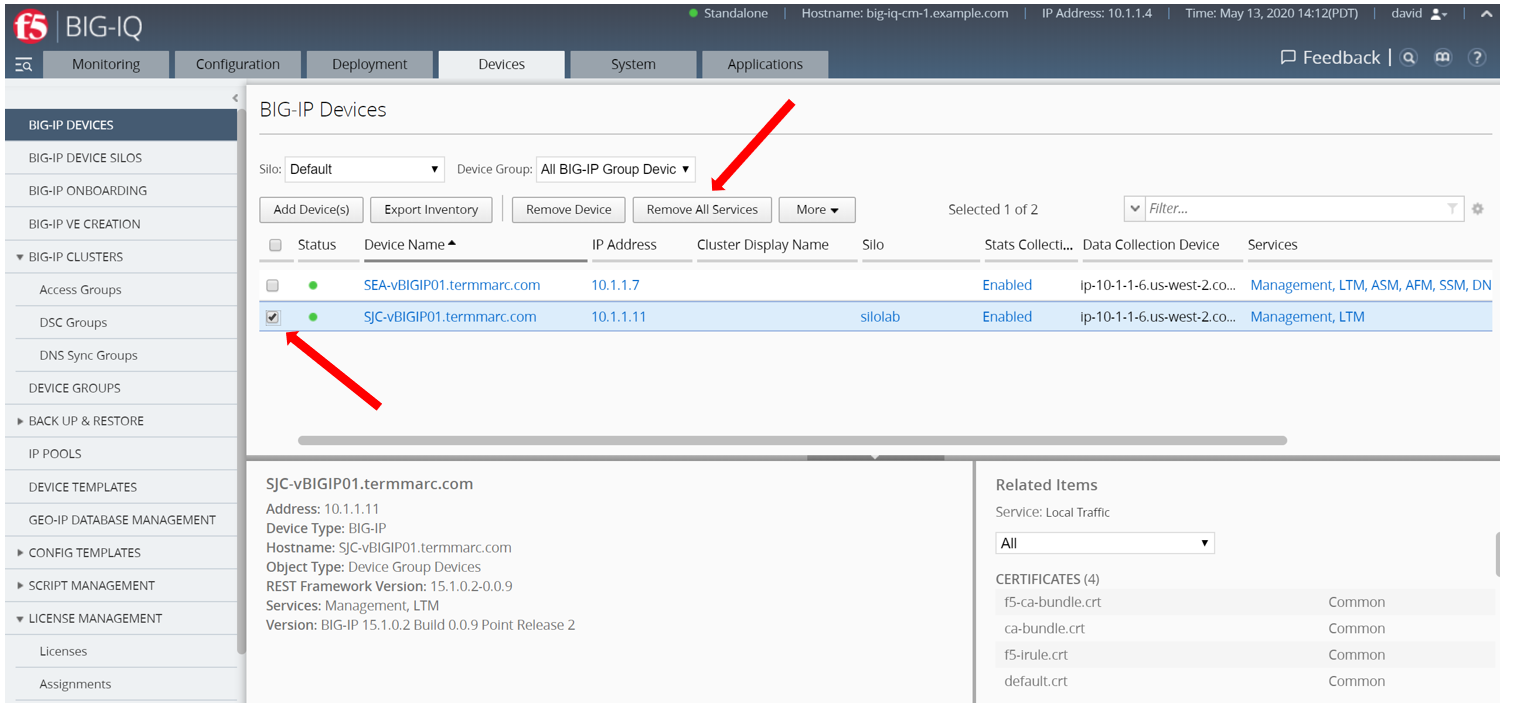
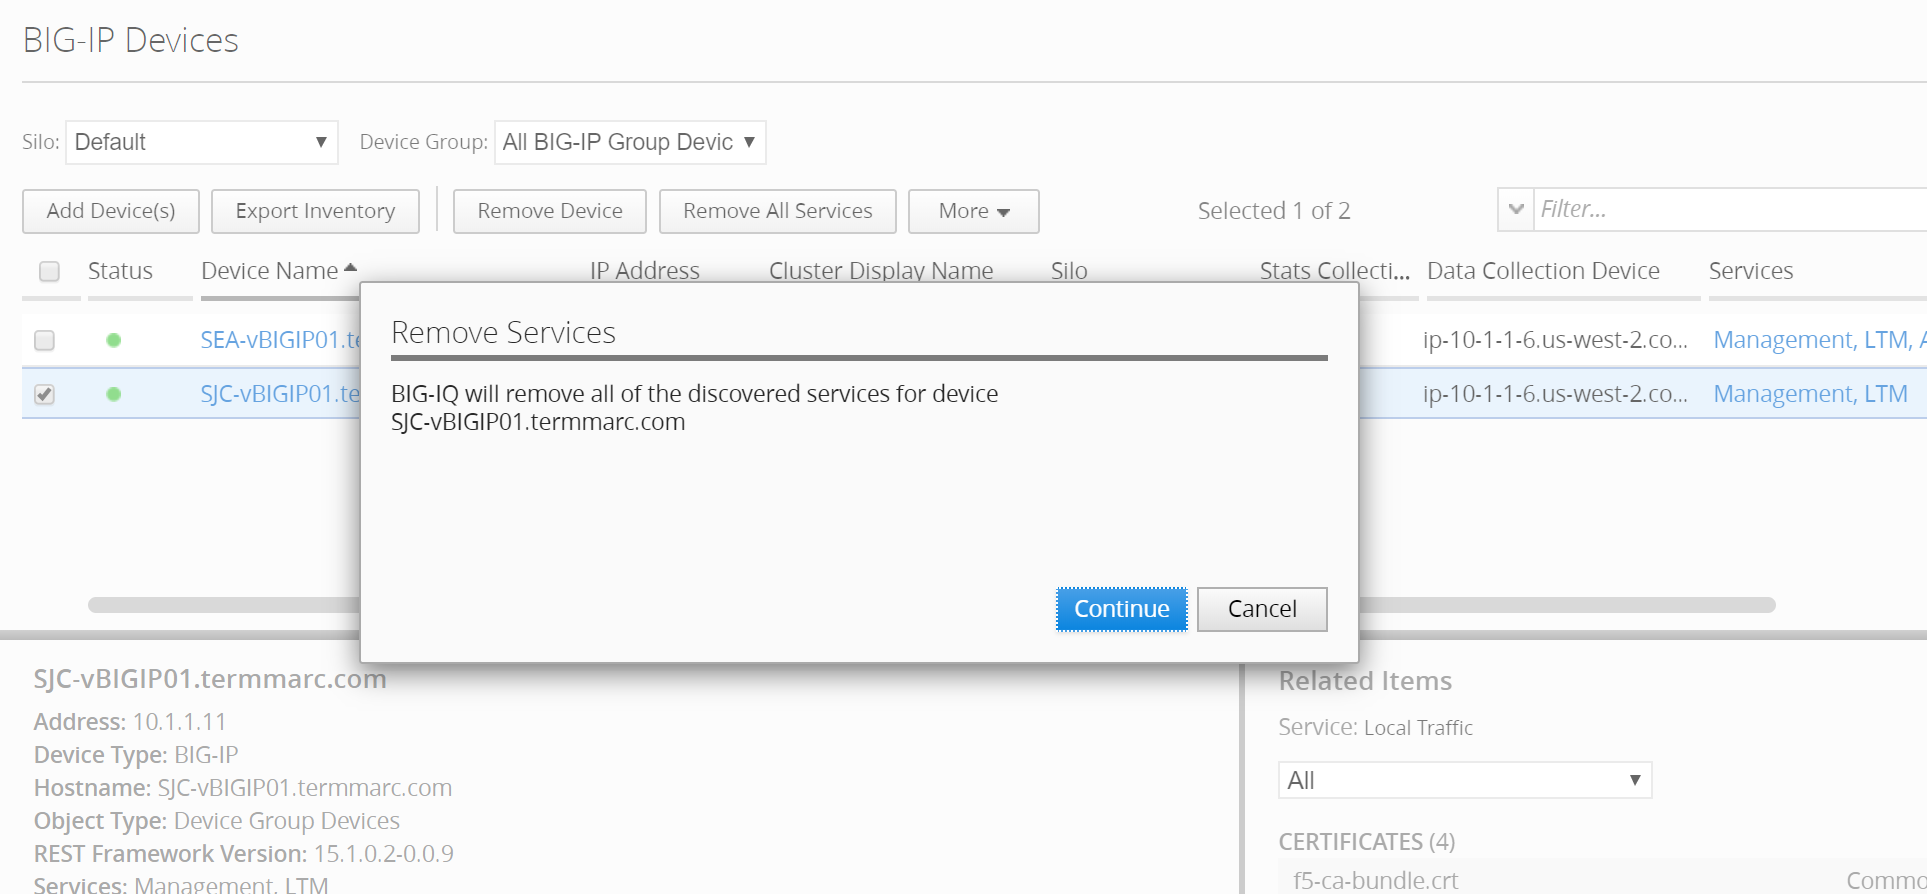
- From the Devices tab > BIG-IP Devices, select SJC-vBIGIP01.termmarc.com and click on Remove All Services
Click on Continue.
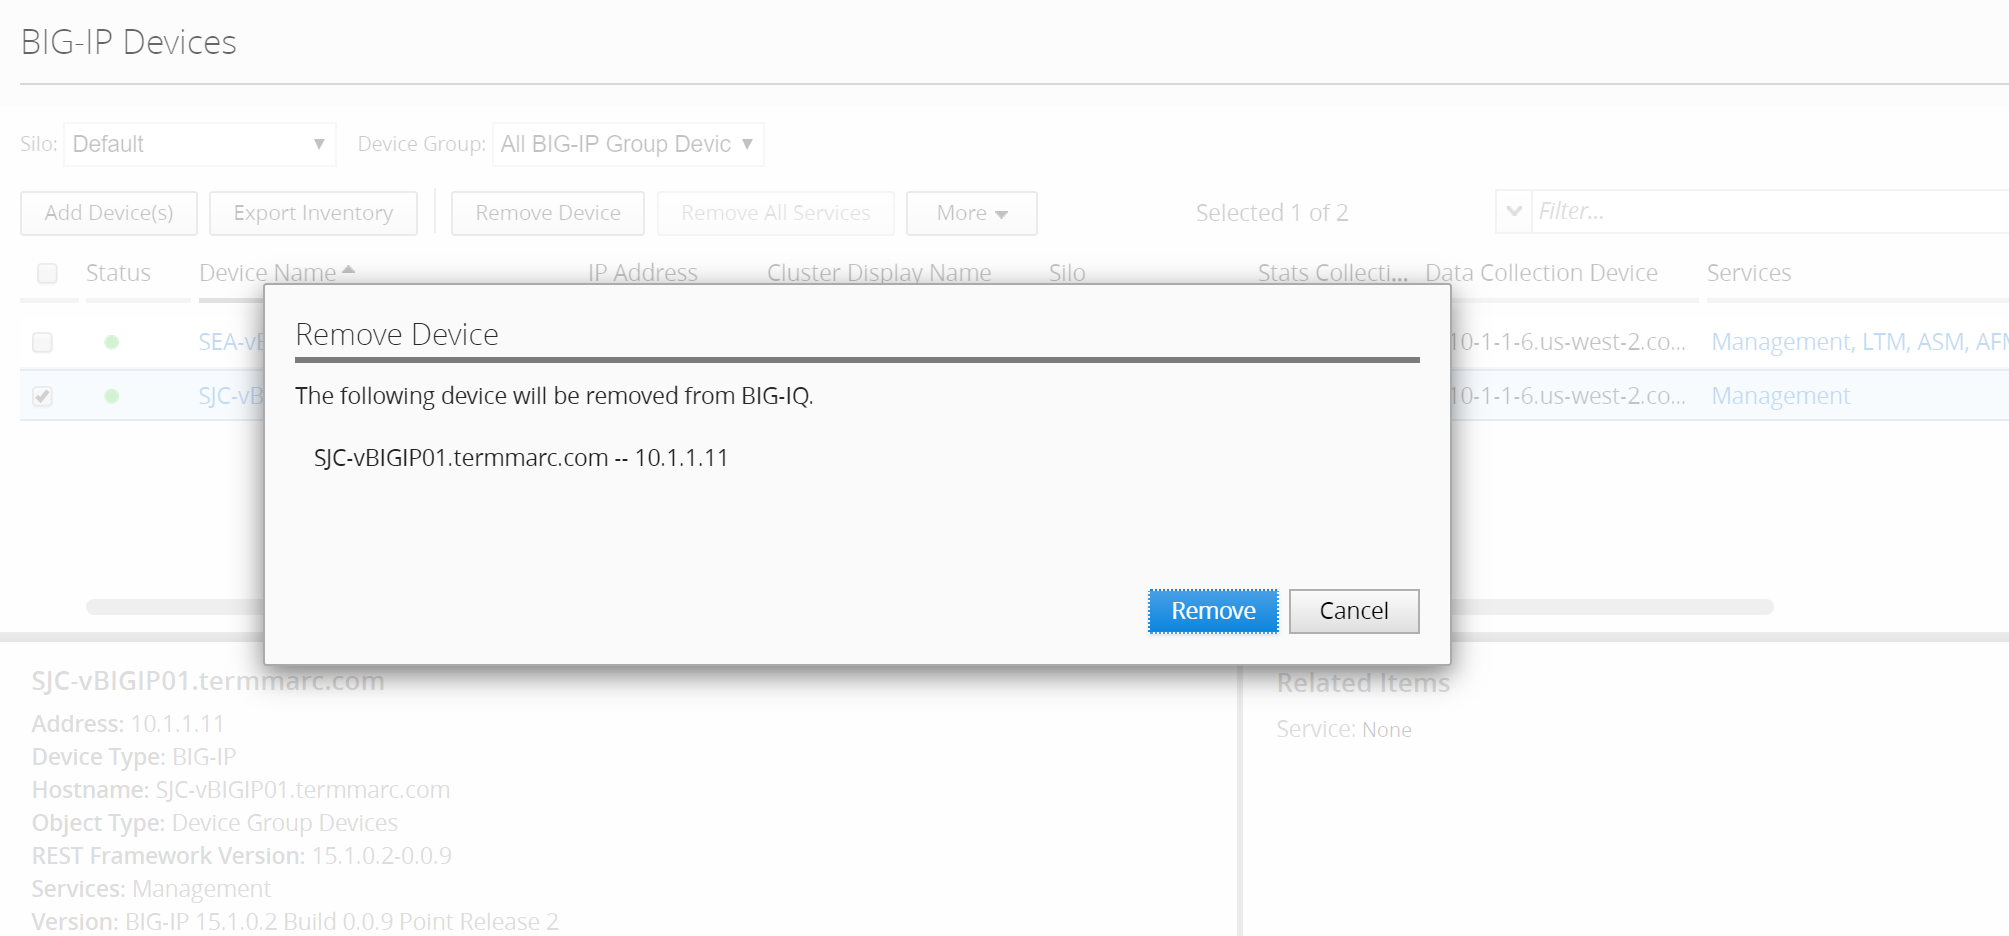
- Once the services are removed, click on Remove Device.

Click on Remove. Note that it may take a few minutes for BIG-IQ to fully remove the device. You may need to refresh the page to see that it has been deleted.
- Click on Add Devices(s) and fill below device information.
- IP Address: 10.1.1.11
- User Name: admin
- Password: purple123
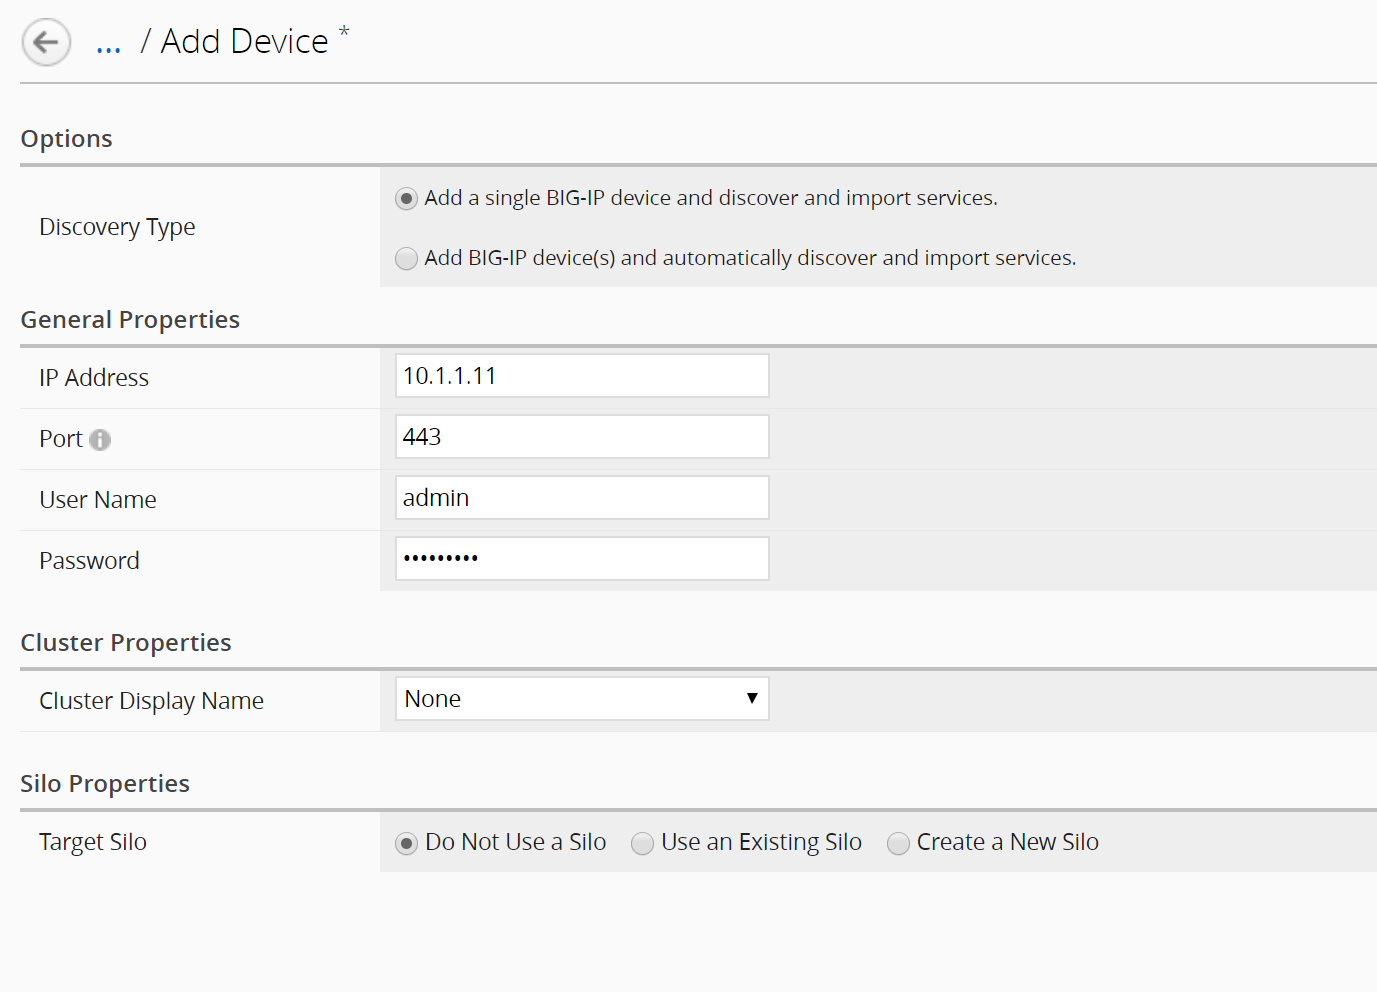
Click Add at the bottom of the screen to add the device.
- The Service configuration & Statistic monitoring window will open. Select LTM and deselect BIG-IP DNS and AFM Statistics Collection.
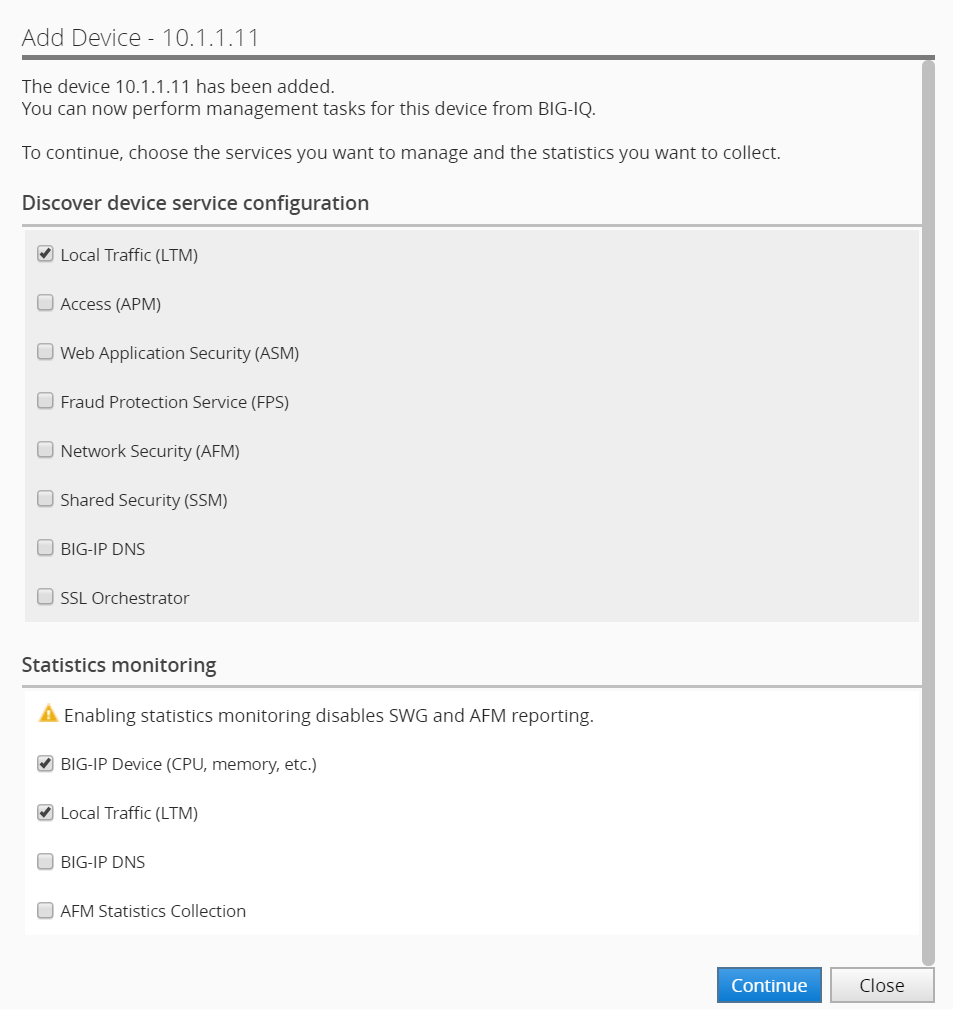
Click on Continue.
- Back on the Devices grid, click on Complete import tasks under SJC-vBIGIP01.termmarc.com Services.
- Click on Import to start the device configuration import in BIG-IQ.
- The conflict resolution window opens. Notice the profile HTTP silo-lab-http-profile is not showing anymore. Select Create Version option for all the remaining default profiles. The remaining conflicts are due to default changes in profiles across different TMOS versions. The Version Specific Defaults feature was added in a previous BIG-IQ release to deal with these sorts of conflicts. BIG-IQ will store different default values for each version of SW starting with what has been imported originally as the default. Next click Continue and if prompted click Resolve to address the version specific default conflicts.
- Once the import is completed, the device no longer shows silolab under Silo and Management, LTM in the device grid.

- You can navigate to the Configuration tab > Local Traffic > Profile and filter on silo-lab-http-profile to confirm both HTTP profiles silo-lab-http-profile and silo-lab-http-profile2 were imported. Note a second copy of silo-lab-http-profile2 still exists in the silolab Silo. Since this Silo is no longer in use it can be deleted.
- Finally, the silo silolab can be removed from BIG-IQ. Go to Devices > BIG-IP Device Silos. You will notice that there are zero devices associated with that Silo. Select the silolab Silo, then click Delete. You may need to refresh the page to see that it is gone. That completes this lab.
