F5 Public Cloud Solutions > Deploying BigIP with F5 Failover Extension in GCP Source | Edit on
3. Lab 2: Create VIP and Test Failover
The purpose of this lab is to test failover after deploying your API based failover google cloud template.
3.1. Objective:
- Gain an understanding of how API base failover functions for BIG-IP in google cloud.
3.2. Lab Requirements:
- Completed Lab1 “Deploying GDM Template”
- Estimated completion time: 25 minutes
3.3. Excercise 2: Create VIP and Test
3.3.1. Task – Create a Test VIP
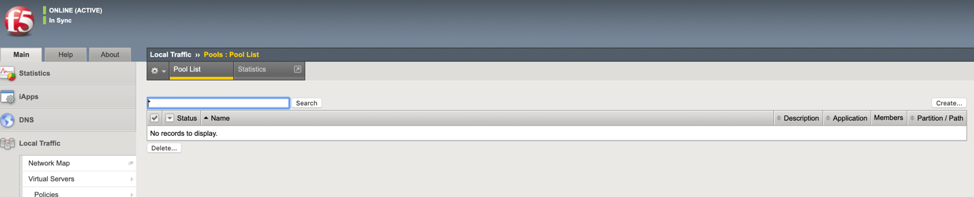
- Create Pool
Navigate to Local Traffic ›› Pools : Pool List. Click the “Create” button on the top right.
You will use the “internal IP address of the web server for your pool member IP”
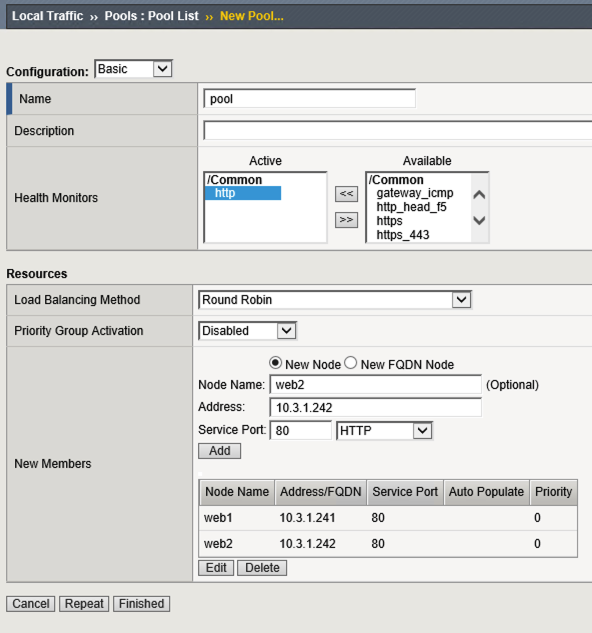
Create a pool with two members. On the Main tab, click Local Traffic ›› Pools : Pool List. Click Create per below.
| Field | Value |
|---|---|
| Name | pool |
| Health Monitors | http |
| Node Name | web1, web2 |
| Address | 10.3.1.241, 10.3.1.242 |
| Service Port | 80 |
In the Name field, type pool. Two backend web servers are pre-configured in the GCP environment.
-Click “Finished”
Verify all pool members are healthy Local Traffic -> Pools:Pool List ->pool -> Members.
2. Now we will create a virtual server that listens for packets destined for the BIG-IP’s IP address.
The VIP should use the forwarding IP that was created.
Note the forwarding IP..
Click on local traffic/Virtual Servers/Virtual Address List
Note the PUBLIC IP address.

In BIG-IP Configuration utility, Local Traffic -> Virtual Servers. Click Create.
| Field | Value |
|---|---|
| Name | testvip |
| Destination Address/Mask | PUBLIC IP address |
| Service Port | 80 |
| HTTP Profile (Client) | http |
| Source Address Translation | Auto Map |
| Default Pool | pool |
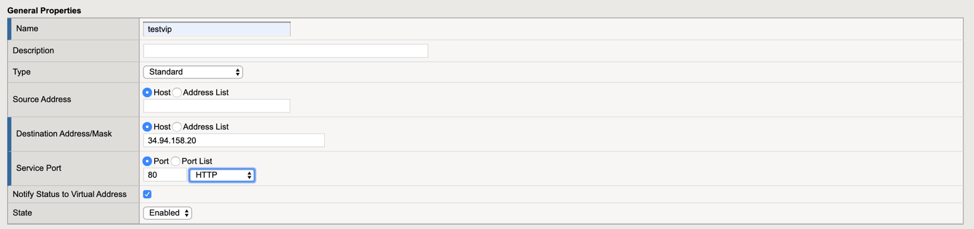

Your end state should similar to the below.

3.3.2. Task – Test Failover
- Open a browser and navigate to http://yourvip
Note the VIP uses the forwarding IP that was created by the template.
You should see the WebPage come up.
- Perform a failover while tailing the failover log.
To test.
On each BIG-IP
- ssh to box as user
- in TMSH type run util bash to get to a bash command line
- tail –f /var/log/restnoded/restnoded.log
- In TMUI go to devices/device management/ and select “force to standby on the active unit”d)
- Watch logs.
You should see something like the following in the log files.: