Deploy F5 BIG-IP Virtual Edition in Azure Classic
Follow these steps to deploy F5 BIG-IP Virtual Edition (VE) in the Azure Classic deployment model. Even though you are using Classic resources, you perform these steps in the new Resource Manager portal.
For Azure Resource Manager instructions, see Deploy F5 BIG-IP VE in Azure Resource Manager.
Log in to the Microsoft Azure Portal at https://portal.azure.com.
On the Start pane, select Marketplace.
In the Filter field, type
F5and press Enter.From the list of options, select the F5 image of your choice.
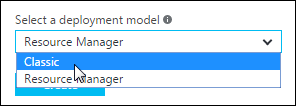
From the Select a deployment model list, select Classic and then click Create.
On the Create VM page:
Setting Details Host Name A name for the virtual appliance. User name A name for the person who will log in. You can’t change or access this field later. Authentication Type SSH keys are more secure than passwords. Pricing Tier Accept the default or change it. For Pricing Tier, leave the default or choose the instance size that meets your needs and click Select.
For Optional Configuration, note the following details.
Setting Details Availability set - All instances in an availability set must have the same subnets.
- BIG-IP high availability is currently not supported in Azure Classic, so you should configure the BIG-IP to reboot if a daemon fails. For details, see the BIG-IP System: Essentials guide on askf5.com.
Network Select the Classic virtual network of your choice. If you accept the default, Azure creates a new virtual network under the Resource Manager deployment model. Storage Select existing Classic storage or create new Classic storage. Endpoints 
- Create an endpoint for port
443. This allows you to access the BIG-IP Configuration utility. In BIG-IP VE 13.0 and later, the port is8443instead. - Create additional endpoints for any other ports that need external access. For example, port
80if the BIG-IP VE will process HTTP traffic. - If you choose SSH and do not specify a public port, Azure provides a port number for you. Port numbers can’t be re-used unless you remove or reconfigure the endpoint.
For Resource Group, either accept the default or click the right arrow (>) to change it. A resource group is a logical container of related resources.
Important: If you choose an existing resource group, you will be choosing from a list of Azure Classic Cloud Services. If you create a new group, you are creating a new resource group.
Confirm that the subscription and location are correct, and agree to the legal terms.
Click Create.
When done, you will have the following resources:
- A BIG-IP VE instance with one network interface
- A VLAN named
internal - A self IP address named
self_1nic
Note: You do not need to use the BIG-IP Setup wizard to configure networking, because BIG-IP configured basic networking during deployment.