KVM: Configure cryptographic offload for BIG-IP VE with Intel QAT
When running on KVM hosts, BIG-IP VE version 14.1.0.3 and later can offload compression as well as key agreement, encryption, and decryption cryptographic operations to Intel QuickAssist Technology (QAT) devices. Protocols for which cryptographic offload is supported include IPSec and Transport Layer Security (TLS).
Note
The following document provides one way of configuring cryptographic offload, but not the only way. For example, depending upon your internal processes you can build packages on one host, and copy them to the intended environment for installation, without using all of the development tools. Adjust these procedures as needed by your environment.
To configure your KVM host, verify the required prerequisites, and then complete the following steps:
- Change your firmware boot options
- Blocklist in-tree QAT drivers
- Build QAT host software
- Edit QAT Endpoint Configuration
- Start QAT drivers
- Verify QAT VFs
- Assign QAT VFs to BIG-IP VE VM
Prerequisites
Your system must meet the following requirements:
Server hardware
Intel x86_64 system with one or more of the following QAT devices:
- Intel Lewisburg C627/C628 PCH with integrated QAT 1.7
- Intel Lewis Hill DH8960 or DH8970 QAT 1.7 PCIe card
Linux OS with Library/Header File Packages
| CentOS 7.4 | Ubuntu 16.04.4 or 18.04 |
|---|---|
| pciutils | pciutils-dev |
| systemd-libs | libudev-dev |
| kernel-devel-$(uname -r) | linux-source-$(uname-r) |
| zlib-devel | zlib1g-dev |
| openssl-devel | libssl-dev |
| elfutils-libelf-devel | libelf-dev |
| boost-devel | libboost-dev |
| systemd-devel |
Tools
- gcc
- g++ or gcc-c++
To identify supported server hardware
To verify Lewisburg/Lewis Hill QAT device information, use the following command:
lspci -d 8086:37c8
A QAT device will expose one or more QAT endpoints. Each QAT endpoint is identified by a PCIe bus:slot.function (BSF) tuple associated with an SR-IOV Physical Function (PF). The bus:slot.function values will vary depending on the PCIe bus slot and motherboard manufacturer.
For each Lewisburg/Lewis Hill QAT device you will see three QAT endpoints, similar to:
# lspci -d 8086:37c8
1a:00.0 Co-processor: Intel Corporation Device 37c8 (rev 04)
1b:00.0 Co-processor: Intel Corporation Device 37c8 (rev 04)
1c:00.0 Co-processor: Intel Corporation Device 37c8 (rev 04)
Add-on license
For the Intel QAT, you will need an add-on license to existing BIG-IP VE 14.1.0.3 and later base SKUs. For complete details, consult the Activating add-on modules procedure in the K7752 article.
Step 1: Change your firmware boot options
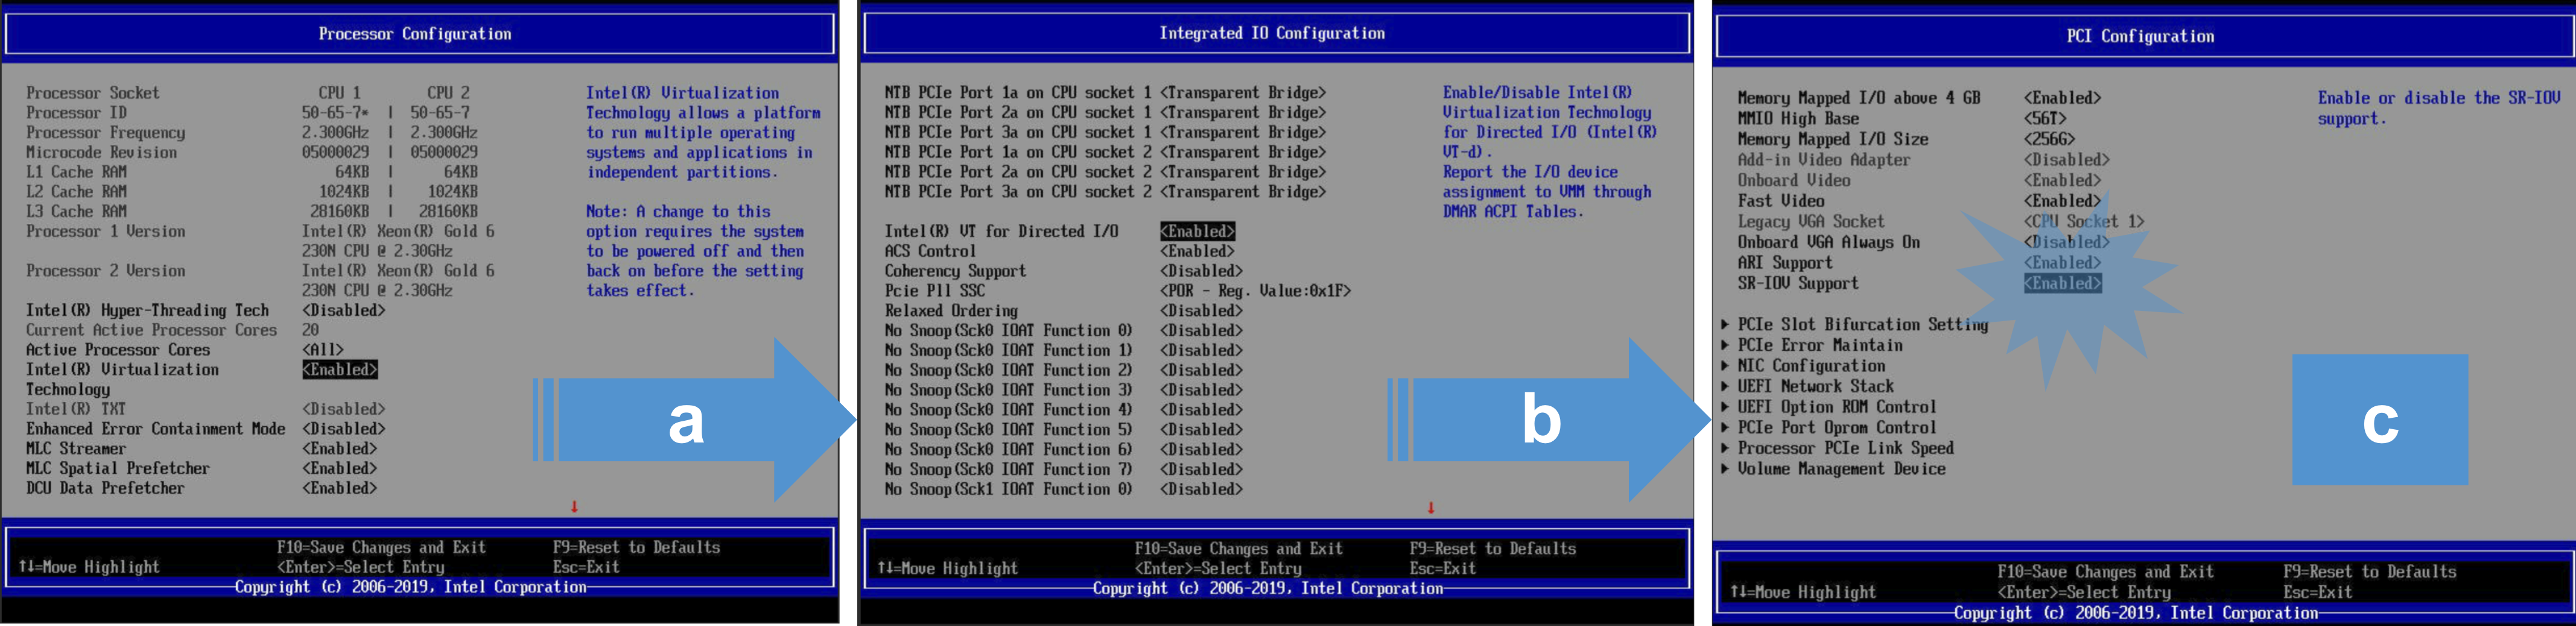
Modify BIOS settings for supporting virtualization and SR-IOV, prepare your system for accelerated QAT device offload capabilities by enabling:
- Intel Virtualization Technology
- SR-IOV
- VT-d or Intel VT for Directed I/O
Caution
To assure SR-IOV support for modern PCIE cards, it is recommended that you do the following:
- Update your BIOS to the latest version per the manufacturer’s directions. However, when updating a system BIOS there is a chance of rendering the system inoperable; backup or image any existing data on the server.
- Do not perform BIOS upgrades on production systems unless you have redundancy.
- Firmware updates and other changes in the BIOS can create a failure to boot or require OS updates. After updating the BIOS, it is recommended that you perform a fresh install of the OS along with the drivers and the hypervisor.
- Check with your manufacture for prerequisites when incrementally updating the BIOS, as large jumps in firmware revisions can be problematic. For example, when running version 3.1.4, you must install 3.5.0, before upgrading to 4.0.0.
To verify that the client has virtualization support, Intel VT-x, and SR-IOV support enabled in the BIOS:
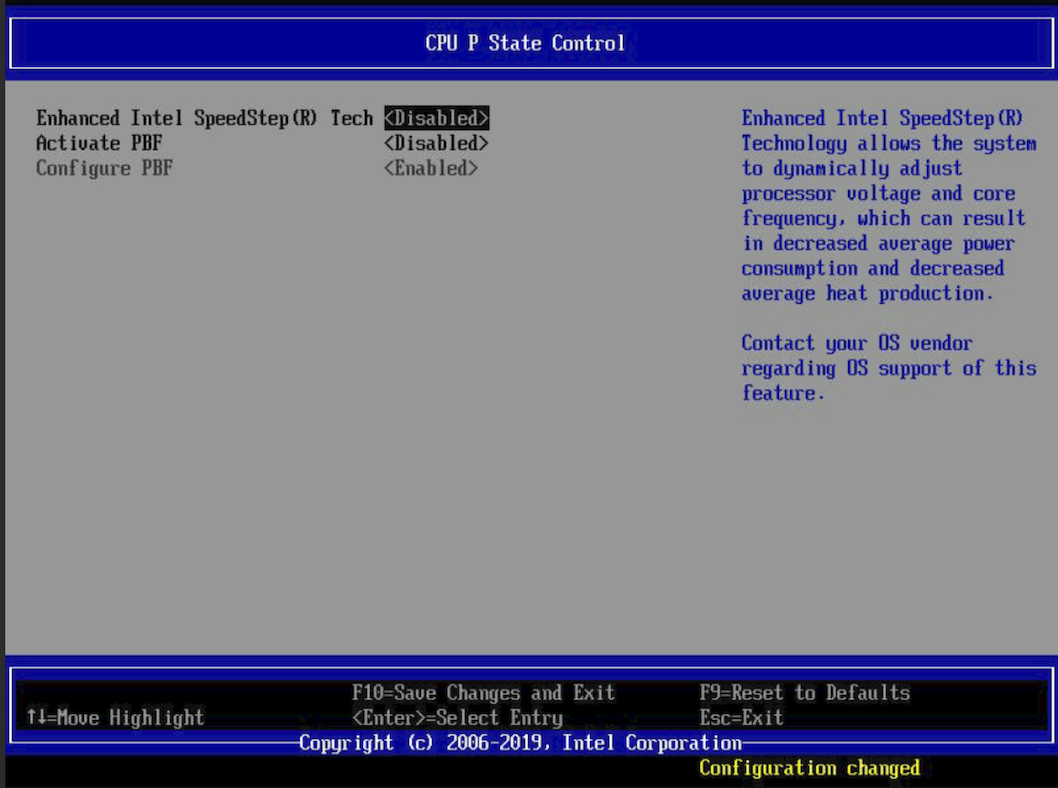
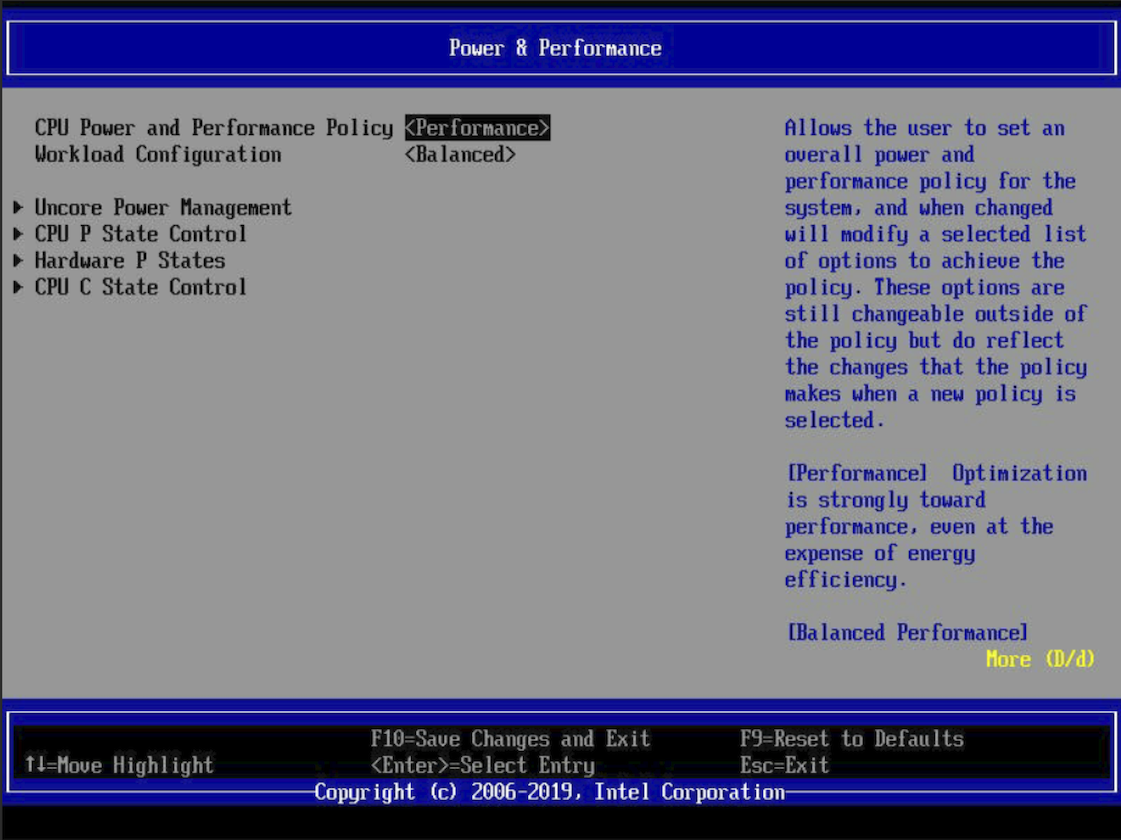
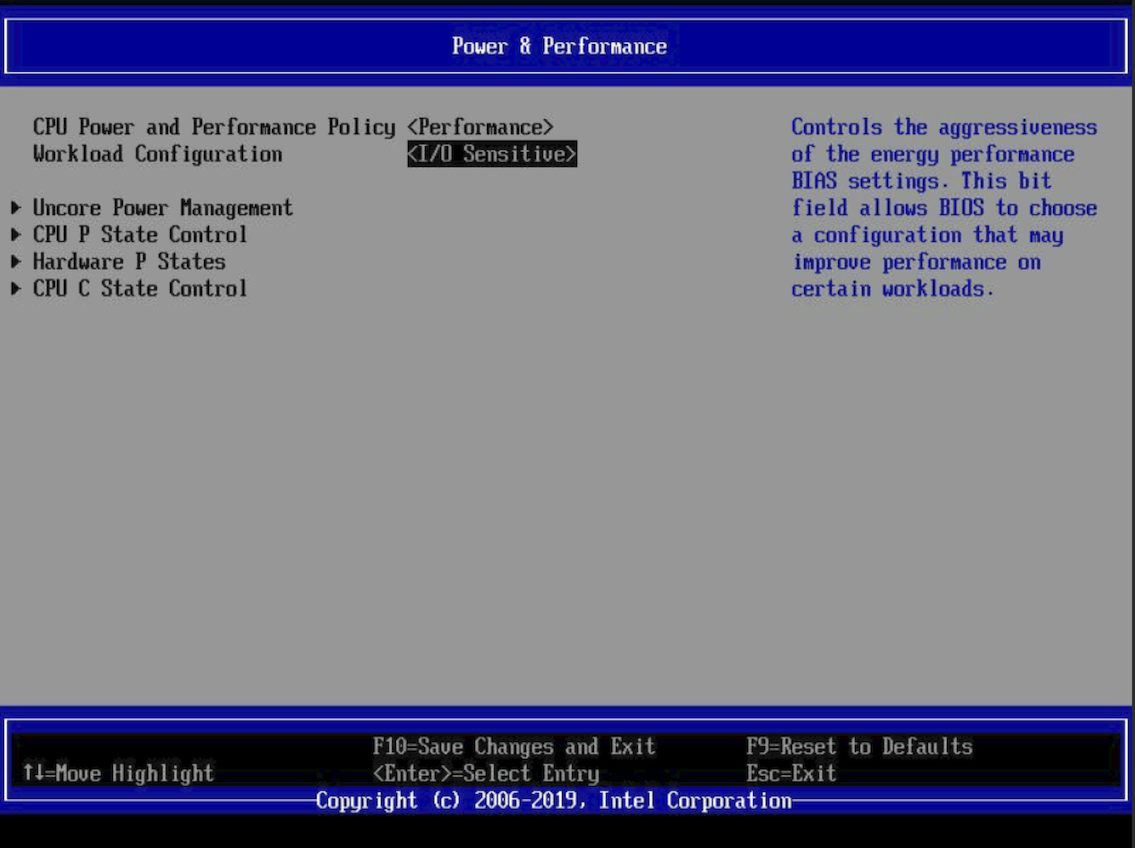
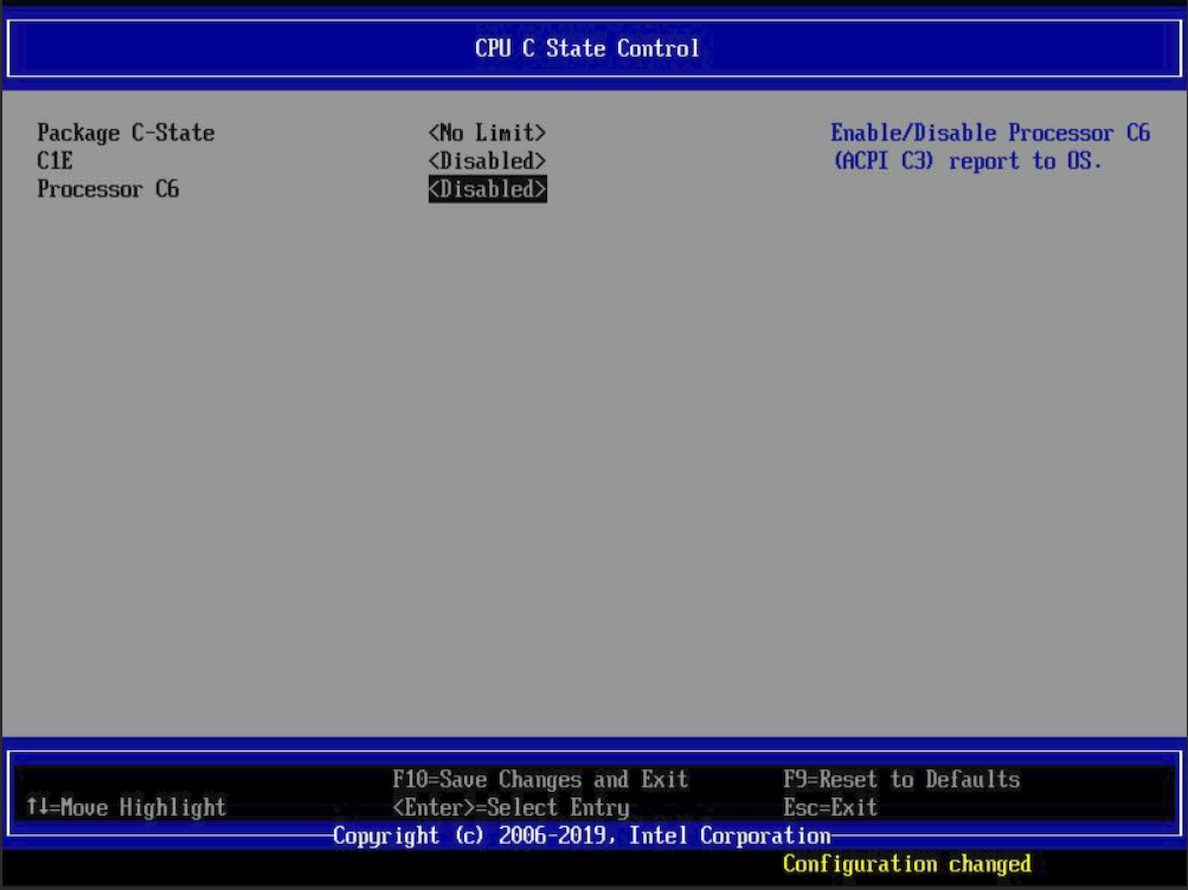
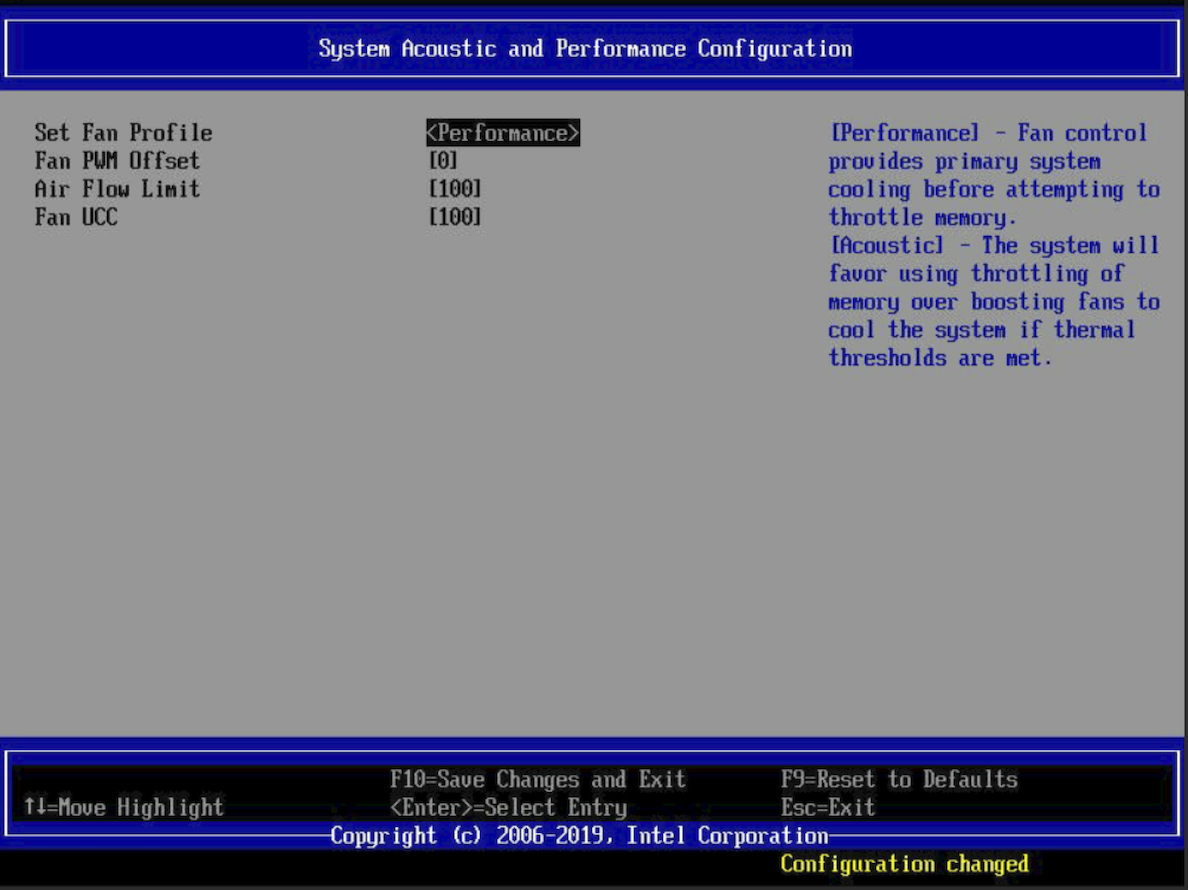
To set the BIOS for optimal performance:
Turn off speed-stepping.
Change the Power Management setting to Performance.
Change the Workload Configuration setting to I/O Sensitive.
Disable the C-State power controls.
Change the Fan Profile setting to Performance.
Verify that the Grub configuration file has
intel_iommu=onin the Linux kernel boot command line.
Step 2: Blocklist in-tree QAT drivers
Linux kernel releases ship with QAT drivers that you will not use.
To block these in-tree QAT drivers, add the following to a quickassist-blacklist.conf file, in the
/lib/modprobe.ddirectory on your host system; for example:### Blacklist in-kernel QAT drivers to avoid kernel ### boot problems. ### # Lewisburg QAT PF blacklist qat_c62x # Common QAT driver blacklist intel_qat
Reboot the host system.
Compile the driver.
Step 3: Build QAT host software
After blocking the unused, in-tree QAT drivers, build and install the supported, out-of-tree Intel QAT 1.7 SDK drivers and utilities.
Note
To install QAT devices in the kernel directory, you must have sudo access.
To work in an empty QAT directory on your KVM host system, type:
mkdir ~/QAT; cd ~/QAT.Download the QAT 1.7.l.4.7.0-00006 SDK tar file to the
~/QATdirectory on your KVM system, and then to unzip the install file, type:tar -xzf qat1.7.l.4.7.0-00006.tar.gz.To customize the build for your system, run autoconf configure:
./configure --enable-icp-sriov=hostCompile the QAT drivers and utilities, type:
sudo make.Install the QAT drivers and utilities, type:
sudo make install.
For the official Intel QAT 1.7 v4.4.0 SDK documentation, consult the Intel QuickAssist Technology Software for Linux Getting Started Guide (336212-006).
Step 4: Edit QAT endpoint configuration
Disable QAT Physical Function resource assignments by modifying the /etc/c6xx_dev[0-9].conf QAT endpoint configuration files.
Edit /etc/c6xx_dev0.conf to set the kernel values to zero as shown below:
##############################################
# Kernel Instances Section
##############################################
[KERNEL]
NumberCyInstances = 0
NumberDcInstances = 0
Delete all user space sections starting at the comment shown below through the end of the file:
##############################################
# User Process Instance Section
##############################################
Replace the other
/etc/c6xx_dev[1-9].conffiles by symbolic links to/etc/c6xx_dev0.conf:# cd /etc # for file in $(ls c6xx_dev[1-9].conf); do ln -f -s /etc/c6xx_dev0.conf $file; done
Step 5: Start QAT drivers
Use qat_service to load the QAT Physical Functions (PFs) and Virtual Functions (VFs).
- To start the QAT 1.7 device drivers, type:
sudo /etc/init.d/qat_service start. - To check driver status, type:
sudo /etc/init.d/qat_service status.
Step 6: Verify QAT VFs
After starting the drivers, check for QAT VFs and related modules.
Use the command
lspci -d 8086:37c9to check for Lewisburg or Lewis Hill VFs.If you do not see QAT VFs, do the following:
If no QAT PF and VF modules exist, type:
find /lib/modules/$(uname -r)/updates/drivers -name 'qat*.ko', and then inspect the output to verify that updated QAT kernel modules are installed in the kernel tree. For example:# find /lib/modules/$(uname -r)/updates/drivers -name 'qat*.ko' /lib/modules/4.4.0-122-generic/updates/drivers/crypto/qat/qat_dh895xccvf/qat_dh895xccvf.ko /lib/modules/4.4.0-122-generic/updates/drivers/crypto/qat/qat_c62x/qat_c62x.ko /lib/modules/4.4.0-122-generic/updates/drivers/crypto/qat/qat_c62xvf/qat_c62xvf.ko /lib/modules/4.4.0-122-generic/updates/drivers/crypto/qat/qat_dh895xcc/qat_dh895xcc.ko
Tip
Use
/etc/init.d/qat_service statusto show all QAT devices asstate: up.If no QAT VFs exist, check the
sriov_numvfsfiles corresponding to the QAT PF bus:slot.function values. For example:Type Filename Value 1a:00.0 /sys/bus/pci/devices/0000:1a:00.0/sriov_numvfs 16 1b:00.0 /sys/bus/pci/devices/0000:1b:00.0/sriov_numvfs 16 1c:00.0 /sys/bus/pci/devices/0000:1c:00.0/sriov_numvfs 16 Note
PCI pass-through of an entire QAT endpoint is not supported for KVM guests. However, SR-IOV virtual functions are supported.
Step 7: Assign QAT VFs to BIG-IP VE VM
For optimal performance and availability, assign QAT VFs for each vCPU assigned to your BIG-IP VM. You must equally pull these VFs from each endpoint for synchronous behavior. For example, for 12 vCPUs, grab 4 VFs from each physical function (PF) endpoint.
Note
Assigning more QAT VFs than a VM’s vCPU count from the same QAT endpoint does NOT improve performance. In multi-tenant environments, assign all VFs associated with the same QAT endpoint to a single tenant.
Create the BIG-IP VE VM.
Do the following:
To Use command Shut down the VM. virt-managerAssign QAT VFs to the VM. virt-managerEdit the libvirt XML in an editor. virsh editModify each QAT hostdev entry so that its destination address has a unique bus number, slot 1, and function 0.
Specify a VFIO driver on the hostdev entry.
Important
Be careful to modify the virtual destination address, and NOT the host PCI source address.
To edit the libvirt XML in an editor, type:
virsh edit vm-name. Modify each QAT VF mapping, specifying its own bus number in the guest destination<address>attribute, as shown in the following example:<hostdev mode='subsystem' type='pci' managed='yes'> <driver name='vfio'/> <source> <address domain='0x0000' bus='0x1a' slot='0x02' function='0x3'/> </source> <address type='pci' domain='0x0000' bus='0x02' slot='0x01' function='0x0'/>