F5 Application Delivery Controller Solutions > Introduction to ADC Deployments with BIG-IP LTM > Module 1: BIG-IP LTM Basic Configuration Source | Edit on
Lab 1: Configure Virtual Servers and Pools
In this lab you will explore the BIG-IP configuration utility, create your first web application, and configure different types of virtual servers and load balancing methods.
Task 1 – Connect to Ravello and Examine the BIG-IP Configuration Utility
Use a browser to access http://IP_address with the IP address supplied by your instructor, and log in using the username and password supplied by your instructor.
For ADC Implementations with LTM click View.
Copy the IP address of the Windows 7 External VM, and then use RDP to access the IP address.
Log into the Windows workstation as external_user / password.
Open Chrome and click the BIGIP_A bookmark.
Log into the BIG-IP system as admin / admin.
From the left menu select Local Traffic.
The Local Traffic menu is where most ADC functions are performed.
From the left menu select Network.
The Network menu is where you configure elements for routing and switching.
From the left menu select System.
The System menu is where you configure DNS and NTP settings, manage licensing, perform software updates, and import SSL certificates.
Open the Network > VLANs > VLAN List page.

Two VLANs were already created, an external VLAN for outside access, and an internal VLAN for access to the internal network.
Open the Network > Self IPs > Self IP List page.
This BIG-IP system is configured with four self IP addresses. Each VLAN has a standard self IP address (ending in .241) and a floating self IP address (ending in .240). We’ll use the floating self IP addresses during the high availability exercise.
Open the Network > Routes page.
This BIG-IP system is configured with a default gateway route for outbound internet access (on 10.1.10.1).
Task 2 – Create a Basic Web Application
Examine the lab diagram on page 2. We’ll be creating a web application for an application that is stored on three web servers (at 10.1.20.11 – 10.1.20.13).
Open the Local Traffic > Pools > Pool List page and click Create.

Use the following information for the new pool. For fields that are not specified, leave them set to the default settings.
Form field Value Name http_pool New Members Node Name: node1 Address: 10.1.20.11 Service Port: 80 (Click Add) Node Name: node 2 Address 10.1.20.12 Service Port: 80 (Click Add) Node Name: node 3 Address: 10.1.20.13 Service Port: 80 (Click Add) Click Finished.
Open the Local Traffic > Virtual Servers > Virtual Server List page and click Create.
Use the following information for the new virtual server, and then click Finished.
Form field Value Name http_virtual Destination Address/ Mask 10.1.10.20 Service Port 80 Resources > Default Pool http_pool Use a new tab to access http://10.1.10.20.
Use Ctrl + F5 to reload the page several times.
You can see that page elements are coming from all three web servers. That’s all it takes to create a basic web application on the BIG-IP system.
Close the tab.
In the Configuration Utility, open the Local Traffic > Pools > Statistics page.
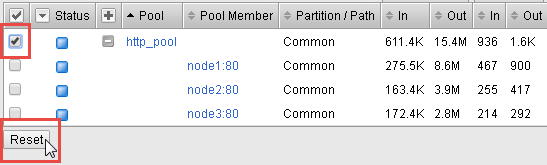
Expand the http_pool by clicking on the + icon.
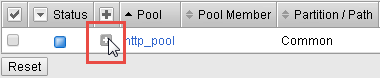
You use the Statistics page to identify the amount of traffic sent to the pool members. Notice that the requests are evenly distributed across all three web servers.
Select the http_pool checkbox, and then click Reset.
Task 3 – Create a Forwarding Virtual Server
Use a new tab to attempt direct access to an internal web server at http://10.1.20.41.
Currently you are unable to access resources on the internal network from the external Windows workstation.
Open the Start menu and type cmd, then right-click cmd.exe and select Run as administrator, and then click Yes.
At the command prompt, type (or copy and paste):
route add 10.1.20.0 mask 255.255.255.0 10.1.10.241This adds a route to the 10.1.20.0 network through the external self IP address (10.1.10.241) of the BIG-IP system.
Reload the page directed at http://10.1.20.41.
The request fails again, as the BIG-IP system does not have a listener to forward this request to the internal network.
In the Configuration Utility, open the Local Traffic > Virtual Servers > Virtual Server List page and click Create.
Use the following information for the new virtual server, and then click Finished.
Form field Value Name forward_virtual Type Forwarding (IP) Destination Address/ Mask 10.1.20.0/24 Service Port * All Ports Protocol * All Protocols This virtual server provides access to the 10.1.20.0/24 network on all ports and all protocols.
Reload the page directed at http://10.1.20.41.
The request is successful. The BIG-IP system doesn’t act as a full proxy, it simply forwards requests to the internal network.
Edit the URL to https://10.1.20.32.
Go to Start > Remote Desktop Connection.
Click Show Options, then select the Display tab, then change the Display configuration to 1024 by 768.
Open the General tab and connect to 10.1.20.251 and log in as administrator / password.
On the Windows Server image go to Start > Log off.
You now have access to all ports and all protocols on the 10.1.20.0 network.
Task 4 – Create a Reject Virtual Server
In the Configuration Utility, on the Virtual Server List page click Create.
Use the following information for the new virtual server, and then click Finished.
Form field Value Name reject_win_server Type Reject Destination Address/ Mask 10.1.20.251 Service Port * All Ports Protocol * All Protocols On the Lorax Intranet tab click Corporate Tools, and then close the tab.
Go to Start > Remote Desktop Connection and connect to 10.1.20.251.
Although you still have access to the 10.1.20.0 network, you no longer have access to 10.1.20.251 (the Windows Server).
Close the Remote Desktop Connection window.
In the command prompt type the following, and then close the command prompt.
route DELETE 10.1.20.0In the Configuration Utility, select the forward_virtual and reject_win_server checkboxes and then click Delete and Delete again.
Task 5 – Use Different Pool Options
Open the Local Traffic > Pools > Pool List page and click http_pool, and then open the Members page.

Currently the pool is using the default load balancing method: Round Robin.
From the Load Balancing Method list select Ratio (member), and then click Update.
Examine the Current Members section.
Currently all three pool members have the same ratio value (1).
Click node1:80, then change the ratio value to 10, and then click Update.
At the top of the page click Members, then click node2:80, then change the ratio value to 5, and then click Update
Click Members again and examine the Current Members section.
Use an incognito window to access http://10.1.10.20, then type Ctrl + F5 at least 10 times to reload the page, and the close the page.

In the Configuration Utility, at the top of the page click Statistics.
Requests are now being distributed to the three pool members in a 10 – 5 – 1 ratio.