F5 Application Delivery Controller Solutions > Introduction to ADC Deployments with BIG-IP LTM > Module 1: BIG-IP LTM Basic Configuration Source | Edit on
Lab 2: Work with SNAT, Profiles, and Monitors
In this lab you will experiment with using SNAT Auto Map for inbound requests as well as outbound requests from internal users. You’ll also use an HTTP and stream profile to make global modifications to text within a web site. Finally you’ll see how using health monitors ensures that you the BIG-IP knows which web servers are available for client requests.
Task 1 – Use SNAT AutoMap
In the Configuration Utility, open the Pool List page and click Create.
Use the following information for the new pool, and then click Finished.
Form field Value Name lorax_pool New Members Address: 10.1.20.41 Service Port: 80 (Click Add) Address 10.1.20.42 Service Port: 80 (Click Add) Address: 10.1.20.43 Service Port: 80 (Click Add) Open the Virtual Server List page and click Create.
Use the following information for the new virtual server, and then click Finished.
Form field Value Name lorax_virtual Destination Address/ Mask 10.1.10.25 Service Port 80 Resources > Default Pool lorax_pool From the desktop open putty, and then connect to BIGIP_A and log in as root / default.
At the CLI type (or copy and paste):
tcpdump -i external port 80Open a second putty session and connect to BIGIP_A.
At the CLI type (or copy and paste):
tcpdump -i internal port 80Use a new tab to access http://10.1.10.25, and then close the tab.
The page displays as expected.
Examine the tcpdump windows.
On the external VLAN the communication is between the client IP address (10.1.10.199) and the virtual server (10.1.10.25).
On the internal VLAN the communication is between the client IP address (10.1.10.199) and a back-end web server (10.1.20.x).
In both tcpdump sessions press the Enter key several times to move the log entries to the top of the window.
In the Ravello window, open the Windows Server console and log in as f5demo\administrator / password.
In the Windows Server image, go to Start > Control Panel, then go to Network and Internet > Network and Sharing Center, and then click Change adapter settings.
Right-click on Local Area Connection 3 and select Properties.
Select Internet Protocol Version 4 (TCP/IPv4) and select Properties.
Currently the Windows Server’s default gateway is configured for the BIG-IP’s internal self IP address (10.1.20.241). The network administrator has chosen to modify the default gateway to an external router.
Edit the Default gateway to 10.1.20.254, then click OK and Close.
On the Windows desktop, use an incognito window to access http://10.1.10.25.
The page fails to load because the web server is now sending its responses to the external router, not the BIG-IP system.
Close the page, and then examine the tcpdump window.
On the external VLAN the communication is still between the client IP address (10.1.10.199) and the virtual server (10.1.10.25).
On the internal VLAN the requests are from the client IP address to a back-end web server, however there are no responses from the web server.
Press the Enter key several times to move the log entries to the top of the window.
In the Configuration Utility, click lorax_virtual.
From the Source Address Translation list select Auto Map, and then click Update.

Use an incognito window to access http://10.1.10.25, and then close the window.
SNAT Auto Map ensures that responses to server request are always sent back to the BIG-IP system.
Examine the tcpdump window.
On the external VLAN the communication is still between the client IP address (10.1.10.199) and the virtual server (10.1.10.25).
On the internal VLAN the communication is now between the BIG-IP internal floating self IP address (10.1.20.240) and a back-end web server (10.1.20.x).
Task 2 – Create a SNAT for Internal Resources
Press the Enter key several times to move the log entries to the top of the window.
On the Windows server, change the default gateway to 10.1.20.240 (the BIG-IP internal floating self IP address).
On the Windows server, use Internet Explorer to access www.f5.com.
The request fails as the internal resource has no access to the WAN (or the Internet).
Close the page, then on the Windows desktop examine the tcpdump windows.
No requests are being sent to the Internet by the BIG-IP system on behalf of the internal resource.
In the Configuration Utility, open the Local Traffic > Address Translation > SNAT List page and click Create.
Use the following information for the new SNAT, and then click Finished.
Form field Value Name internal_snat Translation IP Address: 10.1.10.100 Origin Address List Address/Prefix Length 10.1.20.0/24 (Click Add) On the Windows server, use Internet Explorer to access www.f5.com.
The internal user now has public access to the internet using the SNAT IP address of 10.1.10.100.
On the Windows desktop, examine the tcpdump windows.
On the external VLAN the communication is between the SNAT IP address (10.1.10.100) and the Internet resources.
On the internal VLAN the communication is between the internal client (10.1.20.251) and the Internet resources.
Close the putty sessions.
Task 3 – Use Profiles with a Virtual Server
Use a new tab to access http://10.1.10.25, and then select the links at the top of the page and examine the text on each page.
The pages make several references to the company name Lorax Investments. Lorax Investments has been acquired by Smithy Financial. Instead of updating all the web site code we’ll use profiles on the BIG-IP system to update the web site.
Close the tab.
In the Configuration Utility, open the Local Traffic > Profiles > Other > Stream page and click Create.
Use the following information for the profile, and then click Finished.
Form field Value Name name_change Source Lorax Investments Target Smithy Financials Open the Virtual Server List page and click lorax_virtual.
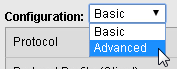
From the Configuration list select Advanced.
From the HTTP Profile list select http.
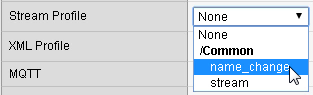
From the Stream Profile list select name_change.
In the Acceleration section, from the HTTP Compression Profile list select httpcompression.
From the Web Acceleration Profile list select optimized-caching, and then click Update.
Use an incognito window to access http://10.1.10.25, and then select the links at the top of the page.
Although the logo need to be updated, all the text on all pages now references Smithy Financials.
Task 4 – Work with Monitors
Edit the URL to http://10.1.10.25/health_check.html
We’re going to use this web page to identify if the web server is up or down.
Close the health check page.
In the Configuration Utility, open the Local Traffic > Monitors page and click Create.
Use the following information for the monitor, and then click Finished.
Form field Value Name lorax_monitor Type http Interval 4 Timeout 13 Send String GET /health_check.html\r\n Receive String Server_Up Receive Disable String Server_Down Open the Pool List page and click lorax_pool.
Identify the current Availability status of the pool.
Unknown identifies when a pool or node doesn’t have a configured monitor.
Add lorax_monitor to the Active list and click Update.
The Availability of the pool changes to Available (Enabled).
Open the Local Traffic > Nodes > Node List page.
Notice that all the nodes currently display unknown.
Open the Local Traffic > Nodes > Default Monitor page.
Add gateway_icmp to the Active list and click Update.
Return to the Nodes >ode List page.
All nodes now display. This means that they are all sending icmp responses.
Open the Local Traffic > Network Map page and view the status for lorax_virtual.
The virtual server, pool, and all three pool members display available.
Use your mouse to hover over the pool members.
All three nodes also display available.
Sub-Task 1 – Take 10.1.20.41:80 Offline
On the Windows server go to Start > Computer, and then navigate to C:\inetpub\wwwroot\lorax_public_site_41.
This is the directory is used for pool member 10.1.20.41:80. The health_check.html web page currently exists on this pool member.
Delete health_check.html.
Wait 13 seconds, and then in the Configuration Utility on the Network Map page click Update Map.
Use your mouse to hover over the pool members.
The first pool member is offline, and all three nodes display available.
Sub-Task 2 – Disable 10.1.20.42:80
On the Windows server navigate to C:\inetpub\wwwroot\lorax_public_site_42.
Right-click health_check and select Open with > WordPad.
In the <p> tag, edit the text to Server_Down, and then click Save.
This file is used by pool member 10.1.20.42:80. This pool member will now match the disable string identified in the monitor.
Wait 13 seconds, and then in the Configuration Utility on the Network Map page click Update Map.
The second pool member is now disabled; however, the virtual server and pool still display available.
Sub-Task 3 – Take Node 10.1.20.43 Offline
On the Windows server, for Local Area Connection 3 open the Internet Protocol Version 4 (TCP/IPv4) properties.
Click Advanced, and in the list of IP addresses scroll down to 10.1.20.43 and click Remove, then click OK three times and then click Close.
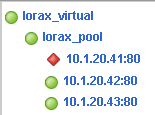
Wait 13 seconds, and then in the Configuration Utility on the Network Map page, click Update Map.
Use your mouse to hover over the pool members.
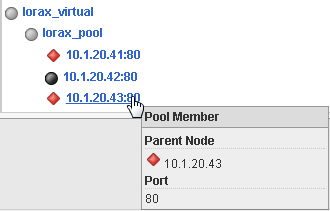
The virtual server and pool display disabled but available. Node 10.1.20.43 now displays offline, which causes pool member 10.1.20.43:80 to display offline.
Sub- Task 4 – Bring 10.1.20.42:80 Back Online
On the Windows server, in the health_check WordPad document, edit the text back to Server_Up, then click Save, and then close WordPad.
In the Configuration Utility on the Network Map page click Update Map.
Because pool member 10.1.20.42:80 is available, the virtual server and pool once again display available.
Use an incognito window to access http://10.1.10.25.
The page displays, with all page elements coming from 10.1.20.42:80.
Close the page.