F5 Application Study Tool Labs > Class 1: Introduction to F5 Application Study Tool > Module 2: Installing, Configuring, Updating, and Accessing the F5 AST Source | Edit on
Lab 2 - Full Installation of the F5 AST
Within this lab, you will undertake the task of performing a full installation of the F5 Application Study Tool onto an Ubuntu host.
Attention
Some platforms may require the Shift key in conjunction with standard copy/paste key combinations when interacting with the Web Shell
For example, use Shift + Ctrl + v to paste instead of Ctrl + v
Pre-requisites Installation
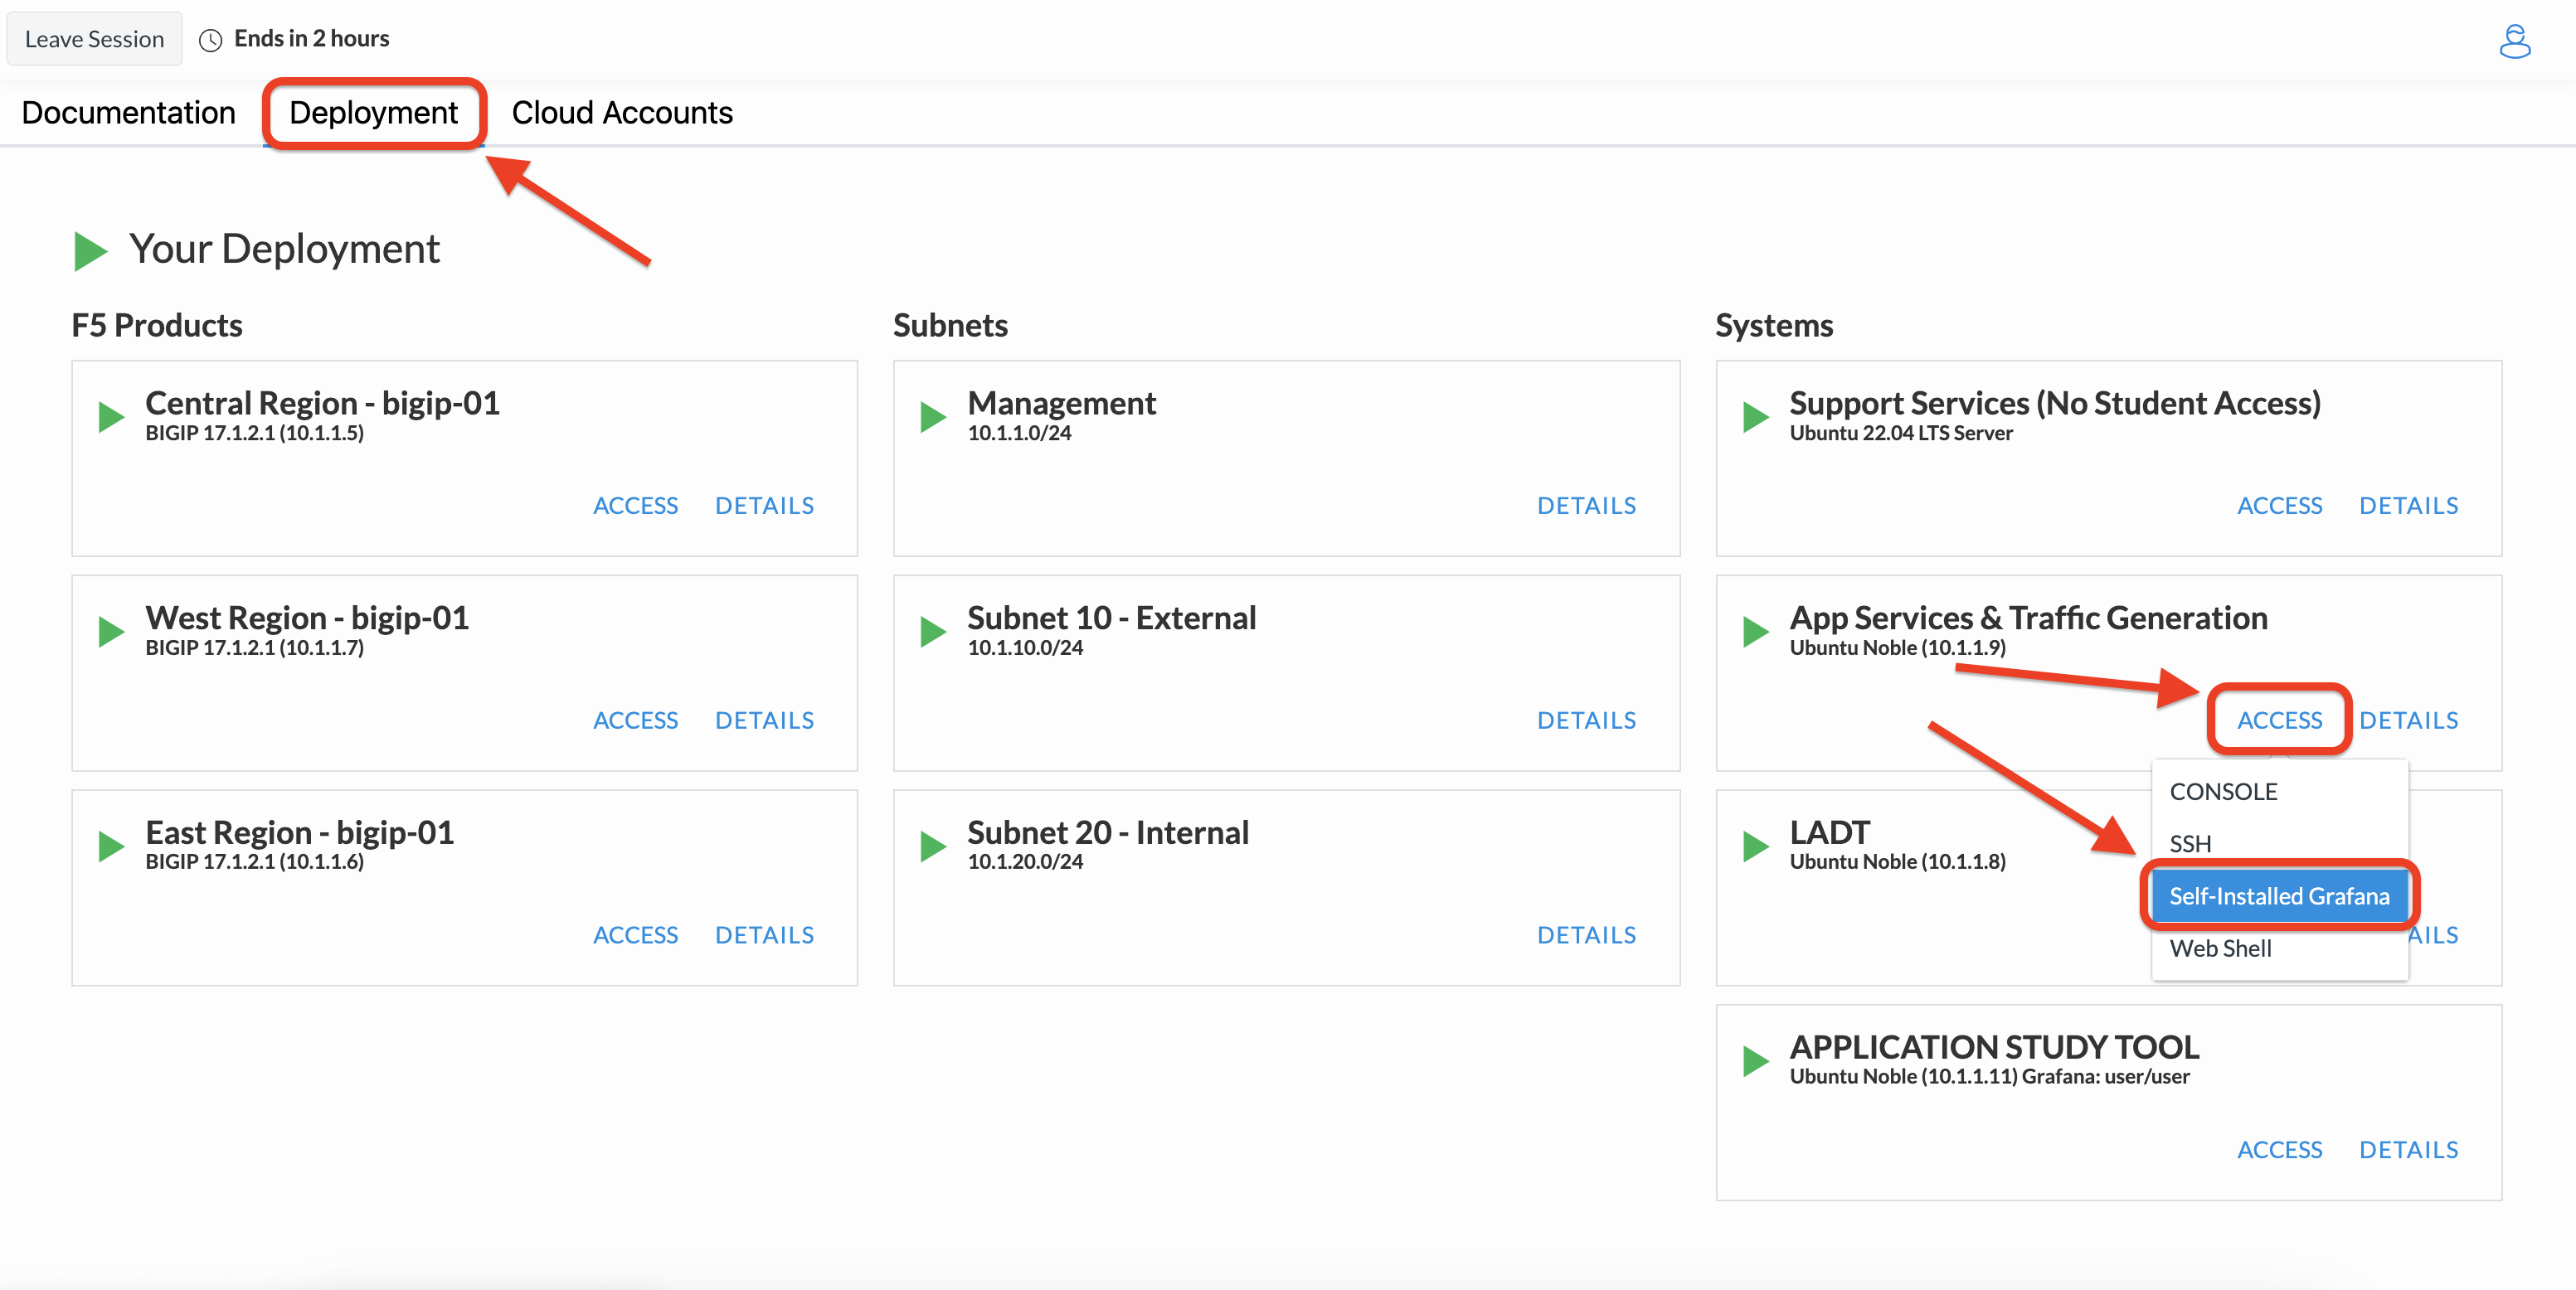
Navigate to the App Services & Traffic Generation component with the UDF lab, then select Access and Web Shell.
Switch to the ubuntu user
su - ubuntuInstall Git Client (Ubuntu)
sudo apt install git-allNote
For more options, there are instructions for installing on several different Unix distributions on the Git website, at https://git-scm.com/download/linux
Install Docker (Ubuntu)
Set up Docker’s
aptrepository by first adding Docker’s official GPG key, then adding the repository to Apt sources:sudo apt-get update sudo apt-get install ca-certificates curl sudo install -m 0755 -d /etc/apt/keyrings sudo curl -fsSL https://download.docker.com/linux/ubuntu/gpg -o /etc/apt/keyrings/docker.asc sudo chmod a+r /etc/apt/keyrings/docker.asc echo \ "deb [arch=$(dpkg --print-architecture) signed-by=/etc/apt/keyrings/docker.asc] https://download.docker.com/linux/ubuntu \ $(. /etc/os-release && echo "$VERSION_CODENAME") stable" | \ sudo tee /etc/apt/sources.list.d/docker.list > /dev/null sudo apt-get update
Install the Docker packages
sudo apt-get install docker-ce docker-ce-cli containerd.io docker-buildx-plugin docker-compose-plugin
F5 Application Study Tool Installation and Setup
Ensure you’re in the ubuntu user home directory
cd && pwdClone the F5 Application Study Tool repo and enter the directory
git clone https://github.com/f5devcentral/application-study-tool.git && cd application-study-toolCreate localized copies of the environment variables and
Device Secretsfiles.cp .env-example .envcp .env.device-secrets-example .env.device-secretsInspect the F5 AST environment variables by running the following commands:
more .envmore .env.device-secretsNote
The environment and configuration files contain documentation tidbits to aid the setup and tuning process
Update the
Device Secretsfile viavim(or another editor of your choosing):vim .env.device-secretsWhile in vim, press
Shift+Gto take your cursor to the bottom line and typeddto delete the line forBIGIP_PASSWORD_2. Next, typeeuntil your cursor reaches the end of the line.At the end of the line, press
ito enter insert mode, thenright-arrow. PressbackspaceuntilA_SECRET_PASSWORDhas been removed.Now, copy and paste the following password into the editor:
f5Twister!The contents of the file should now look like this:
# Names here are arbitrary, but must match values in big-ips.json.
# Passwords can be referenced by many devices (you do not need a unique variable for each device).
BIGIP_PASSWORD_1=f5Twister!
To save your changes, press
escape, then type:wqandreturn. You should see a message similar to the following upon successful save:".env.device-secrets" 3L, 202B writtenExamine the F5 AST default configuration by running the following command. Press the
spacebarto reveal the entire config.more config/ast_defaults.yamlHere’s an excerpt from the
ast_defaults.yamlfile:# These configs are applied to each entry in the bigip_receivers file # where they don't contain an equivalent / overriding entry. bigip_receiver_defaults: # The time to wait between metric collection runs collection_interval: 60s # The username to login to the device with username: admin # The password (not recommended) or a reference to an env variable (recommended, shown) # Below tells the collector to look for an environment variable named BIGIP_PASSWORD_1 password: "${env:BIGIP_PASSWORD_1}" # The timeout field can be used to adjust the maximum amount of time the collector will wait for a response # to BigIP iControl Rest requests. Larger boxes with more complex config may require setting this value # higher. # This value should be less than or equal to the collection_interval. Any requests that haven't completed # before this timer expires (starting at the beginning of the collection interval) will be cancelled. # You can set this for individual devices in bigip_receivers.yaml. timeout: 60s # The data_types that should be enabled or disabled. Default-disabled module users can enable those modules # by setting the below to true. These will apply to all devices and may be better specified on the # per-reciever settings file. # The full list of available data types is [here](https://f5devcentral.github.io/application-study-tool/components/otel_collector/receiver_readme.html#available-data_types). data_types: f5.apm: enabled: false f5.cgnat: enabled: false f5.dns: enabled: false f5.dos: enabled: false f5.firewall: enabled: false f5.gtm: enabled: false f5.policy.api_protection: enabled: false f5.policy.asm: enabled: false f5.policy.firewall: enabled: false f5.policy.ip_intelligence: enabled: false f5.policy.nat: enabled: false f5.profile.dos: enabled: false # The TLS settings to use. Either a CA file must be specified or insecure_skip_verify # set to true (not recommended) tls: insecure_skip_verify: false ca_file: "" # Set to true to enable periodic metric export to F5 DataFabric. # Requires adding your Sensor ID and secret token to the container environment (see .env-example). # Contact your F5 sales rep to obtain the ID / secret token. f5_data_export: falseThis file contains configuration parameters for both the F5 AST itself and the devices subject to data collection. As the name implies, default settings for device collection can be set here.
Take a look at the value for
password. It’s referencing an environment variable – one which has been defined in the.env.device-secretsduring Step 5.Note
Default device settings can be overridden by individual device configurations in the
config/bigip_receivers.yamlfile.Edit the
AST Defaultsconfiguration file.sudo vim config/ast_defaults.yamlThe one property we’re interested in changing is insecure_skip_verify, nested within the tls section. Setting this value to true will allow self-signed BIG-IP device certificates to be ignored and permitted.
Using the arrow keys, navigate to the end of the insecure_skip_verify line, press
ito enter insert mode, thenright-arrow. Pressbackspaceuntilfalsehas been removed and type the wordtrue.To save your changes, press
escape, then type:wqandreturn. You should see a message similar to the following upon successful save:"config/ast_defaults.yaml" 72L, 3286B writtenOpen the
BIG-IP Receiversconfiguration file for editingsudo vim config/bigip_receivers.yamlIn order to preserve the formatting of multi-line copy/paste with vim, we need to set paste by copy/pasting the following into vim and pressing
return.:set pasteNote
It will appear as though nothing has occurred. This is expected behavior.
For the sake of simplicity, we’re going to remove all contents of the file, then paste in the new configuration.
To remove the existing configuration, type
:%dand pressreturn. This will delete all lines.Next,
ito enter insert mode and copy/paste the following into the editor:# Your bigip targets # Values not explicitly configured here inherit values in # the ast_defaults.yaml bigip_receiver_defaults section. # Each entry must have a unique name, starting with bigip/ # (e.g. bigip/1, bigip/2) bigip/1: # Endpoint must be specified for each device # Set this to the management IP for the device. This must be # reachable from the Application Study Tool host (port 443). endpoint: https://10.1.1.5 ## Uncommenting any of the following lines will override the defaults in ## ast_defaults.yaml bigip_receiver_defaults section. # username: SOME_OVERRIDE_ACCOUNT_NAME # password: "${SOME_OTHER_ENV_VAR_WITH_ANOTHER_PASSWORD}" # collection_interval: 30s # timeout: 20s data_types: f5.apm: enabled: true f5.cgnat: enabled: true f5.dns: enabled: true f5.dos: enabled: true f5.firewall: enabled: true f5.gtm: enabled: true f5.policy.api_protection: enabled: false f5.policy.asm: enabled: true f5.policy.firewall: enabled: false f5.policy.ip_intelligence: enabled: false f5.policy.nat: enabled: false f5.profile.dos: enabled: false tls: insecure_skip_verify: true # ca_file: bigip/2: # Endpoint must be specified for each device # Set this to the management IP for the device. This must be # reachable from the Application Study Tool host (port 443). endpoint: https://10.1.1.6 ## Uncommenting any of the following lines will override the defaults in ## ast_defaults.yaml bigip_receiver_defaults section. # username: SOME_OVERRIDE_ACCOUNT_NAME # password: "${SOME_OTHER_ENV_VAR_WITH_ANOTHER_PASSWORD}" # collection_interval: 30s # timeout: 20s data_types: f5.apm: enabled: false f5.cgnat: enabled: false f5.dns: enabled: true f5.dos: enabled: false f5.firewall: enabled: true f5.gtm: enabled: true f5.policy.api_protection: enabled: false f5.policy.asm: enabled: true f5.policy.firewall: enabled: false f5.policy.ip_intelligence: enabled: false f5.policy.nat: enabled: false f5.profile.dos: enabled: false tls: insecure_skip_verify: true # ca_file: bigip/3: endpoint: https://10.1.1.7 data_types: f5.apm: enabled: true f5.cgnat: enabled: true f5.dns: enabled: true f5.dos: enabled: true f5.firewall: enabled: true f5.gtm: enabled: true f5.policy.api_protection: enabled: false f5.policy.asm: enabled: true f5.policy.firewall: enabled: false f5.policy.ip_intelligence: enabled: false f5.policy.nat: enabled: false f5.profile.dos: enabled: false tls: insecure_skip_verify: true # ca_file:
To save your changes, press
escape, then type:wqandreturn. You should see a message similar to the following upon successful save:"config/bigip_receivers.yaml" 50L, 987B writtenRun the Configuration Generator
The Configuration Generator will collect the contents of the files we previously viewed/edited and prepare them for the AST collector container.
sudo docker run --rm -it -w /app -v ${PWD}:/app --entrypoint /app/src/bin/init_entrypoint.sh python:3.12.6-slim-bookworm --generate-configYou should see a slew of output resembling the following:
Unable to find image 'python:3.12.6-slim-bookworm' locally
3.12.6-slim-bookworm: Pulling from library/python
302e3ee49805: Pull complete
699edf835b1b: Pull complete
417a872b7725: Pull complete
9795987f6d21: Pull complete
Digest: sha256:ad48727987b259854d52241fac3bc633574364867b8e20aec305e6e7f4028b26
Status: Downloaded newer image for python:3.12.6-slim-bookworm
Collecting PyYAML==6.0.2
  Downloading PyYAML-6.0.2-cp312-cp312-manylinux_2_17_x86_64.manylinux2014_x86_64.whl.metadata (2.1 kB)
Downloading PyYAML-6.0.2-cp312-cp312-manylinux_2_17_x86_64.manylinux2014_x86_64.whl (767 kB)
  ━━━━━━━━━━━━━━━━━━━━━━━━━━━━━━━━━━━━━━━━ 767.5/767.5 kB 9.7 MB/s eta 0:00:00
Installing collected packages: PyYAML
Successfully installed PyYAML-6.0.2
WARNING: Running pip as the 'root' user can result in broken permissions and conflicting behaviour with the system package manager, possibly rendering your system unusable.It is recommended to use a virtual environment instead: https://pip.pypa.io/warnings/venv. Use the --root-user-action option if you know what you are doing and want to suppress this warning.

[notice] A new release of pip is available: 24.2 -> 25.0.1
[notice] To update, run: pip install --upgrade pip
2025-02-19 16:43:51,954 - INFO - Generating configs from  ./config/ast_defaults.yaml and ./config/bigip_receivers.yaml...
2025-02-19 16:43:51,954 - INFO - Loading AST Default Settings in ./config/ast_defaults.yaml...
2025-02-19 16:43:51,961 - INFO - Successfully loaded './config/ast_defaults.yaml'.
2025-02-19 16:43:51,961 - INFO - Loading Per-Receiver (BigIP) Settings in ./config/bigip_receivers.yaml...
2025-02-19 16:43:51,965 - INFO - Successfully loaded './config/bigip_receivers.yaml'.
2025-02-19 16:43:51,965 - INFO - Generating receiver configs...
2025-02-19 16:43:51,966 - INFO - Generating pipeline configs...
2025-02-19 16:43:51,966 - WARNING - The f5_data_export=true and f5_pipeline_default fields are required to export metrics periodically to F5. Contact your F5 Sales Rep to provision a Sensor ID and Access Token.
2025-02-19 16:43:51,967 - INFO - Built the following pipeline file:

metrics/local:
  exporters:
  - otlphttp/metrics-local
  - debug/bigip
  processors:
  - batch/local
  receivers:
  - bigip/1
  - bigip/2
  - bigip/3

2025-02-19 16:43:51,970 - INFO - Built the following receiver file:

bigip/1:
  collection_interval: 60s
  data_types:
    f5.apm:
      enabled: false
    f5.cgnat:
      enabled: false
    f5.dns:
      enabled: true
    f5.dos:
      enabled: true
    f5.firewall:
      enabled: true
    f5.gtm:
      enabled: true
  endpoint: https://10.1.1.5
  password: ${env:BIGIP_PASSWORD_1}
  timeout: 60s
  tls:
    ca_file: ''
    insecure_skip_verify: true
  username: admin
bigip/2:
  collection_interval: 60s
  data_types:
    f5.apm:
      enabled: false
    f5.cgnat:
      enabled: false
    f5.dns:
      enabled: false
    f5.dos:
      enabled: false
    f5.firewall:
      enabled: true
    f5.gtm:
      enabled: false
  endpoint: https://10.1.1.6
  password: ${env:BIGIP_PASSWORD_1}
  timeout: 60s
  tls:
    ca_file: ''
    insecure_skip_verify: true
  username: admin
bigip/3:
  collection_interval: 60s
  data_types:
    f5.apm:
      enabled: false
    f5.cgnat:
      enabled: false
    f5.dns:
      enabled: false
    f5.dos:
      enabled: false
    f5.firewall:
      enabled: false
    f5.gtm:
      enabled: false
  endpoint: https://10.1.1.7
  password: ${env:BIGIP_PASSWORD_1}
  timeout: 60s
  tls:
    ca_file: ''
    insecure_skip_verify: true
  username: admin

2025-02-19 16:43:51,971 - INFO - Successfully wrote data to './services/otel_collector/pipelines.yaml'.
2025-02-19 16:43:51,975 - INFO - Successfully wrote data to './services/otel_collector/receivers.yaml'.
The last two lines indicate success. If you’re in an instructor-led class and do not see the success messages, please alert the lab assistants and request help.
Start the F5 Application Study Tool
sudo docker compose up -dNote
Depending on the version of Docker installed, you may need to run sudo docker-compose up -d. The command above is tailored to the version of Docker installed within the UDF lab at the time this guide was authored.
You should see output similar to the following:
WARN[0000] /home/ubuntu/application-study-tool/docker-compose.yaml: the attribute `version` is obsolete, it will be ignored, please remove it to avoid potential confusion
[+] Running 27/27
✔ otel-collector Pulled                                                                                                                                   2.9s
  ✔ b8d12e1fc000 Pull complete                                                                                                                            0.3s
  ✔ d016446e7f46 Pull complete                                                                                                                            2.3s
✔ grafana Pulled                                                                                                                                         11.7s
  ✔ 4abcf2066143 Pull complete                                                                                                                            0.5s
  ✔ 39aee5fd3406 Pull complete                                                                                                                            0.5s
  ✔ 592f1e71407c Pull complete                                                                                                                            1.4s
  ✔ 66aec874ce0c Pull complete                                                                                                                            1.6s
  ✔ bde37282dfba Pull complete                                                                                                                            1.6s
  ✔ b6982d0733af Pull complete                                                                                                                            1.7s
  ✔ ab3c28da242b Pull complete                                                                                                                            4.8s
  ✔ e4892977d944 Pull complete                                                                                                                           11.0s
  ✔ ef2b3f3f597e Pull complete                                                                                                                           11.0s
  ✔ 27a3c8ebdfbf Pull complete                                                                                                                           11.0s
✔ prometheus Pulled                                                                                                                                       6.7s
  ✔ 9fa9226be034 Pull complete                                                                                                                            1.5s
  ✔ 1617e25568b2 Pull complete                                                                                                                            2.3s
  ✔ 02203e3d6934 Pull complete                                                                                                                            4.3s
  ✔ 8be4b7271108 Pull complete                                                                                                                            5.7s
  ✔ 8becc689631f Pull complete                                                                                                                            5.8s
  ✔ ceaeea15c1bf Pull complete                                                                                                                            5.8s
  ✔ 564720d6ed13 Pull complete                                                                                                                            5.8s
  ✔ 1fd5d47e09da Pull complete                                                                                                                            5.9s
  ✔ 1afe4a0d7329 Pull complete                                                                                                                            5.9s
  ✔ bd55ccfa5aad Pull complete                                                                                                                            5.9s
  ✔ 54f884861fc1 Pull complete                                                                                                                            6.0s
  ✔ b09316e948c6 Pull complete                                                                                                                            6.0s
[+] Running 6/6
✔ Network application-study-tool_7lc_network         Created                                                                                              0.1s
✔ Volume "application-study-tool_grafana"            Created                                                                                              0.0s
✔ Volume "application-study-tool_prometheus"         Created                                                                                              0.0s
✔ Container application-study-tool-otel-collector-1  Started                                                                                              2.0s
✔ Container grafana                                  Started                                                                                              2.2s
✔ Container prometheus                               Started                                                                                              2.1s
Accessing Self-Installed F5 AST
Here’s where our boots hit the ground and the real adventure begins!
From within the UDF course deployment’s App Services & Traffic Generation System, locate and select ACCESS, then Self-Installed Grafana.
Once the new browser tab has loaded, you will be presented with the self-installed AST Grafana login. Enter the following credentials and select Log in.
Username
adminPassword
admin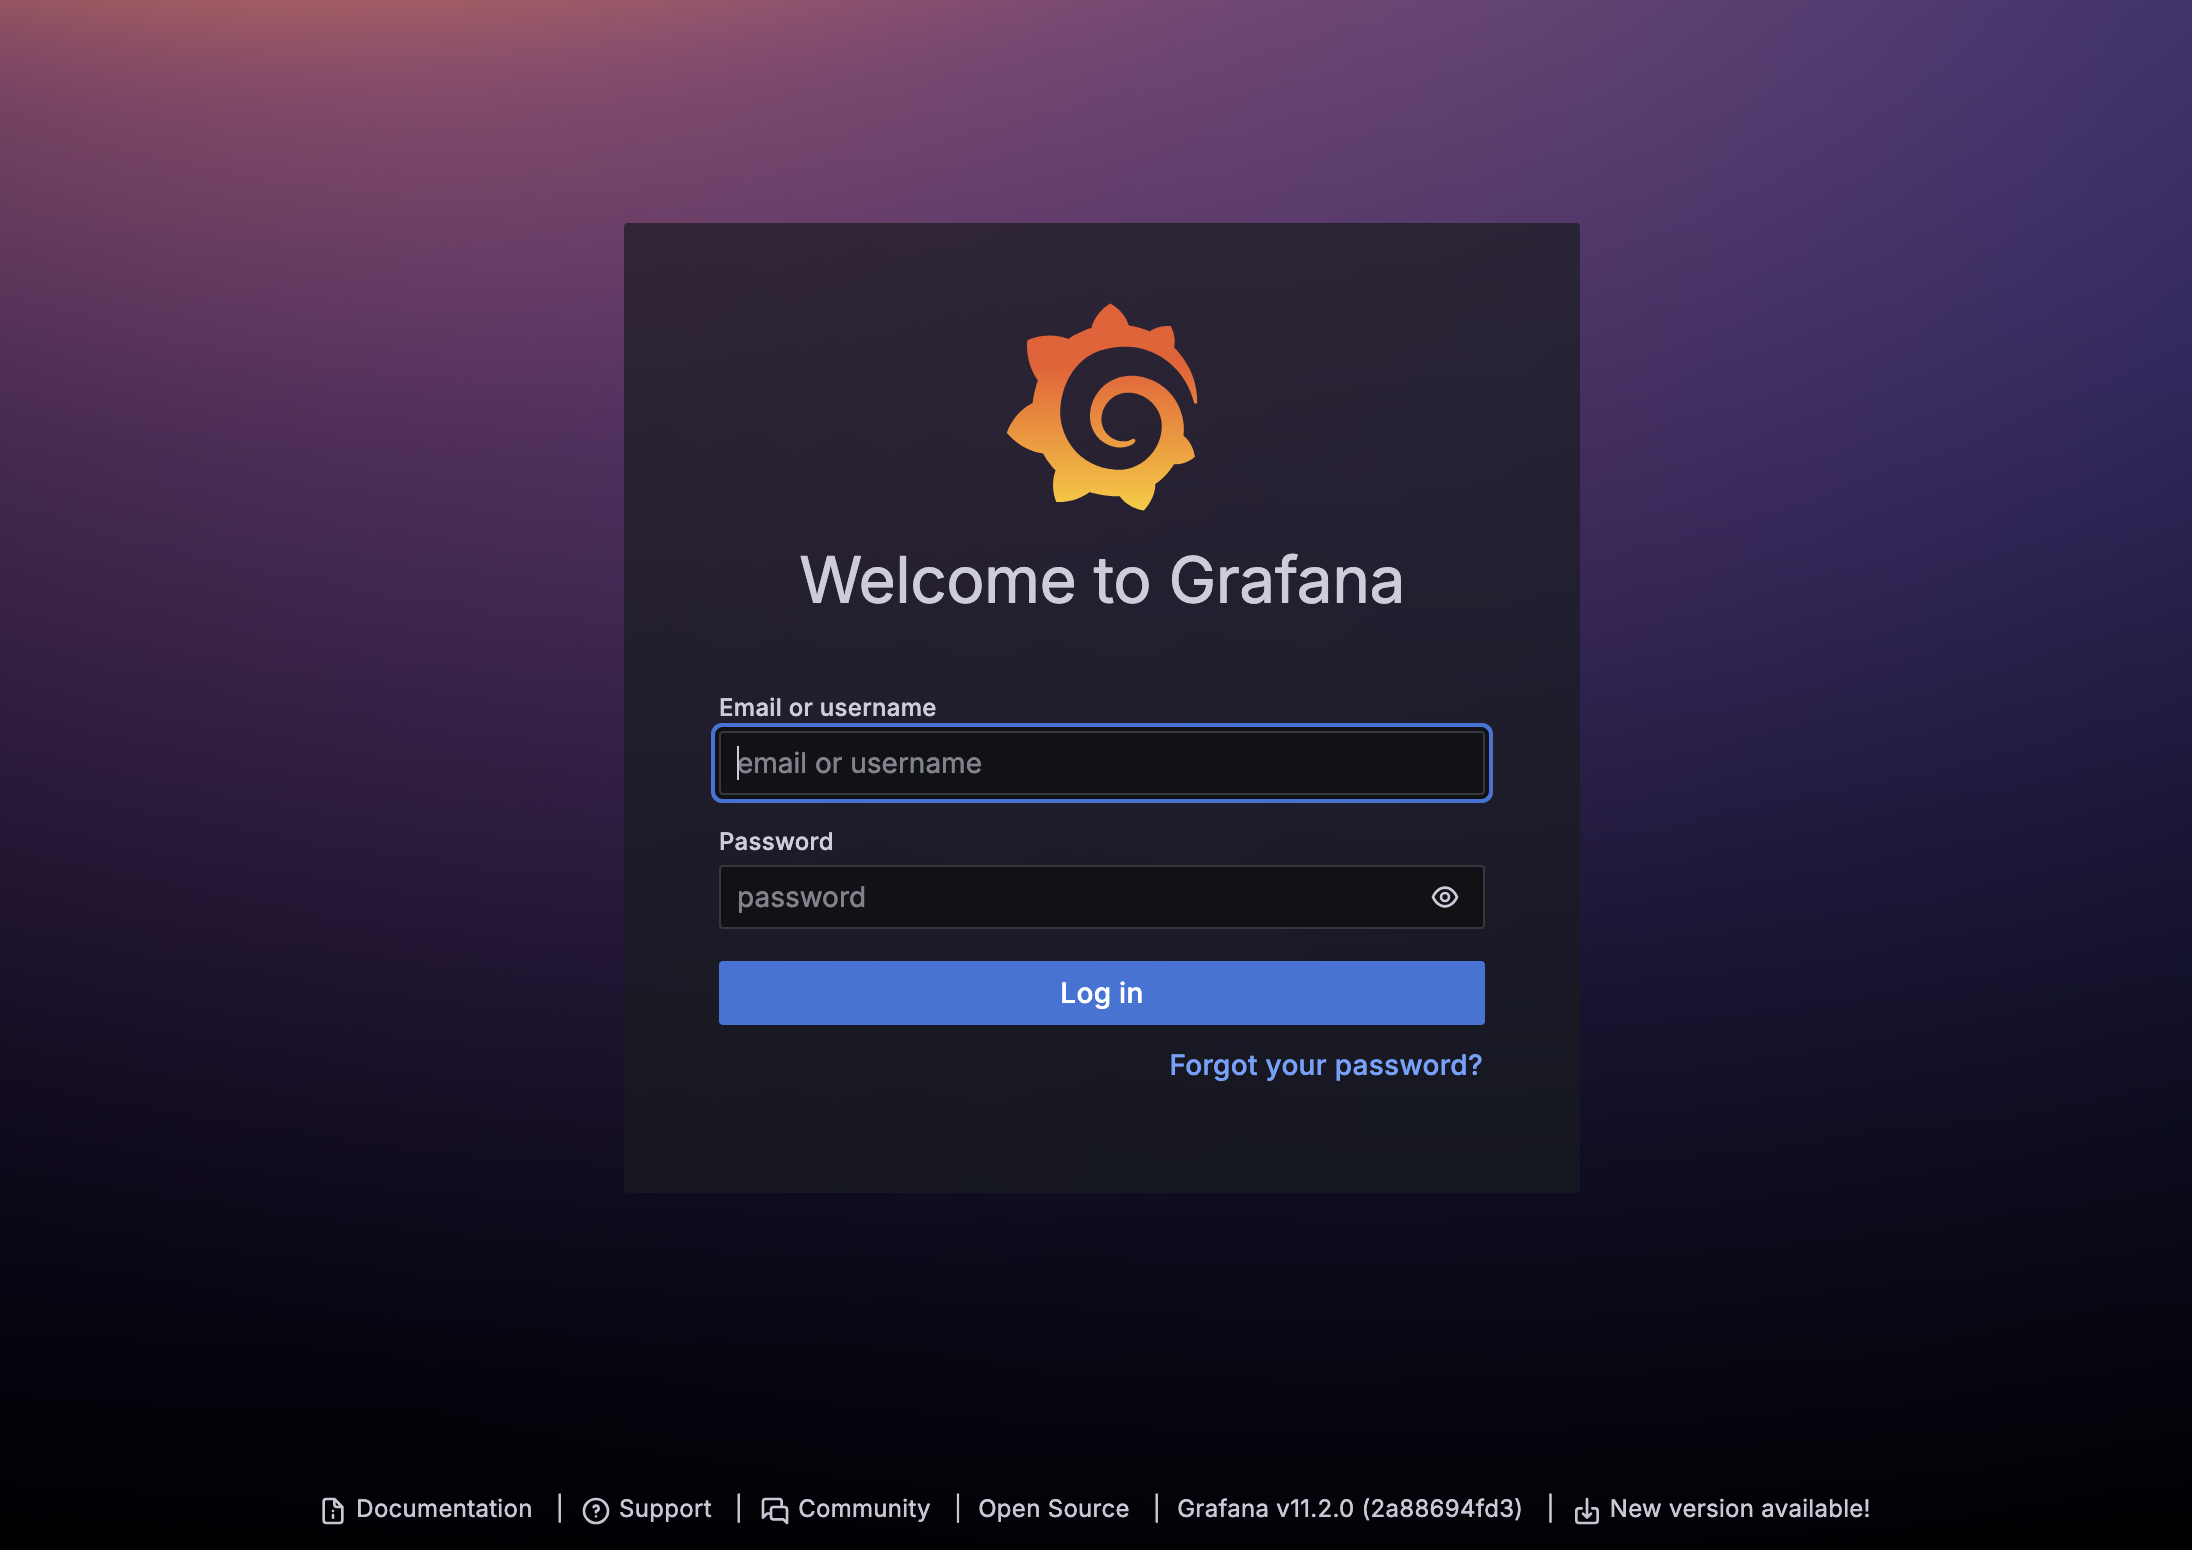
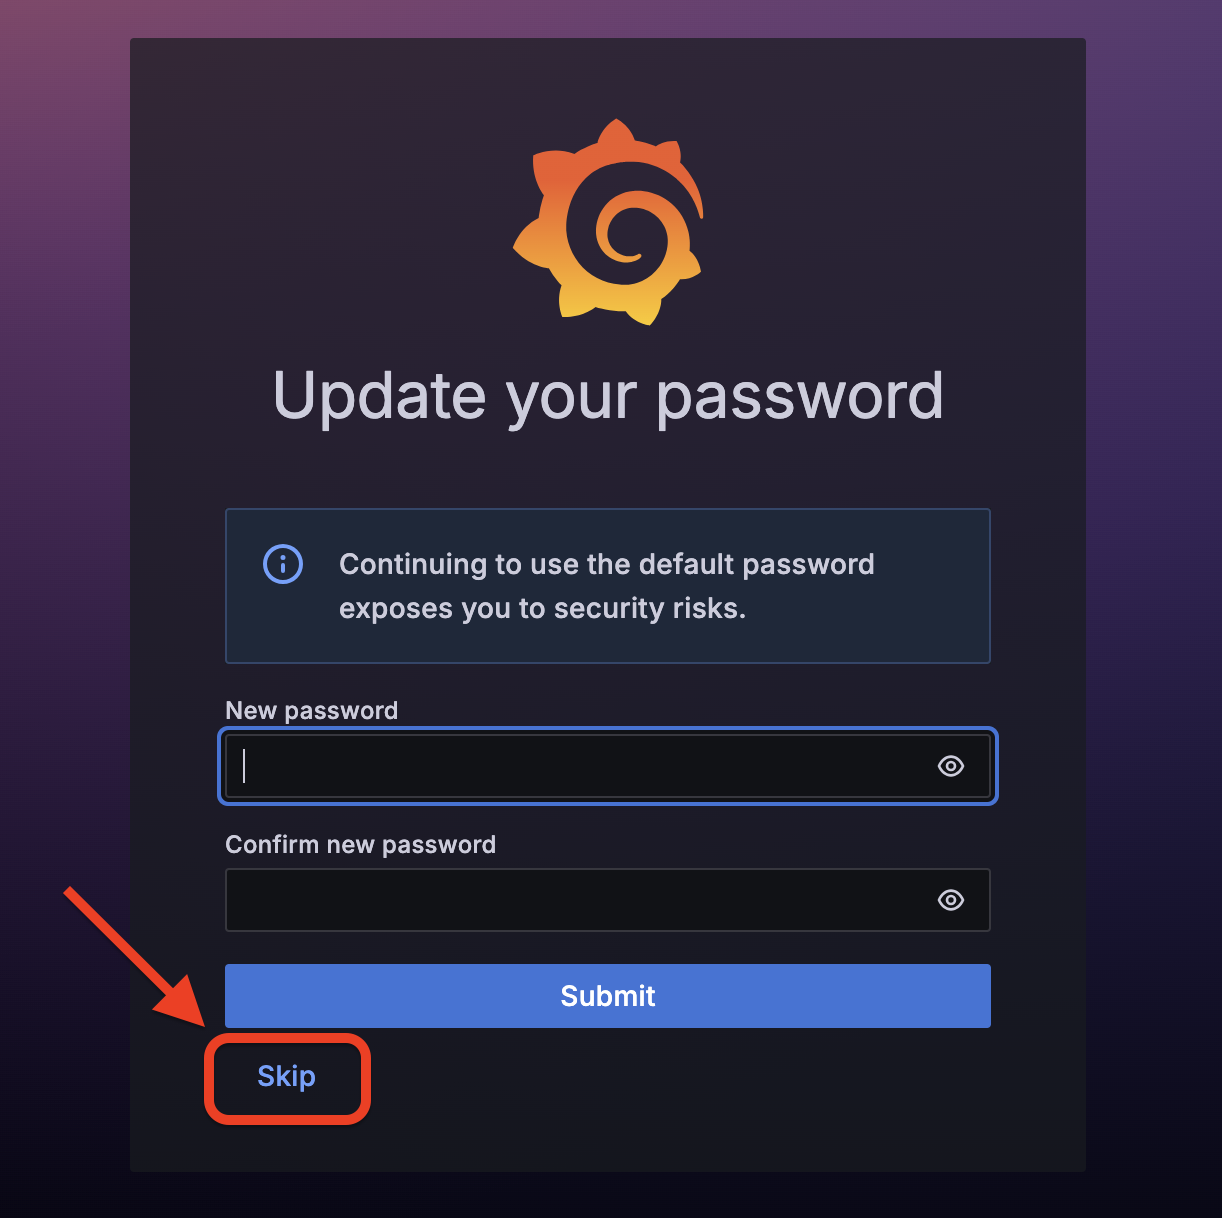
You may either set a new password or select Skip to proceed and retain default credentials.
Although you won’t see the internal, local URL, the self-installed F5 AST Grafana dashboard is exposed via:
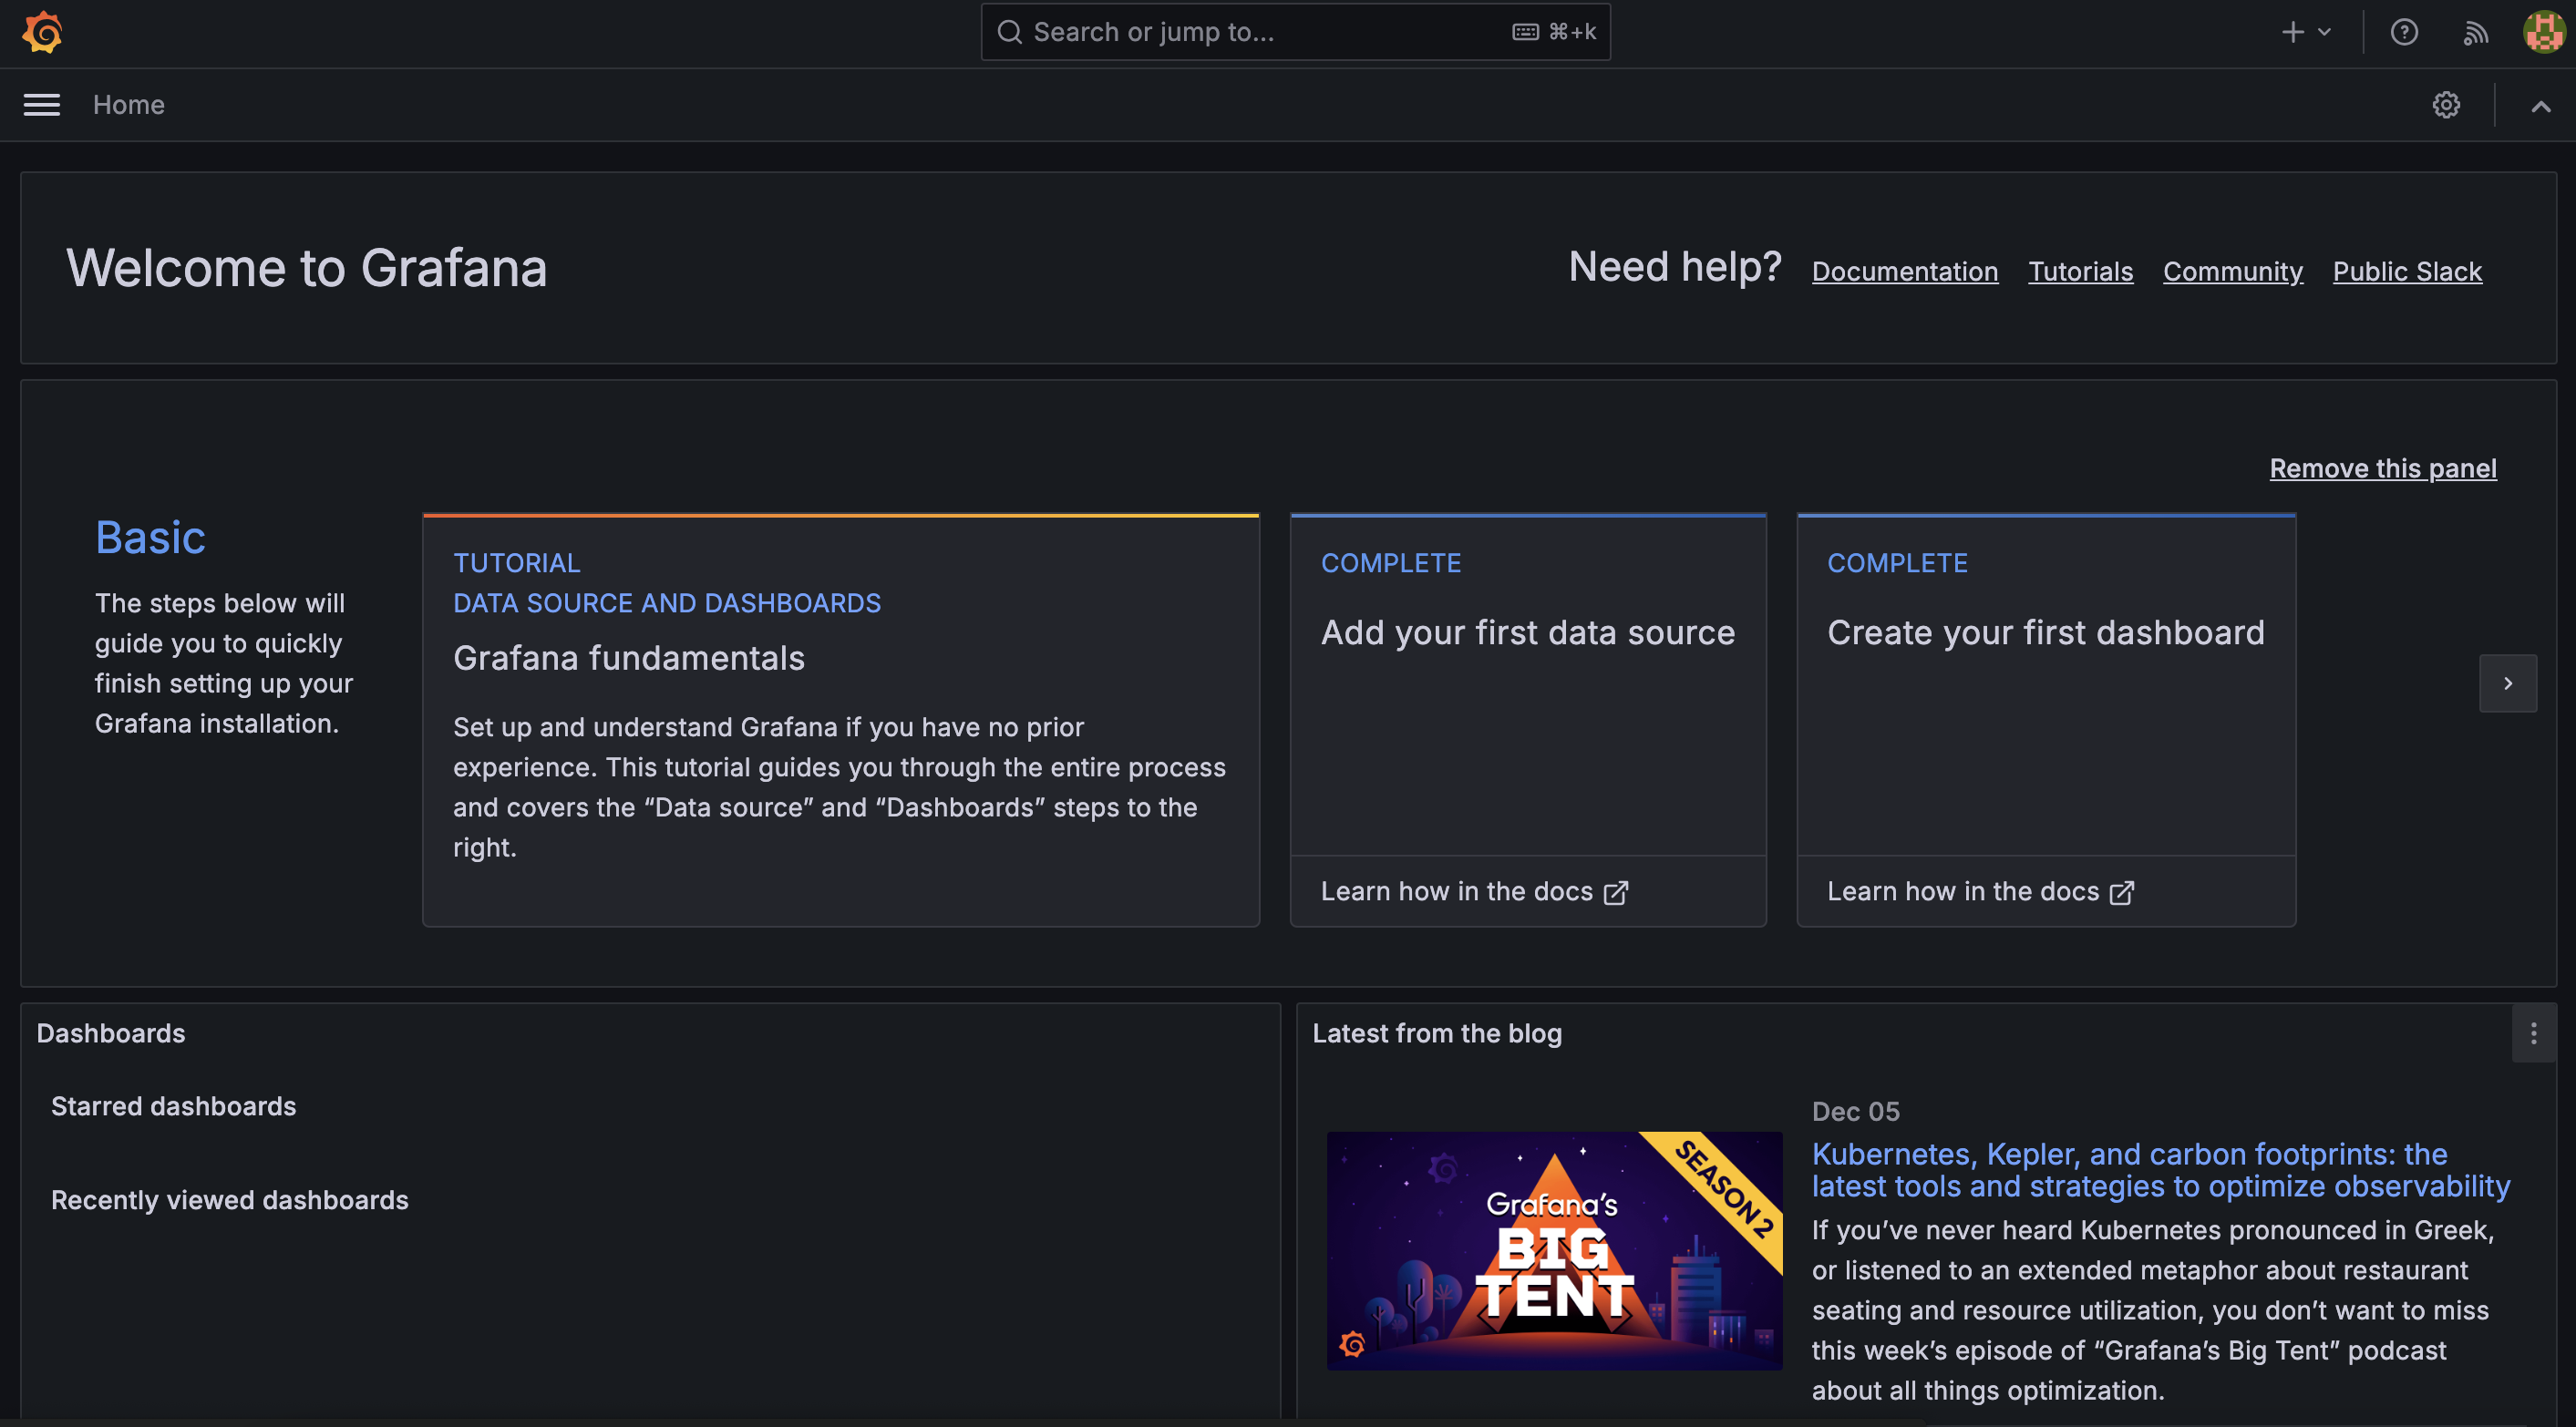
http://10.1.1.9:3000/dashboardsNext, you’ll be presented with the Grafana homepage. From here, select the menu button next to Home, then Dashboards.
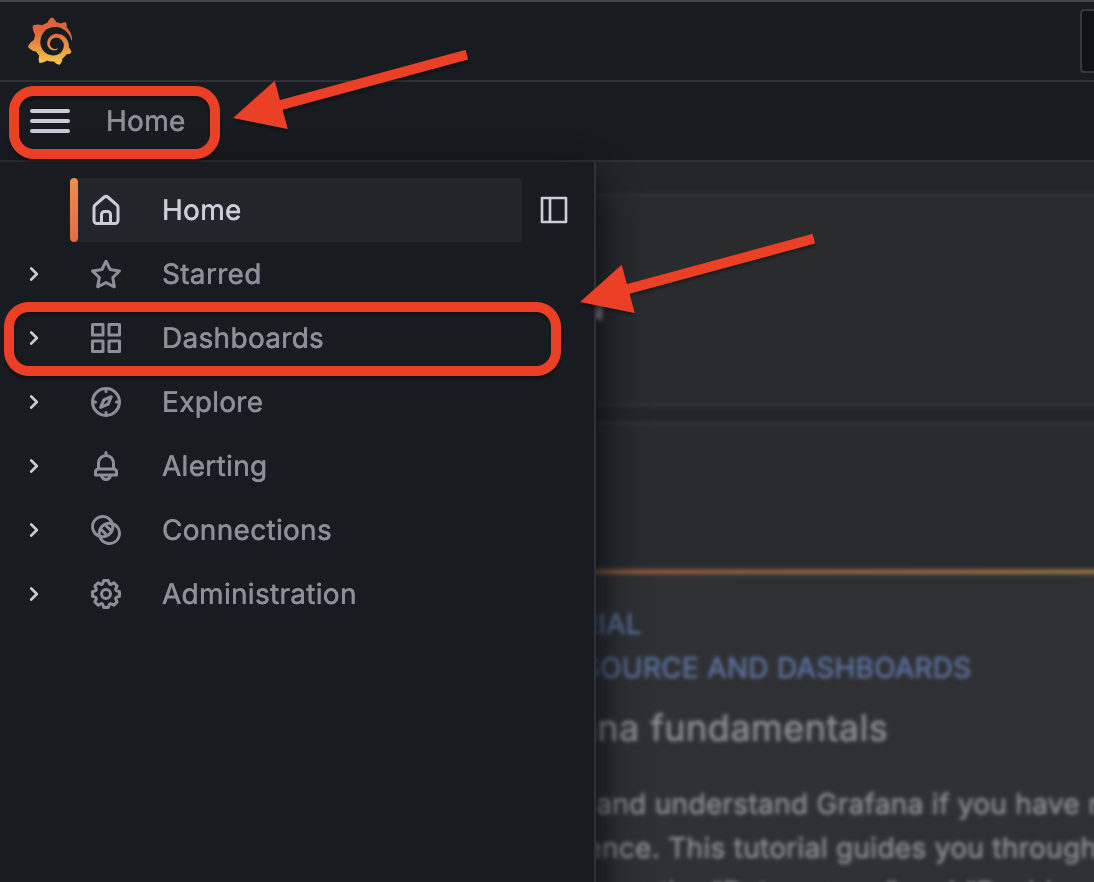
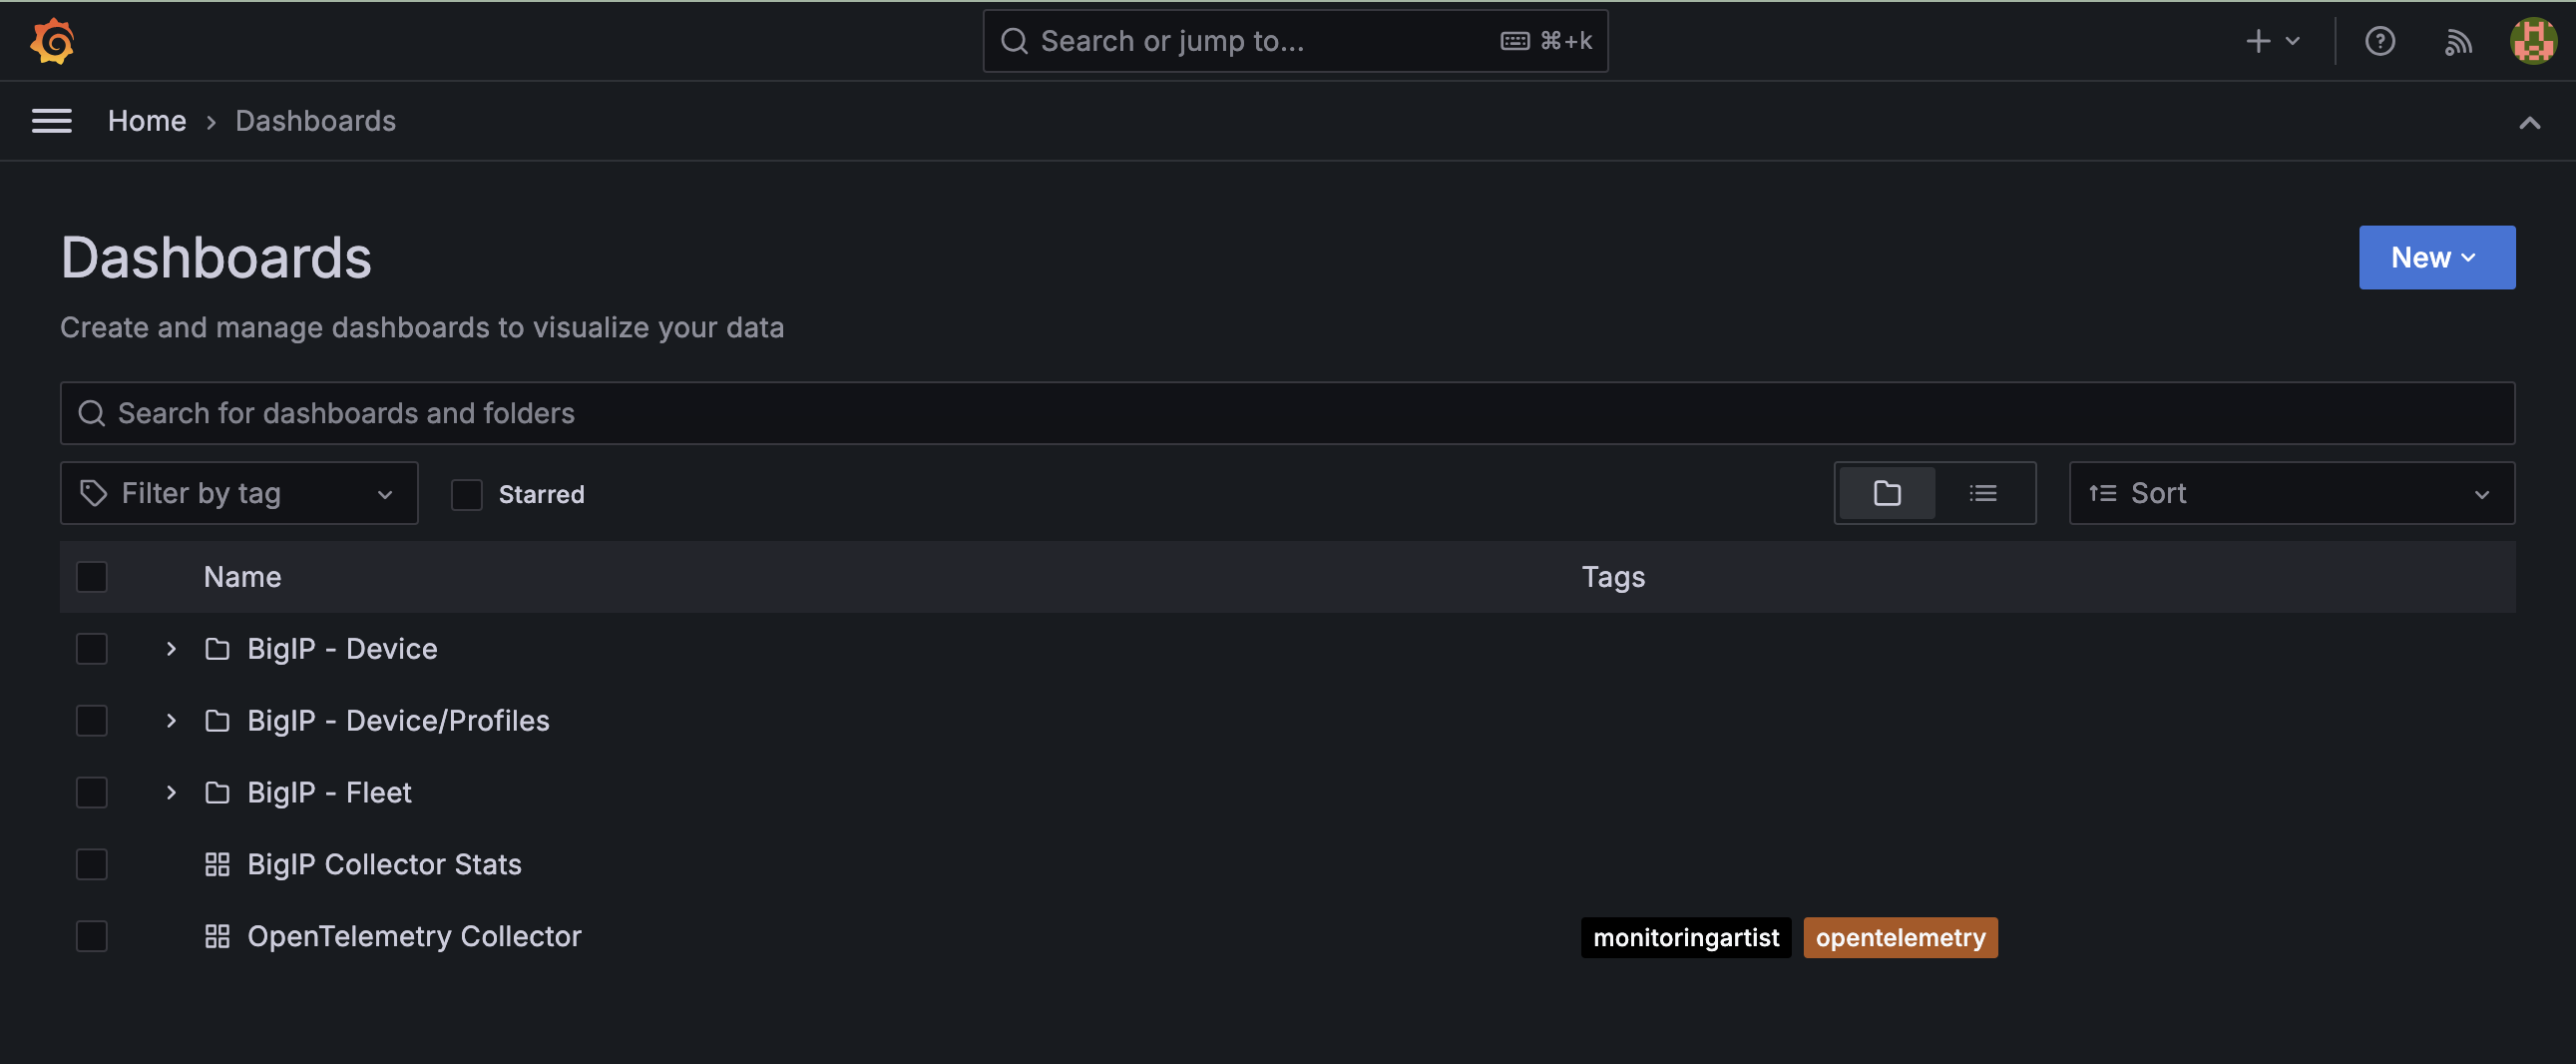
The Dashboards landing page presents users with a couple standalone dashboards and a few collections of dashboards, per the image below.
In Module 3: Exploring the F5 AST Dashboards, you will learn about all of the available pre-packaged dashboards. The door’s open for you to step in and take a look around the F5 Application Study Tool!
Selecting Next below will take you to the Lab 3 - Reviewing, Updating, and Accessing the Pre-Installed F5 AST Instance lab, which you may want to skip, since you’ve already walked through the full, clean installation and setup process.