F5 Solutions for Containers > Appendix > Appendix 2: Build a Kubernetes Cluster Source | Edit on
Lab 2.2 - Setup the Master
The master is the system where the “control plane” components run, including etcd (the cluster database) and the API server (which the kubectl CLI communicates with). All of these components run in pods started by kubelet (which is why we had to setup docker first even on the master node)
Important
The following commands need to be run on the master only unless otherwise specified.
Switch back to the ssh session connected to kube-master1
Tip
This session should be running from the previous if lab. If not simply open mRemoteNG and connect via the saved session.
Initialize kubernetes
kubeadm init --apiserver-advertise-address=10.1.1.7 --pod-network-cidr=10.244.0.0/16
Note
- The IP address used to advertise the master. 10.1.1.0/24 is the network for our control plane. if you don’t specify the –apiserver-advertise-address argument, kubeadm will pick the first interface with a default gateway (because it needs internet access).
- 10.244.0.0/16 is the default network used by flannel. We’ll setup flannel in a later step.
- Be patient this step takes a few minutes. The initialization is successful if you see “Your Kubernetes master has initialized successfully!”.

Important
- Be sure to save the highlighted output from this command to notepad. You’ll need this information to add your worker nodes and configure user administration.
- The “kubeadm join” command is run on the nodes to register themselves with the master. Keep the secret safe since anyone with this token can add an authenticated node to your cluster. This is used for mutual auth between the master and the nodes.
Configure kubernetes administration. At this point you should be logged in as root. The following will update both root and ubuntu user accounts for kubernetes administration.
mkdir -p $HOME/.kube
sudo cp -i /etc/kubernetes/admin.conf $HOME/.kube/config
sudo chown $(id -u):$(id -g) $HOME/.kube/config
exit
mkdir -p $HOME/.kube
sudo cp -i /etc/kubernetes/admin.conf $HOME/.kube/config
sudo chown $(id -u):$(id -g) $HOME/.kube/config
cd $HOME
Verify kubernetes is up and running. You can monitor the services are running by using the following command.
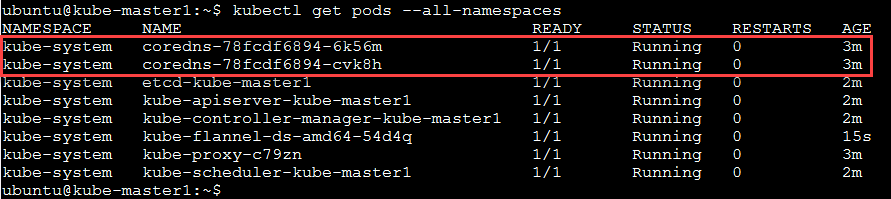
kubectl get pods --all-namespaces
You’ll need to run this several times until you see several containers “Running” It should look like the following:

Note
corends won’t start until the network pod is up and running.
Install flannel
kubectl apply -f https://raw.githubusercontent.com/coreos/flannel/master/Documentation/kube-flannel.yml
Note
You must install a pod network add-on so that your pods can communicate with each other. It is necessary to do this before you try to deploy any applications to your cluster, and before “coredns” will start up.
If everything installs and starts as expected you should have “coredns” and all services status “Running”. To check the status of core services, you can run the following command:
kubectl get pods --all-namespaces
The output should show all services as running.
Important
Before moving to the next lab, “Setup the Nodes” wait for all system pods to show status “Running”.
Additional kubernetes status checks.
kubectl get cs

kubectl cluster-info
Hint
If you made a mistake and need to re-initialize the cluster run the following commands:
# If you followed the instructions you should be currently connected as user **ubuntu**
# When prompted for password enter "default" without the quotes
su -

# This resets the master to default settings
# You may need to run this command on the "nodes" if a fully functioning cluster is configured
kubeadm reset --force

# This removes the admin references to the broken cluster
rm -rf /home/ubuntu/.kube /root/.kube