F5 Solutions for DDoS > Class 3: DDoS Hybrid Defender > DDoS Hybrid Defender Setup Source | Edit on
Lab 2 – Configuring Hybrid Defender DDoS protection
Task 1 – Disable Device-Level DHD DoS Protection
In this lab you will disable Device-level DoS flood protection, and then issue an ICMPv4 flood and review the results.
PuTTY to the BIG-IP CLI (10.1.1.245) from your jumpbox desktop shortcut and resize window by making it wider. You will be logged on as
root.At the config prompt, type (or copy and paste) the following command:
tcpdump -i 0.0 host 10.1.20.12PuTTY to the Attacker host from your jumpbox desktop shortcut. You will be logged in as root. I’t will use a pre-loaded public key as the credentials. Accept the warning.
At the config prompt, type (or copy and paste) the following command:
ping 10.1.20.12
The attacker can successfully communicate with a back-end resource behind the BIG-IP DHD.
- Examine the tcpdump window and verify ICMP packets are flowing through the BIG-IP DHD.
Note
The listener for the ICMP packets is the VLAN group.
Cancel the
pingcommand, then verify thetcpdumpstops receiving ICMP packets, and then press Enter several times to clear the recent log entries.In the Configuration Utility, in the DoS Protection, Quick Configuration, Device Protection section click Device Configuration.

In the Bad Headers row click the + icon, and then click Bad Source.
On the right-side of the page select the drop-down to “Don’t Enforce”

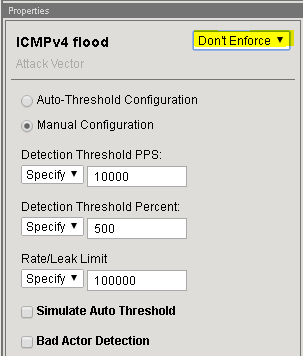
In the Flood row click the + icon, and then click ICMPv4 flood.
Note
If you minimize by clicking the + icon, it will make seeing the other sections easier.
On the right-side of the page select the drop-down to “Don’t Enforce”
Apply the settings above for TCP SYN flood and UDP Flood and then click Update.
On the Jumpbox in the Attacker PuTTY window type (or copy and paste) the following:
# cd scripts
# ls
These are the different scripts we’ll be using during the exercises to simulate DoS attacks.
Type (or copy and paste) the following commands:
for i in {1..10}; do ./icmpflood.sh; done
This script launches 1,000,000 ICMP requests and then repeats for a total of ten occurrences.
View the
tcpdumpwindow and verify that ICMP attack traffic is reaching the back-end server.Let the attack run for about 15 seconds before moving on.
In the Configuration Utility, open the Statistics > Performance > Performance page.
View the Active Connections and Total New Connections charts.
There is a drastic spike in active connections.
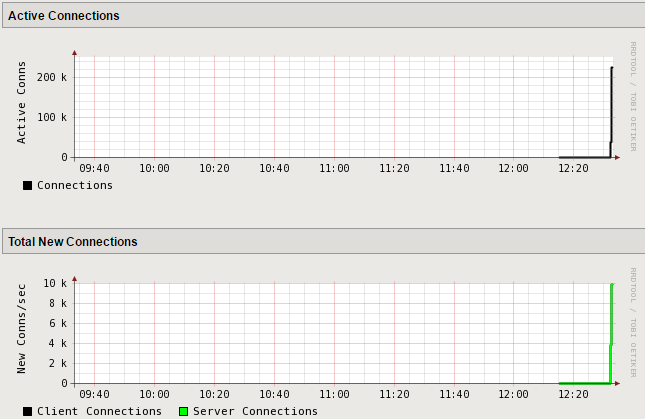
View the Throughput (bits) and Throughput (packets) charts.
There is also a drastic spike in both bits per second and packets per second.
- Open the Security > Event Logs > DoS > Network > Events page.
The log file is empty as we disabled device-level flood protection on BIG-IP DHD.
- On the Jumpbox Attacker shell slowly type Ctrl + C several times
until back at the
scriptsprompt.
Task 2 – Re-enable Device-Level DHD DoS Protection
In this task you will re-configure device-level DoS protection, and then issue an ICMPv4 flood and review the results.
In the Configuration Utility, in the Device Protection section click Device Configuration.

In the Bad Headers row click the + icon, and then click Bad Source.
On the right-side of the page select the drop-down to “Enforce”
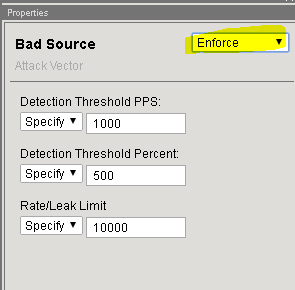
Note
Bad Source is enabled to be able to add the IP addresses to the blacklist.
In the Flood row click the + icon, and then click ICMPv4 flood.
On the right-side of the page select the drop-down to “Enforce”
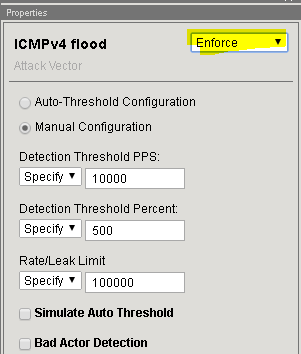
Apply the settings above for TCP SYN flood and UDP Flood and then click Update.
Note
This returns the configuration back to factory supplied device level enforcement.
Task 3 – Configure Protected Object-Level IPv4 Flood DHD DoS Protection
The DHD device wide protection is enforced for all traffic flowing through the device. For more granular control, we use protected objects and configure mitigation settings for those objects to be enforced. In this task you will configure object-level DoS IPv4 flood protection, and then issue an ICMPv4 flood and review the results.
On the Protect Objects page, in the Protected Objects section click Create.
Configure a protected object using the following information, and then click Create.
Name ServerNet IP Address 10.1.20.0/24 Port * Protocol All Protocols Protection Settings: Action Log and Mitigate Protection Settings: DDoS Settings IPv4 In the IPv4 row click the + icon, and then click ICMPv4 flood.
On the right-side of the page configure using the following information, and then click Create at the bottom of the page.
Detection Threshold PPS Specify: 1000 Detection Threshold Percent Infinite Rate/Leak Limit Specify: 1000 On the Jumpbox in the Attacker PuTTY window re-run the following command:
for i in {1..10}; do ./icmpflood.sh; doneExamine the
tcpdumpwindow to see if there are any ICMP packets hitting the back-end server.Let the attack run for about 30 seconds before moving on.
In the Configuration Utility, click DoS Protection > Quick Configuration > ServerNet, and then in the IPv4 row click the + icon.

Open the Security > Event Logs > DoS > Network > Events page.
The DoS Source is Volumetric, Aggregated across all SrcIP’s, VS-Specific attack, metric:PPS.
The context column displays /Common/ServerNet, identifying this is protected object-level protection.
The action is Drop.
On the Jumpbox Attacker shell slowly type Ctrl + C several times until back at the
scriptsprompt.In the BIG-IP CLI type Ctrl + C to stop the tcpdump.