F5 Identity and Access Management Solutions > Archived Identity & Access Management Labs > 300 Series: Advanced Use Cases & Solutions Source | Edit on
Lab 1: Cert Auth to Kerberos SSO
Task 1 - Setup Lab Environment
To access your dedicated student lab environment, you will require a web browser and Remote Desktop Protocol (RDP) client software. The web browser will be used to access the Lab Training Portal. The RDP client will be used to connect to the Jump Host, where you will be able to access the BIG-IP management interfaces (HTTPS, SSH).
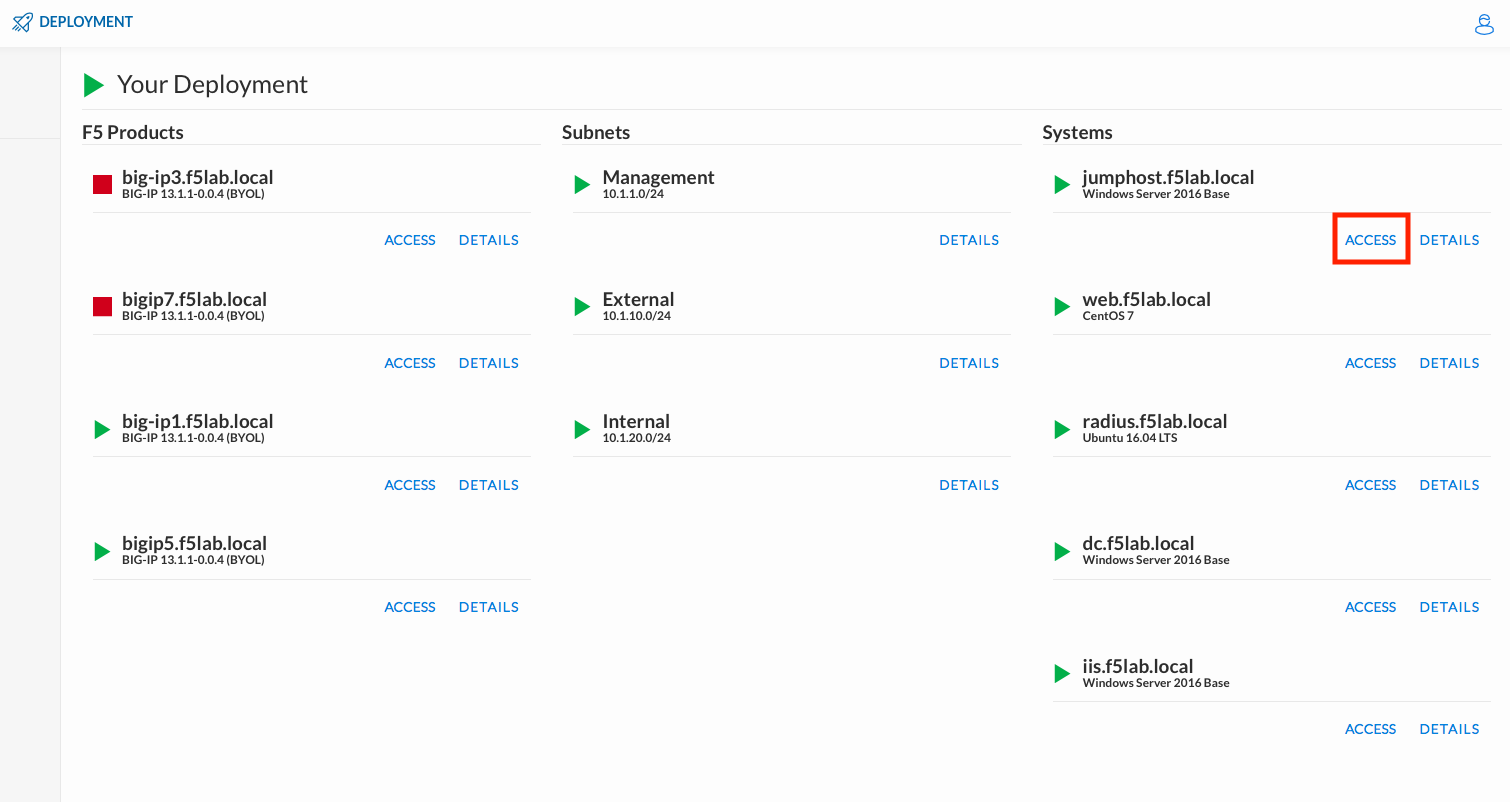
Click DEPLOYMENT located on the top left corner to display the environment
Click ACCESS next to jumpohost.f5lab.local
Select your RDP resolution.
The RDP client on your local host establishes a RDP connection to the Jump Host.
Login with the following credentials:
- User: f5lab\user1
- Password: user1
After successful logon the Chrome browser will auto launch opening the site https://portal.f5lab.local. This process usually takes 30 seconds after logon.
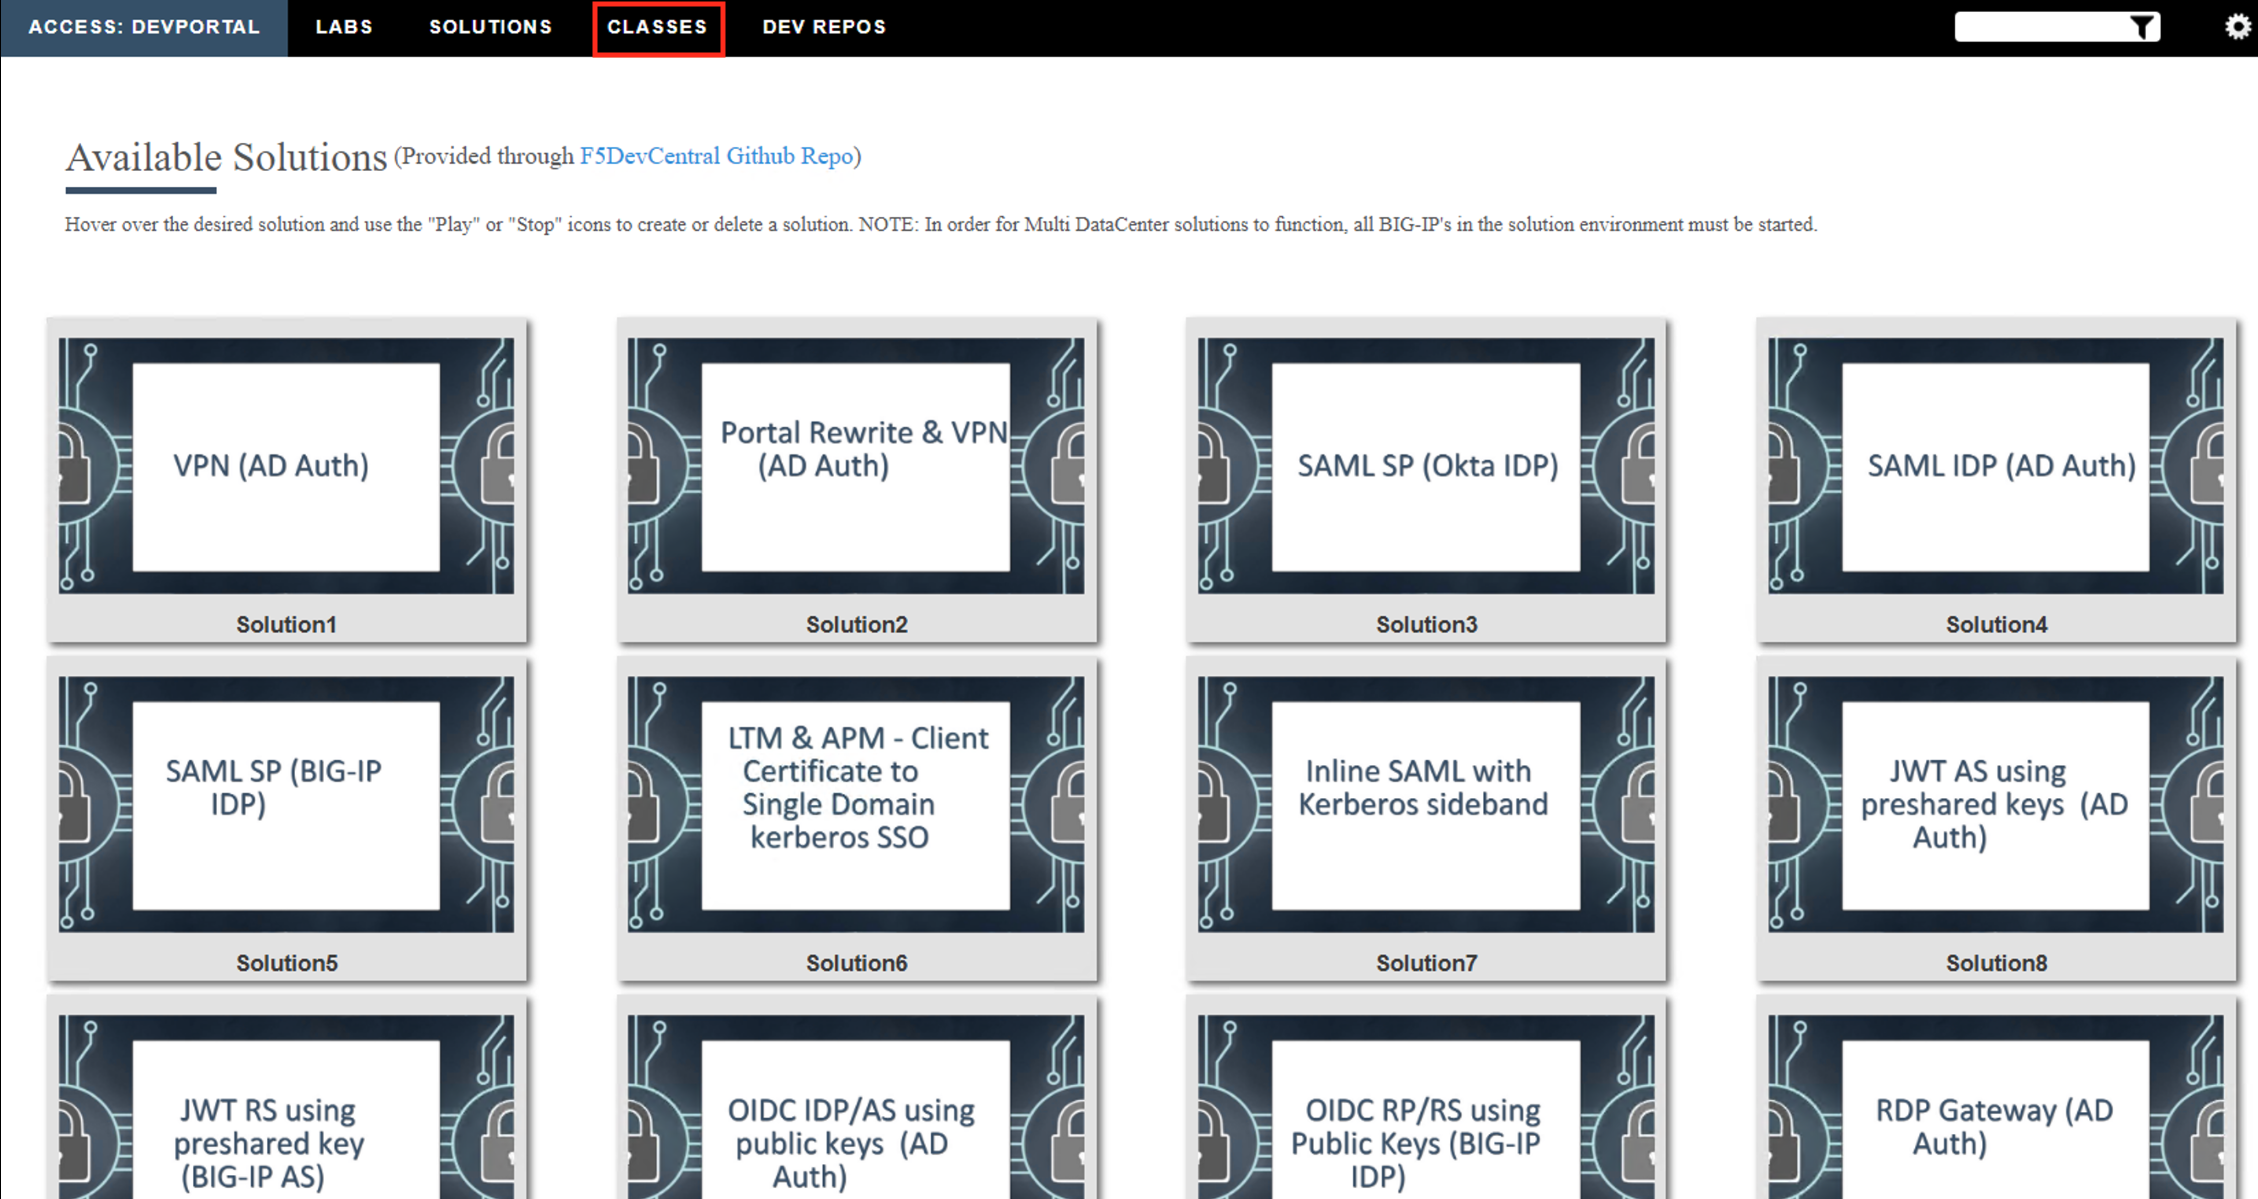
Click the Classes tab at the top of the page.
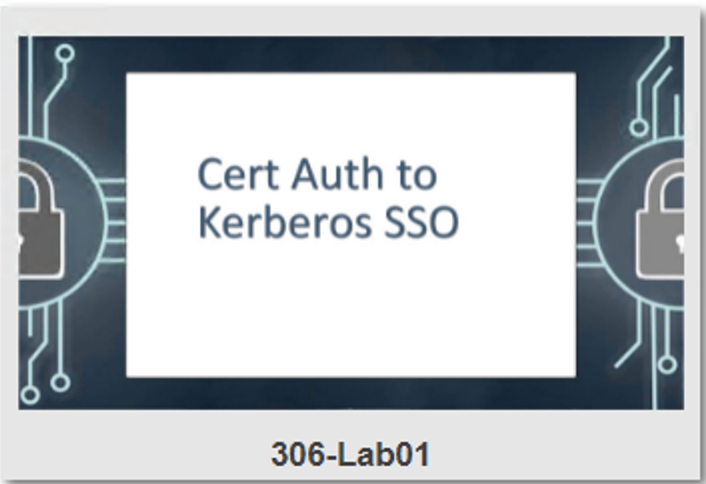
Scroll down the page until you see 306 Per-Session Access Control on the left
Hover over tile Cert Auth to Kerberos SSOs. A start and stop icon should appear within the tile. Click the Play Button to start the automation to build the environment
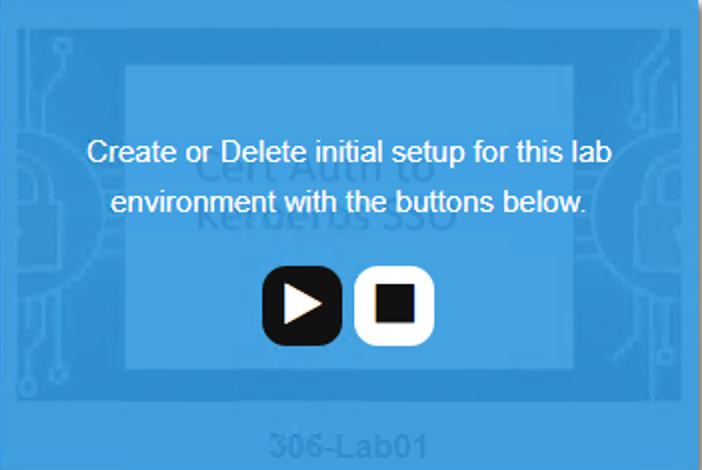
The screen should refresh displaying the progress of the automation within 30 seconds. Scroll to the bottom of the automation workflow to ensure all requests succeeded. If you experience errors try running the automation a second time or open an issue on the Access Labs Repo.

Task 2 - Create an OCSP Responder
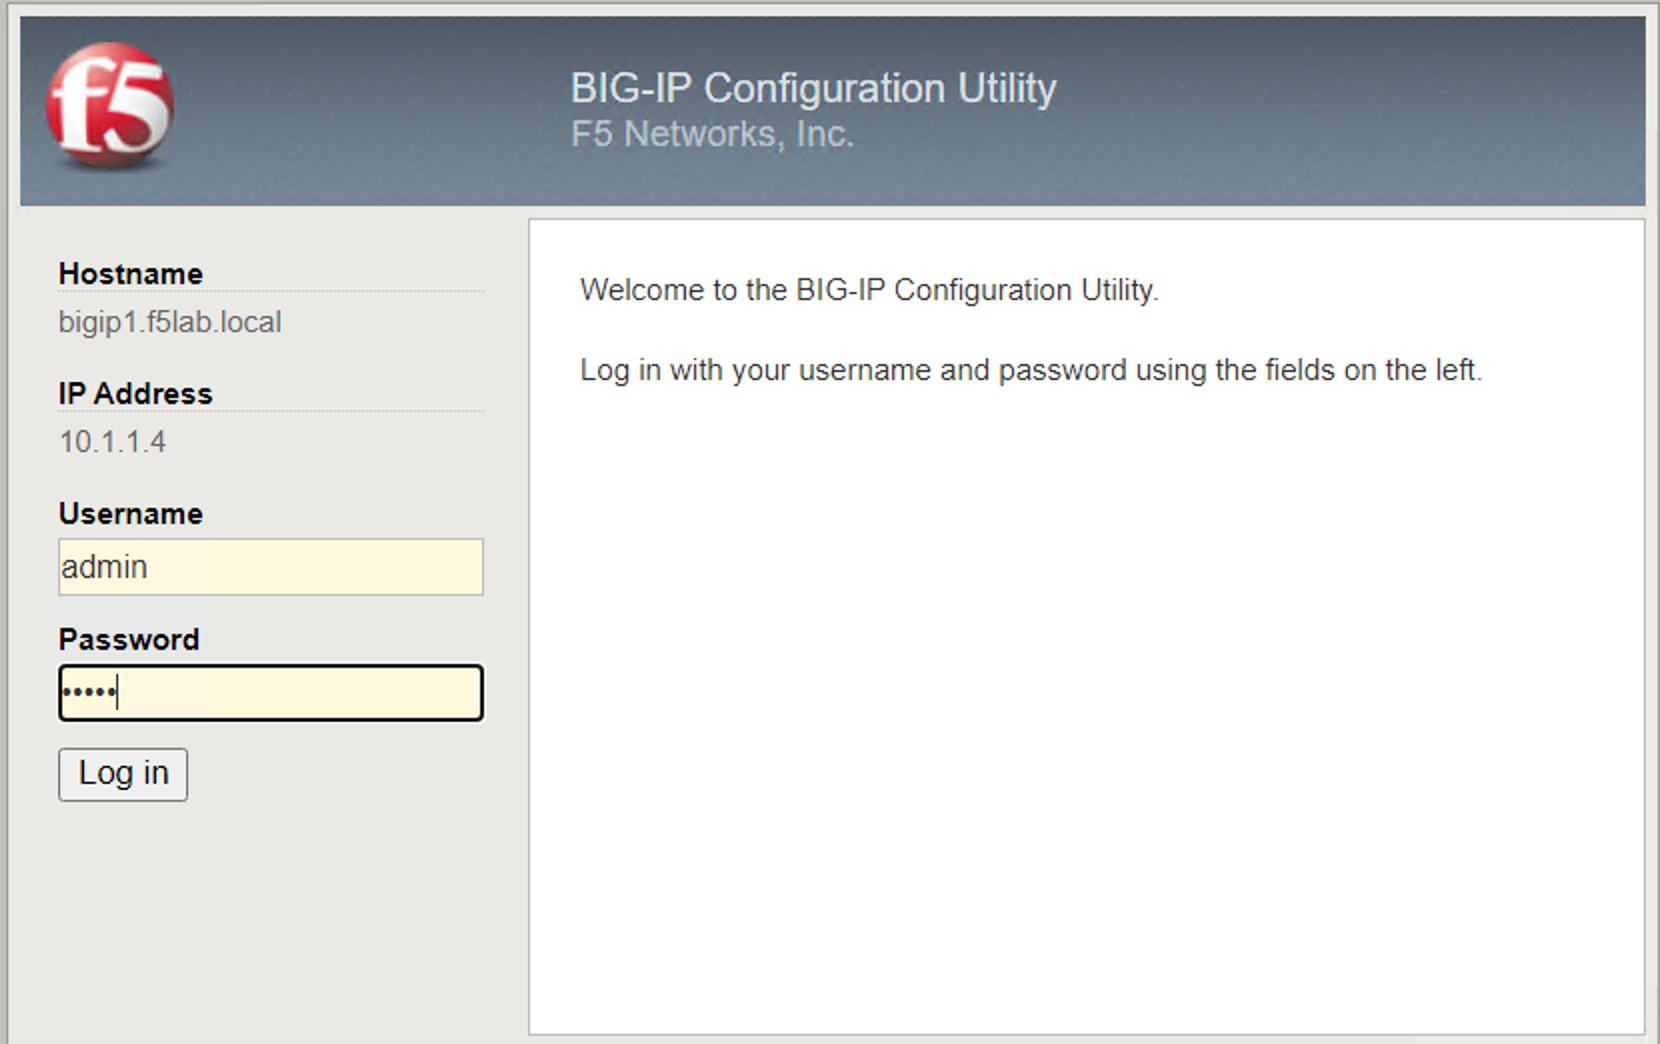
From a browser navigate to https://bigip1.f5lab.local
Login with username admin and password admin
Navigate to Access >> Authentiction >> OCSP Responder >> click the Plus Sign(+).
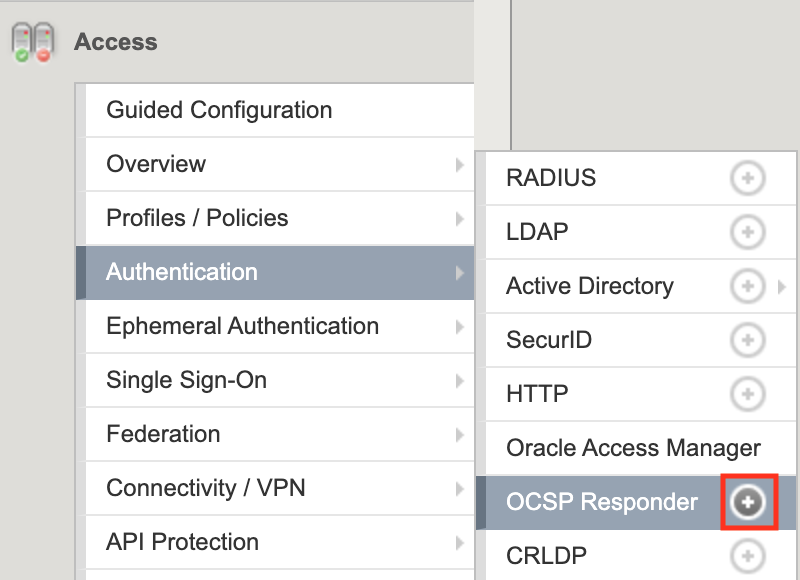
Enter the Name cer2kerb-ocsp
From the Configuration dropdown menu select Advanced
From the Certificate Authority File dropdown menu select ca.f5lab.local
Enter the Certifcate Authority Path /ocsp
Uncheck Nonce
Click Finished

Task 3 - Create an LDAP AAA Server
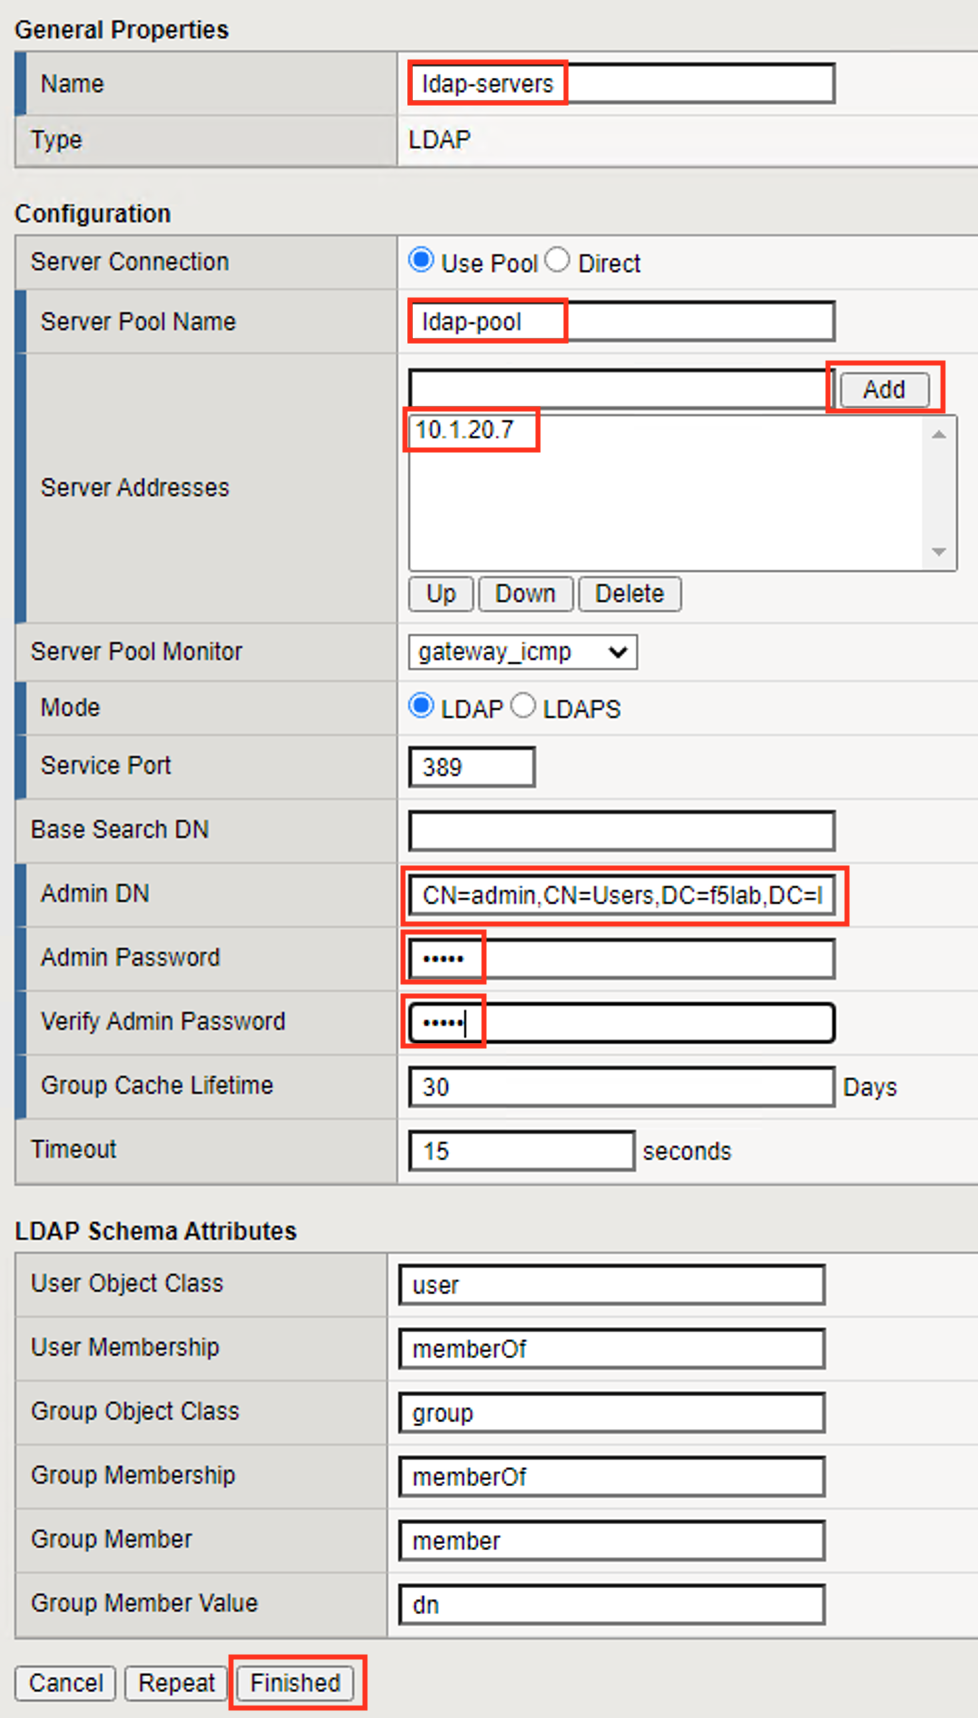
Navigate to Access >> Authentiction >> LDAP >> click the Plus Sign(+).
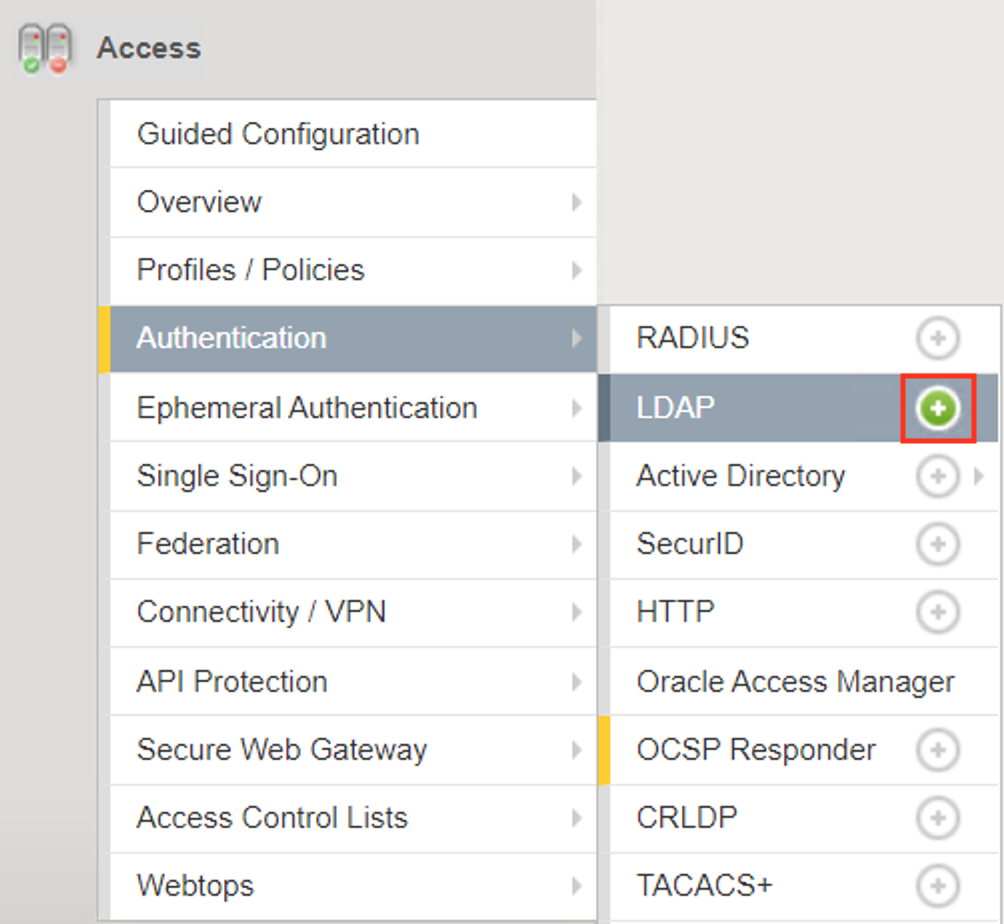
Enter the Name ldap-servers
Enter the Server Pool Name ldap-pool
Add the server address 10.1.20.7
Enter the Admin DN CN=admin,CN=Users,DC=f5lab,DC=local
Enter the Admin Password admin
Click Finished
Task 4 - Create a Kerberos SSO
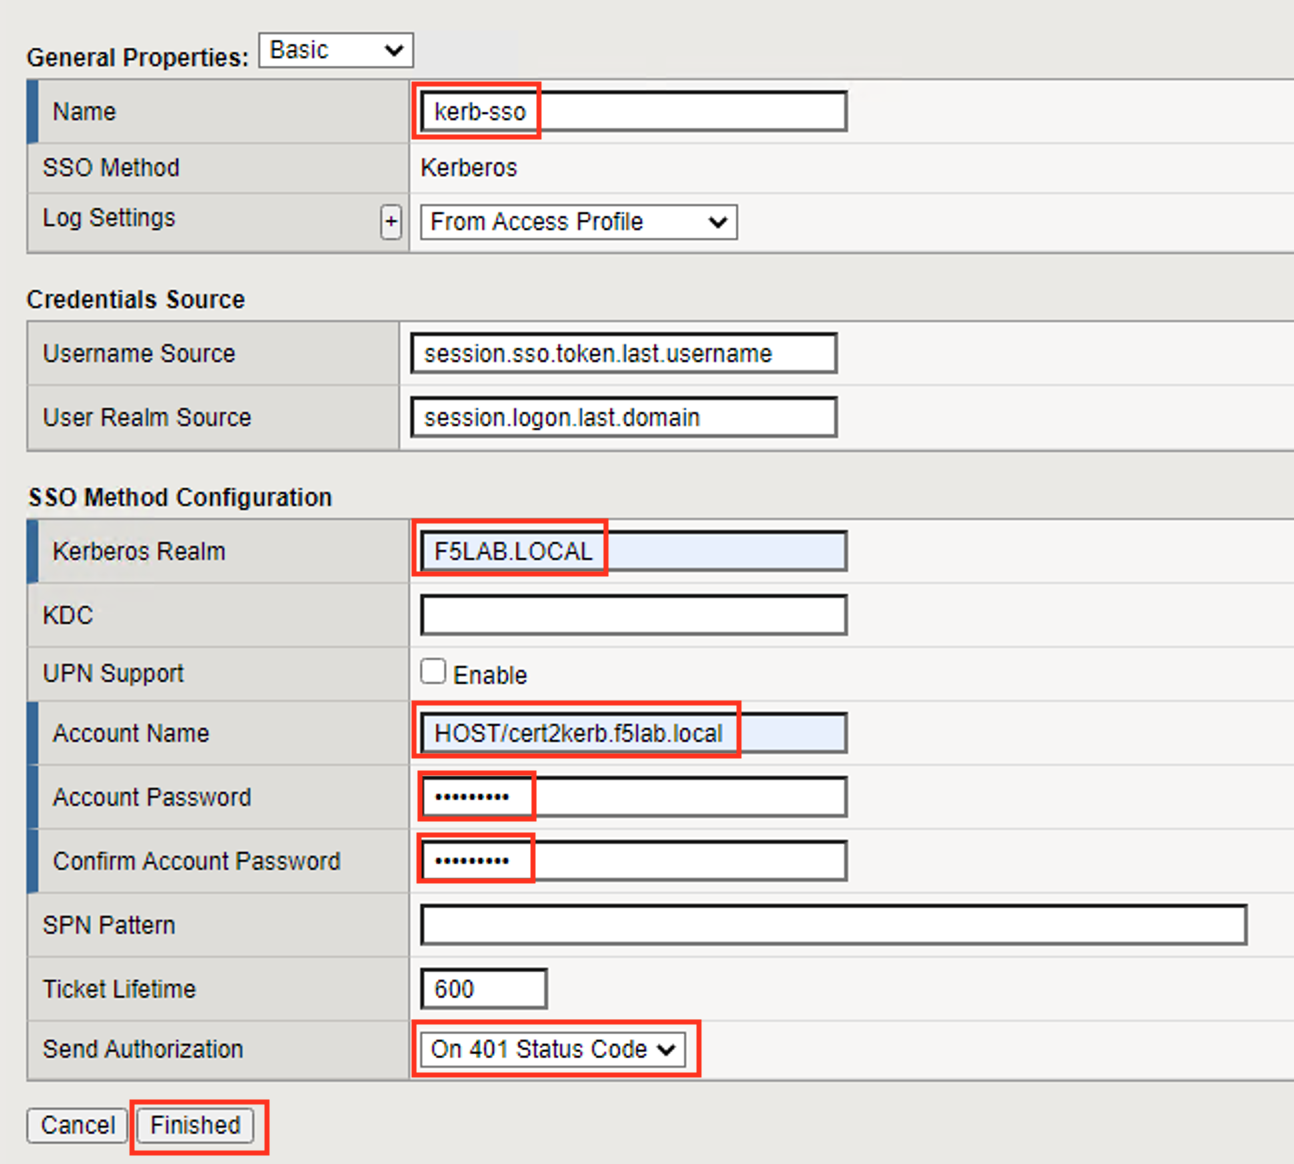
Navigate to Access >> Single Sign-On >> Kerberos >> click the Plus Sign(+).

Enter the Name kerb-sso
Enter the Kerberos Realm F5LAB.LOCAL
Enter the Account Name HOST/cert2kerb.f5lab.local
Enter Account Password cert2kerb
From the Send Authorization dropdown menu select On 401 Status Code
Click Finished
Task 5 - Create a per-session policy
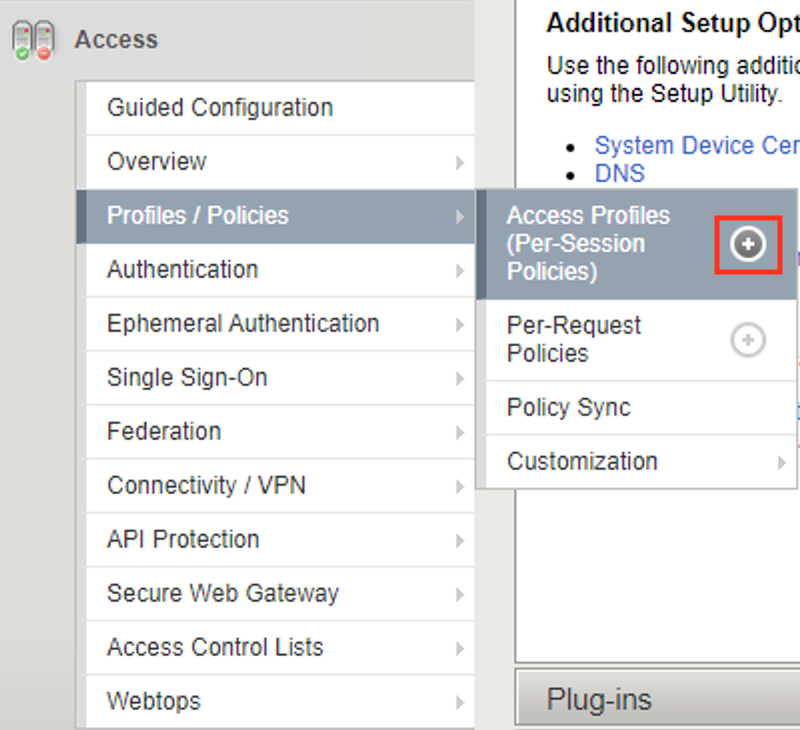
Navigate to Access >> Profiles/Polcies >> Access Profiles (Per-Session Policies) >> click the Plus Sign(+).
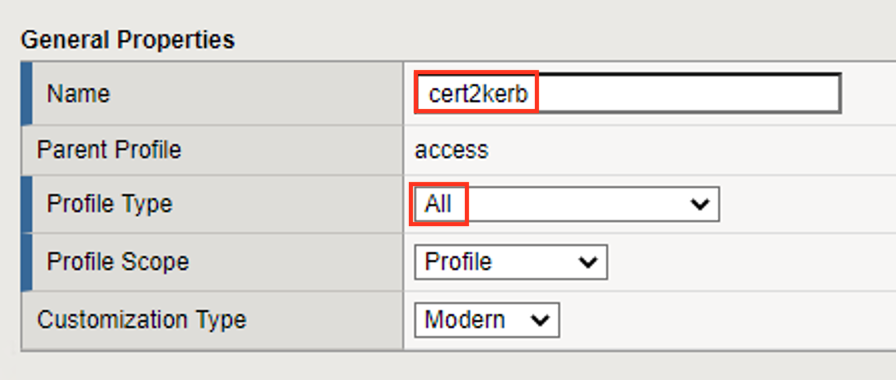
Enter the Name cert2kerb
From the Profile Type dropdown menu select All
Scroll to the bottom of the New Profile window to the Language Settings
Select English from the Factory Built‑in Languages on the right, and click the Double Arrow (<<), then click the Finished button.

From the Access ‑> Profiles/Policies ‑> Access Profiles (Per‑Session Policies) screen, click the Edit link on the previously created
cert2kerbline
In the Visual Policy Editor window for
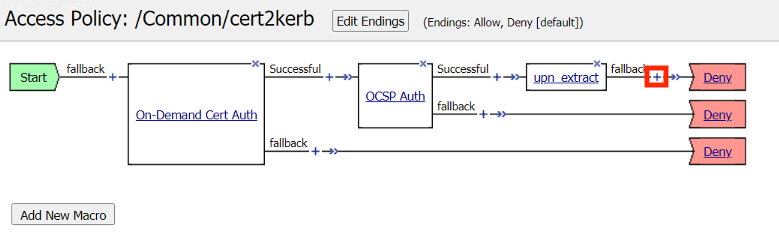
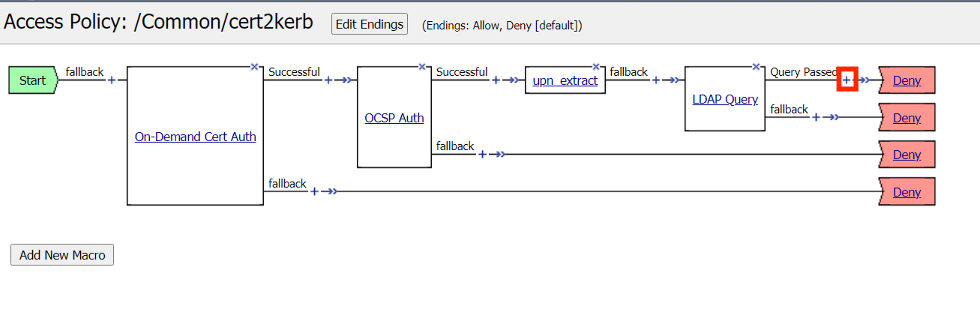
/Common/cert2kerb, click the Plus (+) Sign between Start and Deny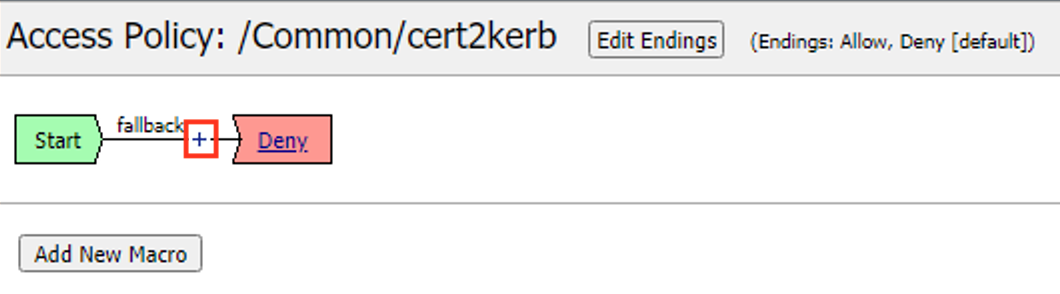
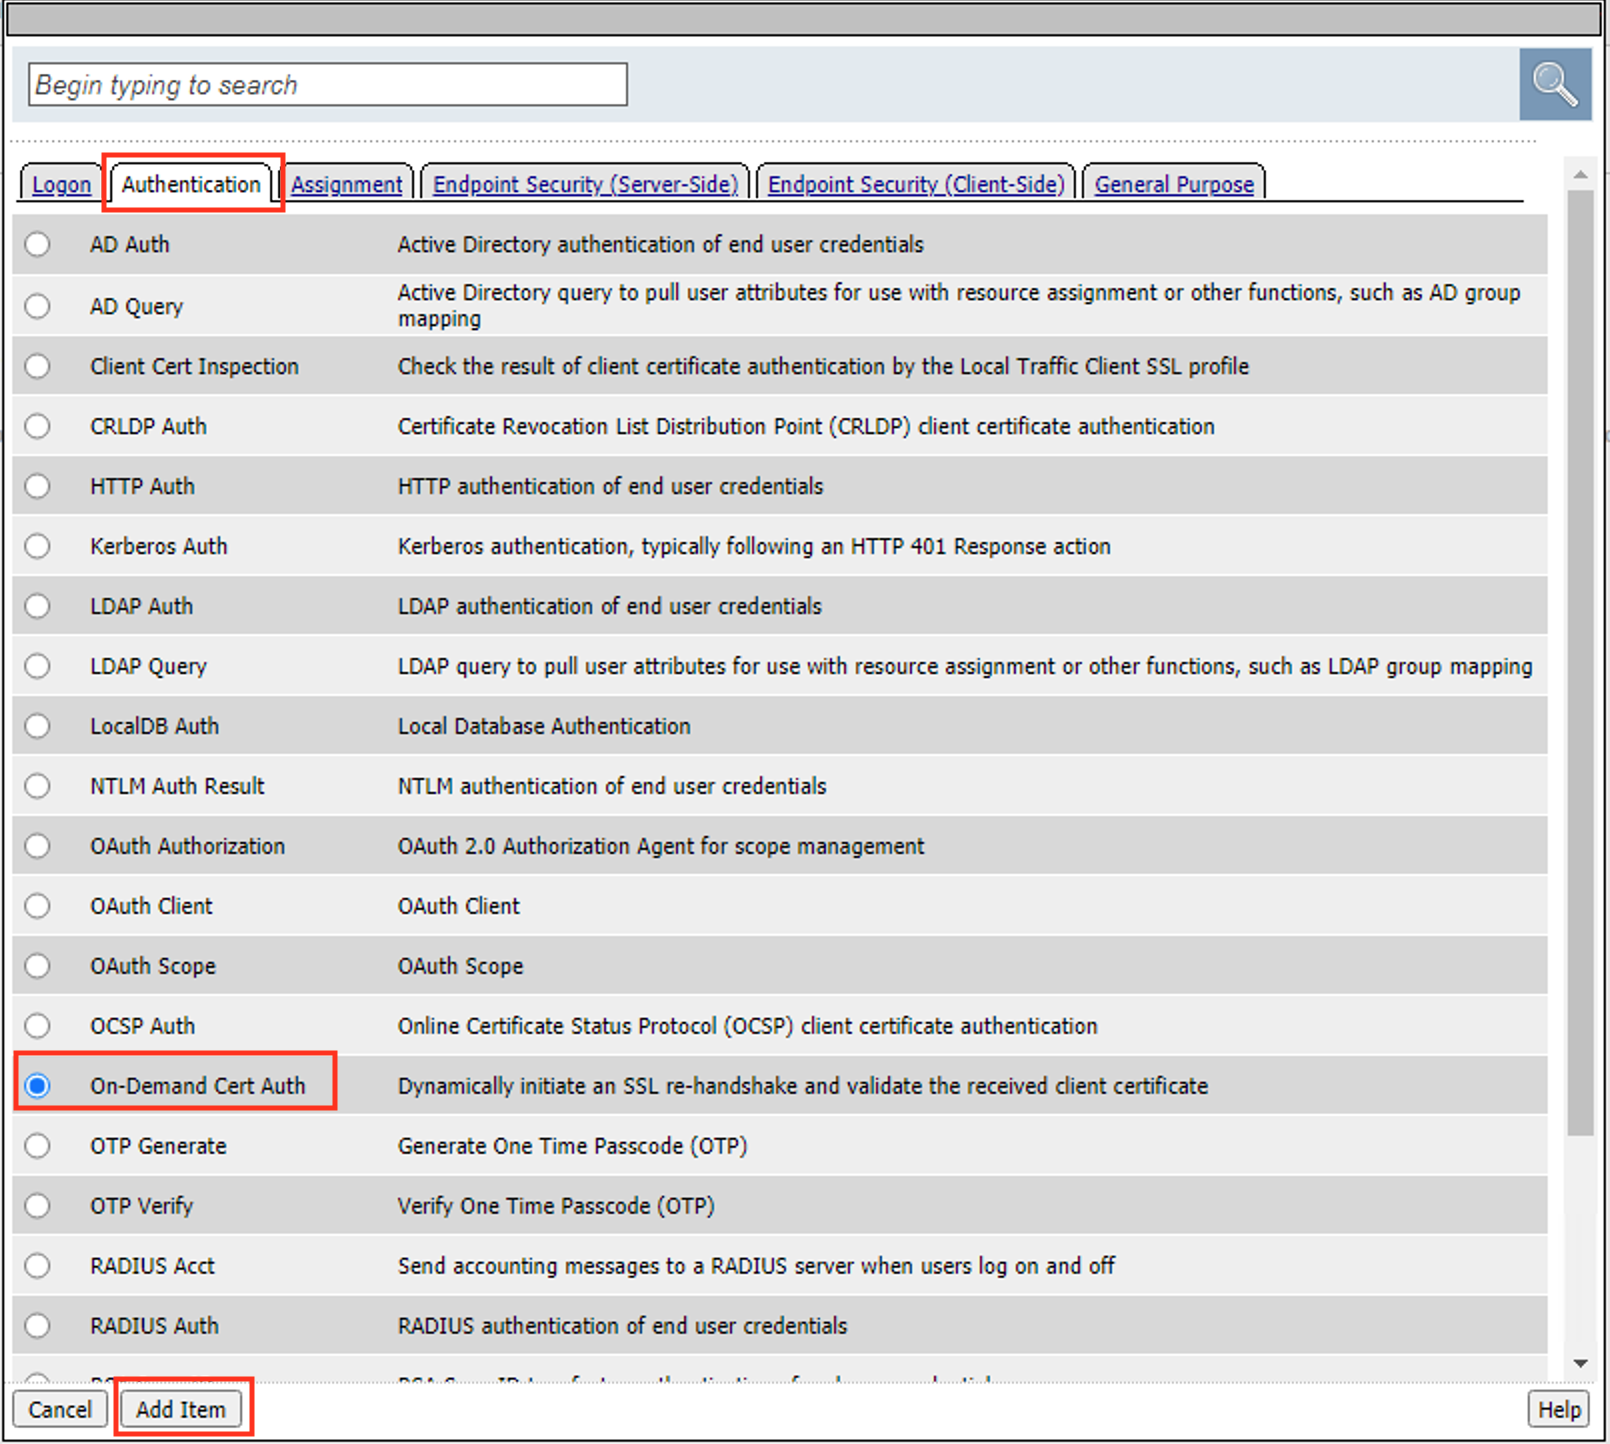
In the pop‑up dialog box, select the Authentication tab and then click the Radio Button next to On-Demand Cert Auth
Once selected, click the Add Item button
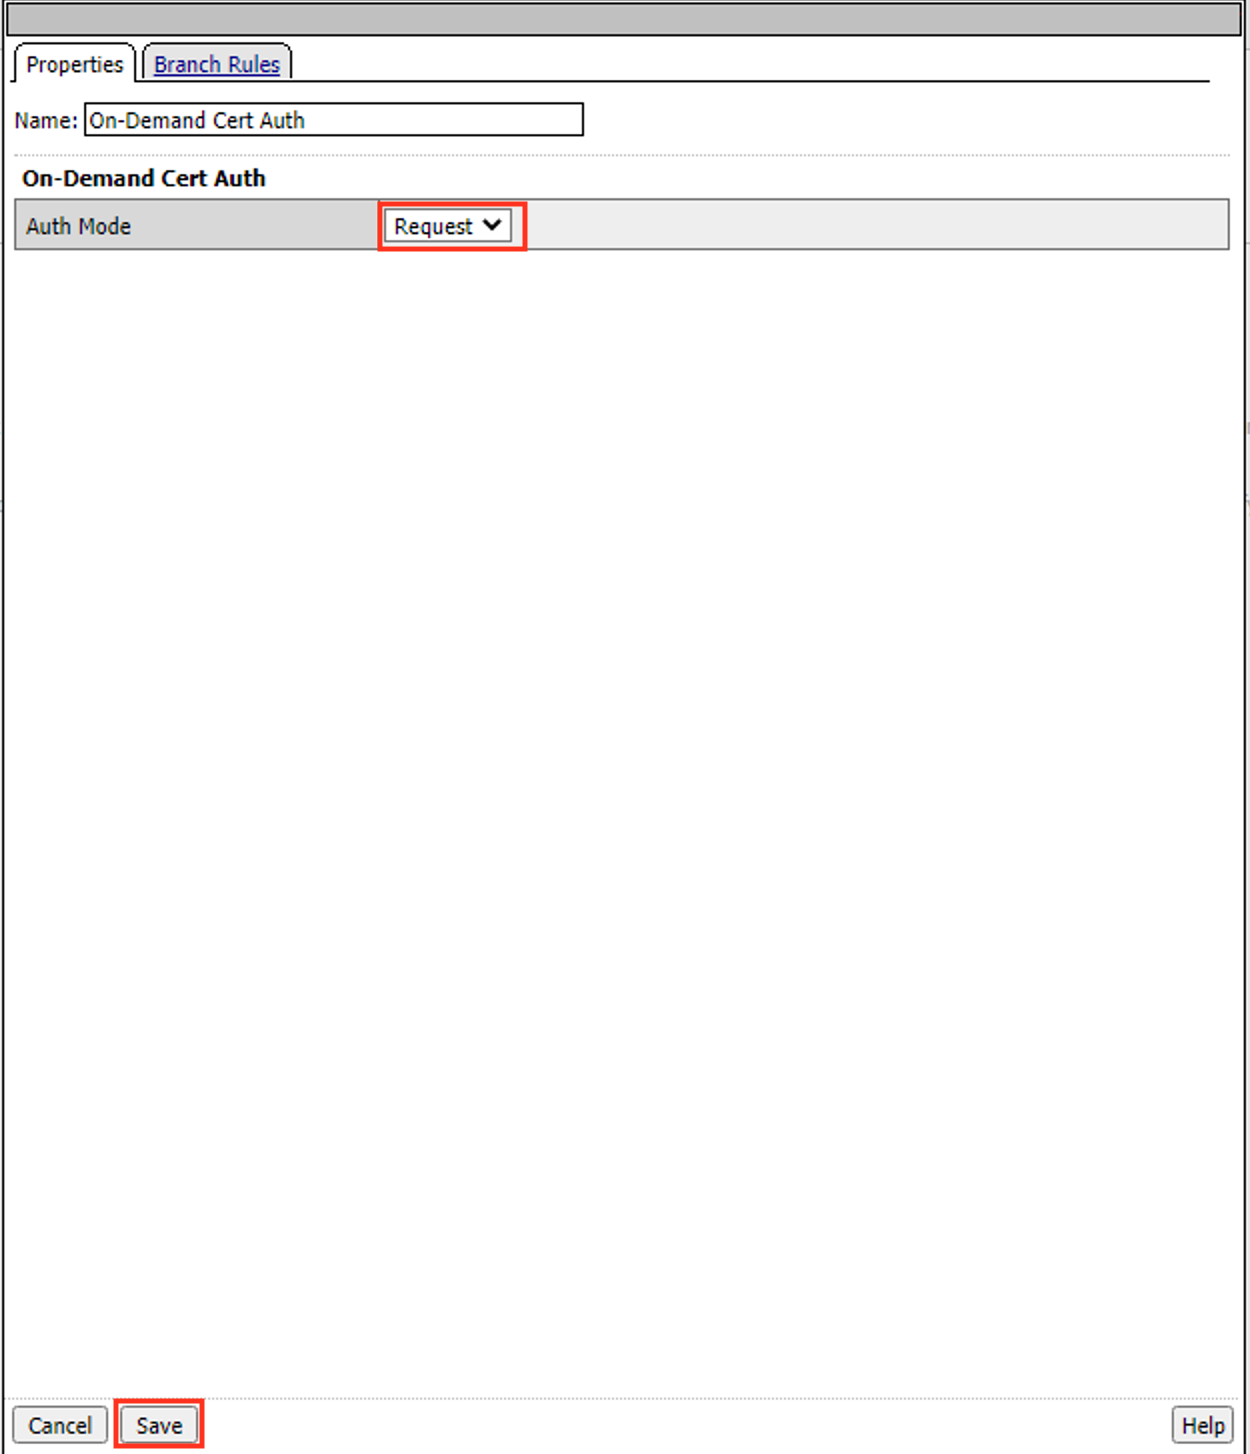
Leave the Auth Mode the default of request
Click Save
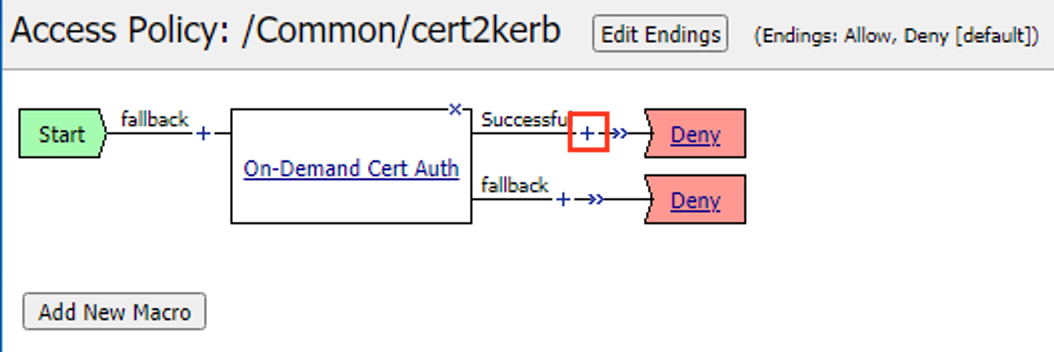
Click the Plus (+) Sign on the Successful branch of the On-demand Cert Auth policy item.
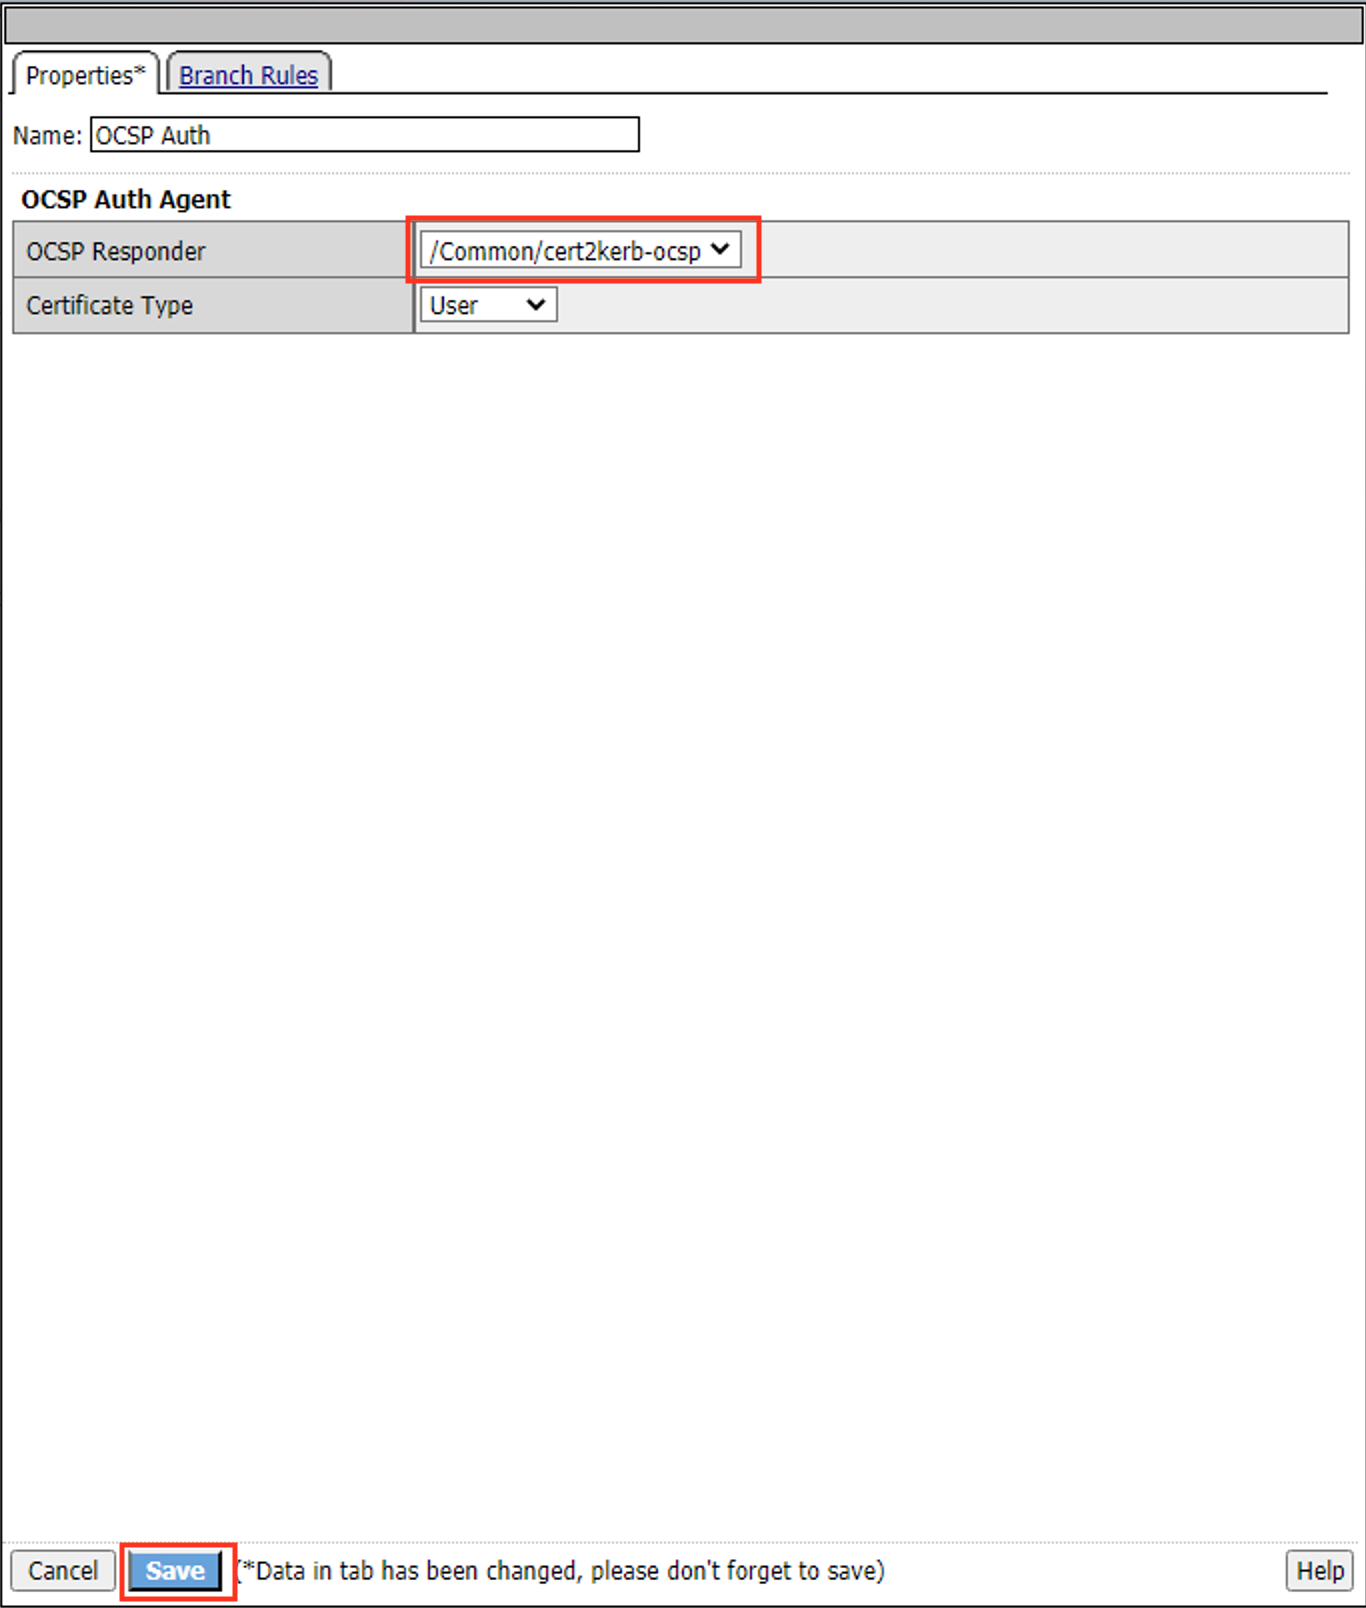
In the pop‑up dialog box, select the Authentication tab and then click the Radio Button next to OCSP Auth
Once selected, click the Add Item button
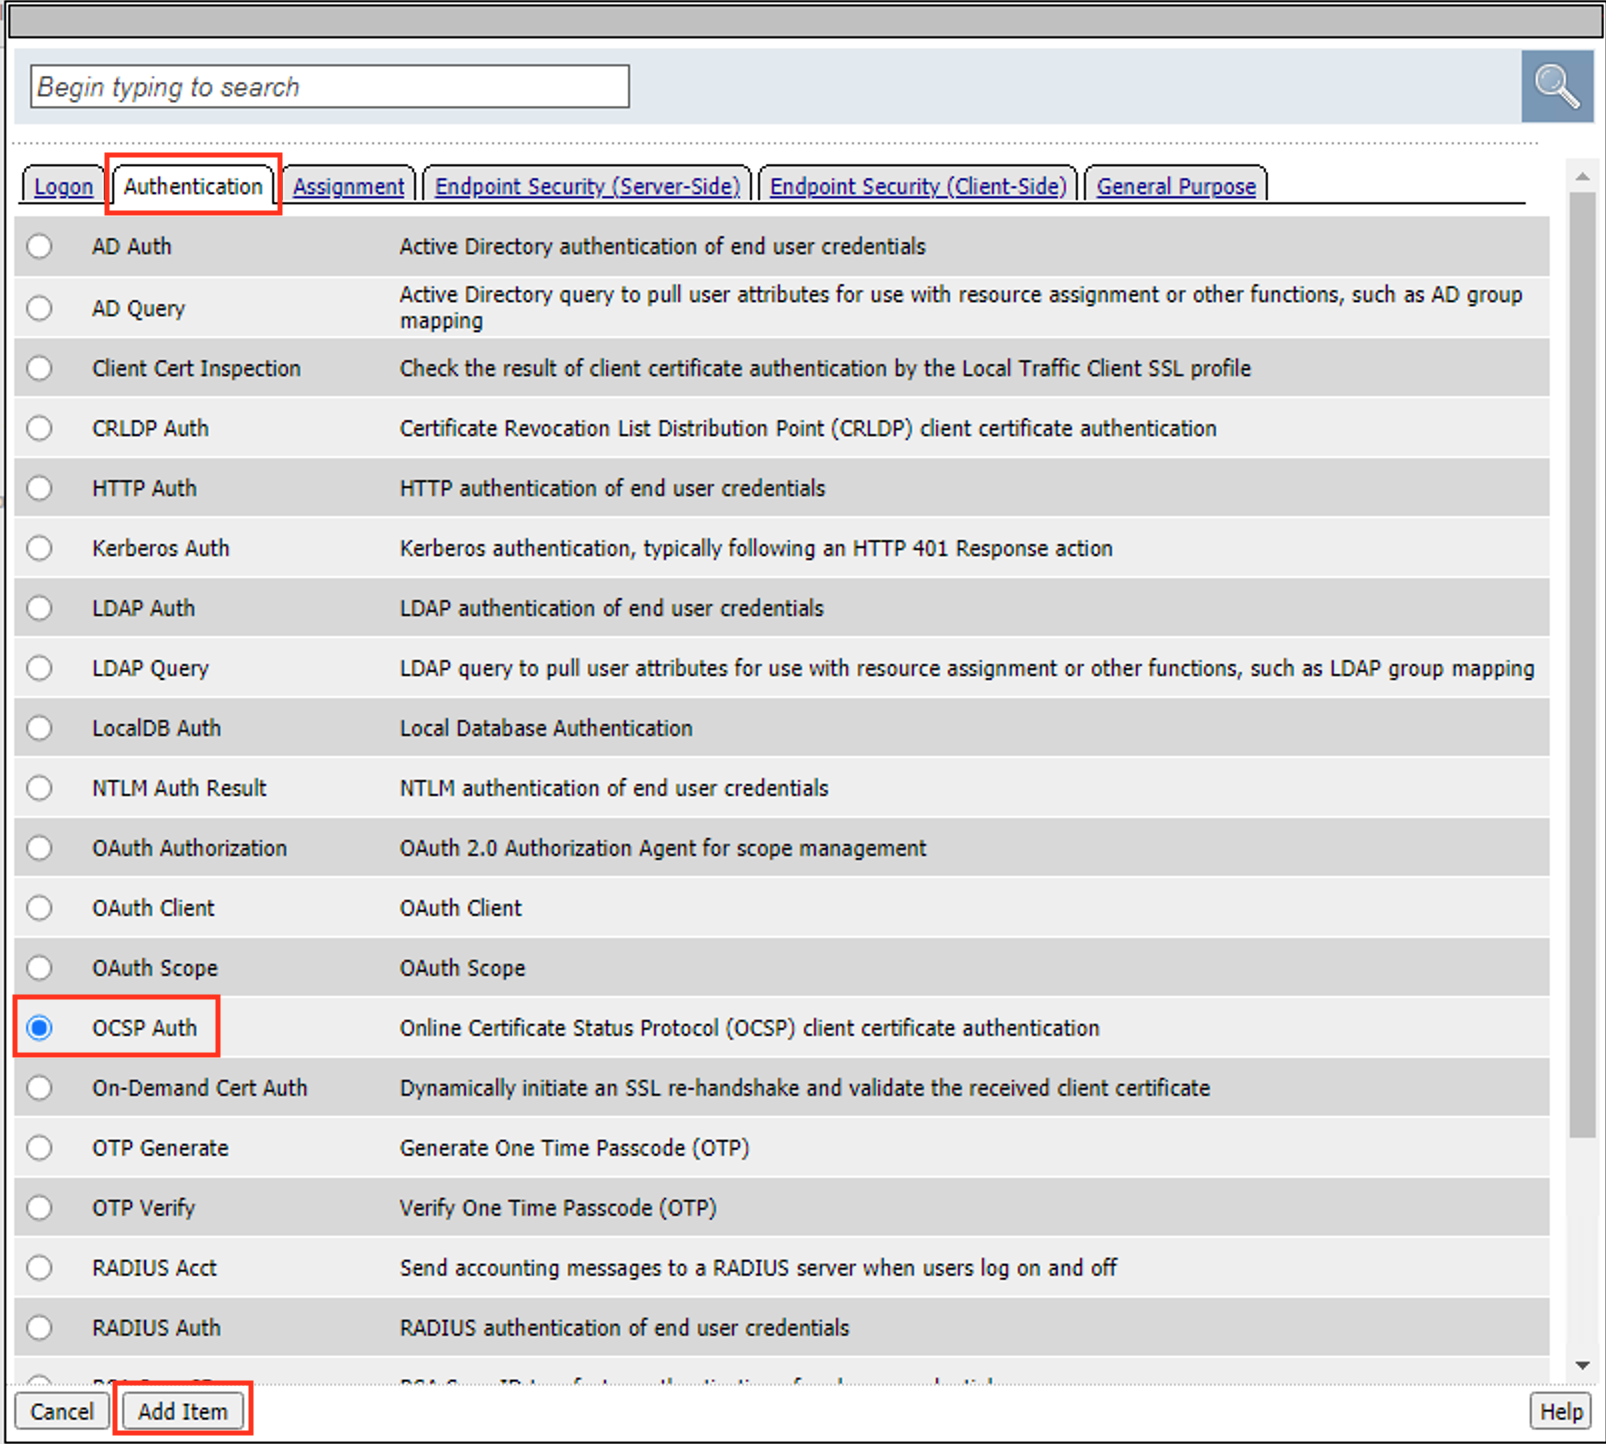
Select /Common/cert2kerb-ocsp from the OCSP Responder dropdown menu
Click Save
Click the Plus (+) Sign on the Successful branch of the OCSP Auth policy item.
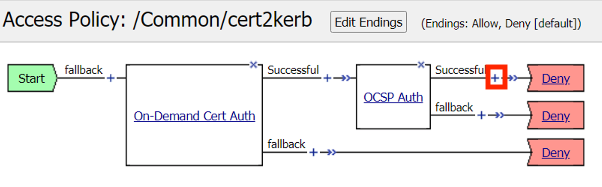
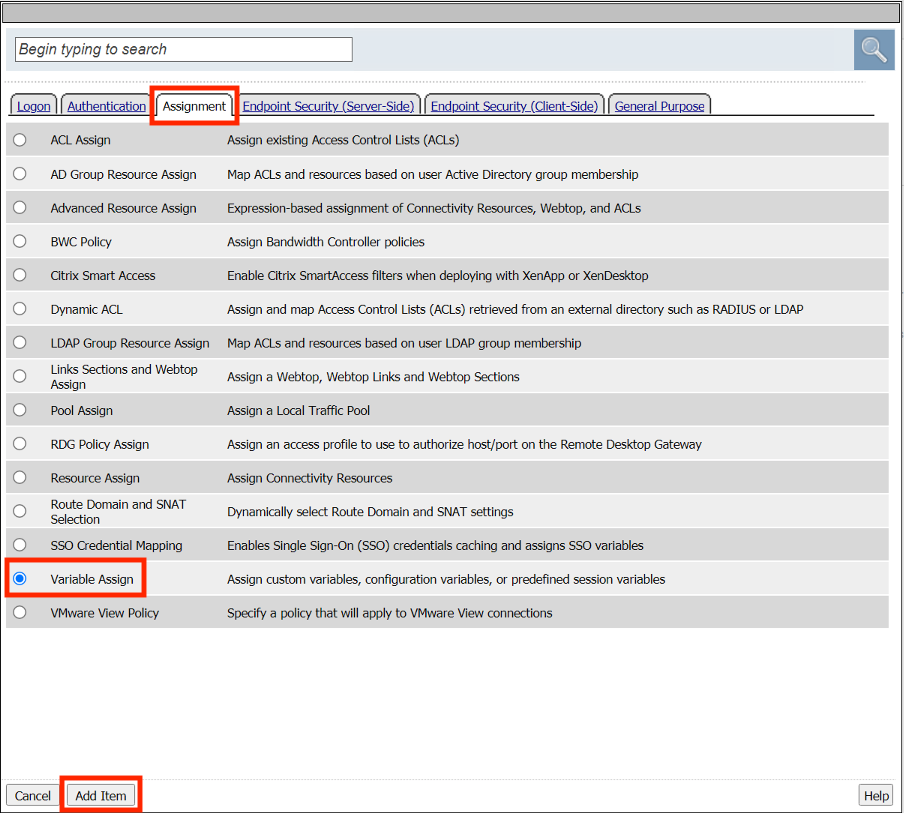
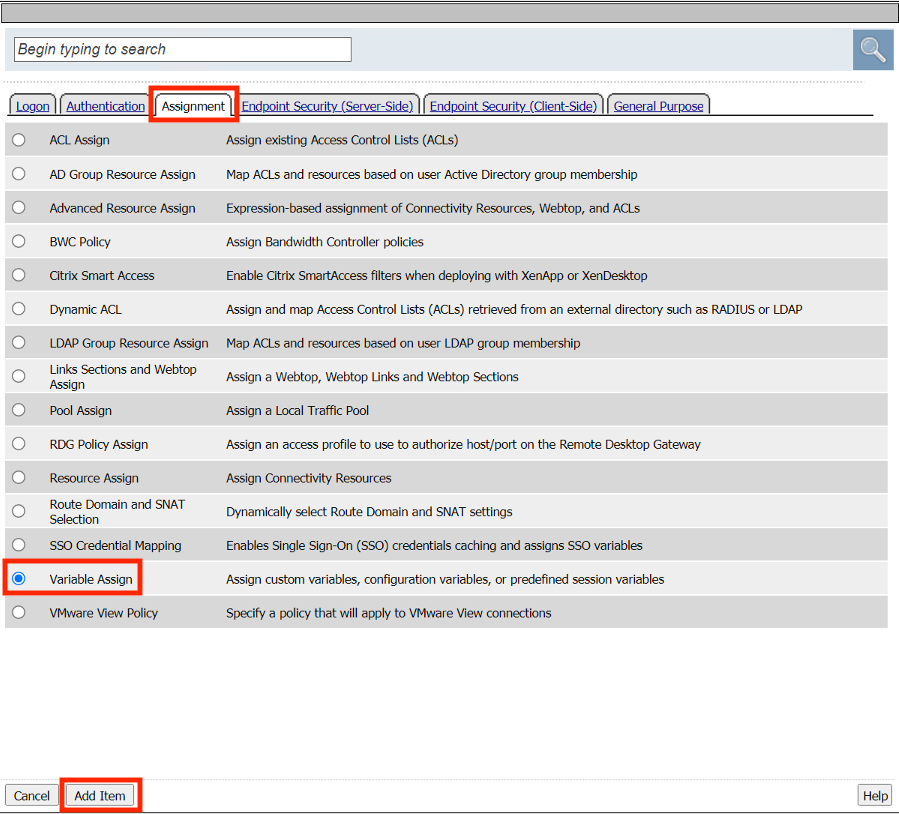
In the pop‑up dialog box, select the Assignment tab and then click the Radio Button next to Variable Assign
Once selected, click the Add Item button
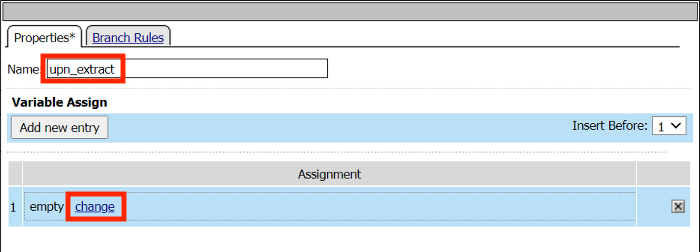
Change the name to upn_extract
Click Add new entry
Click change
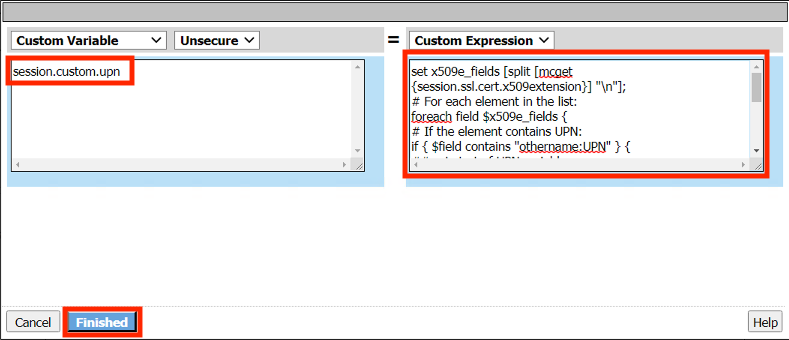
Enter the Custom Variable session.custom.upn
Enter the text below for the custom expression
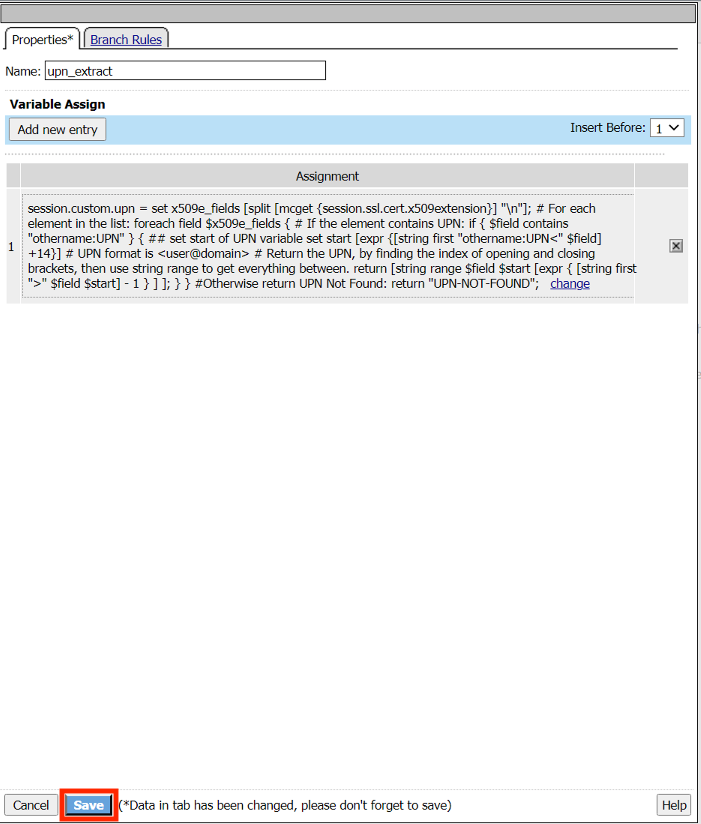
session.custom.upn = set x509e_fields [split [mcget {session.ssl.cert.x509extension}] "\n"]; # For each element in the list: foreach field $x509e_fields { # If the element contains UPN: if { $field contains "othername:UPN" } { ## set start of UPN variable set start [expr {[string first "othername:UPN<" $field] +14}] # UPN format is <user@domain> # Return the UPN, by finding the index of opening and closing brackets, then use string range to get everything between. return [string range $field $start [expr { [string first ">" $field $start] - 1 } ] ]; } } #Otherwise return UPN Not Found: return "UPN-NOT-FOUND";Click Finished
Click Save
Click the Plus (+) Sign on the Successful branch of the upn_extract policy item.
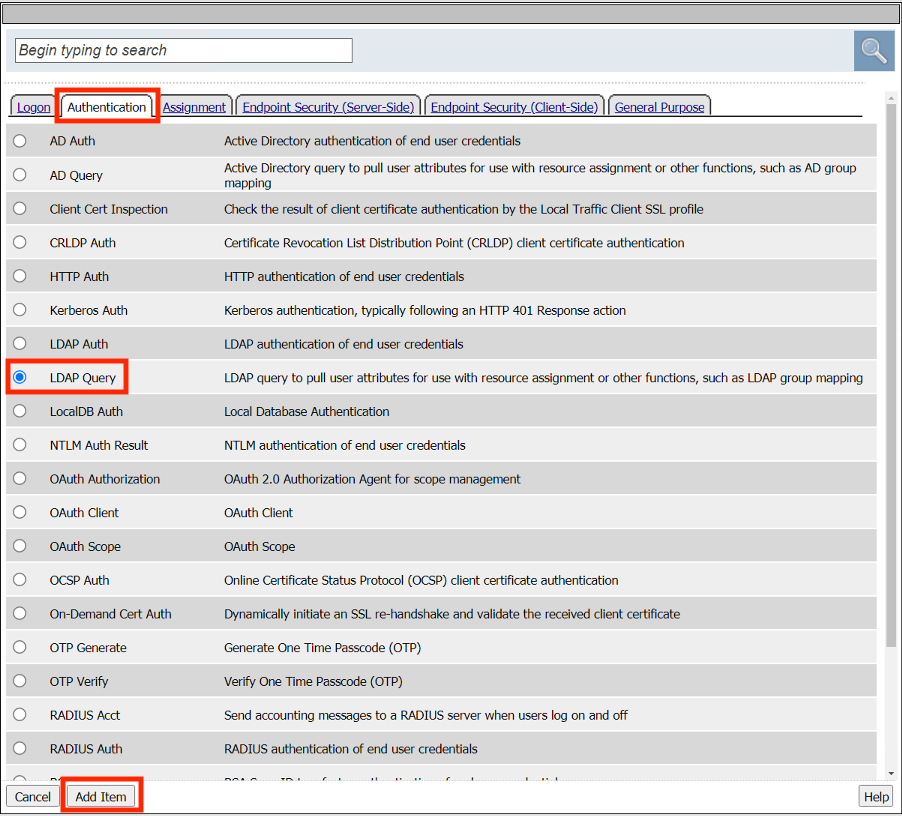
In the pop‑up dialog box, select the Authentication tab and then click the Radio Button next to LDAP Query
Once selected, click the Add Item button
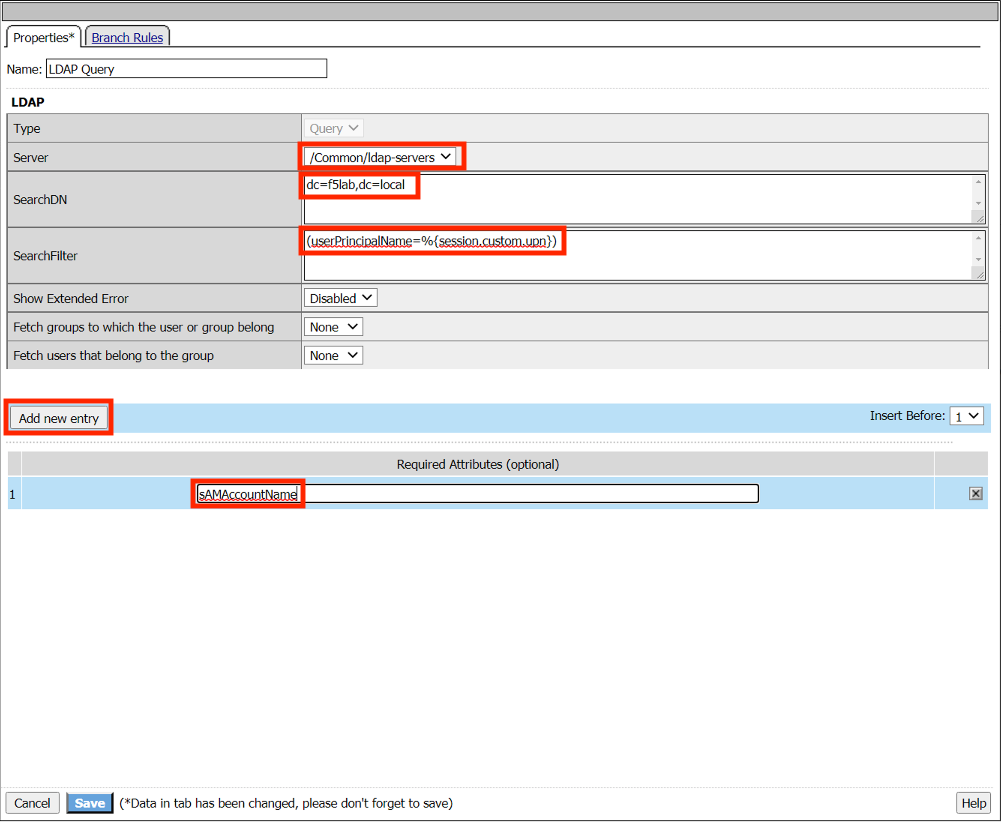
Select /Common/ldap-servers from the Server dropdown menu
Enter the SearchDN dc=f5lab,dc=local
Enter the SearchFilter (userPrincipalName=%{session.custom.upn})
Click Add new entry
Enter the Required Attribute sAMAccountName
Click Save
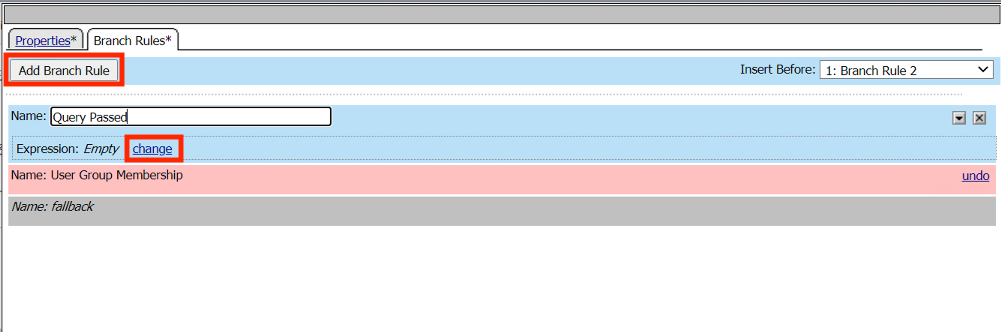
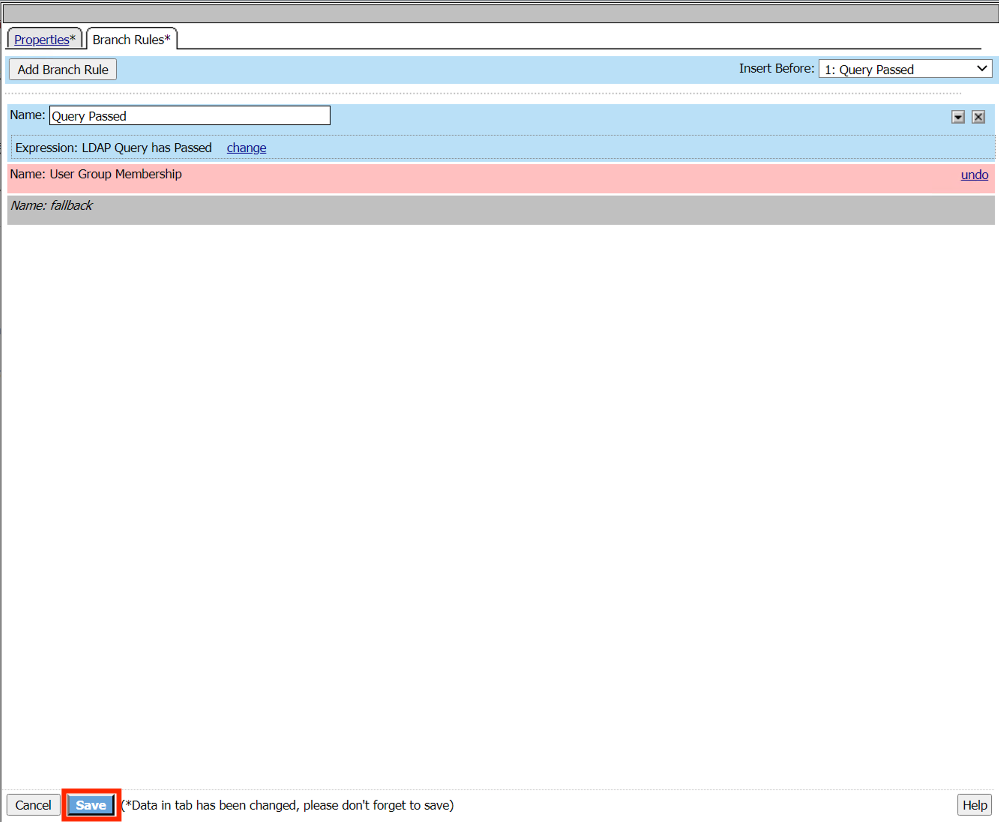
Click Branch Rules
Click the x on User Group Membership Line to delete it.

Click Add Branch Rule
Enter the name Query Passed
Click change
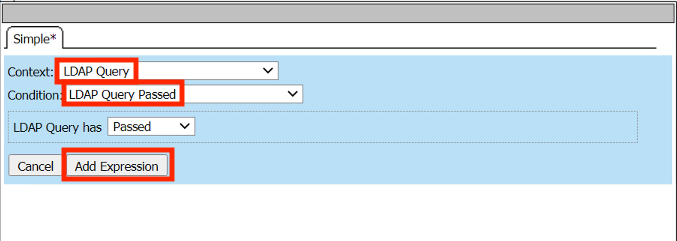
Click Add Expression
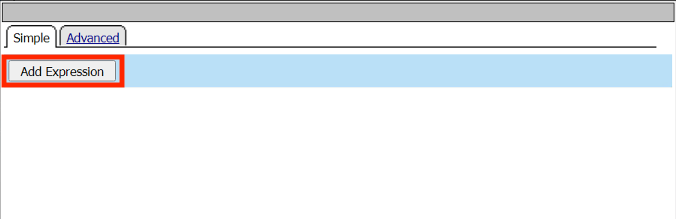
From the Context dropdown Menu select LDAP Query
From the Condition dropdown Menu select LDAP Query Passed
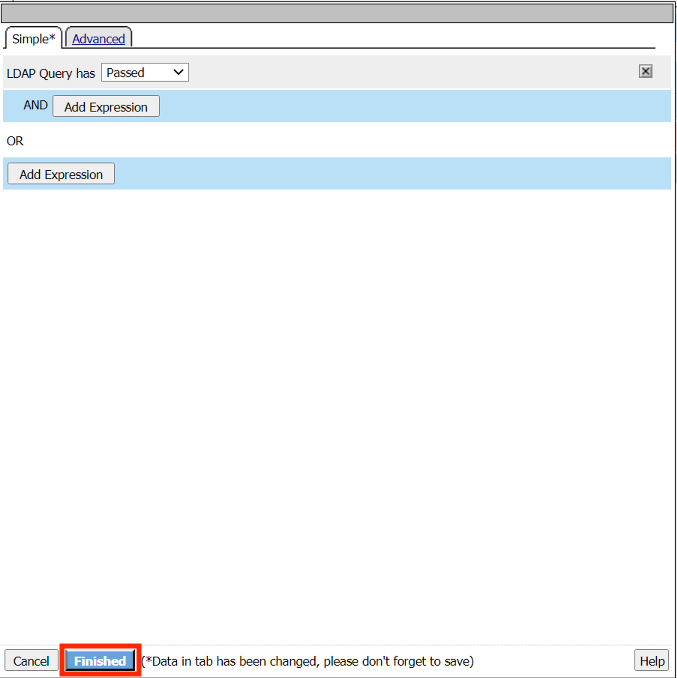
Click Add Expression
Click Finished
Click Save
Click the Plus (+) Sign on the Successful branch of the Query Passed policy item.
In the pop‑up dialog box, select the Assignment tab and then click the Radio Button next to Variable Assign
Once selected, click the Add Item button
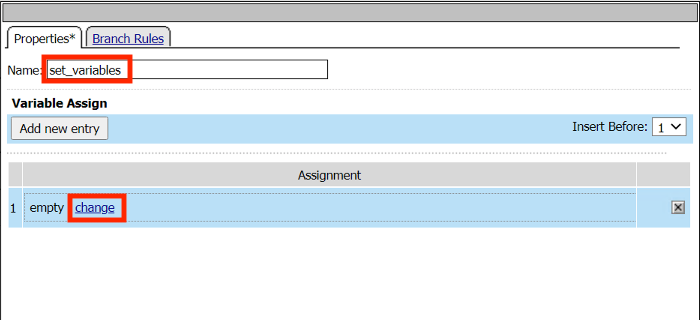
Change the name to set_variables
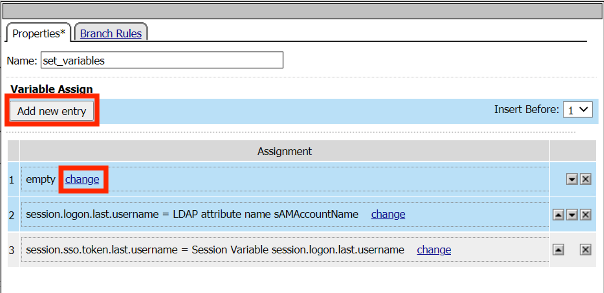
Click Add new entry
Click change
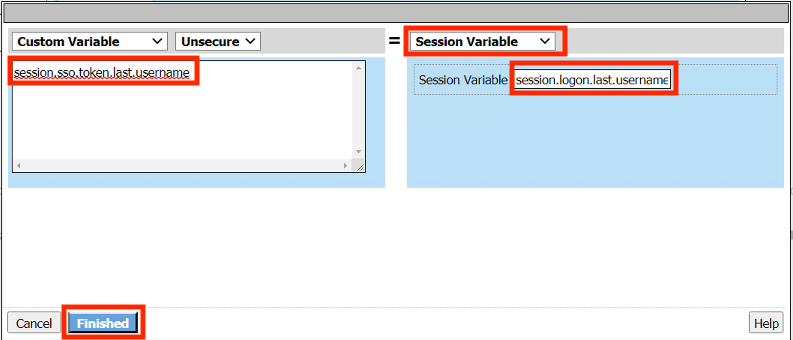
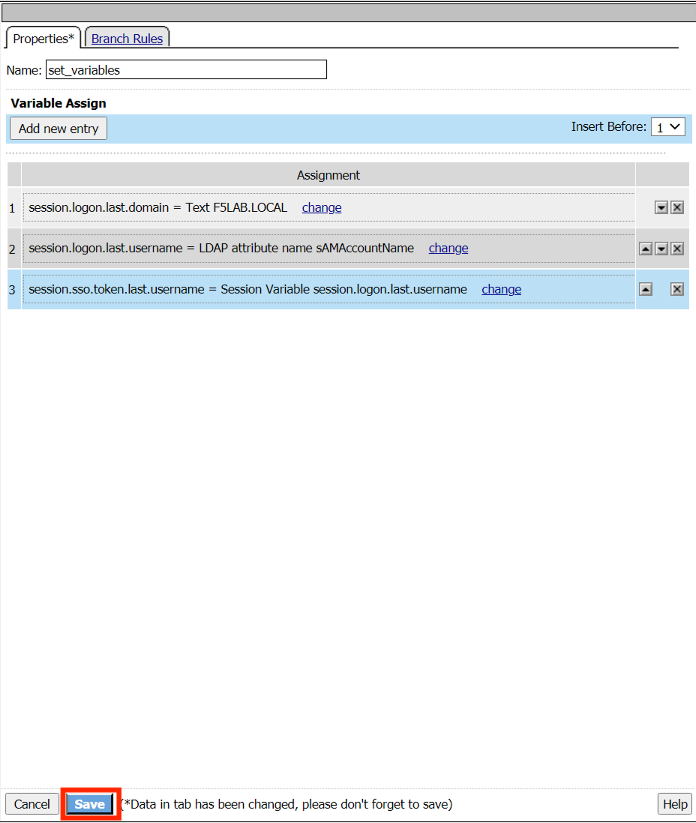
Enter the Custom Variable session.sso.logon.last.username
From the dropdown menu on the right column select AAA Attribute
Enter the Session Variable session.logon.last.username
Click Finished
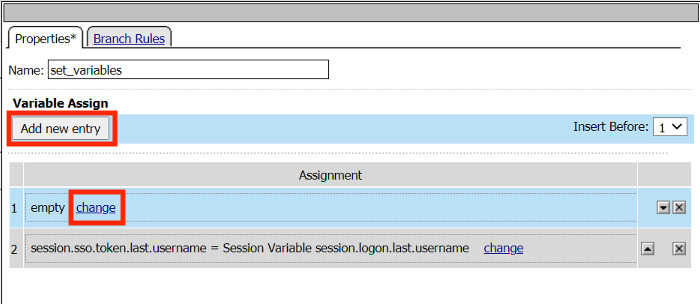
Click Add new entry
Click change
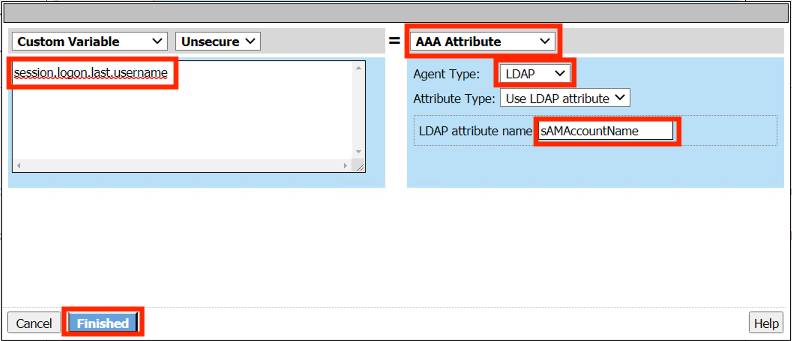
Enter the Custom Variable session.logon.last.username
From the dropdown menu on the right column select AAA Attribute
From the Agent Type dropdown menu select LDAP
Enter the LDAP attribute name sAMAccountName
Click Finished
Click Add new entry
Click change
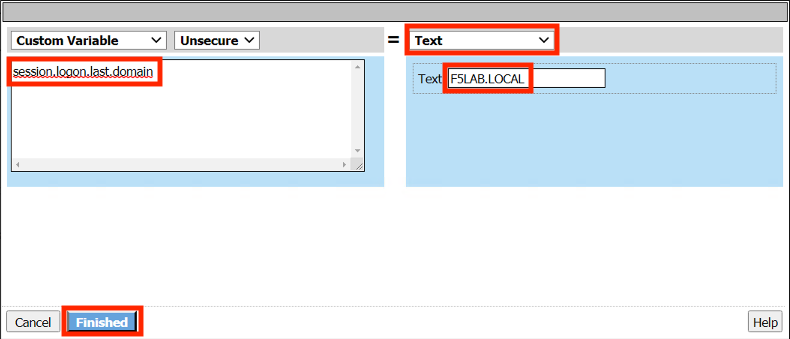
Enter the Custom Variable session.logon.last.domain
From the dropdown menu on the right column select Text
Enter the Text F5LAB.LOCAL
Click Finished
Click Save
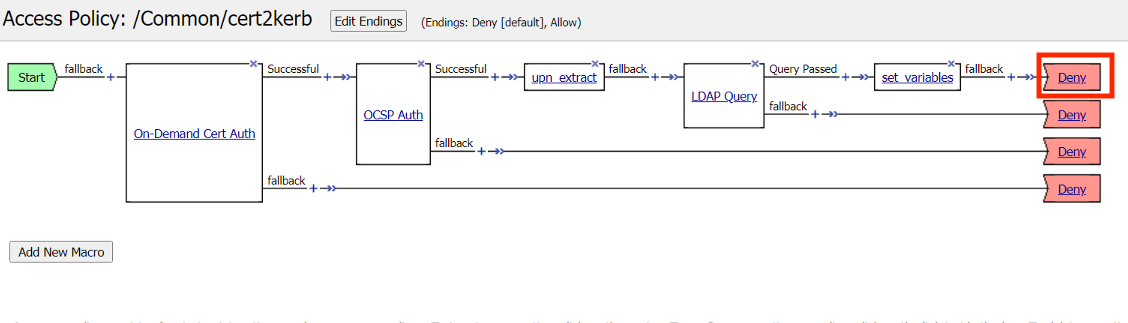
Click the Deny Terminal on the set_variables fallback branch
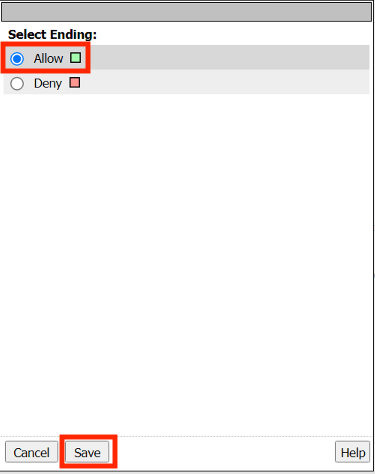
Select Allow
Click Save
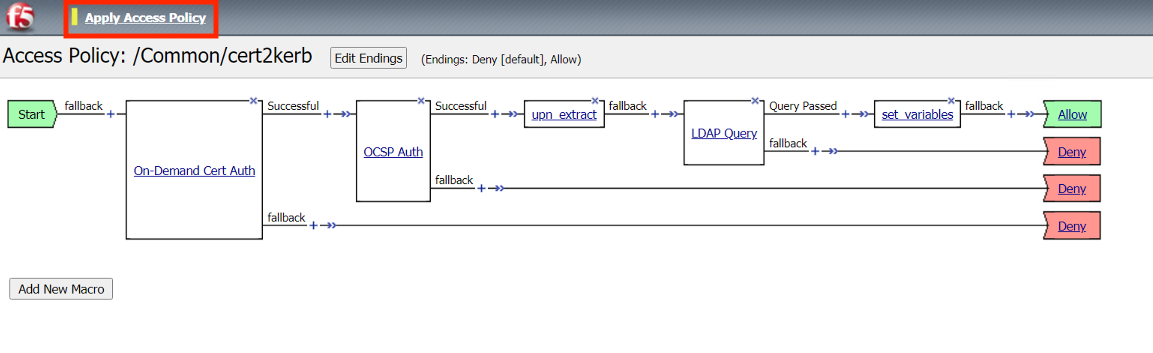
Click Apply Policy
Task 6 - Create a Client-Side SSL Profile
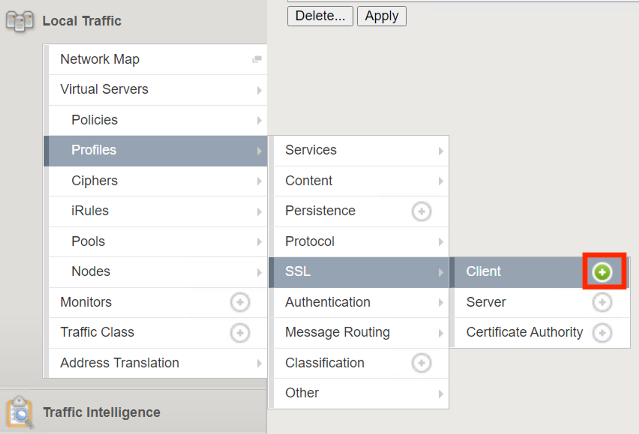
Navigate to Local Traffic >> Profiles >> SSL >> Client >> Click the Plus Sign(+).
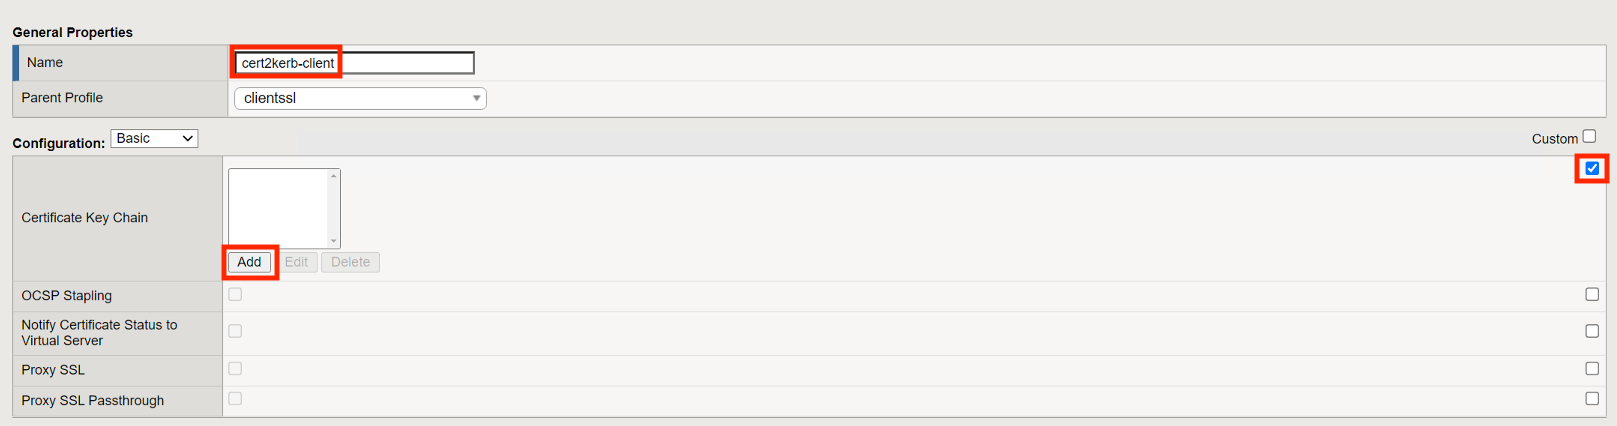
Enter the name cert2kerb-client
Select the custom box to the right on the Certificate Key Chain line
Click Add
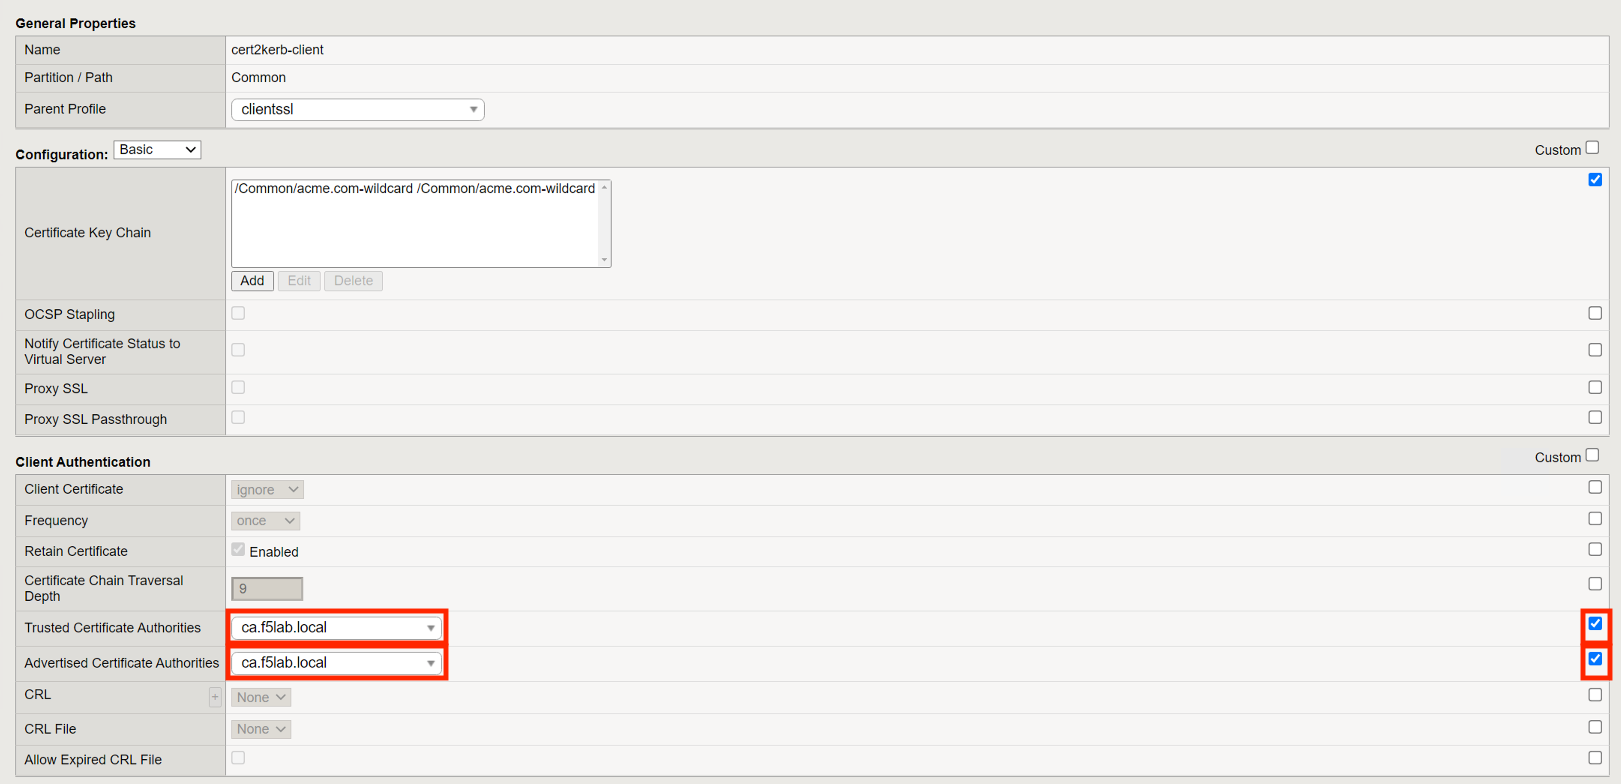
From the Certificate dropdown menu select acme.com-wildcard
From the key dropdown menu select acme.com-wildcard
Click Add

Select the custom box to the right on the Trusted Certificate Authorities line
From the Trusted Certificate Authorities dropdown menu ca.f5lab.local
Select the custom box to the right on the Advertised Certificate Authorities line
From the Advertised Certificate Authorities dropdown menu ca.f5lab.local
Click Finished
Task 7 - Create a Virtual Server
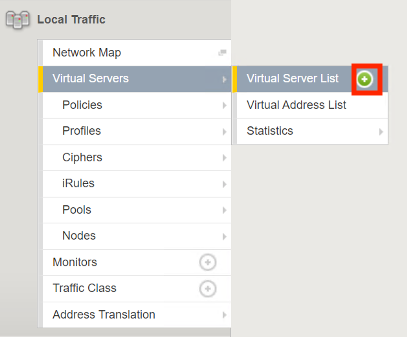
Navigate to Local Traffic >> Virtual Servers >> Virtual Server List >> Click the Plus Sign(+).
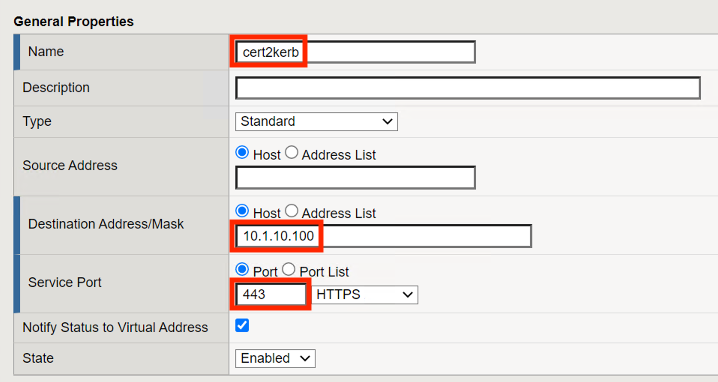
Enter the Name cert2kerb
Enter the Destination Address/Mask 10.1.10.100
Enter the Service Port Port
Scroll down to the Configuration Properties Section
From the HTTP Profile (Client) dropdown menu select http
From the SSL Profile (Client) dropdown menu select cert2kerb-client
From the Source Address Translation dropdown menu select Auto Map
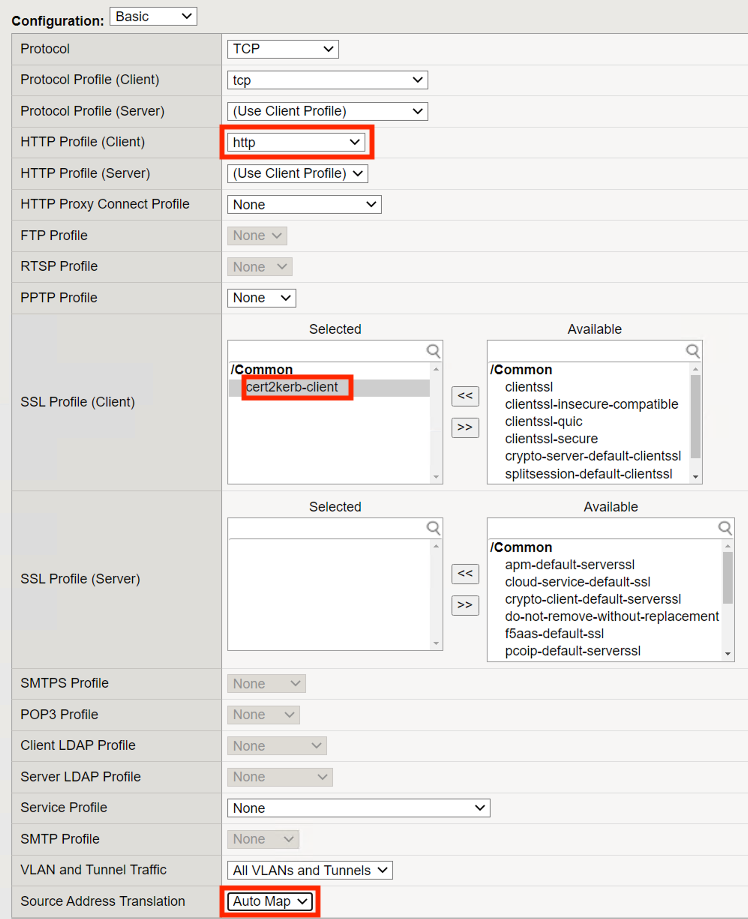
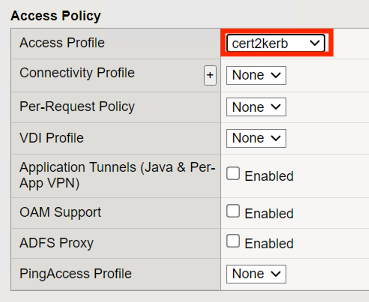
Scroll down to the Access Policy Section
From the Access Profile dropdown menu select cert2kerb
Scroll down to the Resources Section
From the Default Pool dropdown menu select cert2kerb-pool
Click Finished

Task 8 - Test the Configuration
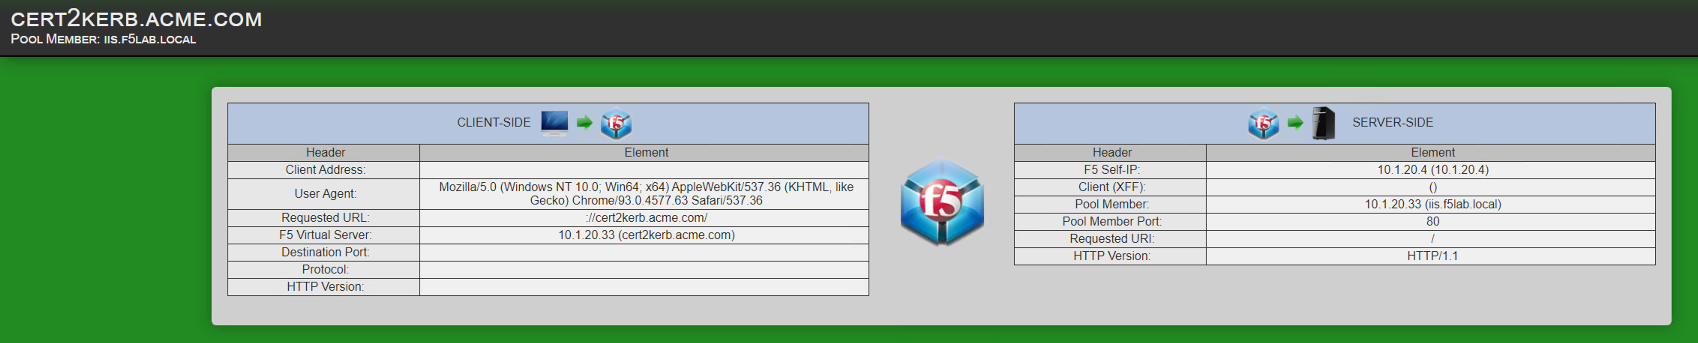
From a browser on the jumphost navigate to https://cert2kerb.acme.com
Select the certificate user1
Click OK

You are successfully logged into the https://cert2kerb.acme.com website
Task 9 - Lab Cleanup
From a browser on the jumphost navigate to https://portal.f5lab.local
Click the Classes tab at the top of the page.
Scroll down the page until you see 06 Per-Session Access Control on the left
Hover over tile Cert Auth to Kerberos SSO. A start and stop icon should appear within the tile. Click the Stop Button to trigger the automation to remove any prebuilt objects from the environment
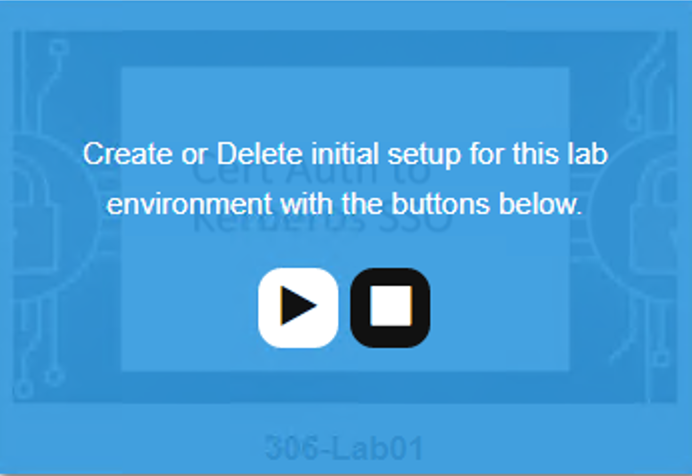
The screen should refresh displaying the progress of the automation within 30 seconds. Scroll to the bottom of the automation workflow to ensure all requests succeeded. If you experience errors try running the automation a second time or open an issue on the Access Labs Repo.
This concludes the lab.
