F5 Identity and Access Management Solutions > Archived Identity & Access Management Labs > 300 Series: Advanced Use Cases & Solutions Source | Edit on
Lab 1: SSL VPN - AD Authentication and MFA
Section 1.1 - Setup Lab Environment
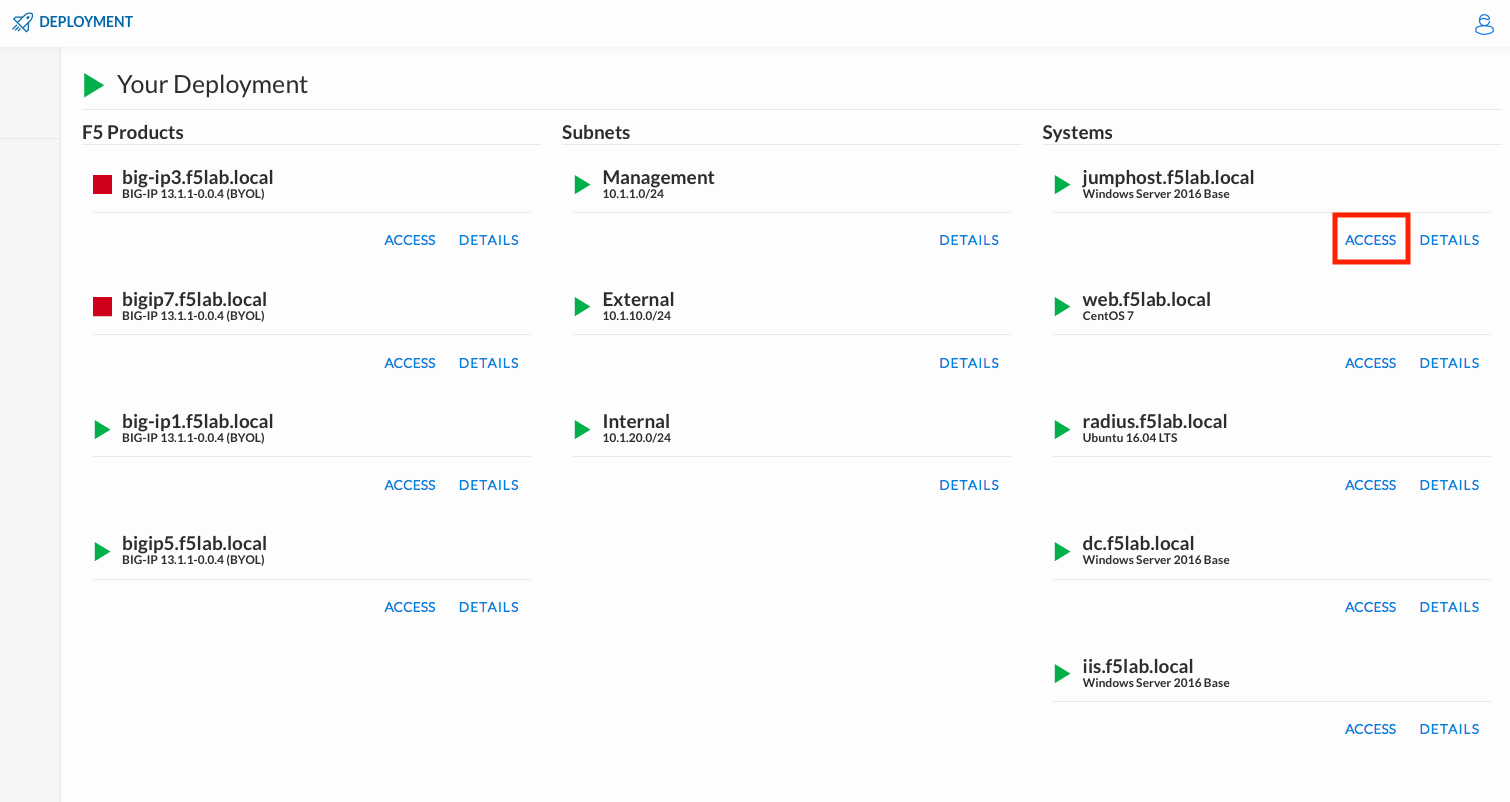
To access your dedicated student lab environment, you will need a web browser and Remote Desktop Protocol (RDP) client software. The web browser will be used to access the Unified Demo Framework (UDF) Training Portal. The RDP client will be used to connect to the jumphost, where you will be able to access the BIG-IP management interfaces (HTTPS, SSH). #. Click DEPLOYMENT located on the top left corner to display the environment
Click ACCESS next to jumphost.f5lab.local
Select your RDP resolution.
The RDP client on your local host establishes a RDP connection to the jumphost.
Login with the following credentials:
- User: f5lab\user1
- Password: user1
After successful logon the Chrome browser will auto launch opening the site https://portal.f5lab.local. This process usually takes 30 seconds after logon.
Click the Classes tab at the top of the page.

Scroll down the page until you see 309 SSL VPN on the left
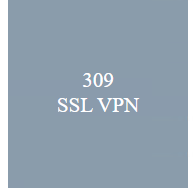
Hover over tile SSL VPN - AD Authentication + MFA. A start and stop icon should appear within the tile. Click the Play Button to start the automation to build the environment

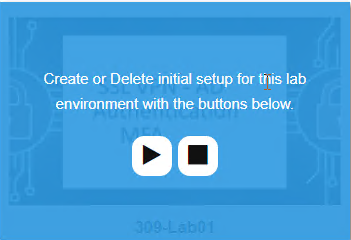
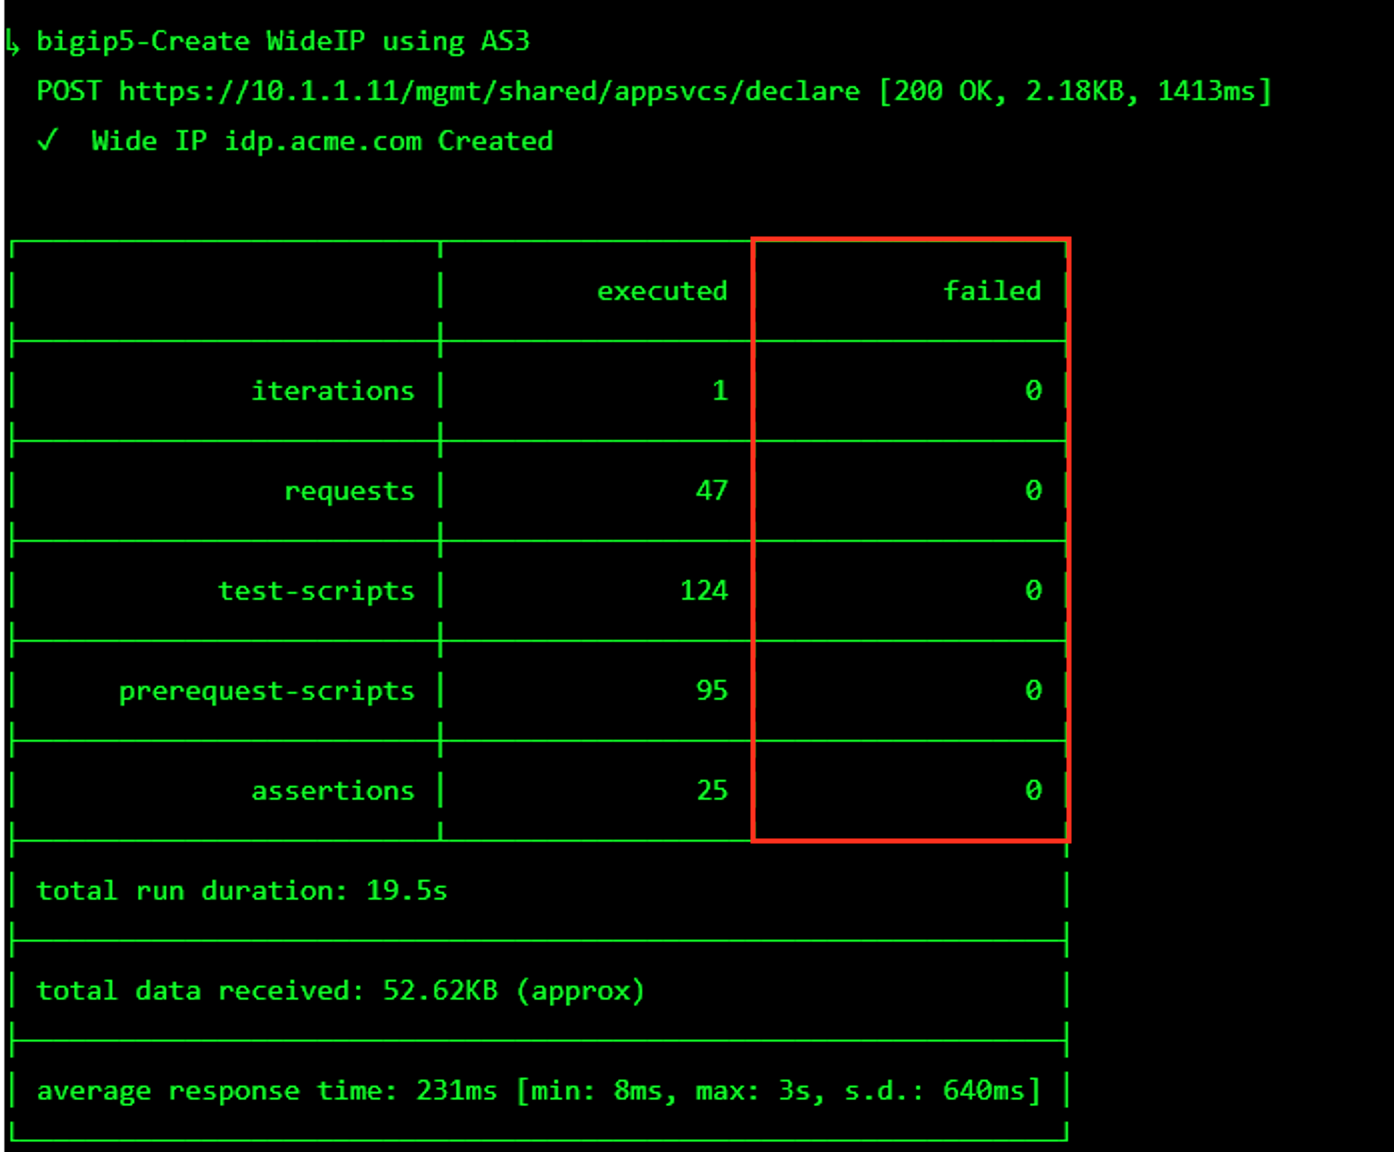
The screen should refresh displaying the progress of the automation within 30 seconds. Scroll to the bottom of the automation workflow to ensure all requests succeeded. If you experience errors try running the automation a second time or open an issue on the Access Labs Repo.
Task 1 - Build Network Access Components
While in the jumphost, launch Chrome and click on the bigip1 bookmark.
Log in to bigip1.f5lab.local
- User: admin
- Password: admin
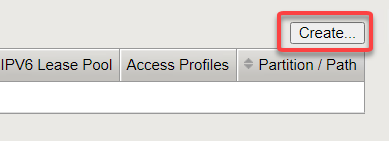
Navigate to Access –> Connectivity/VPN –> Network Access (VPN) –> Network Access Lists
Click the create button
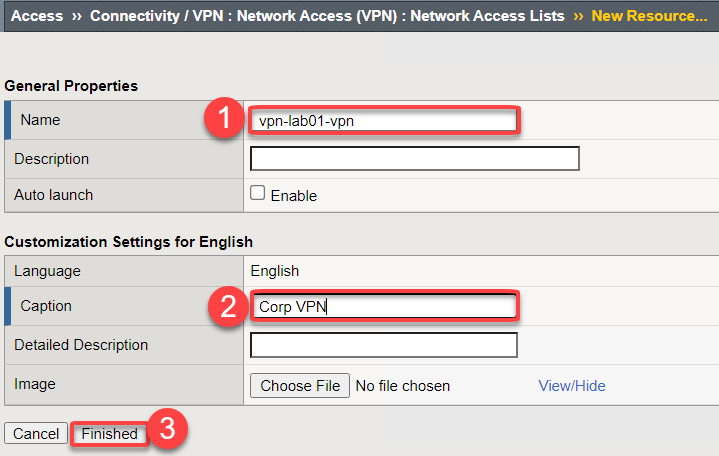
Give the Network Access list a name and caption
Name vpn-lab01-vpn Caption Corp VPN Click Finished
Click on the Network Settings tab
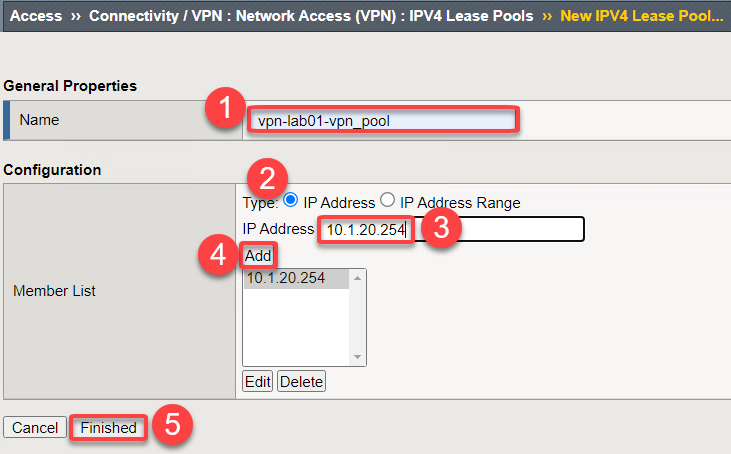
Click the + next to IPV4 Lease Pool to create a lease Pool
Give the pool a name vpn-lab01-vpn_pool
Click the radio button next to IP address
Enter 10.1.20.254
Click Add
Click Update
Note
For the purposes of this lab we are only going to use a single IP address for the lease pool. In a production environment you should set this range to as many as you need.
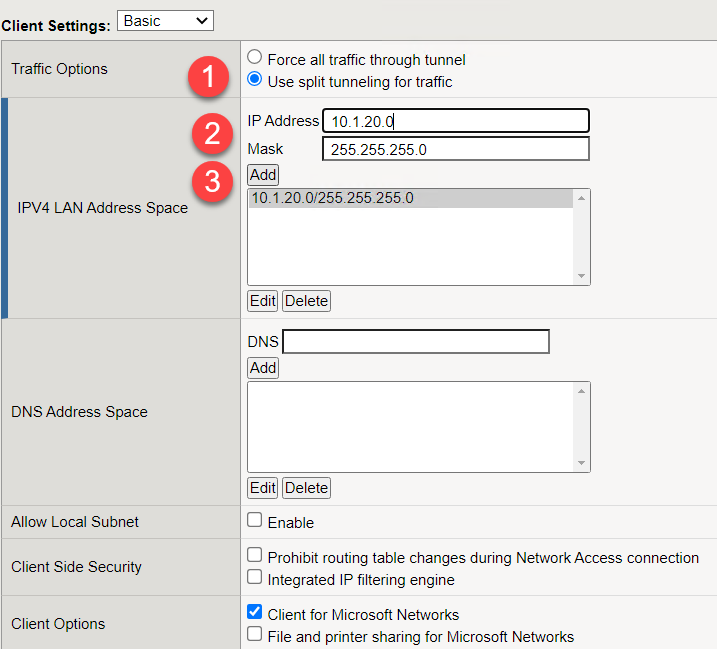
Back at the Network Access object we will configure VPN for split tunneling only accepting traffic destined to the internal network through the VPN tunnel. Click the radio button Use split tunneling for traffic.
Enter IP Address 10.1.20.0
Enter Mask 255.255.255.0
Click Update
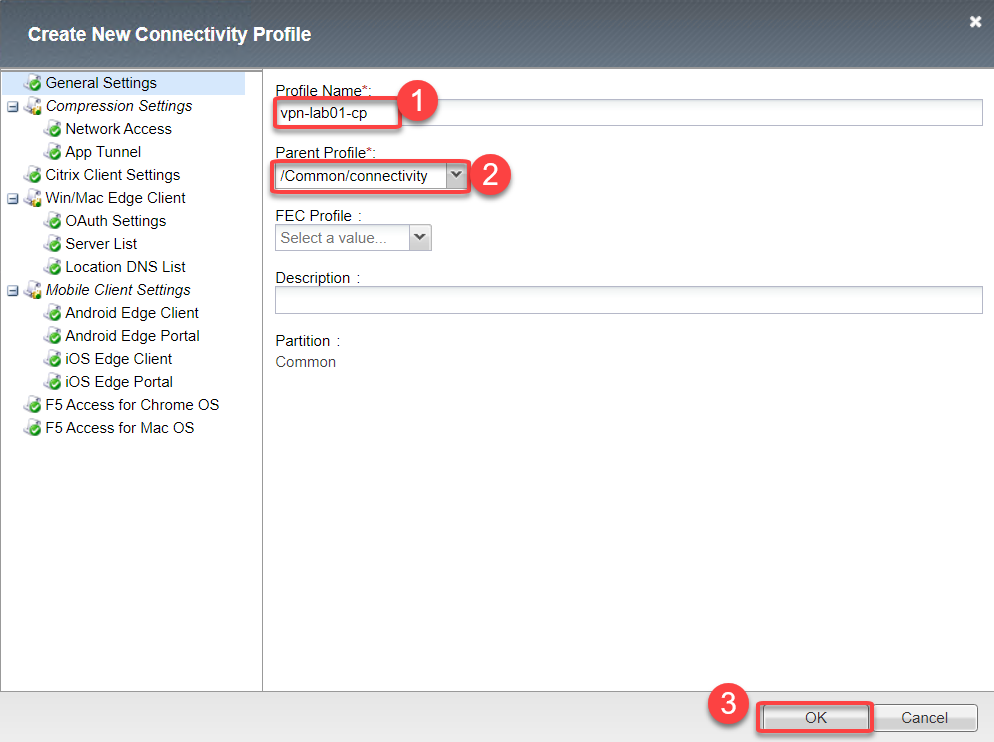
Navigate to Access –> Connectivity/VPN –> Connectivity –> Profiles
Click Add
Profile Name vpn-lab01-cp and Parent Profile /Common/connectivity
Click OK
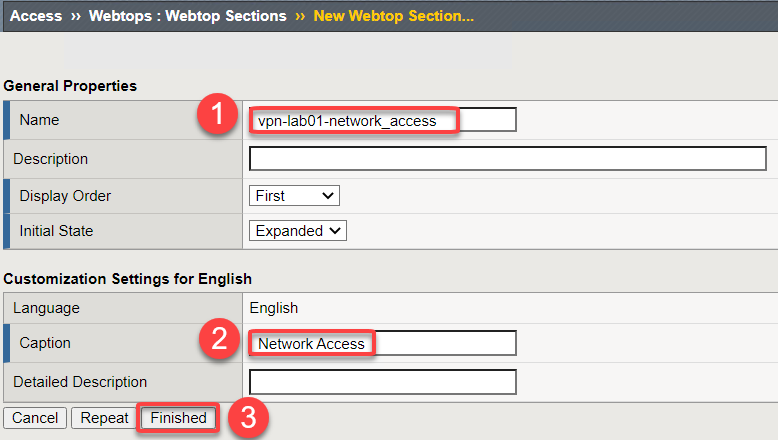
Navigate to Access –> Webtops –> Webtop Sections
Click Create
Enter name vpn-lab01-network_access
Change caption to be Network Access
Click Finished
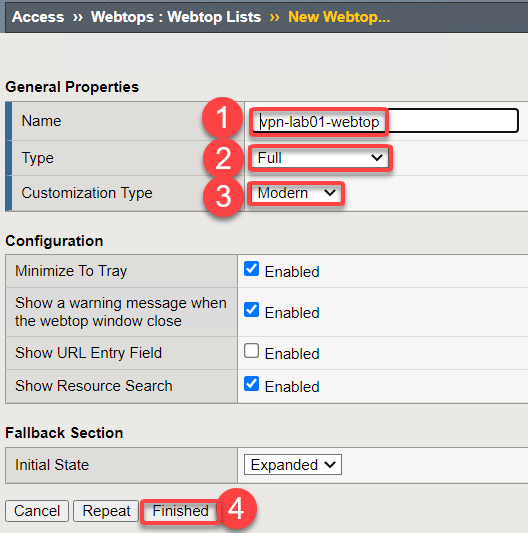
Navigate to Access –> Webtops –> Webtop Lists
Click Create
Click on vpn-lab01-webtop
Select Full from the drop down menu
Customization type Modern
Click Finished
Task 2 - Per Session Access Policy
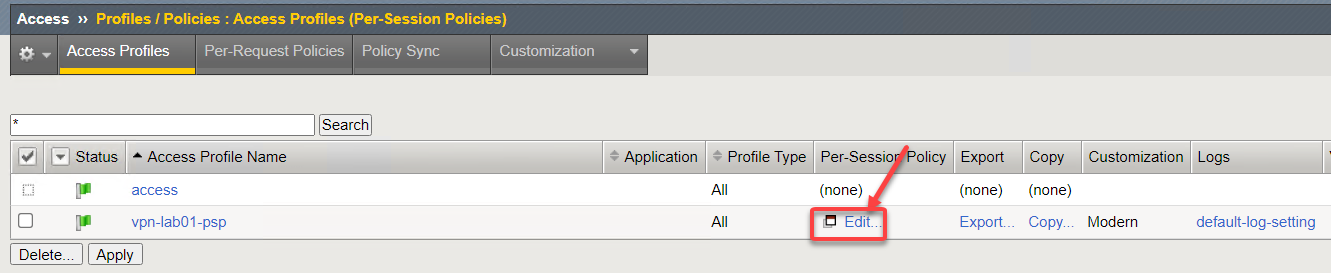
Navigate to Access –> Profiles/Policies –> Access Profiles (Per-Session Policies)
Click Create to create a new per session policy for VPN
Name vpn-lab01-psp Profile Type All Customization Type Modern Scroll to the bottom choose English from the right menu and slide move it to the left and click Finished
Locate profile vpn-lab01-psp and click on Edit. This opens the Visual Policy Editor (VPE) and we can take a look at the policy
Click the + between Start and Deny

Click the Logon Page Radio button and click Add Item
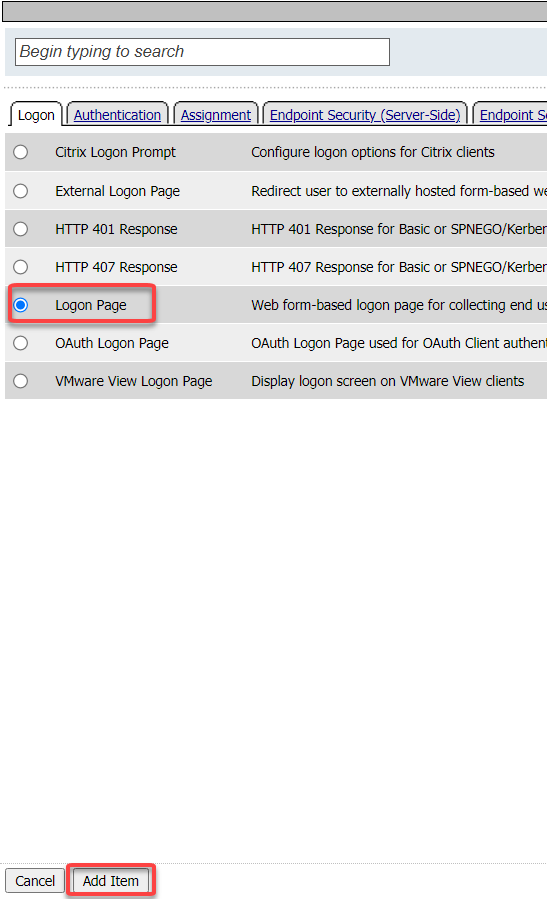
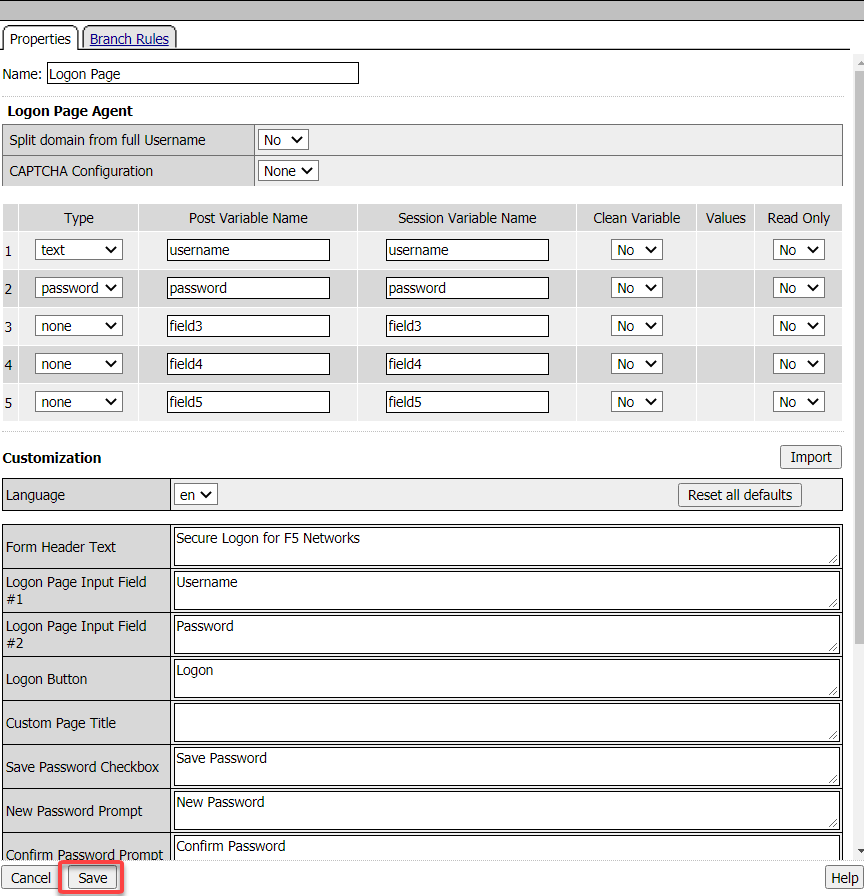
Accept the defaults for Logon Page and click Save
Click the + between Logon Page and Deny
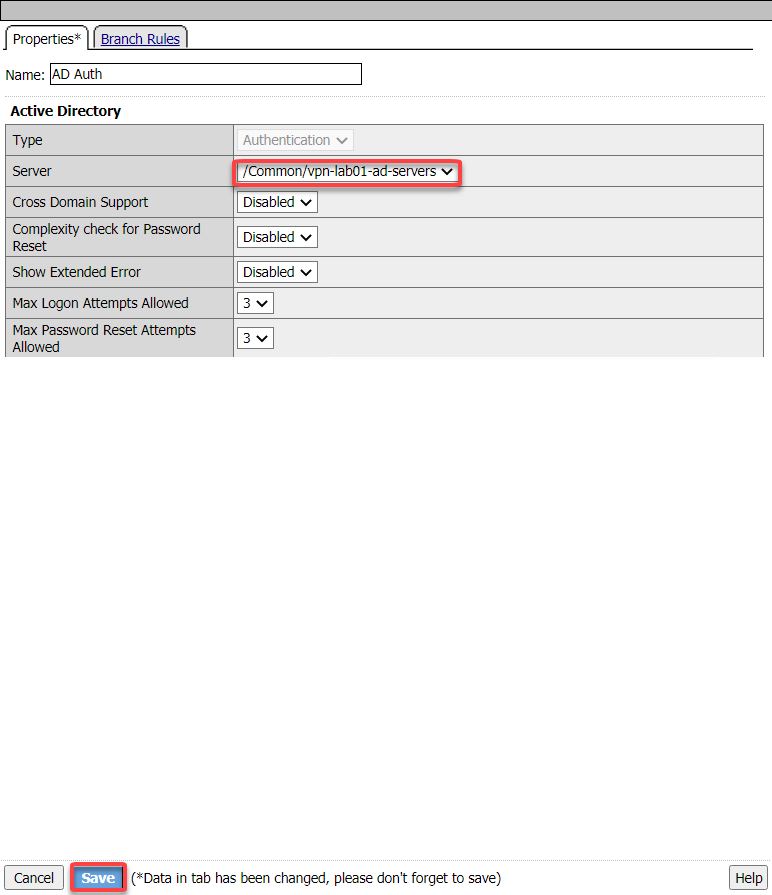
Click the Authentication Tab and click the AD Auth radio button. Cick Add Item
Click the drop down for Server and select /common/vpn-lab01-ad-servers. Click Save
Note
AAA Active Directory object was created through automation. If you want more details on how to create this object see APM 100 Series labs.
Click on the + between AD Auth and Deny
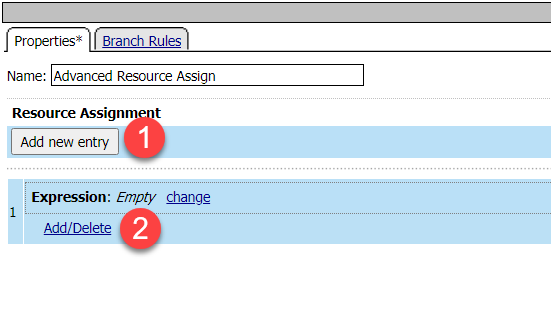
Click on the Assignment tab and choose Advanced Resource Assign. Click Add Item
Click Add new entry Button
Click the Add/Delete link
Click the Network Access tab and check the box for /Common/vpn-lab01-vpn
Click the Webtop tab and click the radio button for /Common/vpn-lab01-webtop
Click the Webtop Sections tab and check the box for /Common/vpn-lab01-network_access
Click Update
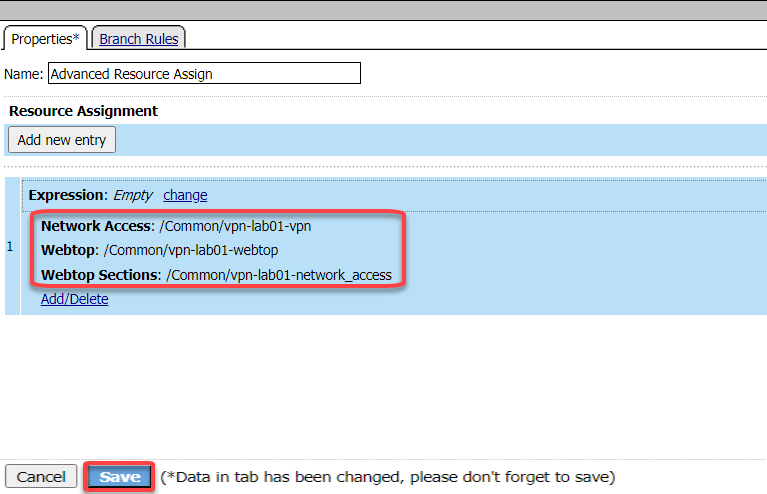
Click Save
Click the Deny end point on the branch with Advanced Resource Assign and select Allow then Save
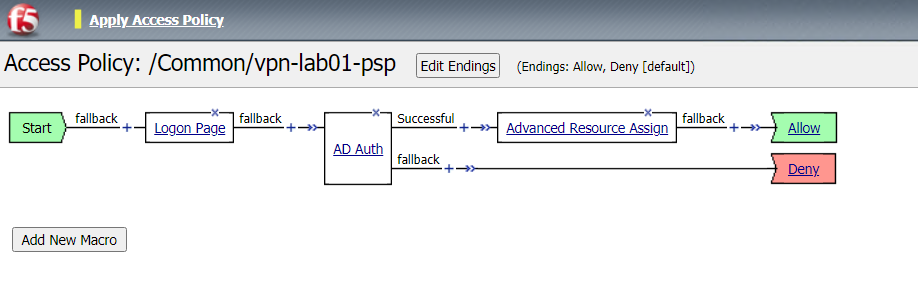
Click Apply Access Policy and Close


Task 3 - Apply Policy and profiles to Virtual Server
Navigate to Local Traffic –> Virtual Servers –> Virtual Server List
Note
Due to how the automation is deployed in the lab the Virtual Server has been deployed in it’s own partition. In your own environment you can choose to deploy the Virtual Server in a specific parition or in Common.
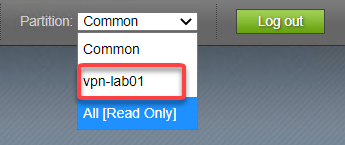
From the Partition drop down in the upper right choose vpn-lab01
Click on vpn-lab01 Virtual Server (not the redirect server)
Scroll down to the Access Policy section
Select the vpn-lab01-psp from the Access Profile drop down menu
Click the drop down for “”Connectivity Profle** and choose the vpn-lab01-cp from the menu
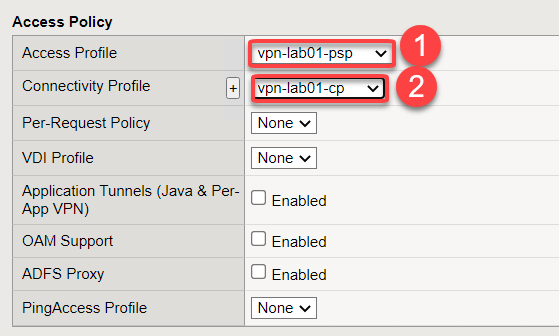
Scroll down and click Update*
Task 4 - Test VPN Access
The connects to https://vpn.acme.com with the following credentials
Username: user1 Password: user1 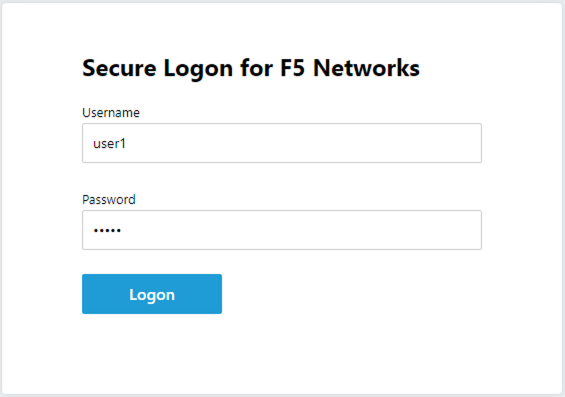
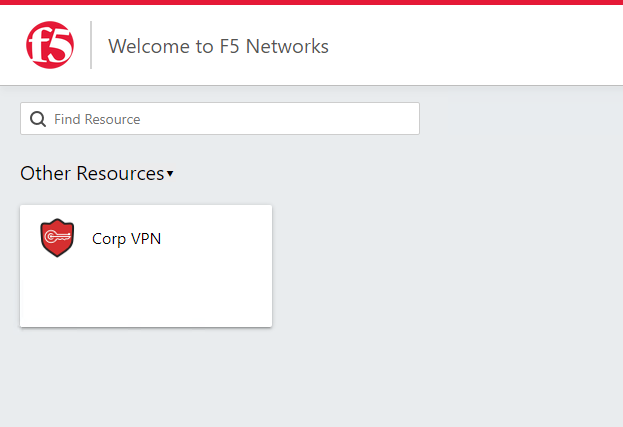
Once authenticated the user is presented a Webtop with a single VPN icon.
Assuming the VPN has already been installed the user is notified that the client is attempting to start

Note
You may be prompted to download the VPN update. This is what a user will experience if you have auto-update enabled in the VPN Connectivity Profile. Click Download and wait for the components to update.
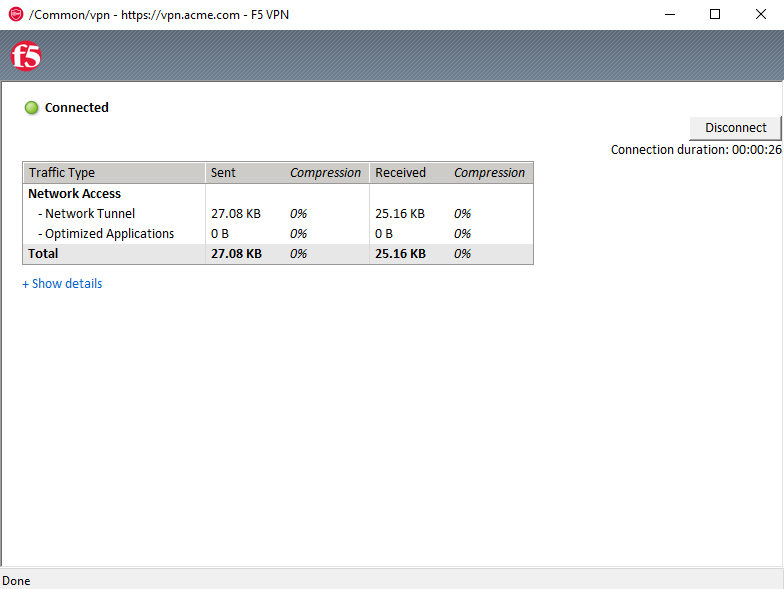
A popup opens displaying the status of the VPN connection. The status will eventually become Connected
Note
If you lose the pop-up check the system tray for the little red ball. Right click and choose restore
Click Disconnect
Task 5 - Adding Radius MFA
Navigate to Access –> Authentication –> RADIUS
From the Partition drop down menu at the top right change your partition back to Common
Note
The Radius server has already been built.
Click on vpn-lab01-radius-server and examine the properties
Name: vpn-lab01-radius Mode: Authentication Server Connection: Use Pool Server Pool Name: vpn-lab01-radius-pool Server Address: 10.1.20.8 Authentication Service Port: 1812 Secret: secret Navigate to Access –> Profiles/Policies –> Access Profiles (Per-Session Policies)
Click on Edit next to the vpn-lab01-psp Profile
Click on the + between AD Auth and Advanced Resource Assign
From the Logon tab select Logon Page and click Add Item
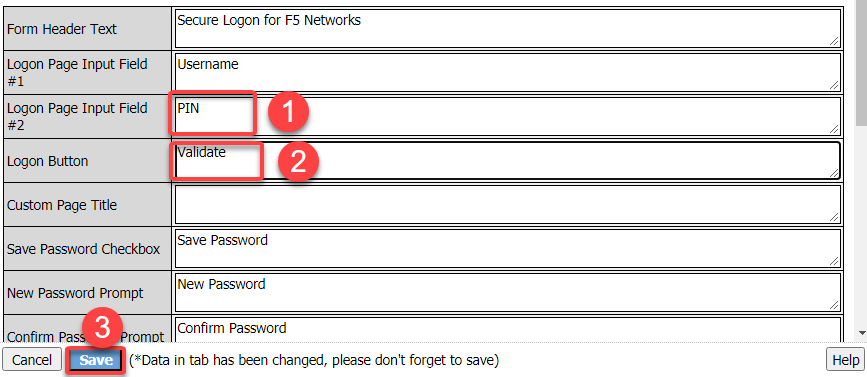
In the name field enter MFA Prompt
On row 1 the Username field change the Read Only value to Yes

Under Customization change Logon Page Input Field #2 to **PIN and Logon Button to Validate
Click Save
Note
In this lab we are using FreeRadius with a pre-configured users and PINs. For this particular setup we need to present two login pages. One for AD Auth and one for MFA. Setting the Username entry to Read Only will ensure we will reuse the sanem username. If you were to add MFA via Radius for other MFA vendors please follow the vendors integration documentation.
Click on the + between MFA Prompt and Advanced Resource Assign.
Click on the Authentication tab and choose Radius Auth
Under AAA Server click the drop down menu and select the vpn-lab01-radius server we created earlier
Click Save
You policy should now be complete. Click Apply Access Policy

Task 5 - Test VPN Access (again)
The connects to https://vpn.acme.com with the following credentials
Username: user1 Password: user1 You will be prompted to enter the PIN
PNI: 123456 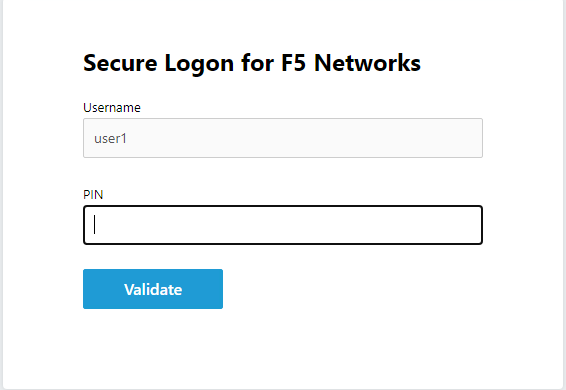
Note
Other MFA providers will operate differently. They may prompt with an auto enrollment for the first login and then present options to send a PUSH or enter a PIN. This is just an example of how to integrate Radius as a second form of auth.
Once we have passed Auth and MFA the user is presented a Webtop with a single VPN icon.
Assuming the VPN has already been installed the user is notified that the client is attempting to start
Note
You may be prompted to download the VPN update. This is what a user will experience if you have auto-update enabled in the VPN Connectivity Profile. Click Download and wait for the components to update.
A popup opens displaying the status of the VPN connection. The status will eventually become Connected
Note
If you lose the pop-up check the system tray for the little red ball. Right click and choose restore
Click Disconnect