F5 Identity and Access Management Solutions > Archived Identity & Access Management Labs > Class 7: Introduction to Universal Access Source | Edit on
Lab 4 – Configuring an APM Webtop
In this lab, we will add a Webtop resource to the Access Policy created in the previous lab.
Note
Lab Requirements:
- Working HTTPS Virtual Server created in Lab 1 with Access Policy created in Lab 2 (Lab 2 successfully completed).
Task – Create a Webtop resource
Expand the Access tab from the main menu on the left and navigate to Webtops > Webtop Lists.
Click Create to create a new Webtop called MyFullWebtop, select Type “Full”, uncheck “Minmize To Tray” and click Finished.

Task – Enable “Content Rewrite” on the Virtual Server
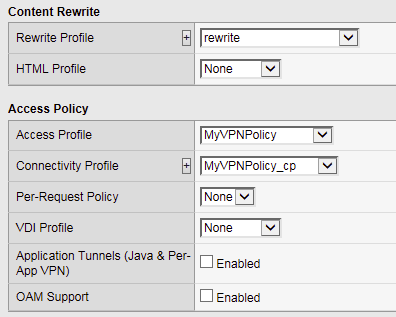
Browse to Local Traffic > Virtual Servers > Virtual Server List and click on the name of your VPN Virtual Server called MyVPNPolicy_vs.
Scroll down to the “Content Rewrite” section, select “rewrite” for the “Rewrite Profile” field and click Update.
Task – Add Webtop resource to existing Access Policy
Browse to Access > Profiles / Policies > Access Profiles (Per-Session Policies), click on Edit for MyVPNPolicy. A new tab should open to the Visual Policy Editor for MyVPNPolicy.
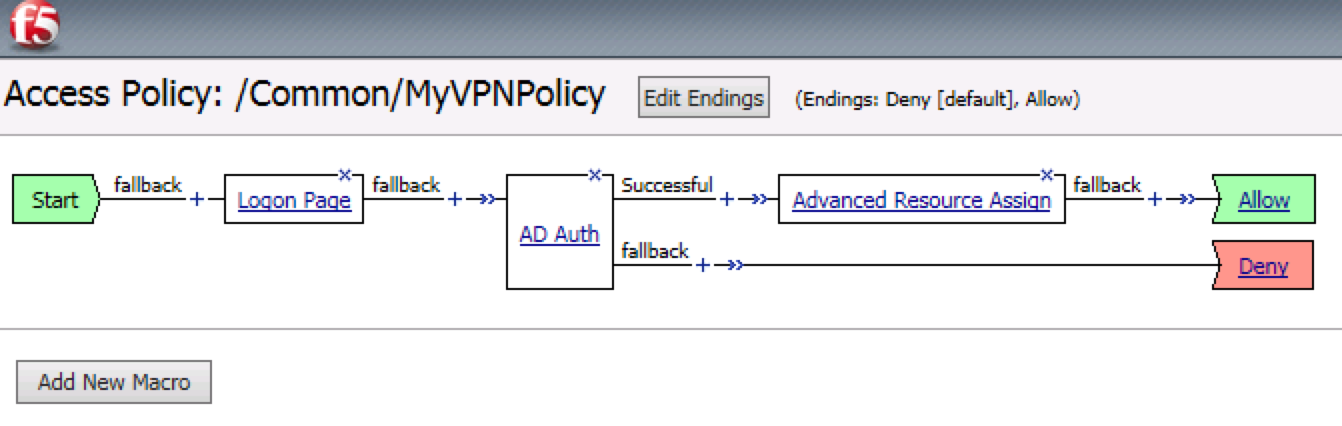
Select the Advanced Resource Assign object.
Click Add/Delete.
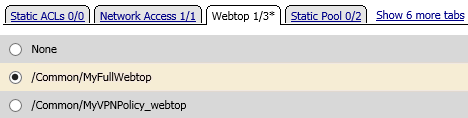
- Click on the Webtop tab, select the radio button for MyFullWebtop, then click the Update button at the bottom of the screen.
Click Save.
- At the top left of the browser window, click on “Apply Access Policy”, then close the tab.

Task – Testing
Open a web browser to the virtual server created in the previous lab by navigating to https://myvpn.f5demo.com. You will be presented with a Logon page similar to the one from the last lab.
Enter the following credentials:
Username: user
Password: Agility1
Click Logon.
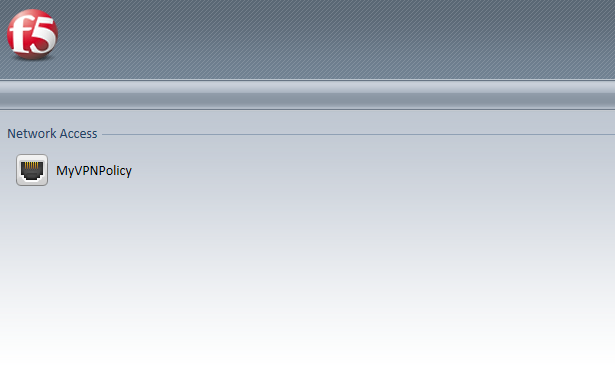
This will open the APM Webtop landing page that shows the resources you are allowed to access. In this lab, we’ve only configured one resource: Network Access, but you can add as many as you want and they will appear on this Webtop page.