F5 Public Cloud Solutions > F5 Azure Automation > Deploy a BYOL BIG-IP in azure with 3 NIC’s Source | Edit on
Deploy a BYOL BIG-IP in Azure with 3 NIC’s
In this lab you will build an F5 BIG-IP using a publicly available github template and a web server using the Azure portal GUI. Once these components are built you will create a Virtual server and pool on the BIG-IP and verify connectivity to the Ubuntu server through the VIP. Take time to inspect the objects in the Azure Resource Group you create. Azure provides integrated NAT and Firewall services. You will review the objects in the resource group through the portal to understand the IP scheme, NAT and Firewall rules.
Log on to the Ravello jumphost using the FQDN assigned by the instructor. All work in this lab will be done from the jumphost using the Browser and Terminal functions.
Accessing Ravello Jump Host and deploy BIG-IP
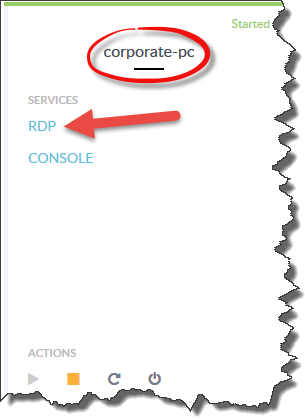
RDP to the Ravello Jumphost
- Username: Ubuntu
- Password: supernetops
- Open the chrome browser
- Adjust the font size using the Zoom In
- Size the window
Browse to Github to access the F5 – Azure templates
- https://github.com/F5Networks/f5-azure-arm-templates
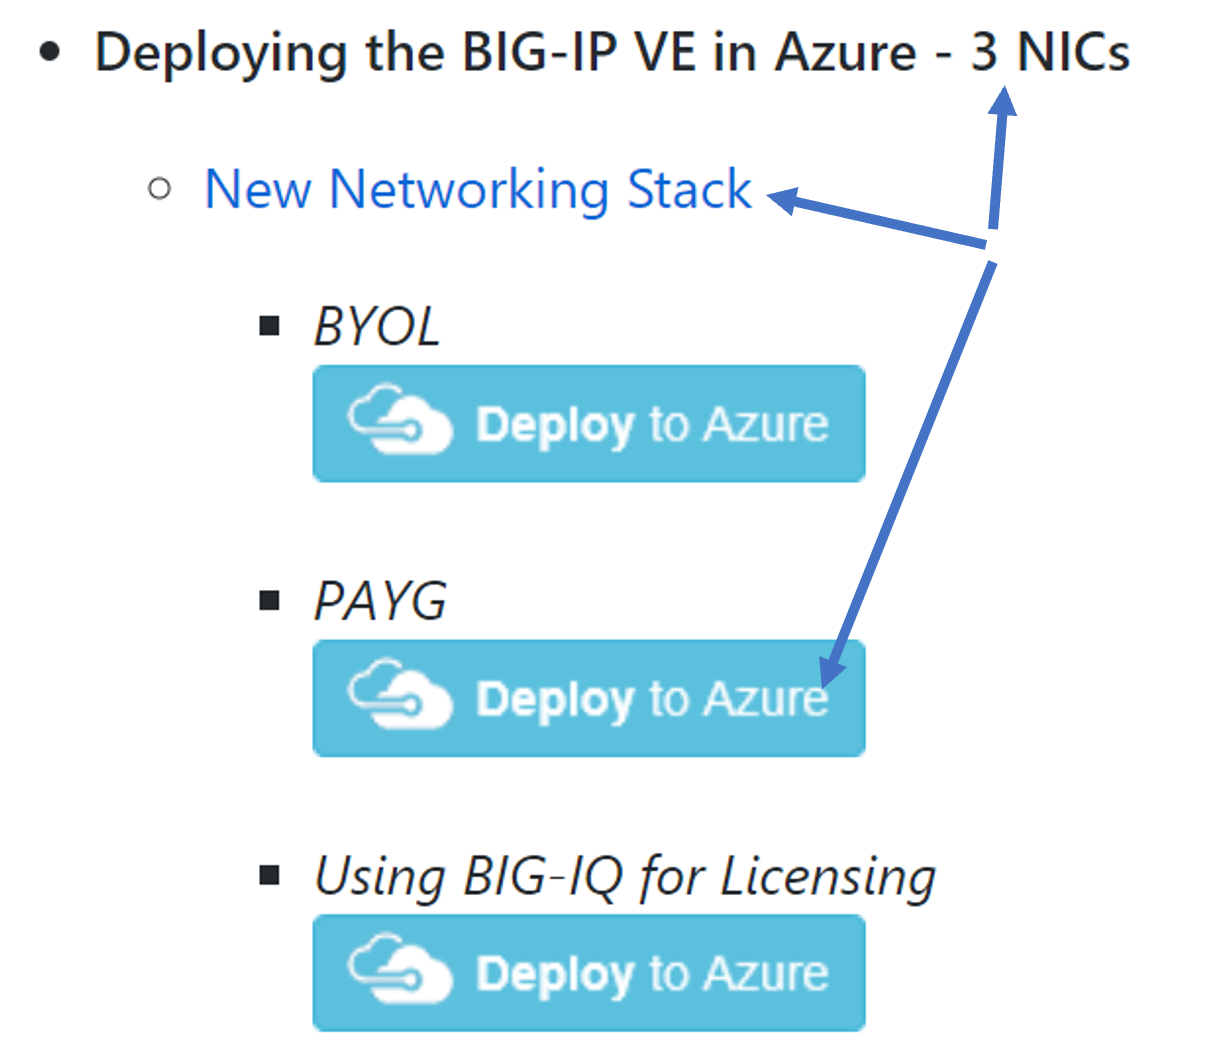
- Scroll down to the List of F5 ARM templates for Azure deployments to the section titled Deploying the BIG-IP VE in Azure
- 3 NICs
- Click PAYG Deploy to Azure
You will be redirected to portal.azure.com
- Log into the azure portal when prompted
- Username : student#@f5custlabs.onmicrosoft.com
- Password: ChangeMeNow123
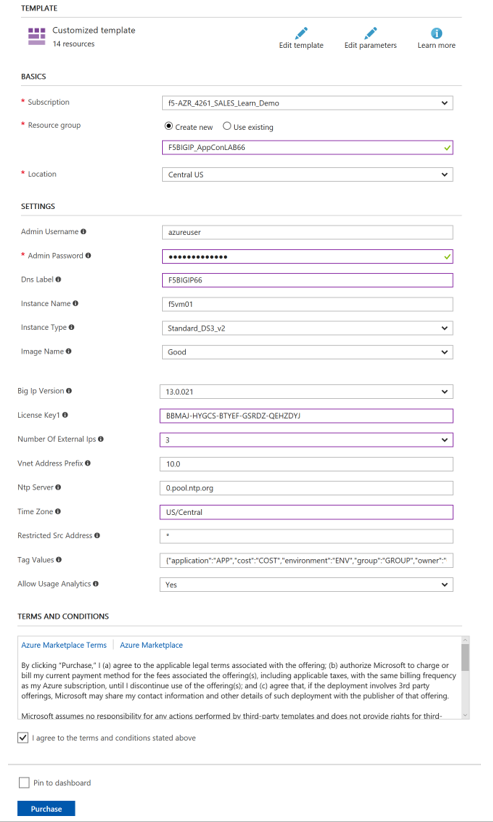
Complete the Customized template with the following values (don’t follow the screen shot)
Resource Group Select Create New Resource Group student#-rg Location East US Admin Username azureuser Admin Password ChangeMeNow123 DNS Label student#BIGIP Licensed Bandwidth 25M Number of External IPs 3 Timezone UTC Check the “I Agree” box in front of the terms and conditions
Select the “Purchase” button
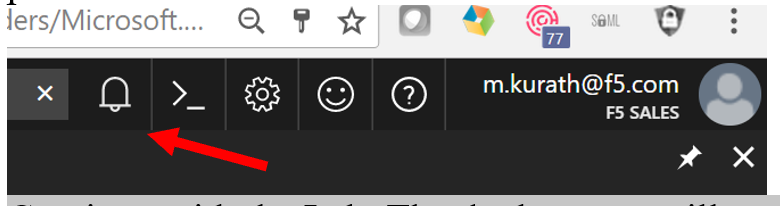
This will take about 15 minutes –
- You can monitor deployment on the azure dashboard by opening the Notifications in the azure portal
Continue with the Lab. The deployment will complete by the time the BIG-IP configuration is required
Install a Linux Server in Azure
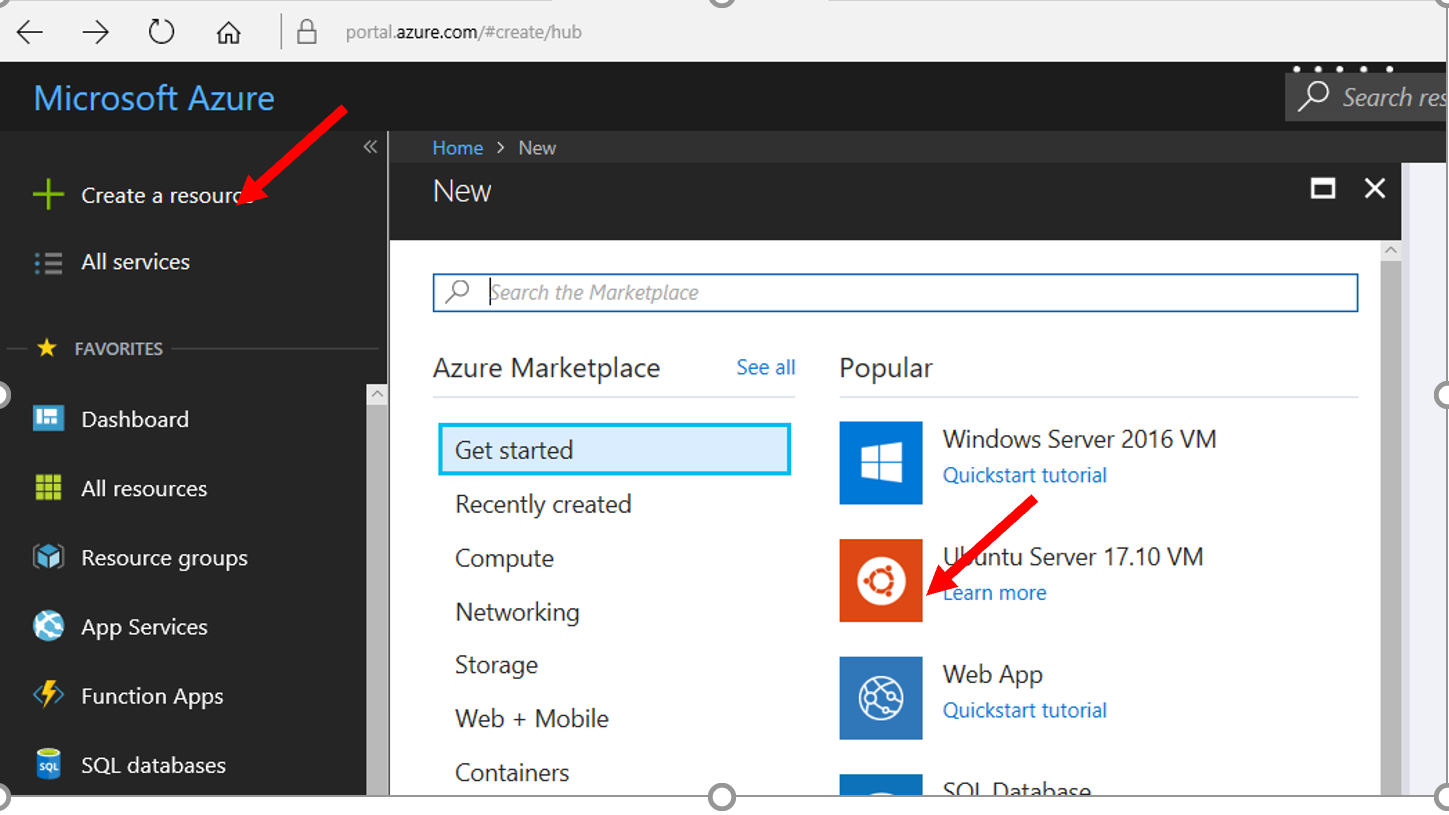
Navigate to the Azure Marketplace and select Create a Resource
Select Ubuntu Server 17.10 VM
Complete the Customized template with the following values (don’t follow the screen shot)
Name F5Ubuntu-student# VM disk type HDD Admin Username azureuser Admin Password ChangeMeNow123 Resource Group Select:Use Existing Resource Group student#-rg Location East US Timezone UTC Select the “OK” button
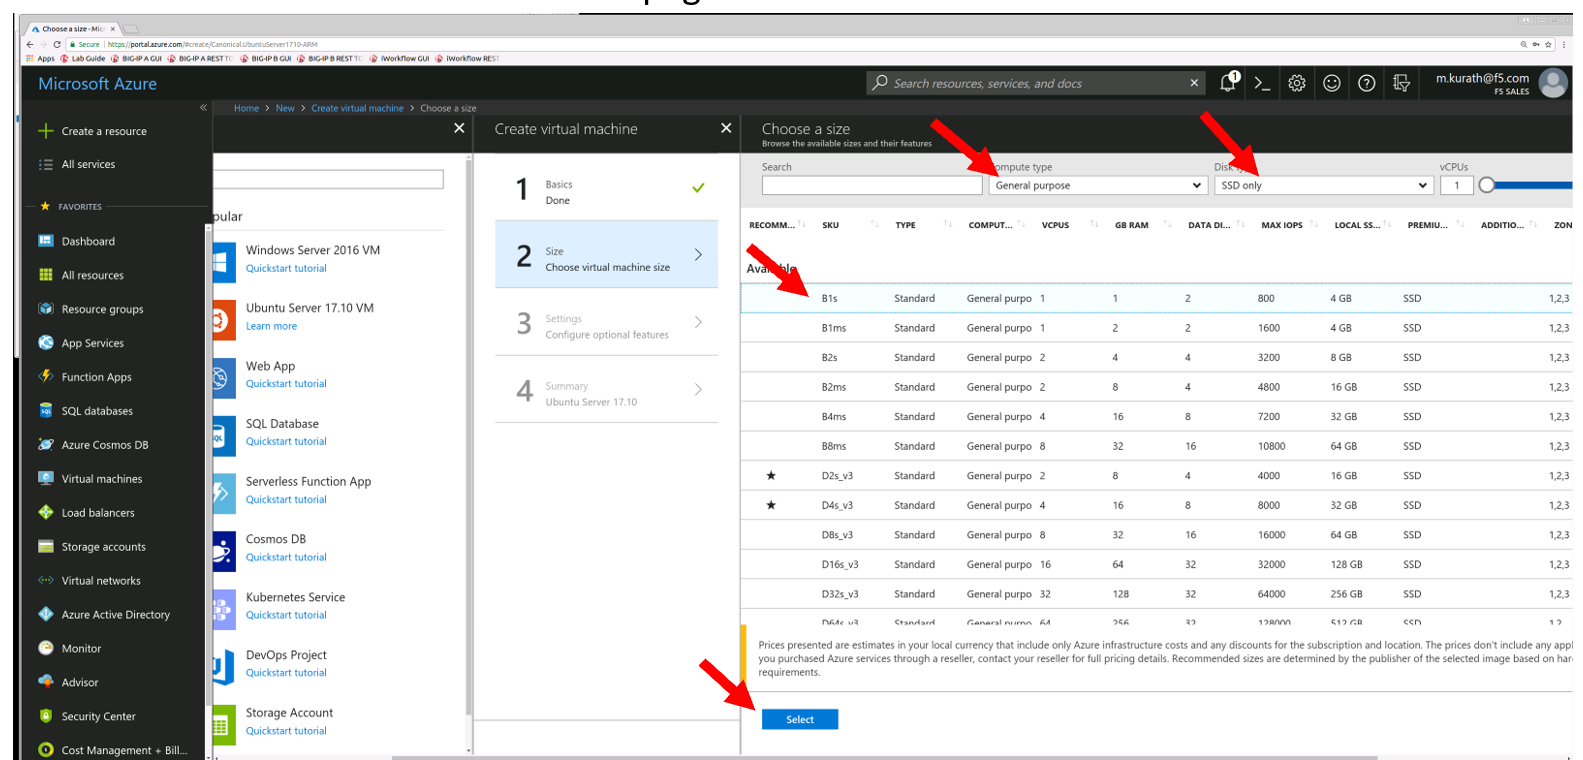
Select the machine type
- Highlight B1s
- Select Button at the bottom of the page
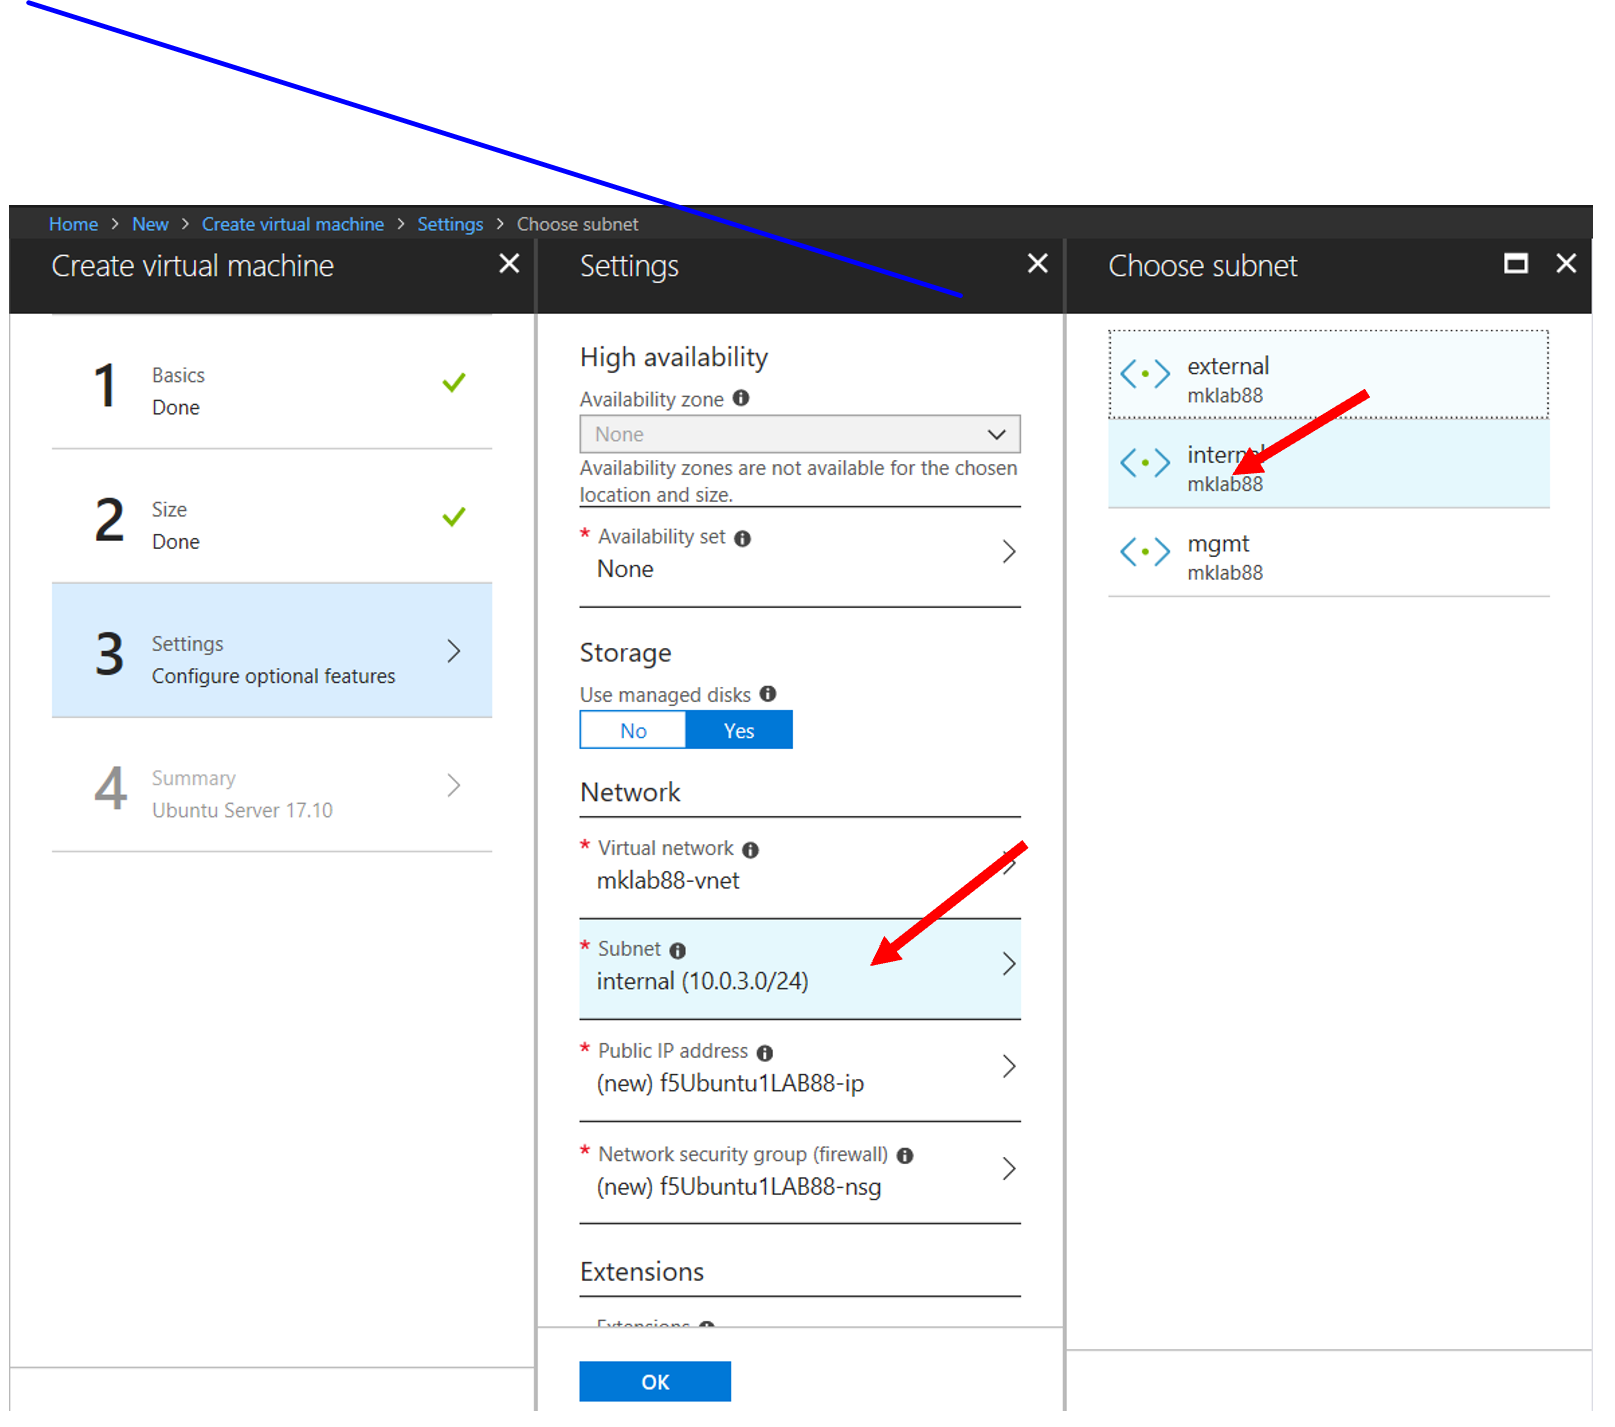
Define the machine config parameters
- Select Subnet
- Select the internal subnet
- Select SSH in the select public inbound ports
- Select the “OK” button
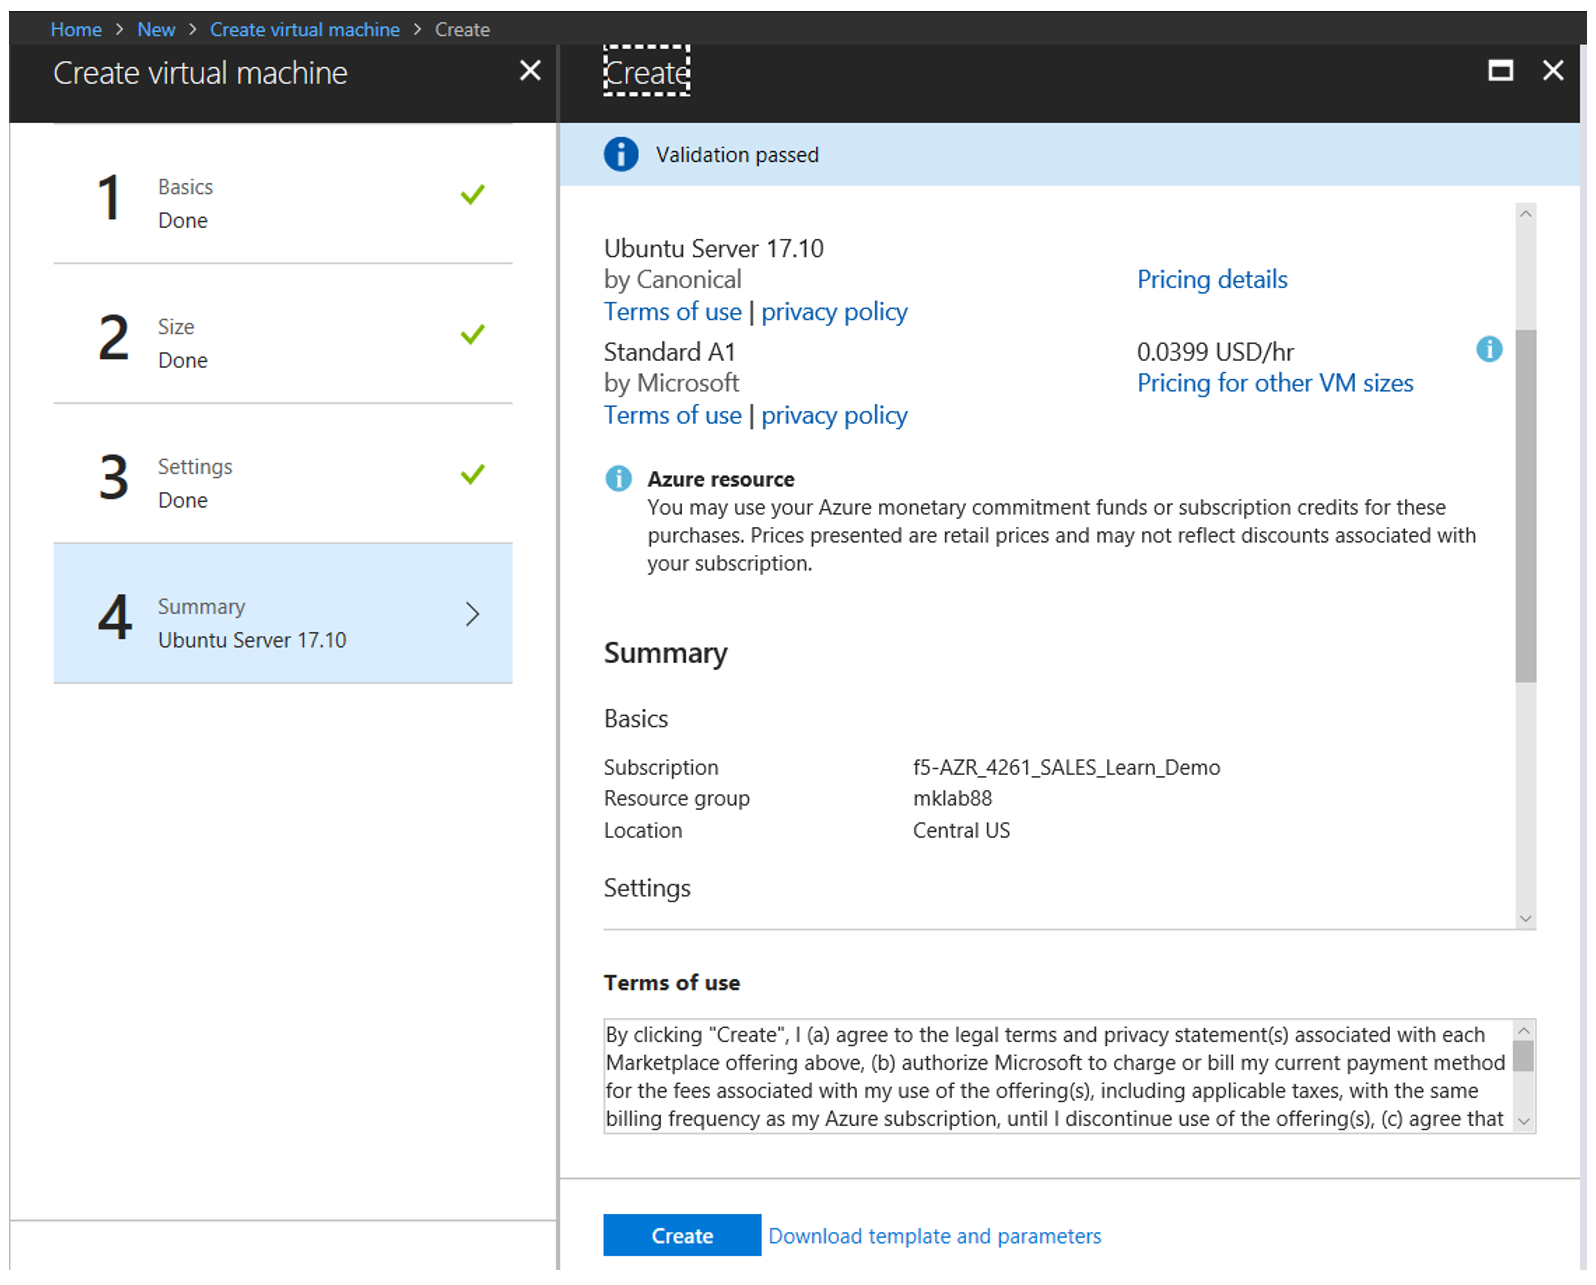
Create the machine
- Review the configuration
- Select the “Create” button

Install Apache Web Server on the Linux Server in Azure
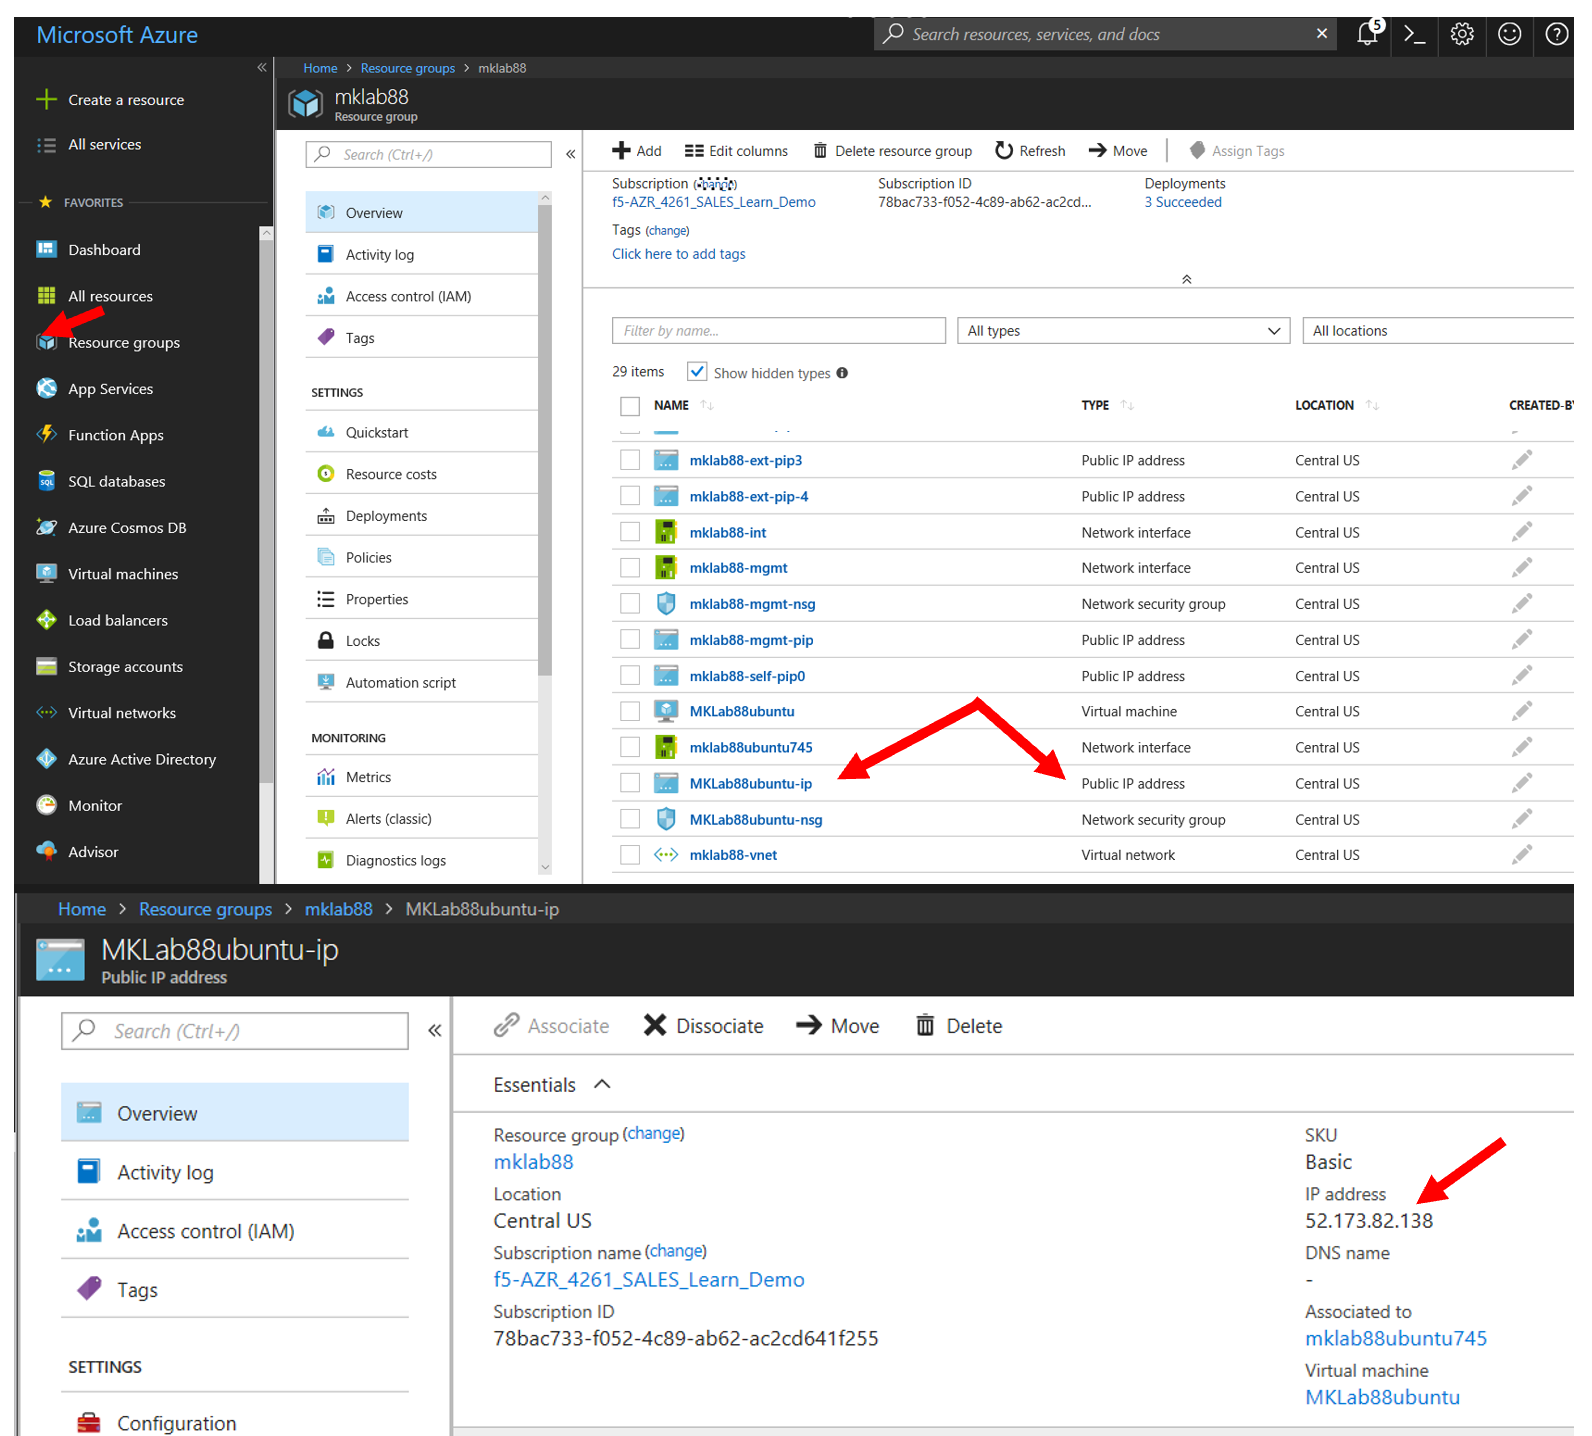
Access the Azure Portal to find the external IP address of the Ubuntu Server
- Resource Groups
- Select your Resource Group
- Identify the Object with the Ubuntu Public IP address
SSH to the Apache Server
- Open the Terminal window on the jumphost
- ssh azureuser@<Ubuntu public IP Address>
- Password: ChangeMeNow123
Use the following Commands to install Apache Web server
- sudo apt-get update
- sudo apt-get install apache2
Use the Azure portal to gather IP information about the systems you have built
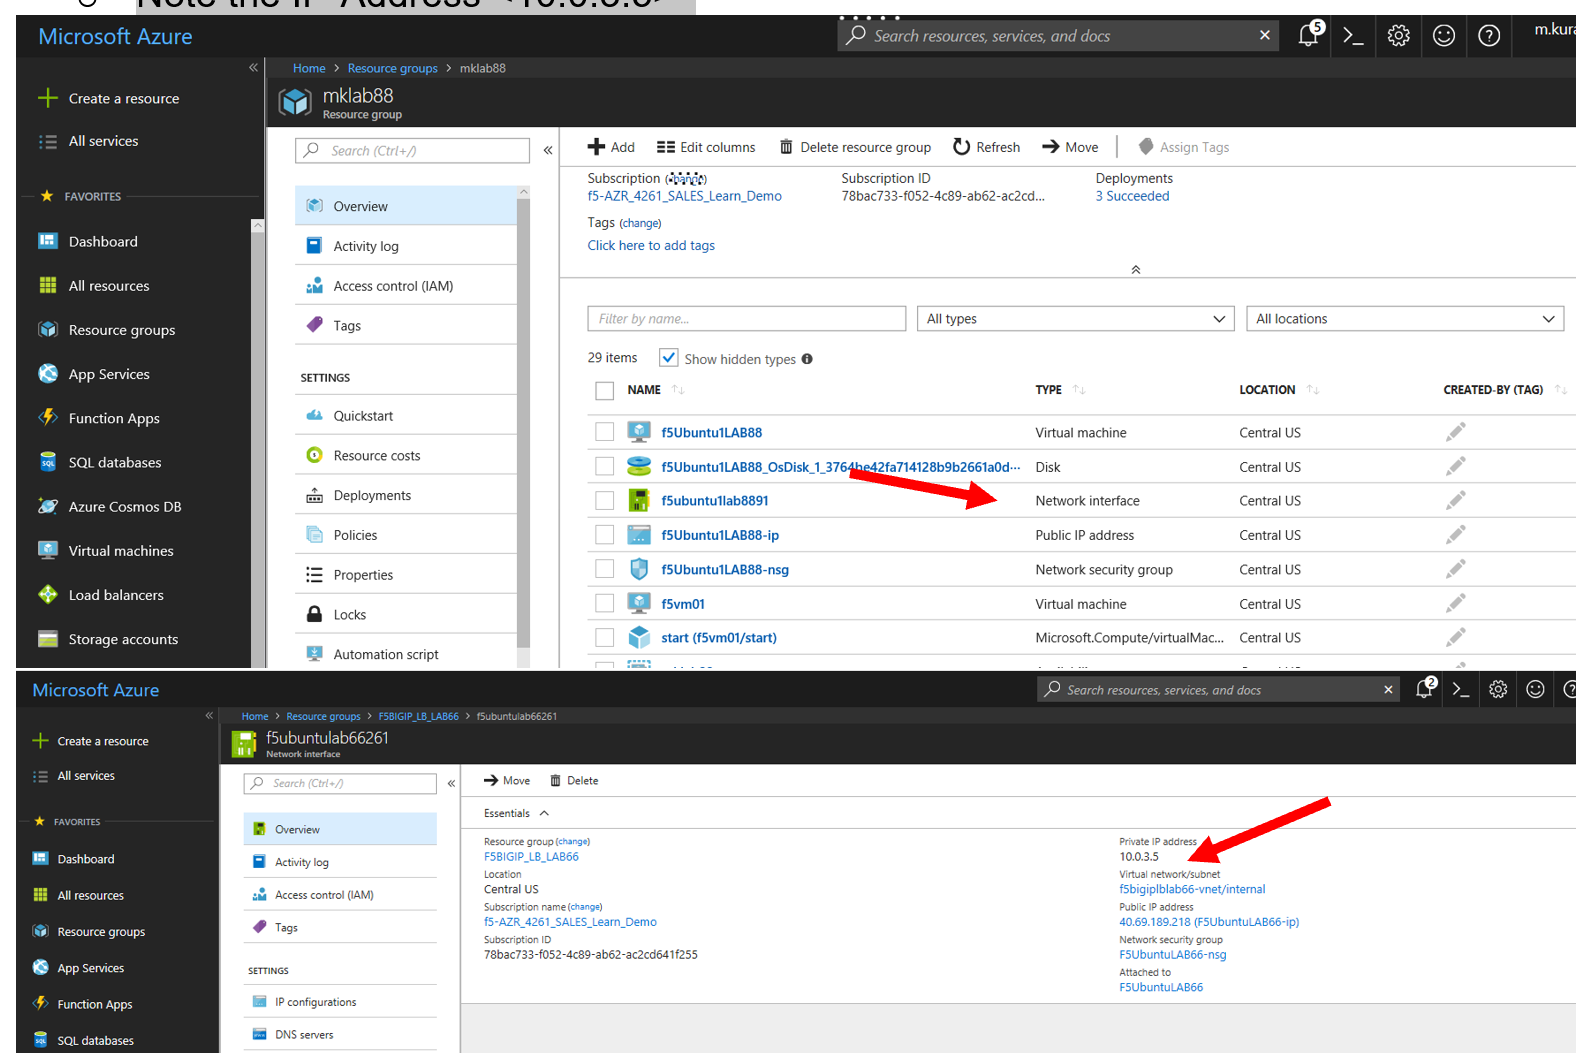
Access the Azure Portal to find the IP address on the internal network of the Ubuntu Server
- Resource Groups
- Select your Resource Group
- Identify the object with the Ubuntu Network Interface
- Select “Ip configurations in the left panel
- Note the IP-Address <10.0.3.5> (this is the address which will be used as the pool member on the BIG-IP config)
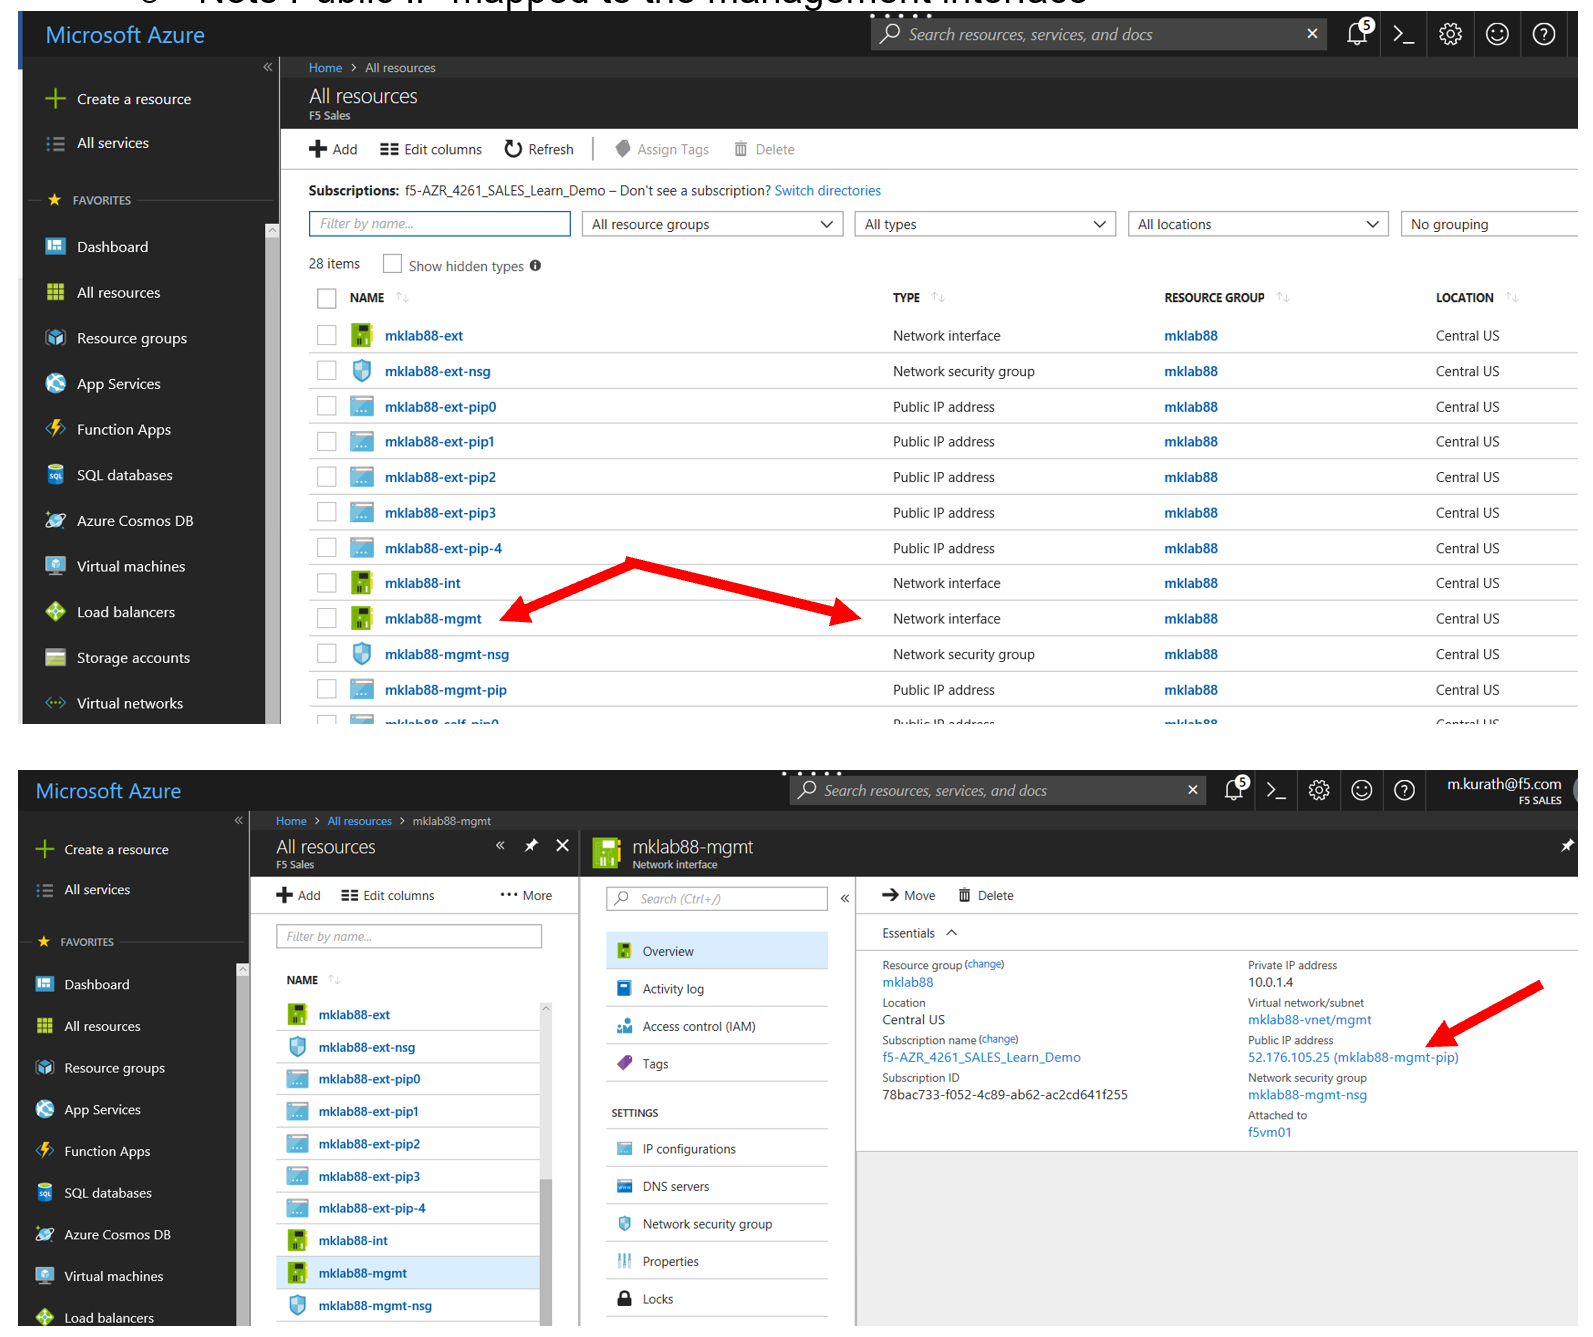
Access the Azure Portal to find the public IP address assigned to the F5 management interface.
- Resource Groups
- Select your Resource Group
- Identify the Object with the BIG-IP Management Interface student#-mgmt
- Note Public IP mapped to the management interface
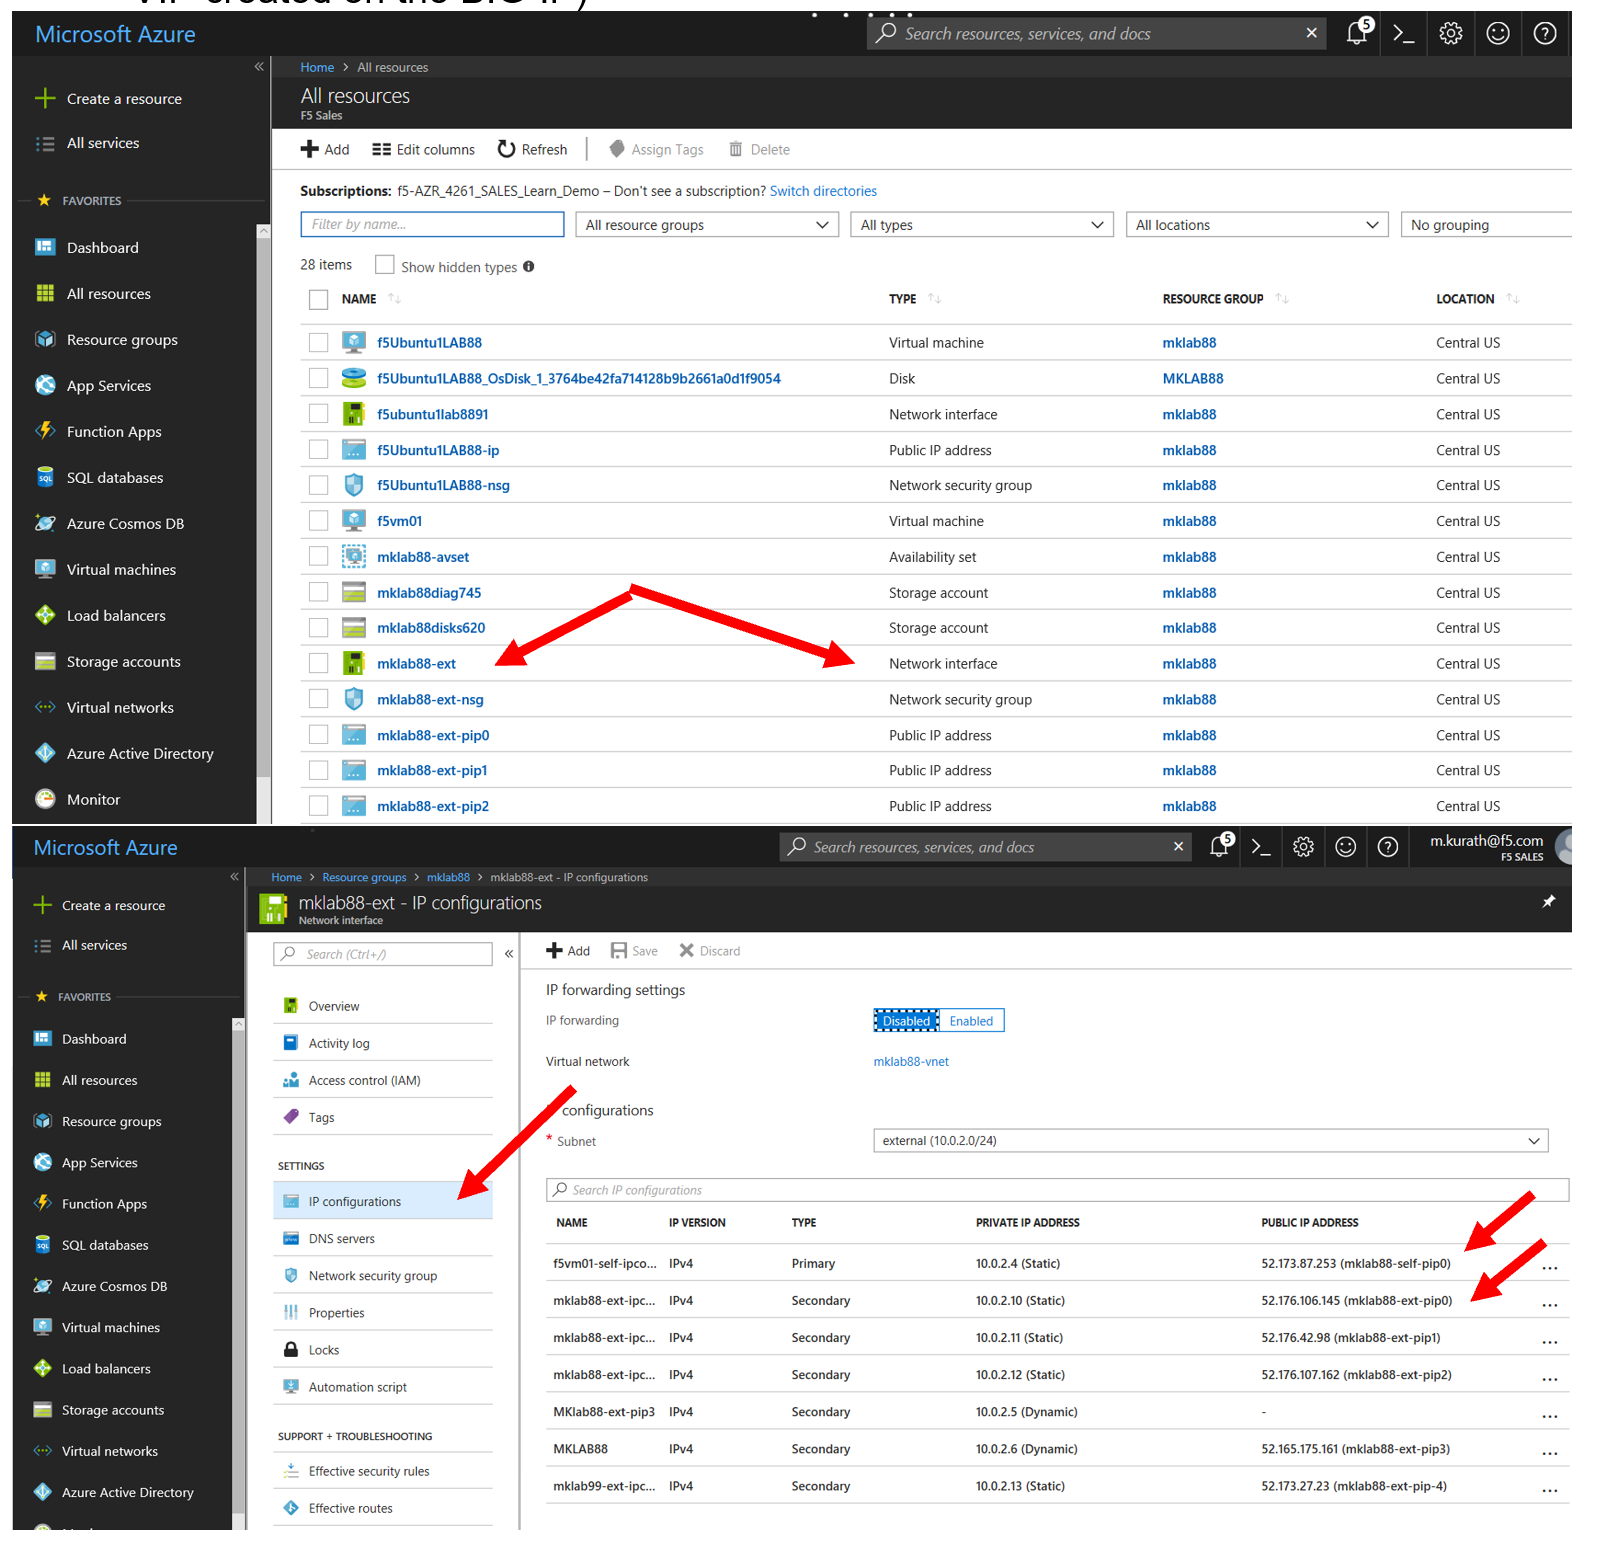
Access the Azure Portal to find the NAT IP address assigned to the external F5 interface.
- Resource Groups
- Select your Resource Group
- Identify the Object with the BIG-IP External Interface student#bigip-ext
- Select “IP configurations” in the left panel
- Note External Self IP mapped to 10.0.2.4
- Note External Self IP mapped to 10.0.2.10 (this will be used to configure the VIP on the BIG-IP)
Review the BIG IP config objects created by the template and build a VIP
Access the BIG-IP management GUI
- Open another browser window
- https://<Public-IP-of-Management>
- Username: azureuser
- Password: ChangeMeNow123
Inspect the configuration of the BIG-IP
- The github template has built the base configuration
- System>>License
- Network>>Self IPs
- Network>>VLANs
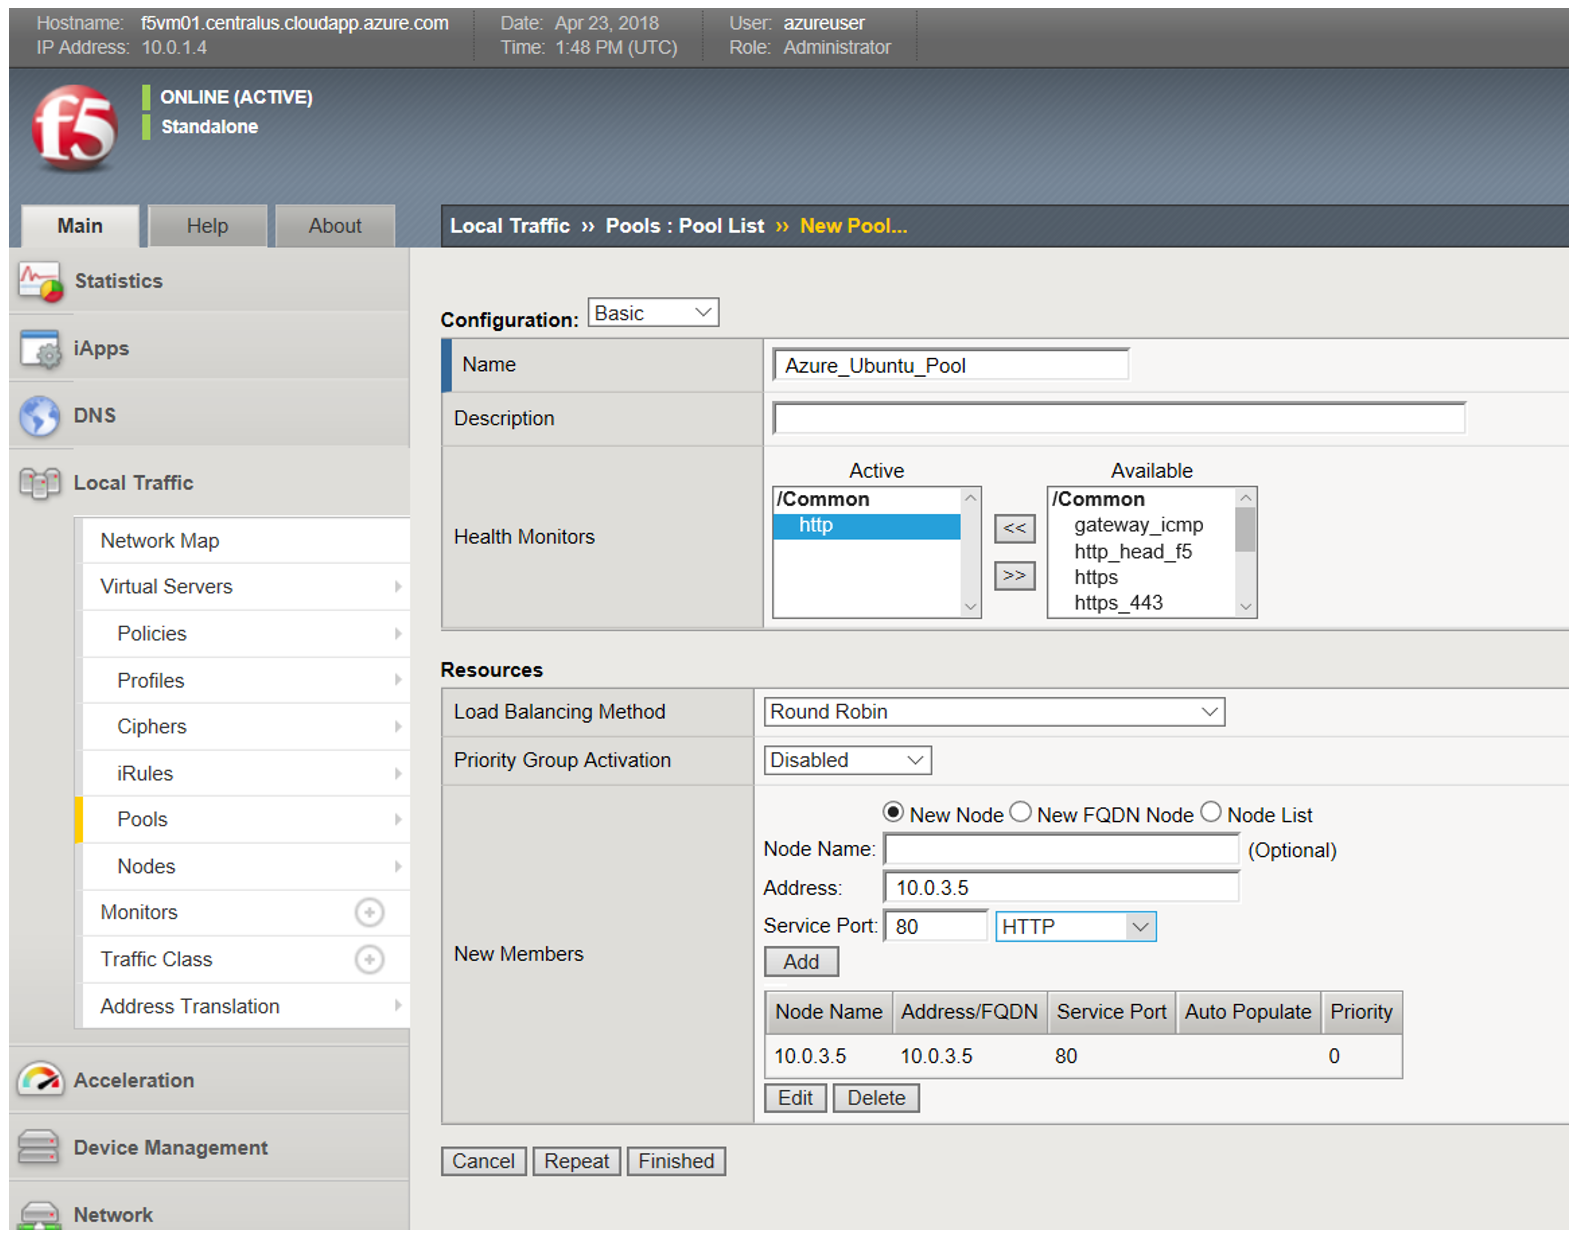
Create a pool with the Ubuntu Server as a member (Note that we only created a single web server. Typically there would be multiple members in the pool)
- Local Traffic>>Pools
- Create Button in upper right corner
Name Azure_Ubuntu_Pool Health Monitors http Address 10.0.3.5 <VIP Info from Azure Portal> Service Port http
- Click the “Add” button
- Click the “Finished” button
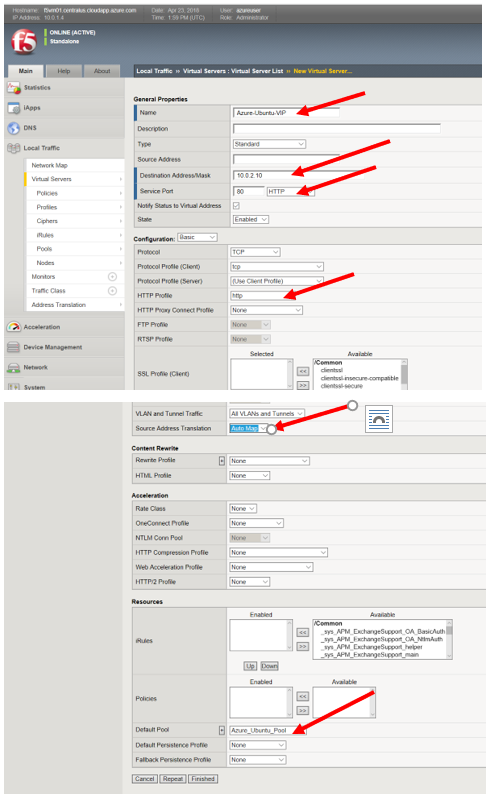
Create a Virtual Server using the Azure_Ubuntu_Pool
- Local Traffic>>Virtual Servers
- Create Button in upper right corner
Name Azure_Ubuntu_VIP Destination Address/Mask 10.0.2.10 <IP Info From Azure Portal> Service Port http HTTP Profile http Source Address Translation auto map Default Pool Azure_Ubuntu_pool
- Click the “Finished” button
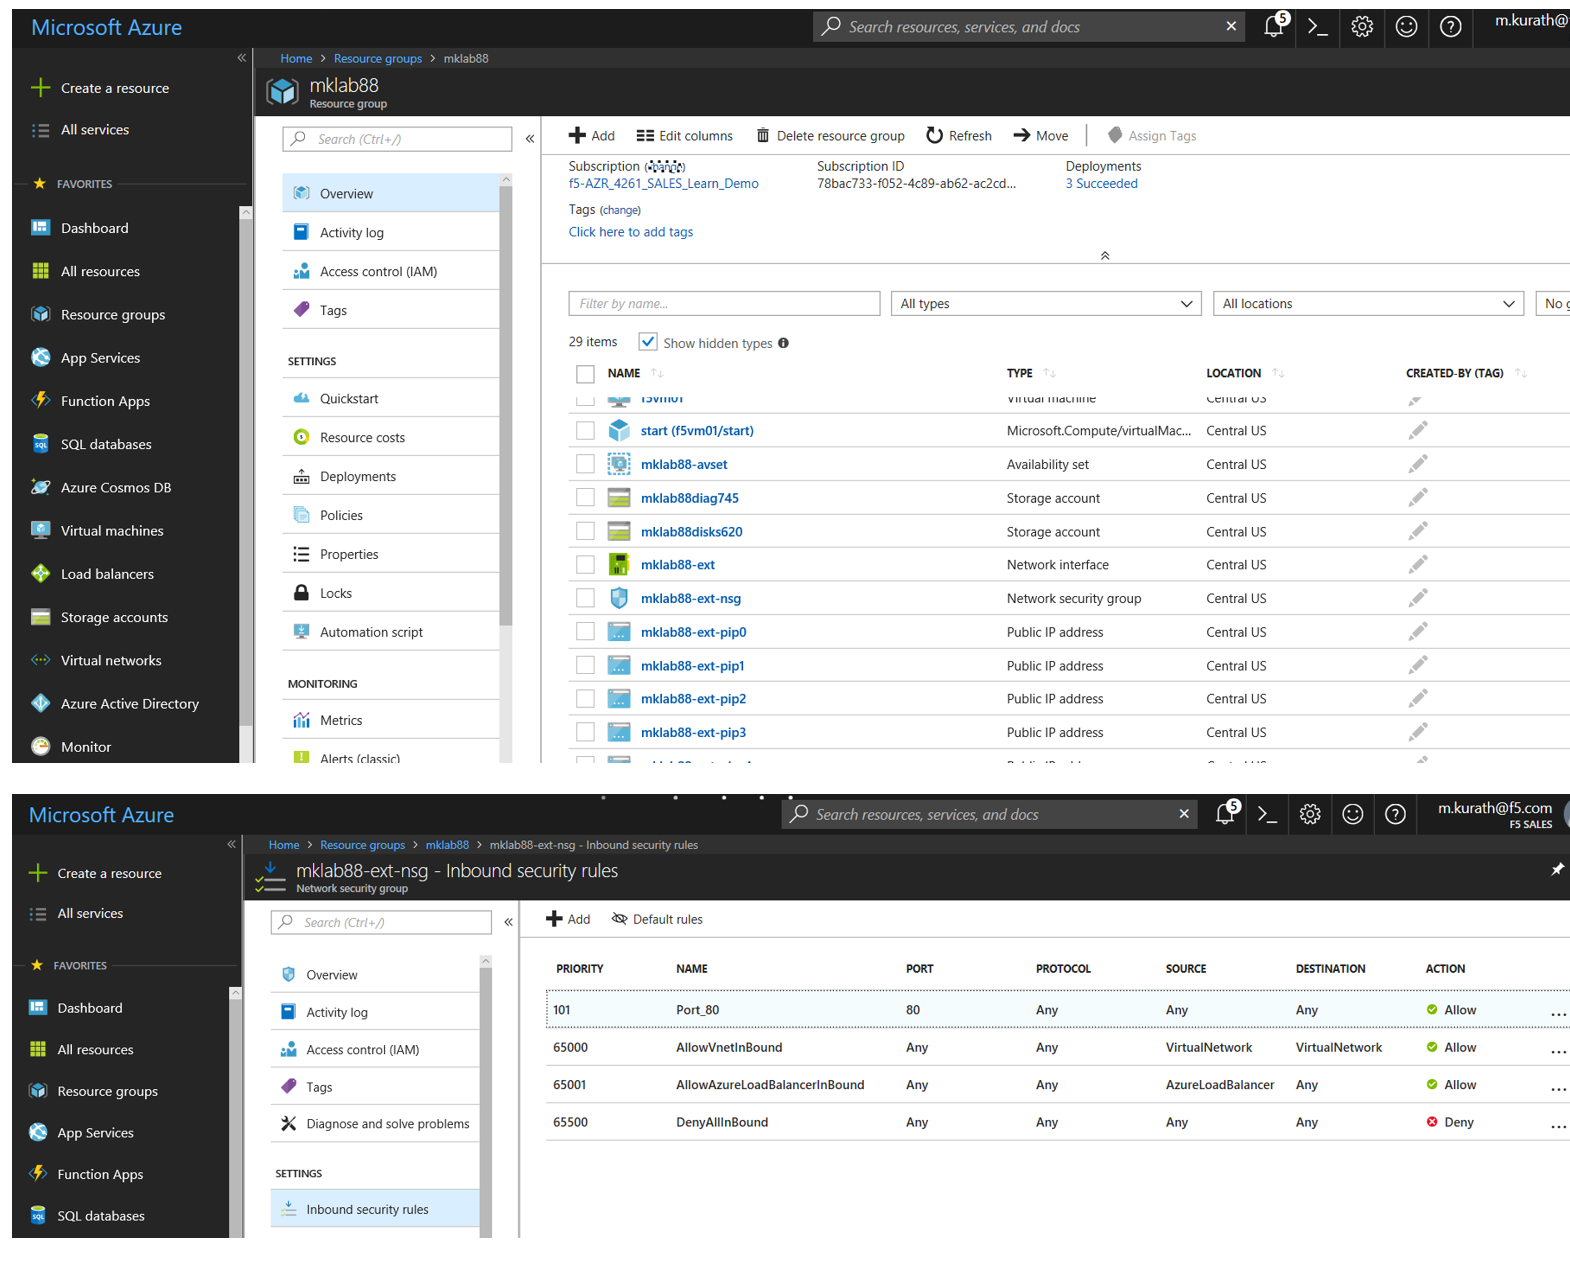
Add an ACL in the Azure portal to permit HTTP traffic to the VIP and test connectivity
Access the Azure Portal to add a permit statement to the external ACL
- Resource Groups
- Select your Resource Group
- Identify the Object with the BIG-IP Network Security student#bigip-ext-nsg
- Select Inbound Security Rules
- Press the +Add button at the top of the page
- Create a rule permitting destination port 80
- Destination Port Ranges 80
- Name Port_80
- Press the Add button at the bottom of the window
Verify that you can connect to the Application
- Open another browser window
- http://<Public-IP mapped to the VIP address from the Azure portal>
Manually add an external IP to azure and build a VIP
In this section we will add a new application to the existing BIG-IP. Since we want to make the application available externally, we will manually add a NAT entry to the external interface in Azure and then create a VIP on the BIG-IP.
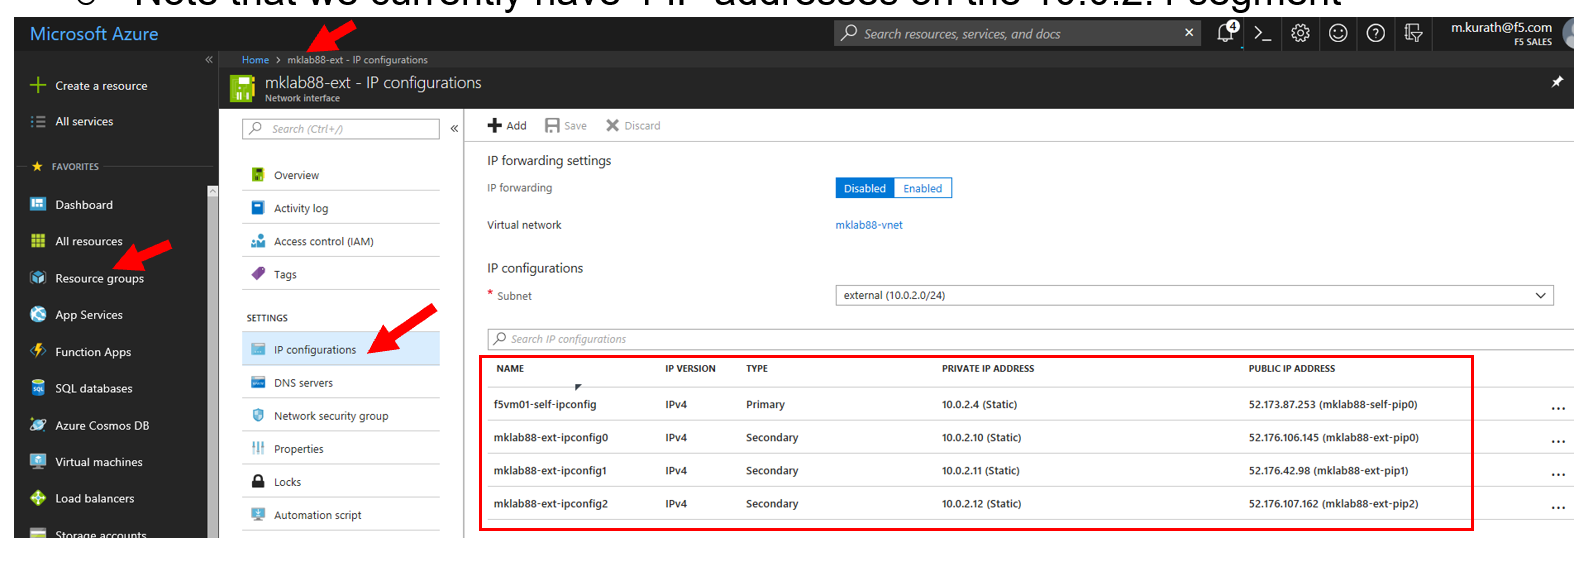
Access the Azure Portal
- Review the existing external interface
- Resource Group
- student#bigip-ext Network interface
- IP configurations
- Note that we currently have 4 IP addresses on the 10.0.2.0 segment
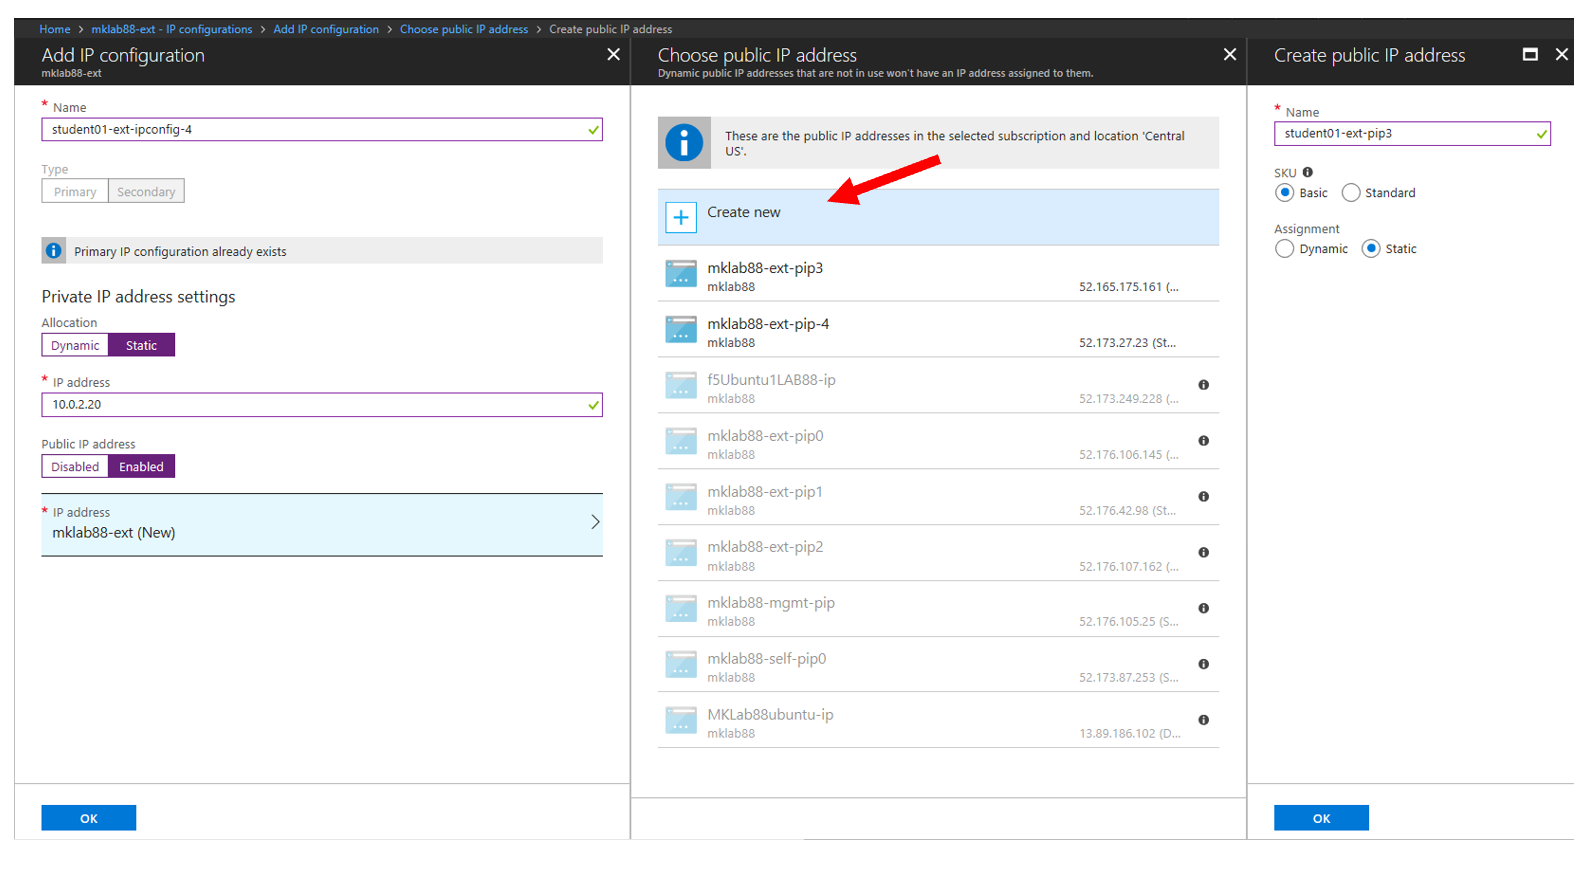
Add a Public IP to Private IP NAT to the external interface in Azure
- Select +ADD at the top of the GUI
- Name student#-rg-ext-ipconfig20
- Allocation Static
- IP address 10.0.2.20
- Public IP address Enabled
- Configure Required Settings
- Click “Create New” at the top of the page
- Name student#bigip-ext-pip20
- SKU Basic
- Assignment Static
- OK (bottom right)
- OK (bottom left)
Access the BIG-IP management GUI
- https://<Public-IP-of -Management)
- Us ername: azureuser
- Password: ChangeMeNow123
Create another Virtual Server using the Azure_Ubuntu_Pool (this is done to skip the redundancy of building another pool)
- Create Button in upper right corner
Name ADD_Azure_Ubuntu_VIP Destination Address/Mask 10.0.2.20 <IP Info From Azure Portal> Service Port http HTTP Profile http Source Address Translation auto map Default Pool Azure_Ubuntu_pool
- Finished Button
Access the Application
- http://<Public-IP mapped to the VIP address–this info can be found in the Azure portal>
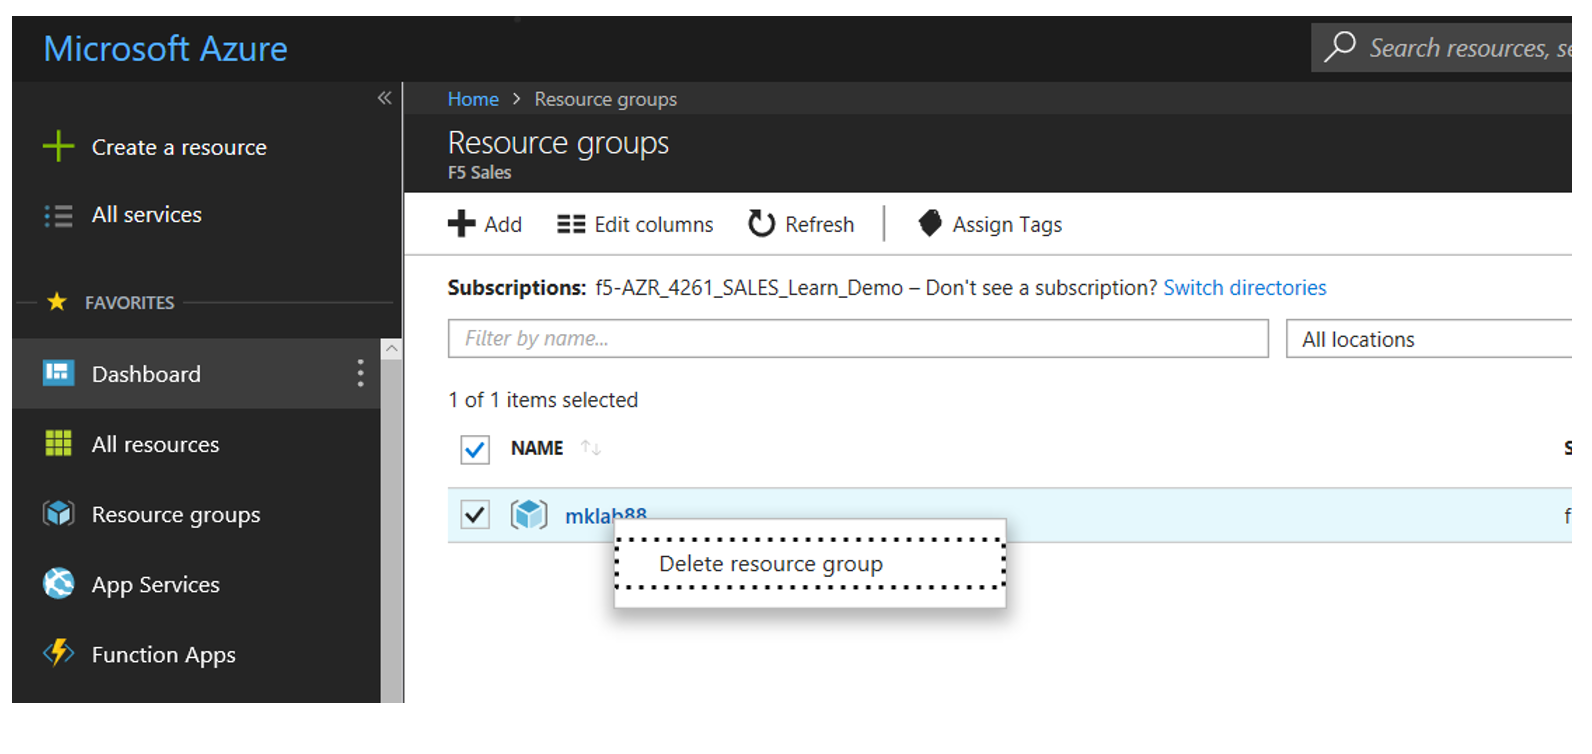
Access the Azure portal to delete the objects you created in this lab
Access the Azure Portal
- Resource Groups
- Select your Resource Group
- Right Click on the Resource group and select Delete Resource Group
- Follow the prompts to complete the process
#