F5 Web Application Firewall Solutions > WAF 102 - Getting started with WAF, Bot Detection and Threat Campaigns > Module 1: IPI & Geolocation Source | Edit on
Exercise 1.1: IP Intelligence Policies
Objective
- Configure Global IPI Profile & Logging
- Review Global IPI Logs
- Configure Custom Category and add an IP
- Create your first WAF Policy and implement IPI w/ XFF inspection
- Estimated time for completion: 30 minutes.
Create Your 1st L3 IPI Policy
An IPI policy can be created and applied globally, at the virtual server (VS) level or within the WAF policy itself. We will follow security best-practice by applying IPI via a Global Policy to secure Layer 3 device-wide and within the Layer 7 WAF policy to protect the App by inspecting the HTTP X-Forwarded-For Header.
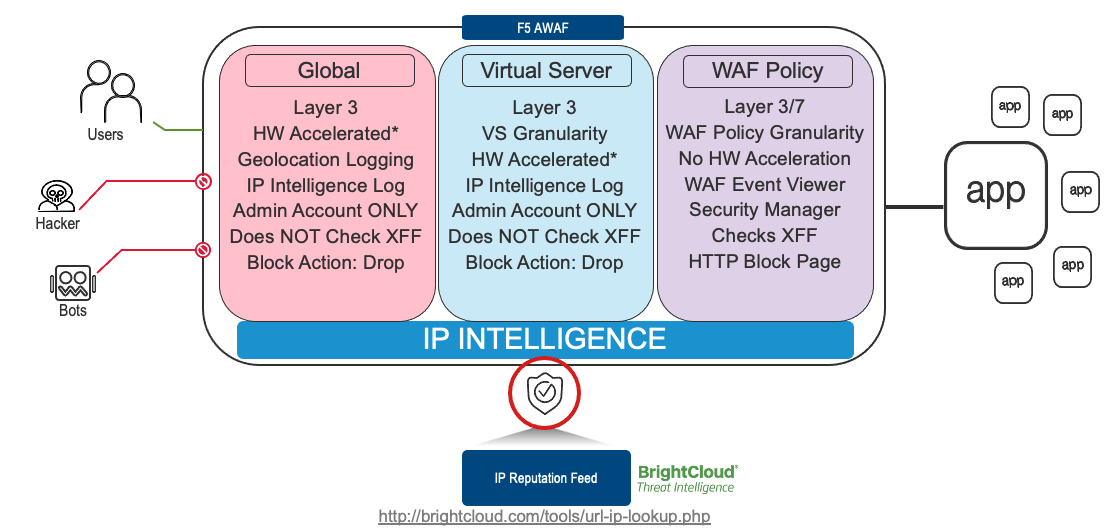
In this first lab, we will start by enabling a Global IPI Policy; much like you would do, as a day 1 task for your WAF:
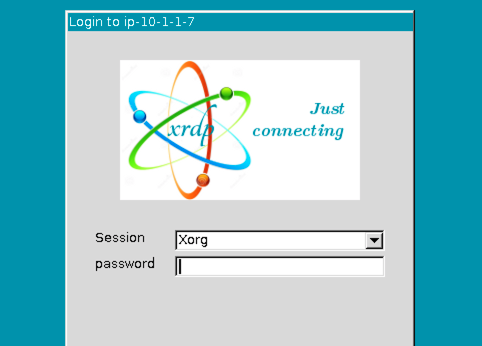
- RDP to the Linux Client by choosing the RDP access method from your UDF environment page. You will be presented with the following prompt where you will enter the password only. The f5student account is hard-coded into XRDP for your convenience.
- Once logged in, launch Chrome Browser. You can double-click the icon or right click and choose execute but do not click multiple times. It does take a few moments for the browser to launch the first time.
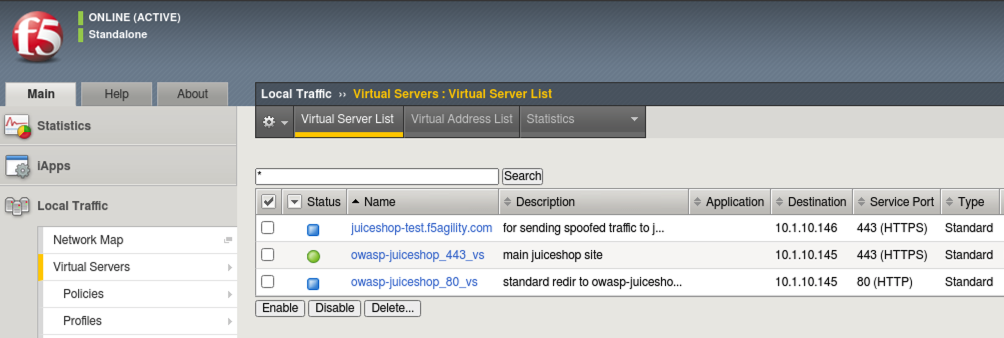
- Click the F5 Advanced WAF bookmark and login to TMUI. admin/[password]. It is normal to see a certificate warning that you can safely click through.
- On the Main tab, click Local Traffic > Virtual Servers and you will see the Virtual Servers that have been pre-configured for your lab. Essentially, these are the listening IP’s that receive requests for your application and proxy the requests to the backend “real” servers.
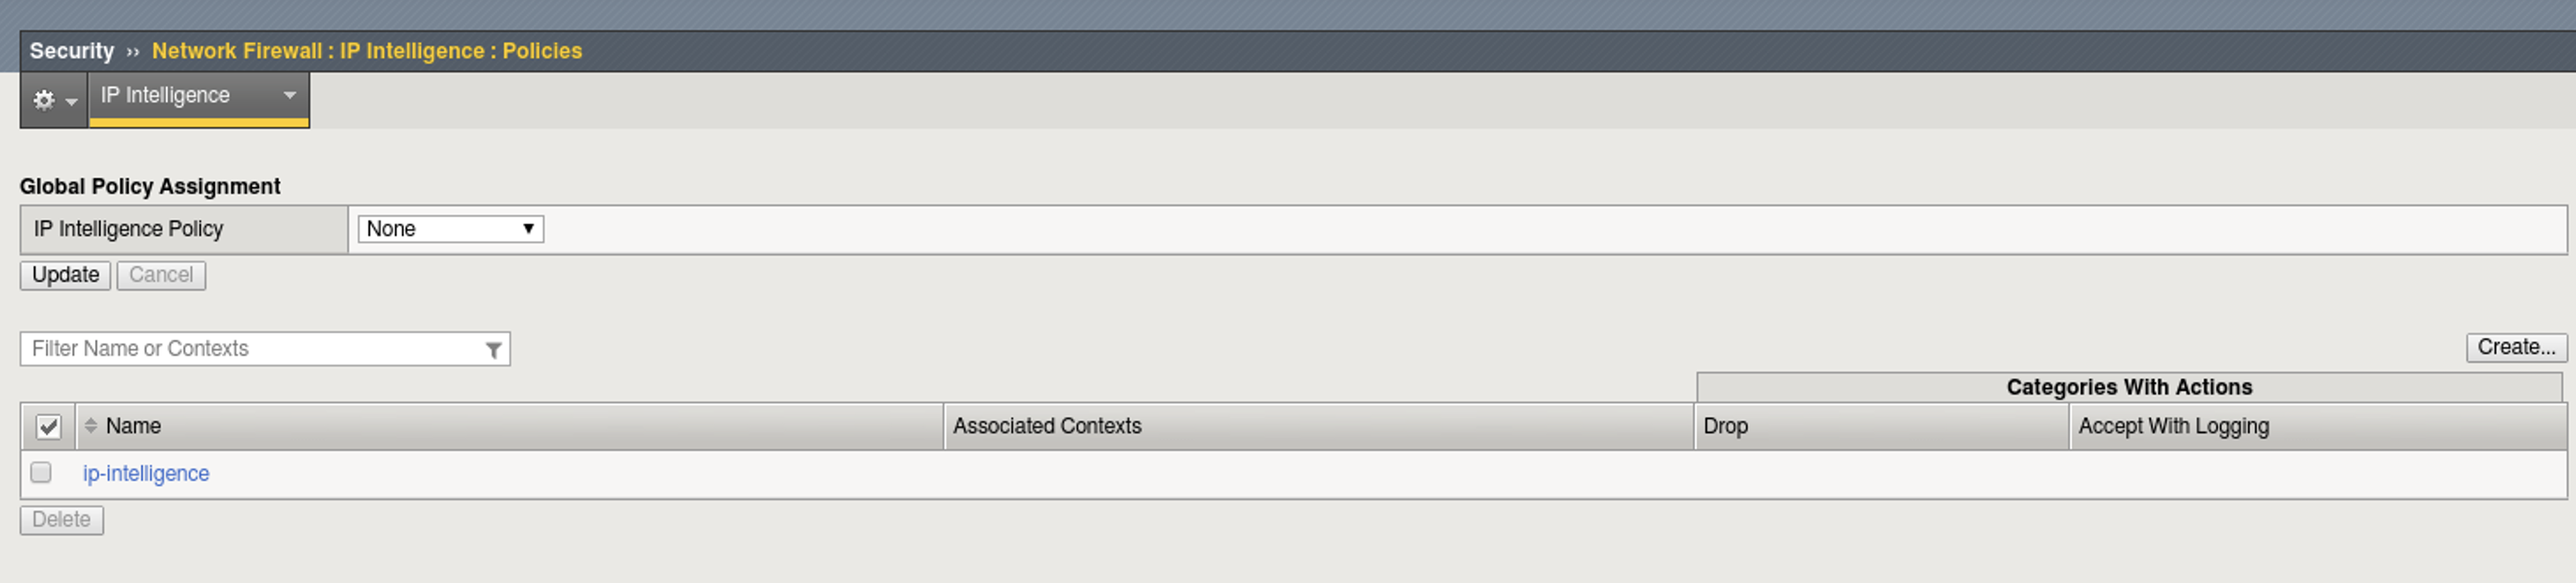
- On the Main tab, click Security > Network Firewall > IP Intelligence > Policies.
Note
Network Firewall IP Intelligence Policies are a layer 3 enforcement capability and part of Advanced WAF. No additional licensing is necessary beyond Advanced WAF with an IPI Subscription.
- Click on the Create button.
- For the name: global_ipi
- Under IP Intelligence Policy Properties For the Default Log Action choose yes to Log Category Matches.
- Browse to the inline Help tab at the top left of the GUI and examine the Default Log Action settings. Inline help is very useful when navigating the myriad of options available within any configuration screen.
Note
Notice in the setting descriptions that hardware acceleration is not available when “logging all matches”. This exercise is to familiarize you with the value of inline help and will not affect our virtual lab.
- To the right of the screen, click Add under the categories section.
- From the category section choose botnets and click Done editing.
- Repeat this process and add the following additional categories: phishing, scanners, spam_sources, & denial_of_service. Outside of this lab, you would want to enable additional categories for protection.
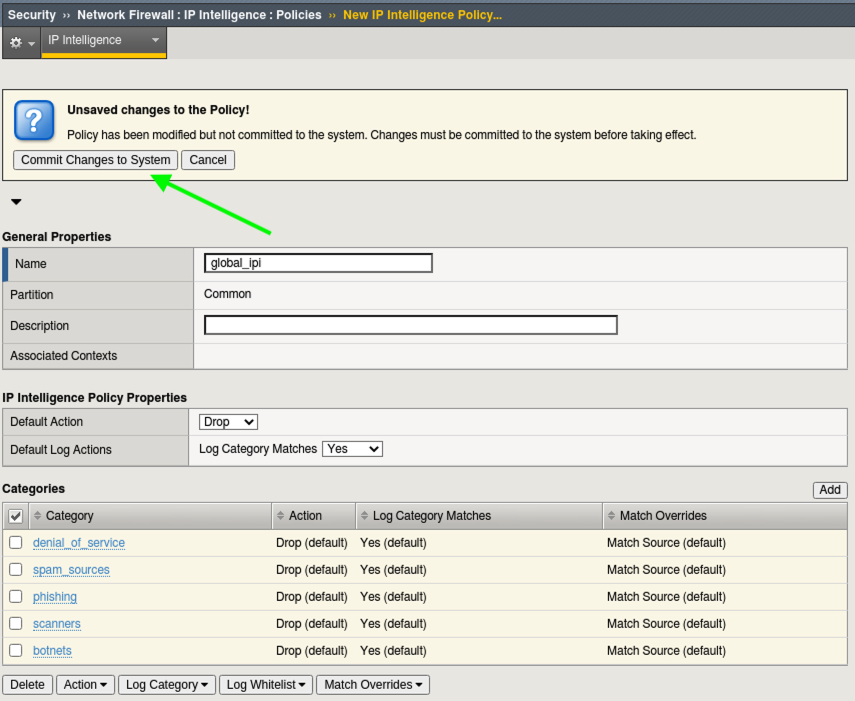
- Commit the Changes to the System.
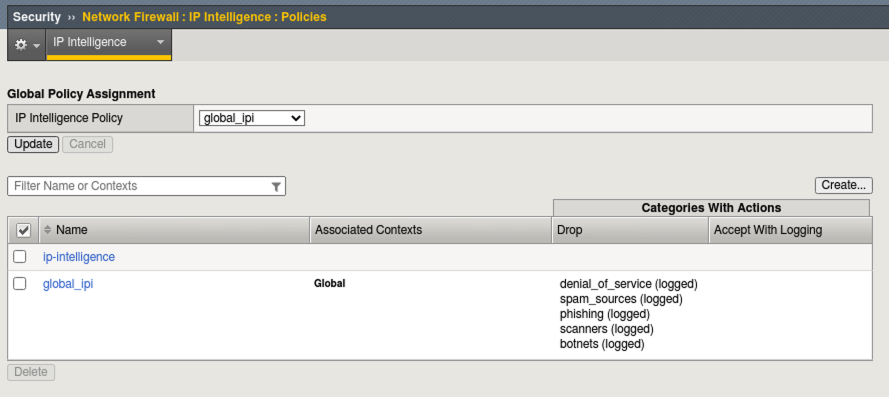
- Under Global Policy Assignment > IP Intelligence Policy click on the dropdown and select the global_ipi policy and click Update.
Setup Logging for Global IPI
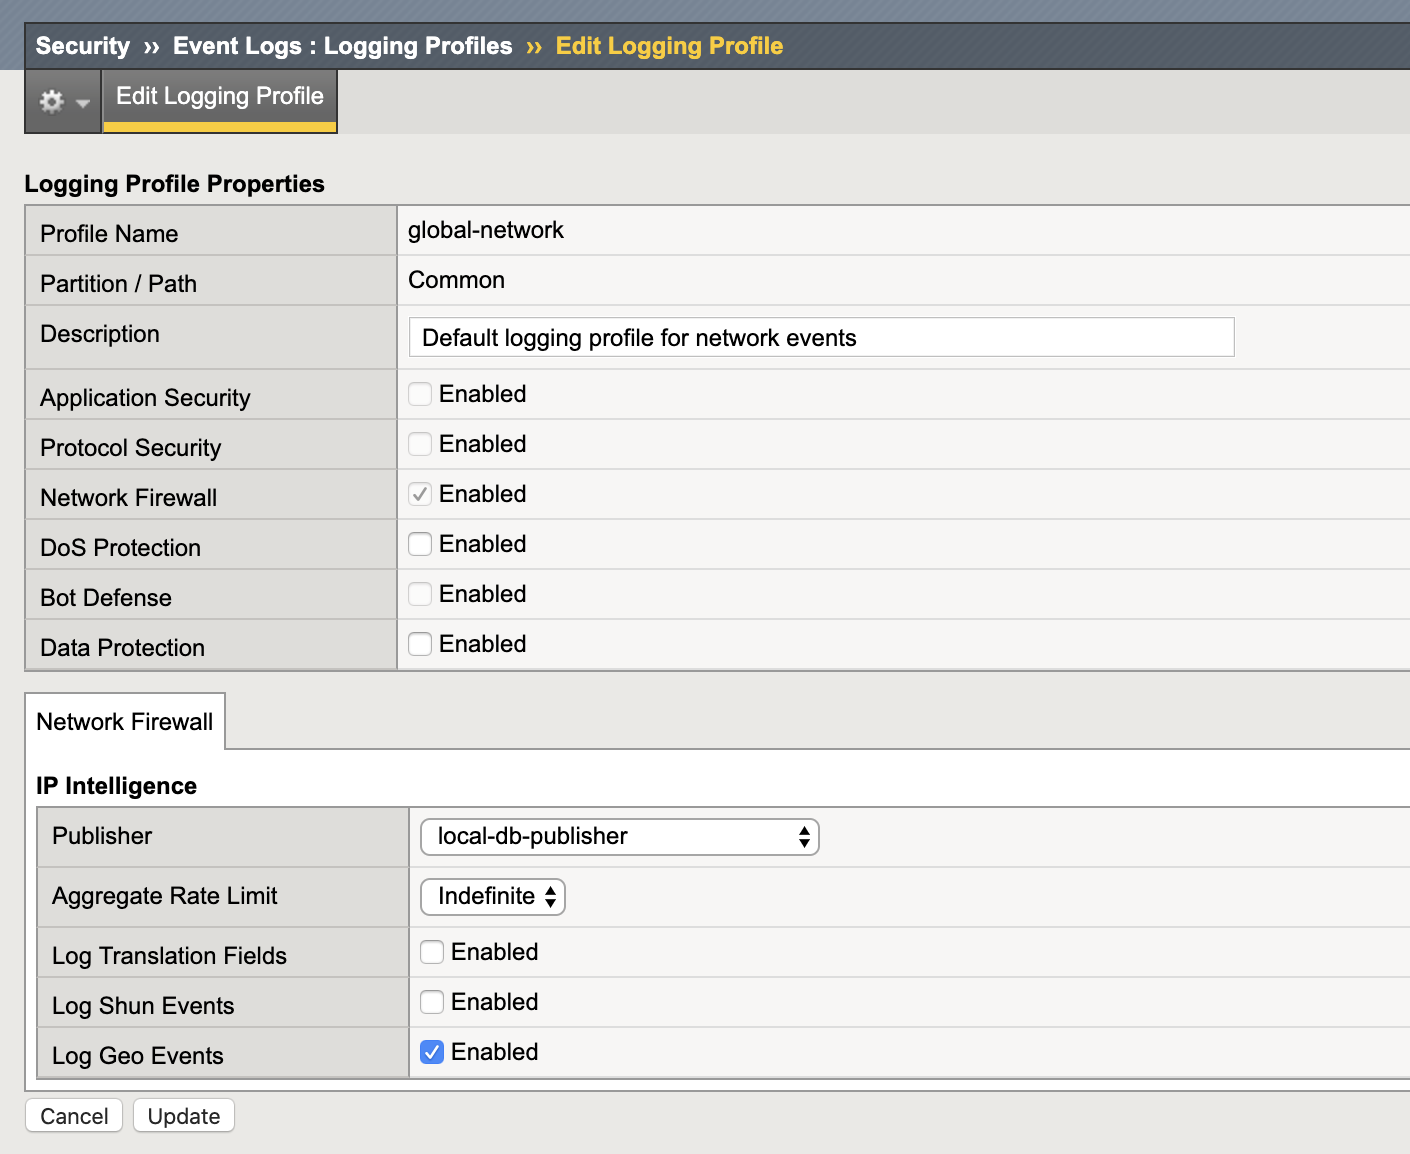
- In the upper left of the GUI under the Main tab, navigate to Security > Event Logs > Logging Profiles and click on global-network
- Under the Network Firewall section configure the IP Intelligence publisher to use local-db-publisher
- Check Log GEO Events
- Click Update
Test
- On the Linux Client, open a terminal and cd to Agility2022wafTools
- Run the following command to send some traffic to the site: ./ipi_tester.
Note
The script should continue to run for the remainder of Lab 1 & 2. Do NOT stop the script.
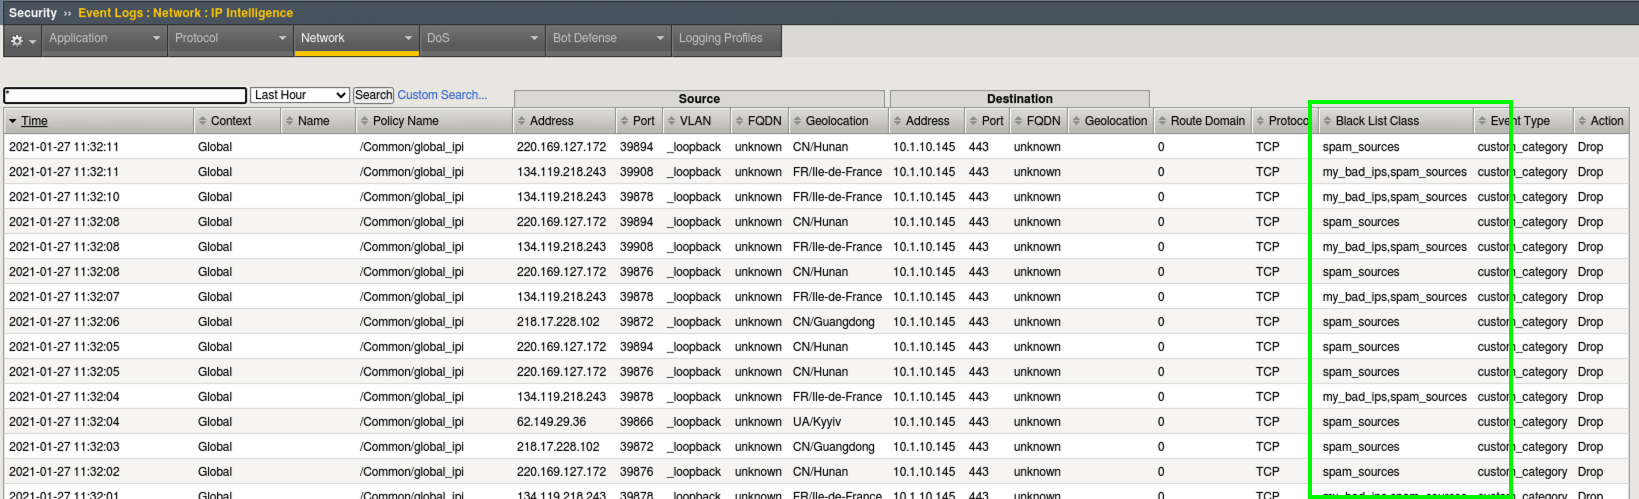
- Navigate to Security > Event Logs > Network > Ip Intelligence and review the entries. Notice the Geolocation Data as well as the Black List Class to the right of the log screen.

Create Custom Category
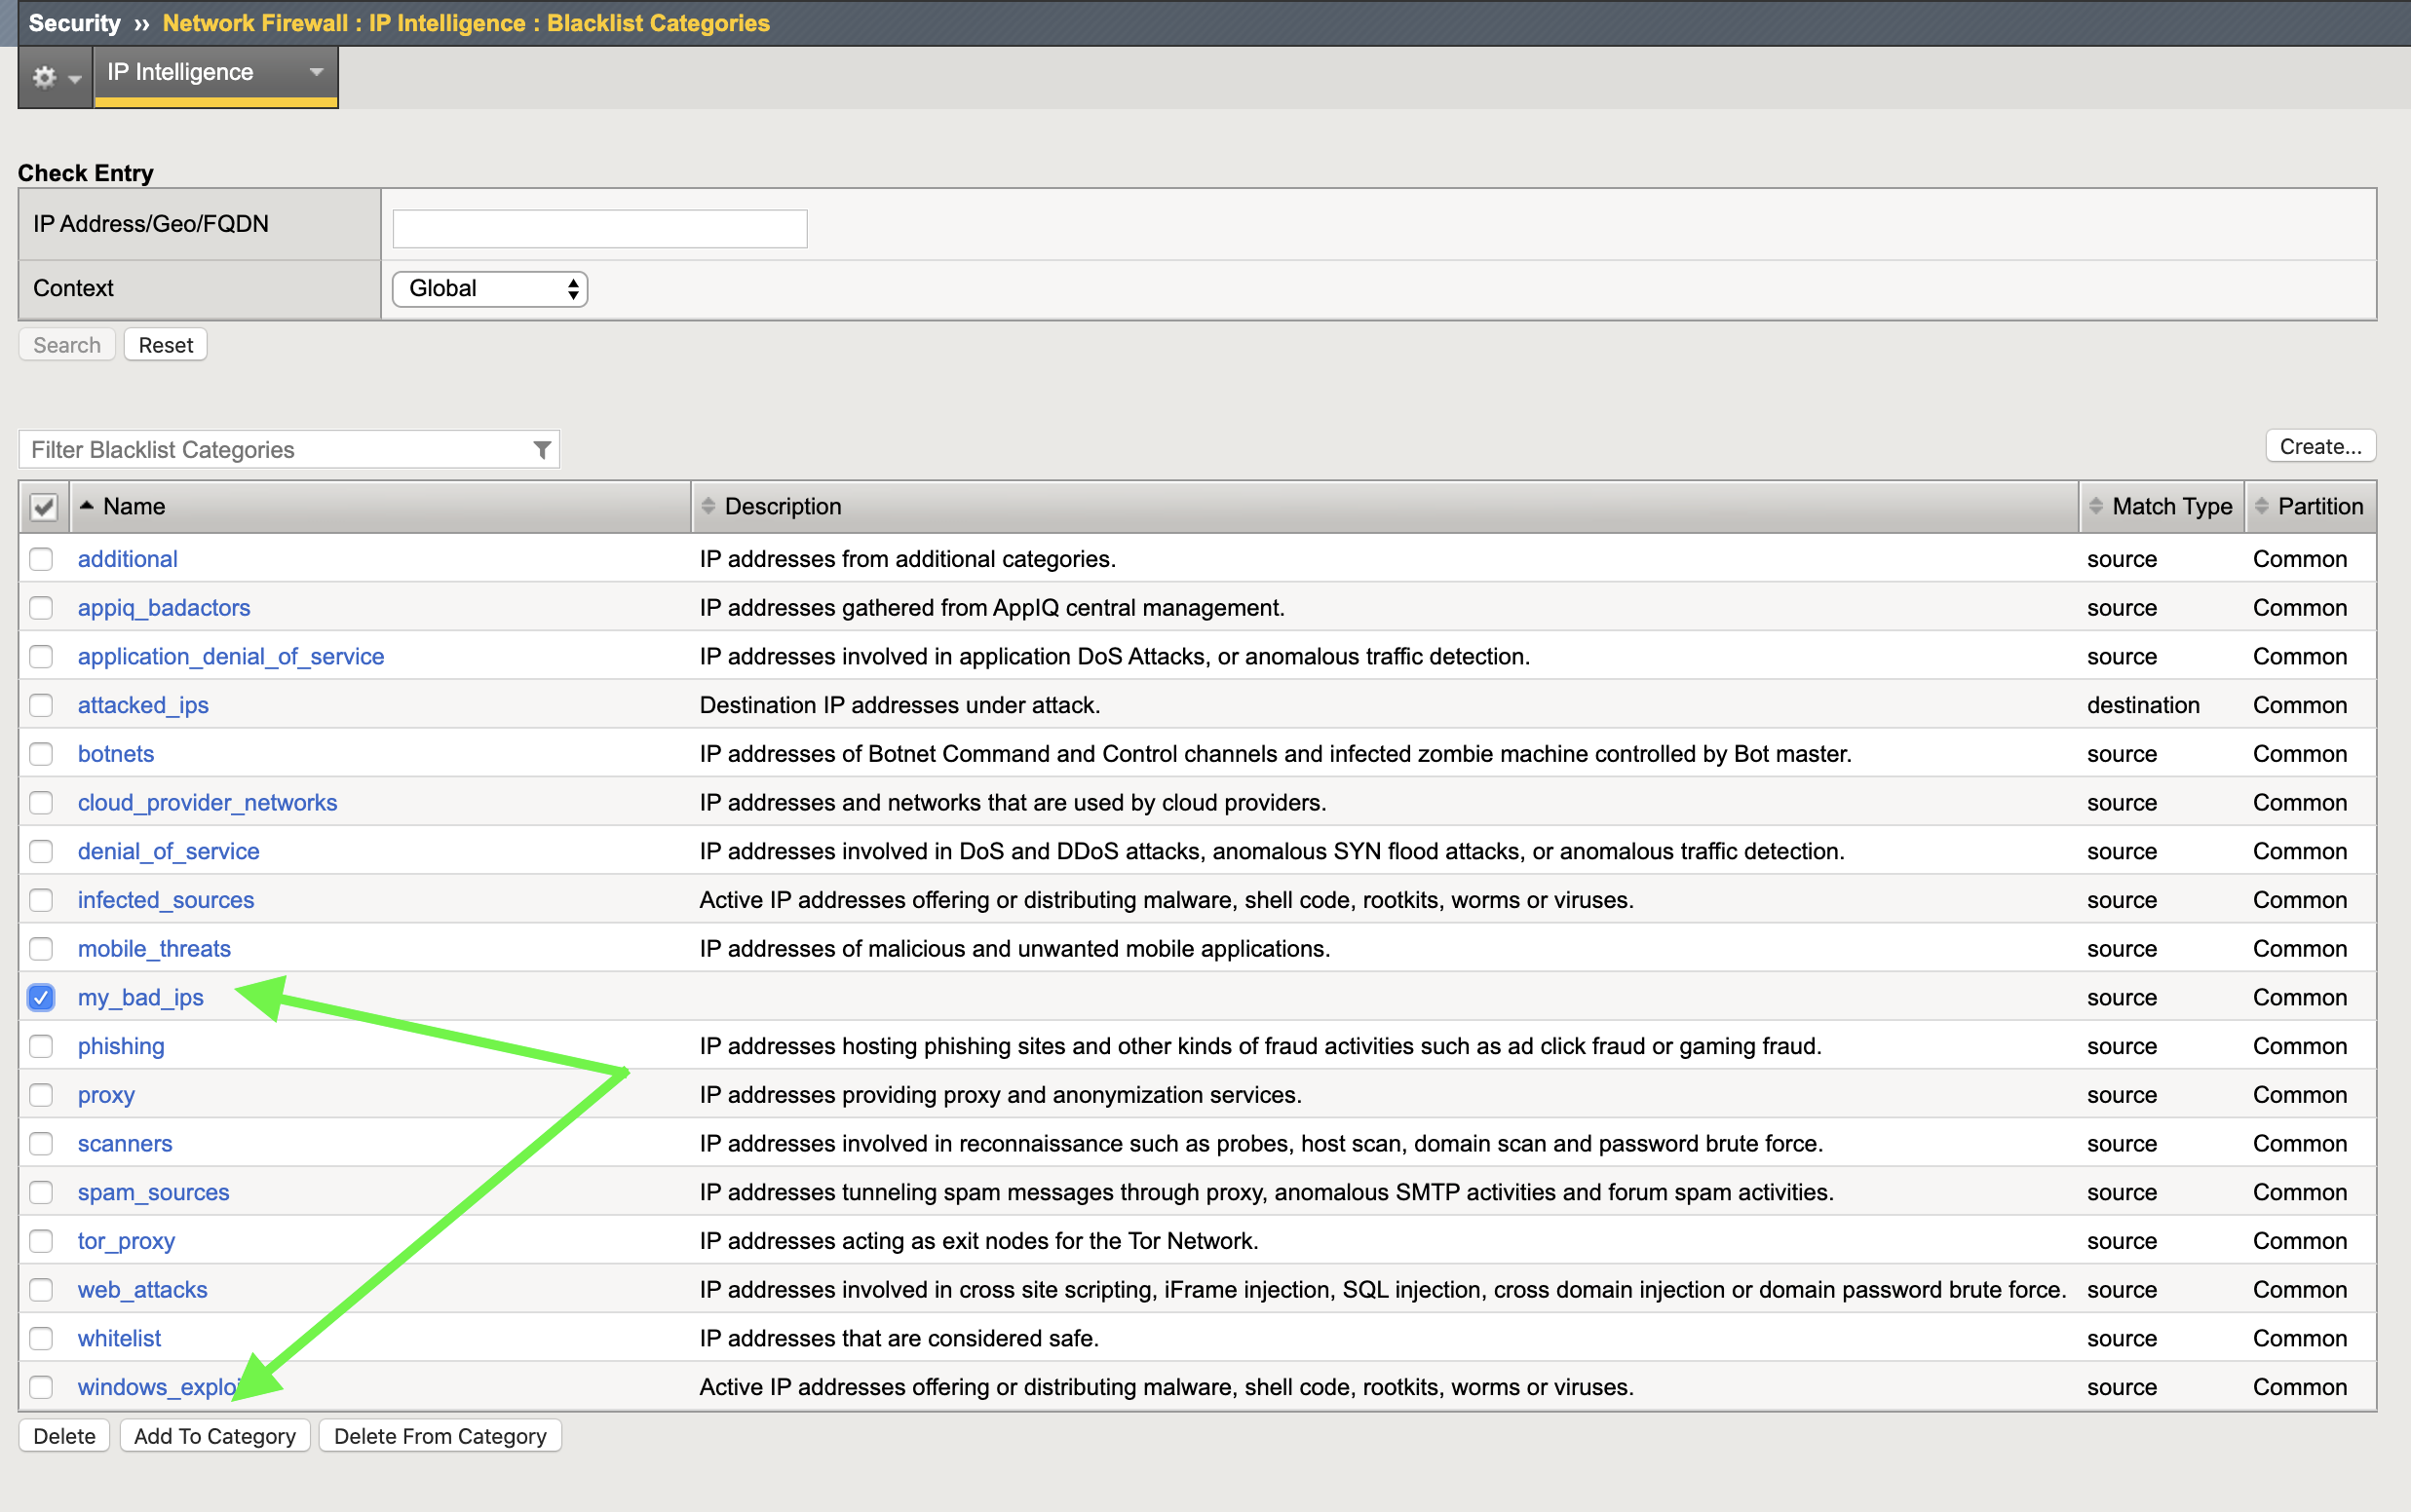
- Navigate to: Security > Network Firewall > IP Intelligence > Blacklist Categories and click Create.
- Name: my_bad_ips with a match type of Source
- Click Finished
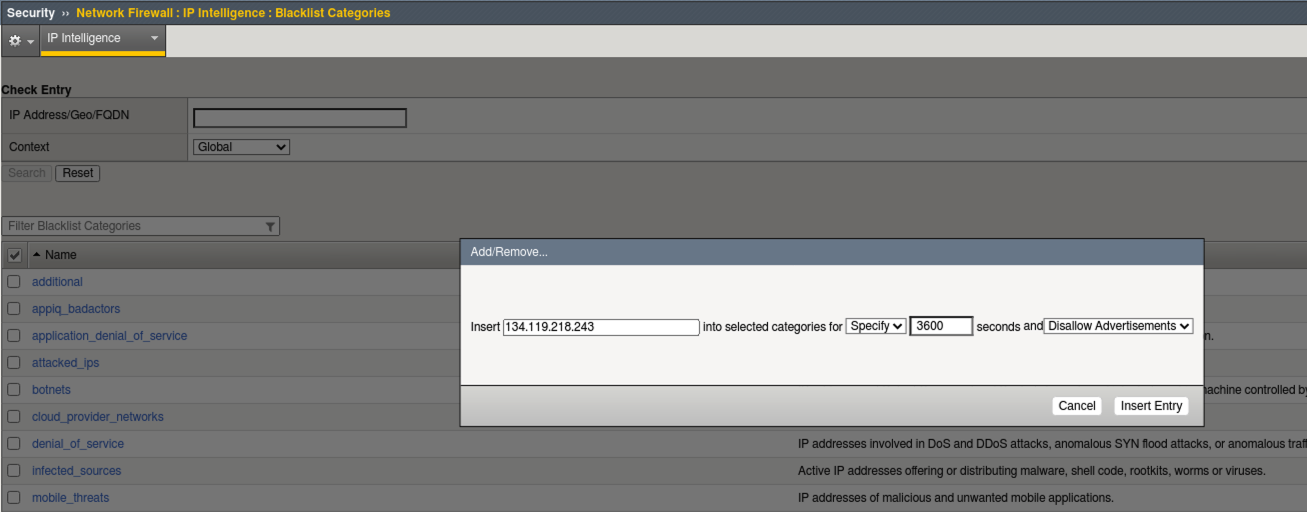
- Click the checkbox next to the name my_bad_ips and then at the bottom of the GUI, click Add To Category.
- Enter the ip address: 134.119.218.243 or any of the other malicious IP’s showing up in the IP Intelligence logs, and set the seconds to 3600 (1 hour)
- Click Insert Entry
- Navigate to Security > Network Firewall > IP Intelligence > Policies and click global_ipi
- Under Categories click Add and select your new custom category my_bad_ips from the drop-down. Click Done Editing and Commit Changes to System.
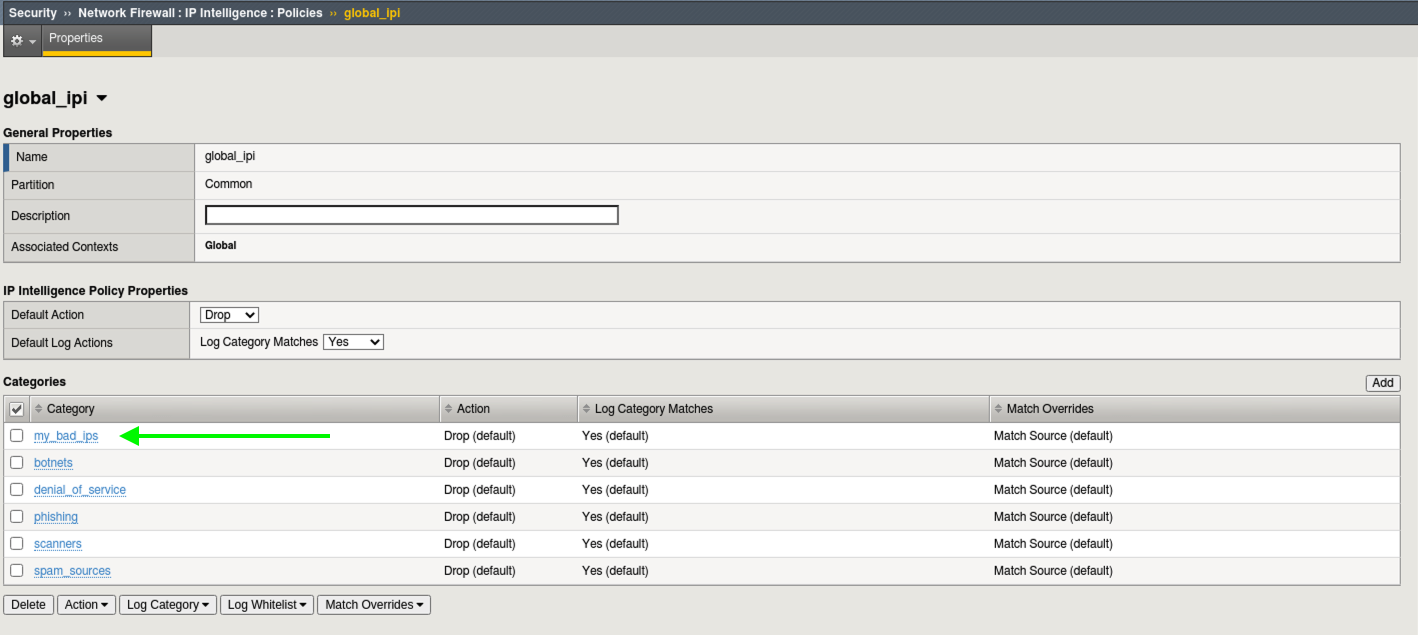
- Navigate back to Security > Event Logs > Network > Ip Intelligence and review the entries under the column Black List Class. You will see entries for your custom category my_bad_ips.
This concludes the Layer 3 IPI policy lab section.
Create your first WAF Policy
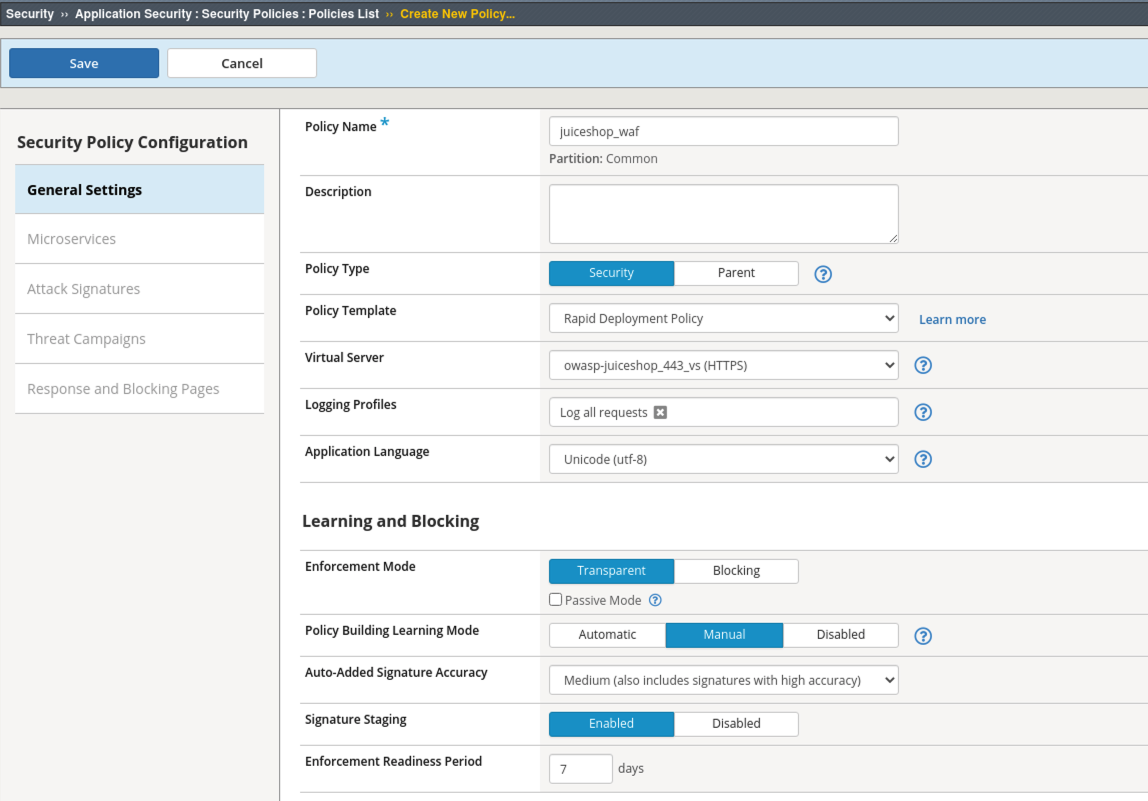
- Navigate to Security > Application Security > Security Policies and click the Plus (+) button.
- Name the policy: juiceshop_waf
- Select Policy Template: Rapid Deployment Policy (accept the popup)
- Select Virtual Server: owasp-juiceshop_443_vs
- Logging Profiles: Log all requests
- Notice that the Enforcement Mode is already in Transparent Mode and Signature Staging is Enabled
- Click Save.
Configure L7 IPI
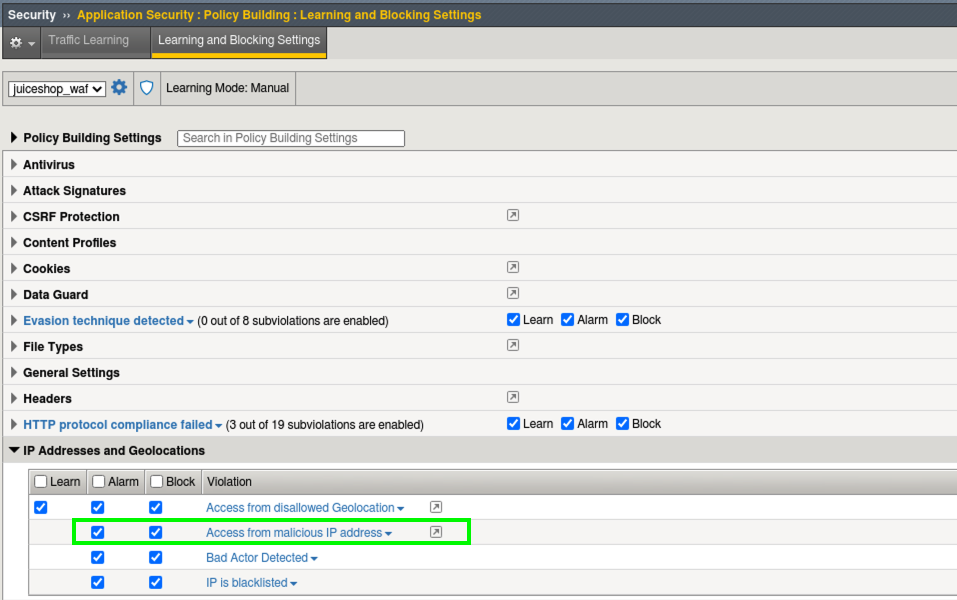
- Navigate to Security > Application Security > Policy Building > Learning and Blocking Settings and expand the IP Addresses and Geolocations section.
Note
These are the settings that govern what happens when a violation occurs such as Alarm and Block. We will cover these concepts later in the lab but for now the policy is still transparent so the blocking setting has no effect.
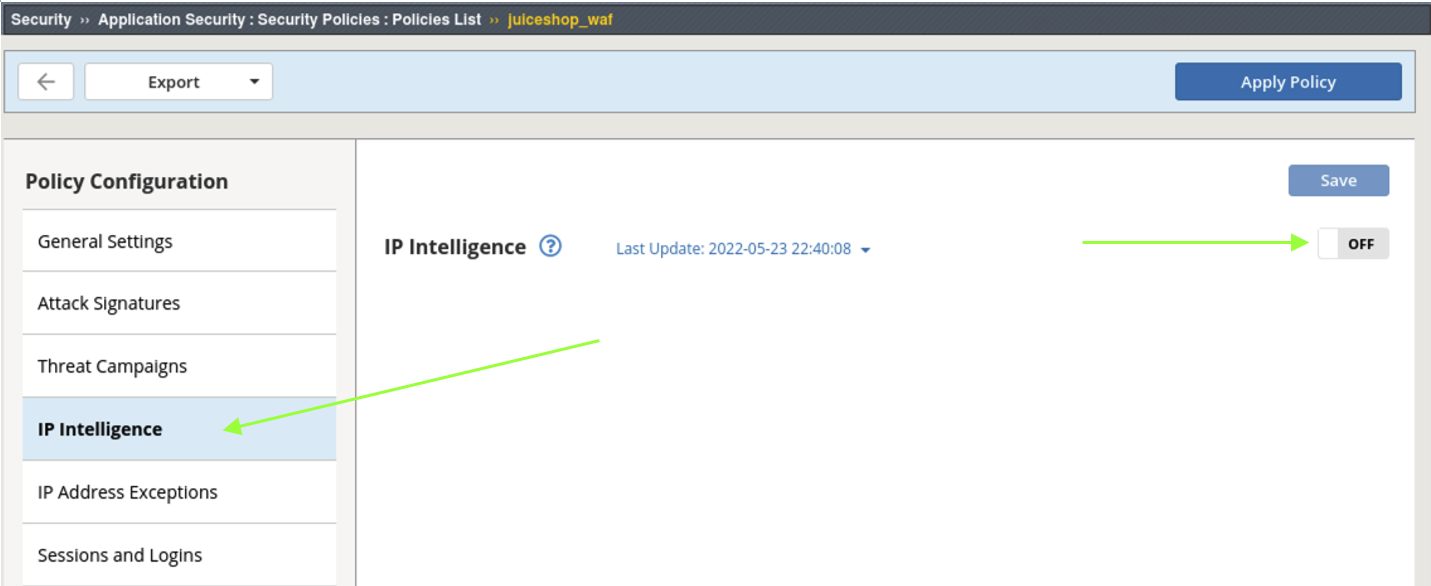
- Navigate to Security > Application Security > Security Policies. Select the juiceshop_waf policy from the policy list. Click IP Intelligence on the middle pane. In the IP Intelligence screen click on the OFF slider to enable IP Intelligence
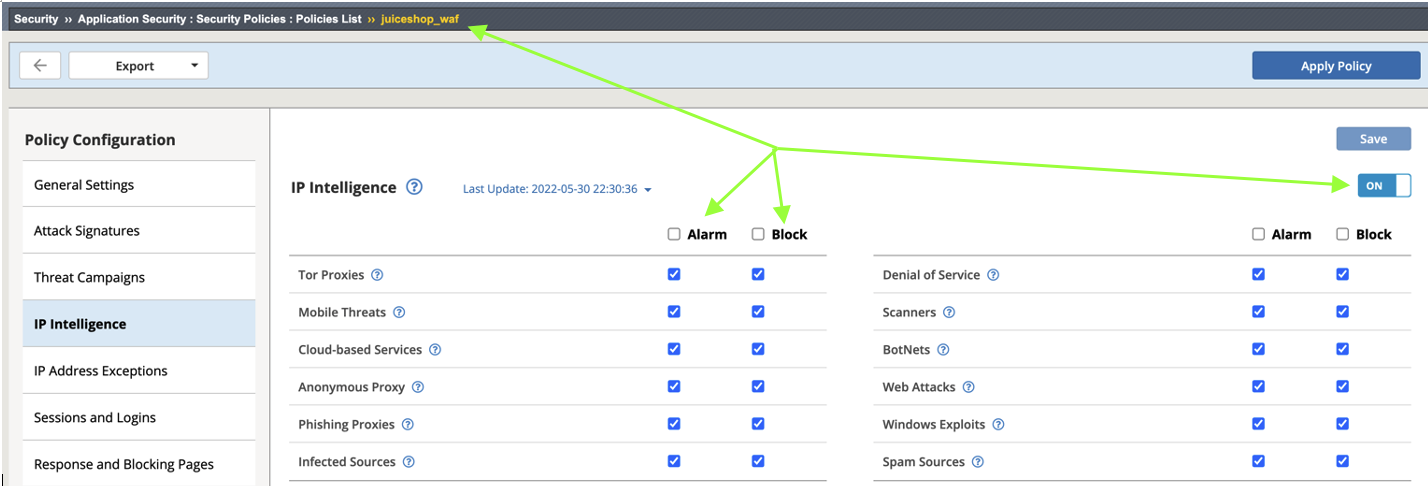
- Notice at the top left drop-down that you are working within the juiceshop_waf policy context. Enable Alarm and Block for each category.
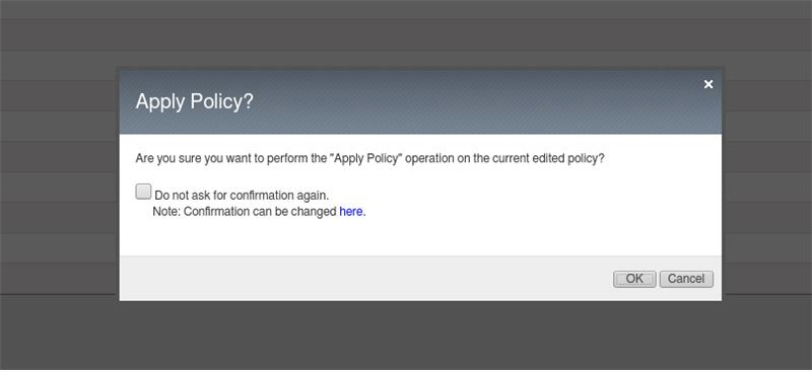
- Click Save and Apply Policy. You will get an “Are you sure” popup that you can banish by clicking Do not ask for this confirmation again.
- Enable XFF inspection in the WAF policy by going to Security > Application Security > Security Policies > Policies List > and click on juiceshop_waf policy.
- Finally, scroll down under General Settings and click Enabled under Trust XFF Header.
- Click Save and Apply Policy
Test XFF Inspection
1. Open a new terminal or terminal tab on the Client (the ipi_tester script should still be running) and run the following command to insert a malicious IP into the XFF Header:
curl -H "X-Forwarded-For: 134.119.218.243" -k https://juiceshop.f5agility.com/xff-test
- 80.191.169.66 - Spam Source
- 85.185.152.146 - Spam Source
- 220.169.127.172 - Scanner
- 222.74.73.202 - Scanner
- 62.149.29.36 - Spam Source
- 82.200.247.241 - Phishing
- 134.119.219.93 - Spam Source
- 218.17.228.102 - Spam Source
- 220.169.127.172 - Scanner
- Navigate to Security > Event Logs > Application > Requests and review the entries. You should see a Sev3 Alert for the attempted access to uri: /xff-test from a malicious IP.
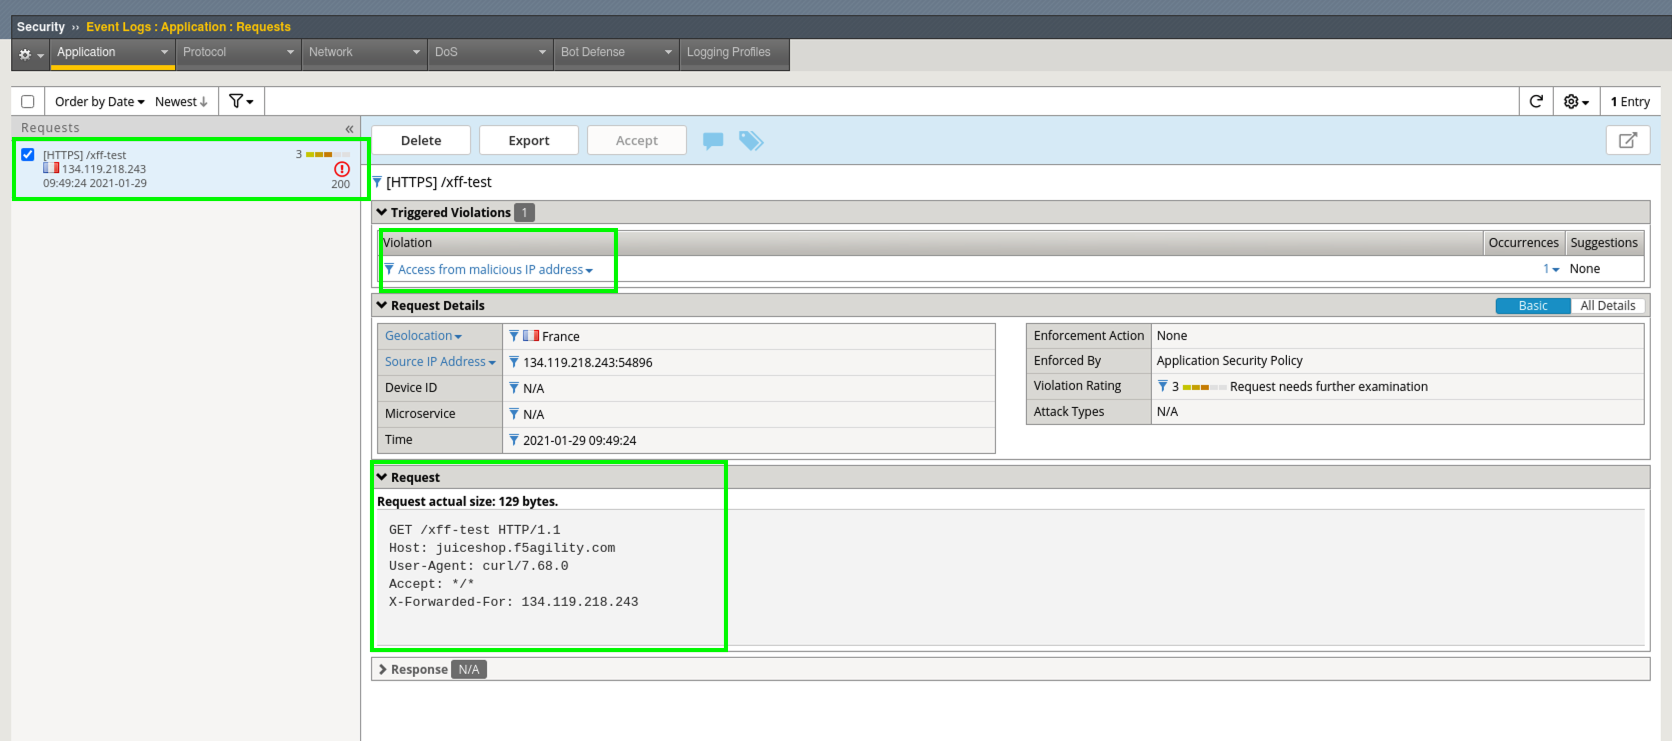
- In the violation details you can see the entire request details including the XFF Header even though this site was using strong TLS for encryption.
Note
Attackers often use proxies to add in source IP randomness. Headers such as XFF are used to track the original source IP so the packets can be returned. In this example the HTTP request was sent from a malicious IP but through a proxy that was not known to be malicious. The request passed right through our Global Layer 3 IPI policy but was picked up at Layer 7 due to the WAF’s capabilities. This demonstrates the importance of implementing security in layers.
This completes Exercise 1.1