How to: Add QAT support on BIG-IP Next
Overview
Intel QuickAssist Technology (QAT) is useful for BIG-IP Next systems to improve SSL performance by offloading SSL encryption.
F5 hardware that supports BIG-IP Next, equipped with hardware SSL accelerators, provides the ability to process SSL transactions through a dedicated hardware chipset and resources, including the QAT SSL card.
Summary
Add QAT support on BIG-IP Next VE
Prerequisites
BIG-IP Next VE
BIG-IP Next instance (v20.0.1 or later) installed on VMware ESXi (v7.x) with a virtual machine (VM) already created
For details, see: Create BIG-IP Next Instance Locally on VMware
Procedures
Modify BIOS settings in VE
To prepare a system for QAT, modify BIOS settings for supporting virtualization and SR-IOV.
This procedure applies to both BIG-IP Next and BIG-IP Next on VELOS.
Caution: Recommendations to assure SR-IOV support for modern PCIE cards:
Update your BIOS to the latest version per the manufacturer’s directions. However, when updating a system BIOS there is a chance of rendering the system inoperable; backup or image any existing data on the server.
Do not perform BIOS upgrades on production systems unless you have redundancy.
Firmware updates and other changes in the BIOS can create a failure to boot or require OS updates. After updating the BIOS, it is recommended that you perform a fresh install of the OS along with the drivers and the hypervisor.
Check with your manufacturer for prerequisites when incrementally updating the BIOS, as large jumps in firmware revisions can be problematic. For example, when running version 3.1.4, you must install 3.5.0, before upgrading to 4.0.0.
Enable Intel Virtualization and VT for Directed I/O, and SR-IOV support:
From Processor Configuration, for Intel Virtualiztion, select Enabled.
From Itegrated IO COnfiguration, for Intel VT for Directedd I/O, select Enabled.
From PCI Configuration, for SR-IOV Support, select Enabled.

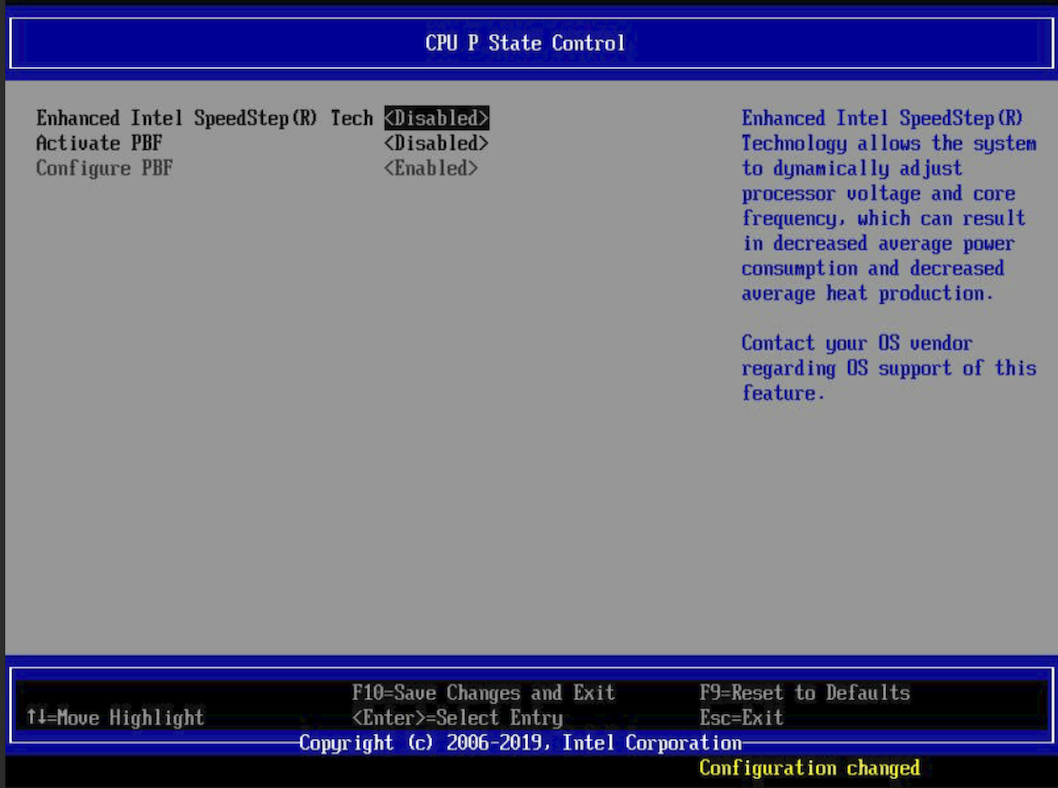
From CPU P State Control, for Enhanced Intel SpeedStep(R) Tech, select Disabled.
From Socket Configuration, for AES-NI, select Enabled.

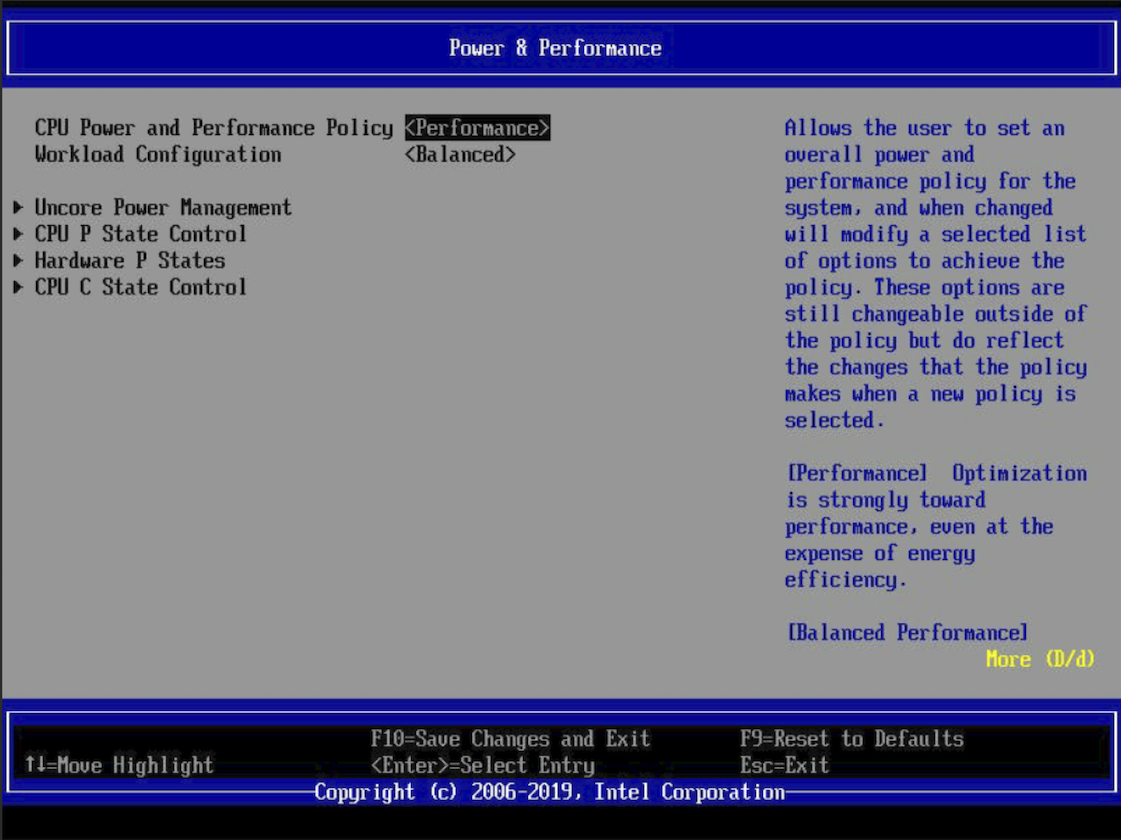
From Power & Performance:
For CPU Power and Performance Policy, select Performance.
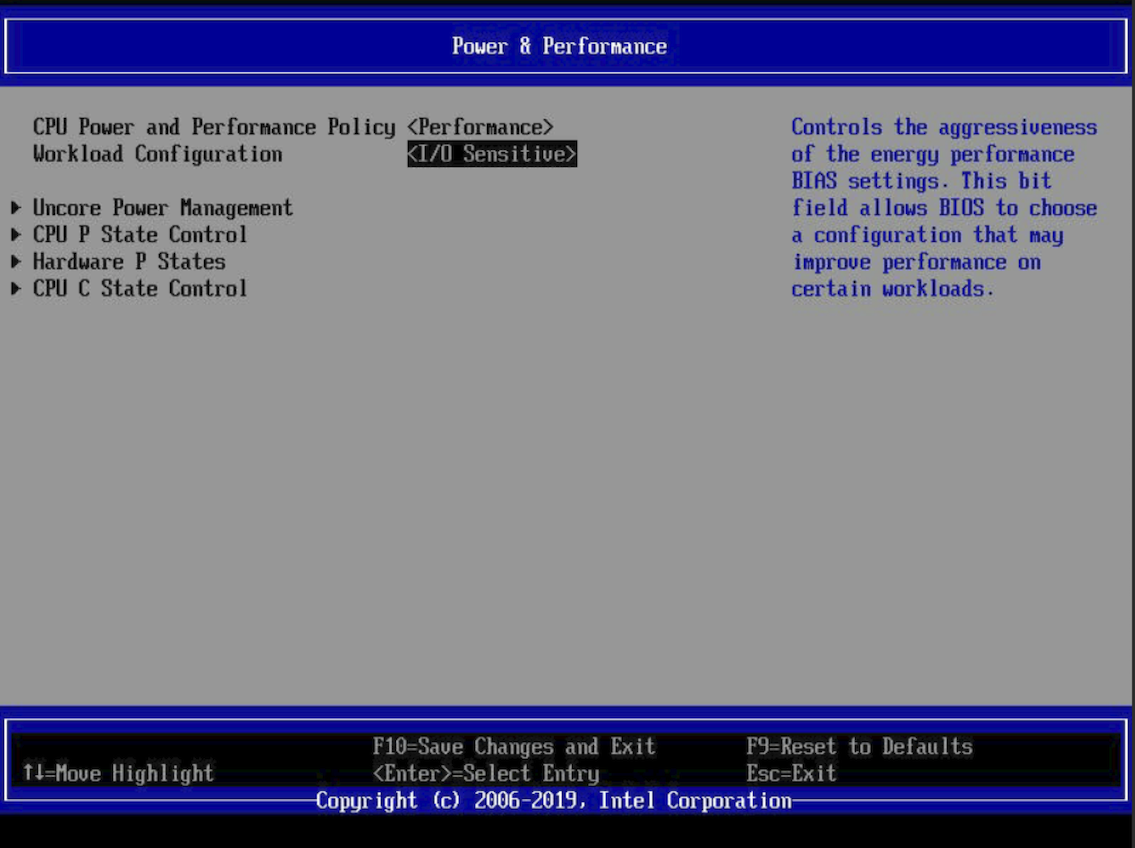
For Workload Configuration, select I/O Sensitive.
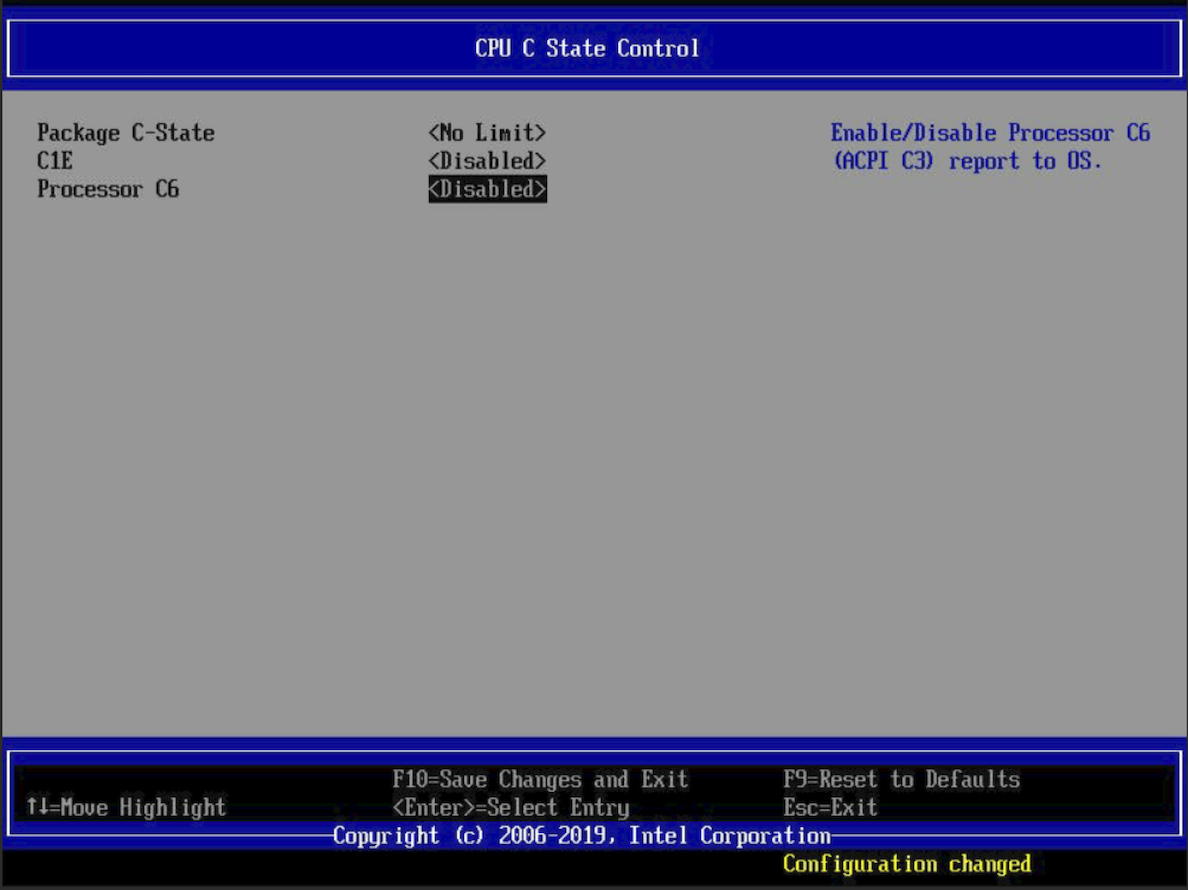
From CPU C State Control, for Processor C6, select Disabled.
From System Acuoustic and Performance Configuration, for Set Fan Profile, select Performance.

VE (VMware ESXi) configuration
Configure settings
Only adding one QAT device.
Log in to VMware ESXi.
In the left pane, click Manage.
In the right pane, click the Hardware tab > PCI Devices.
For all the QAT devices, verify SR-IOV is Active.
Example
Address
Description
SR-IOV
0000:b5:00.0
Intel Corporation c6xx QAT
Active
For all the QAT virtual functions (VFs), verify Passthrough is Active.
Example
Address
Description
Passthrough
0000:b4:01.5
Intel Corporation c6xx QAT VF
Active
In the left pane, click Virtual Machines.
In the right pane, click the name of a VM.
From the top menu, click Edit.
Click Add other device > PCI device.
Scroll down to the bottom of the list to New PCI device and select from the list.
Example
New PIC device | c6xx QAT VF - 0000:b5:01.0
Expand Memory to set the reserved memory to the memory based on the form factor.
Example
MemoryRAM: 16 GB
Reservation: 16 GB
Click Save.
Add QAT support on BIG-IP Next VELOS
Prerequisites
BIG-IP Next for VELOS
VELOS chassis install is complete; power is on in data center
Initial configuration of a VELOS system is complete
For details, see: How to: Initial configuration of a VELOS system
MyF5 account to download the bundle file
Procedures
Complete procedures from How to: Install BIG-IP Next tenant on VELOS:
Download the bundle file
Update the system controller software
Create a chassis partition
Login to the chassis partition webUI
Upload a tenant image onto the chassis partition
From the VELOS Dashboard, navigate to: TENANT MANAGEMENT > Tenant Deployments.
From the Crypto/Compression Acceleration list, select Enabled.
Click Save & Close.
Add QAT support on BIG-IP Next rSeries
Prerequisites
BIG-IP Next for rSeries
Initial configuration of a rSeries system is complete
For details, see: How to: Install BIG-IP Next on rSeries
MyF5 account to download the bundle file
Procedures
Complete procedures from How to: Install BIG-IP Next on rSeries:
Download the BIG-IP Next tenant file
Download the rSeries F5OS-A file
Update the rSeries appliance software
Upload a tenant image onto the rSeries appliance
Deploy a BIG-IP Next instance on an rSeries system using BIG-IP Next Central Manager
From the rSeries Dashboard, navigate to: TENANT MANAGEMENT > Tenant Deployments.
From the Crypto/Compression Acceleration list, select Enabled.
Click Save & Close.
Optional: Verify logs and statistics
All examples apply to BIG-IP Next VE, VELOS, and rSeries.
Log in to VMware ESXi (for BIG-IP Next) or VELOS system or rSeries:
VMware ESXi (for BIG-IP Next):
From a selected VM, from the top menu, click Power on.
VELOS:
Log in to the controller on the command line (root access).
rSeries:
Log in to the controller on the command line (root access).
Verify the pod status.
Example
[root@controller-1 ~]# oc -n partition-2 get pods
NAME                                READY   STATUS
f5-resource-manager-5pnqn           1/1     Running 0
lldpd-56dd44849c-htdx7              1/1     Running 0
tx320-data-store-5649b7d67b-zr6b2   1/1     Running 0
tx320-f5-appsvcs-54c7598589-h6bm8   1/1     Running 0
...
Check the
f5-fsm-tmmlogs to confirm the successful attachment of the QAT device.Example
Relevant logs only{"ts":"2023-10-10 23:31:25.470916 UTC","scid":"","sysid":"0c824d56-f0ca-36e2-5640-1c400e8f82ad","log":"TMM 1. Performing 'device attach 0000:0c:00.0;'","stream":"stdout"} {"ts":"2023-10-10 23:31:25.464029 UTC","scid":"","sysid":"0c824d56-f0ca-36e2-5640-1c400e8f82ad","log":"TMM 2. Performing 'device attach 0000:1b:00.0;'","stream":"stdout"} {"ts":"2023-10-10 23:31:24.938926 UTC","scid":"","sysid":"0c824d56-f0ca-36e2-5640-1c400e8f82ad","log":"TMM 0. Performing 'device attach 0000:04:00.0;'","stream":"stdout"}
Log in to debug-sidecar container inside the
f5-fsm-tmmpod to verify the QAT crypto statistics.Example
f5docker@quick-func-f5-fsm-tmm-5d87f4c99f-nqfd9:/home/debuguser$ tmctl -d blade tmm/crypto
name                            done queued cancelled
------------------------------- ---- ------ ---------
sw_crypto-1                        1      0         0
sw_crypto-1-bulk                   0      0         0
sw_crypto-1-ka-gen                 1      0         0
sw_crypto-1-ka-comp                0      0         0
sw_crypto-1-pk-encrypt             0      0         0
sw_crypto-1-pk-decrypt             0      0         0
sw_crypto-1-pk-sign                0      0         0
sw_crypto-1-pk-verify              0      0         0
sw_crypto-1-kdf-extract            0      0         0
sw_crypto-1-kdf-expand             0      0         0
sw_crypto-1-waiting                1      0         0
sw_crypto-1-deferred               0      0         0
sw_crypto-1-active                 1      0         0
sw_crypto-1-deferred-callback      0      0         0
qat-cryptob5-0                  9525      0         0
qat-cryptob5-0-bulk             7057      0         0
qat-cryptob5-0-ka-gen              6      0         0
qat-cryptob5-0-ka-comp           616      0         0
qat-cryptob5-0-pk-encrypt          0      0         0
qat-cryptob5-0-pk-decrypt          1      0         0
qat-cryptob5-0-pk-sign           617      0         0
qat-cryptob5-0-pk-verify        1228      0         0
qat-cryptob5-0-kdf-extract         0      0         0
qat-cryptob5-0-kdf-expand          0      0         0
qat-cryptob5-0-waiting          9525      0         0
qat-cryptob5-0-deferred            0      0         0
qat-cryptob5-0-active           9525      0         0
qat-cryptob5-0-deferred-callbac    0      0         0
qat-cryptob5-0-nrbg                0      0         0