Alibaba Cloud: Single NIC F5 BIG-IP Virtual Edition
The following diagram shows a basic single NIC deployment of F5 BIG-IP Virtual Edition (VE) in an Alibaba Virtual
Private Cloud (VPC). Traffic is flowing through BIG-IP VE to application servers. The BIG-IP virtual server is listening
for traffic destined for port 443. Port 8443 is for management traffic.
In this configuration, all access to the BIG-IP VE appliance is through the same IP address and virtual network interface (vNIC). (Note: vNICs are called ENIs in Alibaba.)
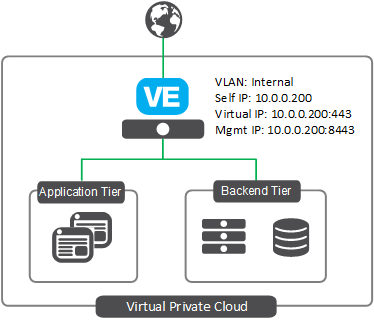
This document shows a specific example, which you can use to test a single NIC deployment. When done, you should be able to send traffic to your application servers through BIG-IP VE.
Steps
The steps to create a single-NIC deployment are:
- Create a VPC with one subnet.
- Edit security rules for the VPC.
- Create or add a key pair.
- Deploy a BIG-IP VE instance.
- Set the admin password.
- License BIG-IP VE.
- Provision BIG-IP VE.
- Create a pool and add members to it.
- Create a virtual server.
If you plan to use BYOL (Bring Your Own License) from F5, consult the F5 licensing topic. You can get a trial license if you need one.
Create a VPC with one subnet
A BIG-IP VE instance must be in an Alibaba virtual private cloud (VPC). In this example, create a VPC with one subnet (called a VSwitch in Alibaba).
- In the Alibaba Console, from the left menu, click Virtual Private Cloud.
- On the top toolbar, select the region you want.
- Click Create VPC.
- Complete the fields. Notice “VSwitch” is the name Alibaba uses for subnet. For more information, see this page.
- Click OK.
- On the success screen, click Complete.
The VPC is displayed in the list.
Edit security rules for the VPC
You must set rules that determine which traffic can access instances in the VPC.
In the list of VPCs, in the row for your VPC, in the Actions column, click Manage.
In the Network Resources section, next to Security Group, click the 0.
In the top right, click Create Security Group.
Complete the fields.
Field Value Template Customize Security Group Name A name you choose. Network Type VPC VPC The VPC you created earlier. Click OK.
On the Notes dialog, click Create Rules Now.
In the top right, click Add Security Group Rule.
Complete the fields to allow SSH access to BIG-IP VE.
Field Value Rule Direction Ingress Action Allow Protocol Type SSH (22) Priority 1 Authorization Type IPv4 CIDR Block Authorization Objects IP address or range on your network; these IP addresses can access the VPC. Click OK.
Repeat steps 7-9 and complete the fields to allow access to the BIG-IP Configuration utility web interface.
Field Value Rule Direction Ingress Action Allow Protocol Type Customized TCP Port Range 8443 Priority 1 Authorization Type IPv4 CIDR Block Authorization Objects IP address or range on your network; these IP addresses can access the VPC. Click OK.
The rules are displayed in the list.
Your application should also be in this VPC, so open the port for the application traffic as well.
Create or add an SSH key pair
You will need a key pair to connect to BIG-IP VE and set the admin password.
- In the Alibaba Console, from the left menu, click Elastic Compute Service.
- On the left menu, under Networks and Security, click SSH Key Pair.
- In the top right, click Create SSH Key Pair.
- Type and name and either create or import a key pair.
- Click OK.
The key pair name is displayed in the list.
Deploy a BIG-IP VE instance
To create an instance of BIG-IP VE in Alibaba, you deploy a BIG-IP VE image from the Alibaba Marketplace.
In the Alibaba Console, from the left menu, click Elastic Compute Service.
On the left menu, click Instances.
In the top right, click Create Instance.
Complete the fields.
Field Value Billing Method - Subscription - You pay monthly for the instance.
- Pay-As-You-Go - You pay based on time. If you are going to choose a BIG-IP VE PAYG image, you should choose this method.
- Preemptible Instance is not supported.
For more information, see Billing method comparison.
Region Keep the default or change it. Instance Type Choose at least 2 vCPU and 4 GB memory. For each vCPU, add at least 2 GB of memory.
Also, ensure the instance type you choose has the number of available NICs you need. In this example, you only need one.
Image Click Marketplace Image and search for F5.
If you choose BYOL, consult the F5 licensing topic. You can get a trial license if you need one.
If you expect to upgrade BIG-IP VE in the future, choose an image with 2 boot locations. If you do not need room to upgrade (if you intend to create a new instance when a new version of BIG-IP VE is released), choose an image with 1 boot location.
Storage Accept the default or change it.
For LTM, set the System Disk value to the minimum available size.
Click Next: Networking.
Complete the fields.
Field Value Network The VPC you created earlier and an associated vSwitch. Network Billing Method Select Assign public IP.
This IP address is for initial management access to BIG-IP VE and you can remove it later.
If you have a jump host on the same vSwitch then you do not need this IP address.
Security Group Leave the default VPC security group. Elastic Network Interface Eth0 is displayed by default. In this example, you don’t need to add another NIC. For other configurations, you can. Click Next: System Configurations.
Complete the fields.
Field Value Key Pair The key pair you created or imported earlier.
Important: A key pair is the only type of logon credentials you can use to connect to BIG-IP VE for the first time.
The other settings (Inherit Password From Image, Password, and Set Later) do not work.
Instance Name A name you choose. Host Important: This setting has no effect on BIG-IP VE. Click Next: Grouping.
Click Add Tag. You may want to add a tag key named Name and a tag value with the name of your instance.
Click Next: Preview.
Optional. If you chose Pay-As-You-Go for the billing method, choose the duration you want.
Select the check box to accept the terms of service and click Create Instance.
On the page that shows billing, click Pay.
The instance is displayed in the list. Wait approximately five minutes for the instance to be ready.
Set the admin password
The first time you boot BIG-IP VE, you must connect to the instance and create a strong admin password. You will use the admin account and password to access the BIG-IP Configuration utility.
This management interface may be accessible to the Internet, so ensure the password is secure.
Connect to BIG-IP VE.
At the command prompt, navigate to the folder where you saved your ssh key and type:
ssh -i <private_key_file.pem> admin@<bigip_public_ip_address>If you prefer, you can open PuTTy and in the Host Name (or IP address) field, enter the external IP address, for example:
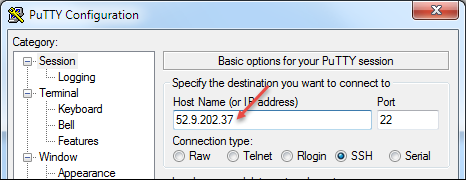
In the Category pane on the left, click .
In the Private key file for authentication field, choose your .ppk file.
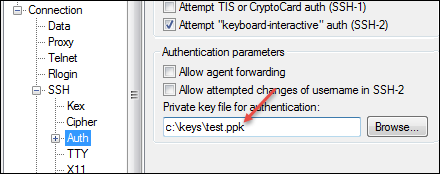
Click Open.
If a host key warning appears, click OK.
The terminal screen displays:
login as:.Type
adminand press Enter.
To change to the
tmshprompt, type:tmshModify the admin password:
modify auth password adminThe terminal screen displays the message:
changing password for admin
new password:
Type the new password and press Enter.
The terminal screen displays the message:
confirm passwordRe-type the new password and press Enter.
Ensure that the system retains the password change and press Enter.
save sys configThe terminal screen displays the message:
Saving Ethernet mapping...done
License BIG-IP VE
You must enter license information before you can use BIG-IP VE.
Open a web browser and log in to the BIG-IP Configuration utility by using
httpswith the external IP address and port8443, for example:https://<external-ip-address>:8443.The username is
adminand the password is the one you set previously.On the Setup Utility Welcome page, click Next.
On the General Properties page, click Activate.
In the Base Registration key field, enter the case-sensitive registration key from F5.
For Activation Method, if you have a production or Eval license, choose Automatic and click Next.
If you chose Manual, complete these steps:
In the Step 1: Dossier field, copy all of the text and then click Click here to access F5 Licensing Server.
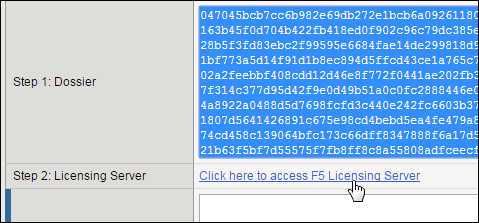
A separate web page opens.
On the new page, click Activate License.
In the Enter your dossier field, paste the text and click Next.
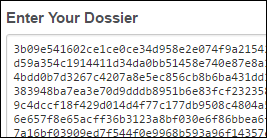
Accept the agreement and click Next.
On the Activate F5 Product page, copy the license text in the box. Now go back to the BIG-IP Configuration utility and paste the text into the Step 3: License field.
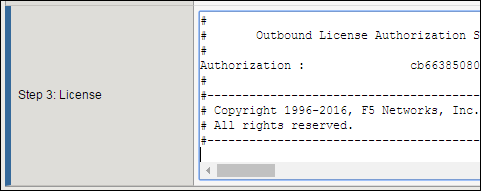
Click Next.
The BIG-IP VE system registers the license and logs you out. When the configuration change is successful, click Continue to provision BIG-IP VE.
Provision BIG-IP VE
You must confirm the modules you want to run before you can begin to work in the BIG-IP Configuration utility.
Open a web browser and log in to the BIG-IP Configuration utility.
On the Resource Provisioning screen, change settings if necessary and click Next.
On the Device Certificates screen, click Next.
On the Platform screen, in the Admin Account field, re-enter the password for the admin account and click Next.
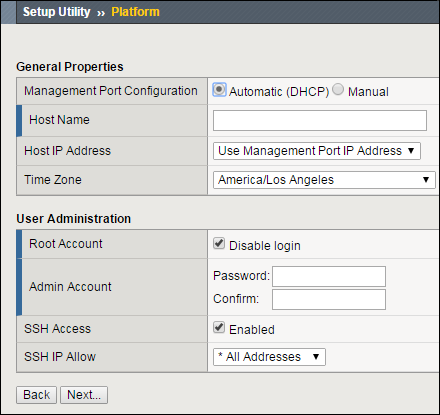
BIG-IP VE logs you out.
When you log back in, on the screen, in the Advanced Network Configuration area, click Finished.

Create a pool and add members
Traffic goes through BIG-IP VE to a pool. You must add your application servers to this pool.
Open a web browser and go to the BIG-IP Configuration utility, for example:
https://<external-ip-address>:8443.On the Main tab, click .
Click Create.
In the Name field, type
web_pool. Names must begin with a letter, be fewer than 63 characters, and can contain only letters, numbers, and the underscore (_) character.For Health Monitors, move
httpsfrom the Available to the Active list.Choose the load balancing method or retain the default setting.
In the New Members section, in the Address field, type the IP address of the application server.
In the Service Port field, type a service port, for example,
443.Click Add.
The list now contains the member.
Add additional pool members as needed and click Finished.
Create a virtual server
A virtual server listens for packets destined for the external IP address. You must create a virtual server that points to the pool you created.
In the BIG-IP Configuration utility, click the Main tab, and then click .
Click Create and complete the following information.
Field Value Name A unique name Destination Address/Mask BIG-IP VE’s private IP address Service Port 443HTTP Profile http SSL Profile (Client) clientssl SSL Profile (Server) serverssl Source Address Translation Auto Map Default Pool web_poolNote
These values are for demonstration only. For details about securing a web application with SSL, see the product documentation at askf5.com.
Click Finished.
Traffic to the BIG-IP VE external IP address will now go to the pool members. To test in a browser, type: https://<external-IP-address>.
See Also