Amazon Web Services: Auto Scaling BIG-IP VE
This guide explains how to create a fairly static configuration of BIG-IP VE and application servers for Auto Scaling. If you are new to Auto Scaling, this guide should help you understand the basics of how BIG-IP VE instances can scale in AWS.
In this deployment, after new BIG-IP VE instances launch, if you want to change the BIG-IP configuration (for example, to add more virtual servers or pools), you must stop the running instances, effectively stopping traffic to your applications. If you don’t stop the running instances, you could have active instances running different configurations of BIG-IP.
Other more flexible Auto Scaling configurations are available by using CloudFormation templates (CFTs) provided by F5. For more information, go to https://github.com/F5Networks.
Overview
You can use the AWS Auto Scaling service to automatically launch or terminate:
- Application servers (pool members used by BIG-IP VE), OR
- Instances running BIG-IP VE, as well as the related application servers (pool members).
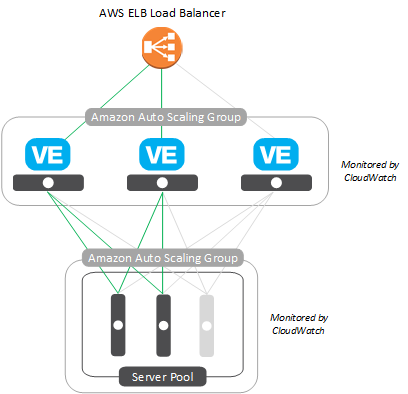
All active instances are in a logical grouping called an AWS Auto Scaling group.
Instances launch and terminate based on thresholds specified in AWS CloudWatch alarms (for example, maximum CPU utilization or disk storage).
- To set a threshold for pool member scaling, you can use AWS EC2 metrics.
- To set a threshold for BIG-IP VE scaling, you can use custom metrics that BIG-IP VE sends to AWS, or use AWS EC2 metrics.
When new BIG-IP VE instances launch, the AWS Elastic Load Balancing (ELB) load balancer discovers them. When application servers launch, BIG-IP VE discovers them and adds them to the pool.
A few things to note about Auto Scaling BIG-IP VE instances:
- You must use an hourly license for BIG-IP VE. Otherwise, you will have to enter licensing information each time a new instance launches.
- You must use a single NIC setup, which means using a VPC with only one subnet. The Amazon Elastic Load Balancer (ELB) will forward traffic only to the first interface on an EC2 instance (in this case, the BIG-IP VE instance). In a multi-NIC configuration, management traffic travels over the first interface (eth0) on BIG-IP VE.
- The BIG-IP VEs do not communicate with each other. If one instance goes offline, the AWS ELB load balancer continues sending traffic to any other available BIG-IP VE instances.
Prepare for Auto Scaling
Before you can configure Auto Scaling, you should have:
- An AWS VPC with a single subnet.
- An application server within the AWS VPC.
- An instance of BIG-IP VE, also in the AWS VPC. This instance must be hourly if you’re going to scale BIG-IP VEs.
For information about how to create the VPC and create and configure the BIG-IP VE instance, see Amazon Web Services: Single NIC BIG-IP VE.
For Pool Member Auto Scaling
For pool member Auto Scaling, you need:
- In BIG-IP VE, a pool with no members. As new application server instances launch in AWS, they are automatically added to the pool.
- An IAM role with appropriate policies attached. Select this role when you deploy BIG-IP VE, or assign it afterward.
For BIG-IP VE Auto Scaling
For BIG-IP VE Auto Scaling, need:
- An AWS ELB that serves traffic to the BIG-IP instance; the ELB is in the AWS VPC.
- In BIG-IP VE, a wildcard virtual server where the Destination Address/Mask is
0.0.0.0/0or is the subnet, for example10.0.0.0/24. This allows the AWS Elastic Load Balancer (ELB) to send traffic to any active BIG-IP VE instance. - An IAM role with appropriate policies attached. Specify this role when you create the BIG-IP VE launch configuration.
- An IAM user with appropriate policies attached, if you don’t want to use an IAM role or are using a version of BIG-IP VE prior to 13.0. Enter the user’s keys in BIG-IP VE before creating an image. If a different user creates the launch configuration, he or she can enter their keys when they create the launch configuration. Keys override roles.
Create Auto Scaling policies
For BIG-IP VE to communicate with AWS, you must create the appropriate policies and attach them to an IAM user or role.
In the AWS Management Console, from the Services menu at the top of the screen, select IAM.
In the Navigation pane, under Details, select Policies.
Click Create Policy.
By Create Your Own Policy, click Select.
For pool member Auto Scaling, enter this text in the Policy Document field.
{
      "Version": "2012-10-17",
      "Statement": [
              {
                      "Effect": "Allow",
                      "Action": [
                          "autoscaling:DescribeAutoScalingGroups",
                          "ec2:describeinstances"
                      ],
                      "Resource": "*"
              }
              ]
}
Enter a name for the policy and click Create Policy.
If you are going to use Auto Scaling with BIG-IP VE instances, and you want BIG-IP VE to send metrics to AWS, create another policy, using this text.
{
     "Version": "2012-10-17",
     "Statement": [
             {
                     "Effect": "Allow",
                     "Action": [
                         "cloudwatch:PutMetricData"
                     ],
                     "Resource": "*"
             }
             ]
}
You now have the policies needed for Auto Scaling.
Assign Auto Scaling policies to an IAM role
Before you complete this task, ensure you have created IAM policies.
For BIG-IP VE to communicate with AWS, you must create an IAM role with the appropriate policies attached.
If you prefer, you can use an IAM user. Versions of BIG-IP VE prior to 13.0 support users only. For more details, see Use an IAM user instead of an IAM role.
- In the AWS Management Console, from the Services menu at the top of the screen, select IAM.
- In the Navigation pane, under Details, select Roles.
- Click Create New Role.
- Type a name and click Next Step.
- Under AWS Service Roles, next to Amazon EC2, click Select.
- Select the policies you created and click Next Step.
- Click Create Role.
The IAM role now has the policies needed to interact between BIG-IP VE and AWS.
- For pool member Auto Scaling only, you must assign this role when you deploy BIG-IP VE in AWS (or you can do it afterward).
- For BIG-IP VE Auto Scaling, you must assign this role when you create the BIG-IP VE launch configuration.
Use an IAM user instead of an IAM role
For BIG-IP VE to communicate with AWS when Auto Scaling BIG-IP VE instances, you should create an IAM role with the appropriate policies attached. However, if you prefer, you can use an IAM user instead.
In the Navigation pane, under Details, select Users.
Click Create New Users.
Type a user name, select Generate an access key for each user and then click Create.
Click Download Credentials.
An access key ID and a secret access key download.
Important
AWS downloads these credentials only once, so keep track of where you store them.
Click Close.
In the list of users, click the row for the user.
On the Permissions tab, click Attach Policy.
Select the check box for the policy you created previously.
Click Attach Policy.
Finally, enter the user’s keys into BIG-IP VE. Or, if you prefer, you can enter the keys in AWS later, when you create the launch configuration.
- Log in to the BIG-IP Configuration utility.
- On the Main tab, click .
- In the Access Key field, type the access key.
- In the Secret Key field, type the secret key.
- Click Update.
The IAM user can now communicate between BIG-IP VE and AWS.
Note
If you enter these keys in BIG-IP, you should delete them before you create the image. You can enter keys when creating the launch configuration for BIG-IP VE.
Auto Scaling application servers in AWS
For BIG-IP VE to discover application server (pool member) instances created by the AWS Auto Scaling service, complete the following tasks.
| Step | Task | Description |
|---|---|---|
| 1 | In BIG-IP VE, define attributes for future pool members | BIG-IP VE needs to know how to configure new pool members. Use an iApp for this information. |
| 2 | In BIG-IP VE, set up pool member discovery | BIG-IP VE will poll AWS every 10 minutes and update the pool with the latest pool members. You can change this interval. |
| 3 | In AWS, create an image (AMI) of the application server instance you want to scale | You will specify the image when you create the AWS launch configuration. |
| 4 | In AWS, create the launch configuration, Auto Scaling group, and CloudWatch alarms | The name you entered in the BIG-IP VE iApp for the pool member Auto Scaling group must be the name of the pool member Auto Scaling group in AWS. Each time a new application server instance launches, BIG-IP adds it to the pool. |
Define future pool member attributes
You must specify the properties that BIG-IP VE should use when creating new pool members.
Log in to the BIG-IP Configuration utility.
On the Main tab, click .
On the Application Service List screen, click Create.
In the Name field, type a name for the Auto Scaling template that determines the properties of new instances.
From the Template list, select the template
f5-iAppLX-aws-autoscaleand click Next.In the Pool Name field, type the name of the pool you created in BIG-IP VE.
In the AWS AutoScale Group Name field, type the name of the Auto Scaling group. You will use this name in AWS when you create the Auto Scaling group.
Important
If you have other Auto Scaling groups in AWS, ensure that this name is not a duplicate of one that already exists.
In the Port Number field, type the port number, based on the type of application this pool member serves.
Configure remaining settings as needed.
At the bottom of the screen, click Deploy to save your changes.
Set up pool member discovery
You must configure communication so that BIG-IP VE can discover new application server (pool member) instances.
Use SSH to log in to the BIG-IP VE as admin.
Ensure you are at the tmsh prompt, not the bash prompt.
Load a script that BIG-IP VE uses to poll AWS periodically for the list of active pool members.
load sys config merge file /usr/share/aws/autoscale/aws-autoscale-icall-configSave the changes.
save /sys config
Polling happens every 10 minutes (600 seconds). To change the interval, run this case-sensitive tmsh command:
modify sys icall handler periodic autoscaleHandler interval <number_of_seconds>
Now create an image (AMI) of the application server so you can use it for Auto Scaling.
Create a launch configuration for pool members
Before you can create a launch configuration for a pool member, you must have an Amazon machine image (AMI) of the pool member you want to use for Auto Scaling.
A launch configuration is a template that determines the properties of new instances.
Note
You cannot revise a launch configuration after you create it.
In the AWS Management Console, from the Services menu at the top of the screen, select EC2.
In the Navigation pane, under AUTO SCALING, select Launch Configurations.
From the My AMIs list, select the pool member image.
Specify settings appropriate for your use.
Setting Details Enable CloudWatch detailed monitoring Select this option. Select this option to assist with troubleshooting. Configure Security Group Select a group associated with the VPC. If you create a new security group, Auto Scaling will fail. Click Create launch configuration.
Create an Auto Scaling group for pool members
Auto Scaling groups are a logical grouping of auto scaled instances. In order for AWS to automatically create application servers, you must create an Auto Scaling group with CloudWatch alarms that trigger Auto Scaling.
In the AWS Management Console, from the Services menu at the top of the screen, select EC2.
In the Navigation pane, under AUTO SCALING, select Auto Scaling groups and Create Auto Scaling group.
Specify settings appropriate for your use.
Setting Details Group name Type the autoscale-group name you specified when you defined the Auto Scaling resources in the iApp. Network and Subnet Select the virtual private cloud (VPC) and its subnet ( 10.0.0.0/24).Receive traffic from Elastic Load Balancer(s) Clear this check box. Traffic to the pool members is coming from BIG-IP VE, not the AWS ELB. Use scaling policies to adjust the capacity of this group Select this option, enter the minimum and maximum number of instances, and create alarms that will trigger Auto Scaling. When done, click Create Auto Scaling group.
New instances will launch and terminate based on the alarms you created. When new instances start, BIG-IP VE will add them to the pool. When instances terminate, they are no longer active in the pool.
Auto Scaling BIG-IP VEs in AWS
To use Auto Scaling with BIG-IP VE, complete the following tasks.
| Step | Task | Description |
|---|---|---|
| 1 | In BIG-IP VE, specify the Auto Scaling group name you will use in AWS | BIG-IP VE needs to know the name you plan to use for the AWS Auto Scaling group. You will create a group with this name later in AWS.
|
| 2 | Optional. In BIG-IP VE, set up communication of metrics to AWS | BIG-IP VE can send metrics about its health to AWS; you can use these metrics to trigger Auto Scaling. If you want to use AWS metrics instead, you do not need to perform this task.
|
| 3 | In BIG-IP VE, finalize the instance by removing specific information | You must remove some information that is specific to this instance of BIG-IP VE. This ensures that new instances retrieve their own set of information.
|
| 4 | In AWS, create an image of the BIG-IP VE instance you want to scale | Shut down BIG-IP VE and create an Amazon machine image (AMI). This image is the basis for new instances. |
| 5 | In AWS, create a CloudWatch alarm | If you want to use BIG-IP metrics to trigger Auto Scaling, create the CloudWatch alarm before creating the launch configuration. If you want to use AWS metrics, you do not need this task; you can create the alarm while creating the Auto Scaling group. |
| 6 | In AWS, create a launch configuration and Auto Scaling group | The name you entered in BIG-IP VE for the Auto Scaling group must be the name of the AWS Auto Scaling group. Each time a new BIG-IP VE instance launches, it is available to the AWS ELB. |
Set AWS Auto Scaling group name
Before you can create an Auto Scaling group for BIG-IP VEs in AWS, you must log in to BIG-IP VE and specify the name that you plan to use for the Auto Scaling group.
Use SSH to log in to the BIG-IP VE as admin.
Ensure you are at the tmsh prompt, not the bash prompt.
Specify a name for the group.
Important: If you have other Auto Scaling groups in AWS, ensure that this name is not a duplicate of one that already exists.
modify sys autoscale-group autoscale-group-id <group_name>Confirm the group name.
list sys autoscale-groupSave the changes.
save /sys config
Later you will use this name for the Auto Scaling group in AWS.
Make BIG-IP VE communicate metrics to AWS
If you plan to use BIG-IP metrics to trigger Auto Scaling of BIG-IP VE instances, you must enable a script to send the metrics from BIG-IP VE to AWS.
Use SSH to log in to the BIG-IP VE as admin.
Ensure you are at the tmsh prompt, not the bash prompt.
tmshLoad a script that BIG-IP VE uses to periodically send metrics to AWS.
load sys config merge file /usr/share/aws/metrics/aws-cloudwatch-icall-metrics-configSave the changes.
save /sys config
When BIG-IP sends metrics to AWS, you can see them in the AWS console in the CloudWatch Metrics area.
Note
Communication happens every 10 minutes (600 seconds). To change the interval, run this case-sensitive tmsh command:
modify sys icall handler periodic metricUploadHandler interval <number_of_seconds>
Remove instance-specific information
You must remove some information that is specific to this instance of BIG-IP VE. This ensures that new instances retrieve their own set of information.
Use SSH to log in to the BIG-IP VE as admin.
Ensure you are at the tmsh prompt, not the bash prompt.
Remove the information.
run util finalize-custom-ami
Create an AMI
In AWS, stop the instance and create an Amazon Machine Image (AMI) by right-clicking the instance and clicking .
The AMI is the basis for new BIG-IP VE instances.
Create a CloudWatch alarm for custom BIG-IP metrics
CloudWatch alarms are the triggers that determine when Auto Scaling policies take effect. To auto scale instances of BIG-IP VE, you can use AWS metrics or metrics provided by BIG-IP.
If you want to use metrics provided by BIG-IP, complete the following steps.
- In the AWS Management Console, from the Services menu, select CloudWatch.
- In the Navigation pane, under ALARM, select ALARM.
- Click Create Alarm.
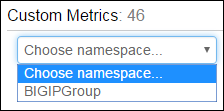
- In the Custom Metrics area, in the list, click the name of the custom metrics you created earlier.
- In the list, select the metric you want to trigger the alarm.
- Click Next.
- Type a name for the alarm and specify where to send the notification.
- Click Create Alarm.
Now you can create an Auto Scaling group that uses this alarm to trigger Auto Scaling.
Create a BIG-IP VE launch configuration
Before you can create a BIG-IP VE launch configuration, you must have an Amazon machine image (AMI) of BIG-IP VE that you want to use as the model for AWS to generate new instances.
A launch configuration is a template that determines the properties of new instances. To scale BIG-IP VE instances, you must create a launch configuration.
Note: You cannot revise a launch configuration after you create it.
In the AWS Management Console, from the Services menu at the top of the screen, select EC2.
In the Navigation pane, under AUTO SCALING, select Launch Configurations.
Click Create launch configuration.
From the My AMIs list, select the BIG-IP VE image.
Specify settings appropriate for your use.
Setting Details IAM role Select the role you created earlier. You must select the role, unless you are using an IAM user’s keys. Enable CloudWatch detailed monitoring Select this option. Select this option. BIG-IP VE prior to version 13.1.0.2 must access the internet when it launches, so it can get a license from F5. If you want to use IAM user keys instead of an IAM role, or a different user created the BIG-IP VE image, enter your keys:
AWS_ACCESS_KEY,*<user_access_key>*
AWS_SECRET_KEY,*<user_secret_key>*
Note: Keys override roles.
Configure Security Group Select an existing group associated with the VPC. Click Create launch configuration.
Create a BIG-IP VE Auto Scaling group
Auto Scaling groups are a logical grouping of auto scaled instances. In order for AWS to automatically create BIG-IP VE instances, you must create an Auto Scaling group with CloudWatch alarms that trigger Auto Scaling.
Important: After you complete this task, any changes to the BIG-IP configuration will require you to stop running instances of BIG-IP VE, effectively stopping traffic to your applications. Ensure you configured BIG-IP properly before proceeding.
In the AWS Management Console, from the Services menu at the top of the screen, select EC2.
In the Navigation pane, under AUTO SCALING, select Auto Scaling groups.
Click Create Auto Scaling group and create an Auto Scaling group associated with your BIG-IP VE launch configuration.
Specify settings appropriate for your use.
Setting Details Group name Type the name of the Auto Scaling group you created in tmsh. Network and Subnet Select the virtual private cloud (VPC) and its subnet ( 10.0.0.0/24).Receive traffic from Elastic Load Balancer(s) Select this check box and choose your ELB. This ensures that traffic flows from AWS ELB load balancer to the BIG-IP VE instances. Use scaling policies to adjust the capacity of this group Set the minimum and maximum number of instances and add an alarm.
If you want to use BIG-IP metrics to trigger scaling of BIG-IP instances, from the Execute policy when list, select the CloudWatch alarm you created previously.
When done, click Create Auto Scaling group.
BIG-IP VE instances launch based on the alarms you specified.