Amazon Web Services: Three-NIC F5 BIG-IP Virtual Edition
The following diagram shows a basic three-NIC deployment of F5® BIG-IP® Virtual Edition (VE) in an Amazon Virtual Private Cloud (VPC).
Complete the tasks in this guide to create this deployment.
Alternately, you can use a F5® BIG-IP® AWS Cloud Formation Template (CFT) to create this deployment. For more information about F5 BIG-IP CFTs, visit https://github.com/F5Networks/f5-aws-cloudformation.
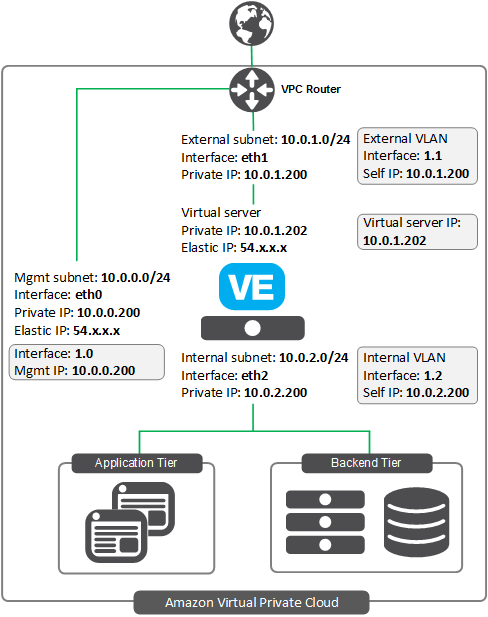
This deployment shows three subnets:
- An external, public subnet, where you’ll create a virtual server to accept Internet traffic.
- An internal, private subnet, where your application servers live.
- A management subnet, where you can access the BIG-IP Configuration utility; you use the Configuration utility to configure BIG-IP VE.
Traffic flows from clients through BIG-IP VE to application servers.
You create all IP addresses and network interfaces in AWS. Then in BIG-IP VE, you create corresponding objects for the same IP addresses, represented by the shaded boxes in the diagram.
Prepare
To create a multi-NIC configuration, you must first create an Amazon virtual private cloud (VPC). This is the network environment where your instances will reside.
| Step | Task | Description |
|---|---|---|
| 1 | Create an SSH key pair | Create a key pair. You will need it to access the instance. |
| 2 | Create a VPC with multiple subnets | Use the VPC wizard to create a management subnet for administrative access, an external subnet for application access, and a NAT instance for network translation.
|
| 3 | Create an internal subnet | This subnet contains your web servers.
|
| 4 | Add routes so BIG-IP VE can access the Internet | Add the private IP address of the external subnet as the gateway in a route for outbound traffic. |
| 5 | Create security groups | These groups determine which traffic can travel in and out of the VPC.
|
Create an SSH key pair
To access Amazon EC2 instances, you must have an SSH key pair. You can create one in AWS or import a key pair if you already have one.
In AWS, note the region you are in. Everything you create in the console going forward must be in the same region.
Later, you will use an SSH tool like PuTTY to access your EC2 instance. You may have to use PuTTYgen to convert the .pem file to .ppk format.
Create a VPC with multiple subnets
A BIG-IP VE instance must be in an Amazon virtual private cloud (VPC). You can use a wizard to create a VPC that has management and external subnets. You will create the internal subnet separately.
In the AWS Management Console, from the Services menu at the top of the screen, select VPC.
Click , and then click Select.
Complete the wizard with the following entries.
The subnet listed as Public in the AWS UI is for management traffic to the BIG-IP Configuration utility. The subnet listed as Private is for application traffic to the BIG-IP VE external VLAN.
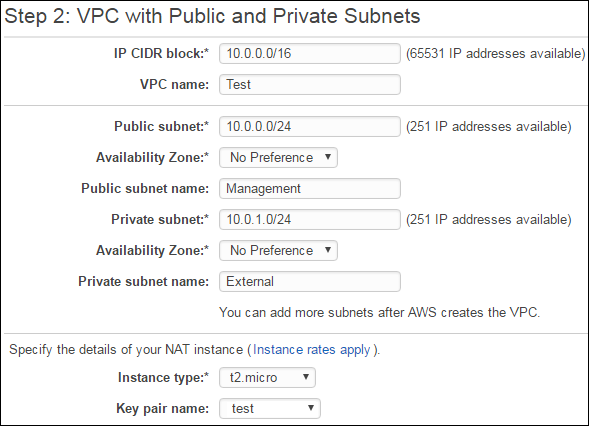
Leave all other default settings and click Create VPC.
Create an internal subnet
When you used the VPC wizard, you created two subnets: management and external. Note the availability zone for these subnets (for example, us-west-2a).
Now create the internal subnet in that same availability zone. The internal subnet corresponds to the BIG-IP internal VLAN.
In the AWS Management Console, from the Services menu at the top of the screen, select VPC.
In the Navigation pane, under Virtual Private Cloud, select Subnets.
Click Create Subnet and populate the appropriate fields.
Field Value Name tag InternalVPC Your VPC Availability Zone The zone where the other subnets reside CIDR block 10.0.2.0/24Click Yes, Create.
Your VPC should now have three subnets.

Add routes for accessing the Internet
By default, AWS prevents traffic from the management and external subnets to leave the VPC. You must add the BIG-IP VE external self IP address to the routing table for outbound traffic for the VPC.
In the AWS Management Console, from the Services menu at the top of the screen, select VPC.
In the Navigation pane, under Virtual Private Cloud, select Internet Gateways, and then do the following:
Click Create Internet Gateway.
Right-click, select Attach to VPC, and then select your VPC.
In Navigation pane, under Virtual Private Cloud, select Route Tables, and then select the route table with 1 Subnet.

At the bottom of the page, click the Routes tab, and then click Edit routes.
Click Add route, enter 0.0.0.0/0 as the destination, and then to set the target select the Internet gateway that you previously created.
At the bottom of the page, click the Subnet Associations tab.
Click Edit.
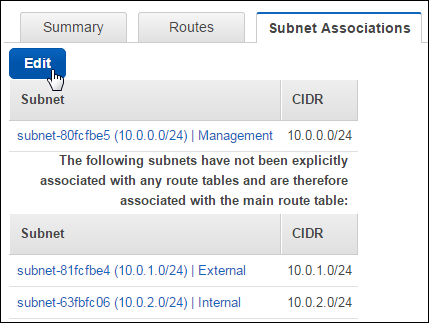
Select the check box for the external subnet,
10.0.1.0/24.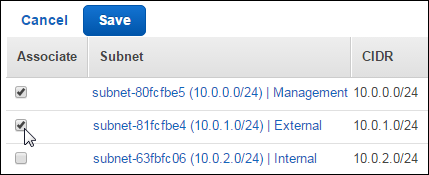
Click Save.
The management and external subnets are now explicitly associated with the route table.
Create security groups
Amazon security groups control the inbound and outbound traffic allowed by an EC2 instance.
You can create security groups based on your needs. This specific configuration uses three security groups: one for the BIG-IP Configuration utility, one for virtual server traffic, and one for internal traffic.
In AWS, from the Services menu at the top of the screen, select VPC.
In the Navigation pane, under Security, select Security Groups.
Click Create Security Group.
Create three groups associated with the VPC, based on the following information. Leave outbound traffic for each group as the default (all).
Purpose Type Protocol Source Management SSH
HTTPS
22
443
Administrator’s IP address on a secure network. You can choose My IP from the Source list to select your computer’s public IP address.
Administrator’s IP address on a secure network. You can choose My IP from the Source list to select your computer’s public IP address.
VirtualServer HTTP
HTTPS
80
443
Clients’ IP address range. InternalTraffic TCP
TCP
UDP
4353
6699
1026
An internal IP address, for example 10.0.0.0/16. BIG-IP VE uses these ports for config sync and failover.
Consult AWS documentation for complete details.
Deploy
Now deploy a BIG-IP VE instance and configure basic networking for it.
| Step | Task Description | |
|---|---|---|
| 1 | Deploy the BIG-IP VE instance | From the AWS Marketplace, choose an F5 BIG-IP VE image. Ensure you add an extra, external NIC.
|
| 2 | Create an internal network interface | You created NICs for the management and external subnets when you deployed the instance. You must create an internal NIC and reboot, so BIG-IP VE can recognize the new NIC.
|
| 3 | Create an Elastic IP for the BIG-IP Configuration utility | An EIP address is a publicly-routable address that provides access to the BIG-IP Configuration utility. If the BIG-IP VE reboots, stops, or terminates, the EIP address persists on that NIC.
|
| 4 | Add a secondary private IP address for the virtual server | This is the address BIG-IP VE will use for the virtual IP address.
|
| 5 | Create an Elastic IP for the virtual server | You must create an EIP address and associate it with the secondary private IP address of the external subnet. This will make the virtual server accessible from the Internet.
|
Deploy the BIG-IP VE instance
To create an EC2 instance of BIG-IP Virtual Edition (VE), you deploy a version of it from the Amazon Web Services (AWS) Marketplace.
Go to the AWS Marketplace.
In the Search AWS Marketplace field, type
F5 BIG-IPand then click GO.Click the version you want to deploy, and then click Continue.
Important: Choose the region where you created your VPC.
By the appropriate region, click Launch with EC2 Console.
Select an instance type.
Click Next: Configure Instance Details.
In the Number of Network Instances field, type
1.From the Network list, select your VPC.
From the Subnet list, select the management subnet:
10.0.0.0/24.
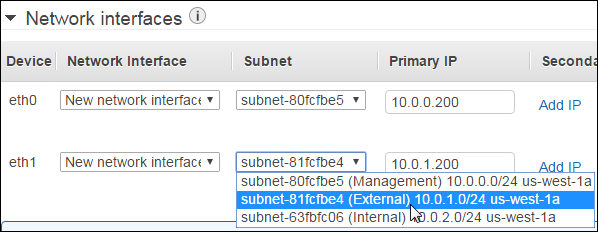
On the lower part of the screen, expand Network interfaces and click Add Device.
For eth0, type the IP address of
10.0.0.200. For eth1, select the external subnet, and type the primary IP address of10.0.1.200.Important: You must create the second interface (eth1) or BIG-IP VE will not install properly.
Click Next: Add Storage.
Click Next: Tag instance.
In the Value field, type a name for the instance. If you plan to create multiple BIG-IP VEs, then consider naming it, BIG-IP A.
Click Next: Configure Security Group.
For Assign a Security Group, select Select an existing security group and choose both Management and VirtualServer.
Click Review and Launch.
Confirm that all settings are correct, and then click Launch.
Select the key pair you created, select the acknowledgement check box, and click Launch Instances.
Click View Instances to view the new instance.
When the status in the Status Checks column has changed from Initializing to 2/2 checks passed, the instance is ready.
Important: Prior to BIG-IP VE 13.1.0.2, if you chose an hourly instance, you must associate an AWS Elastic IP address with the instance while it is launching, so the instance can register the license with F5. If the instance lacks internet access when it first boots, you must reboot the instance so it can connect to F5 for licensing.
Create an internal network interface
When you created the BIG-IP VE instance, you associated two network interfaces with it (one for management and one for external). To connect BIG-IP VE with your internal servers, create an internal network interface, and attach it to your BIG-IP VE instance.
In the AWS Management Console, from the Services menu at the top of the screen, select EC2.
In the Navigation pane, under NETWORK & SECURITY, select Network Interfaces.
Enter names for your existing network interfaces. In the list, there should be one interface for the NAT instance and two interfaces for BIG-IP VE. Use the values in the Primary private IP column to determine which NIC is for which subnet.
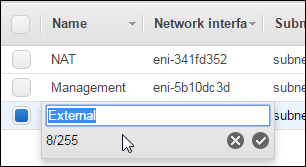
Click Create Network Interface and populate the appropriate fields.
Field Value Description InternalSubnet 10.0.2.0/24Private IP 10.0.2.200Security groups InternalTrafficClick Yes, Create.
AWS adds the network interface to the list.
Update the name in the list to
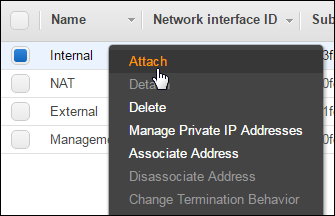
Internal.Right-click the new Internal network interface and select Attach.
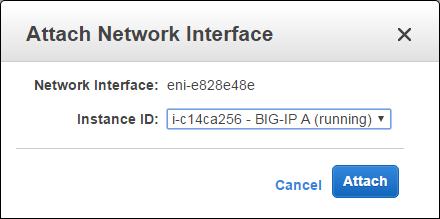
The Attach Network Interface popup screen opens.
From the Instance ID list, select the VE instance that you created and click Attach.
Important
You must now reboot the BIG-IP VE so that it can register the new NIC. To do this, right-click the instance in the Instances list and choose .
Create an Elastic IP for the BIG-IP Configuration utility
In order to access the BIG-IP Configuration utility from the Internet, the BIG-IP VE instance must have an Elastic IP (EIP) address associated with it. Hourly instances of BIG-IP VE prior to version 13.1.0.2 must also have internet access so that they can get a license from F5.
Note: EIPs are accessible to the Internet. Because of this, later you will set a strong password for the BIG-IP VE admin account, which you use to access the Configuration utility.
In the AWS Management Console, from the Services menu at the top of the screen, select EC2.
In the Navigation pane, under NETWORK & SECURITY, select Elastic IPs.
Click Allocate new address.
Click Allocate and then click Close.
Right-click the newly created EIP and select Associate address from the popup menu screen.
For Resource type select Network interface, for Network interface select the management NIC, and for Private IP select the management subnet’s private IP address,
10.0.0.200.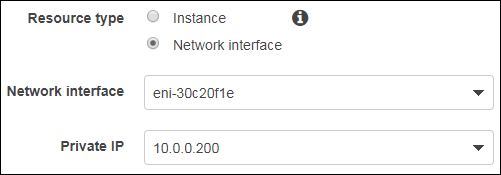
Click Associate.
Later, you will use this EIP to access the BIG-IP Configuration utility.
Add a secondary private IP address for the virtual server
Before you can create a virtual server, you must assign a secondary IP address to the external network interface. You will associate this secondary IP address with the BIG-IP VE virtual server address.
In the AWS Management Console, from the Services menu at the top of the screen, select EC2.
In the Navigation pane, under NETWORK & SECURITY, select Network Interfaces.
Identify the external network interface (the NIC that uses the 10.0.1.0 subnet).
Right-click the external network interface and click Manage IP Addresses.
Below the existing address, select Assign new IP.
Type
10.0.1.202for the address.Click Yes, Update.
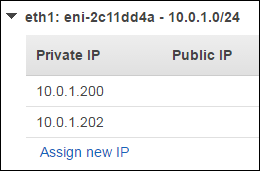
Click Cancel to close the dialog box.
The new IP address is in the Secondary private IPs column of the Network Interfaces screen. Later, you will enter this IP address in BIG-IP VE as the virtual server address.
Create an Elastic IP for the virtual server
Before you begin, note the secondary private IP address assigned to the external network interface. If you followed the steps in the previous task, the secondary private IP address is 10.0.1.202.
Now make the virtual server IP address (the secondary private IP address) accessible to the Internet by associating an Elastic IP (EIP) address with it.
- In the AWS Management Console, from the Services menu at the top of the screen, select EC2.
- In the Navigation pane, under NETWORK & SECURITY, select Elastic IPs.
- Click Allocate new address.
- Click Allocate, and then click Close.
- From the list of EIP addresses, right-click the newly created address, and select Associate address from the popup menu.
- Select the external network interface and the secondary IP address (
10.0.1.202). - Click Associate.
Configure
Finally, configure BIG-IP VE so that traffic passes through it to your application servers.
| Step | Task | Description |
|---|---|---|
| 1 | Set the admin password for BIG-IP VE | Before you can license and provision BIG-IP VE, use SSH and your key pair to connect to the instance and set a strong password.
|
| 2 | License BIG-IP VE | Use the admin account to log in to the BIG-IP Configuration utility (https://<ElasticIP>). If you have trouble accessing the Configuration utility, check the AWS security groups to ensure that they allow the appropriate traffic. |
| 3 | Provision BIG-IP VE | Enable the modules you need. |
| 4 | Create internal and external VLANs | These VLANs and their interfaces directly correspond to the AWS external and internal subnets and their interfaces.
|
| 5 | Create internal and external self IPs | These static IP addresses provide a way for application traffic to reach the BIG-IP system. These addresses should match the private IP addresses you assigned to the external and internal subnets in AWS.
|
| 6 | Create a pool and add members to it | Create a pool with pool members on the internal VLAN. |
| 7 | Create a virtual server | The virtual server provides a destination for your inbound web traffic and points to the pool of web servers. The destination IP address must match the secondary private IP address you assigned to the external subnet in AWS.
|
Set the admin password for BIG-IP VE
The first time you boot BIG-IP VE, you must connect to the instance and create a strong admin password. You will use the admin account and password to access the BIG-IP Configuration utility.
This management interface may be accessible to the Internet, so ensure the password is secure.
Connect to BIG-IP VE.
At the command prompt, navigate to the folder where you saved your ssh key and type:
ssh -i <private_key_file.pem> admin@<bigip_public_ip_address>If you prefer, you can open PuTTy and in the Host Name (or IP address) field, enter the external IP address, for example:
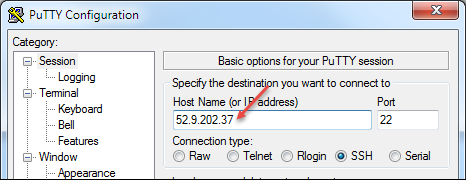
In the Category pane on the left, click .
In the Private key file for authentication field, choose your .ppk file.
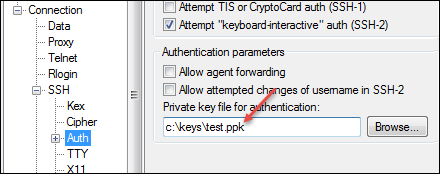
Click Open.
If a host key warning appears, click OK.
The terminal screen displays:
login as:.Type
adminand press Enter.
To change to the
tmshprompt, type:tmshModify the admin password:
modify auth password adminThe terminal screen displays the message:
changing password for admin
new password:
Type the new password and press Enter.
The terminal screen displays the message:
confirm passwordRe-type the new password and press Enter.
Ensure that the system retains the password change and press Enter.
save sys configThe terminal screen displays the message:
Saving Ethernet mapping...done
License BIG-IP VE
You must enter license information before you can use BIG-IP VE.
Open a web browser and log in to the BIG-IP Configuration utility by using
httpswith the external IP address, for example:https://<external-ip-address>. The username isadminand the password is the one you set previously.On the Setup Utility Welcome page, click Next.
On the General Properties page, click Activate.
In the Base Registration key field, enter the case-sensitive registration key from F5.
For Activation Method, if you have a production or Eval license, choose Automatic and click Next.
If you chose Manual, complete these steps:
In the Step 1: Dossier field, copy all of the text and then click Click here to access F5 Licensing Server.
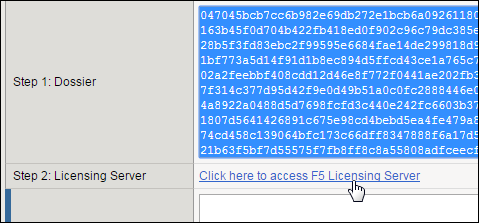
A separate web page opens.
On the new page, click Activate License.
In the Enter your dossier field, paste the text and click Next.
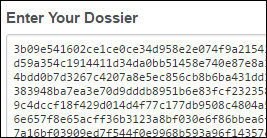
Accept the agreement and click Next.
On the Activate F5 Product page, copy the license text in the box. Now go back to the BIG-IP Configuration utility and paste the text into the Step 3: License field.
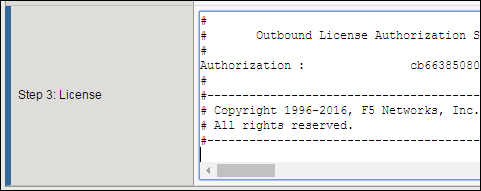
Click Next.
The BIG-IP VE system registers the license and logs you out. When the configuration change is successful, click Continue to provision BIG-IP VE.
Provision BIG-IP VE
You must confirm the modules you want to run before you can begin to work in the BIG-IP Configuration utility.
Open a web browser and log in to the BIG-IP Configuration utility.
On the Resource Provisioning screen, change settings if necessary and click Next.
On the Device Certificates screen, click Next.
On the Platform screen, in the Admin Account field, re-enter the password for the admin account and click Next.
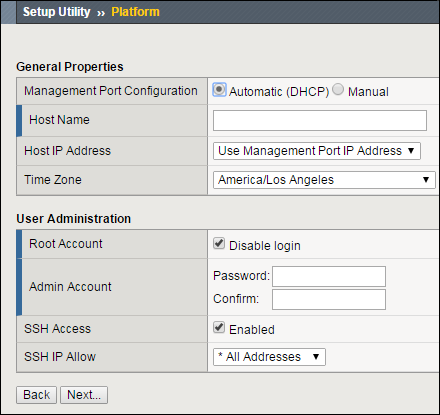
BIG-IP VE logs you out.
When you log back in, on the screen, in the Advanced Network Configuration area, click Finished.

Create internal and external VLANs
In BIG-IP VE, you must create an external and internal VLAN that corresponds to the AWS VPC subnets.
In the BIG-IP VE Configuration utility, on the Setup Utility Network page, under Advanced Network Configuration, click Finished.
On the Main tab, click .
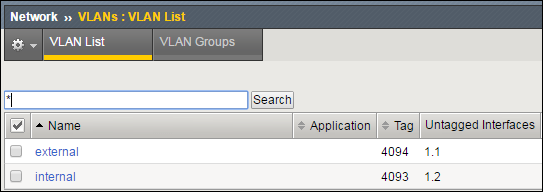
Click Create and populate the appropriate fields for the external VLAN.
Field Value Name externalInterface 1.1Tagging UntaggedClick Finished.
Now click Create again and populate the appropriate fields for the internal VLAN.
Field Value Name internalInterface 1.2Tagging UntaggedClick Finished.
The screen refreshes, and the two new VLANs are in the list.
Create internal and external self IPs
Before starting these steps, in AWS, note the primary private IP addresses for the external network interface (device index 1) and the internal network interface (device index 2).
Then in BIG-IP VE, create an external and internal self IP address, based on these private IP addresses.
In the BIG-IP VE Configuration utility, on the Main tab, click .
Click Create and populate the appropriate fields for the external self IP address.
Field Value Name ExternalSelfIPIP Address 10.0.1.200Netmask 255.255.255.0VLAN/Tunnel externalPort Lockdown Allow AllClick Repeat and populate the appropriate fields for the internal self IP address.
Field Value Name InternalSelfIPIP Address 10.0.2.200Netmask 255.255.255.0VLAN/Tunnel internalPort Lockdown Allow AllClick Finished.
The screen refreshes, and the two new self IP addresses are in the list.
Create a pool and add members to it
Traffic goes through BIG-IP VE to a pool. Your application servers should be members of this pool.
Open a web browser and go to the BIG-IP Configuration utility, using the public IP address on the management network, for example:
https://<external-ip-address>.On the Main tab, click .
Click Create.
In the Name field, type
web_pool. Names must begin with a letter, be fewer than 63 characters, and can contain only letters, numbers, and the underscore (_) character.For Health Monitors, move
httpsfrom the Available to the Active list.Choose the load balancing method or retain the default setting.
In the New Members section, in the Address field, type the IP address of the application server.
In the Service Port field, type a service port, for example,
443.Click Add.
The list now contains the member.
Add additional pool members as needed and click Finished.
Create a virtual server
You must create a virtual server for the secondary private IP address that’s associated with the external network interface. Application traffic goes to the Elastic IP (EIP) address associated with this BIG-IP VE virtual server.
In the BIG-IP Configuration utility, on the Main tab, click .
Click Create and populate the following fields.
Field Value Name A unique name Destination Address/Mask 10.0.1.202Service Port A port number or a service name from the Service Port list HTTP Profile http Source Address Translation Auto MapDefault Pool web_poolConfigure any other settings as needed and click Finished.
Traffic to the virtual server EIP address will now go to the pool members.