Amazon Web Services: Two-NIC F5 BIG-IP Virtual Edition
When you deploy F5® BIG-IP® Virtual Edition (VE) from the AWS Marketplace, if you don’t choose additional NICs, BIG-IP VE has a single NIC and only one available IP address. All traffic shares the single NIC.
If you prefer a configuration with multiple NICs and/or IP addresses, you can:
- Use a CloudFormation template and choose from the variety of supported templates.
- Create a three-NIC configuration manually by using these instructions.
- Create a two-NIC configuration manually by using the instructions on this page.
Share a NIC for management and data traffic
By default, BIG-IP VE uses eth0 for management traffic, and eth1 for data traffic.
To use two NICs in AWS and share eth0 for management and data traffic, you must change BIG-IP VE’s default behavior.
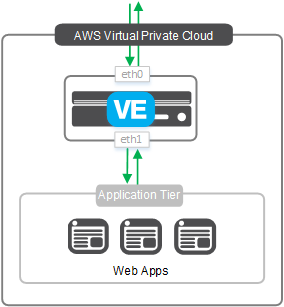
In this example, eth0 is for the external VLAN, and eth1 for the internal VLAN.
To create this configuration, complete the following steps.
Deploy BIG-IP VE from the AWS Marketplace.
During the deployment, on Step 3: Configure Instance Details, expand Network Interfaces and click Add Device to add a second NIC on the internal subnet. The first NIC should be on the external subnet.
When the instance has successfully launched, use SSH to connect, and ensure that you are at the
tmshprompt.Set this variable so that when BIG-IP VE boots, it sets eth0 as interface 1.0.
modify sys db provision.1nic value forced_enableConfirm that the value is correct.
list sys db provision.1nicThe result should be value
"forced_enable".BIG-IP VE automatically creates a VLAN named internal and an associated self IP address. Disable this functionality so you can create the VLAN and self IP address with the names you want. (For example, you can name the VLAN
external.)modify sys db provision.1nicautoconfig value disableConfirm that the value is correct.
list sys db provision.1nicautoconfigThe result should be
value "disable".Restart BIG-IP VE.
bigstart restartCreate the VLAN. You must do this step in tmsh.
create net vlan external interfaces add { 1.0 { untagged }}Create the self IP address. You must do this step in tmsh.
create net self external_ip address 10.9.0.10/24 vlan external allow-service defaultIn this example, the IP address is an address on your external subnet.
Create a gateway. You must do this step in
tmsh.create net route default gw 10.9.0.1In this example, the IP address is an address on your external subnet. Typically, this address ends in 1.
Save the configuration.
save sys configReboot BIG-IP VE.
reboot
When BIG-IP VE is available, you can open the Configuration utility and view the interfaces, self IP address, and VLAN you created. In this example, you would create an internal VLAN for the second NIC. You can also enable config sync now. You should not change the provision.1nic database variable value when you do.
In versions prior to 13.0, BIG-IP VE uses port 443 for management traffic by default. You should change the port if you want to use 443 for other traffic.