F5 BIG-IP Virtual Edition Accelerated Networking on Azure
F5 BIG-IP Virtual Edition (VE) supports Accelerated Networking (SR-IOV) on multi-NIC BIG-IPs for higher performance and lower latency. The Azure Marketplace listings lack Accelerated Networking enabled by default, but you can enable Accelerated Networking, programmatically or using the CLI or PowerShell.
Setup requirements
You require the following to programmatically enable Accelerated Networking:
BIG-IP VE 15.X and later
Consult this list of Virtual machine setups that support Accelerated Networking. Create a VM and attach the NIC.
Ensure the VM type selected supports the maximum bandwidth required (for example, 10G throughput requires using DS5_v2 with minimum 8vCPUs).
Standard_DS5_v2
- 16 vCPU
- 56 GB memory
- 112 Temp storage (SSD) GB
- 64 Max data disks
- 64000/512 (688) Max cached and temporary storage throughput: IOPS / MBps (cache size in GB)
- 51200/768 Max un-cached disk throughput: IOPS/MBps
- 8/12000 Max NICs/expected network bandwidth (Mbps)
To set up a multi-NIC VE, enable the
enableAcceleratedNetworkingattribute on the data plane NICs only. For a three-NIC deployment example, set the following:NIC for ETH0= ManagementNIC for ETH1= Dataplane (enable Accelerated Networking)NIC for ETH2= Dataplane (enable Accelerated Networking)
Consult this CLI example of programmatically setting that attribute when provisioning/attaching the NICs.
Consult this ARM template example of programmatically setting the
enableAcceleratedNetworkingattribute to true when provisioning/attaching the NICs.To enable Accelerated Networking on existing VMs, the VM must support Accelerated Networking and meet the previously listed and the following prerequisites:
- The VM must be a supported size for Accelerated Networking
- The VM must be a supported Azure Gallery image (and kernel version for Linux)
- All VMs in an availability set or VMSS must be stopped/de-allocated before enabling Accelerated Networking on any NIC
To verify that Accelerated Networking is enabled on your BIG-IP VE, do the following:
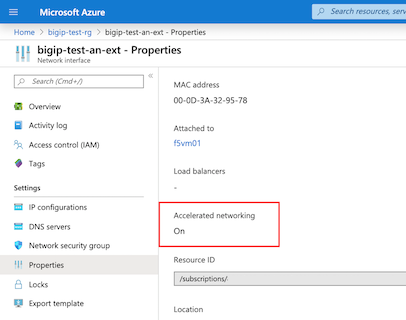
In Azure Portal navigate to Network Interface Properties and verify that the Accelerated networking setting is On:

To verify Accelerated Networking is functional, on the BIG-IP device use the following:
lspci– to confirm that Mellanox VF is exposed[azureuser@f5vm01:Active:Standalone] ~ # lspci 0000:00:00.0 Host bridge: Intel Corporation 440BX/ZX/DX - 82443BX/ZX/DX Host bridge (AGP disabled) (rev 03) 0000:00:07.0 ISA bridge: Intel Corporation 82371AB/EB/MB PIIX4 ISA (rev 01) 0000:00:07.1 IDE interface: Intel Corporation 82371AB/EB/MB PIIX4 IDE (rev 01) 0000:00:07.3 Bridge: Intel Corporation 82371AB/EB/MB PIIX4 ACPI (rev 02) 0000:00:08.0 VGA compatible controller: Microsoft Corporation Hyper-V virtual VGA 0002:00:02.0 Ethernet controller: Mellanox Technologies MT27500/MT27520 Family [ConnectX-3/ConnectX-3 Pro Virtual Function] 0003:00:02.0 Ethernet controller: Mellanox Technologies MT27500/MT27520 Family [ConnectX-3/ConnectX-3 Pro Virtual Function]
ethtool -S eth0 | grep vf_- to confirm activities on VF(s). NOTE: Theeth0is the management interface, which lacks the Accelerated Networking feature enabled, whereaseth1andeth2(also known as, external and internal) must show activities when Accelerated Networking is enabled.[azureuser@f5vm01:Active:Standalone] ~ # ethtool -S eth0 | grep vf_ vf_rx_packets: 0 vf_rx_bytes: 0 vf_tx_packets: 0 vf_tx_bytes: 0 vf_tx_dropped: 0 [azureuser@f5vm01:Active:Standalone] ~ # ethtool -S eth1 | grep vf_ vf_rx_packets: 8919 vf_rx_bytes: 21331943 vf_tx_packets: 24631 vf_tx_bytes: 8170778 vf_tx_dropped: 0 [azureuser@f5vm01:Active:Standalone] ~ # ethtool -S eth2 | grep vf_ vf_rx_packets: 12050 vf_rx_bytes: 32412309 vf_tx_packets: 19200 vf_tx_bytes: 5686869 vf_tx_dropped: 0
For more information, consult the Confirm that accelerated networking is enabled article.