F5 BIG-IP Next > Class 1: Introduction to BIG-IP Next DNS > Module 1: Introduction to BIG-IP Next DNS Source | Edit on
Lab 1.3 - Deploy Application with Global Resiliency
In this first exercise we will associate an application on a single instance with a Global Resiliency Group. This will enable us to resolve the name of the application using BIG-IP Next DNS.
Lab 1.3.1 - Open Firefox
First we will confirm that we do not have a DNS record for our application.
Within your UDF Deployment, go to the Firefox access method that is under the Ubuntu Jump Host
This will open an embedded Firefox browser session that is running inside the lab environment.

Inside the Firefox browser session go to https://gr.example.com
You should get an error that the name cannot be found
Lab 1.3.2 - Create Application
Navigate to Applications
Navigate to Applications by clicking the workspace switcher next to the F5 icon
Then click on Applications

Click on “Start Adding Apps”
- Name your application
Under “Application Service Name” name your application “gr_app” (keep the type “Standard”) and then click on “Start Creating”
Click on “Start Creating” (2nd time)
Click on the toggle next to “Enable Global Resiliency” (If you do not see “Enable Global Resiliency” make sure you have clicked on “Start Creating” again)
Click on “Configure” under “Global Resiliency is not configured”
Configure Global Resiliency
Note
You will see an option to use Global Availibility as a Load Balancing method. During Early Access Global Availability does not allow you to modify the order of the virtuals that are returned. During the lab we will use Round Robin.
Use the following values
Property Value Global Resiliency Group grgroup FQDN gr.example.com 
The click on “Save”
Click on the “Pools” tab
Use the following values
Property Value Pool Name gr_pool Service Port 8080 Click on the “Virtual Servers” tab
Select the “gr_pool”
Use the following values
Property Value Virtual Server Name gr_vs Virtual Port 443 Next to “Protocols & Profiles” click on the edit icon
Toggle on the “Enable HTTPS (Client-Side TLS)” radio button
Under “No Client-Side TLS” click on “Add”
Use the following values
Property Value Name wildcard RSA Certificate wildcard.example.com 
Click on “Save”
Click on “Save” again to return to the “Application Service Properties” screen
Click on “Review & Deploy”
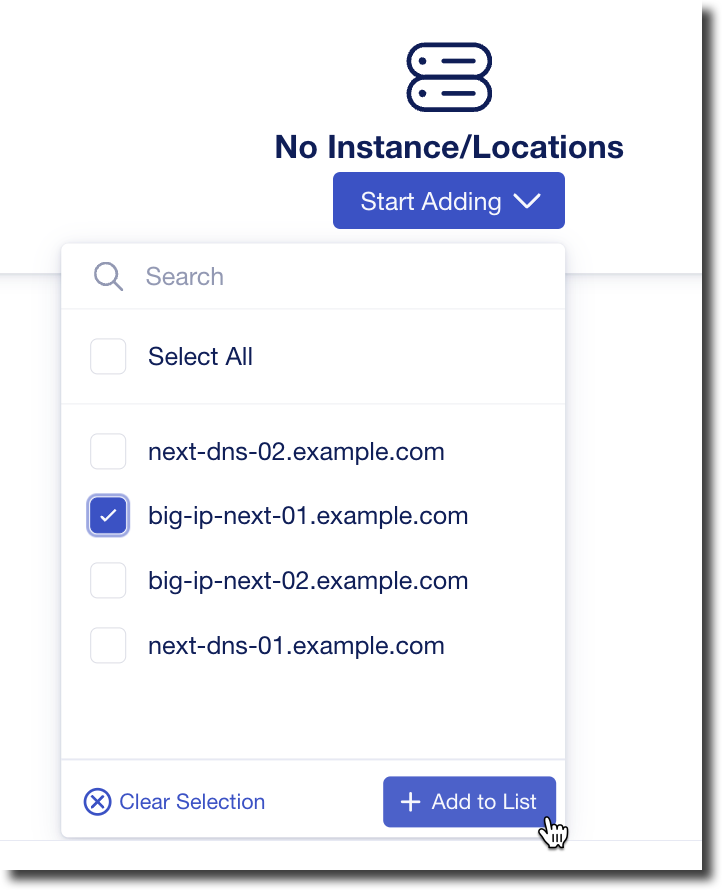
Under “No Instance/Locations” click on “Start Adding”
Note
During Early Access you cannot deploy an application on an instance that is hosting DNS
Select “big-ip-next-01” and click on “+Add to List”
Enter a Virtual Address
Enter the Virtual Address of “10.1.10.100”
Under “Members” click on the down arrow and select “+Pool Members”
Click on “+ Add Row”
Use the following values
Property Value Name node1 IP Address 10.1.20.101 Click on “Save” to return to the “Deploy” screen
Click on “Deploy Changes”
When prompted, press “Yes, Deploy”
Lab 1.3.3 - Re-open Firefox
Now we will verify our application is deployed with DNS
Within your UDF Deployment, go to the Firefox access method that is under the Ubuntu Jump Host
This will open an embedded Firefox browser session that is running inside the lab environment.
Inside the Firefox browser session go to https://gr.example.com (or press “Try Again”)
You should now see your application
