F5 Application Delivery Controller Solutions > Introduction to ADC Deployments with BIG-IP LTM > Module 1: BIG-IP LTM Basic Configuration Source | Edit on
Lab 3: Use SSL Offload, Best Practices, and iApps
In this lab you will create an HTTPS web application and use the BIG-IP SSL offload feature to free up CPU resources from the web servers. You’ll update the BIG-IP configuration by including some best practices. Finally you’ll re-create the HTTPS web application by using BIG-IP iApps.
Task 1 – Use SSL Offload
In the Configuration Utility, open the Pool List page and click Create.
Use the following information for the new pool, and then click Finished.
Form field Value Name https_pool Health Monitors https_443 New Members Node List: node1 (10.1.20.11) Service Port: 443 (Click Add) Node List: node2 (10.1.20.12) Service Port: 443 (Click Add) Node List: node3 (10.1.20.13) Service Port: 443 (Click Add) Open the Virtual Server List page and click Create.
Use the following information for the new virtual server, and then click Finished.
Form field Value Name https_virtual Destination Address/ Mask 10.1.10.20 Service Port 443 HTTP Profile http Acceleration > HTTP Compression Profile httpcompression Resources > Default Pool https_pool Use a new tab to access https://10.1.10.20.
The page fails to load. At this point the BIG-IP system is simply forwarding SSL requests to the downstream HTTPS web server without decrypting them first. This prevents the BIG-IP system from performing any HTTP functions (such as HTTP compression) which is why the page fails to load.
In the Configuration Utility, on the Virtual Server List page click https_virtual, and then for SSL Profile (Client) move clientssl to the Selected list.
For SSL Profile (Server) move serverssl-insecure-compatible to the Selected list, and then click Update.
Reload the https://10.1.10.20 page.
The page displays as expected.
Identify the protocol used in the URL, and the port used on the downstream server (in the Pool member address/port entry).
Although the BIG-IP system is now decrypting requests, it is re-encrypting before sending to the HTTPS web servers, which means they must perform the CPU-intensive task of decrypting requests and encrypting responses.
In the Configuration Utility, on the https_virtual page, for SSL Profile (Server) move serverssl-insecure-compatible back to the Available list, and then click Update.
Open the Resources page.

From the Default Pool list select http_pool, and then click Update.
Reload the https://10.1.10.20 page.
Identify the protocol used in the URL, and the port used on the downstream server (in the Pool member address/port entry).
The BIP-IP system is now performing SSL offload, sending all downstream requests using port 80. This means that the web servers no longer need to perform the CPU-intensive task of decrypting requests and encrypting responses.
Close the tab.
Task 2 – Configure BIG-IP Best Practices
Close the Configuration Utility, then open Internet Explorer and access https://10.1.10.240.
Currently the BIG-IP system can be accessed by the outside world using the external self IP address, which is not recommended.
Log into the BIG-IP system, and then open the Network > Self IPs page and click 10.1.10.240.
From the Port Lockdown list select Allow None, and then click Update.
Return to the Self IPs page.
Why are you now unable to access the BIG-IP system?
Close Internet Explorer, then open Chrome and access https://10.1.1.245 and then log into the BIG-IP system as admin / admin.
It is not recommended to use the default admin account.
Open the System > Users > Authentication page and click Change.
From the User Directory list select Remote – Active Directory.
Use the following information, and then click Finished.
Form field Value Host 10.1.20.251 Remote Directory Tree DC=f5demo,DC=com Bind DN CN=Service Account,OU=Corporate,DC=f5demo,DC=com Bind Password password Check Member Attribute Enabled (selected) Role Guest Open the Remote Role Groups page and click Create.

Use the following information, and then click Finished.
Form field Value Group Name F5Admins Line Order 10 Attribute String memberOf=CN=loraxadmins,CN=Users,DC=f5demo,DC=com Assigned Role Administrator Terminal Access tmsh Create another role group using the following information, and then click Finished.
Form field Value Group Name F5ResourceAdmins Line Order 15 Attribute String memberOf=CN=resadmins,CN=Users,DC=f5demo,DC=com Assigned Role Resource Administrator Terminal Access Disabled Create another role group using the following information, and then click Finished.
Form field Value Group Name F5Operators Line Order 20 Attribute String memberOf=CN=operators,CN=Users,DC=f5demo,DC=com Assigned Role Operator Terminal Access Disabled Open the System > Users > User List page.
Select the admin account and change the password to admin-pass and then click Update.
Log in as bigip_operator / password.
Notice the user’s role at the top of the page.

Open the Virtual Server List page and examine the Create button.
This user can view all virtual servers and other BIG-IP system objects, but can’t create or update objects.
Log out and then log back in as bigip_ra / password.
Notice the user’s role at the top of the page.
Open the Virtual Server List page.
This user and see and manage all virtual servers.
Open the System > Users > Authentication page and examine the Change button.
Log out and then log back in as bigip_admin / admin. (NOTE: You are intentionally logging in with the wrong password.)
Log in as bigip_admin / password.
Open the System > Logs > Audit > List page, and then sort the list by the Time column in descending order.
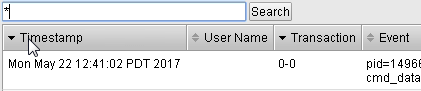
Examine the login and logout details for the three users.
You can see when each user logged in, logged out, and failed to login correctly.
Task 3 – Re-create the Application using iApp
Open the Virtual Server List page, then select the http_virtual and https_virtual checkboxes, and then click Delete twice.
Open the Pool List page, then select the http_pool and https_pool checkboxes, and then click Delete twice.
Open the Node List page, then select the node1, node2, and node3 checkboxes, and then click Delete twice.
Open the iApps > Application Services > Applications page and click Create.
Create an application using the following information, and then click Finished.
Form field Value User Name https_app Template f5.http Network > Do you want to use the latest TCP profiles? Yes SSL Encryption > How should the BIG-IP system handle SSL traffic? Terminate SSL from clients, plaintext to servers Virtual Server and Pools > What IP address do you want to use 10.1.10.20 FQDN www.f5demo.com Web servers 10.1.20.11: 80 (Click Add) 10.1.20.12: 80 (Click Add) 10.1.20.13: 80 Application Health > What HTTP URI /index.php Expected Response Welcome Open the Virtual Server List page.
iApp created two virtual servers for the web application. The port 80 virtual server is used to redirect requests to the port 443 virtual server.
Open the Pool List page.
iApp created a pool with three pool members and a monitor attached (which you can identify by it being identified as available).
Open the Monitors page and click https_app_http_monitor.
iApp created the custom HTTP monitor for the web application.
Use a new tab to access http://10.1.10.20.
Notice that the request is redirected to https. The requests are sent to the web servers on port 80, identifying that SSL offload is taking place.
Close the tab.