F5 Application Delivery Controller Solutions > Introduction to ADC Deployments with BIG-IP LTM > Module 1: BIG-IP LTM Basic Configuration Source | Edit on
Lab 4: Configure High-Availability
In this lab you will set up a high availability pair using two BIG-IP systems. You’ll then test failover between the two HA members.
Task 1 – Set up a Device Group
Open a new tab and click the BIGIP_B bookmark and then log into the BIG-IP system.
Note the status of both BIG-IP systems.

On bigipA.f5demo.com
- Open the Device Management > Device Trust > Device Trust Members page and click Add.
- In the Device IP Address field, type 10.1.1.246.
- Enter admin for the Administrator Username and Administrator Password.
- Click Retrieve Device Information.
- Click Device Certificate Matches.
- Verify that the Name value is bigipB.f5demo.com and click Add Device.
On bigipB.f5demo.com
Open the Device Management > Device Trust > Device Trust Members page.
This BIG-IP system sees bigipA.f5demo.com as a trusted peer.
Note the new status of both BIG-IP systems.

On bigipA.f5demo.com
Open the Device Management > Device Groups page and click Create. (ENSURE you are on bigipA.f5demo.com.)
Create a device group using the following information, and then click Finished.
Form field Value Name lorax_device_group Group Type Sync-Failover Members bigipA.f5demo.com bigipB.f5demo.com Sync Type Manual with Incremental Sync Note the new status of bigipA.f5demo.com.
Click Awaiting Initial Sync.
This directs you to the Device Management > Overview page.
In the Devices section, leave the bigipA.f5demo.com (Self) option selected.
For Sync Options leave Push the selected device configuration to the group selected and click Sync.
Note the status of bigipA.f5demo.com.
Both BIG-IP systems are now in sync with each other.
On bigipB.f5demo.com
Attempt to log in as admin / admin.
Why do you think your login failed?
Log in as bigip_admin / password.
Examine the Virtual Server List and Pool List pages.
Open the iApps > Application Services > Applications page and click https_app.
Open the Reconfigure page.
Add a new pool member for 10.1.20.14:80, and then click Finished.
Note the updated status of bigipB.f5demo.com.
Click Changes Pending.
In the Devices section leave the default options selected and click Sync.
On bigipA.f5demo.com
Examine the Pool List page.
The https_app_pool now contains 4 members.
Task 2 – Test Failover
On bigipA.f5demo.com
- Navigate to Local Traffic > Virtual Servers and right-click on Statistics and open the page in a new tab.
- In the statistics tab reset the statistics for all three virtual servers.
On bigipB.f5demo.com
Navigate to Local Traffic > Virtual Servers and right-click on Statistics and open the page in a new tab.
Use a new tab to access http://10.1.10.25.
Use both statistics tabs (click Refresh) to identify which BIG-IP system processed the incoming request.
In the Configuration Utility tab for bigipB.f5demo.com, open the Device Management > Traffic Groups page and click traffic-group-1.
For this traffic group the Current Device is bigipB.f5demo.com.
Click Force to Standby twice, and then view the value in the Active Device column.
In the Lorax Investments page, edit the URL to http://10.1.10.20, then use both statistics tabs to identify which BIG-IP system processed the incoming request.
On bigipA.f5demo.com
- In the Configuration Utility tab, open the Device Management > Devices page and click bigipA.f5demo.com (Self).
- Click Force Offline and then OK.
On bigipB.f5demo.com
- Note the status of bigipB.f5demo.com.
On bigipA.f5demo.com
- On the Devices page click Release Offline and then OK.
On bigipB.f5demo.com
- Note the status of bigipB.f5demo.com.
When bigipA.f5demo.com comes back online it doesn’t become the active device.
Task 3 – Create an Active / Active Pair
On bigipA.f5demo.com
Open the Device Management > Traffic Groups page and click Create.
Create a traffic group using the following information, and then click Create Traffic Group.
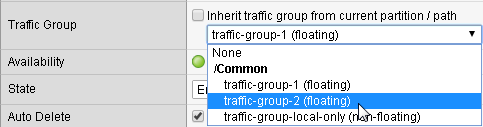
Form field Value Name traffic-group-2 Failover Method Preferred Device Order Preferred Order bigipA.f5demo.com bigipB.f5demo.com Open the Local Traffic > Virtual Servers > Virtual Address List page and click 10.1.10.25.
From the Traffic Group list select traffic-group-2 (floating), and then click Update.
Click Changes Pending.
Leave the default options selected and click Sync.
Note the status of both BIG-IP systems.
You now have an active / active pair.
Reset both statistics pages.
Access https ://10.1.10.20 and identify which BIG-IP processed the request.
Access http://10.1.10.25 and identify which BIG-IP is processed the request.
That concludes the hands-on exercises for the Introduction to ADC Deployments with LTM lab session.