F5 BIG-IQ Centralized Management Lab > BIG-IQ All Labs > Class 11: BIG-IQ DDoS Monitoring and Dashboard > Module 2: Configure DoS Profile Settings Source | Edit on
Lab 2.2: Creating and Applying a DoS Profile for a Virtual Server
Note
Estimated time to complete: 5 minutes
Lab environment access
If you have not yet visited the page Getting Started, please do so.
Tasks
For more granular DoS Settings, a DoS Profile can be created and applied to Virtual Servers which will then be viewed as Protected Objects under DoS Reporting. In this lab we will create a DoS profile for the DNS Virtual Server that detects and mitigates a sub-set of vectors at a lower rate then Device DoS.
First we will create and edit a new DoS Profile:
- Under Configuration > Security > Shared Security > DoS Profiles, click the Create button
- Under Properties, give the profile a unique name such as my_dos_profile
- Select Protocol DNS Security and check DNS Protection which enables all Attack Types to be viewed and edited
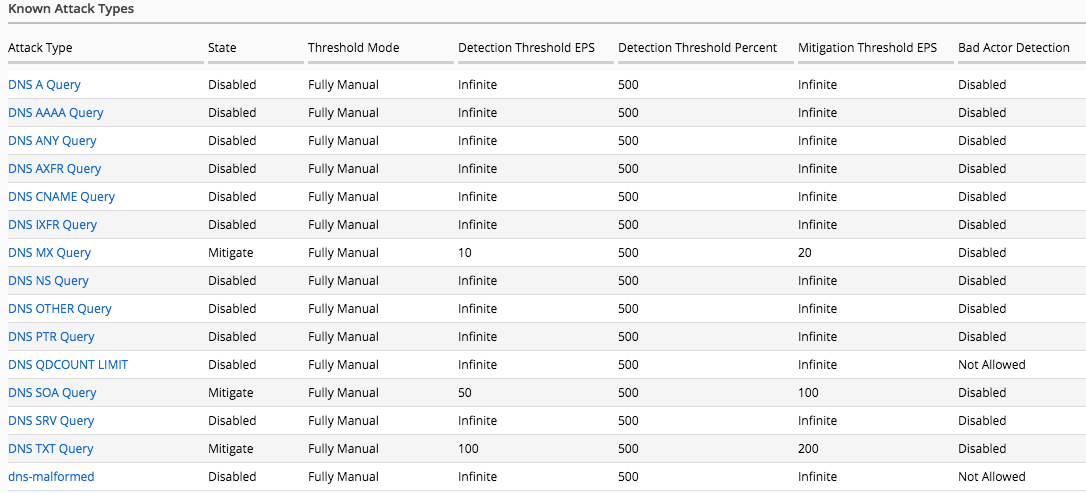
- Enable and set the SOA Query, MX Query, and TXT Query Vectors for manual detection with values shown in the image below

- Save and Close to return to the DoS Profiles
When using profiles on Virtual Servers, a logging profile should also be set. While different log profiles can be used, typcially the same publisher is used. Previously created only a new publisher, and set that on Device Dos. To use that same publisher on a Virtual Server, we must create a new Logging Profile and assign that publisher to it.
- Under Configuration > Security > Shared Security -> Logging Profiles click Create
- Give the profile a unique name such as my_dos_logging_profile
- From the DoS Protection tab, set the Status to enabled
- Set the Publisher to dos-remote-logging-publisher for DNS DoS Protection
- Save and Close changes
Now that the profiles are created, we assign it to the Virtual Server and Deploy all Changes
- Under Configuration > Security > Shared Security > Virtual Servers, click on the dnsListenerUDP Virtual for BOS-vBIGIP01
- Set the DoS Profile to the newly created one
- Set the Logging profile to the profile created above
- Save the changes as shown in the image below

Finally deploy the changes to both BOS BIG-IPs via Deployment > Shared Security