F5 Solutions for DDoS > Multilayer DDoS Protection > Module - Network Level DoS Protection Source | Edit on
Lab – Launching Network-Level Flood Attacks
The idea in this lab is to observe how poorly the application performs when the network is under attack.
Configure DHD Device Bandwidth Thresholds
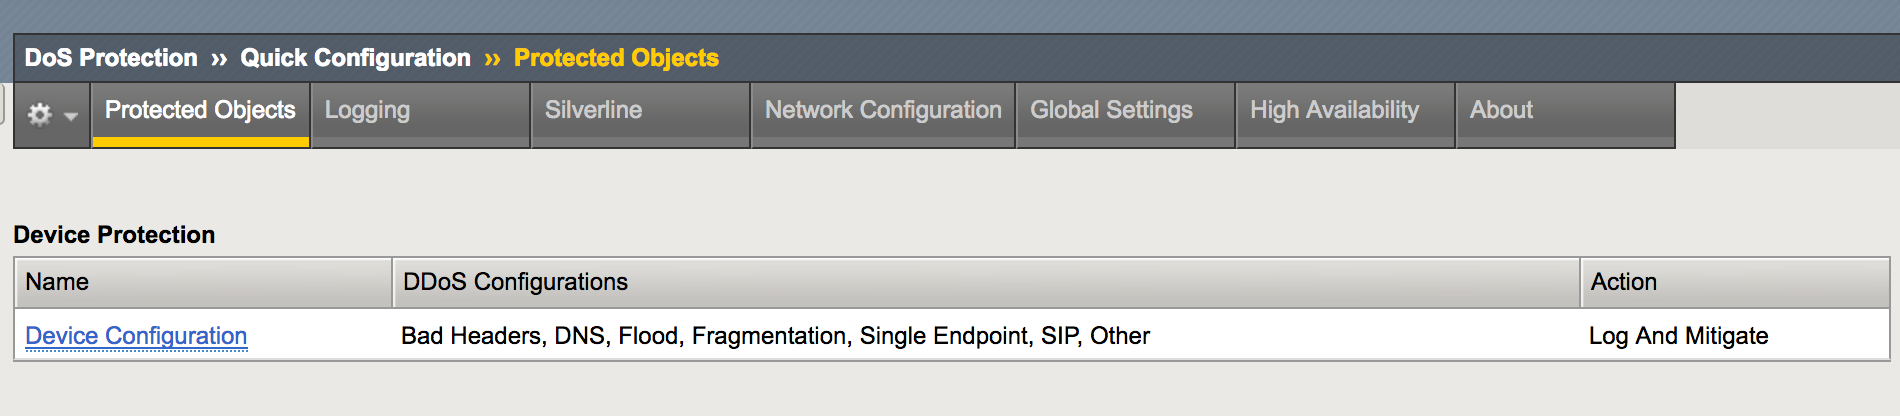
In the Configuration Utility, open the Protected Objects page.
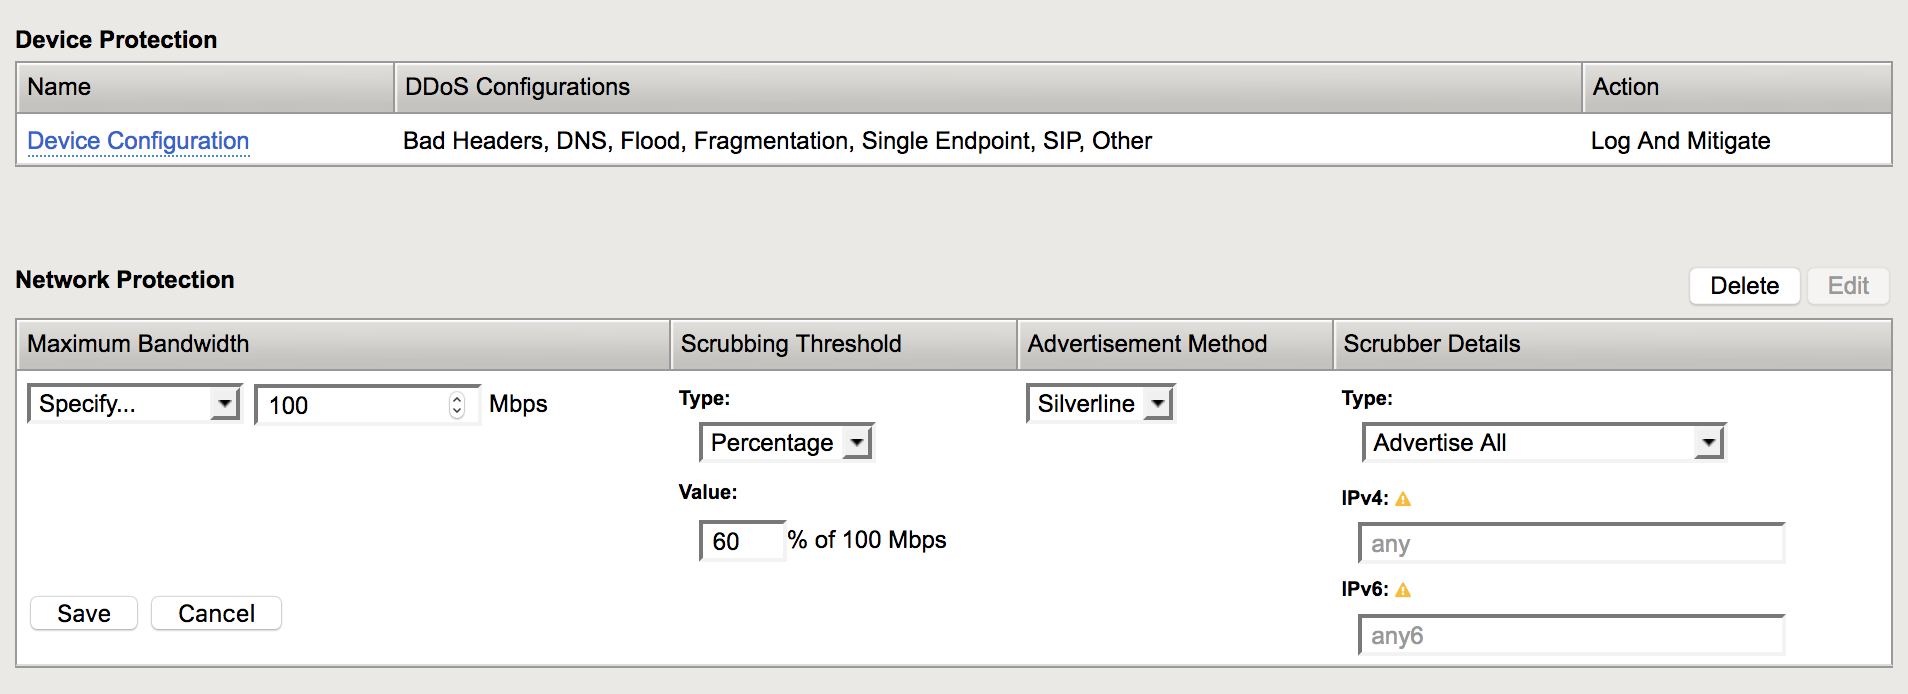
In the Network Protection section click Create.
Configure as follows then click Save.
Maximum Bandwidth: Specify 100 Scrubbing Threshold: Type Percentage Scrubbing Threshold: Value 60 Advertisement Method Silveline Scrubber Details: Type Advertise All
Turning Device-Level Protection off
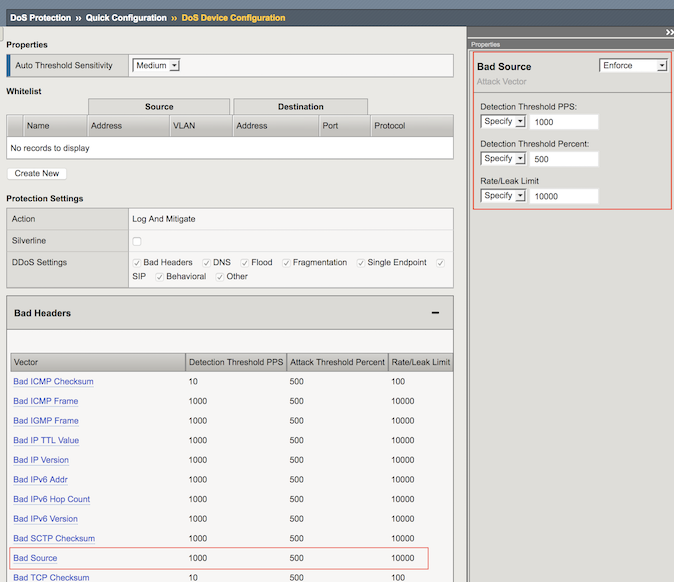
In the Configuration Utility, in the Device Protection section click Device Configuration.
In the Bad Headers row click the + icon, and then click Bad Source.
On the right-side of the page configure using the following information.
Detection Threshold PPS Infinite Detection Threshold Percent Infinite Rate/Leak Limit Infinite
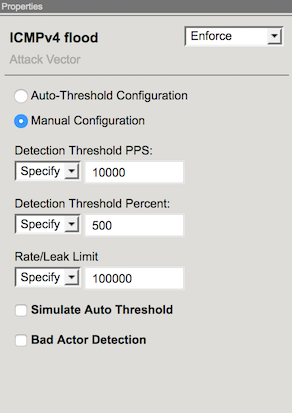
Now In the Flood row, click the + icon, and then click ICMPv4 flood.
On the right-side of the page configure using the following information.
Detection Threshold PPS Infinite Detection Threshold Percent Infinite Rate/Leak Limit Infinite
Apply the settings above for TCP SYN flood and UDP Flood.
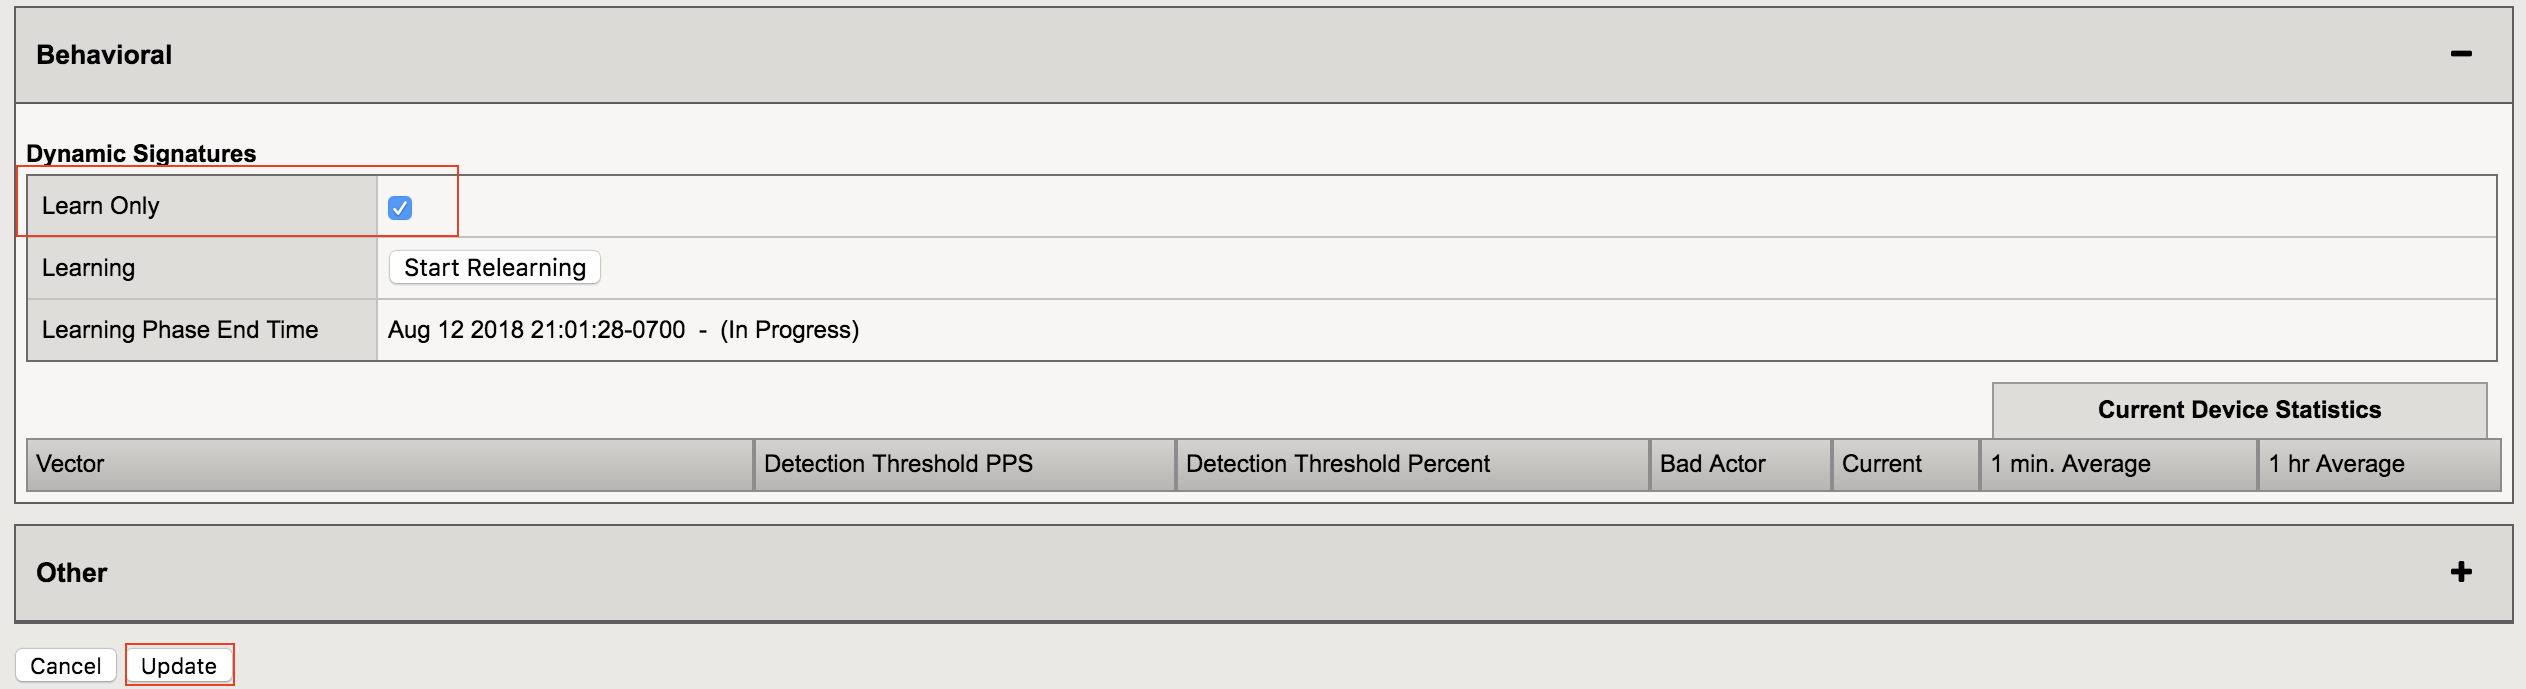
In the Behavioral row click on Learn Only, then click Update.
On the goodclient, start the network baselining (Let it running for the entire lab)
sudo ~/tools_agility_183/baseline_l4.shImportant
In order to assure best performance and good lab results, always use the management network ip addresses/hostnames for remote access (goodclient-mgmt, attacker-mgmt and lamp-mgmt)
f5student@goodclient:~$ cd ~/tools_agility_183/
f5student@goodclient:~/tools_agility_183$ ./baseline_l4.sh
/   status: 200     bytes: 3952     time: 0.016
/   status: 200     bytes: 3952     time: 0.019
/   status: 200     bytes: 3952     time: 0.014
/   status: 200     bytes: 3952     time: 0.014
/   status: 200     bytes: 3952     time: 0.018
/   status: 200     bytes: 3952     time: 0.221
/httprequest.php    status: 200     bytes: 699      time: 0.014
/httprequest.php    status: 200     bytes: 699      time: 0.014
Launch an ICMP flood Attack on the LAMP Server
Hint
The pentest tool can be used to send several types of DoS Attacks for the most part of the lab, few free to try it out. For some specific exercises there will be custom shell scrtips though.
sudo ~/tools_agility_183/pentest________ _______ _ _________ _______ ________ _ | ____ || ____ \| \ /|\__ __/| || ____ \| \ /||\ /| | | | || | \/| \ | | | | | || || || | \/| \ | || | | | | |____| || |__ | \ | | | | | || || || |__ | \ | || | | | | ______|| __) | |\ \| | | | | ||_|| || __) | |\ \| || | | | | | | | | | \ | | | | | | || | | | \ || | | | | | | |____/\| | \ | | | | | | || |____/\| | \ || |___| | |/ (_______/|/ \_| |_| |/ \||_______/|/ \_||_______| Welcome to pentmenu! Please report all bugs, improvements and suggestions to https://github.com/GinjaChris/pentmenu/issues This software is only for responsible, authorised use. YOU are responsible for your own actions! Please review the readme at https://raw.githubusercontent.com/GinjaChris/pentmenu/master/README.md before proceeding 1) Recon 2) DOS 3) Extraction 4) View Readme 5) Quit Pentmenu>
Hit option 2 (DOS), then 1 (ICMP Echo Flood)
Use Attack options as follows:
Enter target IP/hostname: server1 Enter Source IP: r (random) Now open two more terminal sessions with attacker and lamp servers respectively. On each screen open the bmon util for instant traffic stats.
eth1
Interfaces                   │ RX bps       pps     %│ TX bps       pps     %
lo                           │      0         0      │      0         0
eth0                         │     66B        1      │    545B        1
    qdisc none (pfifo_fast)  │      0         0      │    525B        1
->eth1                       │     77B        1      │   1.59MiB  39.63K
    qdisc none (pfifo_fast)  │      0         0      │   1.59MiB  39.63K
───────────────────────────────┴───────────────────────┴────────────────────────────────────────────────────────────
                            (RX Packtes/second)
    5.00 ....|..|.........|......|........................|..........
    4.17 ...|||||||...|...|.||.|||...........|||.......|..||.|.|...||
    3.33 ...||||||||..|..||||||||||..||.....|||||.....|||||||||||.|||
    2.50 ...||||||||..|..||||||||||..||.....|||||.....|||||||||||.|||
    1.67 .|||||||||||||.|||||||||||||||....|||||||...||||||||||||||||
    0.83 ||||||||||||||||||||||||||||||||.|||||||||..||||||||||||||||
        1   5   10   15   20   25   30   35   40   45   50   55   60
    K                     (TX Packtes/second)
    52.32 ..............||||....|.||..................................
    43.60 ||.|||||||||||||||||||||||||||||||||..||||||||.|||||||||||||
    34.88 ||||||||||||||||||||||||||||||||||||||||||||||||||||||||||||
    26.16 ||||||||||||||||||||||||||||||||||||||||||||||||||||||||||||
    17.44 ||||||||||||||||||||||||||||||||||||||||||||||||||||||||||||
        8.72 ||||||||||||||||||||||||||||||||||||||||||||||||||||||||||||
            1   5   10   15   20   25   30   35   40   45   50   55   60
Hint
Use either the RIGHT and LEFT arrow keys to move between Bps and pps metrics. Don’t forget selecting the right inteface using the UP/DOWN arrow keys. Attacker uses eth1 and Lamp uses eth4 for data traffic.
Open a terminal session with the DHD and use the tcpdump util to verify that ICMP attack traffic is passing through the device.
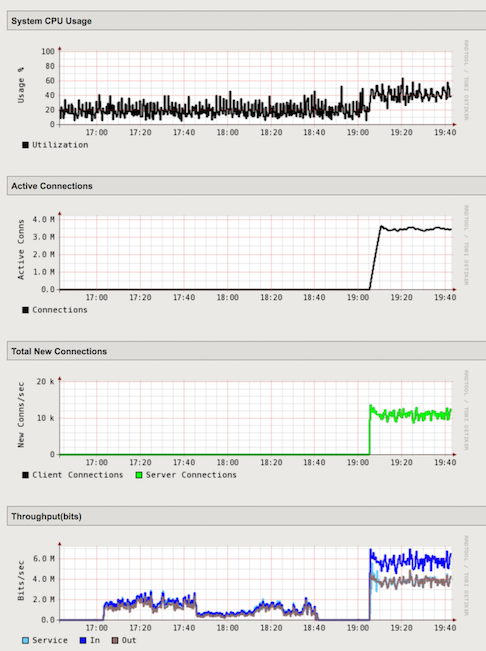
[root@dhd:Active:Standalone] config # tcpdump -i defaultVLANObserve the baseline running on goodclient. Since the flood attack is hitting the server hard, the legitimate client sessions are being degraded. Look at the statude code 000 for most requests.
In the Configuration Utility, open the Statistics-> Performance-> Performance page. As you can see, there is a drastic spike in the traffic.
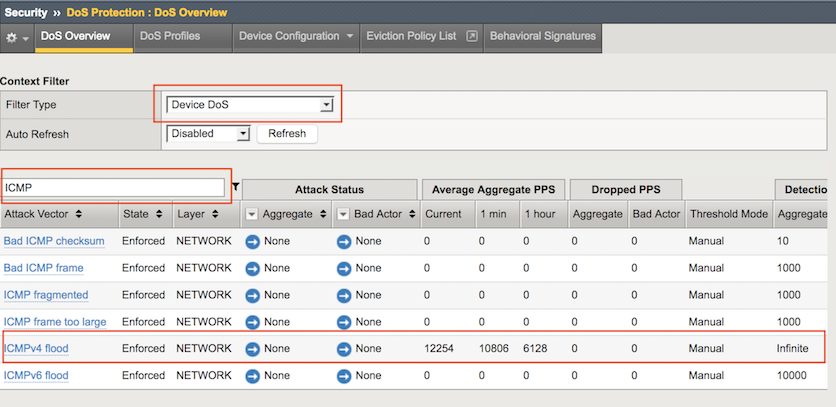
Open the Security-> DoS Protection-> DoS Overview page.
In the Filter Type field select Device DoS. Then on the left corner search for ICMP.
Review the statistics for Current, 1 min. Average, and 1 hr Average.
- Open the Security-> Event Logs-> DoS-> Network-> Events page.
The log file is empty as we disabled device-level flood protection on BIG-IP DHD.
From the attacker terminal session type Ctrl + C to stop the ICMP flood.