F5 Solutions for DDoS > Multilayer DDoS Protection > Module - Network Level DoS Protection Source | Edit on
Lab - Configure Hybrid Defender Flood Protections
This lab teachs you on how to configure DoS protection for common network-level DoS vectors.
Configure Protected Object-Level IPv4 Flood DHD DoS Protection
Configure object-level IPv4 ICMP flood protection, and then issue an ICMP DoS flood and review the results.
On the Protect Objects page, in the Protected Objects section click Create.
Configure a protected object using the following information, and then click Create:
Name: ServerNet IP Address: 10.1.20.0/24 Port: any Protocol All Protocols Protec. Settings Action: Advertise All Protec. Settings DDoS: IPv4 In the IPv4 row click the + icon, and then click ICMPv4 flood
On the right-side of the page configure using the following information, and then click Create.
Detection Threshold PPS: Specify: 1000 Detection Threshold Percent: Infinite Rate/Leak Limit: Specify: 1000 Important
From now on, make sure you have an always-on terminal session with both the attacker and LAMP servers. Let them running the bmon utility, or a tcpdump. Those will provide instant and detailed visibility of the ammount of packets comming in/out of both virtual machines.
From the attacker terminal session launch an ICMPv4 DoS attack using the Pentmenu tool (Options 2, 1) as follows:
target IP/hostname: server1 source IP: r[random] Check out the LAMP terminal session and observe how many ICMP packets are hitting this server.
Before moving on, wait the attack to run for about 30 seconds or so
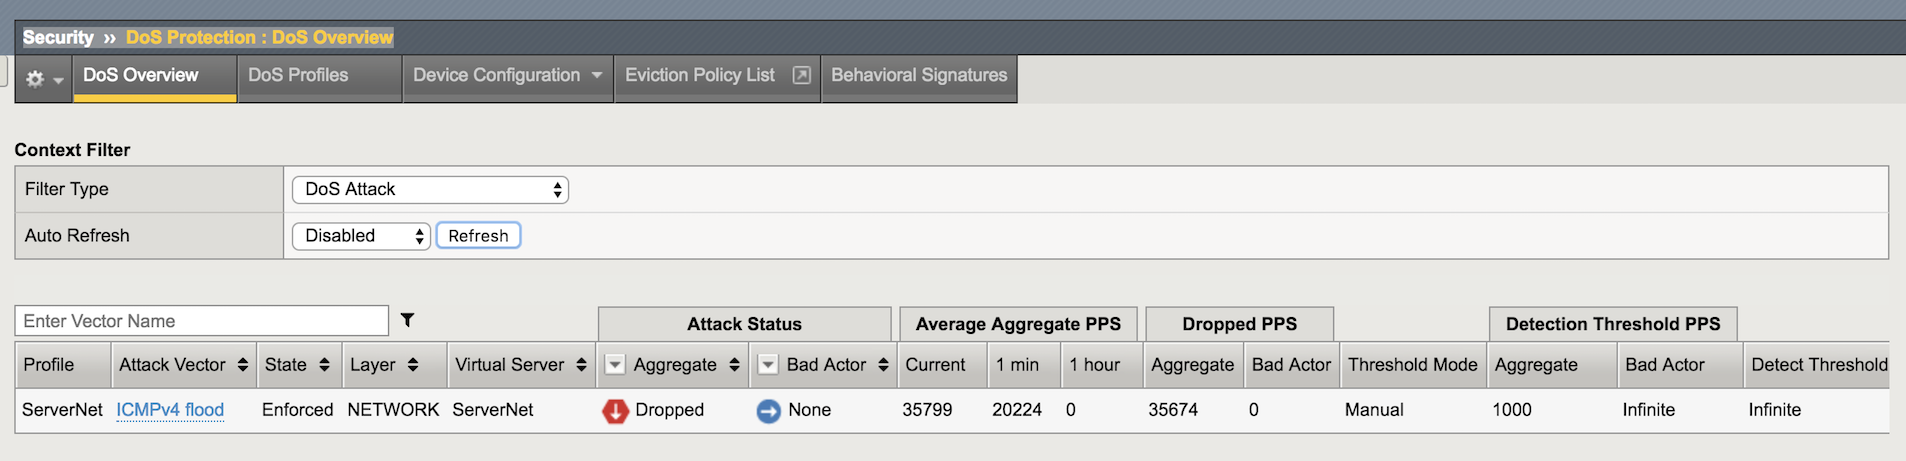
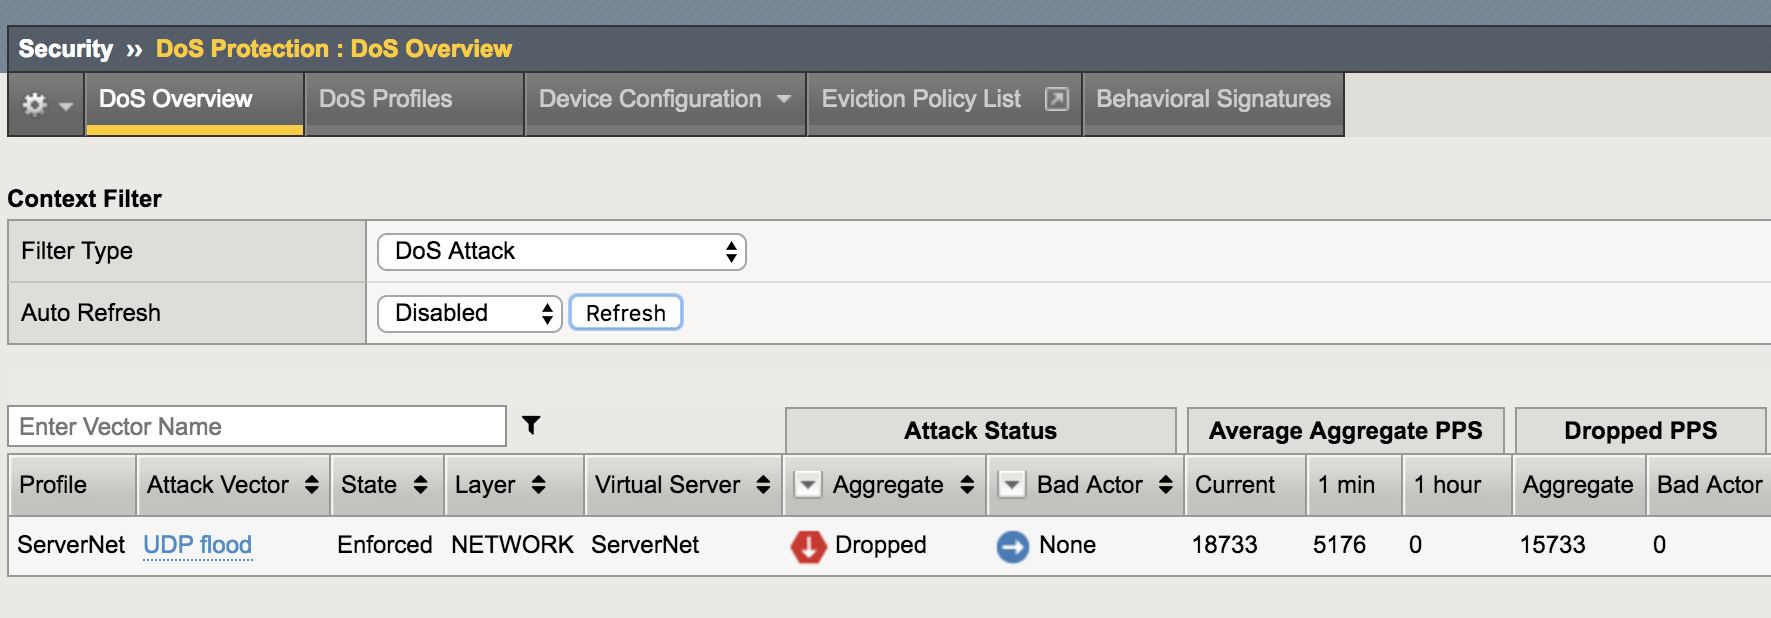
In the Configuration Utility go to Security-> DoS Protection-> DoS Overview. You should be able to see the DHD stopping the Attack.
Now stop the Attack with Ctrl + C.
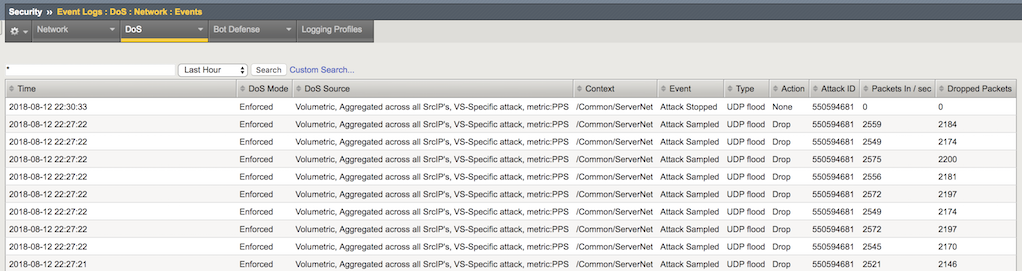
Open the Security-> Event Logs-> DoS-> Network-> Events page.
The DoS Source is Volumetric, Aggregated across all SrcIP’s, VS-Specific attack, metric:PPS.
- The virtual server column displays /Common/ServerNet, identifying this is a protected object.
- The type is ICMPv4 flood.
- The action is Drop.
Now check out the Security-> Event Logs-> DoS-> Network-> Events Page.
The DHD was able to detect the moment the attack started and stopped, along with all volumetric info.
Configure Protected Object-Level UDP Flood Attack Protection
Configure object-level DoS UDP flood protection, and then issue an UPD flood and review the results.
From the attacker terminal session launch an UDP flood attack using the Pentmenu tool (Options 2, 7) as follows:
target IP/hostname: server2 target port (defaults to 80): default [ENTER] random string (data to send): F5Agility2018 source IP: r[random] Let the attack run for about 30 seconds before moving on.
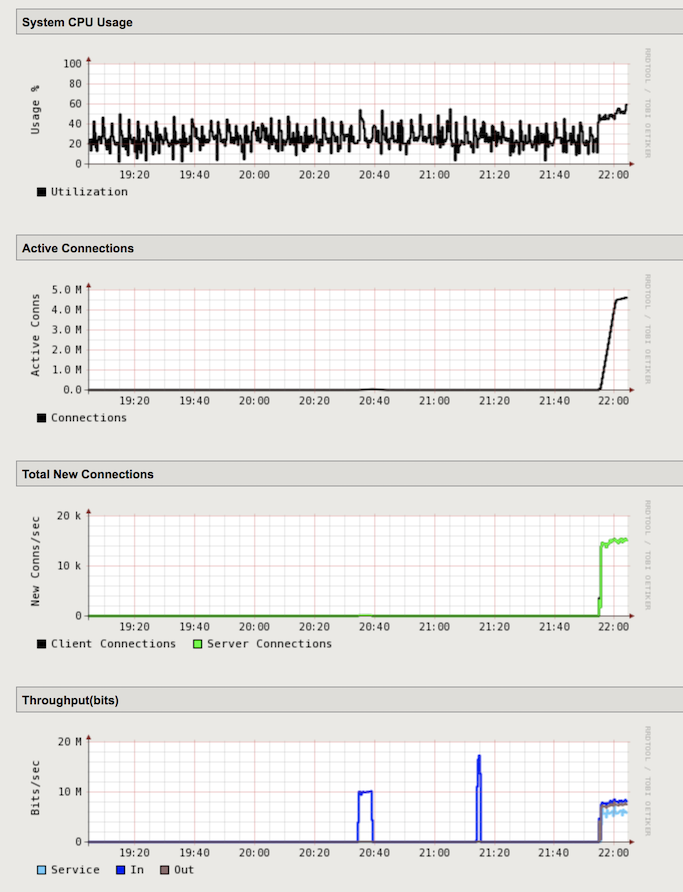
In the Configuration Utility, open the Statistics-> Performance-> Performance page. There is a spike in connections and throughput. The BIG-IP system is being hit with the UDP flood attack.
Open the DoS Protection-> Quick Configuration page and in the Protected Objects section click ServerNet.
In the DDoS Settings row click the UDP checkbox. In the UDP row click the + icon, and then click UDP Flood.
On the right-side of the page configure using the following information, and then click Update.
Detection Threshold PPS: Specify: 1000 Detection Threshold Percent: Infinite Rate/Leak Limit: Specify: 3000 From the Attacker terminal session launch a new UDP flood attack using the same options and values as previously in this task.
Let the attack run for about 30 seconds before moving on.
In the Configuration Utility, click Security-> DoS Protection-> DoS Overview. You should be able to see the DHD stopping the DNS Attack.
Now stop the Attack with Ctrl + C.
Open the Security-> Event Logs-> DoS-> Network-> Events page.
- In one minute or so, the virtual server column displays /Common/ServerNet, identifying this is protected object.
- The type is UDP flood.
- The action is Drop.
Configure Bad Actor Detection
Add bad actor detection for the UDP flood protection
In the Configuration Utility, open the DoS Protection-> Quick Configuration page and in the Protected Objects section click ServerNet.
In the UDP row click the + icon, and then click UDP Flood.
On the right-side of the page configure using the following information, and then click Update.
Bad Actor Detection: Yes (selected) Per Source IP Detection (PPS): Specify: 100 Per Source IP Rate Limit (PPS): Specify: 30 Blacklist Attacking Address: Yes (selected) Detection Time: 30 Duration: 60 From the attacker virtual machine launch an UDP flood attack using a single IP address [Pentmenu tool - Options 2, 7]:
target IP/hostname: server4 target port (defaults to 80): 53 random string (data to send): F5Agility2018 source IP: i[interface] Let the attack run for like 30s seconds before moving on.
Stop the attack with Ctrl + C.
Now try to ping the server4. Try to ping the same address from the goodclient virtual machine. Does it work ???
Stop the Attack with Ctrl + C and move to the next exercise.
Configure Protected Object-Based Sweep Protection
In the Configuration Utility, open the DoS Protection-> Quick Configuration page and in the Protected Objects section click ServerNet.
In the DDoS Settings row click the Sweep checkbox.
In the Sweep row click the + icon, and then click Sweep.
On the right-side of the page configure using the following information, and then click Update.
Detection Threshold PPS: Specify: 1000 Rate/Leak Limit: Specify: 3000 Packet Types: Move All IPv4 to the Selected field On the attacker machine type (or copy and paste) the following command:
sudo ./sweep.shLet the attack run for like 30s seconds before moving on.
Stop the attack with Ctrl + C.
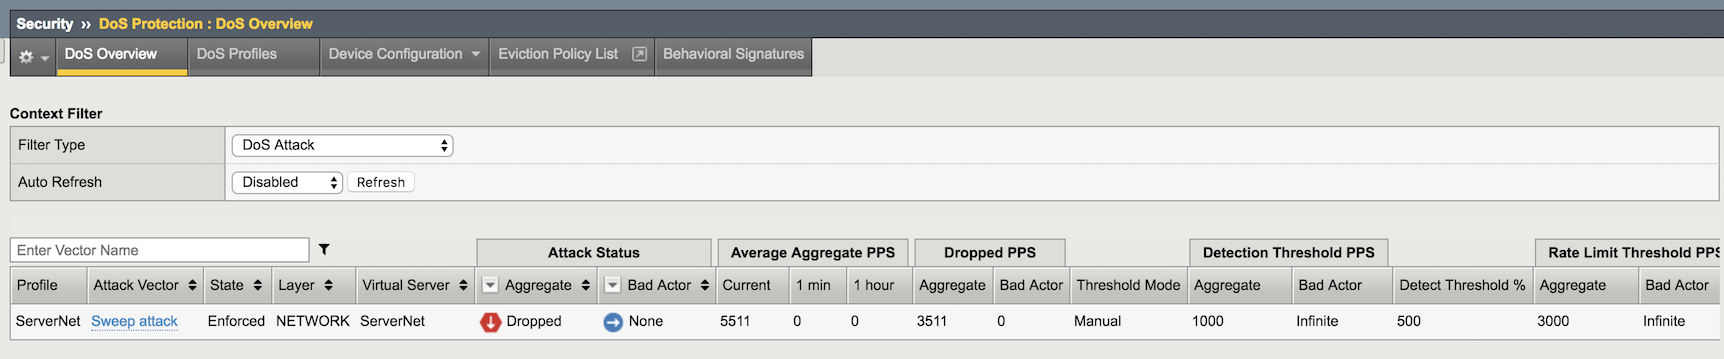
In the Configuration Utility, click Security-> DoS Protection-> DoS Overview. You should be able to see the DHD stopping the Sweep attack.
Check out the DoS Visibility Page
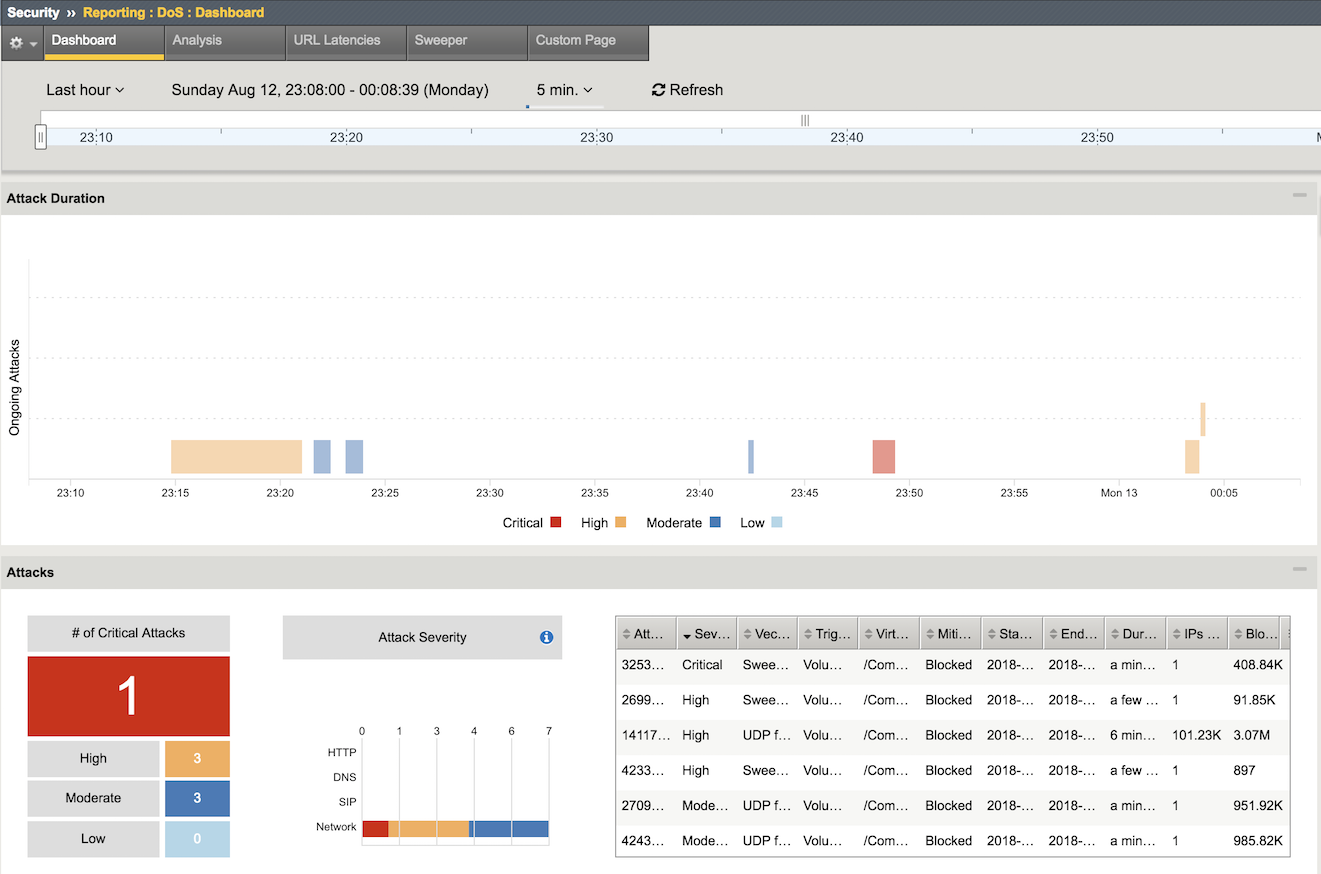
Use the DoS Visibility page to view statistics about the DoS attacks you submitted during this exercise.
Mouse over several of the attacks to get additional details of each attack.
Scroll down in the left-side of the page to view the Attacks section.
You can see the number of high, moderate, and low attacks in addition to the types of attacks (HTTP, ICMP, etc.) and the severity levels.
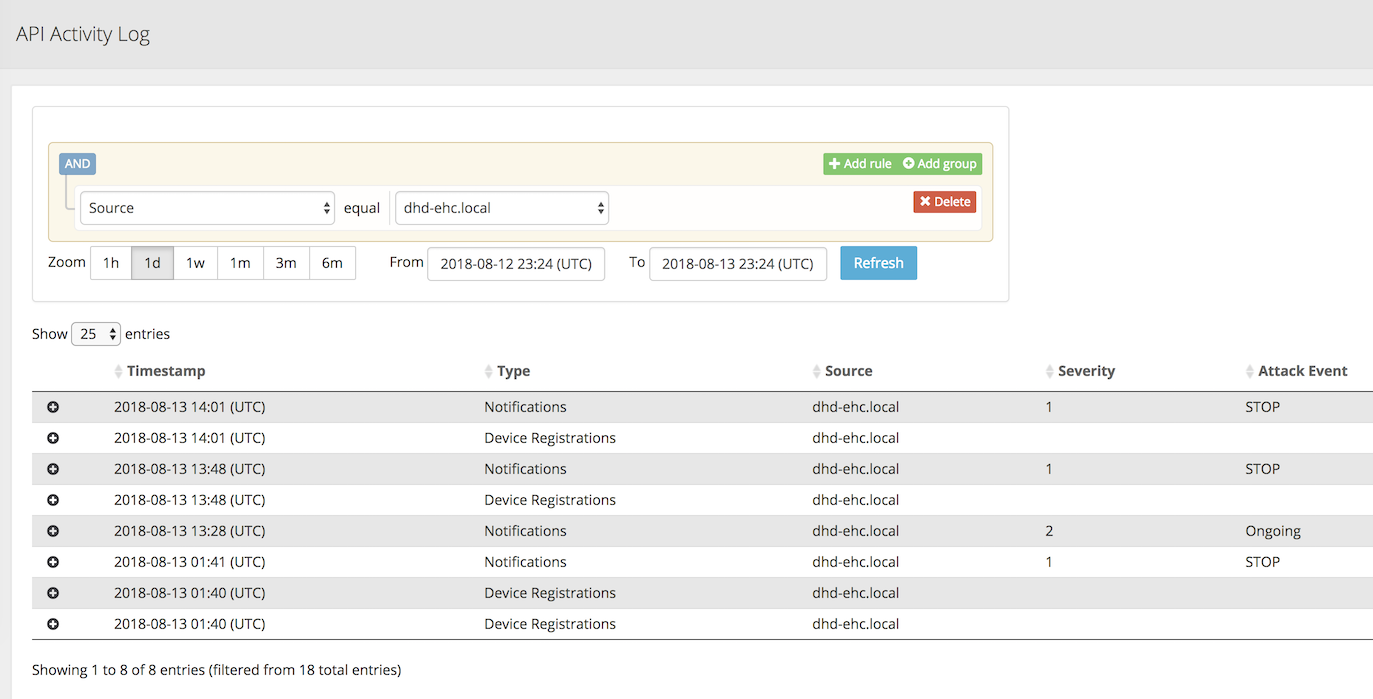
Check out the Silverline Portal
Use the Silverline portal to view details about the attacks launched in this exercise.
Access the Silverline Portal https://portal.f5silverline.com
Open the Audit-> API Activity log page.
Enter the hostname of your DHD device in the Search field and then check out the activity your Hybrid Defender device has reported back to the Silverline Scrubing Center.