Lab 1: Access Guided Configuration - Per Request Policy
The purpose of this lab is to leverage Access Guided Configuration (AGC) to
deploy an Identity Aware Proxy extended by Per Request Policies (PRP) access
controls. The Per Request Policies will restrict access based on AD Group
Membership and the URI accessed. Students will configure the various aspects
of the application using strictly AGC, review the configuration and perform
tests of the deployment.
Objective:
- Gain an understanding of Access Guided Configurations and
its various configurations and deployment models
- Gain an initial understanding of Per Request Policies and their applicability
in various delivery and control scenarios
Lab Requirements:
- All Lab requirements will be noted in the tasks that follow
- Estimated completion time: 30 minutes
Lab 1 Tasks:
TASK 1: Intialize Access Guided Configuration (AGC)
Login to your provided lab Virtual Edition: bigp1.f5lab.local
Navigate to: Access -> Guided Configuration
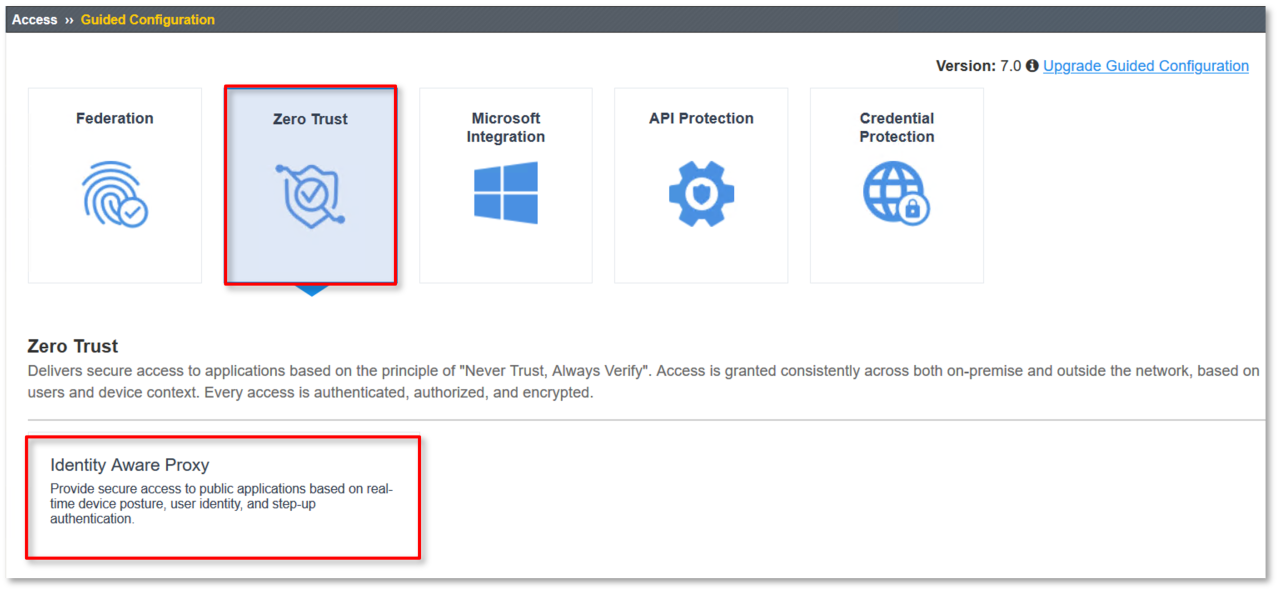
Click the Zero Trust graphic as shown.
Click on the Identity Aware Proxy dialogue box click under Zero Trust
in the navigation as shown.
|
 |
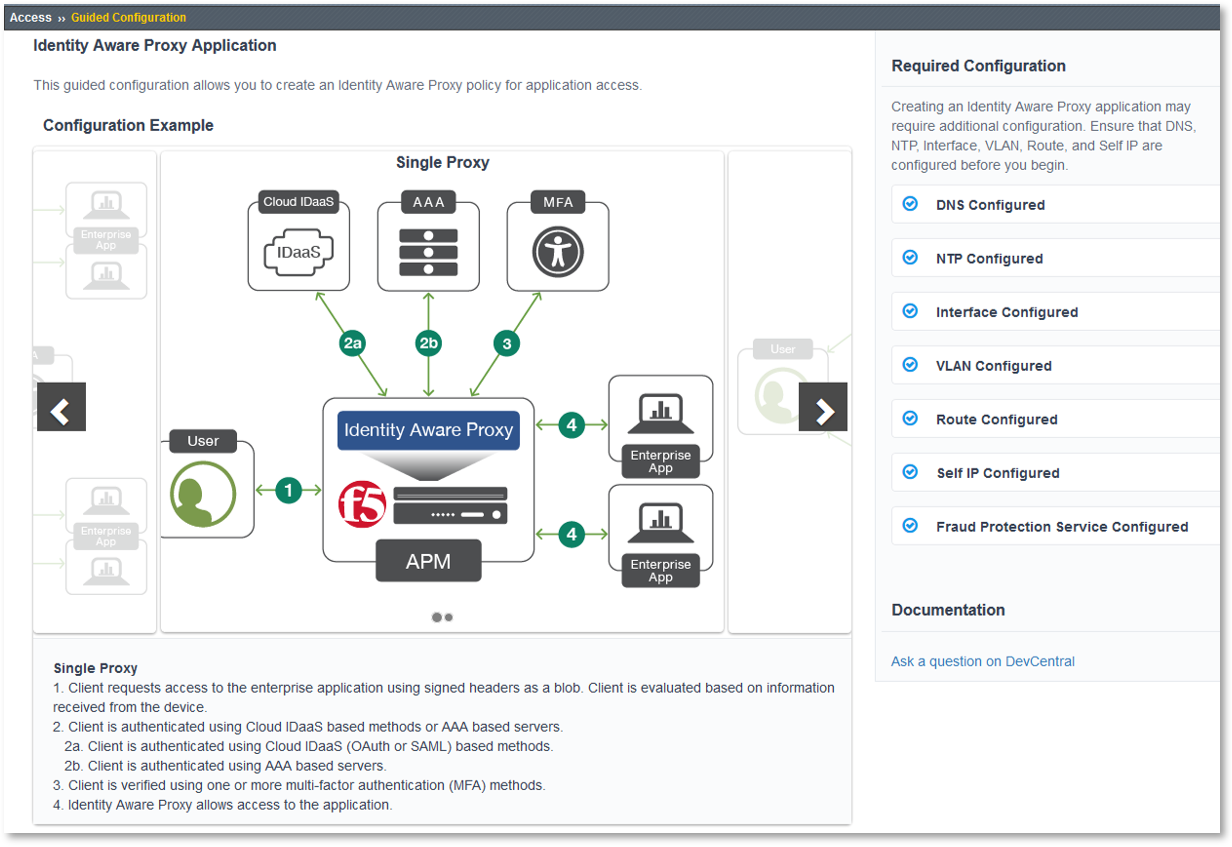
Review the Identity Aware Proxy Application configuration example presented.
Scroll through and review the remaining element of the dialogue box to the bottom of the
screen and click Next.
|

|
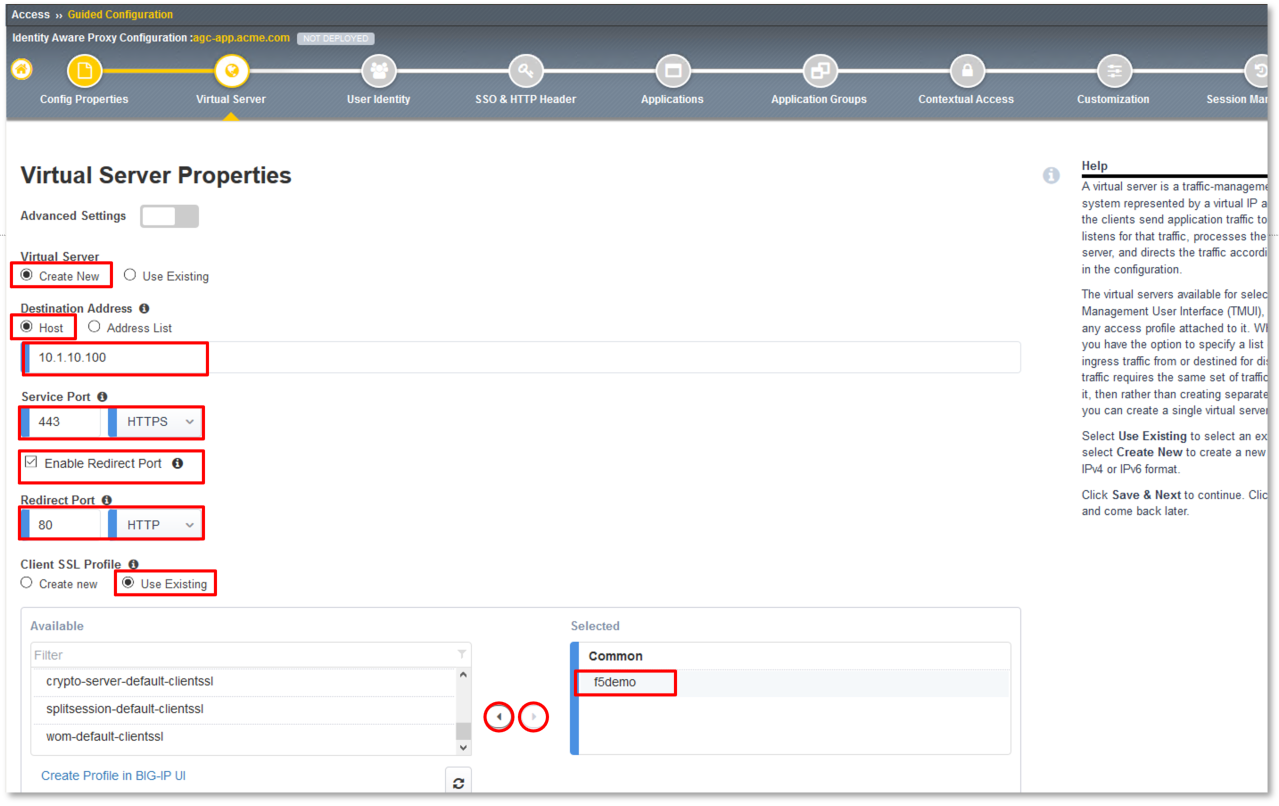
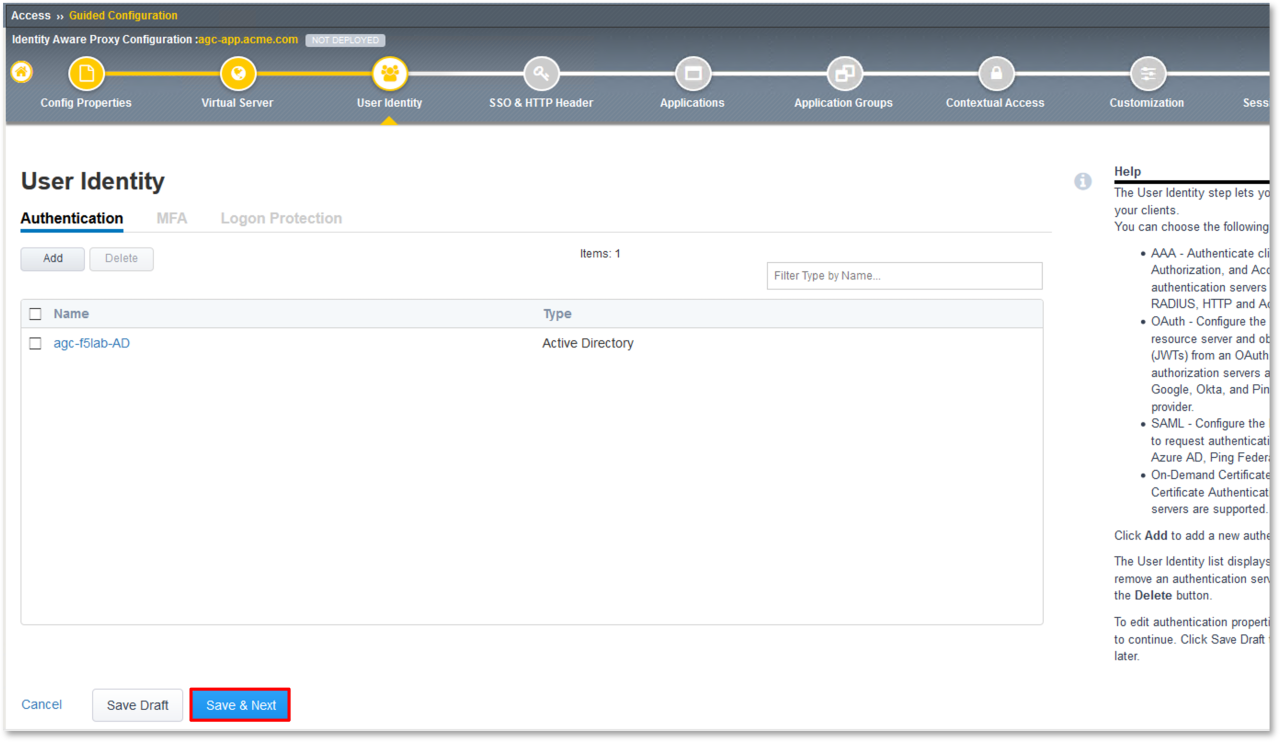
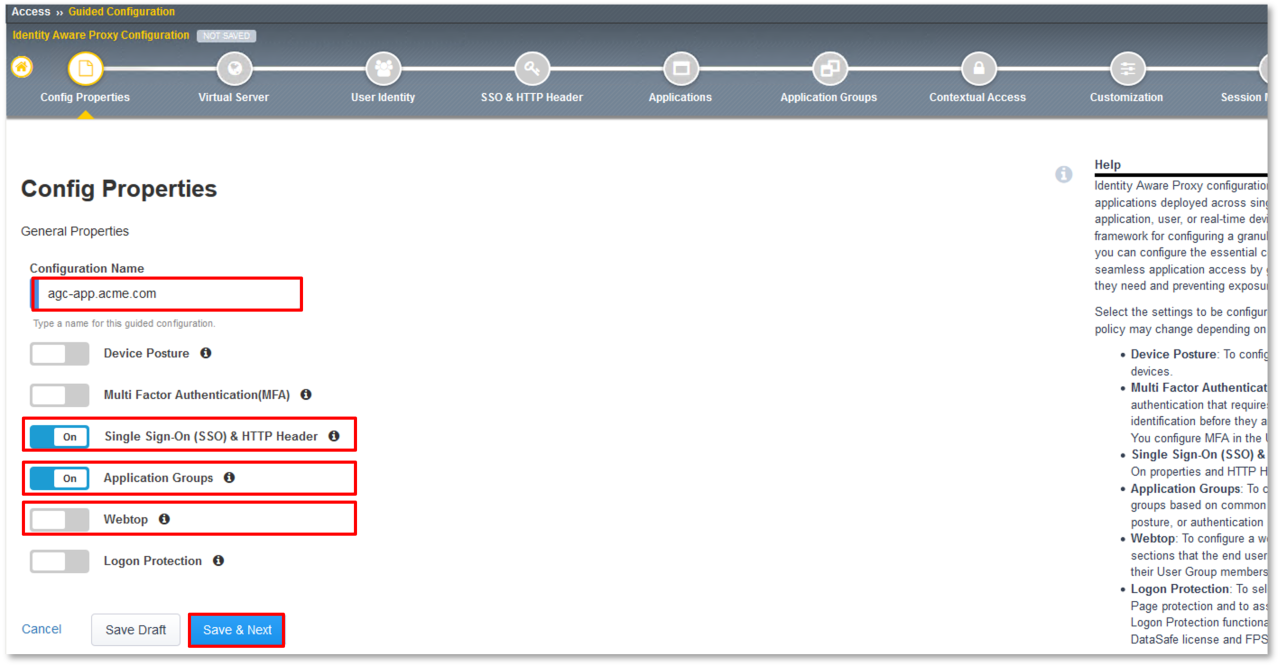
TASK 2: Config Properties
- In the Configuration Name dialogue box, enter agc-app.acme.com.
- Toggle Single Sign-On (SSO) & HTTP Header to the On position.
- Toggle Application Groups to the On position.
- Toggle Webtop to the Off position.
- Click Save & Next at the bottom of the dialogue window.
|
 |
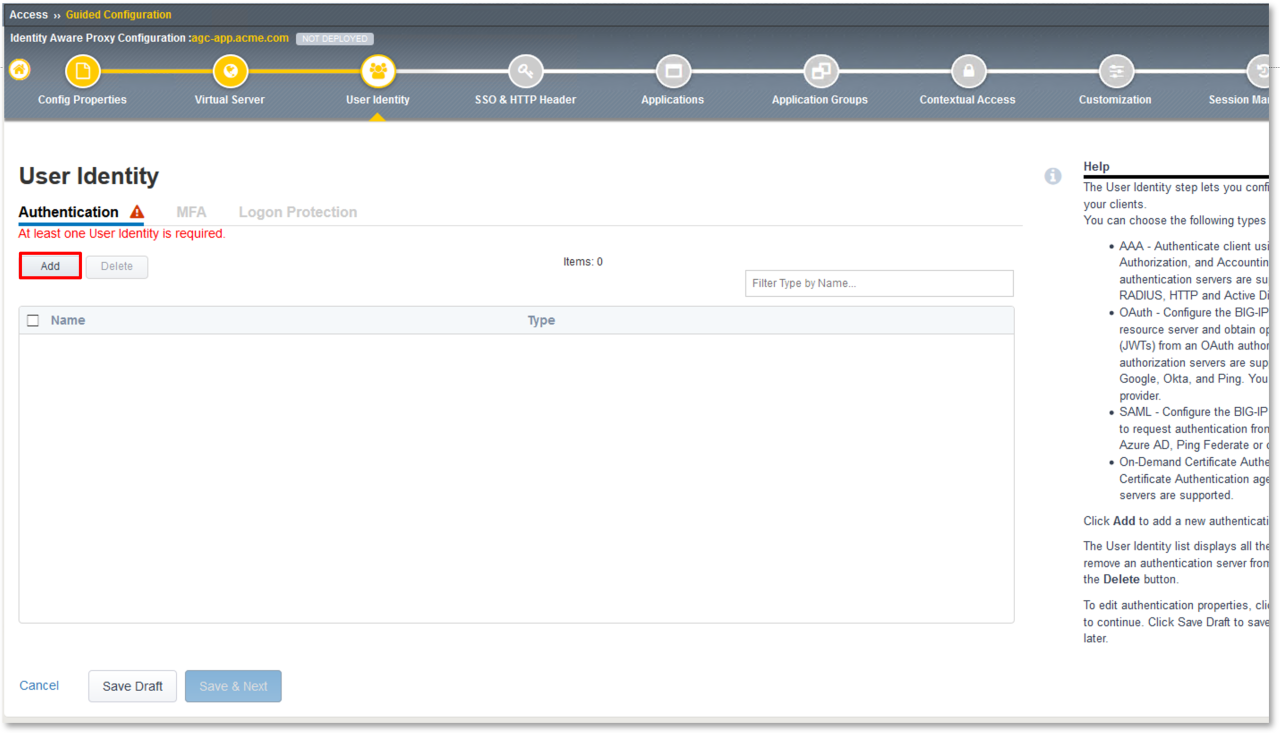
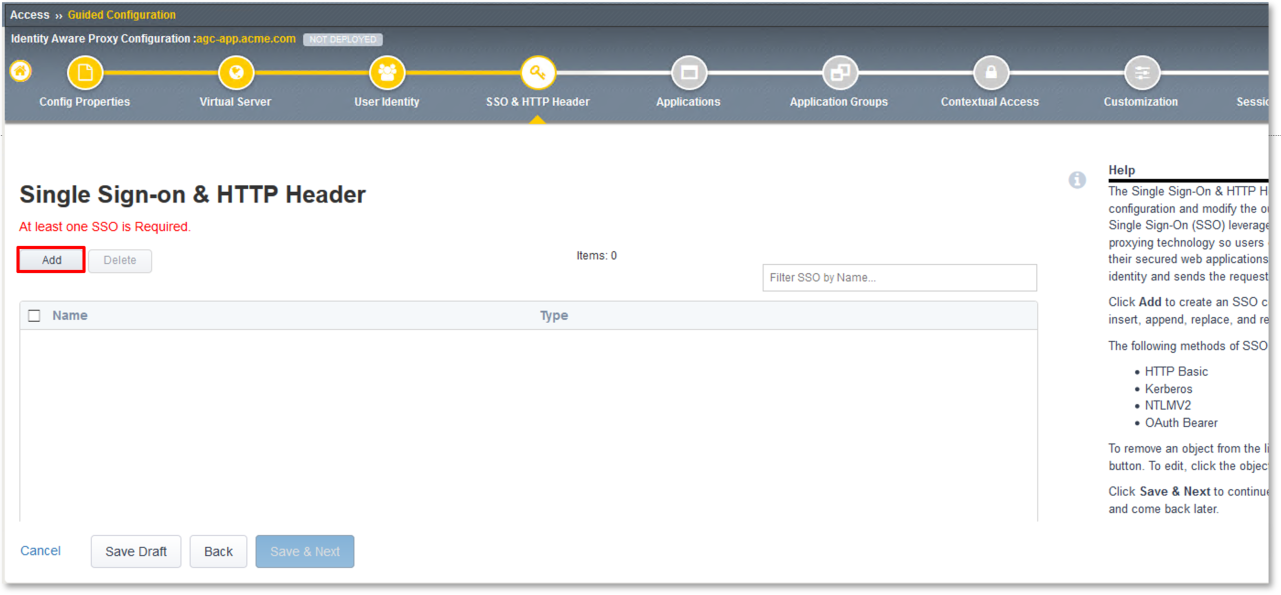
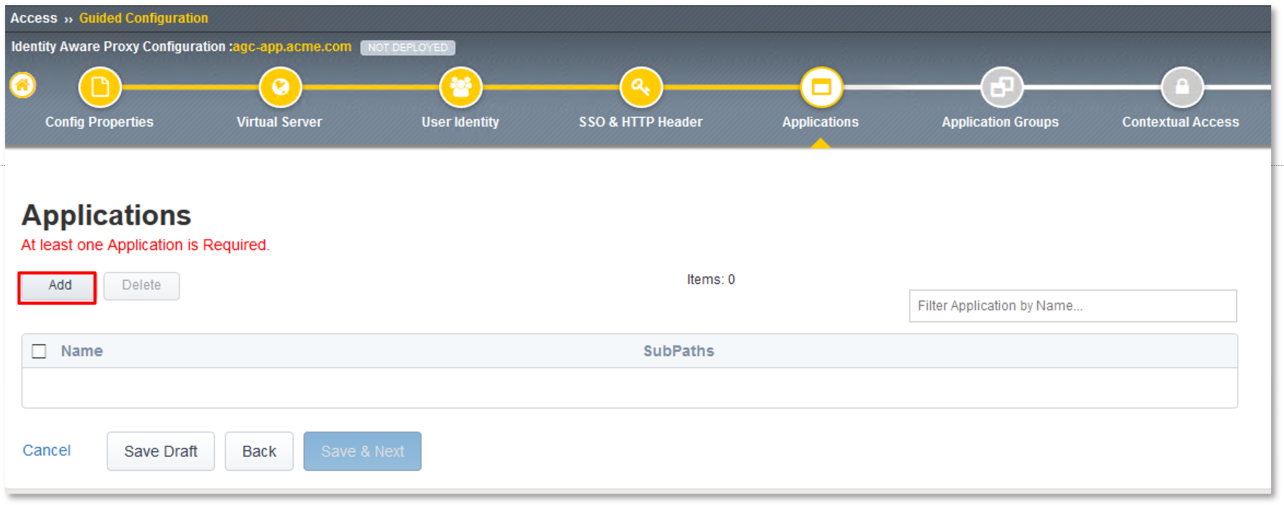
TASK 6: Applications
- Click the Add button in the Applications dialogue window.
|
 |
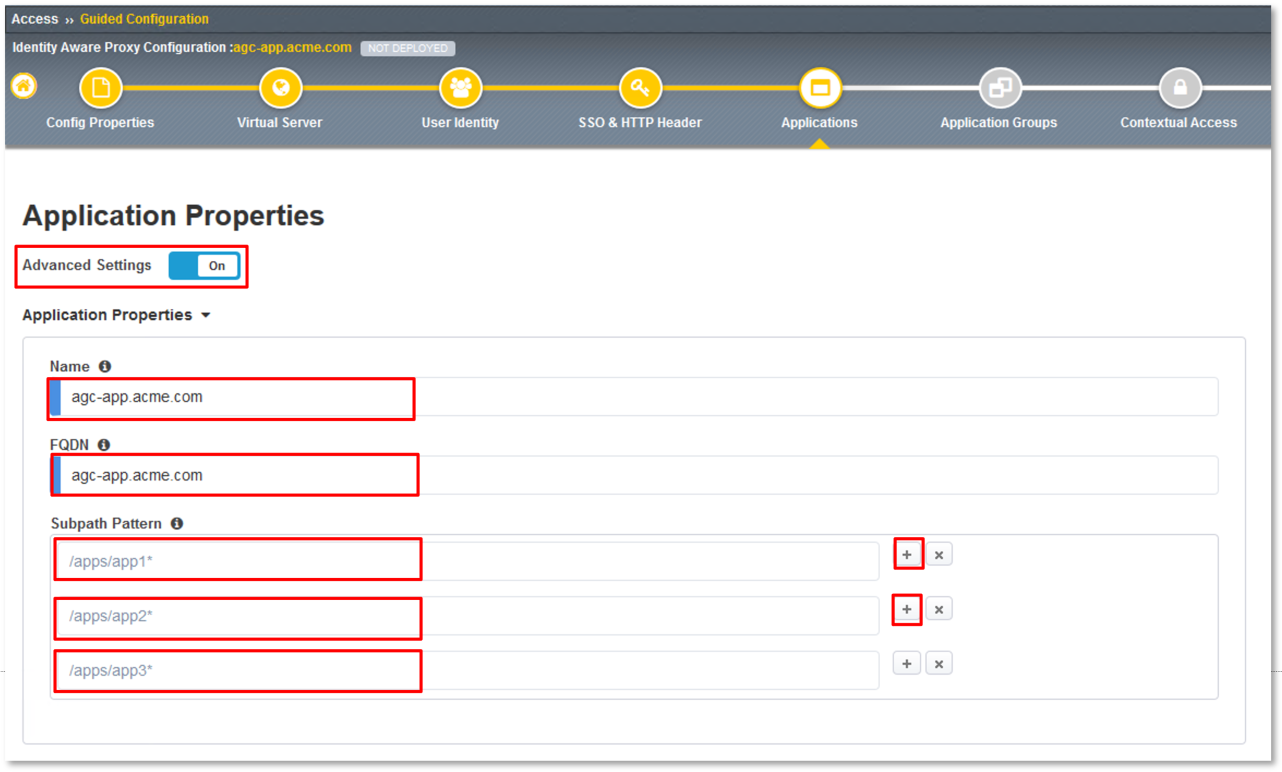
In the Application Properties dialogue window, toggle Advanced Settings to the
On position.
In the Name field enter agc-app.acme.com.
In the FQDN field enter agc-app.acme.com.
In the Subpath Pattern field enter /apps/app1*.
On the Subpath Pattern row entered in Step 5, click the + (Plus Symbol) twice
to add two more rows.
In the two new rows add /apps/app2* and /apps/app3* respectively.
|
 |
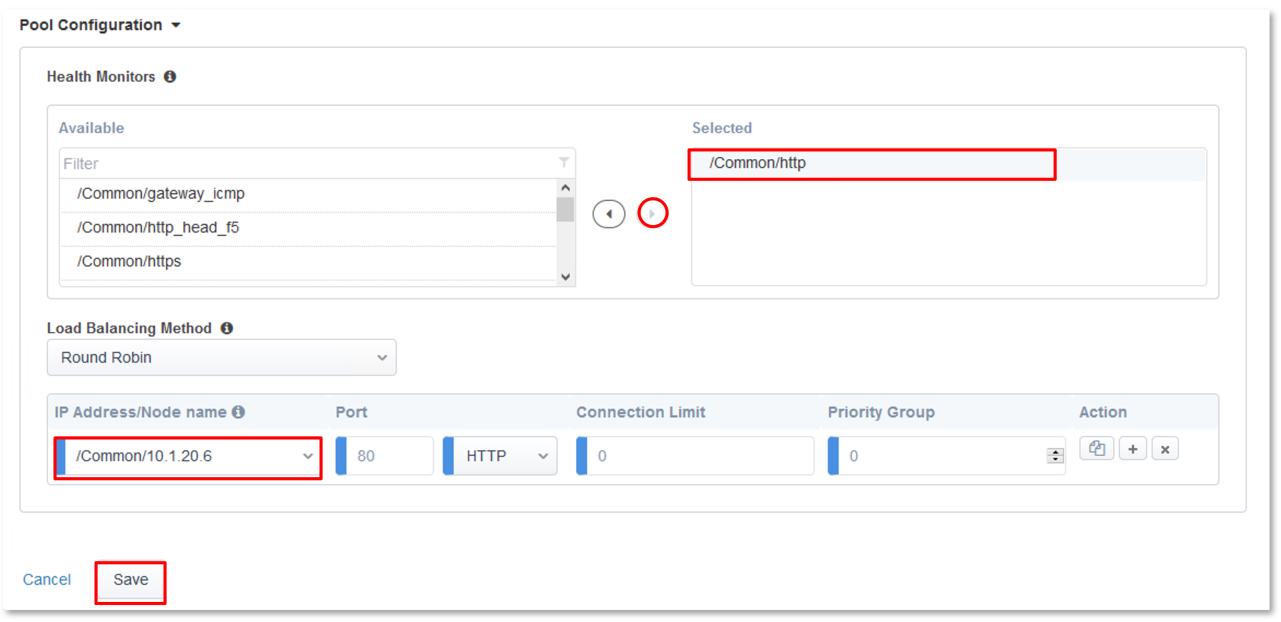
In the Pool Configuration section, under Health Monitors area move
/Common/http to the right Selected side.
In the Pool Configuration section, under Load Balancing Method area select
/Common/10.1.20.6 from the IP Address/Node name
Click the Save button at the bottom of the dialogue window.
|
 |
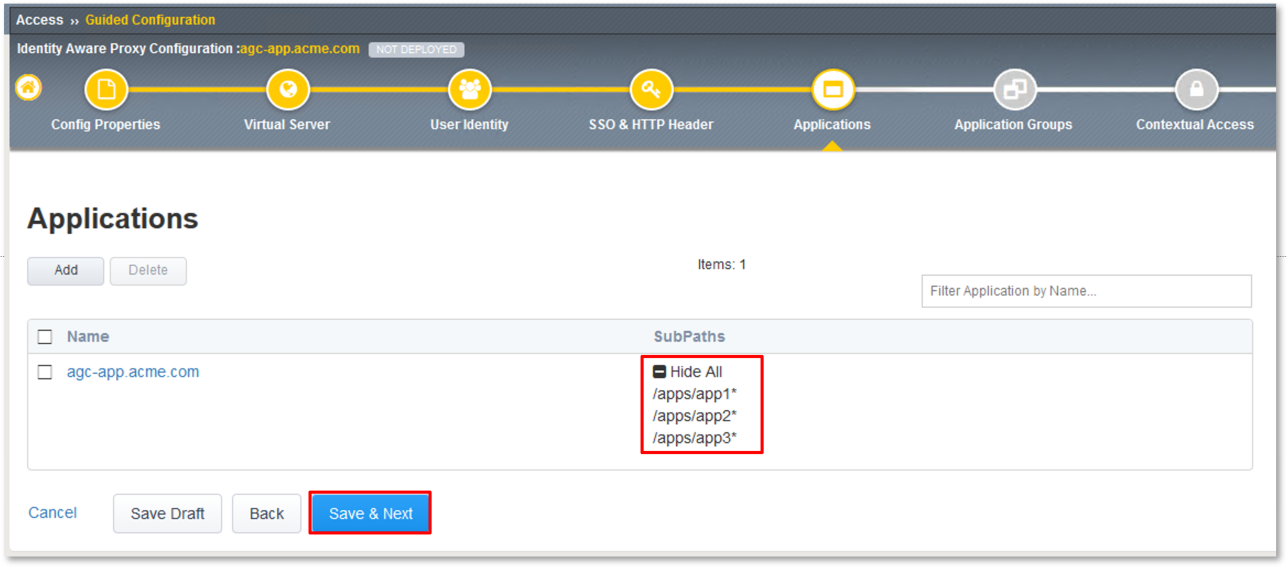
In the Applications dialogue window that follows, expand the Subpaths and ensure
/apps/app1*, /apps/app2*, /apps/app3* are present for the agc-app.acme.com row.
Click the Save & Next button at the bottom of the dialogue window.
|
 |
TASK 7: Application Groups
- Click the Add button in the Application Groups dialogue window.
|
 |
In the resulting Application Group Properties dialogue window, enter app1 in the
Name field.
Move /apps/app1* from the Available side to the Selected side under
Application List.
Click the Save button at the bottom of the dialogue window.
|
 |
Click the Add button in the Application Groups dialogue window that follows and
repeat steps 2 through 4 using the following values:
- Name: app2, Selected: /apps/app2*
- Name: app3, Selected: /apps/app3*
- Name: base, Selected: /
|
 |
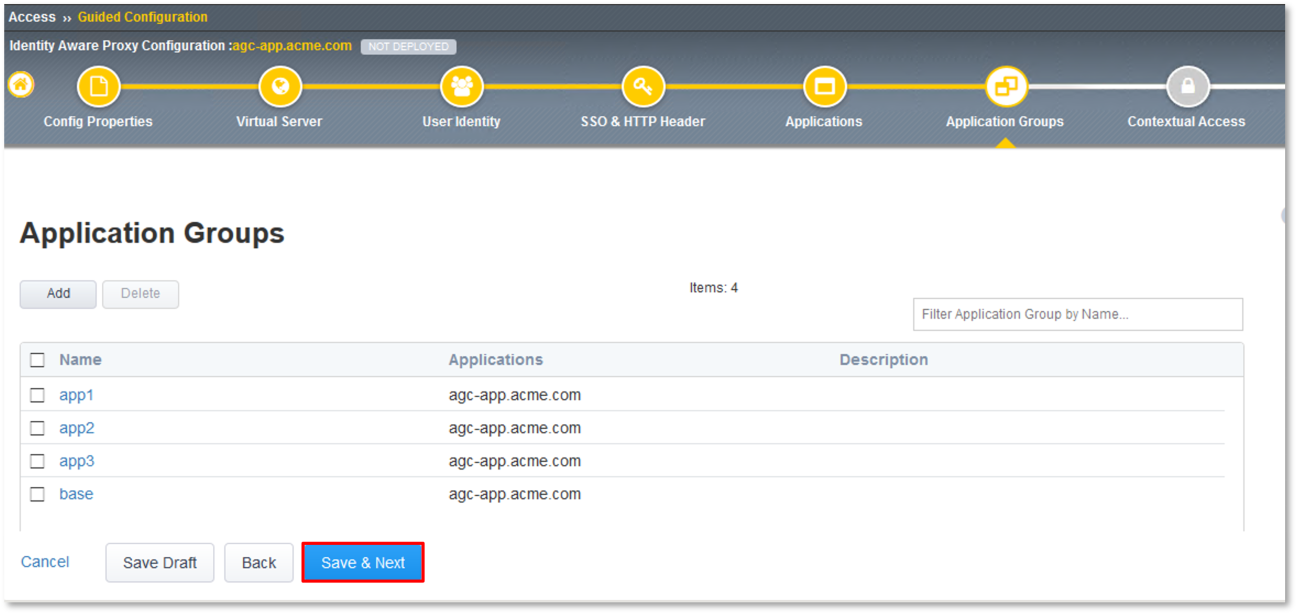
- Review the Applications Groups dialogue window following completion of step 5 and
- Click the Save & Next button at the bottom of the dialogue window.
|
 |
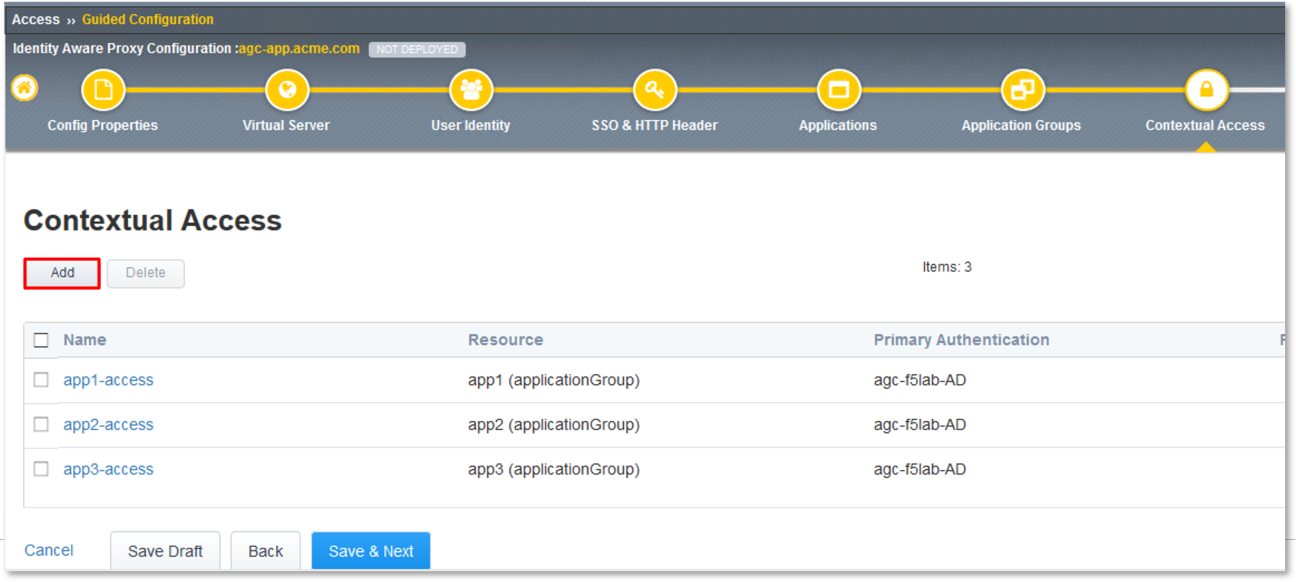
TASK 8: Contextual Access
- Click the Add button in the Contextual Access dialogue window.
|
 |
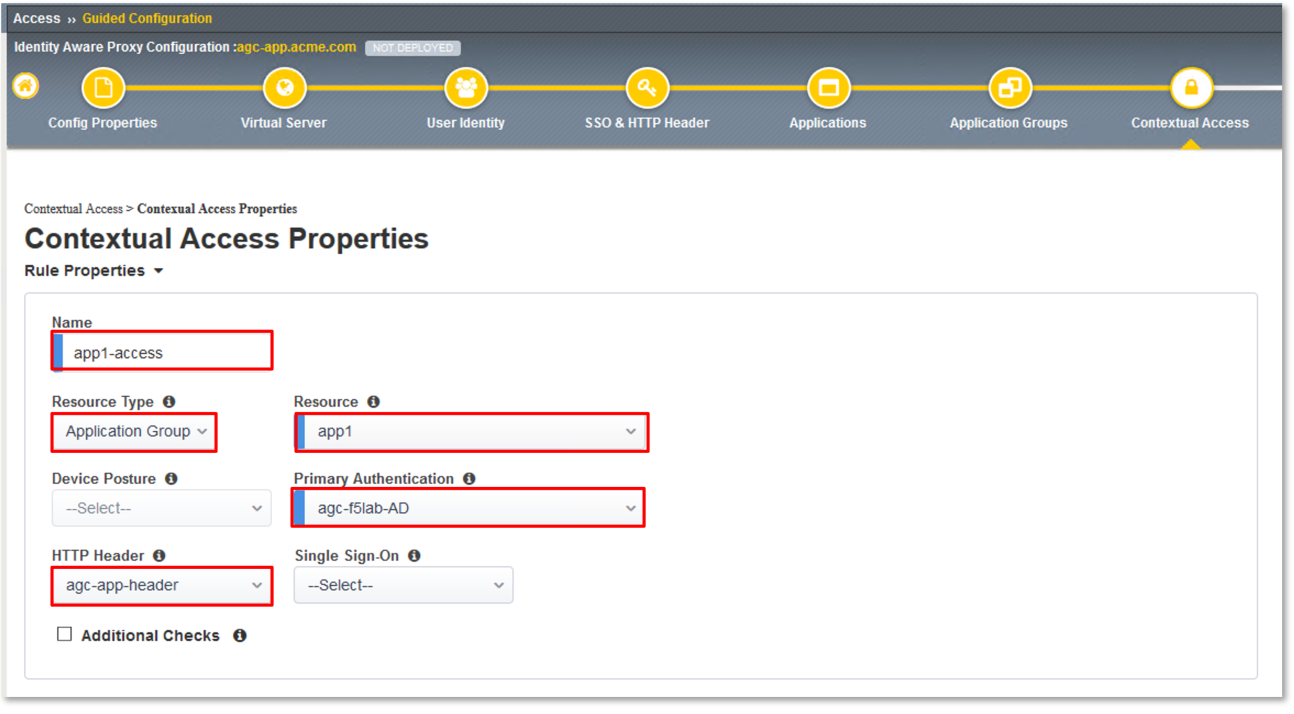
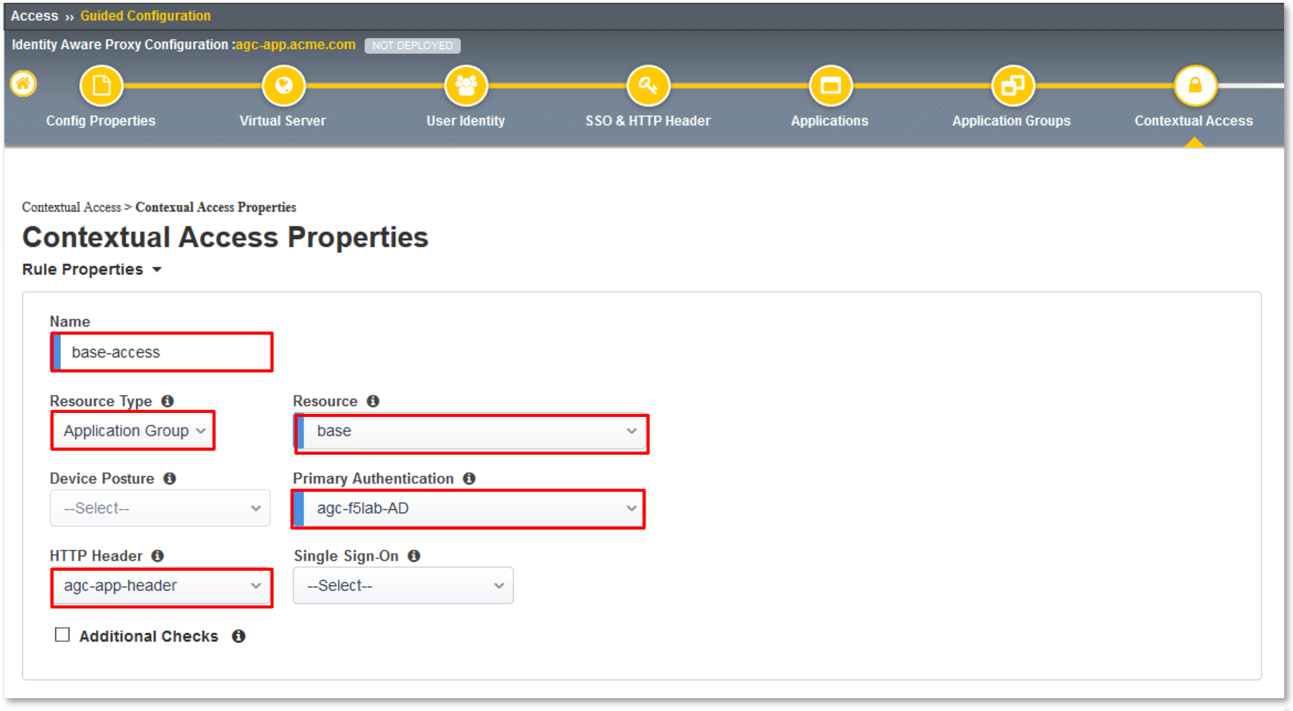
In the Contextual Access Properties dialigue window that follows, enter
app1-access in the Name field.
Select Application Group from the Resource Type drop down.
Select app1 from the Resource drop down.
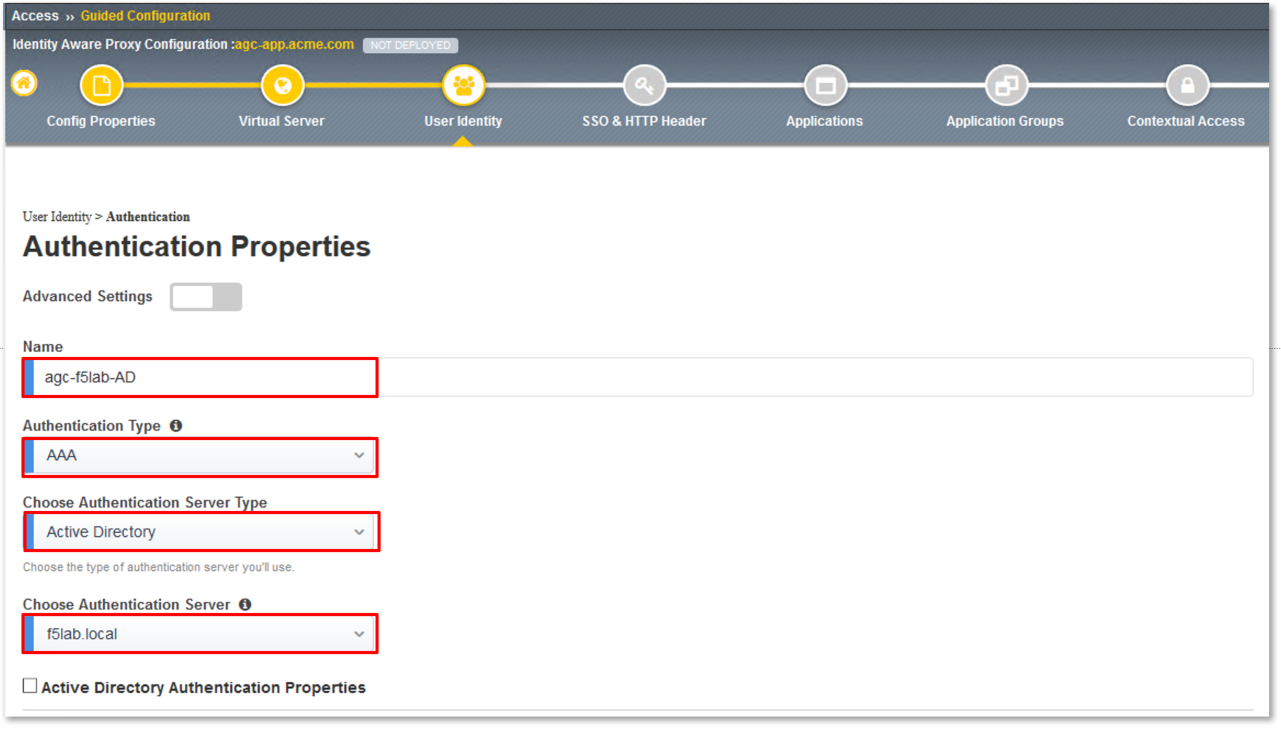
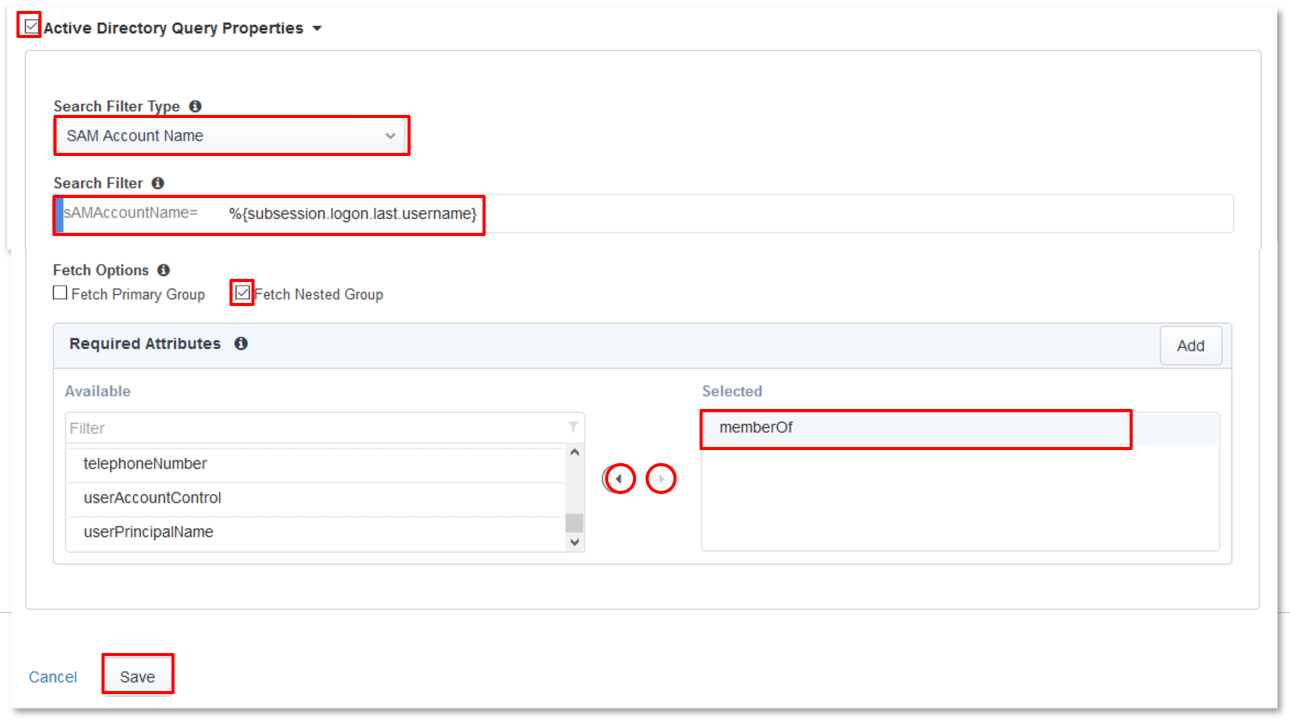
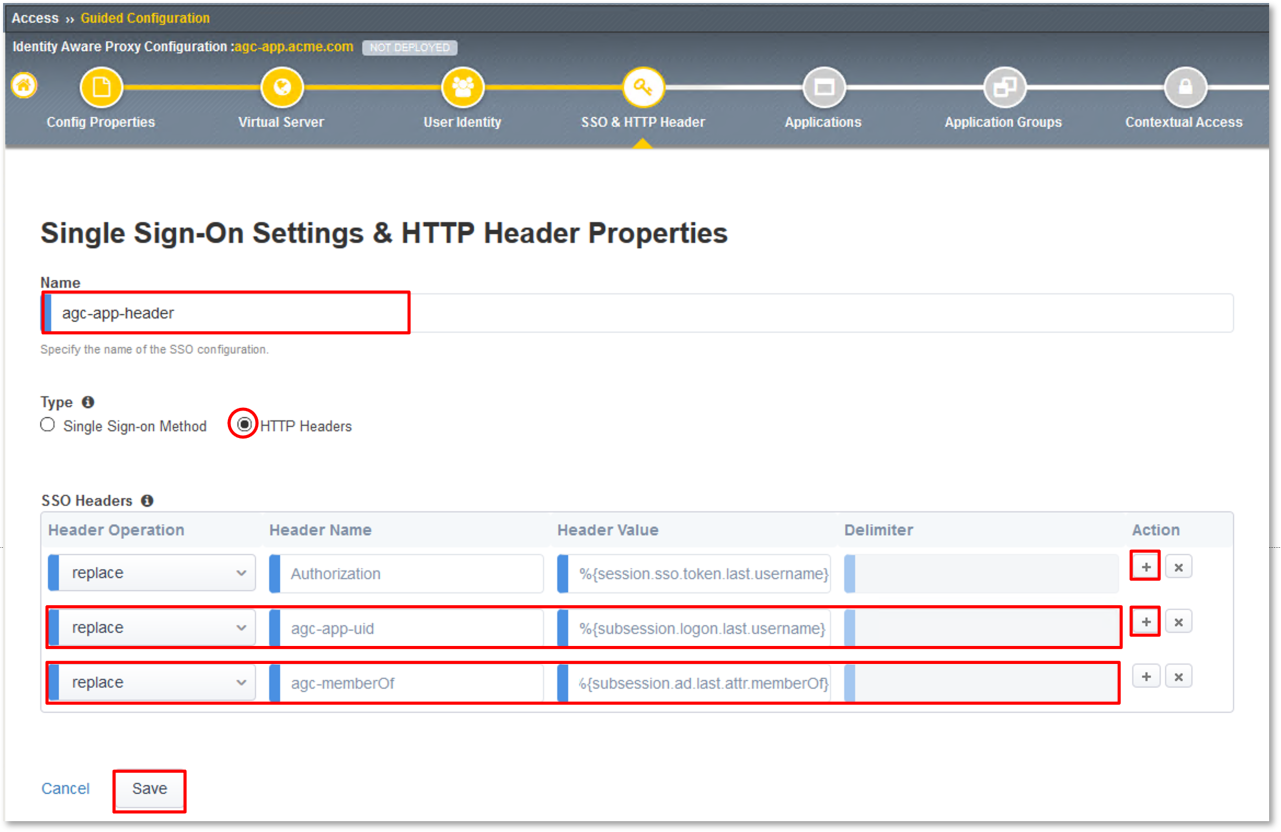
Select agc-f5lab-AD from the Primary Authentication drop down.
Select agc-app-header from the HTTP Header drop down.
|
 |
In the Assign User Groups section, scroll through the available groups to find the
app1 Group Name. Click the Add button in the Action column.
(The filter can be used to find the appropriate group faster.)
Verify the added group in the Selected User Groups.
Click the Save button at the bottom of the dialogue window.
|
 |
Click the Add button in the Contextual Access dialogue window.
Repeat steps 2 through 9 for app2 and app3 using the following values
App2
Contextual Access Properties
- Name: app2-access
- Resource Type: Application Group
- Resource: app2
- Primary Authentication: agc-f5lab-AD
- HTTP Header: agc-app-header
Assign User Groups
App3
Contextual Access Properties
- Name: app3-access
- Resource Type: Application Group
- Resource: app3
- Primary Authentication: agc-f5lab-AD
- HTTP Header: agc-app-header
Assign User Groups
|
 |
- Click the Add button in the Contextual Access dialogue window.
|
 |
In the Contextual Access Properties dialogue window that follows, enter
base-access in the Name field.
Select Application Group from the Resource Type drop down.
Select base from the Resource drop down.
Select agc-f5lab-AD from the Primary Authentication drop down.
Select agc-app-header from the HTTP Header drop down.
|
 |
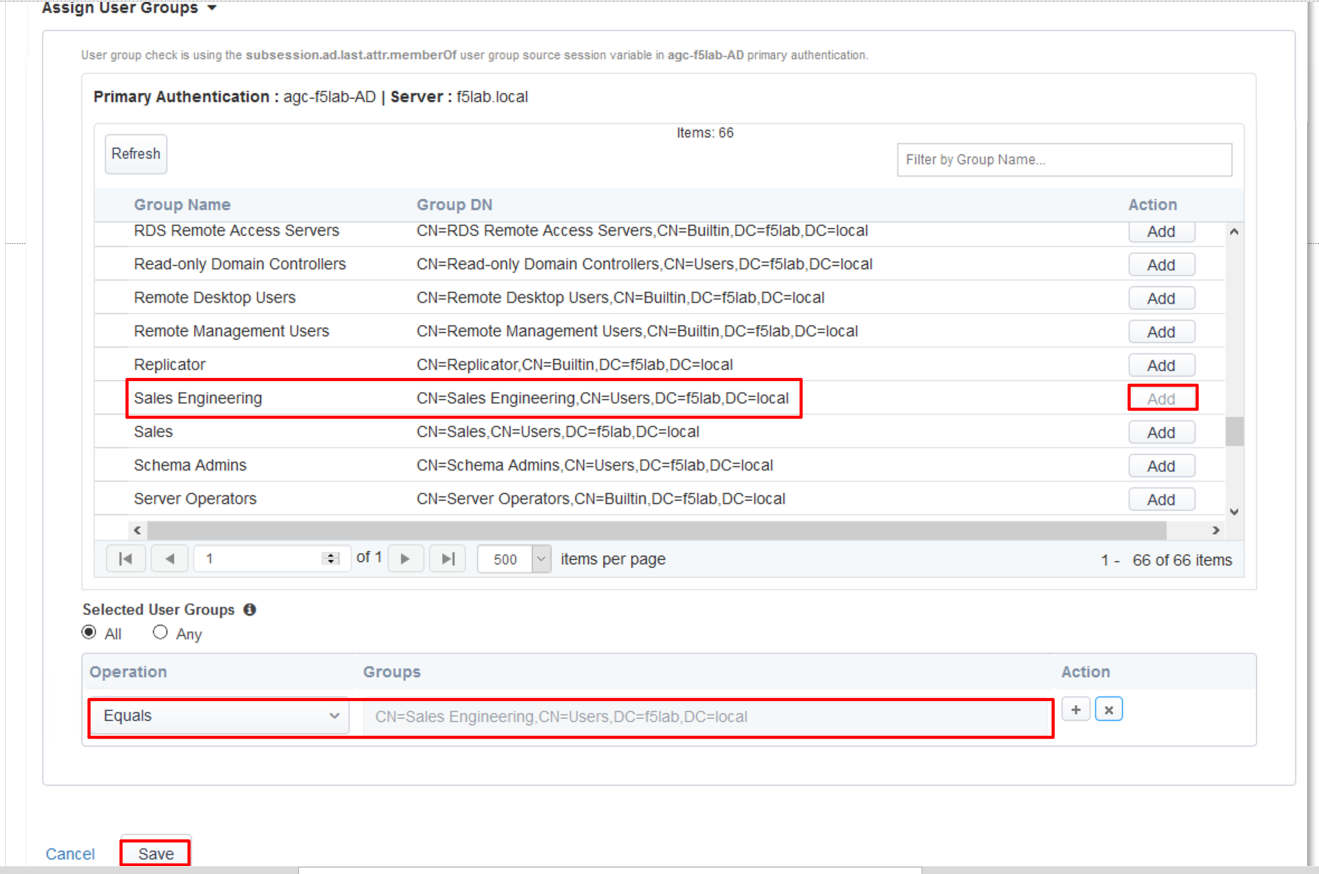
In the Assign User Groups section, scroll through the available groups to find the
Sales Engineering Group Name. Click the Add button in the Action column.
Verify the added group in the Selected User Groups.
Click the Save button at the bottom of the dialogue window.
|
 |
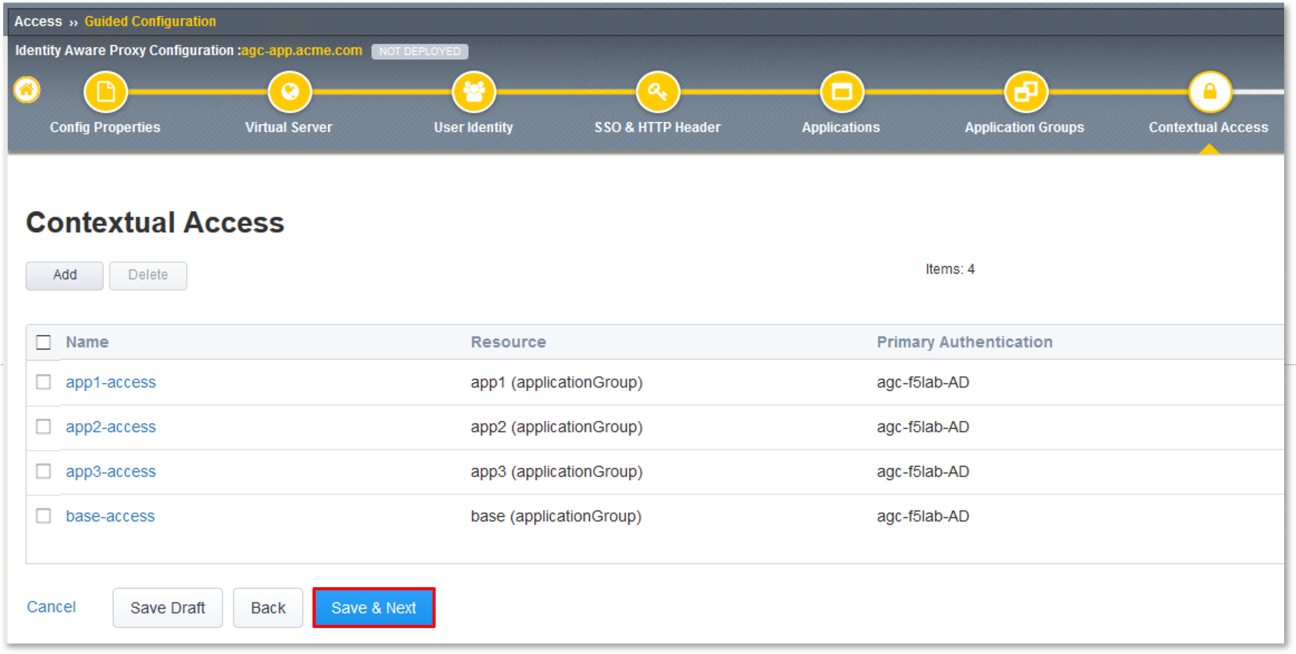
Review the resulting Contextual Access dialogue window for completion of all
created access rules.
Click the Save & Next button at the bottom of the dialogue window.
|
 |
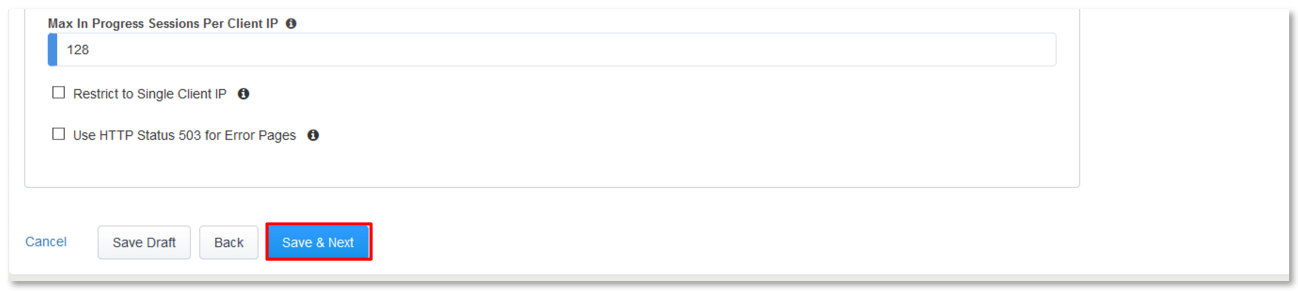
TASK 9: Customization
Scroll the bottom of the Customization Properties dialogue window, leaving all
defaults and then click Save & Next.
|


|
TASK 10: Session Management Properties
Scroll the bottom of the Session Management Properties dialogue window, leaving all
defaults and then click Save & Next.
|

|
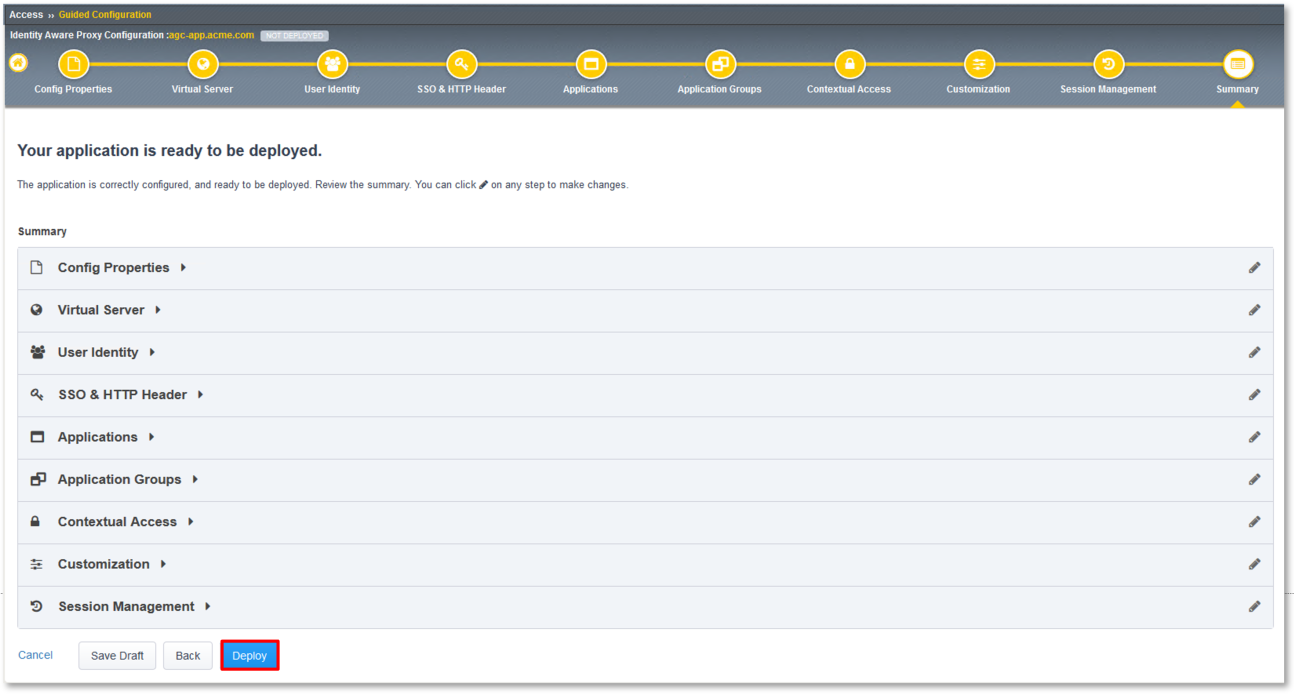
TASK 11: Summary
In the resulting Summary dialogue window, review the configured elements and then
click the Deploy button.
|
 |
Click the Finish button in the final dialogue window. Access Guided Configuration
will return to the start screen and agc-app.acme.com will be DEPLOYED
|


|
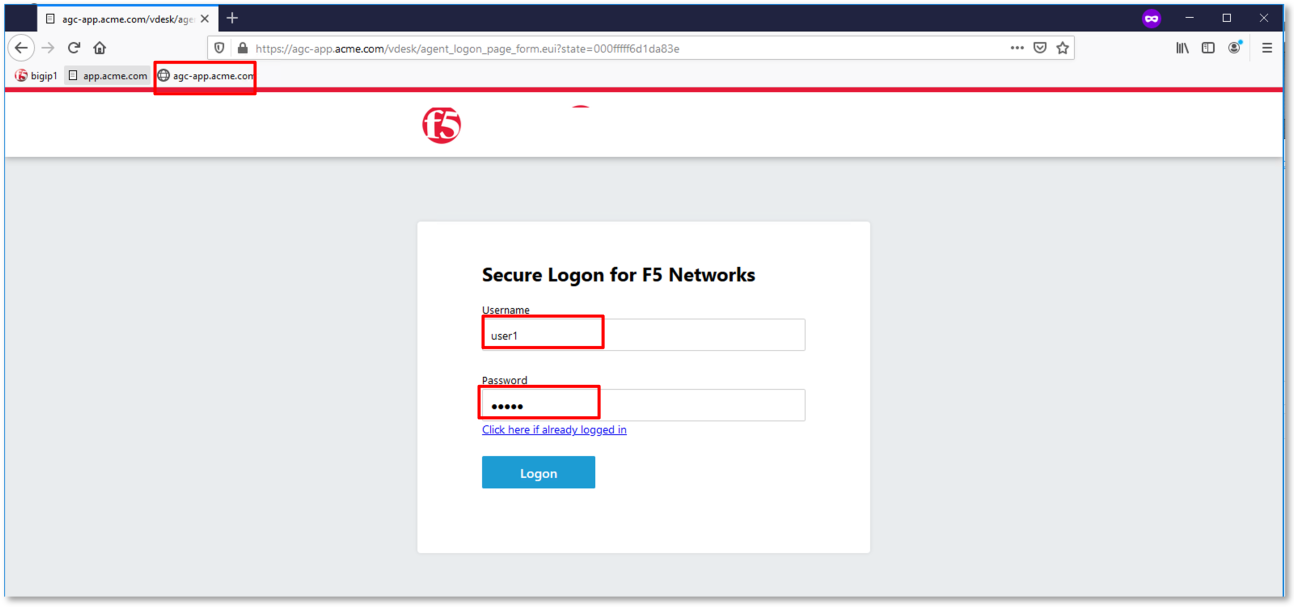
TASK 12: Testing
Begin a RDP session with the Jumphost (10.1.10.10) through the Student Portal.
Open Firefox from the desktop and navigate to https://agc-app.acme.com. A bookmark
link has been provided in the toolbar.
Logon to the resulting logon page with UserID: user1 and Password: user1
|
 |
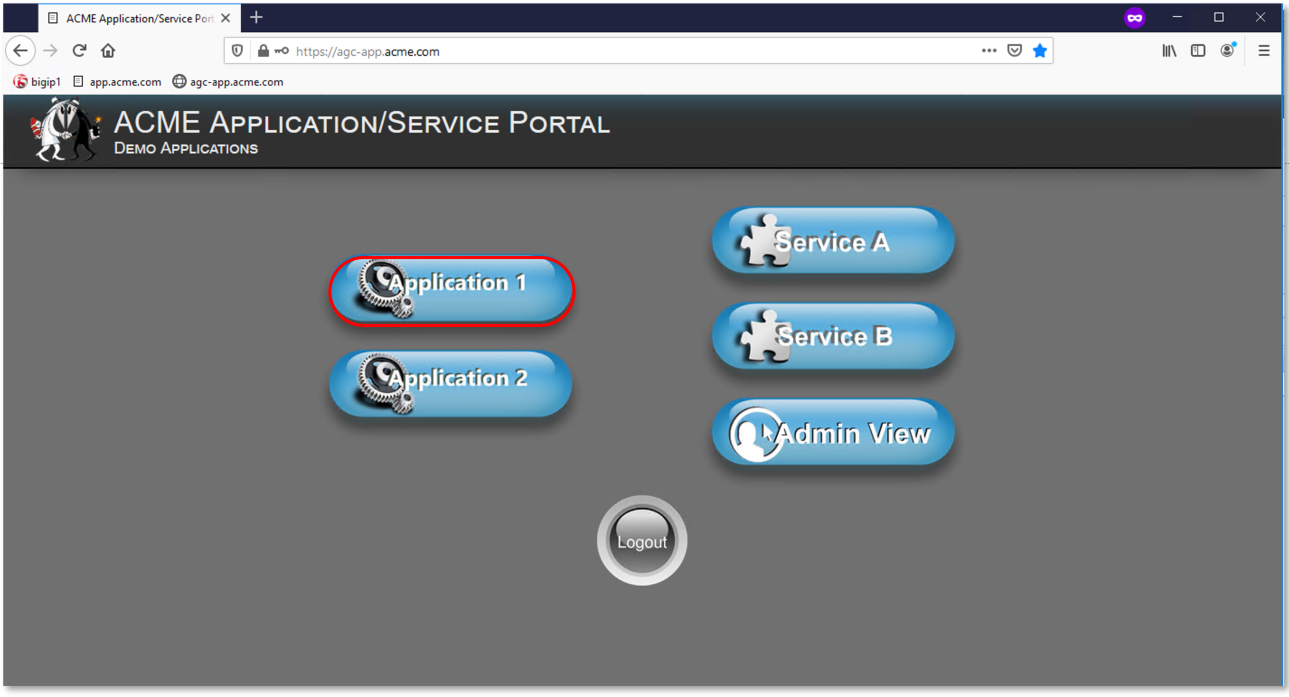
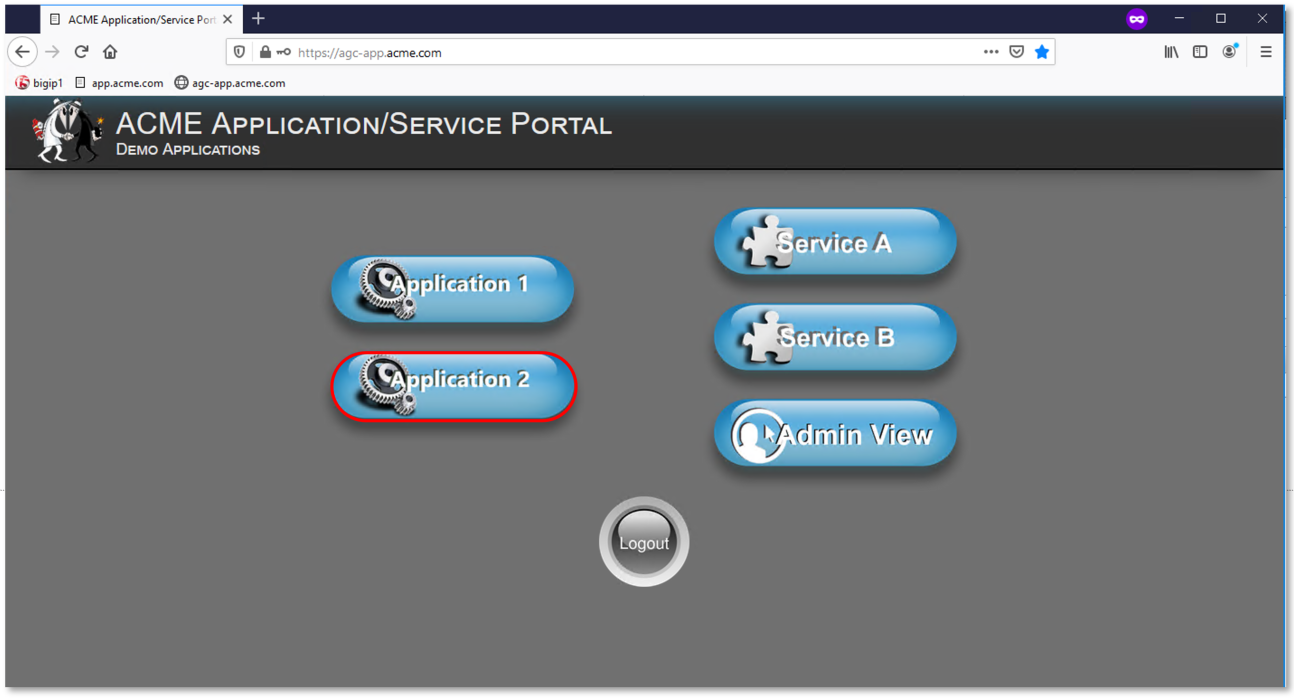
Click on the Application 1 button in the ACME Application/Service Portal.
A new tab will open displaying received headers demonstrating the user has accces to the
application.
|

|
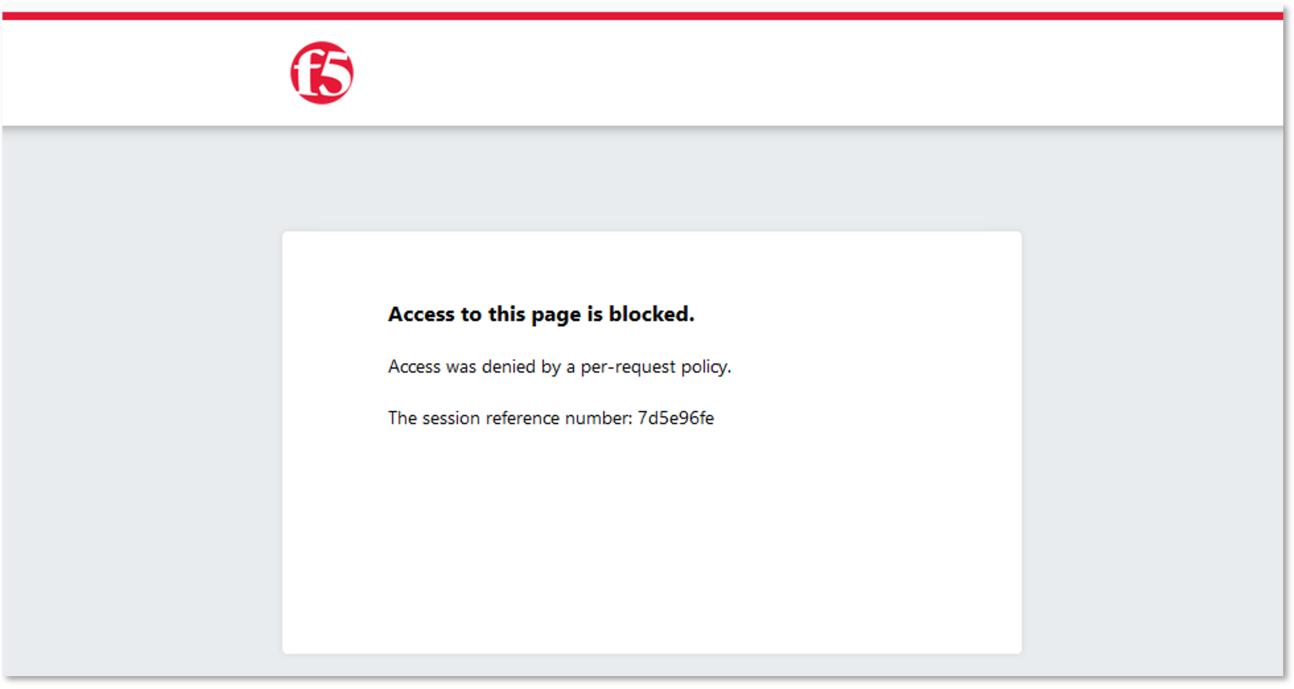
Return to the ACME Application/Service Portal and click Application 2.
A new tab will open displaying a Block Page (customizable), restricting access to the
application based on AD group membership.
|
|
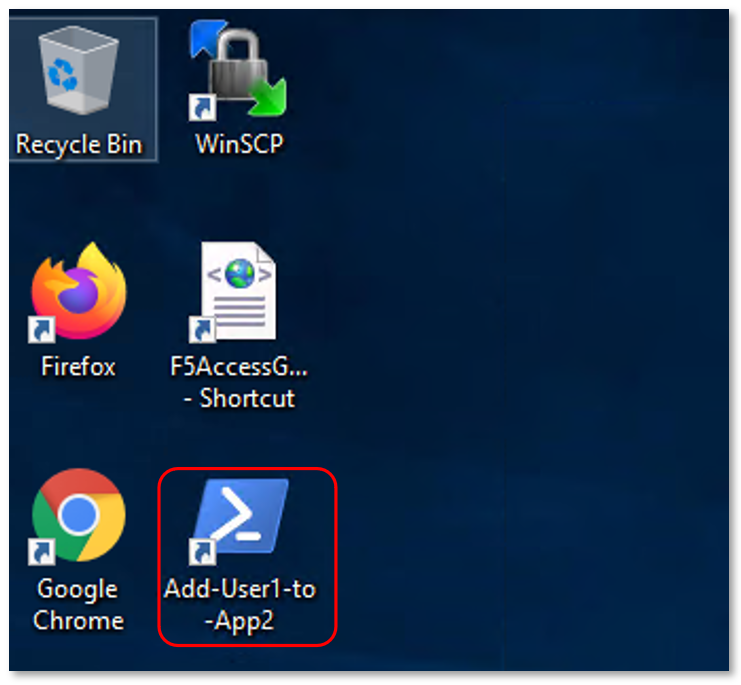
Close the open application tabs and return to the ACME Application/Service Portal
and click the Logout button, then close the browser.
Run the Add-User1-to-App2 Powesrshell script link provided on the Jumphost
desktop. The script will run and automatically close.
|

|
Reopen Firefox using the desktop link on the Jumphost and launch the
agc-app.acme.com application from the link provided in the broswer.
Click on the Application 2 button in the ACME Application/Service Portal.
A new tab will open displaying received headers demonstrating the user has accces to the
application becasue of the change in the user’s Group Membership.
|
 |
TASK 13: Review
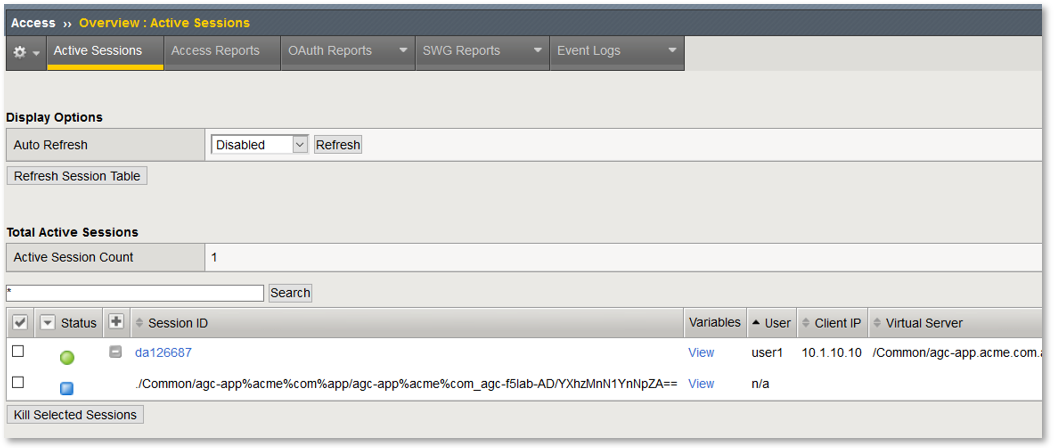
Login to your provided lab Virtual Edition: bigp1.f5lab.local
Navigate to: Access -> Overview -> Active Sessions
Here you can see the active session and any subsessions created by virtue of the Per
Request Policies and view their associated varibles.
Click on the View asscoiated with the active session’s subsession.
|
 |
In the resulting variable view, review the subsession variables created as a result of
access requests performed in testing.
|
 |
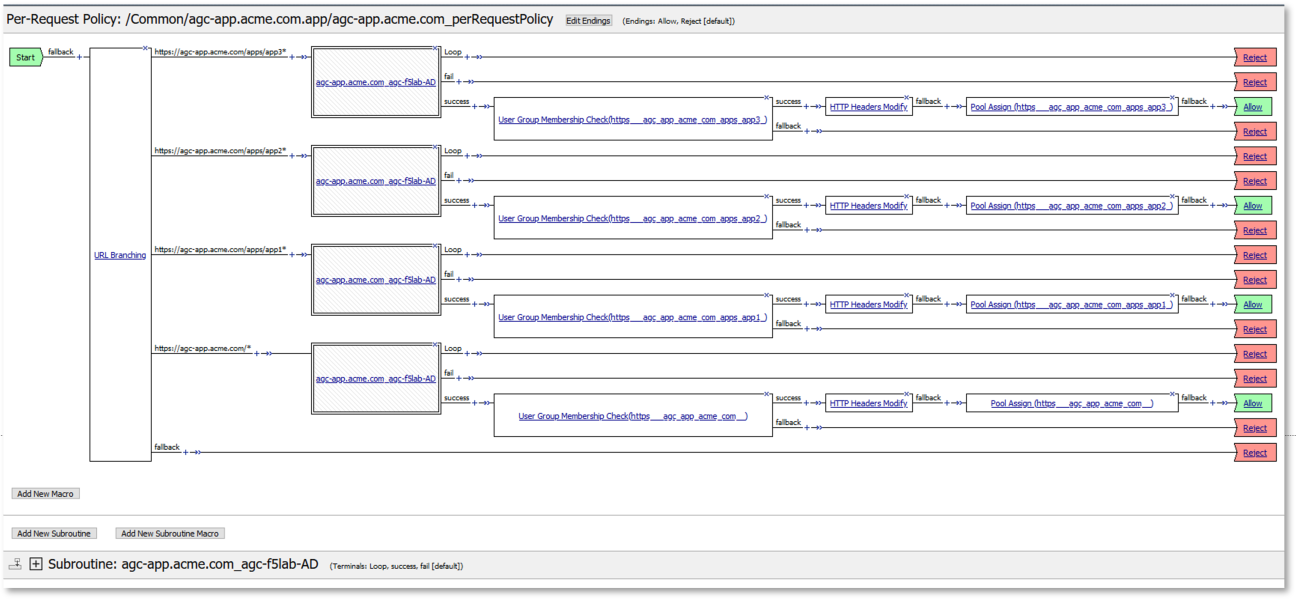
Navigate to: Access -> Profiles/Policies -> Per-Request Policies in the left-hand
navigation menu.
In the resulting dialogue window, click on the Edit link in the
agc-app.acme.com_perRequestPolicy row.
Review the created Per Request Policy
|

|
TASK 14: End of Lab1
- This concludes Lab1, feel free to review and test the configuration.
|
 |