Lab 3: Custom Per Request Policy - Extended

The purpose of this lab is to change the behavior of the custom Per Request Policies built during Lab 2. Lab attendees will expand policies by incorporating HTTP_Connector agents to query external API’s and incorporate Gating Criteria to enforce policy behavior while accessing the lab application. Students will configure the various aspects of this lab using the Visual Policy Editor, review the configuration and perform tests of the deployment.

Objective:

  • Gain a deeper understanding of Per Request Policies and their applicability in various delivery and control scenarios.
  • Gain a further understanding of Per Request Policy Subroutines and their expandaility with HTTP_Connector and gating criteria.

Lab Requirements:

  • All Lab requirements will be noted in the tasks that follow
  • Estimated completion time: 20 minutes.

Lab 3 Tasks:

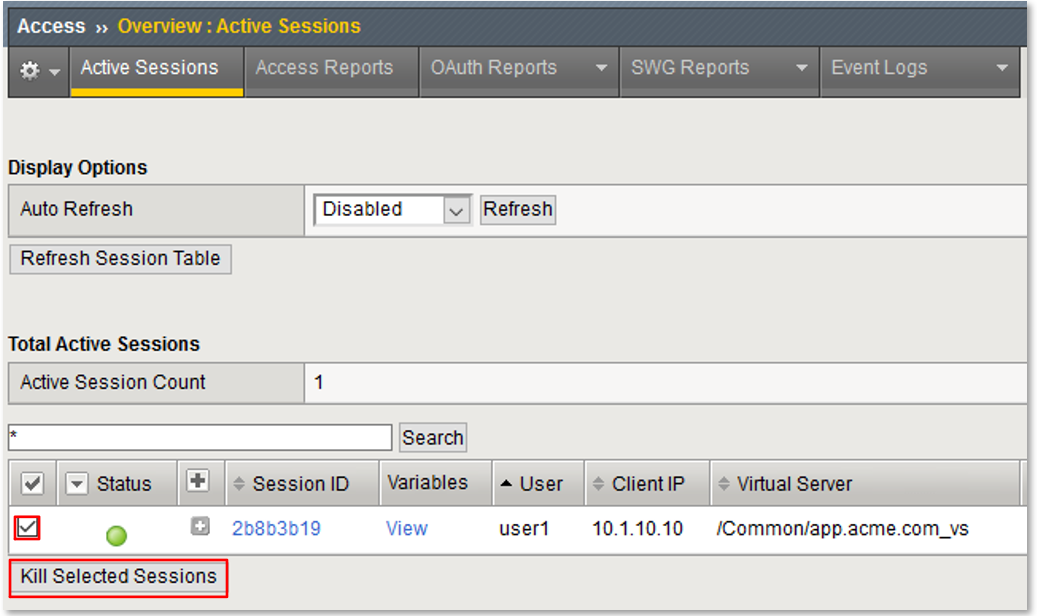
TASK 1: Prepare Lab Environment

  1. On bigip1.f5lab.local, navigate to Access -> Overview -> Active Sessions and

    confirm all active sessions have been killed.

  2. If any sessions are active, click all checkboxes by the active session and then click

    the Kill Selected Sessions button. In the resulting dialogue window ensure the

    Session ID/Subsession ID is checked and click the Delete button.

  3. Close any open browser windows on the Jumphost desktop.

    This prepares the environment for further user testing.

image001

image002

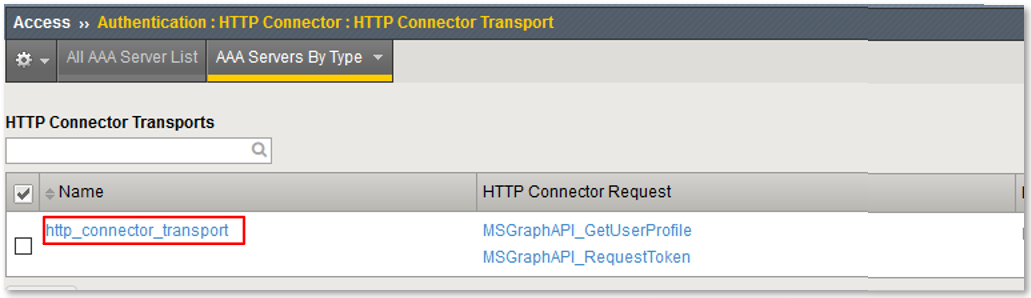
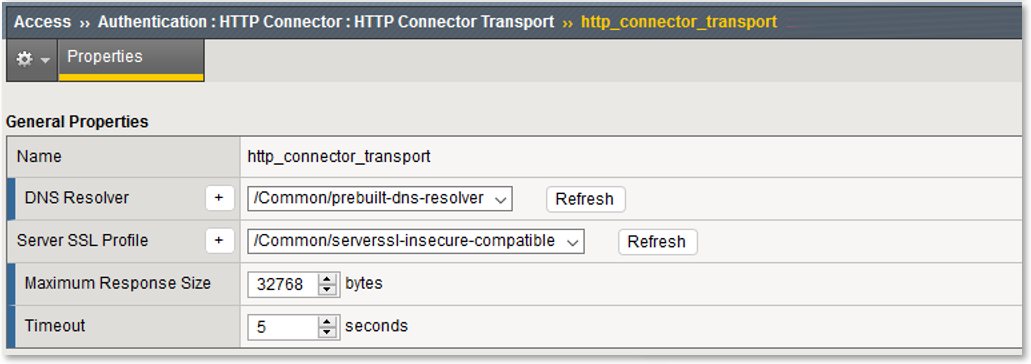
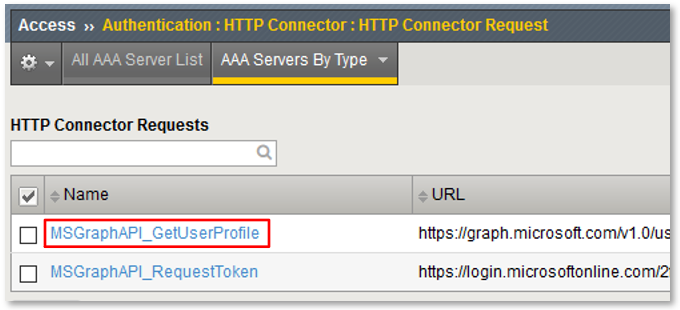
TASK 2: Review HTTP Connector Configuration

  1. On bigip1.f5lab.local, navigate to Access -> Authentication -> HTTP Connector ->

    HTTP Connector Transport.

  2. Click on the http_connector_transport link.

Note: This configured resource provides DNS resolution and HTTPS functionality

enabling access to queried Web Service and API endpoints.

image003

image004

  1. Navigate to Access -> Authentication -> HTTP Connector -> HTTP Connector Request.
  2. Click on the MSGraphAPI_RequestToken link.

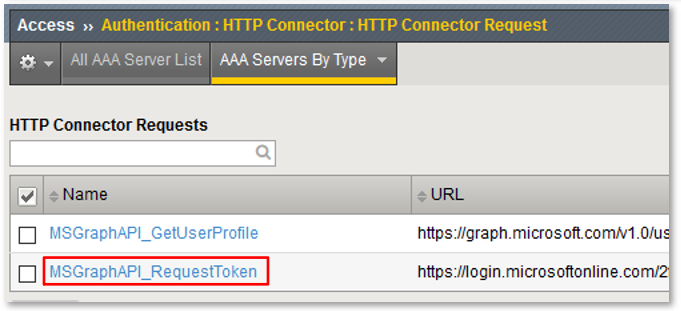
Note: This configured resource retrieves an oAuth Bearer Token to be used to query the

Microsoft Graph API.

Note: While values like tenant_id, client_id & client_secret have been statically

entered for the purposes of this lab, these could have been referenced variables set

in the Per Request Policy flow. Screenshot may show different values then your lab.

image005

image006

  1. Navigate to Access -> Authentication -> HTTP Connector -> HTTP Connector Request.
  2. Click on the MSGraphAPI_GetUserProfile link.

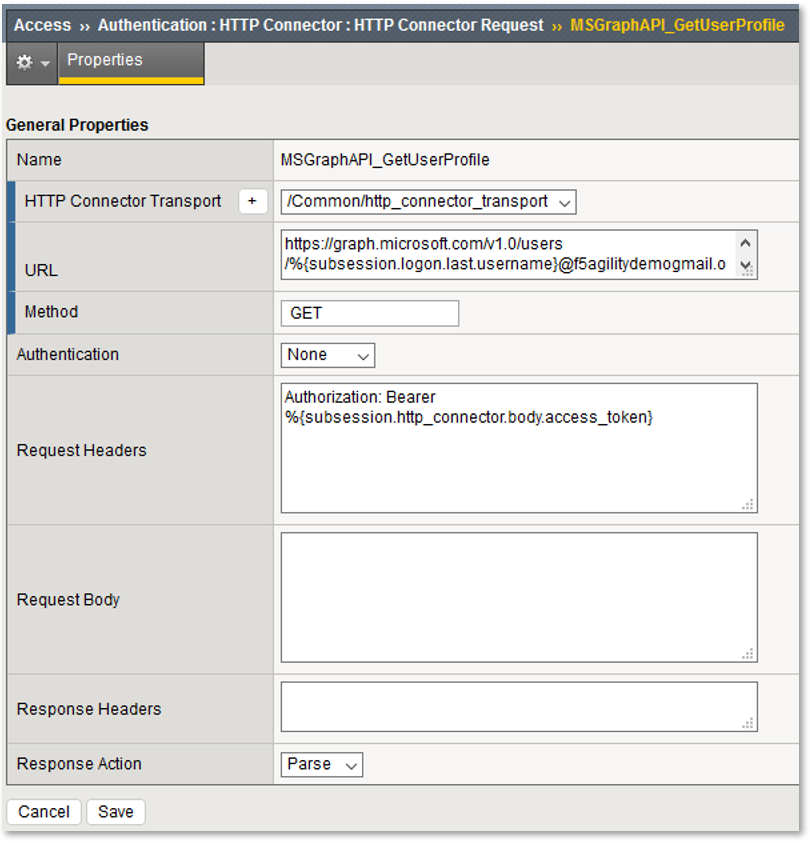
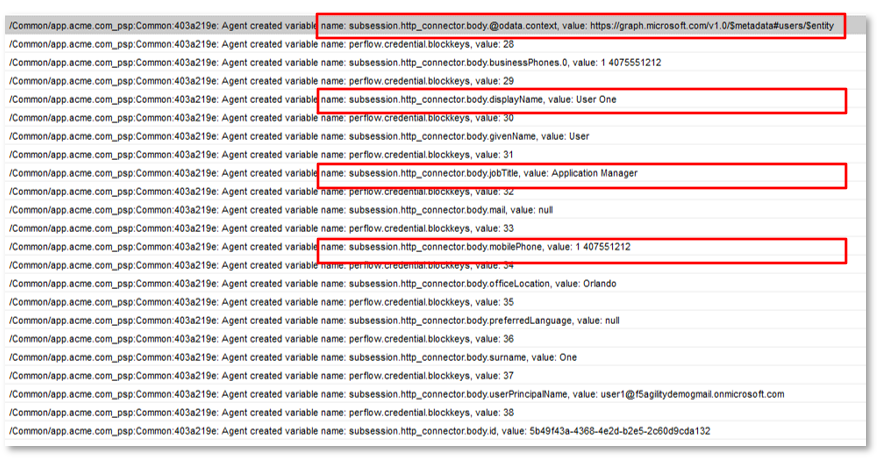
Note: This configured resource uses a previously obtained oAuth Bearer Token and

queries the Microsoft Graph API for the queried user’s profile information.

Note: The Application (client_id) has been granted API Permissions for User.Read.All

image007

image008

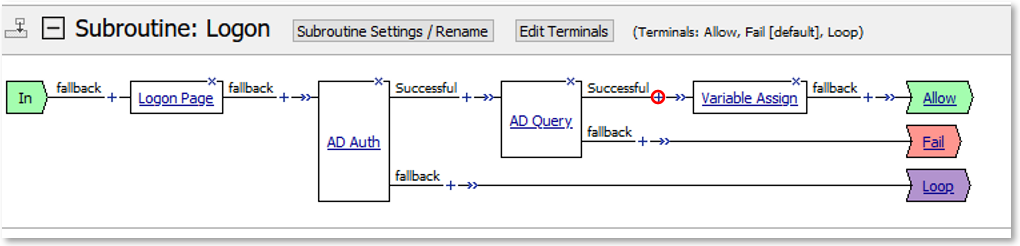
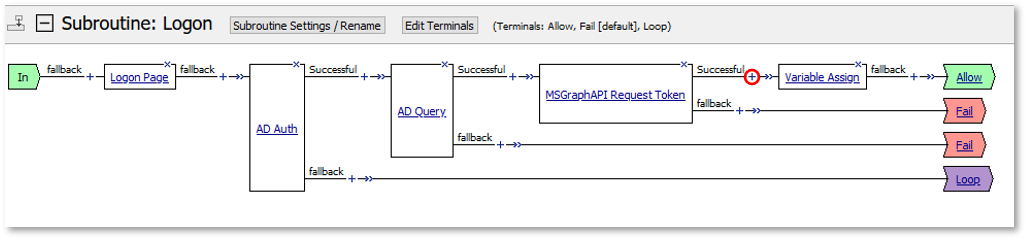
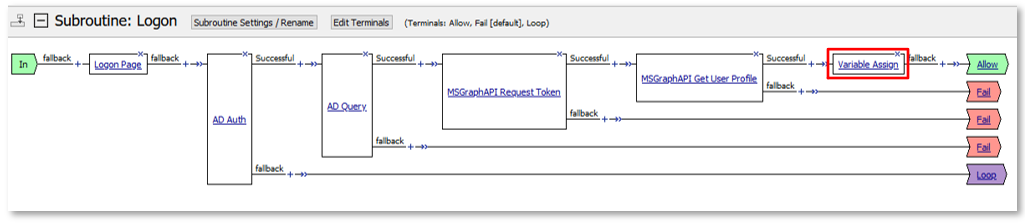
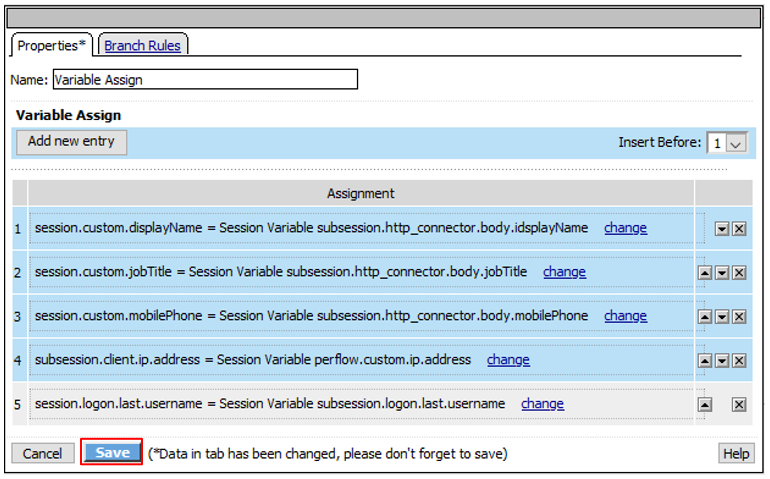
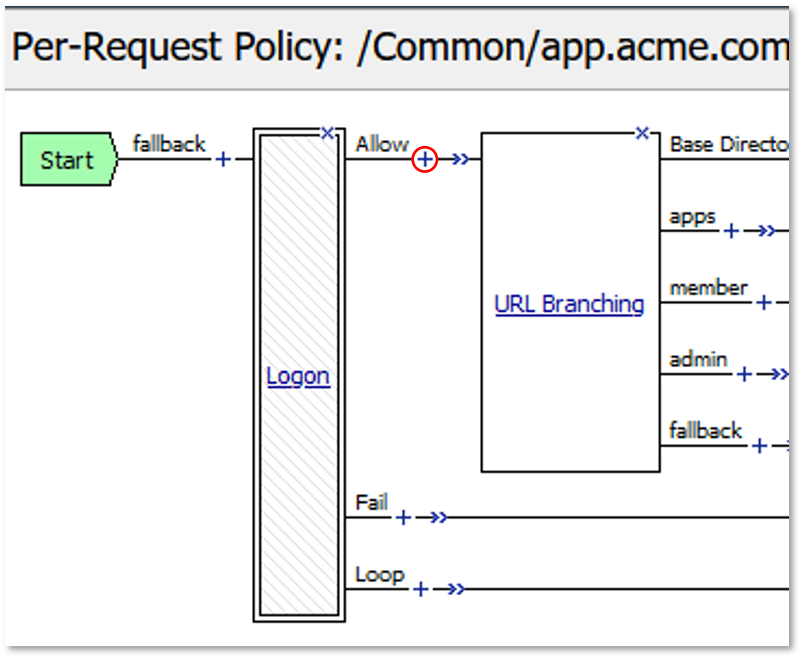
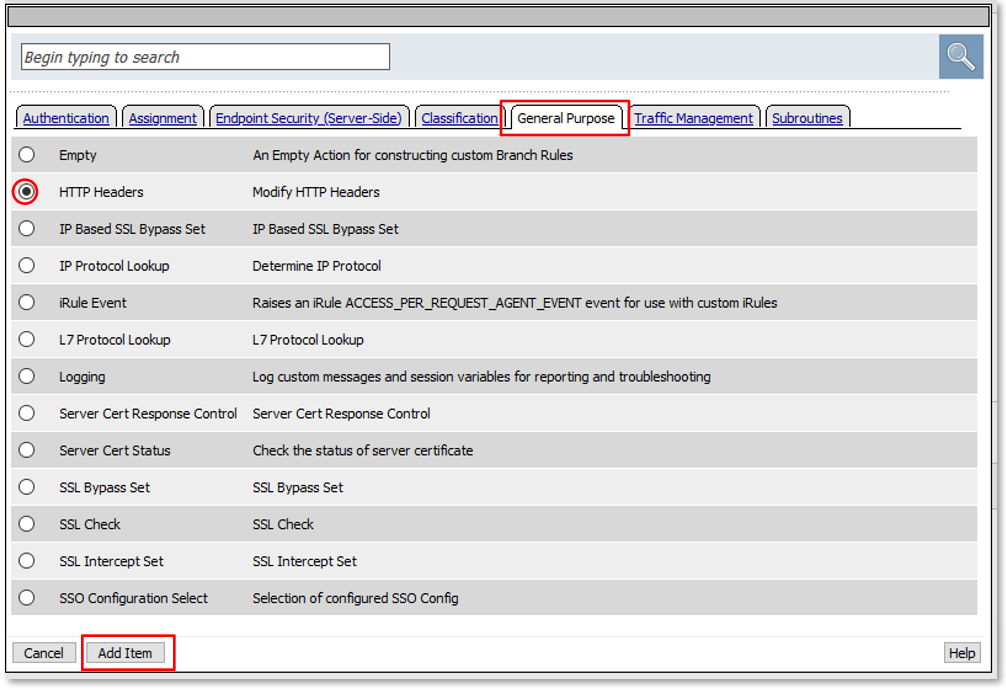
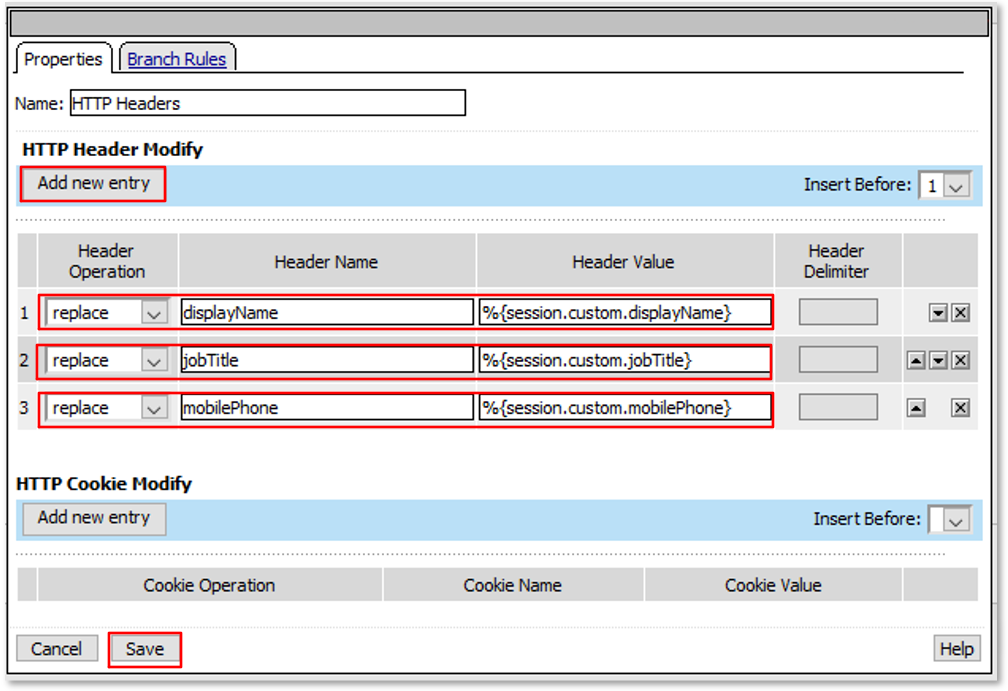
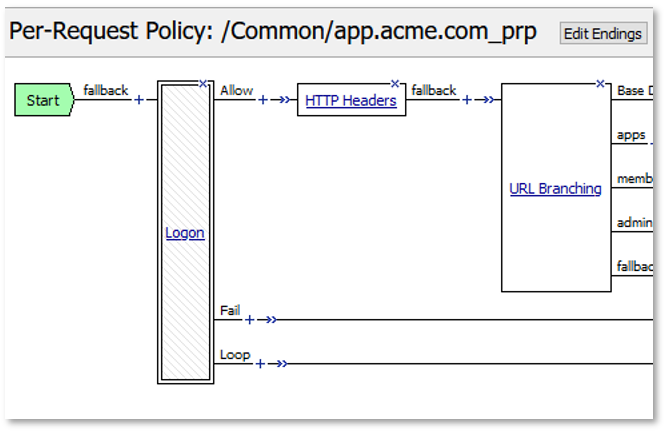
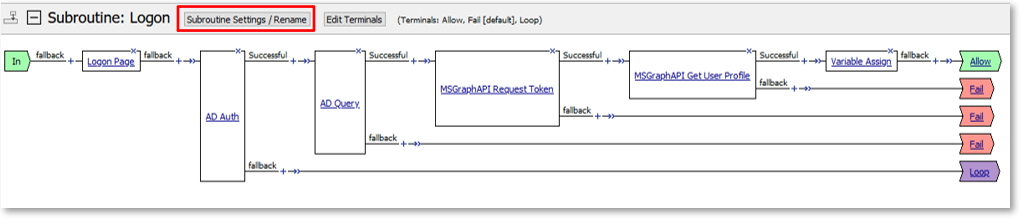
TASK 3: Extended Logon Subroutine

  1. Navigate to Access -> Profiles/Policies -> Per-Request Policies and then click the

    Edit link for the app.acme.com_prp Per Request Policy.

Note: This may already be open.

image032
  1. In the resulting Visual Policy Editor window for the On app.acme.com_prp, expand the

    Logon subroutine and click the + (Plus Symbol) on the Successful branch

    following the AD Query and before the Variable Assign.

  2. In the pop-up window, select the General Purpose tab, then click the radio button

    on the HTTP Connector action line, then click Add Item.

image009

image010

  1. In the resulting HTTP Connector window, change the Name field to MSGraphAPI

    Request Token.

  2. In the HTTP Connector section, Select /Common/MSGraphAPI_RequestToken from the

    the drop down for HTTP Connector Request and then click Save.

image011
  1. In the Logon subroutine and click the + (Plus Symbol) on the Successful

    branch following the MSGraphAPI Request Token and before the Variable Assign.

  2. In the pop-up window, select the General Purpose tab, then click the radio button

    on the HTTP Connector action line, then click Add Item.

image012

image013

  1. In the resulting HTTP Connector window, change the Name field to MSGraphAPI

    Get User Profile.

  2. In the HTTP Connector section, Select /Common/MSGraphAPI_GetUserProfile from the

    the drop down for HTTP Connector Request and then click Save.

image014

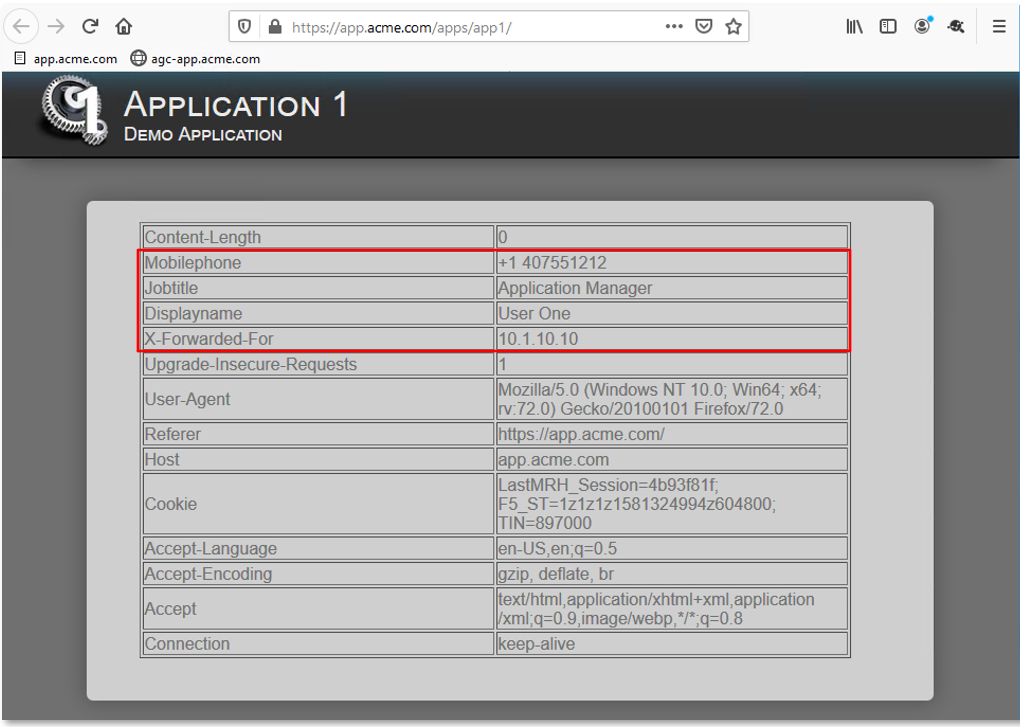
Note: The extending of Per Request Policies using the HTTP Connector can be leveraged

to query any Web Service or API endpoint. In this case, MS Graph API is being leveraged

to retrieve additional information regarding a logged in user.

  1. In the Logon subroutine click the link for the Variable Assign.
image015
  1. In the resulting Variable Assign window, in the Variable Assign section, click

    the Add new entry button four(4) times. Click the change link in the first

    empty row.

image016
  1. In the resulting assignment window use the following values:

    LEFT SIDE

    • Custom Variable
    • Unsecure
    • Text Window: session.custom.displayName

    RIGHT SIDE

    • Session Variable
    • Text Window: subsession.http_connector.body.displayName
  2. Click Finished once complete.

image017
  1. Repeat the process again for the remaining two(2) empty rows using the values shown

    below.

ROW 2

  • LEFT SIDE
  • Custom Variable
  • Unsecure
  • Text Window: session.custom.jobTitle
  • RIGHT SIDE
  • Session Variable
  • Text Window: subsession.http_connector.body.jobTitle

ROW 3

  • LEFT SIDE
  • Custom Variable
  • Unsecure
  • Text Window: session.custom.mobilePhone
  • RIGHT SIDE
  • Session Variable
  • Text Window: subsession.http_connector.body.mobilePhone

ROW 4

  • LEFT SIDE
  • Custom Variable
  • Unsecure
  • Text Window: subsession.client.ip.address
  • RIGHT SIDE
  • Session Variable
  • Text Window: perflow.client.ip.address

image018

image019

image042

  1. Review the Variable Assign and click Save once completed.
image020
  1. In the Per-Request Policy section, click the + (Plus Symbol) on the Allow

    branch following the Logon subroutine and the URL Branching agent.

image021
  1. In the pop-up window, select the General Purpose tab, then click the radio button

    on the HTTP Headers action line, then click Add Item.

image022
  1. In the resulting HTTP Headers window, click the Add new entry button three(3)

    times to add three(3) rows in the Header Modify Section. Use the following values

    to complete each added row.

ROW 1

  • Header Operation: replace
  • Header Name: displayName
  • Header Value: %{session.custom.displayName}

ROW 2

  • Header Operation: replace
  • Header Name: jobTitle
  • Header Value: %{session.custom.jobTitle}

ROW 3

  • Header Operation: replace
  • Header Name: mobilePhone
  • Header Value: %{session.custom.mobilePhone}
  1. Click Save once completed.

image023

image024

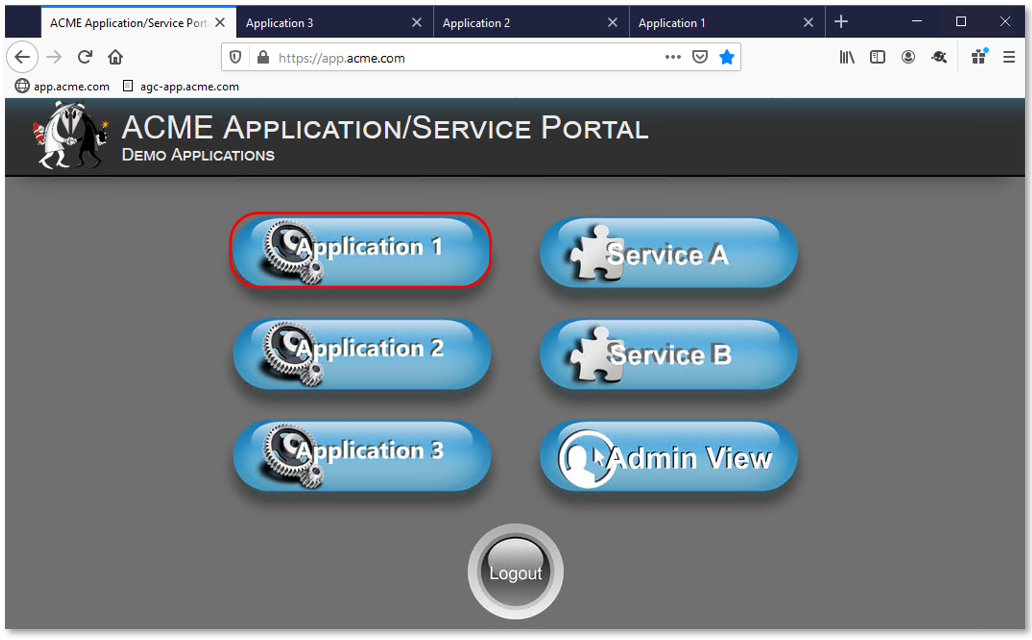
TASK 4: Testing & Reviewing the Extended Logon Subroutine

  1. Return to Firefox on the Jumphost test access to the app.acme.com application and

    access App1.

image025
  1. Note the newly injected headers into Application 1’s display page.
image026
  1. Return to bigip1.f5lab.local, navigate to Access -> Overview -> Active Sessions.

    Expand the + (Plus Symbol) to see the subsession.

  2. Click on the View link in the Variables column for the listed subsession.

image027
  1. Review the variables collected via the HTTP Connector Requests.
image028
  1. Navigate to Access -> Overview -> Active Sessions. Click on the Session ID link

    in the Session ID column for the listed active session.

image034
  1. Review the actions in the Session log, particularly those associated with HTTP Connector

    requests.

image029

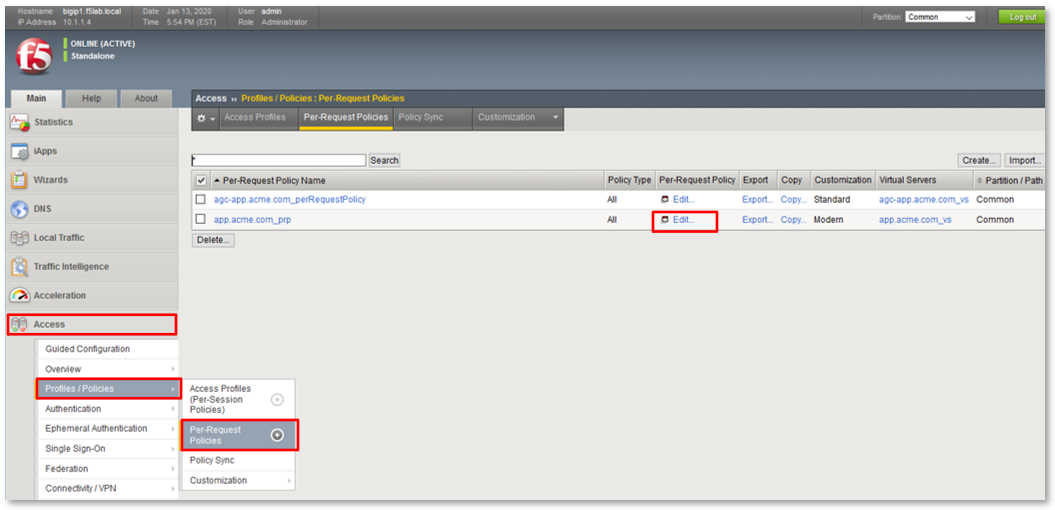
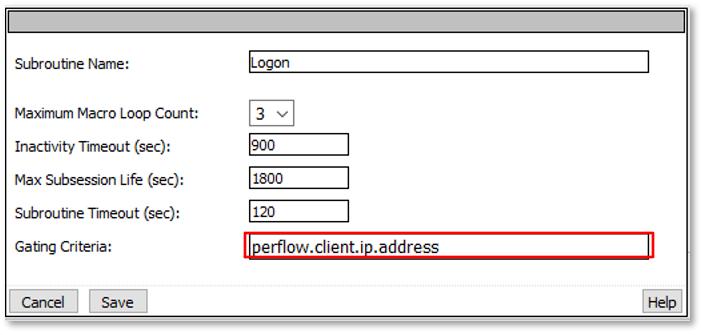
TASK 5: Configuring Gating Criteria

  1. Navigate to Access -> Profiles/Policies -> Per-Request Policies and then click the

    Edit link for the app.acme.com_prp Per Request Policy.

Note: This may already be open.

image032
  1. In the resulting Visual Policy Editor window for app.acme.com_prp, expand the

    Logon subroutine and click the Subroutine Settings/Rename link.

image030
  1. In the pop-up window, in the Gating Criteria field, enter

    perflow.client.ip.address and click Save.

image031

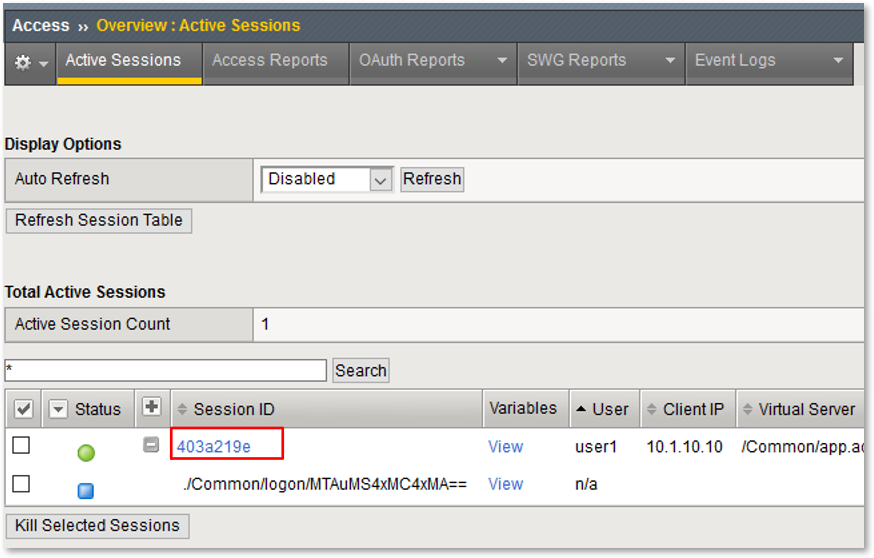
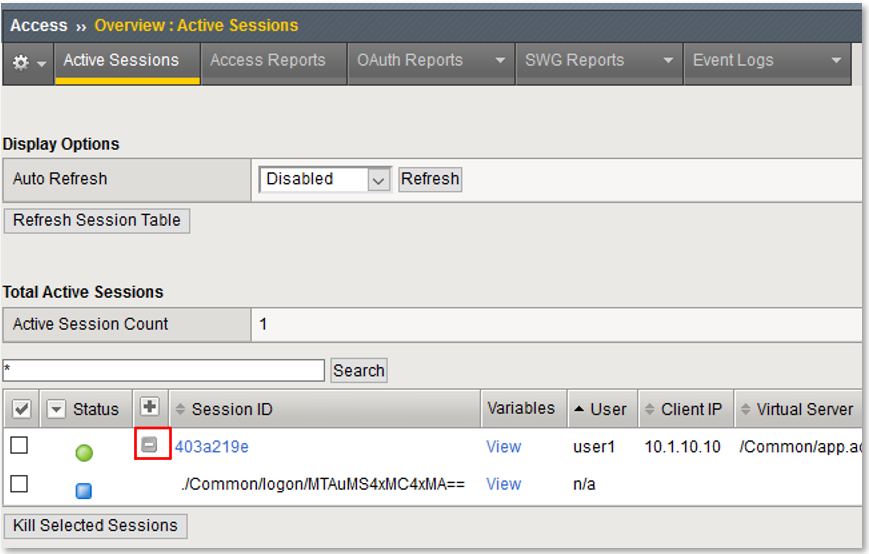
TASK 6: Testing Gating Criteria

  1. Return to Firefox on the Jumphost test access to the app.acme.com application and

    access App1. Re-login to the application if necessary.

image025

image040

  1. Confirm on that your session is active on bigip1.f5lab.local, by navigating to

    Access -> Overview -> Active Sessions. Expand the + (Plus Symbol) to see the

    subsession.

image033
  1. Return to the Jumphost. Do NOT close the browser and the already opened

    application.

  2. Navigate to the Jumphost desktop and click on the Change IP 10.1.10.11 link (Confirm

    the elevated Administrator privlege pop-up).

image035

image036

  1. Return to Firefox and the app.acme.com application by accessing App1 again. Note that

    you will be re-prompted for access.

image025

image100

image041

  1. Return to bigip1.f5lab.local, and navigate to Access -> Overview -> Active

    Sessions. Expand the + (Plus Symbol) to see the two(2) subsessions now associated

    with your session. (You may alternatively refresh the screen if already opened.)

image037

image038

image039

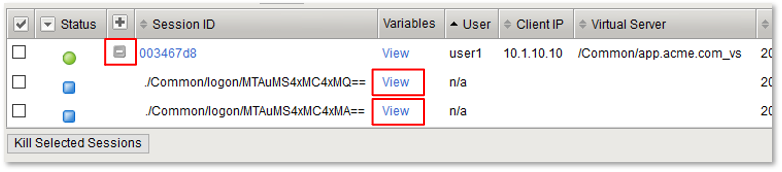
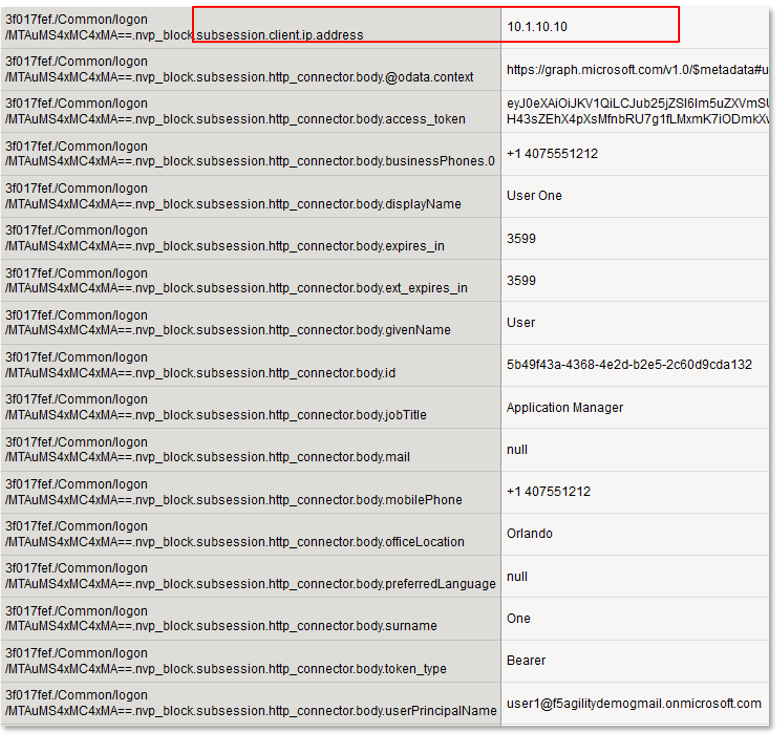
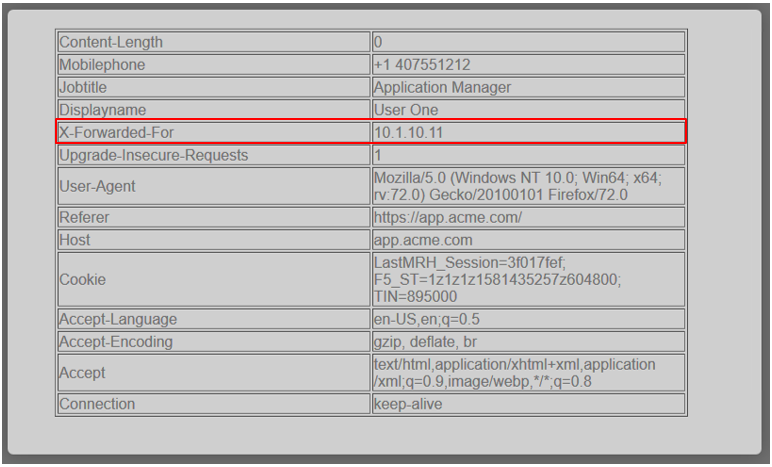
Note: The are multiple examples of Gating Criteria. In this example, client IP was

used to show that any changes in the connecting entity can result in establishing a new

subsession. What happens in new subsessions, the number of subsessions and how they are

controlled is based on the individual customer/application need.

TASK 7: End of Lab3

  1. This concludes Lab3, feel free to review and test the configuration.
image000