NGINX Modern Apps > Class 6 - NGINX API Management > Module 4 - Add security controls Source | Edit on
Step 7 - Set up authentication and authorization
In this lab, we will add a security layer in front of our API Gateway. To do so, we will:
- Add JWT token validation
- Add JWT claims authorization
Note
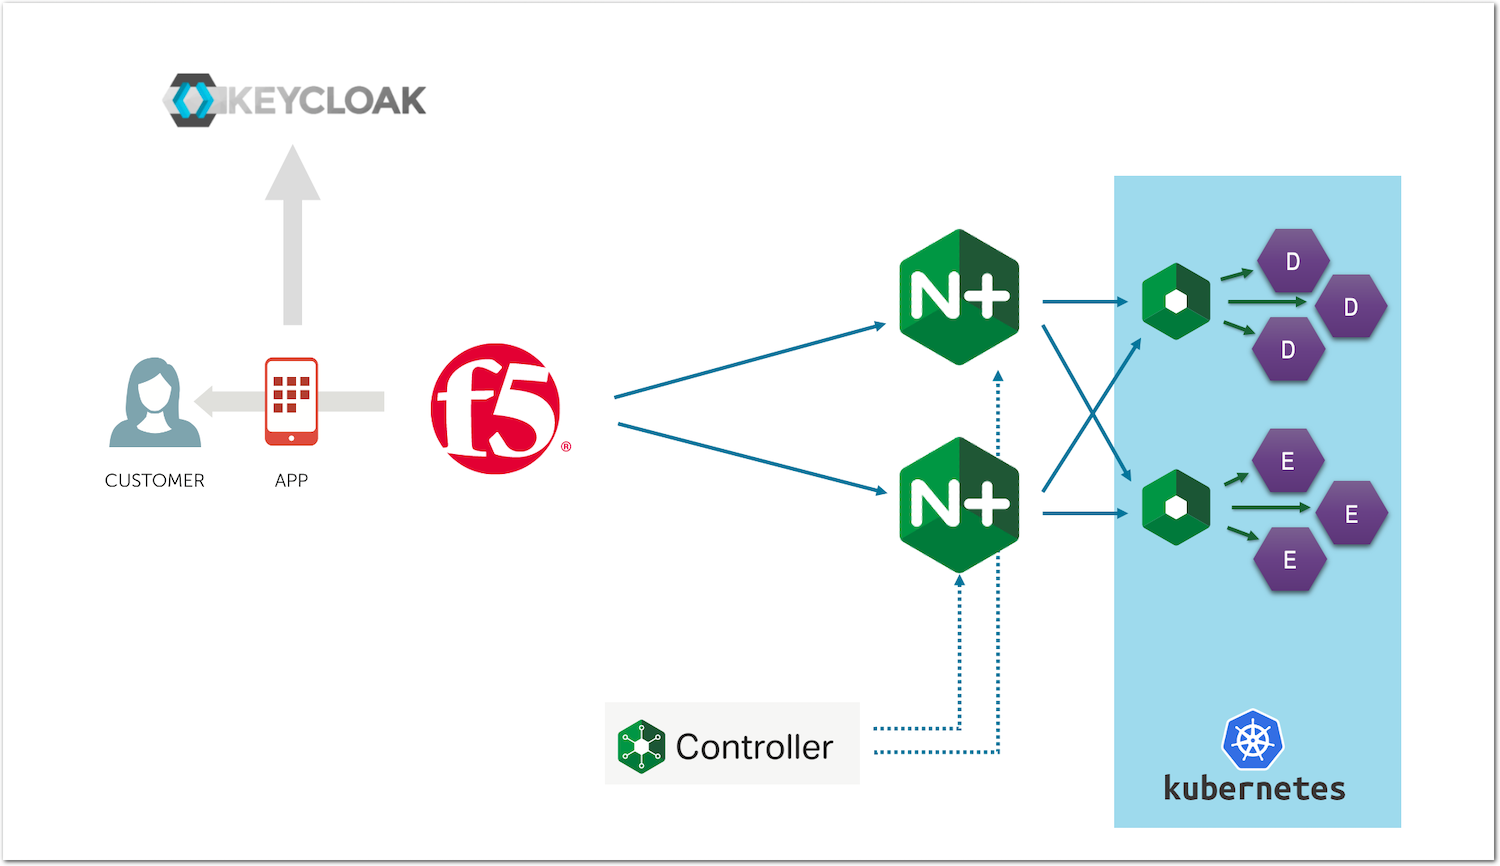
A JWT token needs to be issued by an OAuth Authorization Server (AS). There are several OAuth AS on the market. Some are IDaaS (Identity as a Service) like Azure AD or Okta. Some others are OSS (Open Source Software) or commercial like Keycloak.
In this lab, we will use Keycloak as our OAuth AS to issue the JWT tokens.
Steps to enable JWT token validation and authorization
Configure Keycloak as a JWT OIDC token issuer
RDP to the
Win10VM (user/user).Open the
Edge Browserand select theKeycloak HTTPSbookmark.Click on
Administration Console.
Login to Keycloak using
adminas both the user and password.On the top left corner, check that the realm selected is
Api-appand click on theClientsmenu.Select
my-postman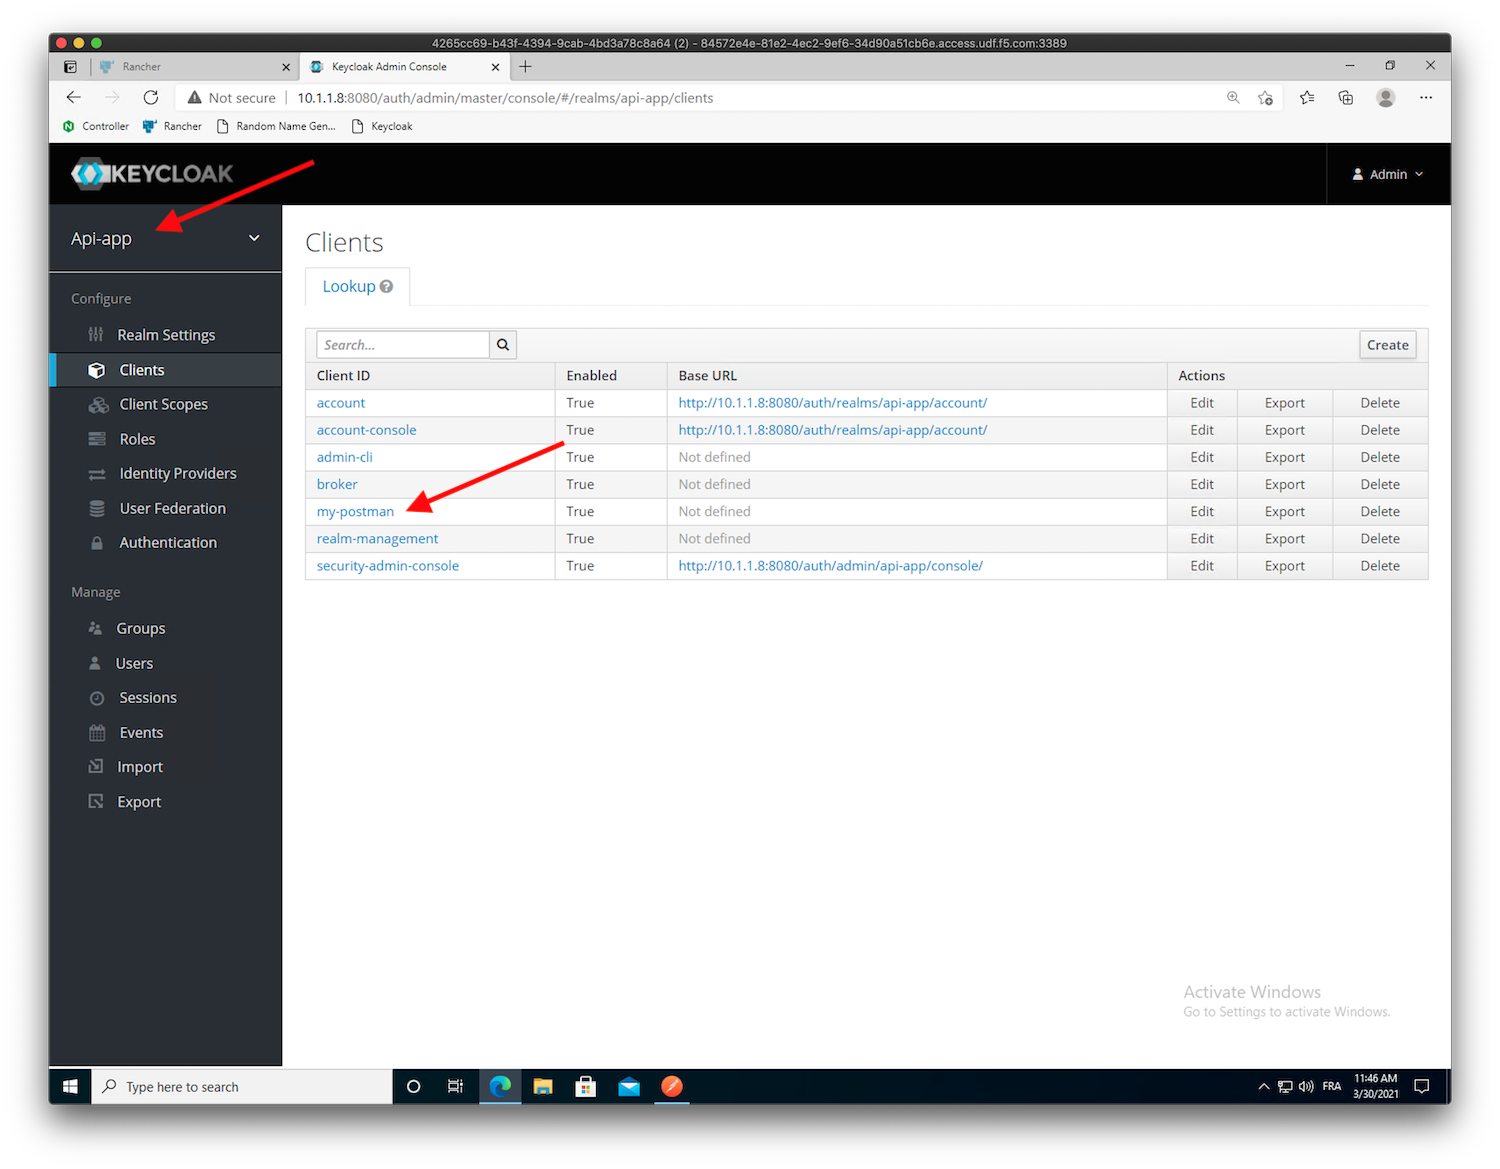
Note
In order to avoid any mistakes during this lab, we created in advance the
my-postmanclient and thesecret key(9cabf36d-8eda-4cf8-a362-ccc982408ba7).In the
my-postmanclient, click onCredentials. You should be able to see the secret key we will use to ask for a JWT token in postman.Click on
Usersin the left menu, and click onView all users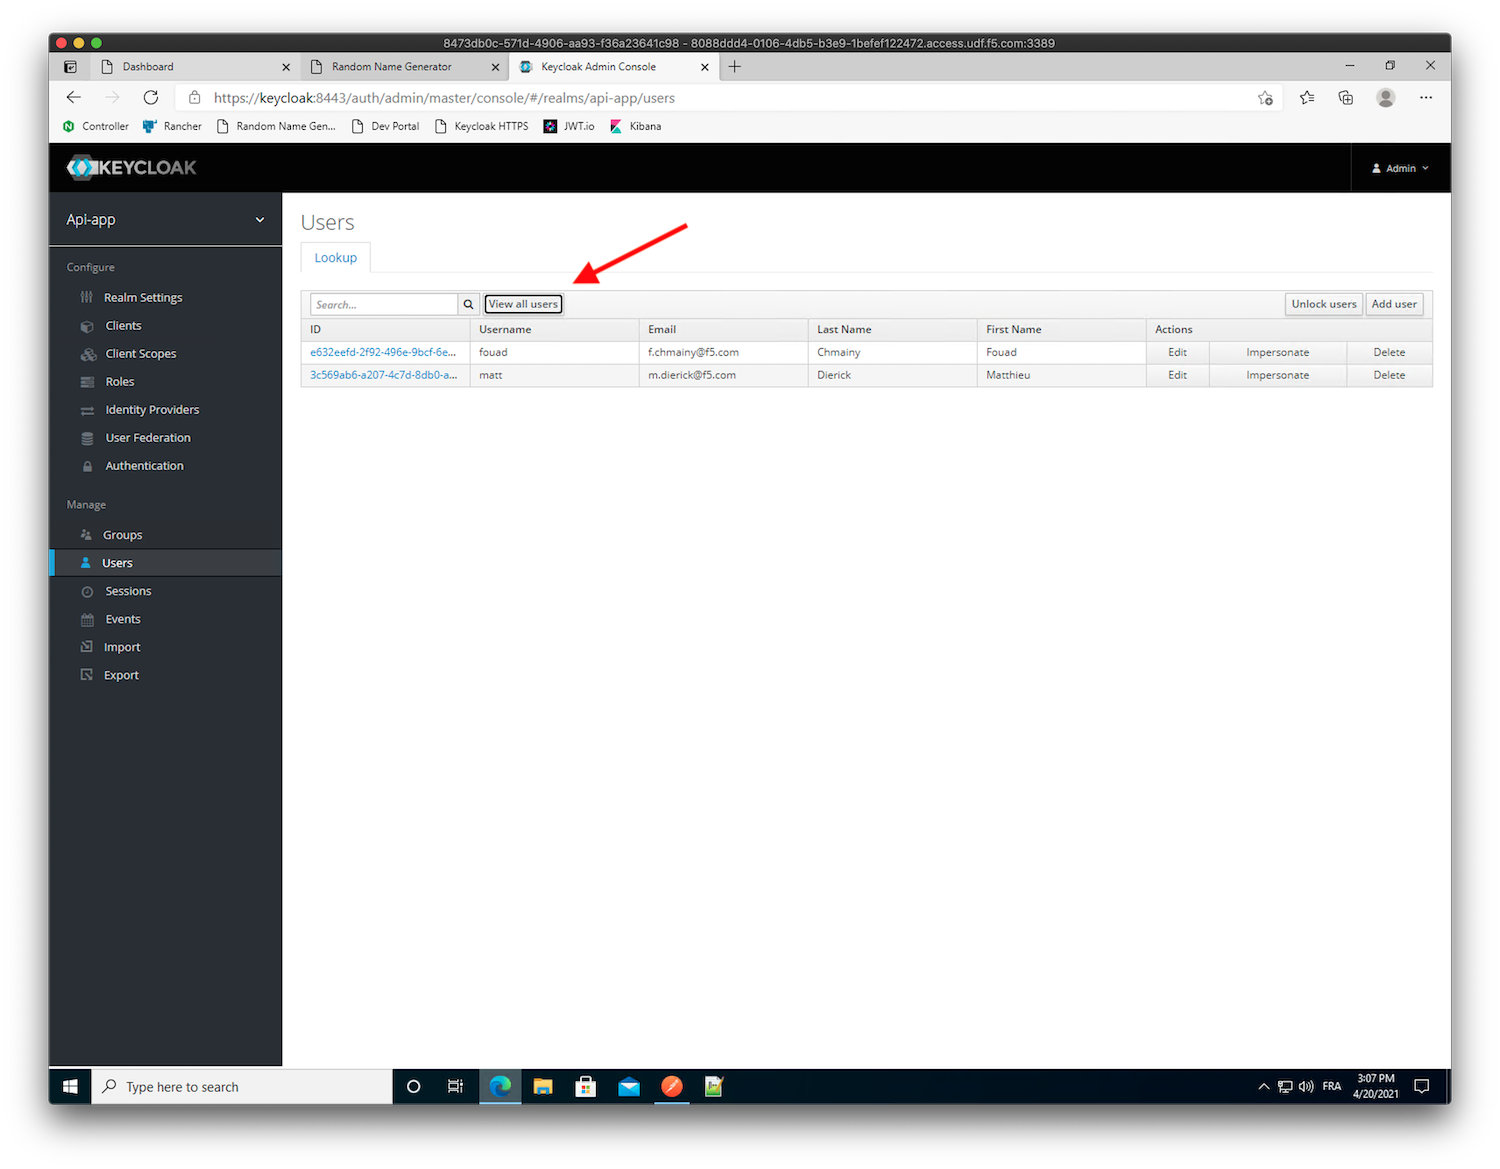
Note
You should see 2 users,
matt(passwordmatt), andfouad(passwordfouad). At this stage, these users do not have any attributes assigned.Click on the
mattID to edit it.In the
Attributestab, add a new keygroupswith valueemployee.Warning
Don’t miss the
Sat the end ofgroups.Click
Add-> ClickSaveWarning
You need to click on
Addto add the attribute, and onSaveto save the user settings.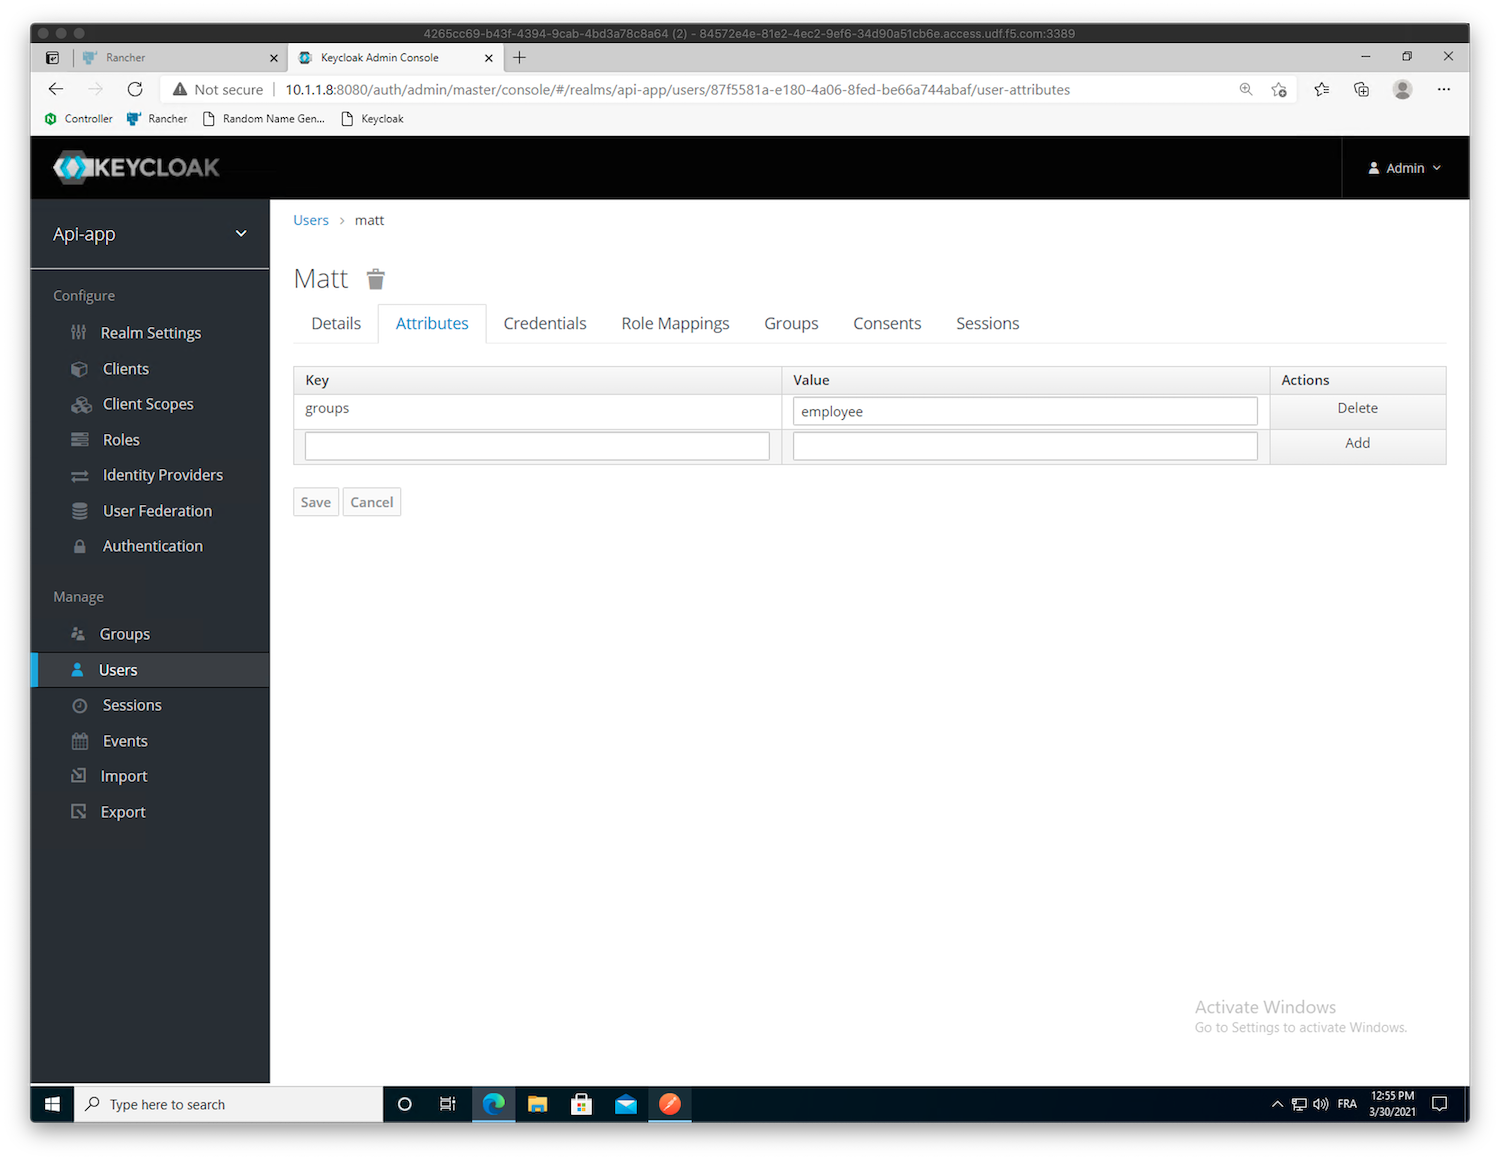
- We will now create our own scope,
groups, so that a JWT claim is added into every JWT token with the respective attribute value(s): Click on
Client Scopes->CreateName the scope
groups-> ClickSave-> Click theMapperstab -> ClickCreateCreate a new mapper. Use the following values:
- Name:
groups - Mapper Type:
User Attribute - User Attribute:
groups - Token Claim Name:
groups - Claim JSON Type:
String - Add to ID token:
ON - Add to access token:
ON - Add to userinfo:
ON - Multivalued:
OFF - Aggregate attribute values:
OFF
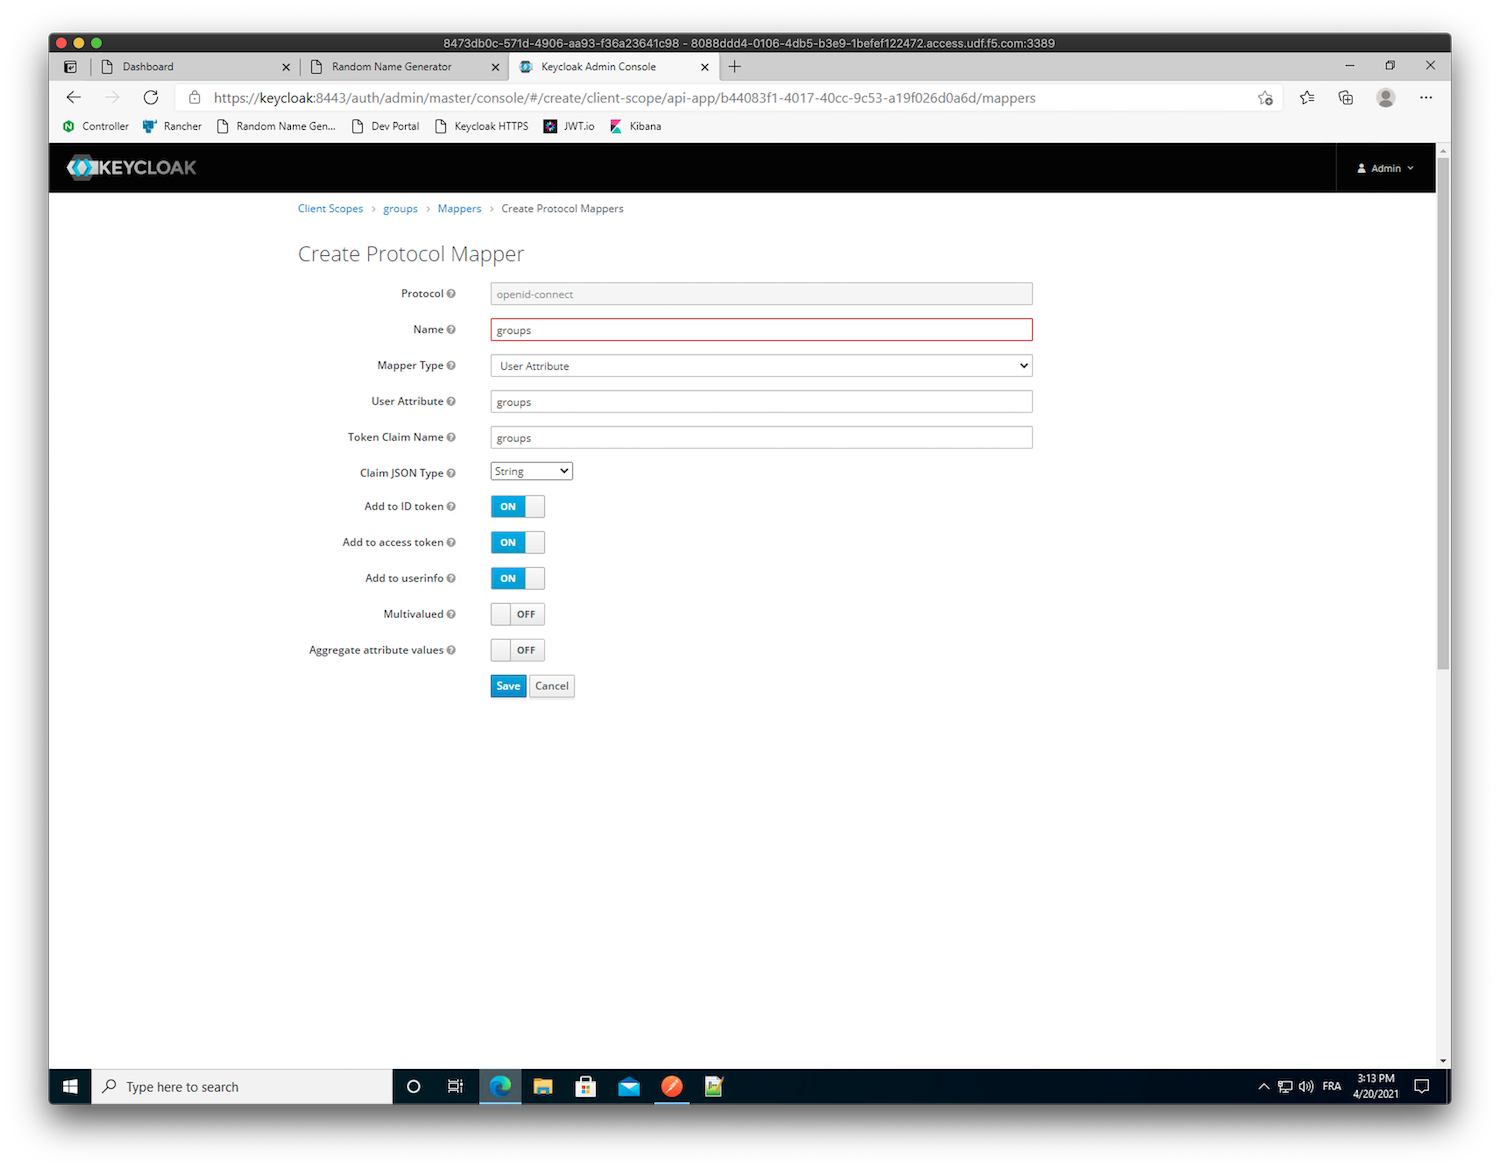
Note
The configuration above says to add a claim with the name
groupsand assign it the value from the user attributegroups- Name:
Click
Save
- We will now create our own scope,
Leave the
Mapperswindow by clicking on the top left menuClient Scopes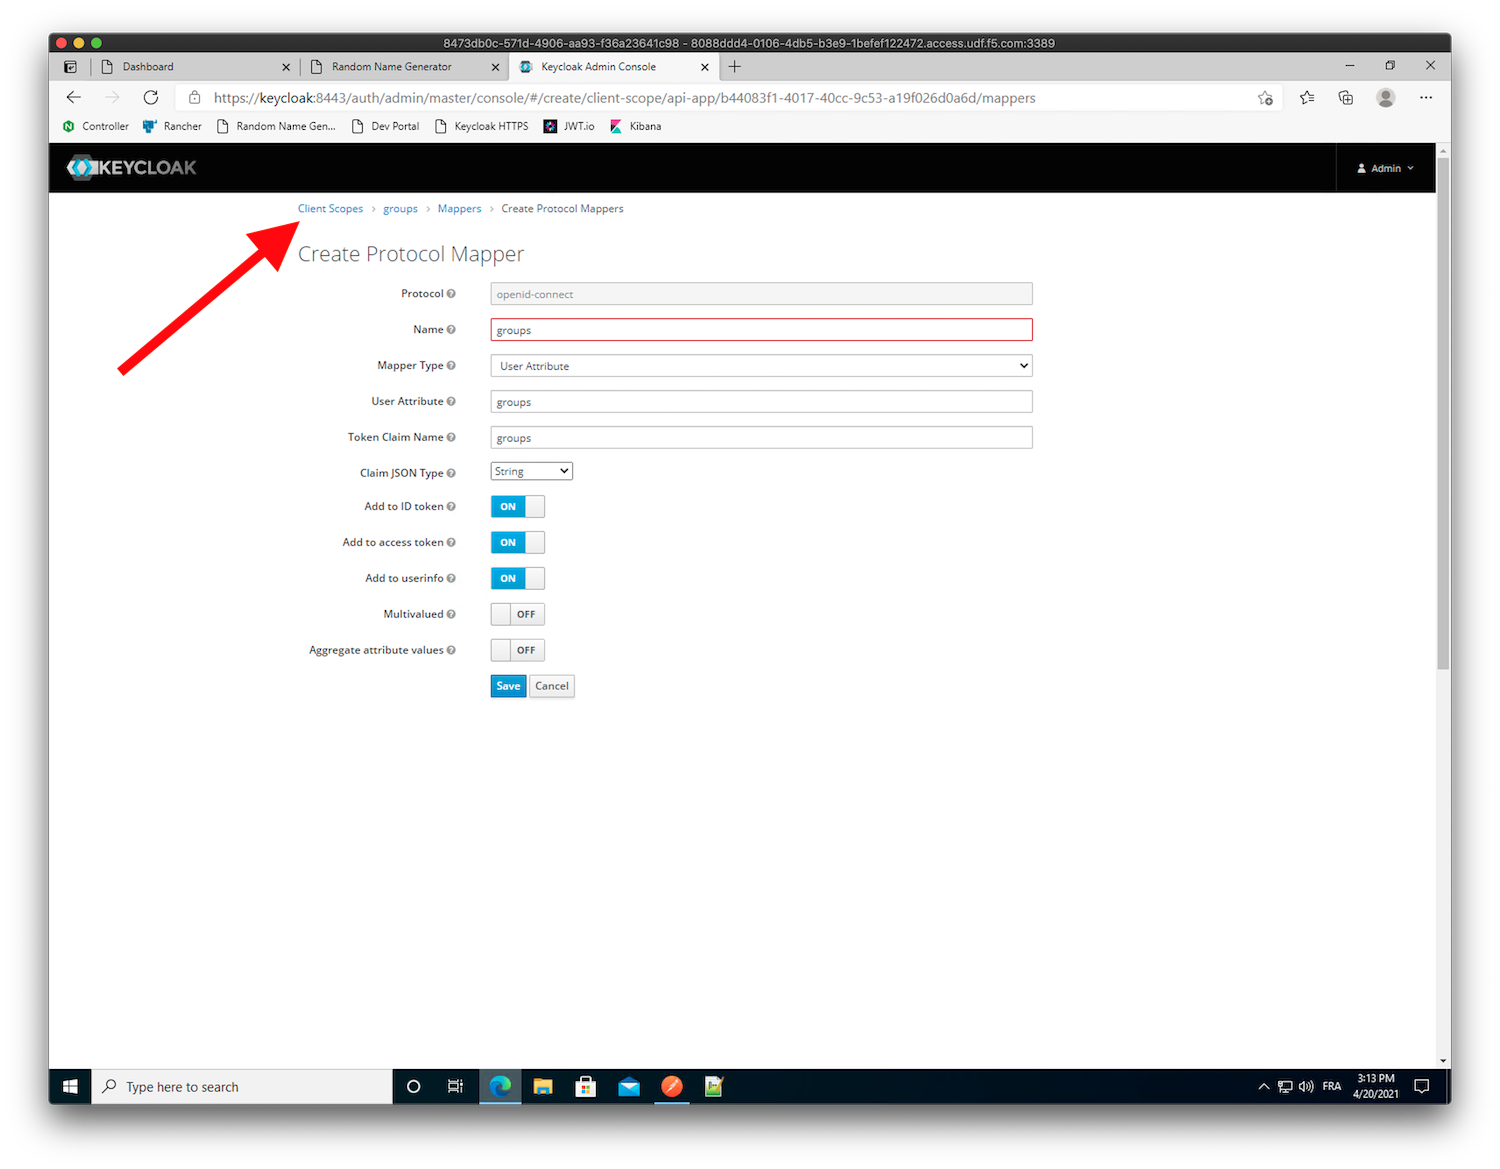
- Still in
Keycloak, add this new scope to themy-postmanclient: Click
Clients->my-postmanand select theClient ScopestabBefore adding our new scope
groups, let’s have a look in at how the generated JWT token looks like. Click onEvaluateand selectmattas theuser, then clickEvaluate.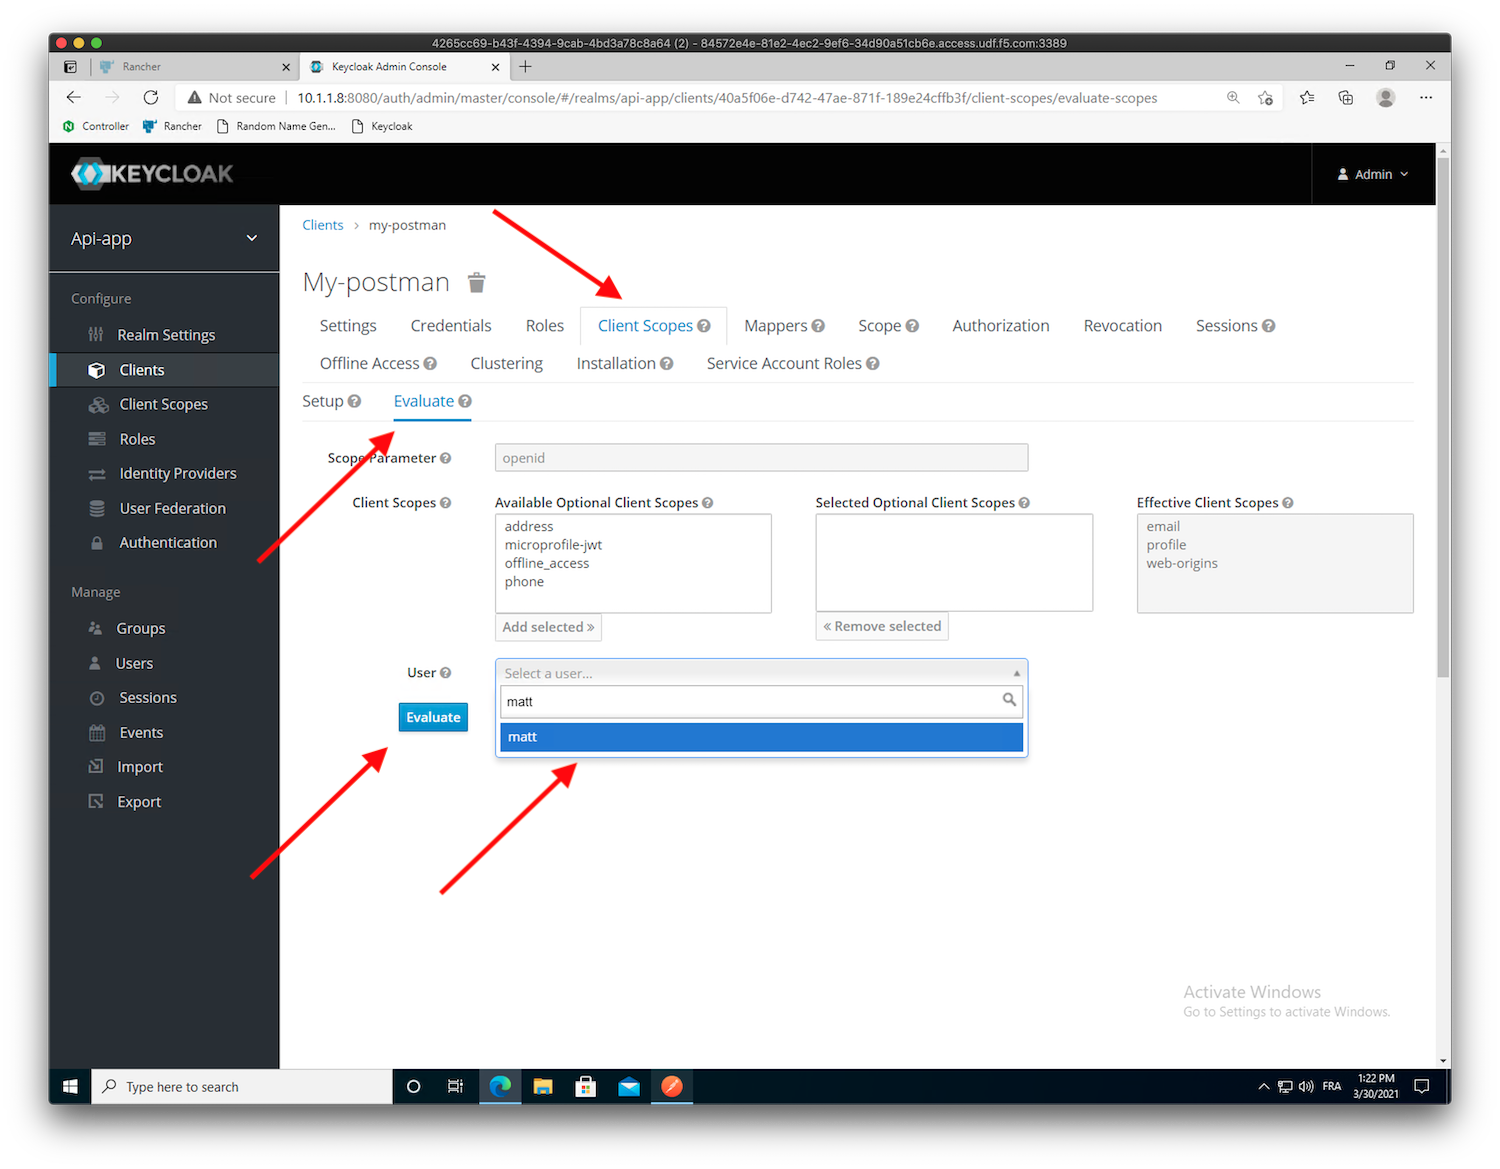
Click
Generated Access Token, and check the JWT content.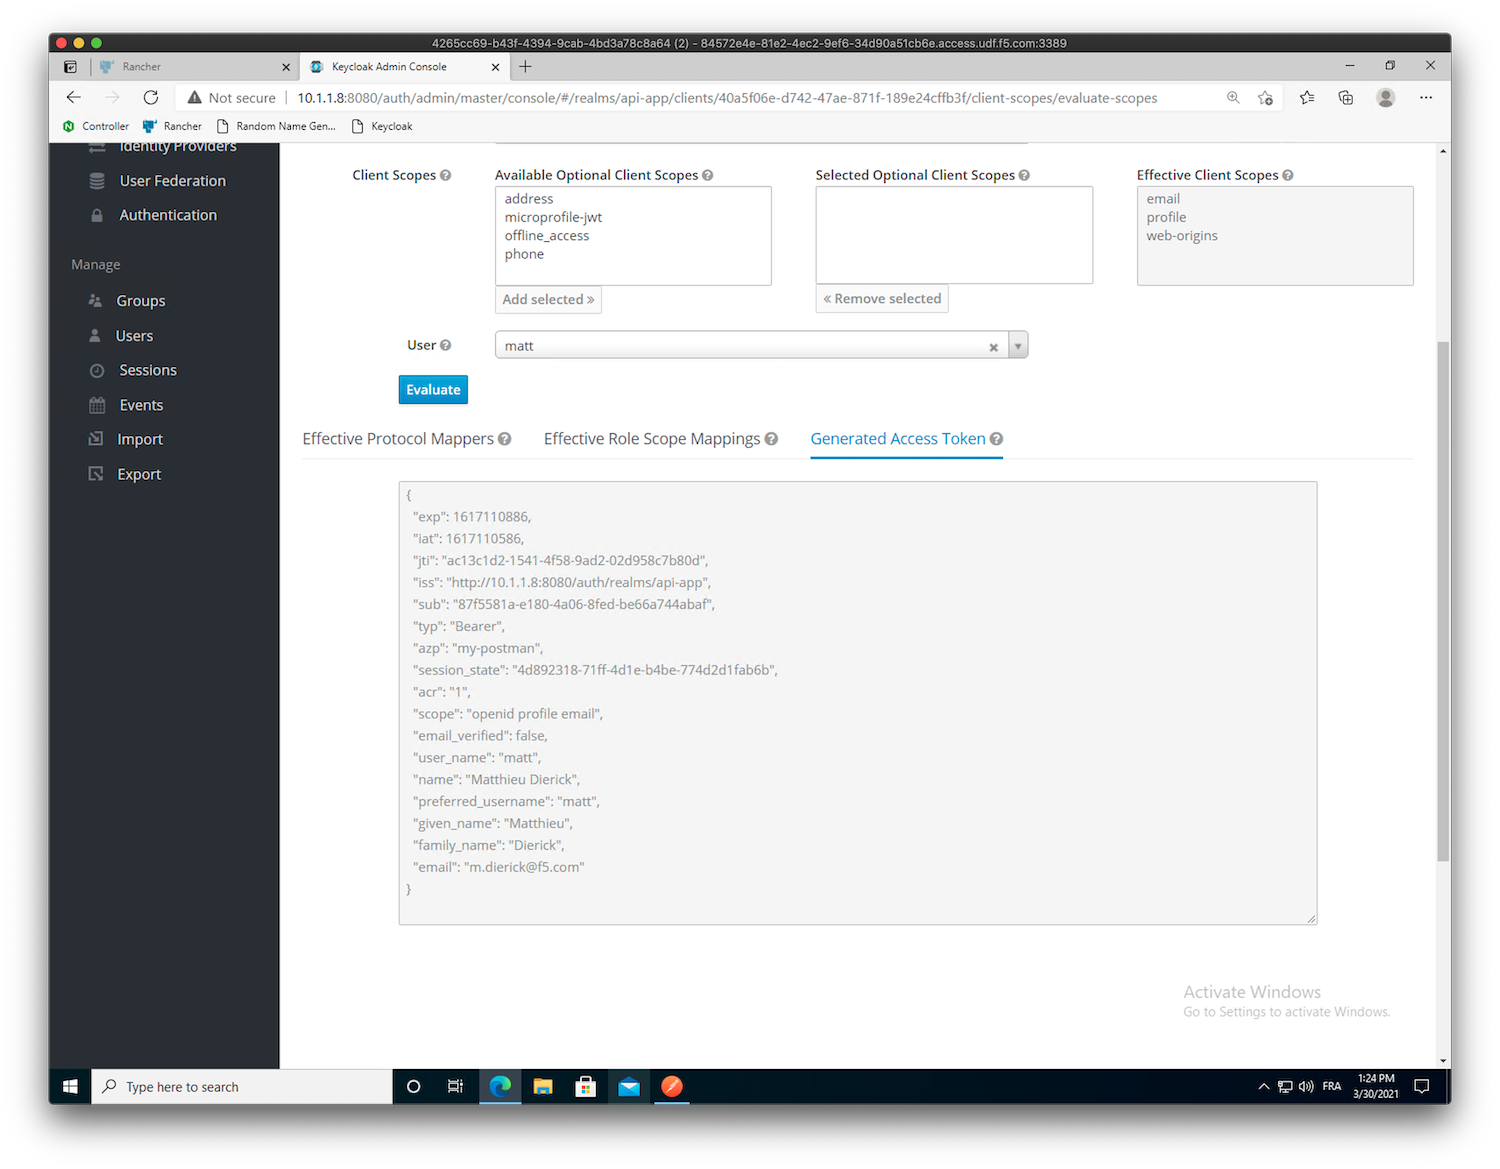
Note
As you can see, there is no
groupsclaim in this JWT tokenClick on the
Setupsub-menu (next to theEvaluatesub-menu), select thegroupsscope underAvailable Client Scopesand clickAdd Selectedto move the scope into theAssigned Default Client Scopes.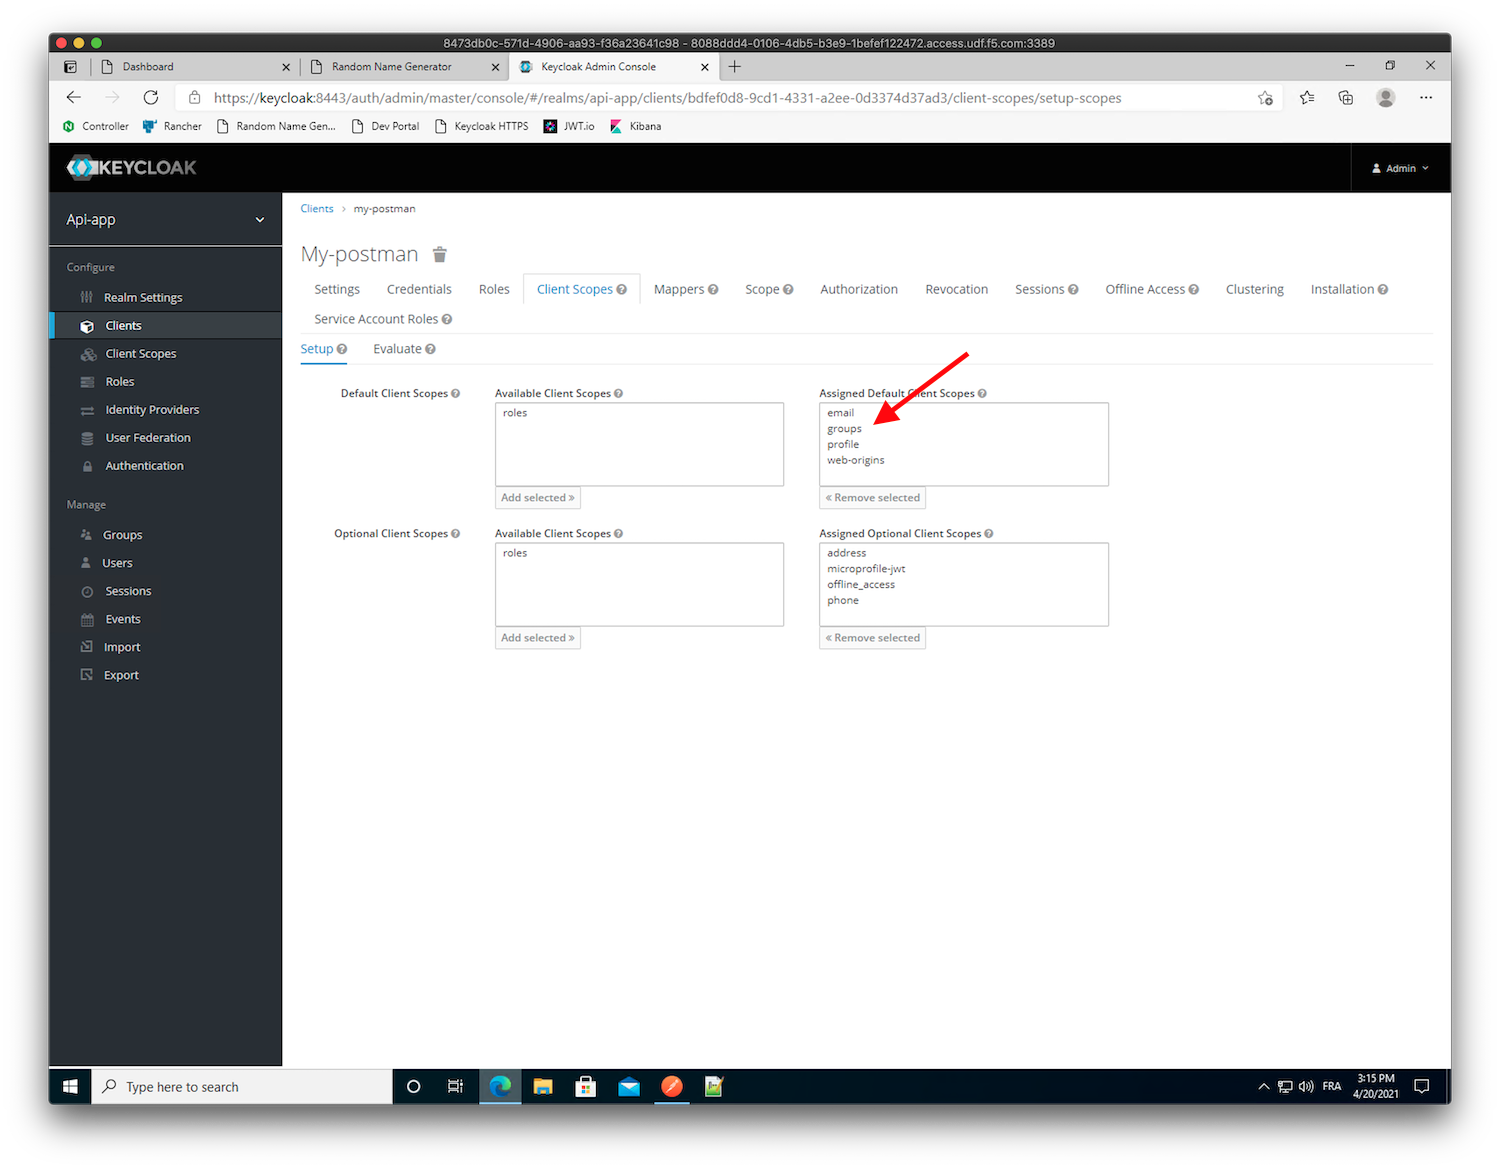
Move back to the
Evaluatesub-menu, selectmattas a user, now you can see agroups: employeeattribute value inGenerated Access Tokenformattuser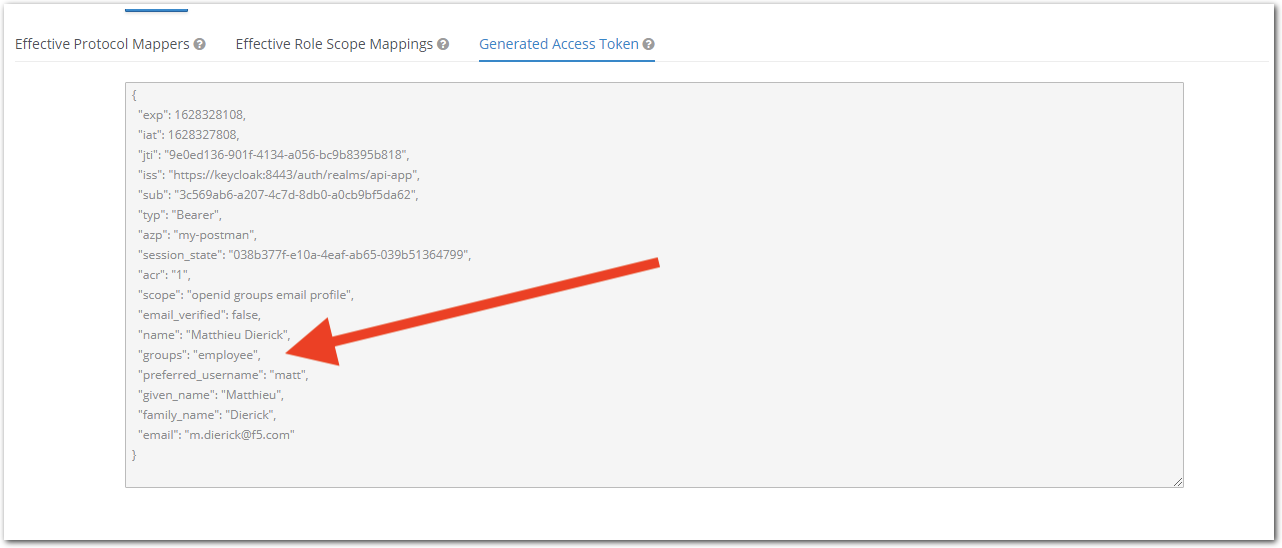
- Still in
Warning
Congrats! We are now ready to configure NGINX Controller to check the groups claim values and conditionally grant access to our API endpoints.
Create an Identity Provider in NGINX Controller
A JWT token is a readable token signed by a public/private key workflow. Keycloak (or any other Oauth AS) provides you with either a private secret key or a JWKS url.
A JWKS url is a public URL to retrieve and download the public keys used to sign the JWT token. The Keycloak JWKS url is http://10.1.1.8:8080/auth/realms/api-app/protocol/openid-connect/certs, and the content looks like:
{
    "keys": [
        {
            "kid": "as8gYx18yAyuzBOD9UiVp-ndr-aGmnSwfOqscHGuJUM",
            "kty": "RSA",
            "alg": "RS256",
            "use": "sig",
            "n": "nJY5azyX0e5ropzKVBmFH3kt3vftV1iG7O157WyxgFU8hd22wM5vJwmkodBy91Yc3M6qcag9Gi3YMvKnFQF6OrYeaOg7ePWnabAhyhMjATWtnypbRcqM9AyyBekphNhpuNT2Mlqo7eYIt85VUT9iv3upLNy2PZ1W_iAYTh5f-RQukWAagMX7vTWQ4mrUvKfKc7RCc-ikBToaSEte193ckjRqawSLYoHRs2vAeywZYaPFXeIuBaFKglpV051dNwcJFfWMCNmbIJ0xTlXJP2HfQ1AaY7u5SFXnkcX-pkt2PBTDrWqPahZhDQjCstr3M_qbpYd6LUls5z-yhiaHQ4JW1w",
            "e": "AQAB",
            "x5c": [
                "MIICnTCCAYUCBgF4fRp2jzANBgkqhkiG9w0BAQsFADASMRAwDgYDVQQDDAdhcGktYXBwMB4XDTIxMDMyOTA4MjgwOVoXDTMxMDMyOTA4Mjk0OVowEjEQMA4GA1UEAwwHYXBpLWFwcDCCASIwDQYJKoZIhvcNAQEBBQADggEPADCCAQoCggEBAJyWOWs8l9Hua6KcylQZhR95Ld737VdYhuztee1ssYBVPIXdtsDObycJpKHQcvdWHNzOqnGoPRot2DLypxUBejq2HmjoO3j1p2mwIcoTIwE1rZ8qW0XKjPQMsgXpKYTYabjU9jJaqO3mCLfOVVE/Yr97qSzctj2dVv4gGE4eX/kULpFgGoDF+701kOJq1LynynO0QnPopAU6GkhLXtfd3JI0amsEi2KB0bNrwHssGWGjxV3iLgWhSoJaVdOdXTcHCRX1jAjZmyCdMU5VyT9h30NQGmO7uUhV55HF/qZLdjwUw61qj2oWYQ0IwrLa9zP6m6WHei1JbOc/soYmh0OCVtcCAwEAATANBgkqhkiG9w0BAQsFAAOCAQEARr5/4RxFeHMtQxa3soEgQdQ6nCMqUiAKM0V7Upnoo3lTorMiujsi3Iog2olq1r/z4+xdOXTNL6WqNWdGr+z1OFnqzmUl1l+xESNSXBYTUZyeIbLYCjLGCfrzqYJBQvs/ECJ8Rk4mabL1tLDAUOiEUhvlJgiiNLWrqhwrpOrdJtlU8rlGk5TRjv+lpWkex9ZqpYKZ4ewHlZSTlAri9Jb+WuxFmw8ksrufmqn4IQ5Oee9O3HL8nadbqgeokY6Rb8U5HKaNDyvuCERfC/wLph+DVJQd1ubG1XvnfRcdGW8e79US+uIxJUQZCY2BN01Y0f89rRmgk5tZ15Fxl6FYeT2Y/Q=="
            ]
            ,
            "x5t": "_qPH5MQIPZ4EmoWlTHv7Ciq28EY",
            "x5t#S256": "V5zhNTYsKPltmTdF9j_LnZfaIgMHCnLJoiNwxpEBUc8"
        }
    ]
}
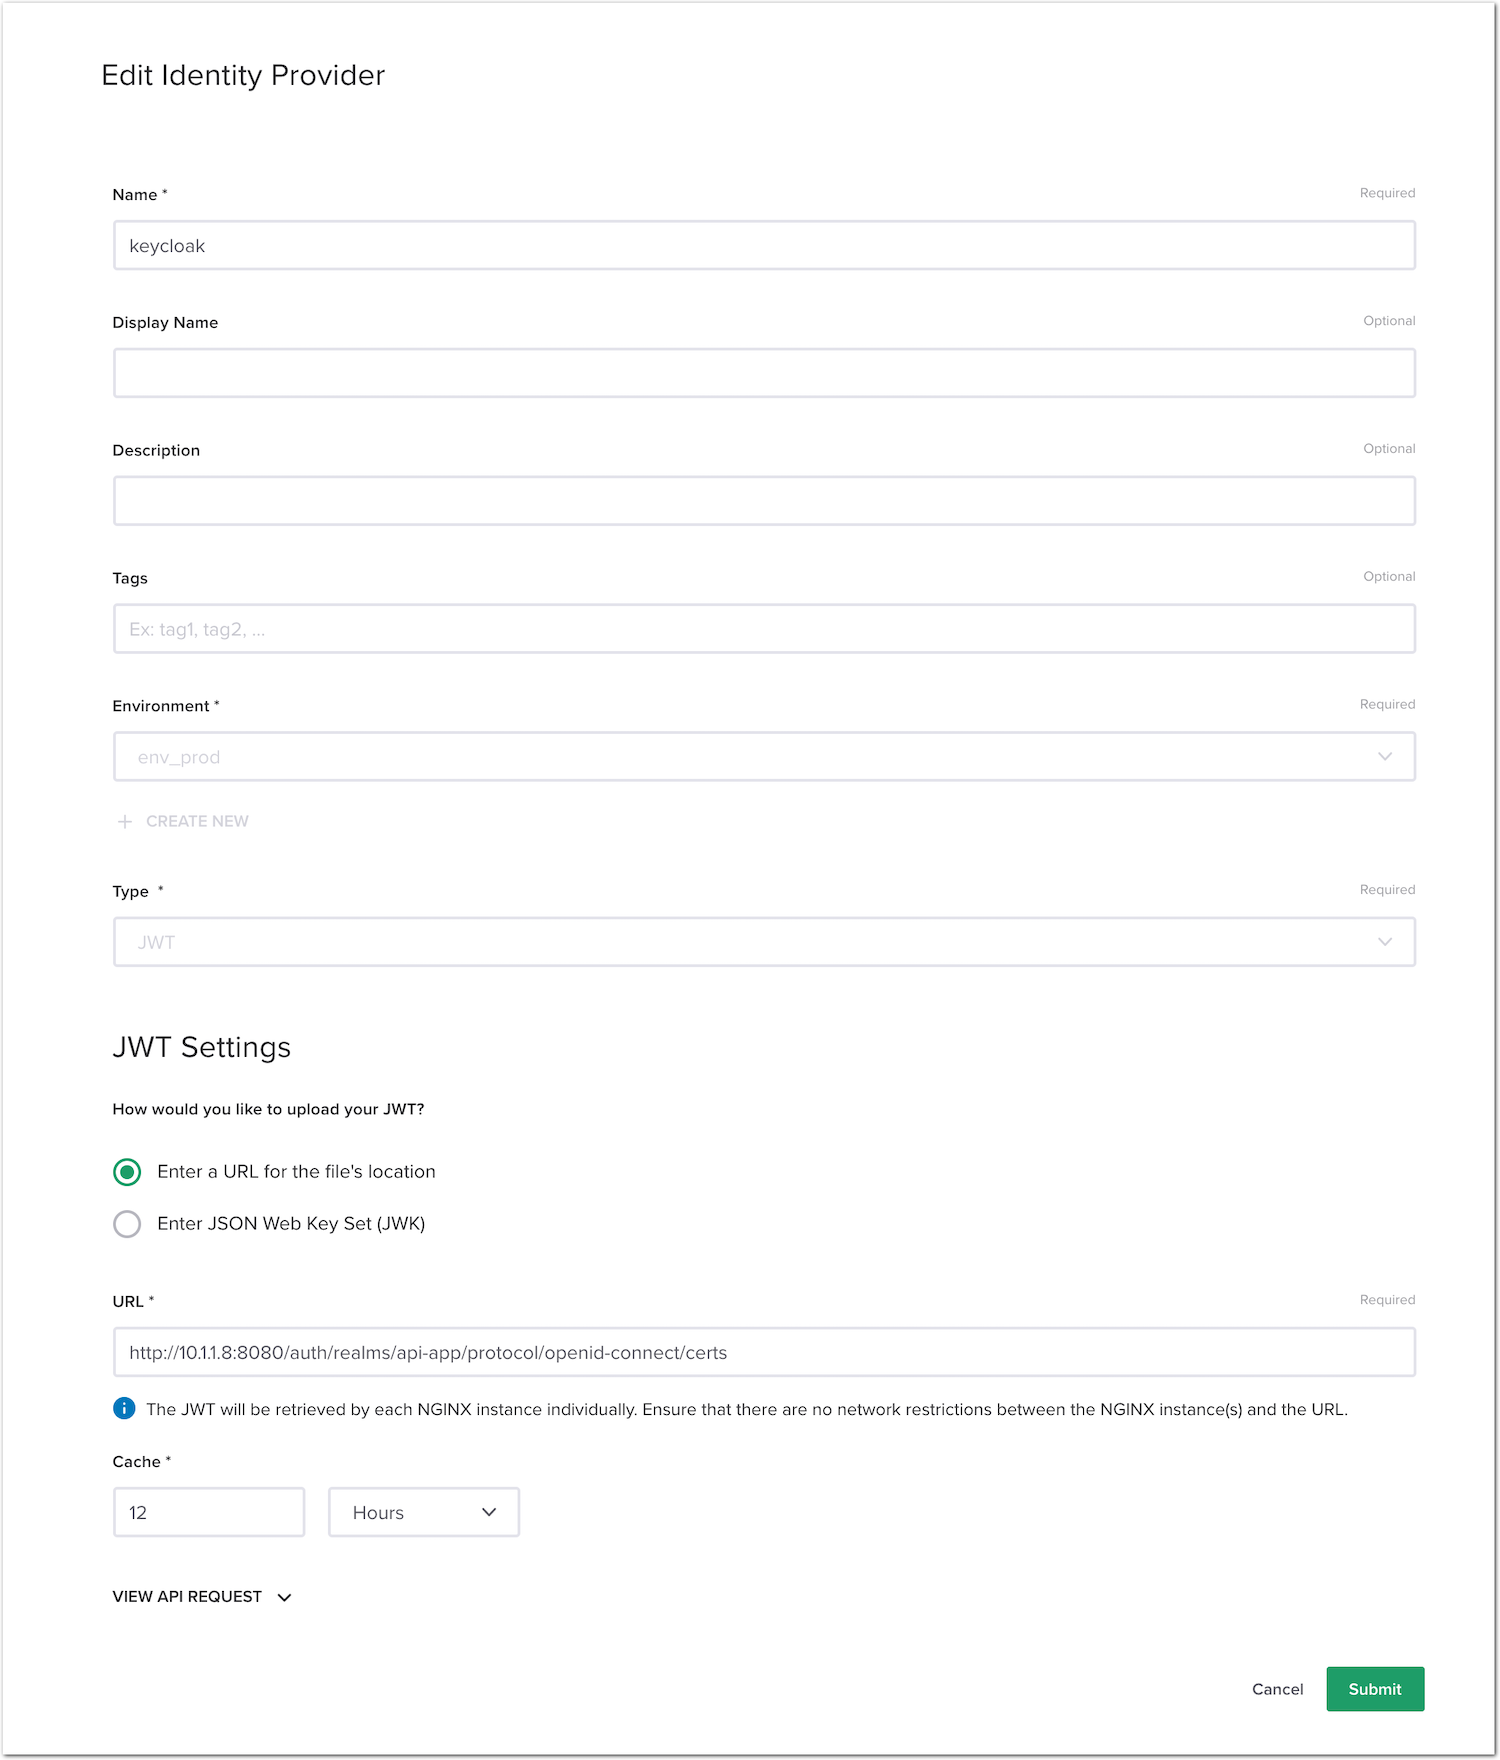
- In NGINX Controller -> Select
Services->Identity Providers->Create Identity Provider. Use the following values:- Name:
keycloak - Environment:
env_prod - Type:
JWT - JWT Settings:
Enter a URL for the file's location - URL:
http://10.1.1.8:8080/auth/realms/api-app/protocol/openid-connect/certs
- Name:
- Click
Submit
Add authentication to the /colors API endpoint
In NGINX Controller -> Select
Services(from top left Nginx menu) ->APIs->api-sentence-> Edit theapi-sentence-v3published API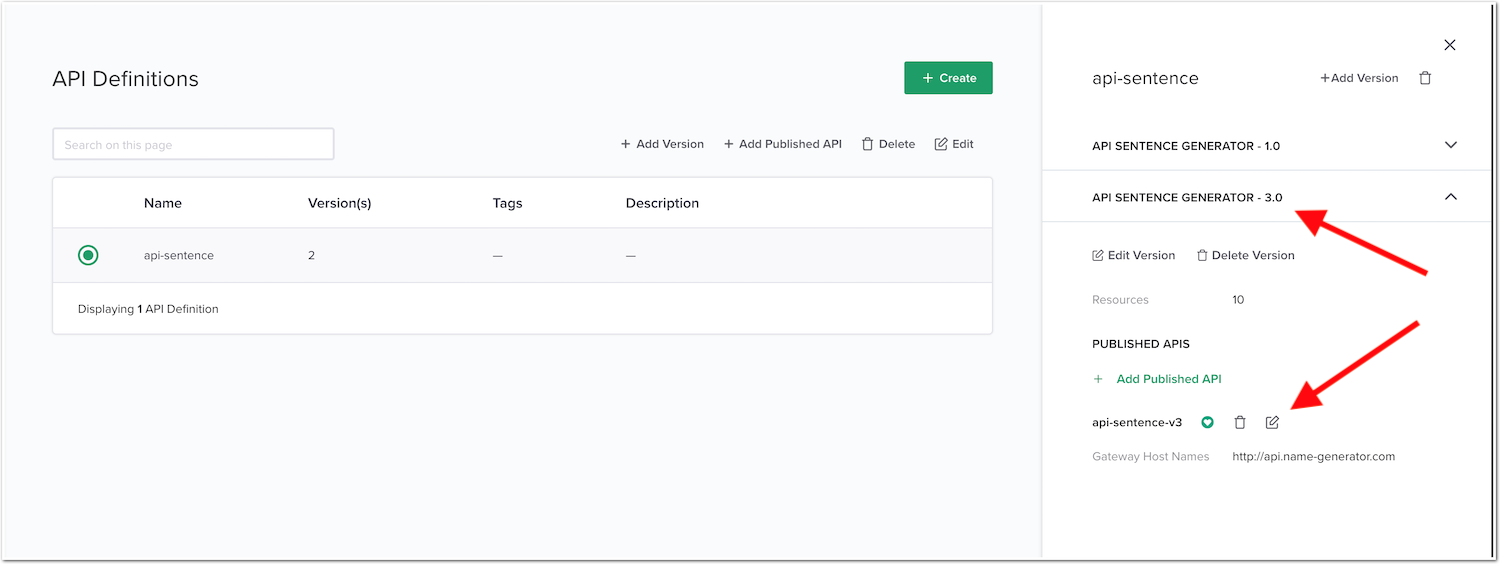
In the
Routingmenu, edit theSecurity Settingsfor thecp-colors-v3component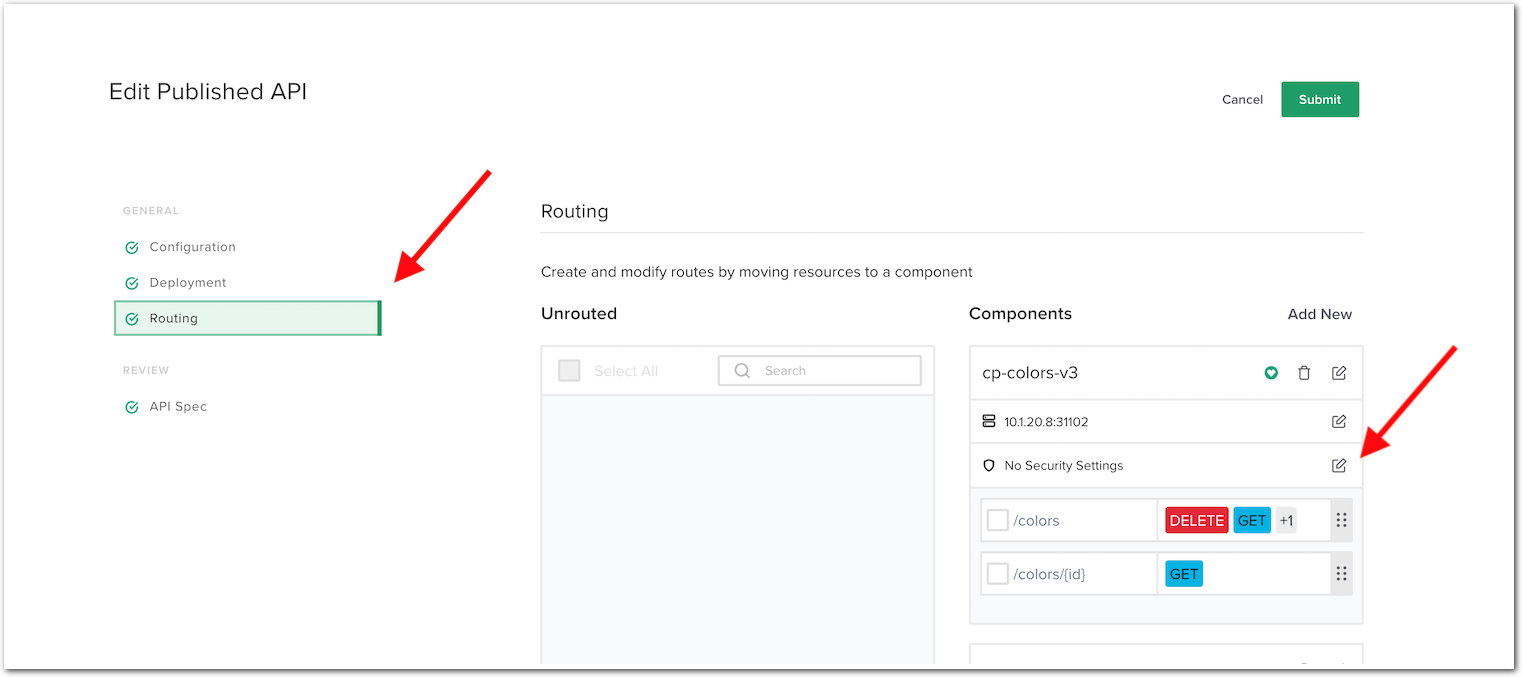
Click
Add Authentication
Use the following values:
- Identity Provider:
keycloak - Credential Location:
BEARER
Note
This setting means that the JWT token is expected to be present in the
Authorization: BearerHTTP header- Identity Provider:
Click
DoneClick
Submit->Submitagain to validate the config and push it to the NGINX instance.
Note
We have not enabled conditional access for now.
Test the authentication protected API
RDP to the
Win10VM (user/user).Open
Postman, select theAPI Sentence Generator v3collection, and select theGET Colors v3request.Run the request, you should get a
401 Authorization Requiredresponse. This is because there is no JWT token in the request.- Request a JWT token from Keycloak
In the
Authorizationtab, underType, selectOAuth 2.0, and click the orangeGet New Access Tokenbutton (at the bottom of the right side menu).Note
We already configured Postman as our OAuth client behind the scenes. You can retrieve the
Client ID and secretfrom themy-postmanKeycloak client configuration.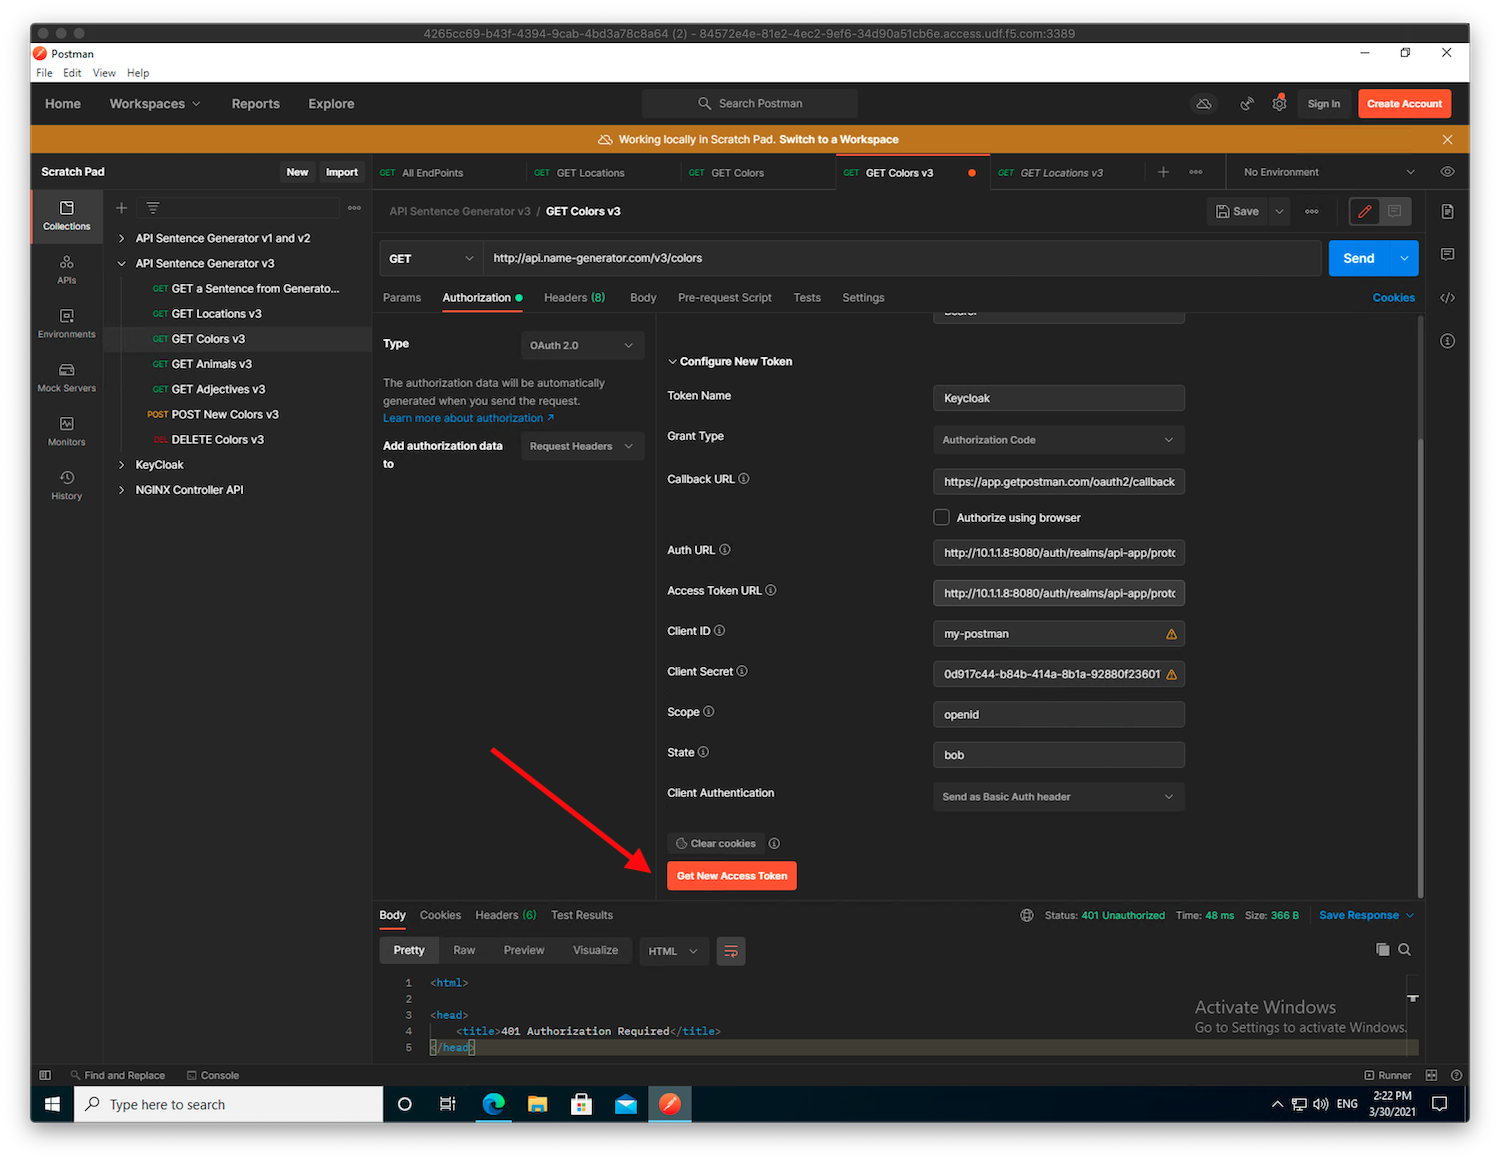
Authenticate as
matt(passwordmatt).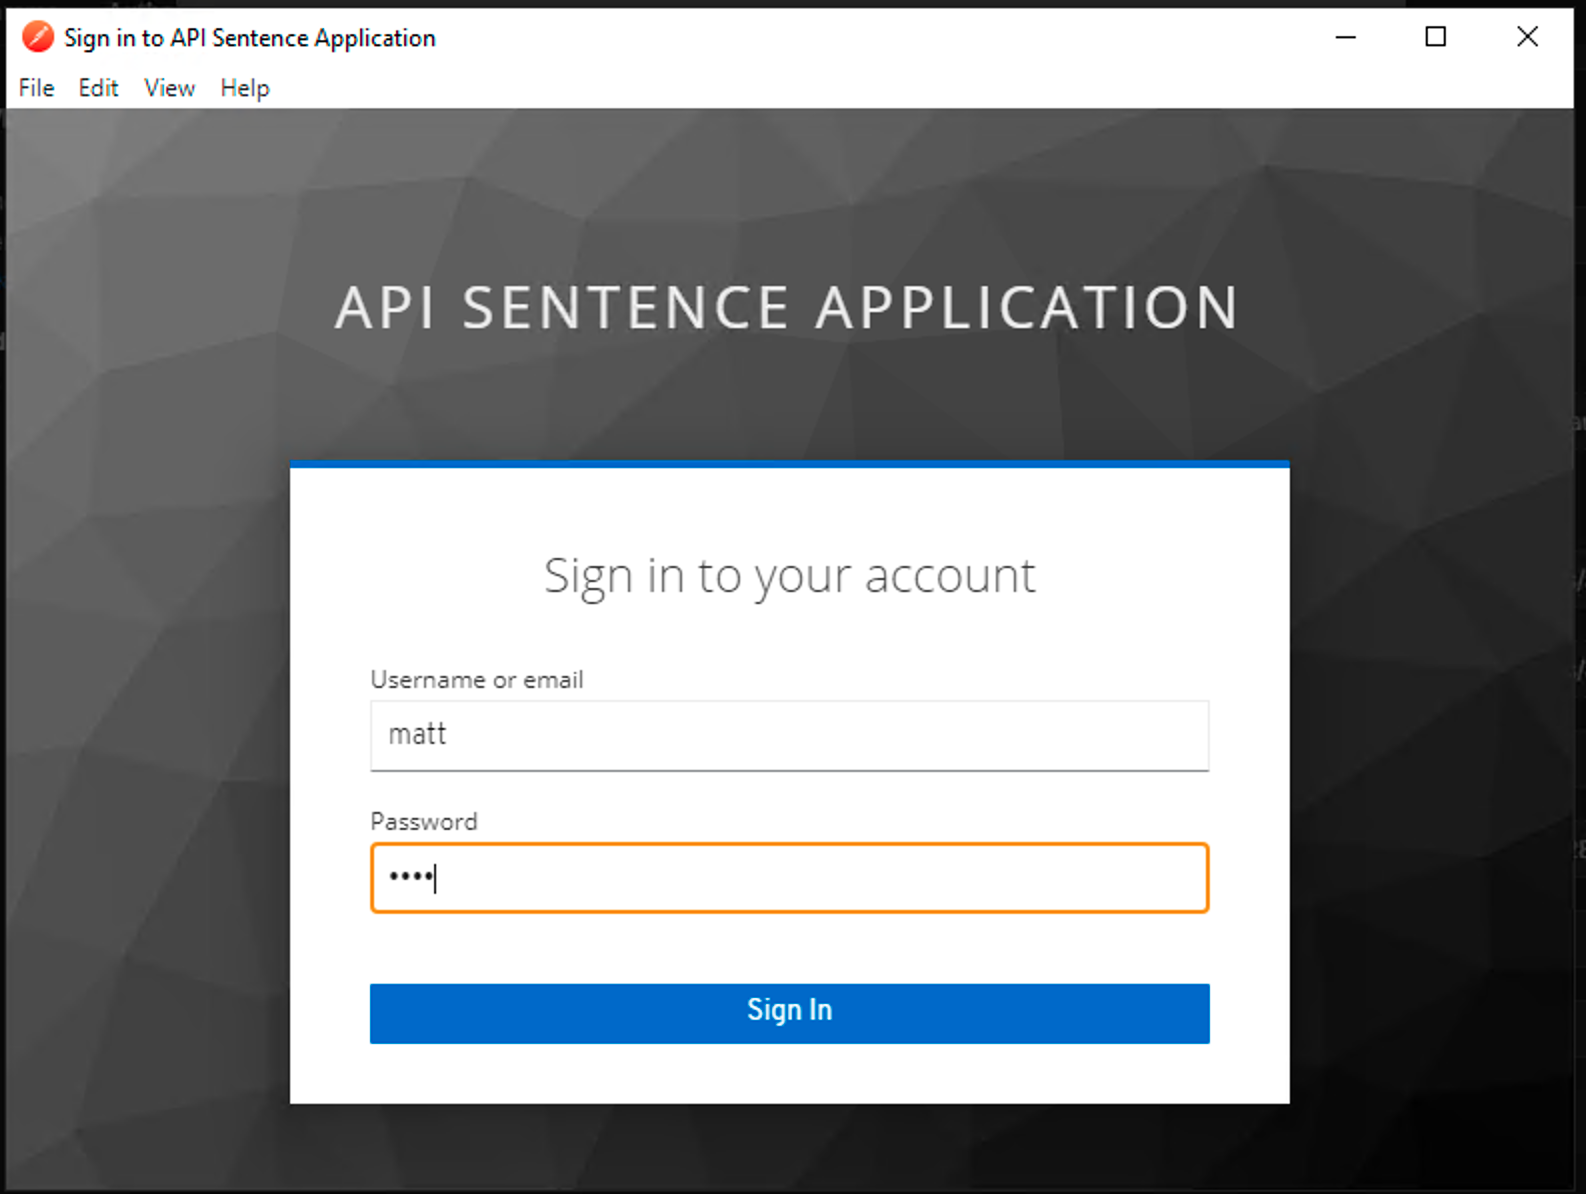
Click on
Use Tokenorange button. The JWT token is now saved and ready to be used.Send the request again. It should pass.
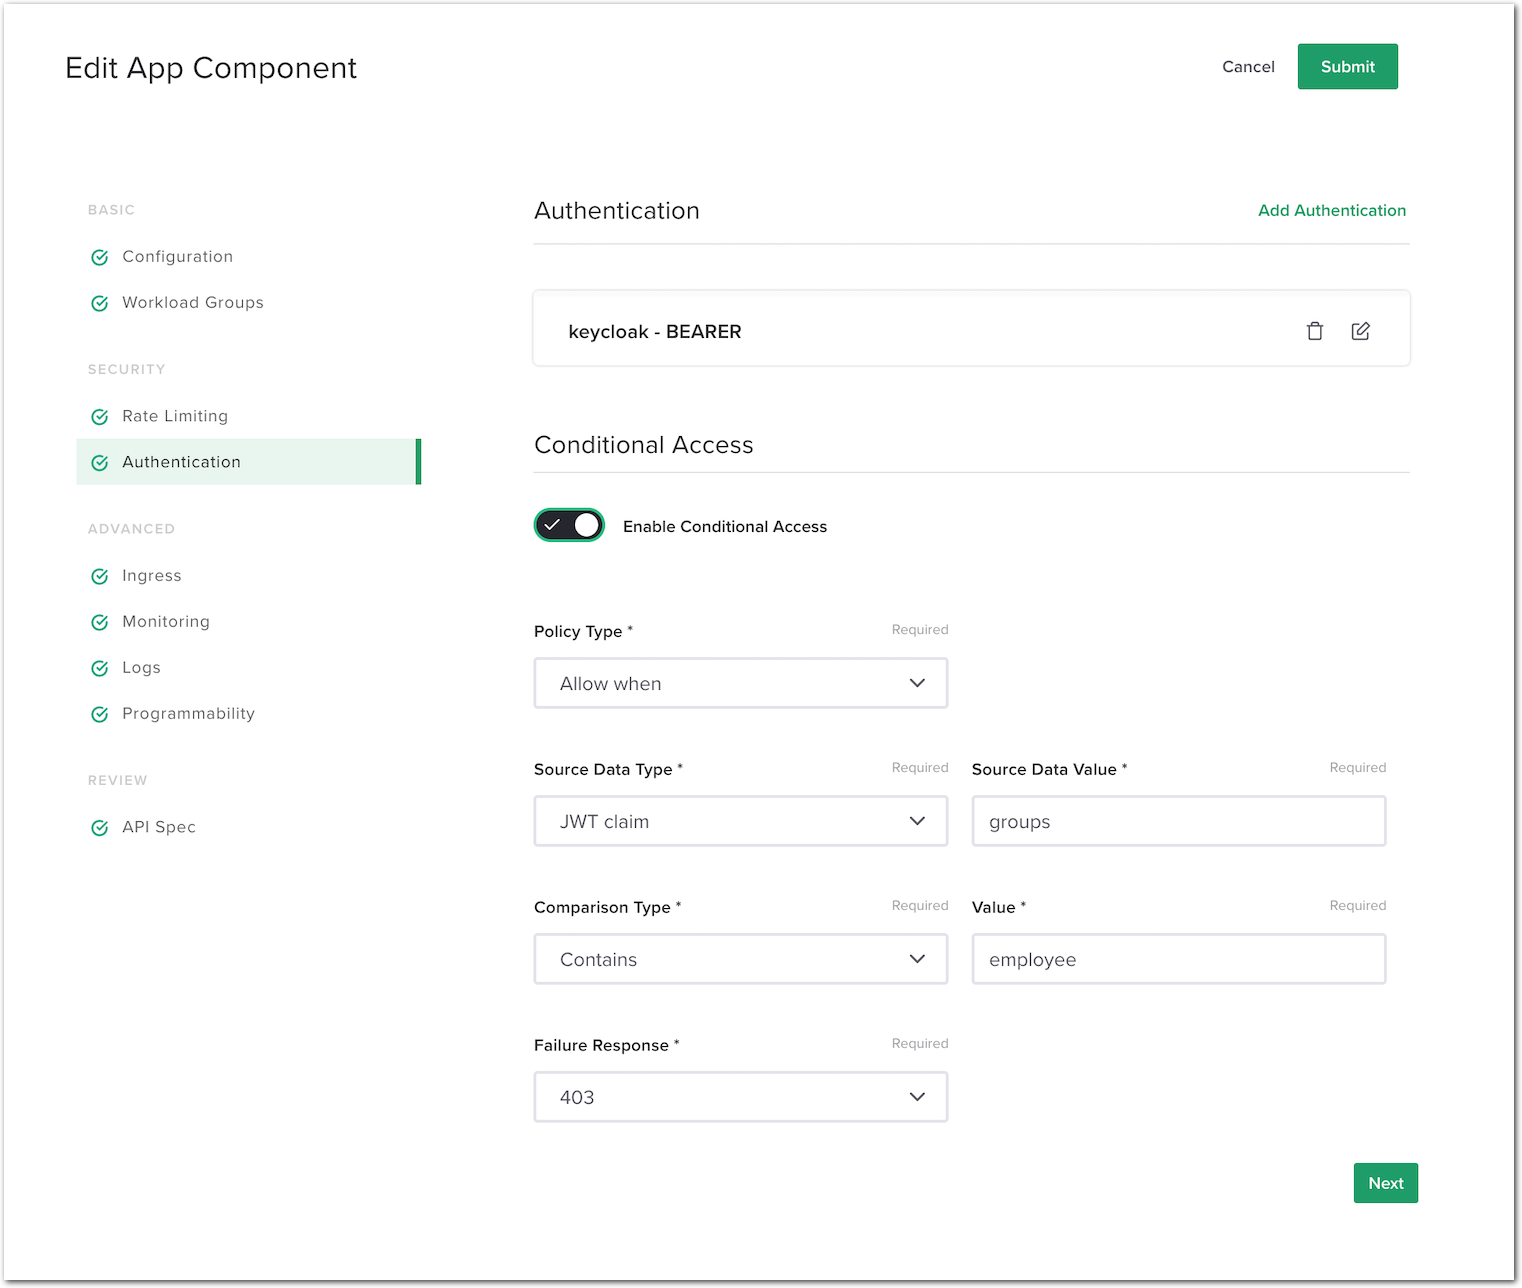
Add conditional access to the /colors API endpoint
The next step is to add Conditional Access for employee users only. This way, any JWT token without the claim groups and the value employee can’t reach the /colors API Endpoint.
In NGINX Controller -> Select
Services(from top left Nginx menu) -> SelectAPIs->api-sentence-> Edit theapi-sentence-v3published API.In the
Routingmenu, edit theAuthenticationsetting for thecp-colors-v3component.Turn on
Enable Conditional Access.
Configure it so that only a JWT with a
group: employeeclaim is allowed. Use the following values:- Policy Type:
Allow when - Source Data Type:
JWT claim - Source Data Value:
groups - Comparison Type:
Contains - Value:
employee - Failure Response:
403
- Policy Type:
Click
Submit->Submitagain to validate the config and push it to the NGINX instance.
Test the conditional access protected API
RDP to the
Win10VM (user/user).Open
Postman, select theAPI Sentence Generator v3collection, and select theGET Colors v3request. If necessary, request a new token for usermatt(passwordmatt).Note
Don’t be surprised if you don’t see the popup window asking for the credentials. It means Postman still has a session opened with Keycloak for
matt.Use the token and send the request. It should pass.
- Now, try with another user that’s not part of the
employeegroup. Click on
Clear cookies(down next to the orangeGet New Access Tokenbutton).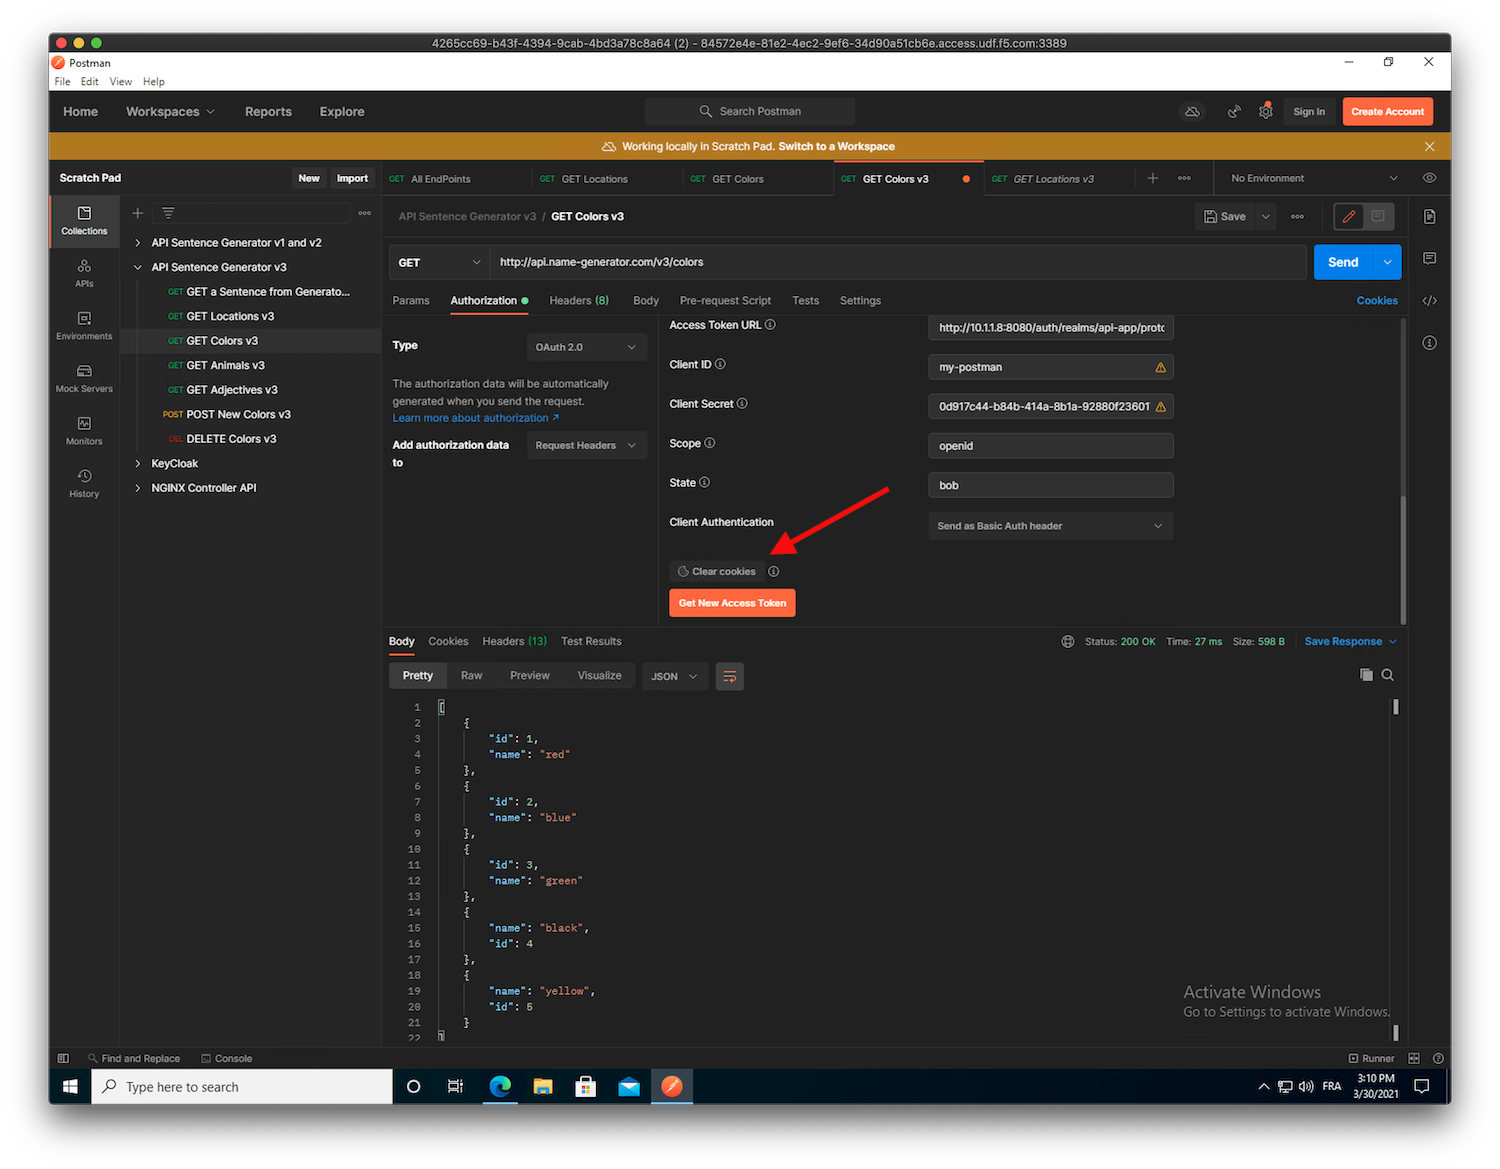
Request a new token but with
fouad(passwordfouad).Use the token and send the request. You will get a
403 Forbidden.The response code/message should be
403 Forbidden. Note that this is different from the response code401 Authorization Requiredwe received when the JWT was not present.Go back to the
Get New Access Tokenmenu. Copy the token generated by Postman, and paste it in https://jwt.io (bookmark inEdge Browser) in order to see the claims contained in the JWT.Note
As you can see,
fouadis not part of theemployeegroup, so he can’t access the/colorsendpoint.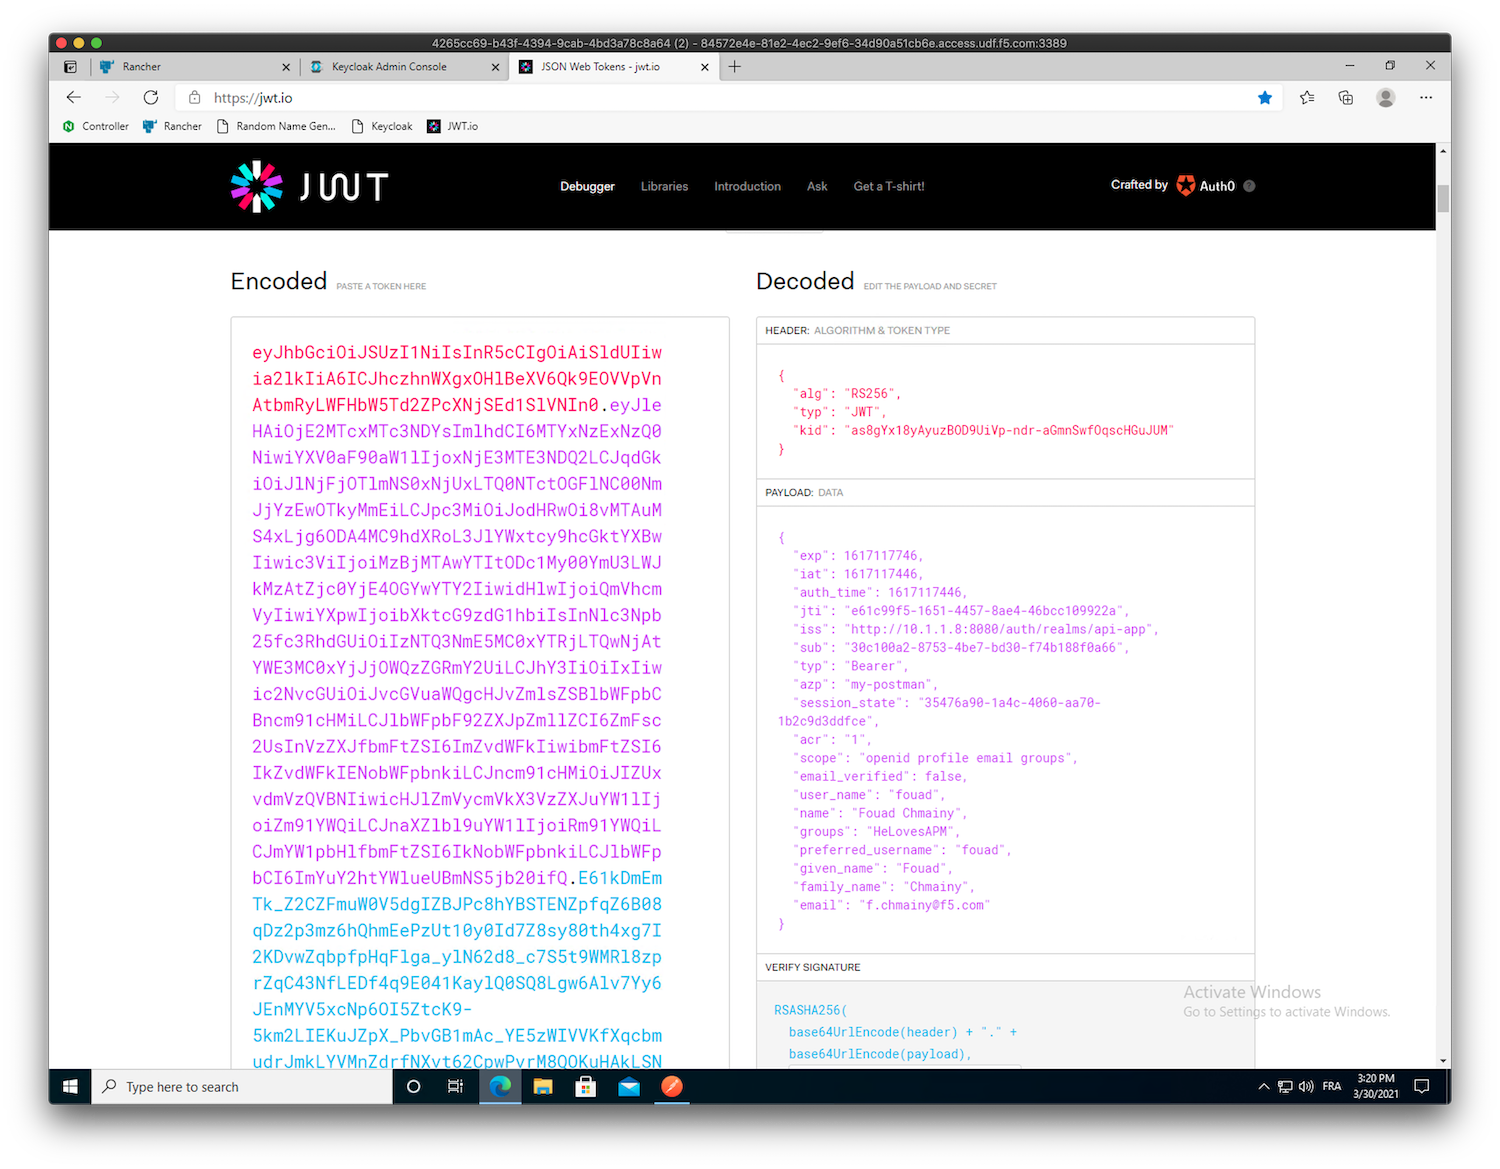
- Now, try with another user that’s not part of the
Attention
Congrats! You enabled authentication in front of the /colors API endpoint, and you then implemented conditional access based on a JWT claim!