KVM: Configure Intel X710 - E810 series NICs for High Performance
This document explains the basic driver and SR-IOV setup of the Intel X710 and E810 series of NICs on Linux.
Note
F5 BIG-IP VE currently supports the Intel E810 NIC series using a sock driver only. Contact your F5 Support Sales Engineer for details.
The document assumes the built-in driver is loaded in the base OS and that BIG-IP 13.0.0 and later is using the default optimized driver.
To configure your KVM host, verify the required prerequisites, and then complete the following steps:
- Add Intel IOMMU to the Linux grub file
- Modify driver settings to enable SR-IOV
- Upgrade X710-E810 NIC firmware using supplied NVM tool
- Create VFs
- Deploy BIG-IP VE in KVM
- Diagnostics and troubleshooting tips
Prerequisites
Before you begin, ensure you have completed the following tasks.
- Enable Intel® Virtualization Technology (Intel® VT) in the host machine BIOS.
- Enable SR-IOV in the BIOS.
- Optional. Optimize power management settings:
- Turn off speed-stepping.
- Change power management from Balanced to Performance.
- Disable C-State power controls.
Tip
Linux lshw utility
Use the lshw tool to extract detailed information on the hardware configuration.
To install lshw, type:
yum install -y lshwTo look up i40e driver information, type:
Modinfo i40eOther lshw commands include:
lshw -c network -businfo
ip l | grep vf
virsh nodedev-list –tree
ifconfig -a
lsmod or lsmod |grep igb
iplink show
ethtool -i enp134s0f0
Add Intel IOMMU to the Linux grub file
Modify the Linux grub file to add Intel input–output memory management unit (IOMMU) support. Depending on the Linux distribution, use grub or grub2. Grub files are located in the following directories:
/boot/grub/grub.conf
/boot/grub2/grub.cfg
View the current configuration by typing:
grubby --info=ALLConfigure
intel_iommu=onin the grub file, and addiommu=pt(pass-through) to the grub file, when using SR-IOV. When in pass-through mode, the adapter does not use DMA translation to the memory, improving performance.Append the IOMMU settings to the grub file:
grubby --update-kernel=ALL --args="intel_iommu=on iommu=pt"Type,
update-grub.
For an example on RHEL 7.6 using Grubby, consult this RHEL article.
To modify the huge page file size settings, use this command:
grubby --update-kernel=ALL --args="default_hugepagesz=1G hugepagesz=1G hugepages=16"
Modify driver settings to enable SR-IOV
Intel NIC’s ship with the SR-IOV Virtual Functions (VF) set to zero. You must modify the operating system driver settings so the VF’s will persist (even after an OS reload).
PF and VF drivers for the X710 and XL710 server adapters are included in Red Hat Enterprise Linux, Centos and Ubuntu. 7.x distribution are named i40e and i40evf respectively. Newer versions of these drivers are available on the Intel Downloads site.
The driver or software for your Intel® component may have changed or been replaced by the computer manufacturer. F5 recommends you work with your computer manufacturer, before installing the mainstream Intel driver, so you don’t lose OEM features or customizations.
Verify the OS has loaded the Intel driver
Check that the adapters are recognized by running the following
lspcicommand:sudo lspci -D | grep EthernetA list of network adaptors similar to the following is returned:

In the previous list you see our onboard I350 and the Dual Port Intel XL710:
- Port 0 of the PF is at PCI address 0000:86:00.0
- Port 1 of the PF is at PCI address 0000:86:00.1
OPTIONAL: If you do not see the Intel XL710 listed, then load the OEM or Intel driver.
Install the supplied Intel Ice PF driver
Visit the Intel Downloads Center for Intel® Ethernet 810 NIC series that uses Ice PF driver. The X710 NIC series uses the i40E PF driver.
Download the supplied Intel Ice PF X710-E810 driver ice-1.3.2.tar.gz file.
Change to the driver
srcdirectory, type:cd ice-<version>/src/ chmod +x *
Compile the driver module, and install either
libelf-dev,libelf-devel, orelfutils-libelf-devel.sudo yum install elfutils-libelf-devel -y sudo make install
Remove all previously installed ice driver versions and install the latest version downloaded in step 1.
rmmod ice
modprobe ice
OPTIONAL: For certain distributions like (but not limited to) RedHat Enterprise Linux 7 and Ubuntu, once the driver is installed, you may need to update the
initrd/initramfsfile to prevent the OS from loading an older version of the driver.Verify that the new version of the driver has been loaded:
modinfo ice

Example Output:
[root@prototype src]# modinfo ice
filename:       /lib/modules/4.18.0-240.10.1.el8_3.x86_64/updates/drivers/net/ethernet/intel/ice/ice.ko
firmware:       intel/ice/ddp/ice.pkg
version:        1.3.2
license:        GPL v2
description:    Intel(R) Ethernet Connection E800 Series Linux Driver
author:         Intel Corporation, <linux.nics@intel.com>
rhelversion:    8.3
srcversion:     22DB853ECEFB6FC0EDAB51C
Reboot the server.
Install the supplied Intel IAVF driver
Both the Intel X710 and E810 NIC series uses the IAVF driver.
Set VF’s to zero before upgrading IAVF driver:
echo 0 > /sys/class/net/ens818f0/device/sriov_numvfs
echo 0 > /sys/class/net/ens818f1/device/sriov_numvfs
Download the Network Adapter Linux* Virtual Function Driver for Intel® Ethernet Controller 700 and E810 Series tar xzf iavf-4.0.2.tar.gz file.
To determine bus information, device ID, and description, use the following command:
lshw -class network -businfo

# example output
[root@prototype ~]# lshw -class network -businfo

Bus info          Device          Class          Description
============================================================
pci@0000:b1:00.0  ens801f0        network        Ethernet Controller E810-C for QSFP
pci@0000:b1:00.1  ens801f1        network        Ethernet Controller E810-C for QSFP
pci@0000:b1:01.0                  network        Ethernet Adaptive Virtual Function
pci@0000:b1:01.1                  network        Ethernet Adaptive Virtual Function
pci@0000:b1:11.0                  network        Ethernet Adaptive Virtual Function
pci@0000:b1:11.1                  network        Ethernet Adaptive Virtual Function
Install new IAVF driver, tar xzf iavf-4.0.2.tar.gz file that you downloaded in step 2.
OPTIONAL: If you see errors in compile, change directory to the
cd srcdirectory and type:chmod +x *.Compile the driver module, type:
make
sudo make install
To verify that all older i40evf drivers are removed from the kernel BEFORE loading the new module, type:
rmmod i40evfTo load the new driver module, type:
modprobe iavfNote
The
make installcommand creates/etc/modprobe.d/iavf-blacklist-i40evf.confthat containsdenylisti40evf.##!!!!Adds the linealias i40evf iavfto themodprobeconfiguration.Reboot the server.
Upgrade X710-E810 NIC firmware using supplied NVM tool
This is an OPTIONAL step for most hypervisors. However, for VMware, upgrading the Intel X710 firmware is a requirement. The Intel E810 firmware must be version is 2.32 or higher. Consult the VMware setup guide for firmware details.
Important
You must first upgrade to the Intel ice driver or the NVM tool will fail.
Download the Non-Volatile Memory (NVM) Update Utility for Intel® Ethernet Network Adapter E810_NVMUpdatePackage_v2_32.zip file to the
/installs/NVMUpdatePackagedirectory.Change directories to
/installs/NVMUpdatePackageand unpack the E810_NVMUpdatePackage_v2_32.zip file.tar xzvf E810_NVMUpdatePackage_v2_32_Linux.tar.gz chmod +x * ./nvmupdate64e -i -l -o inventory.xml ./nvmupdate64e*
Select
X710orE810file, and backup the NVM.Shutdown and power off the server.
Create VF’s
Create as many virtual functions as needed using the following:
Use the rc.local file
The following example initializes the VFs using two VFs per PF. Assigning MACs is optional.
sudo vi /etc/rc.d/rc.local
echo 2 > /sys/class/net/ens801f0/device/sriov_numvfs
ip link set ens801f0 vf 0 trust on
ip link set ens801f0 vf 0 spoofchk off
#ip link set ens801f0 vf 0 mac [insert mac address]
ip link set ens801f0 vf 1 trust on
ip link set ens801f0 vf 1 spoofchk off
#ip link set ens801f0 vf 1 mac [insert mac address]
echo 2 > /sys/class/net/ens801f1/device/sriov_numvfs
ip link set ens801f1 vf 0 trust on
ip link set ens801f1 vf 0 spoofchk off
#ip link set ens801f1 vf 0 mac [insert mac address]
ip link set ens801f1 vf 1 trust on
ip link set ens801f1 vf 1 spoofchk off
#ip link set ens801f1 vf 1 mac [insert mac address]
Initialize the VFs for the driver
Module options are not persistent from one boot to the next. To ensure that the desired number of VFs are created, each
time you power cycle the server, append the rc.local file, located in the /etc/rc.d/ directory. The Linux OS
executes the rc.local script at the end of the boot process. Edit /etc/rc.d/rc.local to initialize the VFs for the driver.
Modify the
rc.localfile to initialize the VFs for the driver. On a new install therc.localfile may not be set to initialize on startup. To allow for initialization, modify the file attributes:sudo chmod +x /etc/rc.d/rc.localFor each device port (for example, enp175s0f0, enp175s0f1, enp24s0f0, enp24s0f1), add to the
/etc/rc.d/rc.localfile:sudo vi /etc/rc.d/rc.localAdd the following information by using
vi(i = insert mode, esc = exit mode, :w = write, :q = quit).echo 24 > /sys/class/net/enp24s0f0/device/sriov_numvfs echo 24 > /sys/class/net/enp24s0f1/device/sriov_numvfs
This example assumes 24 VFs on two ports. The variables are <#ofVFs> and <portname>:
echo <#ofVF’s> > /sys/class/net/<portname>/device/sriov_numvfsSave the file and reboot.
Start and enable the rc-local service:
sudo systemctl start rc-local
sudo systemctl enable rc-local
Deploy BIG-IP VE in KVM
To deploy BIG-IP VE, download an image from F5 and deploy it in your environment.
Important
- Do not change the configuration (CPU, RAM, and network adapters) of the KVM guest environment with settings less powerful than those recommended and described here.
- i440FX and Q35 QEMU machine types are supported. For more details, refer F5 BIG-IP Virtual Edition Supported Platforms.
- In a browser, open the F5 Downloads page and log in.
- On the Downloads Overview page, do the following:
- Click Find a Download.
- Under Product Line, click the link similar to BIG-IP v.x/Virtual Edition.
- If the End User Software License is displayed, click I Accept.
- Download the BIG-IP VE file package ending with qcow2.zip.
- Extract the file from the Zip archive and save it where your qcow2 files reside on the KVM server.
- Use VNC to access the KVM server, and then start Virt Manager.
Warning
If you are using QEMU v8.1.0 or later, there have been identified issues with System Management BIOS (SMBIOS) v3.x (64-bit entry point). It is recommended to downgrade SMBIOS to v2.x (32-bit entry point). When configuring a virtual machine (VM), use the following command to enforce the 32-bit entry point:
-machine smbios-entry-point-type=32
Right-click localhost (QEMU), and on the popup menu, select New.
The Create a new virtual machine, Step 1 of 4 dialog box opens.
In the Name field, enter a name for the connection.
Select the import existing disk image method for installing the operating system, and then click Forward.
Enter the path to the extracted qcow file, or click Browse and navigate to the file.
Select the file, and then click Choose Volume.
Expand OS type, select Linux, expand Version, select Red Hat Enterprise Linux 6, and then click Forward.
In the Memory (RAM), enter the appropriate amount of memory (in megabytes) for your deployment (for example
4096for a 4GB deployment).In the CPUs list, select the number of CPU cores appropriate for your deployment, and click Forward.
Select Customize configuration before installing, and then click Advanced options.
Select the network interface adapter that corresponds to your management IP address, and click Finish.
The Virtual Machine configuration dialog box opens.
Click Add Hardware.
The Add New Virtual Hardware dialog box opens. Do one of the following:
If SR-IOV is NOT required, select Network.
- In the Host device list, select the network interface adapter for your external network, in the Device model list, select virtio, and then click Finish.
- Repeat the previous step for your internal and HA networks.
If SR-IOV is required, select PCI Host Device.
Select the PCI device for the virtual function that is mapped to your host device’s external VLAN, and then click Finish.
Tip
Be sure to use the Virtual Function (VF) PCI Host Device instead of the Physical Function (PF) to take advantage of VE high-speed drivers.
The following image illustrates adding a PCI VF Network Interface within the Virtual Machine Manager:
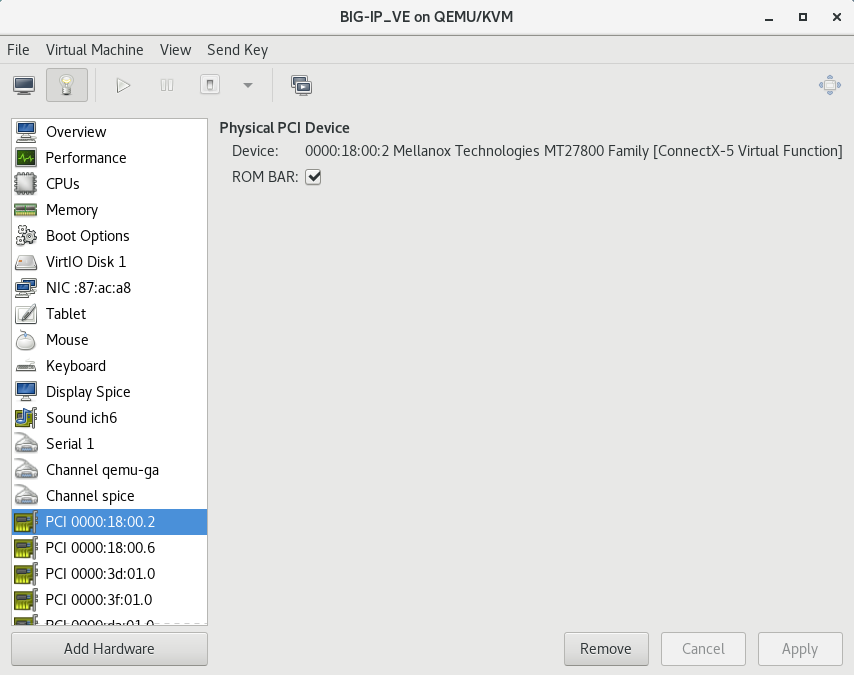
Repeat the previous step for your host device’s internal VLAN and HA VLAN.
In the left pane, select Disk 1, and then click Advanced options.
- From the Disk bus list, select Virtio.
- In the Storage format list, select qcow2.
- Click Apply.
Click Begin Installation.
The Virtual Machine Manager creates the virtual machine configured as you defined.
Diagnostics and troubleshooting tips
When using ifconfig to bring down the ports, the physical link can continue to indicate that it is up on the Switch side.
Use the following commands at the OS level (not BIG-IP VE) to change this behavior, and close any VM’s and zero-out the VF’s.
Note
This behavior does not persist after rebooting the server.
ethtool --set-priv-flags ens801f0 link-down-on-close on

ethtool --set-priv-flags ens801f1 link-down-on-close on
To set different media speeds, use the Intel Port Configuration Tool.
For a list of supported NICs with SR-IOV capability, consult the K17204 support article.
To check the NIC firmware version without loading the Intel NVM tool type,
ethtool -i <interface>. For example:ethtool -i ens4f0 driver: ice version: 4.18.0-408.el8.x86_64 firmware-version: 2.15 0x800049c3 1.2789.0 expansion-rom-version: bus-info: 0000:8a:00.0 supports-statistics: yes supports-test: yes supports-eeprom-access: yes supports-register-dump: yes supports-priv-flags: yes