F5 Solutions for Containers > Class 1: Kubernetes with F5 Container Ingress Service > Module 2: CIS Using ClusterIP Mode Source | Edit on
Lab 2.1 - Install & Configure CIS in ClusterIP Mode
In the previous moudule we learned about Nodeport Mode. Here we’ll learn about ClusterIP Mode.
See also
For more information see BIG-IP Deployment Options
BIG-IP Setup
With ClusterIP we’re utilizing VXLAN to communicate with the application pods. To do so we’ll need to configure BIG-IP first.
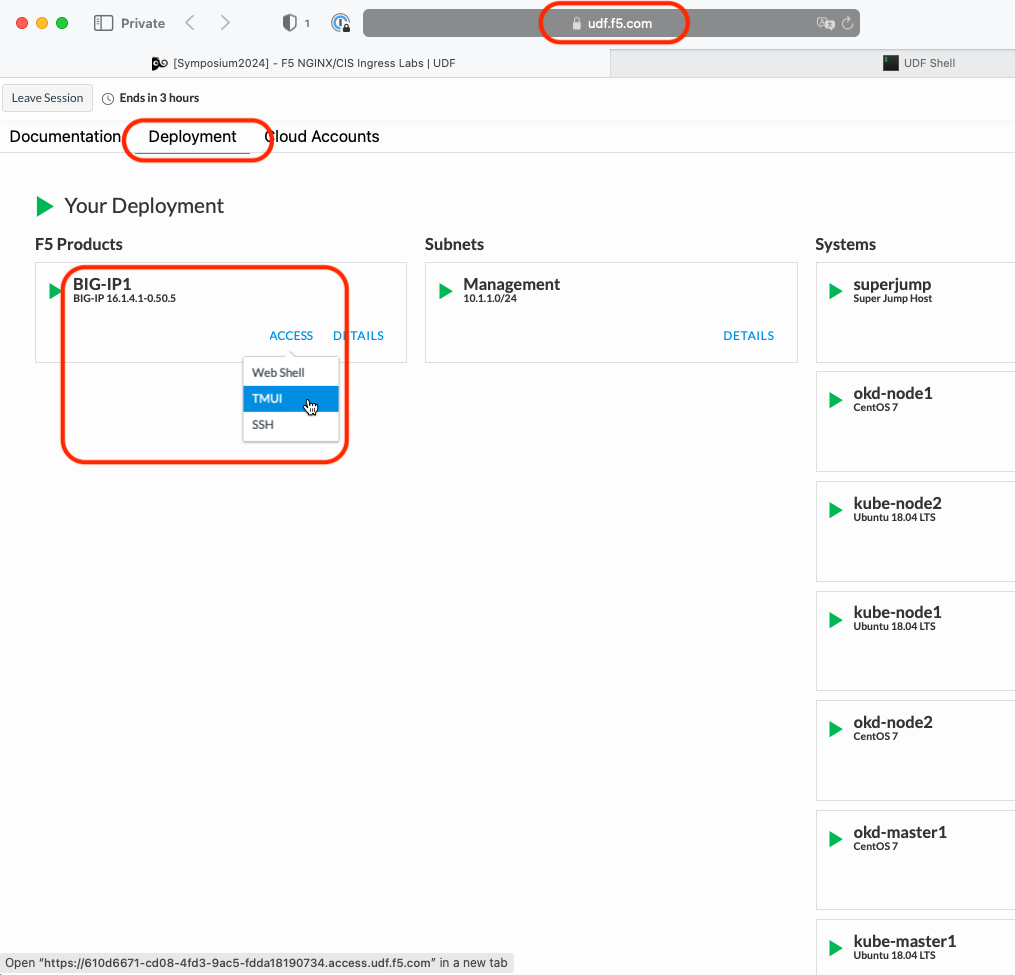
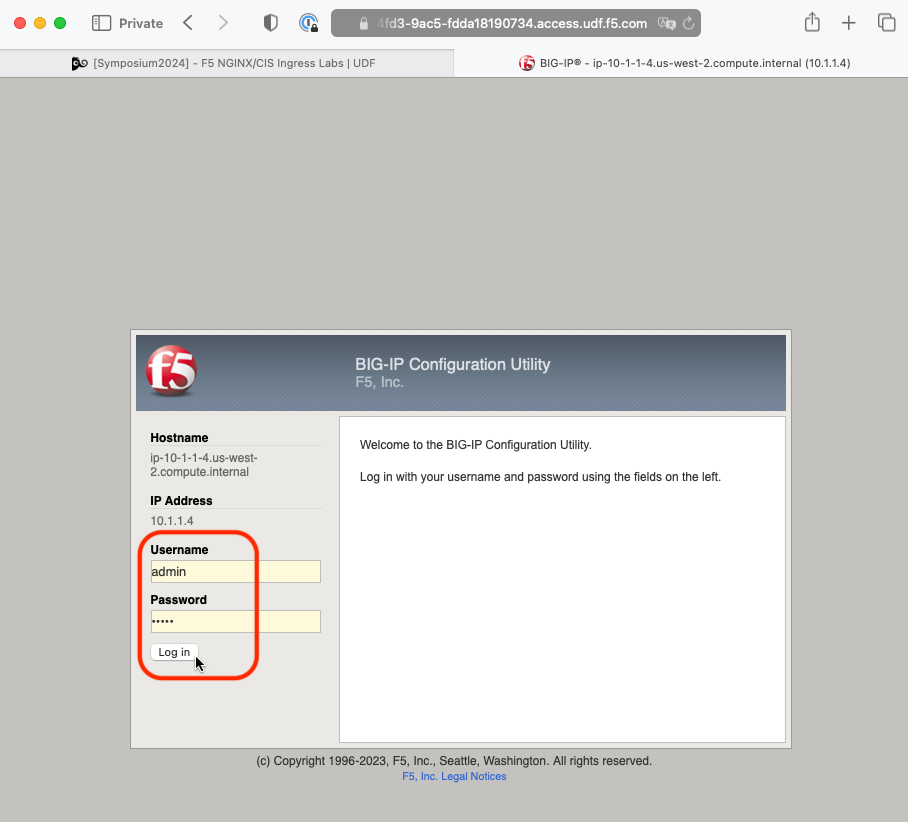
Go back to the TMUI session you opened in a previous task. If you need to open a new session go back to the Deployment tab of your UDF lab session at https://udf.f5.com and connect to BIG-IP1 using the TMUI access method (username: admin and password: admin)
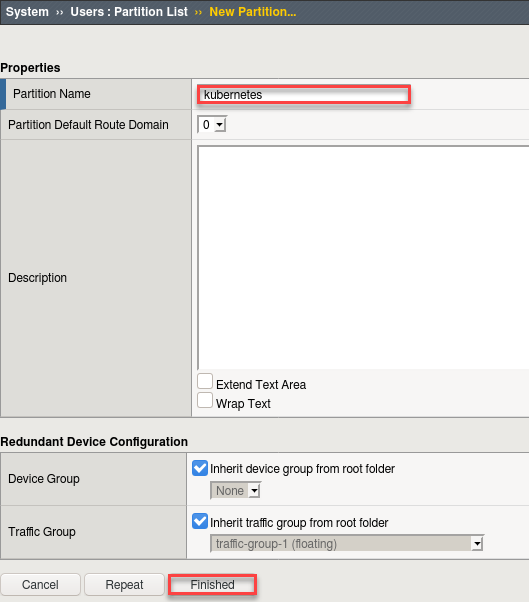
First we need to setup a partition that will be used by F5 Container Ingress Service.
Note
This step was performed in the previous module. Verify the “kubernetes” partion exists and if not follow the instructions below.
- Browse to:
Attention
Be sure to be in the Common partition before creating the following objects.

Create a new partition called “kubernetes” (use default settings)
Click Finished
# Via the CLI:
ssh admin@10.1.1.4 tmsh create auth partition kubernetes
Install AS3 via the management console
Attention
This has been done to save time. If needed see Module1 / Lab 1.1 / Install AS3 Steps
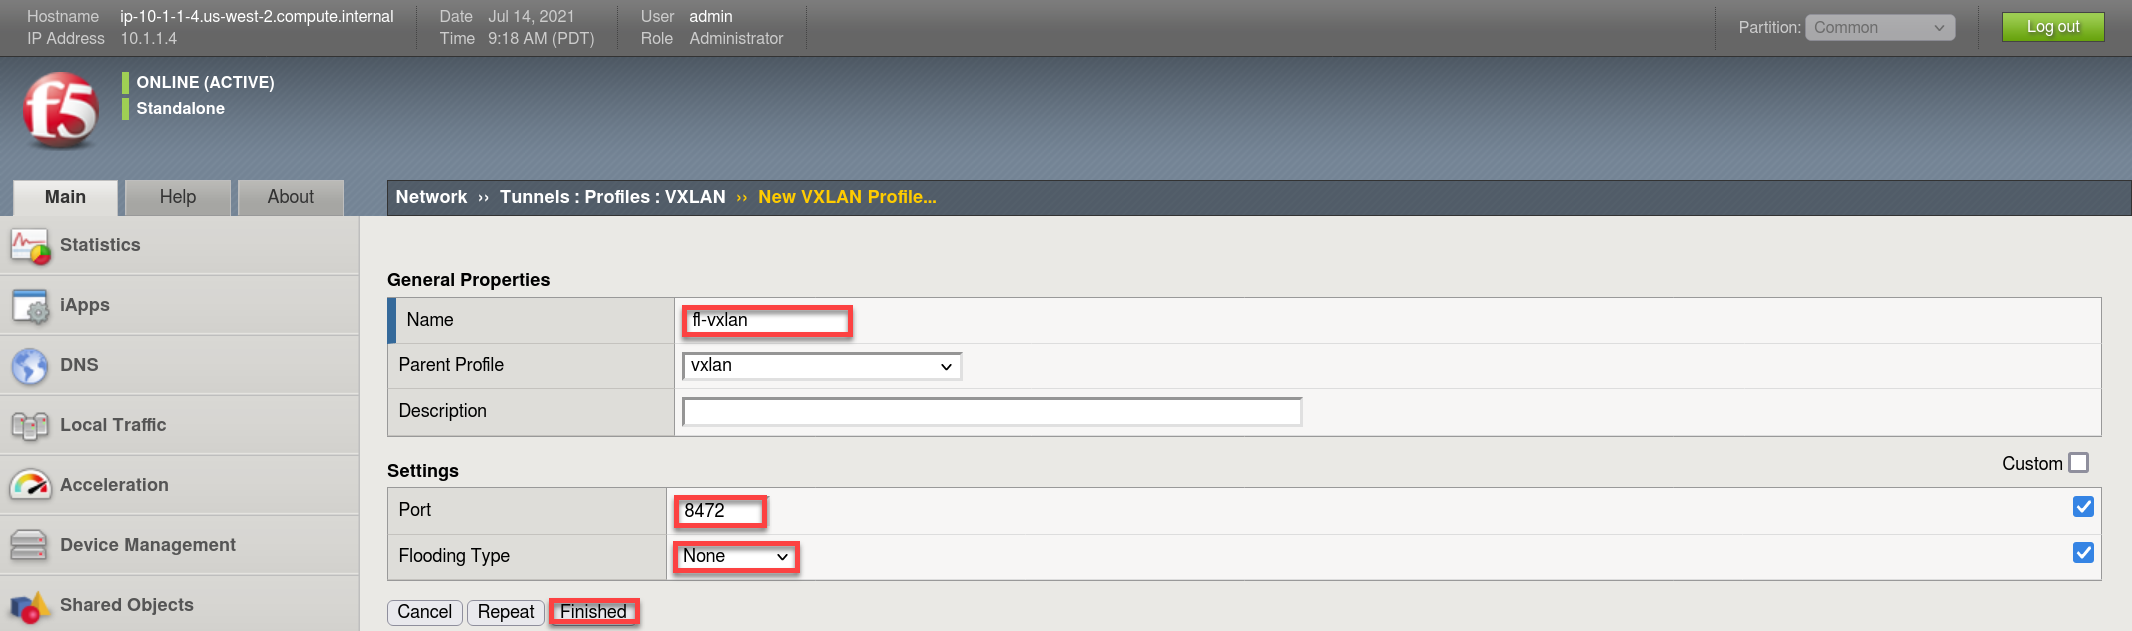
Create a vxlan tunnel profile.
- Browse to:
- Create a new profile called “fl-vxlan”
- Put a checkmark in the Custom checkbox to set the Port and Flooding Type values
- Set Port = 8472
- Set the Flooding Type = None
- Click Finished
# Via the CLI:
ssh admin@10.1.1.4 tmsh create net tunnels vxlan fl-vxlan { app-service none port 8472 flooding-type none }
Create a vxlan tunnel.
- Browse to:
- Create a new tunnel called “fl-tunnel”
- Set the Profile to the one previously created called “fl-vxlan”
- set the Key = 1
- Set the Local Address to 10.1.1.4
- Click Finished
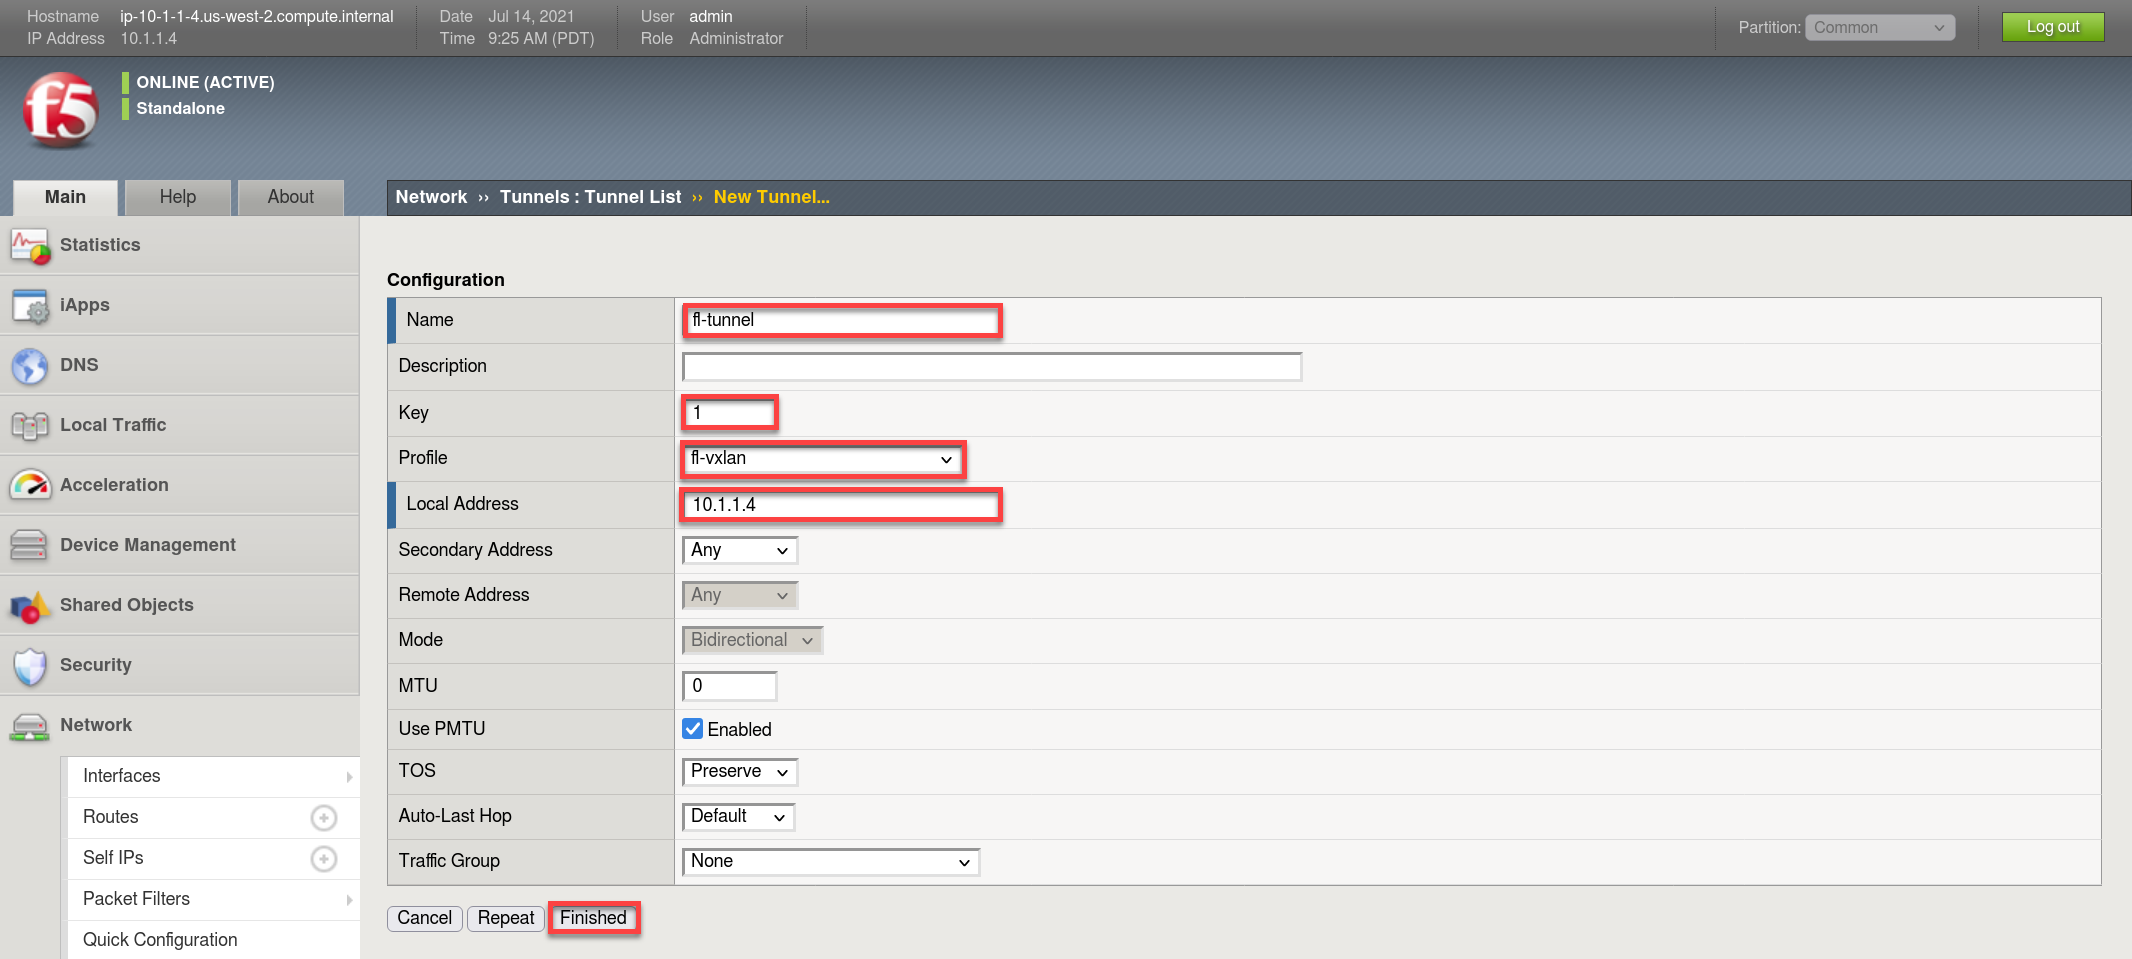
# Via the CLI:
ssh admin@10.1.1.4 tmsh create net tunnels tunnel fl-tunnel { app-service none key 1 local-address 10.1.1.4 profile fl-vxlan }
Create the vxlan tunnel self-ip
Tip
For your SELF-IP subnet, remember it is a /16 and not a /24.
Why? The Self-IP has to know all other /24 subnets are local to this namespace, which includes Master1, Node1, Node2, etc. Each of which have their own /24.
Many students accidently use /24, doing so would limit the self-ip to only communicate with that subnet. When trying to ping services on other /24 subnets from the BIG-IP for instance, communication will fail as your self-ip doesn’t have the proper subnet mask to know the other subnets are local.
- Browse to:
- Create a new Self-IP called “fl-vxlan-selfip”
- Set the IP Address to “10.244.20.1”
- Set the Netmask to “255.255.0.0”
- Set the VLAN / Tunnel to “fl-tunnel” (Created earlier)
- Set Port Lockdown to “Allow All”
- Click Finished
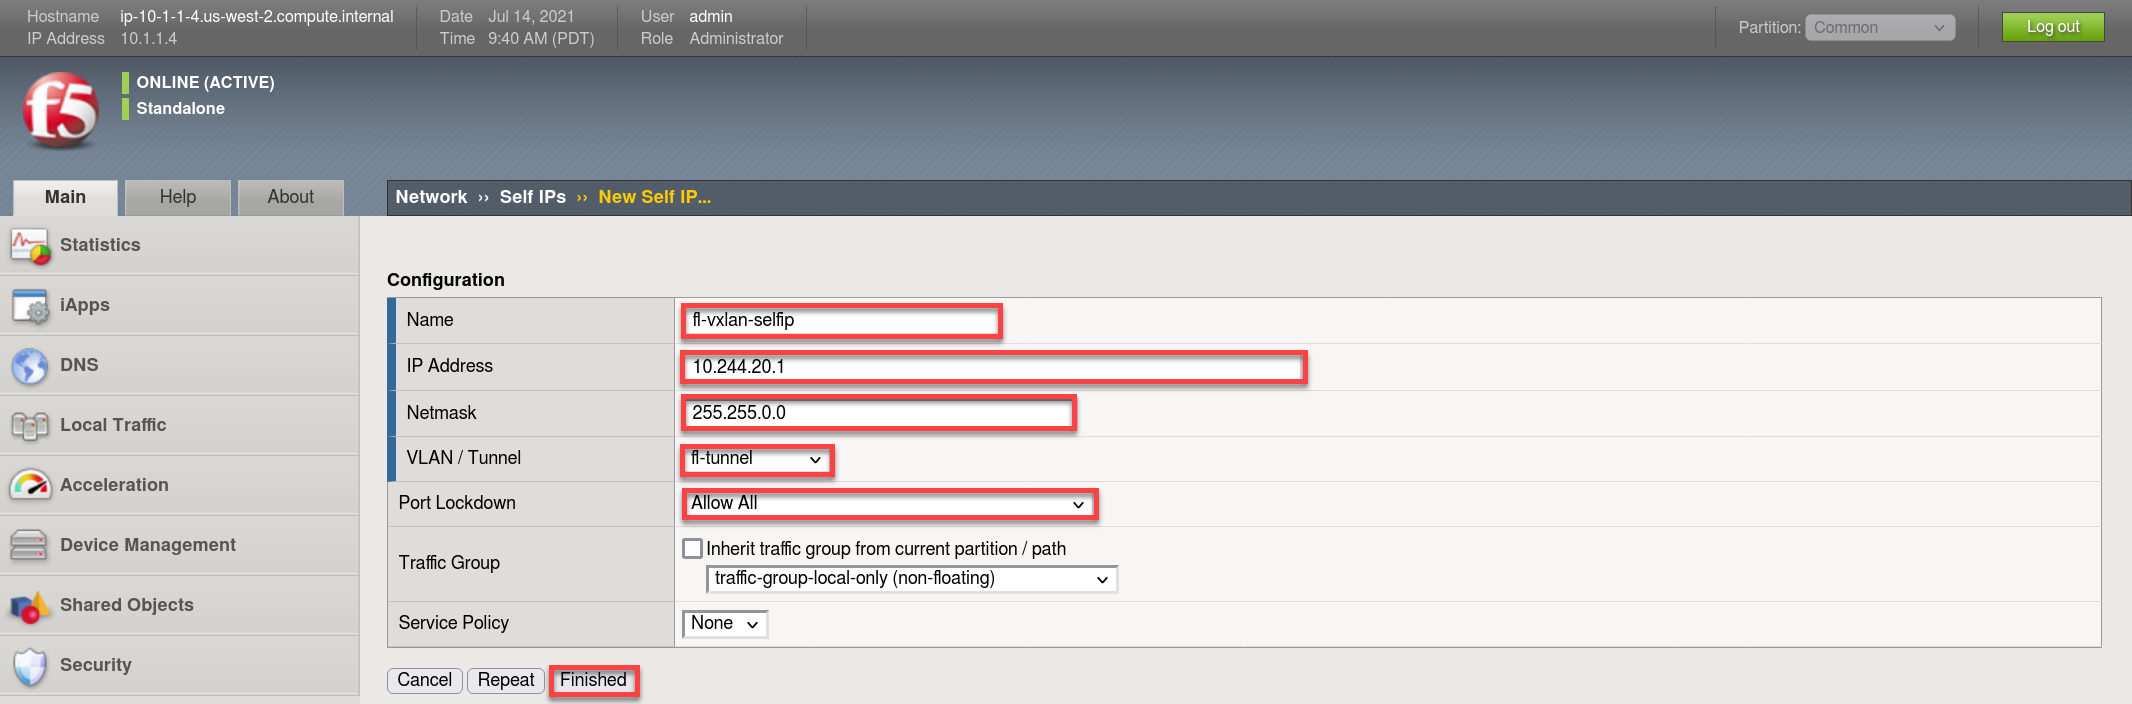
# Via the CLI:
ssh admin@10.1.1.4 tmsh create net self fl-vxlan-selfip { address 10.244.20.1/16 vlan fl-tunnel allow-service all }
CIS Deployment
Note
- For your convenience the file can be found in /home/ubuntu/agilitydocs/docs/class1/kubernetes (downloaded earlier in the git clone repo step).
- Or you can cut and paste the file below and create your own file.
- If you have issues with your yaml and syntax (indentation MATTERS), you can try to use an online parser to help you : Yaml parser
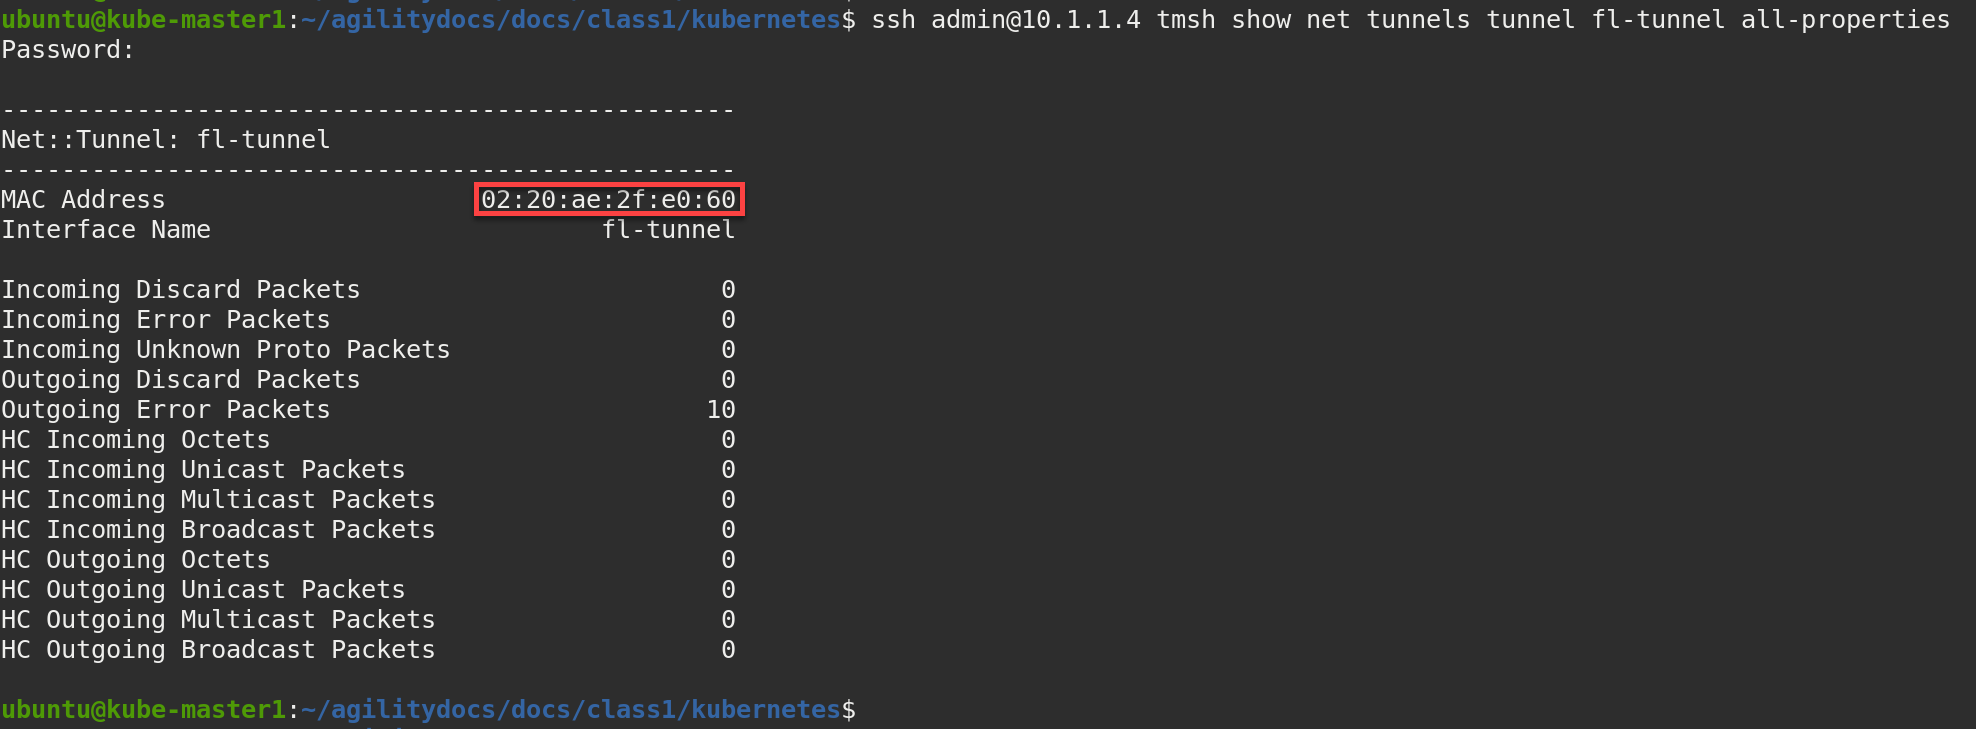
Before deploying CIS in ClusterIP mode we need to configure Big-IP as a node in the kubernetes cluster. To do so you’ll need to modify “bigip-node.yaml” with the MAC address auto created from the previous steps. Go back to the Web Shell session you opened in the previous task. If you need to open a new session go back to the Deployment tab of your UDF lab session at https://udf.f5.com to connect to kube-master1 using the Web Shell access method, then switch to the ubuntu user account using the “su” command:
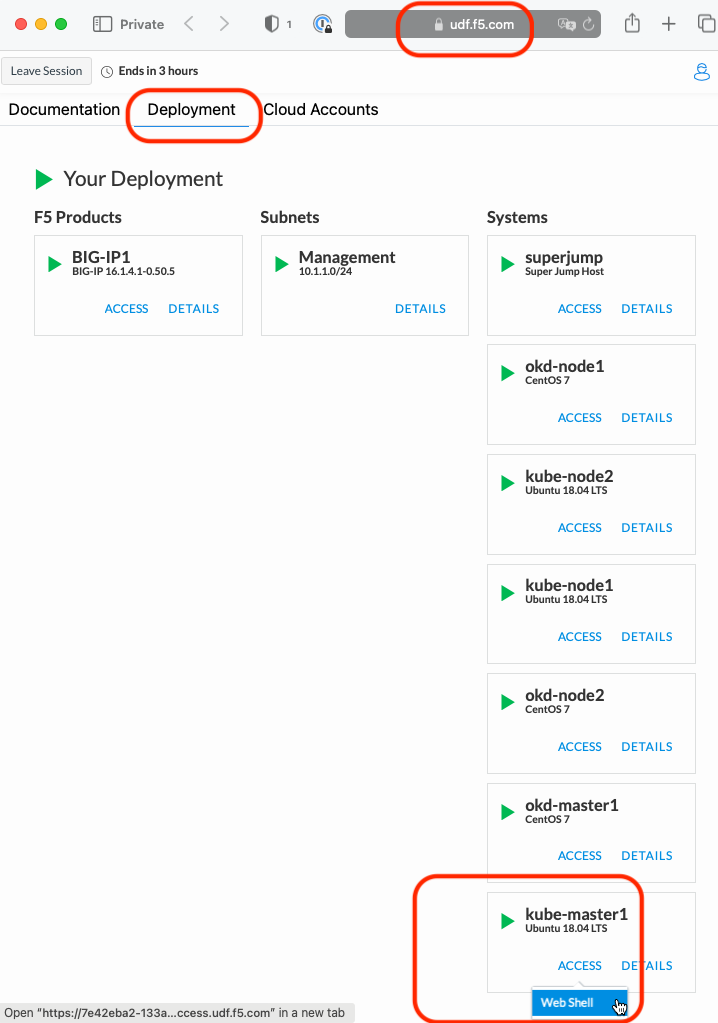
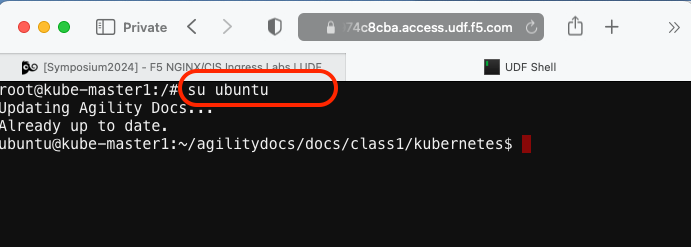
su ubuntuFrom the Web Shell window (command line of kube-master1) run the following command to obtain the MAC address from BIG-IP1. You’ll want to copy the displayed “MAC Address” value.
Note
If prompted, accept the authenticity of the host by typing “yes” and hitting Enter to continue. The password is “admin”
ssh admin@10.1.1.4 tmsh show net tunnels tunnel fl-tunnel all-properties
Tip
This command returns only the desired MAC address:
ssh admin@10.1.1.4 tmsh show net tunnels tunnel fl-tunnel all-properties | grep MAC | cut -c 33-51
In the Web Shell window (command line of kube-master1), edit the bigip-node.yaml file to change the highlighted MAC address with the MAC address copied from the previous step.
Note
If your unfamiliar with VI ask for help.
vim ~/agilitydocs/docs/class1/kubernetes/bigip-node.yamli # To enable insert mode and start editing # Replace the current MAC addr with the one previously copied <ESC> # To exit insert mode :wq <ENTER> # To write and exit file
bigip-node.yaml¶1apiVersion: v1 2kind: Node 3metadata: 4 name: bigip1 5 annotations: 6 #Replace IP with Self-IP for your deployment 7 flannel.alpha.coreos.com/public-ip: "10.1.1.4" 8 #Replace MAC with your BIGIP Flannel VXLAN Tunnel MAC 9 flannel.alpha.coreos.com/backend-data: '{"VtepMAC":"02:20:ae:2f:e0:60"}' 10 flannel.alpha.coreos.com/backend-type: "vxlan" 11 flannel.alpha.coreos.com/kube-subnet-manager: "true" 12spec: 13 #Replace Subnet with your BIGIP Flannel Subnet 14 podCIDR: "10.244.20.0/24"
Create the bigip node:
kubectl create -f bigip-node.yaml
Verify “bigip1” node is created:
kubectl get nodes

Note
It’s normal for bigip1 to show up as “Unknown” or “NotReady”. This status can be ignored.
Just like the previous module where we deployed CIS in NodePort mode we need to create a “secret”, “serviceaccount”, and “clusterrolebinding”.
Important
This step can be skipped if previously done in module1(NodePort). Some classes may choose to skip module1.
kubectl create secret generic bigip-login -n kube-system --from-literal=username=admin --from-literal=password=admin
kubectl create serviceaccount k8s-bigip-ctlr -n kube-system
kubectl create clusterrolebinding k8s-bigip-ctlr-clusteradmin --clusterrole=cluster-admin --serviceaccount=kube-system:k8s-bigip-ctlr
Now that we have BIG-IP1 added as a Node we can launch the CIS deployment. It will start the f5-k8s-controller container on one of the worker nodes.
Attention
This may take around 30sec to get to a running state.
cd ~/agilitydocs/docs/class1/kubernetes

cat cluster-deployment.yaml
You’ll see a config file similar to this:
cluster-deployment.yaml¶1apiVersion: apps/v1 2kind: Deployment 3metadata: 4 name: k8s-bigip-ctlr 5 namespace: kube-system 6spec: 7 replicas: 1 8 selector: 9 matchLabels: 10 app: k8s-bigip-ctlr 11 template: 12 metadata: 13 name: k8s-bigip-ctlr 14 labels: 15 app: k8s-bigip-ctlr 16 spec: 17 serviceAccountName: k8s-bigip-ctlr 18 containers: 19 - name: k8s-bigip-ctlr 20 image: "f5networks/k8s-bigip-ctlr:2.4.1" 21 imagePullPolicy: IfNotPresent 22 env: 23 - name: BIGIP_USERNAME 24 valueFrom: 25 secretKeyRef: 26 name: bigip-login 27 key: username 28 - name: BIGIP_PASSWORD 29 valueFrom: 30 secretKeyRef: 31 name: bigip-login 32 key: password 33 command: ["/app/bin/k8s-bigip-ctlr"] 34 args: [ 35 "--bigip-username=$(BIGIP_USERNAME)", 36 "--bigip-password=$(BIGIP_PASSWORD)", 37 "--bigip-url=https://10.1.1.4:8443", 38 "--insecure=true", 39 "--bigip-partition=kubernetes", 40 "--pool-member-type=cluster", 41 "--flannel-name=/Common/fl-tunnel" 42 ]
Create the CIS deployment with the following command
kubectl create -f cluster-deployment.yaml
Verify the deployment “deployed”
kubectl get deployment k8s-bigip-ctlr --namespace kube-system

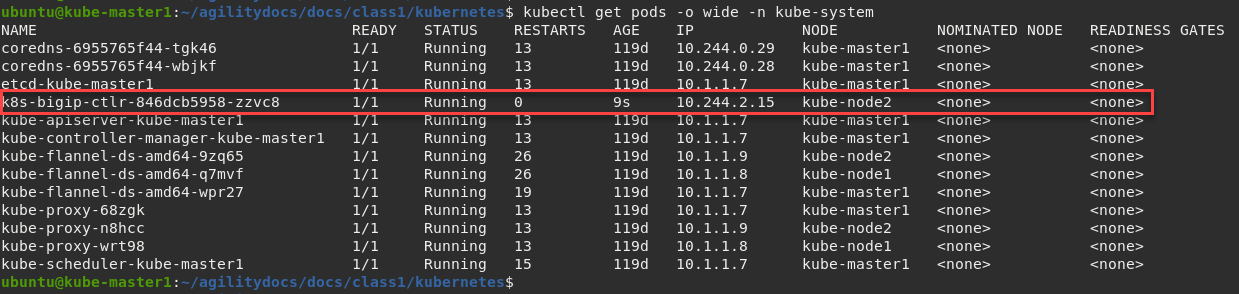
To locate on which node CIS is running, you can use the following command:
kubectl get pods -o wide -n kube-system
In the example below we can see that our container is running on kube-node2.
Troubleshooting
Check the container/pod logs via kubectl command. You also have the option
of checking the Docker container as described in the previos module.
Using the full name of your pod as showed in the previous image run the following command:
# For example:
kubectl logs k8s-bigip-ctlr-846dcb5958-zzvc8 -n kube-system
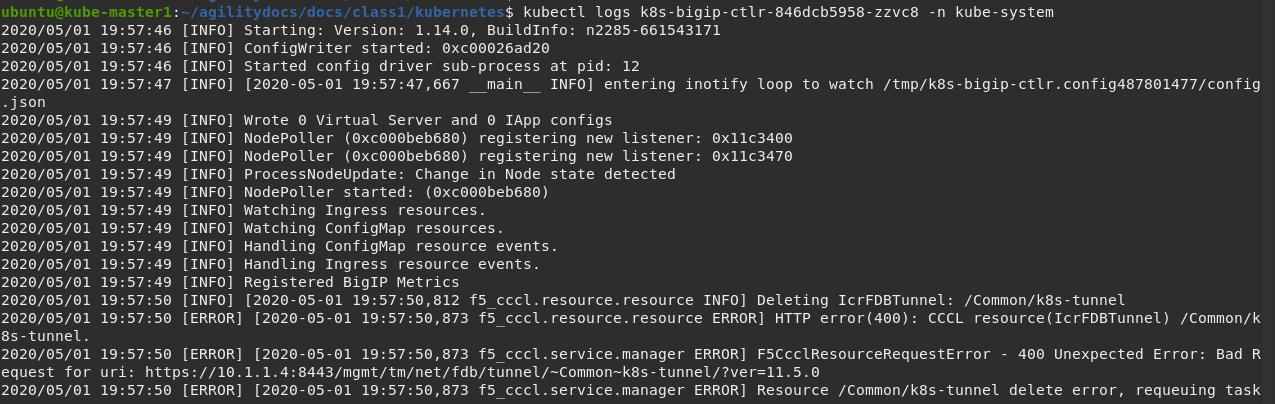
Attention
Ingore any ERROR you might see in this log output. These errors can be ignored. The lab will work as expected.