F5 Solutions for DDoS > Class 3: DDoS Hybrid Defender > DDoS Hybrid Defender Setup Source | Edit on
Lab 7 – Configuring DNS Attack Protection
DNS DoS attacks come in many flavors and target different resources. DNS query, reverse flood and amplification attacks are some such DNS attacks.
DNS Query Flood
This type of DoS of service attack has a couple possible resource impacts.
- Overwhelm the DNS server’s ability to respond by sending too many requests.
This can be done just by asking for more requests than the server can reply with and prevent the server from servicing legitimate requests. It doesn’t really matter if the clients are spoofed or not, it only matters that the DNS server just can’t keep up.
Mitigation Options
DNS DoS mitigation generally requires an awareness of what you’re trying to protect. This allows you to apply the appropriate mitigations and push the problem upstream until the next step is to force it off premises and in to a cloud solution. Load balancing is one remedy to this solution (anycast). Spreading the requests across pools of servers can help mitigate against these types of attacks. DNS Express is another option to increase the capacity of your DNS infrastructure. Layering in DHD DNS DoS vector mitigation also stops common DNS attacks.
Task 1 – Use a Protected Object to Mitigate a DNS Query Flood
In the BIG-IP Configuration Utility, open the DoS Protection > Quick Configuration page.
In the Protected Objects section click Create.
Configure a protected object using the following information, and then click Create.
Name DNSServer IP Address 10.1.20.14 Port 53 Protocol UDP Protection Settings: Action Log and Mitigate Protection Settings: DDoS Settings DNS 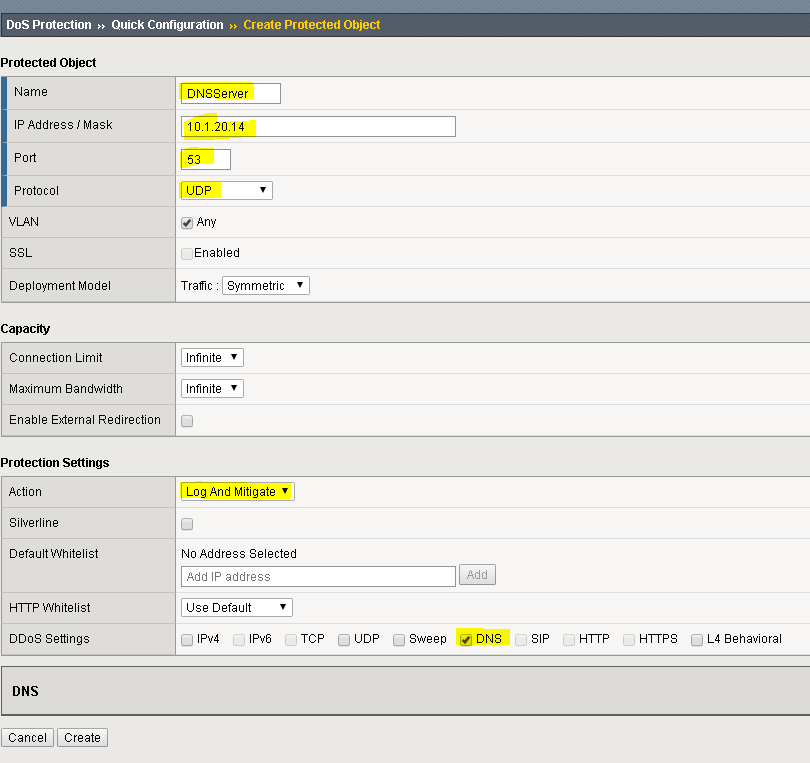
In the DNS row click the + icon, and then click DNS A Query.
On the right-side of the page configure using the following information, and then click Create.
Detection Threshold PPS Specify: 75 Detection Threshold Percent Specify: 500 Rate Limit Specify: 100 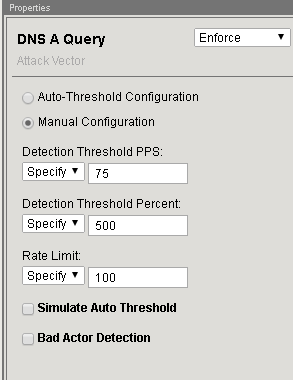
Task 2 – Establish a DNS Baseline
In the Attacker putty window type (or copy and paste) the following command:
# cd ~/scripts
# ./dnsbaseline.sh
Continue to run the baseline until you get the following results:

Task 3 – Initiate a DNS Attack that Exceeds the Rate Limit
In the Attacker putty window type (or copy and paste) the following command:
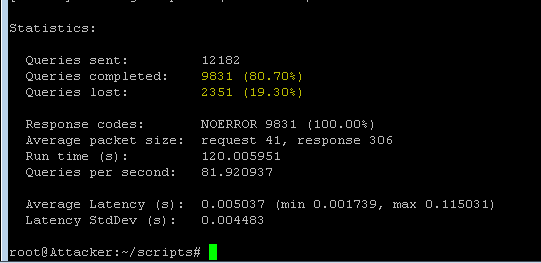
./dnsdosrate.shWait for the attack to run for about 30 seconds before moving on.
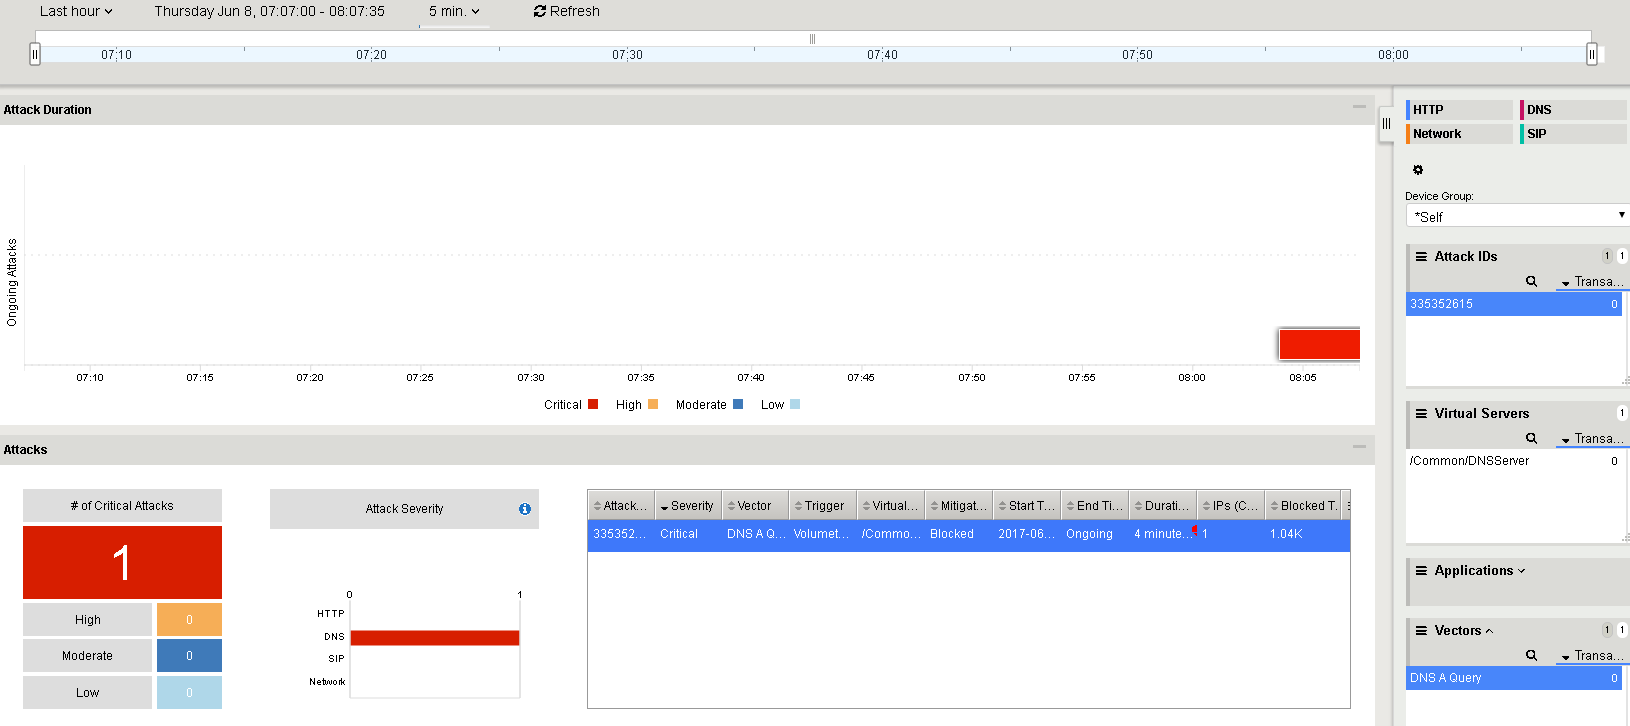
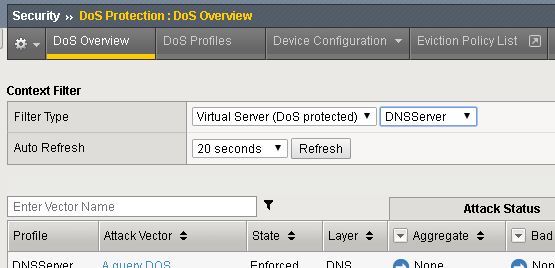
In the Configuration Utility, review the DoS Overview page.
Change the selection to Virtual Server and DNSServer.
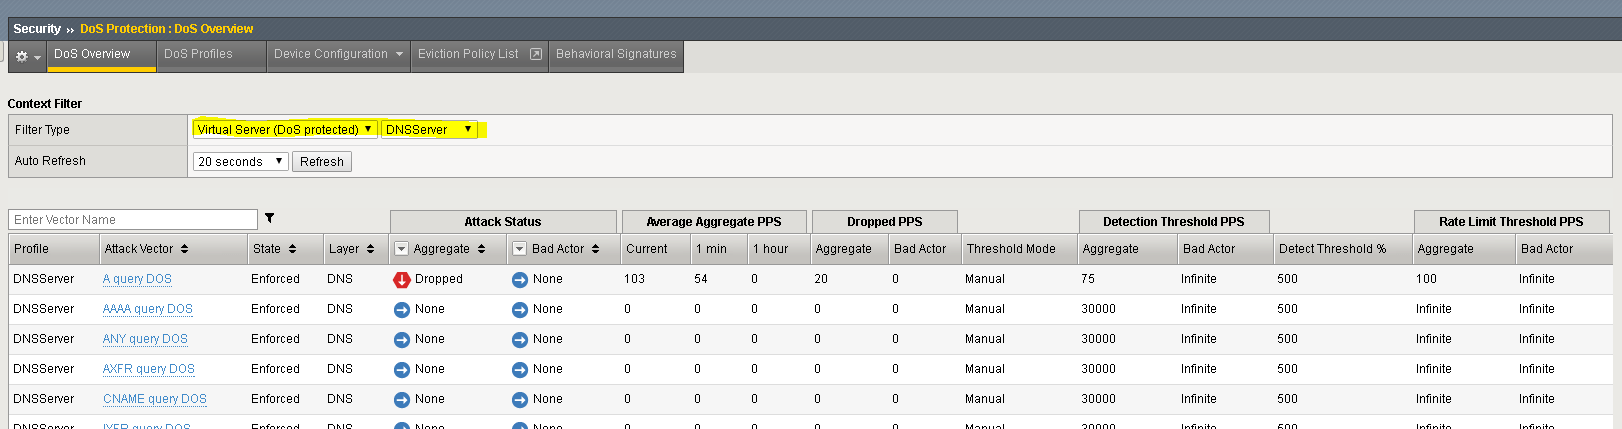
The A query DOS attack vector is now dropping attack traffic.
The script will also record the number of drops if any as a result of the attack rate limit being hit.
In the Configuration Utility open the Statistics >>DoS Visibility page. View details in various sections
DNS Reverse flood
Sometimes DNS responses are used in flooding network resources. A small request has a disproportionately larger response and since the transport protocol is UDP it can easily be spoofed. The outbound pipe can easily get congested responding to a smaller number of requests with large responses.
Task 1 – View DNS Reverse Flood
Use tcpdump and dig to view DNS request and response packets. A small request produces a large response. You will open two ssh sessions to the attacker.
Open two windows via Putty to the Attacker CLI (use the shortcut).
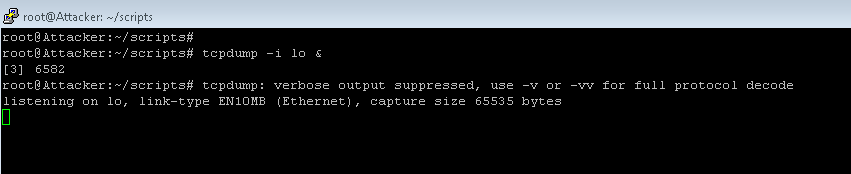
In the first ssh window on the attacker start a tcpdump using the following command:
# cd ~/scripts
# tcpdump -i lo &
In the second ssh window on the attacker issue a dig against the loop back with “ANY”
# cd ~/scripts
# dig ANY floodzone.local @localhost
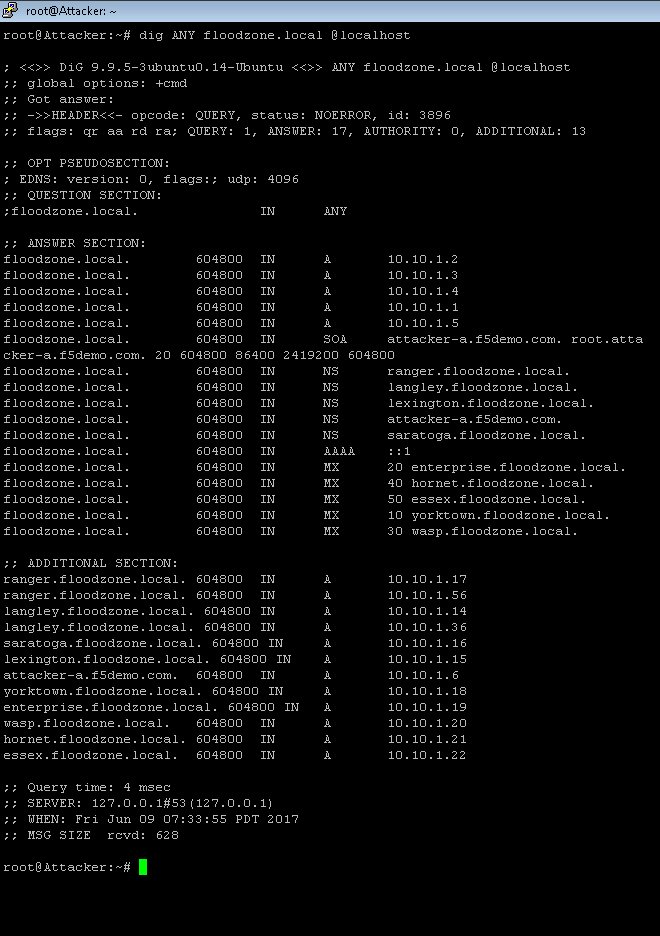
In the first ssh window on the attacker view the results of the tcpdump : Notice the difference in the size of the request (44) vs the response (628). Your values maybe different. The point is that a small request can generate an enormous response.
root@Attacker:~/scripts# tcpdump: verbose output suppressed, use -v or
-vv for full protocol decodelistening on lo, link-type EN10MB
(Ethernet), capture size 65535 bytes

07:33:55.737892 IP localhost.47406 > localhost.domain: 3896+ [1au] ANY?
floodzone.local. **(44)**

07:33:55.738563 IP localhost.domain > localhost.47406: 3896\* 17/0/13 A
10.10.1.2, A 10.10.1.3, A 10.10.1.4, A 10.10.1.1, A 10.10.1.5, SOA, NS
ranger.floodzone.local., NS langley.floodzone.local., NS
lexington.floodzone.local., NS attacker-a.f5d emo.com., NS
saratoga.floodzone.local., AAAA ::1, MX enterprise.floodzone.local. 20,
MX hornet.floodzone.local. 40, MX ess ex.floodzone.local. 50, MX
yorktown.floodzone.local. 10, MX wasp.floodzone.local. 30 **(628)**
In the second ssh window on the attacker issue a dig against the loop back with a query to RIPE.NET and with DNSSEC for a larger response.
# sudo bash
# cd ~/scripts
# dig ANY ripe.net @localhost +dnssec
In the first ssh window on the attacker view the results of the tcpdump : Notice the difference in the size of the request (37) vs the response (2715). Your values maybe different. The point is that a small request can generate an enormous response.
root@Attacker:~/scripts# tcpdump: verbose output suppressed, use -v or
-vv for full protocol decode

listening on lo, link-type EN10MB (Ethernet), capture size 65535 bytes

07:43:44.018212 IP localhost.51272 > localhost.domain: 58304+ [1au] ANY?
ripe.net. **(37)**

07:43:44.018889 IP localhost.domain > localhost.51272: 58304$ 18/8/15
RRSIG, SOA, RRSIG, RRSIG, A 193.0.6.139, RRSIG, DNSKEY, DNSKEY, DNSKEY,
RRSIG, DS, NS manus.authdns.ripe.net., NS a2.verisigndns.com., NS
a1.verisigndns.com., NS tinnie.arin.net., NS sns-pb.isc.org., NS
sec3.apnic.net., NS a3.verisigndns.com. **(2715)**
Once you’re done, type ‘fg’ and ‘CTRL+C’ to stop the tcpdump.
root@Attacker:~/scripts# tcpdump: verbose output suppressed, use -v or
-vv for full protocol decode listening on lo, link-type EN10MB
(Ethernet), capture size 65535 bytes
fg
tcpdump -i lo^C0 packets captured 0 packets received by filter 0 packets dropped by kernel root@Attacker:~/scripts#
This can easily overwhelm the server or overwhelm the outbound network pipe disrupting traffic responses for legitimate requests and/or other applications.
One industry accepted way to mitigate this type of attack is to rate limit the responses on the DNS servers. More information on Response Rate Limiting can be found here:
https://www.isc.org/wp-content/uploads/2014/11/DNS-RRL-LISA14.pdf
Because DoS policies are applied to traffic flows on ingress to the DHD, response rate limiting isn’t currently available. But you still can limit the types of queries that can disproportionately consume bandwidth. The ANY query used in the previous example is one such example.
Task 2 – Use a Protected Object to Mitigate a DNS Reverse Query Flood
In the BIG-IP Configuration Utility, open the DoS Protection > Quick Configuration page
In the Protected Objects section click DNSServer.
In the DNS row click the + icon, and then click DNS ANY Query.
On the right-side of the page configure using the following information, and then click Update.
Detection Threshold PPS Specify: 50 Detection Threshold Percent Specify: 500 Rate Limit Specify: 75 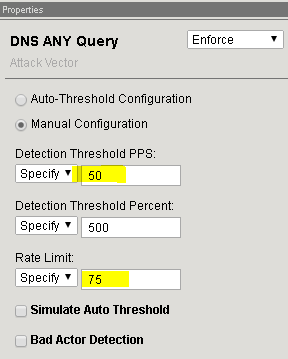
In the BIG-IP Configuration Utility, open the Security>>DoS Protection>> DoS Overview page and set the Filter type to “Virtual Server (DoS protected) / DNSServer” Set Auto-Refresh to 20 seconds.
In the attacker ssh window issue dns reverse flood attack as follows:
# cd ~/scripts
# ./dnsReverseFlood.sh
Observe the DoS Overview as it gradually starts to drop the ANY queries.


In the attacker ssh window stop the attack by hitting CTRL+C many times