F5 Solutions for DDoS > F5 Agility 2018: DDoS Attack Protection > DDoS Hybrid Defender Setup Source | Edit on
Lab 2 – Configuring Hybrid Defender DDoS Device Protection
Task 1 – Verify Communication Through the DHD Device.
PuTTY to the BIG-IP CLI (10.1.1.245) from your jumpbox desktop shortcut and resize window by making it wider. You will be logged on as
root.At the config prompt, type (or copy and paste) the following command:
tcpdump -i 0.0 host 10.1.20.12PuTTY to the Attacker host from your jumpbox desktop shortcut. Accept the Warning. Enter “ubuntu” as the user. It will use a pre-loaded public key as the credentials.
At the config prompt, type (or copy and paste) the following command:
ping 10.1.20.12Examine the tcpdump window and verify ICMP packets are flowing through the BIG-IP DHD.
The attacker can successfully communicate with a back-end resource behind the BIG-IP DHD.
Note
The listener for the ICMP packets is the VLAN group.
- Cancel the
pingcommand, then verify thetcpdumpstops receiving ICMP packets, and then press Enter several times to clear the recent log entries.
Task 2 – Disable Device-Level DHD DoS Protection
- In the Configuration Utility, in the DoS Configuration >> Device Protection section click Network.

- On the left side of the page select the checkbox for ICMPv4 flood and UDP Flood.
- At the bottom just below the last vector, choose the drop down Set State and then select Disabled.
Hint
This is the new method for selecting and changing multiple items at one-time. This will be how we will Set State and Set Threshold.
 - Navigate back to the top of the window and Select Commit Changes to System
 - On the Jumpbox in the Attacker PuTTY window type (or copy and paste) the following:
# sudo su
# cd scripts
# ls
Note
Ignore the “sudo: unable to resolve host” error.

These are some of the different scripts we’ll be using during the exercises to simulate DoS attacks.
Type (or copy and paste) the following command:
for i in {1..10}; do ./icmpflood.sh; done
This script launches the Attack and then repeats for a total of ten occurrences.
- View the
tcpdumpwindow and verify that ICMP attack traffic is reaching the back-end server. - Let the attack run for about 15 seconds before moving on.
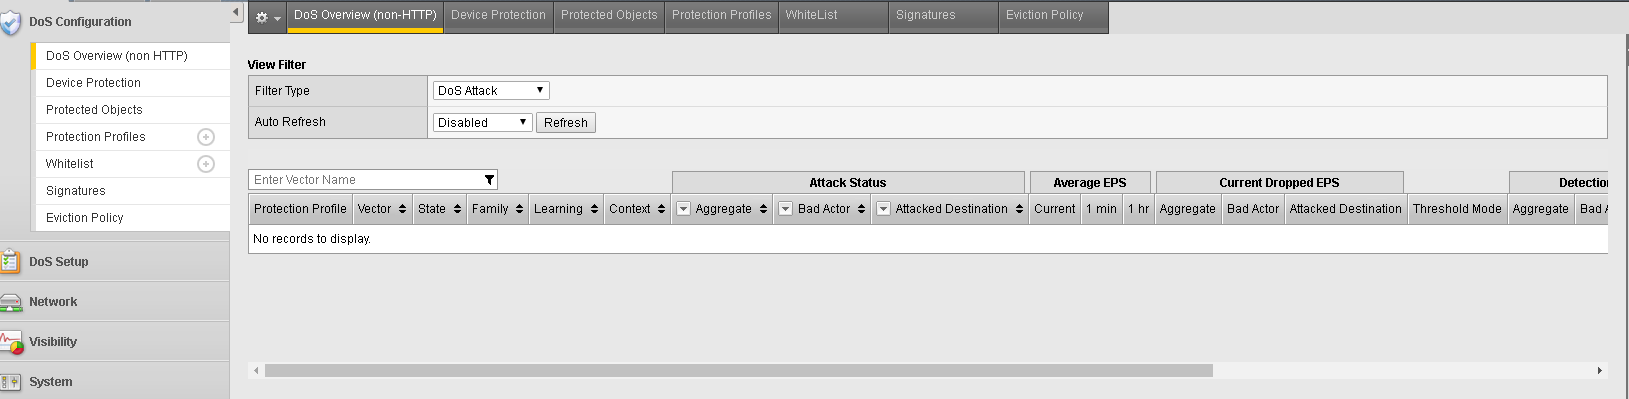
- In the Configuration Utility, open the DoS Configuration >> DoS Overview (non HTTP) page.
- Make sure the Filter Type is “Dos Attack”.
- View the Protection Profile column in the display and notice no results are returned, you disabled those vectors.
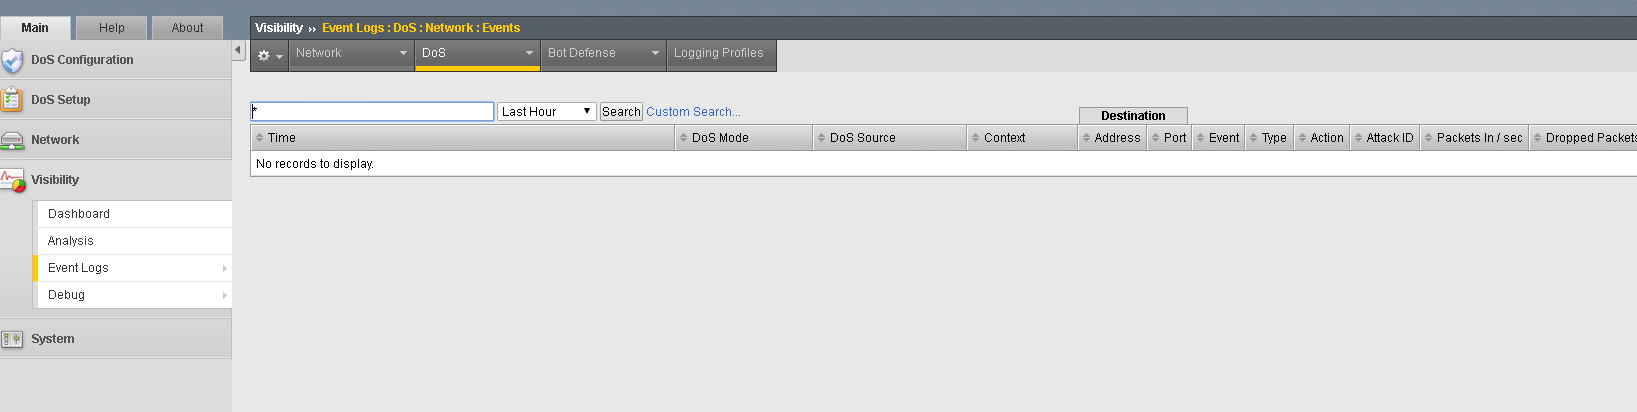
- Navigate to Visibility >> Event Logs >> DoS >> Network >> Events.
 - Go back to the Attacker and stop the script. CTRL+C (This needs to be hit several times to break out of the script)
- Notice no logs are captured. We could have chosen Learn Only or Detect Only and had different results. If you want to test, feel free.
Note
If you want to run the other attacks, use the format above. ./synflood.sh and udp_flood.sh behave similar. If you are not seeing the traffic on the DHD CLI, Stop and Re-Start the tcpdump.
Both of these locations we will return to throughout this course to see how our DHD is viewing these attacks.
Task 3 – Re-enable Device-Level DHD DoS Protection
In this task you will re-configure device-level DoS protection and then issue the same command and review the results.
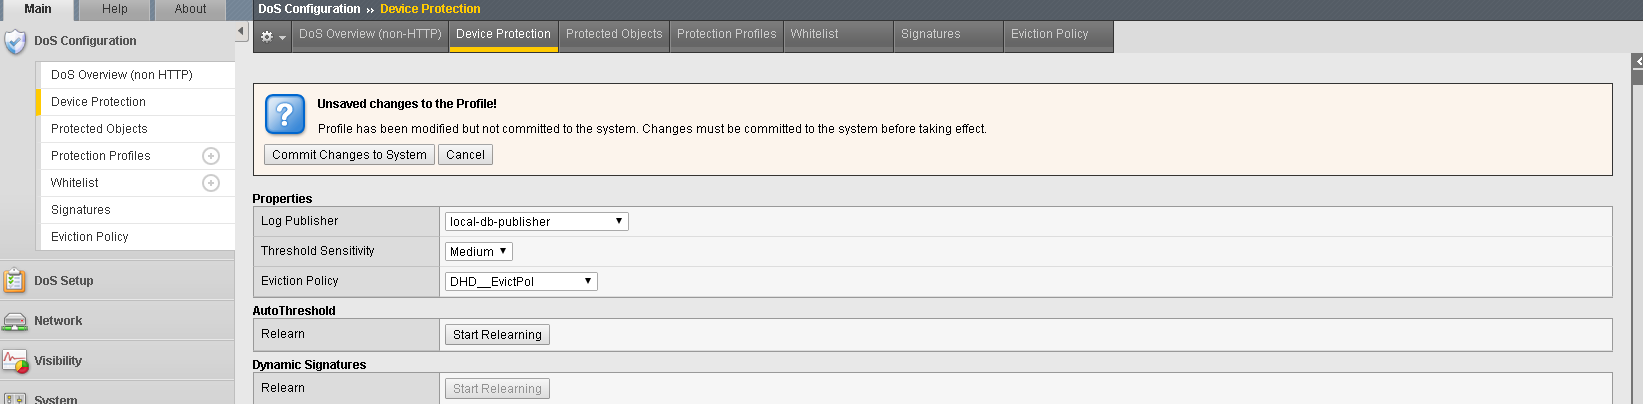
- In the Configuration Utility, in the DoS Configuration >> Device Protection under Log Publisher select “local-db-publisher”.
- Next click the Network section.
- On the left side of the page select the checkbox for ICMPv4 flood and UDP Flood.
- At the bottom just below the last vector, chose the drop down Set State and then select Mitigate.
Note
You have the option of Learn Only and Detect Only as well.
- Navigate back to the top of the window and Select Commit Changes to System
Note
This returns the configuration back to factory supplied device level enforcement.
Task 4 – Attack the DDoS Hybrid Defender again and see what you can tell.
Type (or copy and paste) the following command:
for i in {1..10}; do ./icmpflood.sh; doneIn the Configuration Utility, open the DoS Configuration >> DoS Overview (non HTTP) page.
Make sure the Filter Type is “Device Dos”.
This page will show the preset vectors for the Device and the Current Attack Status, Average EPS, Current Dropped EPS and the Detection Thresholds including the Threshold Mode.
Scroll down until you see ICMPv4 Flood.

Attention
Why is the DHD not dropping packets?
Hint
Look at the Manual Thresholds set and the current rate of packets. We are not generating enough traffic.
- We need to set a lower threshold Manually.
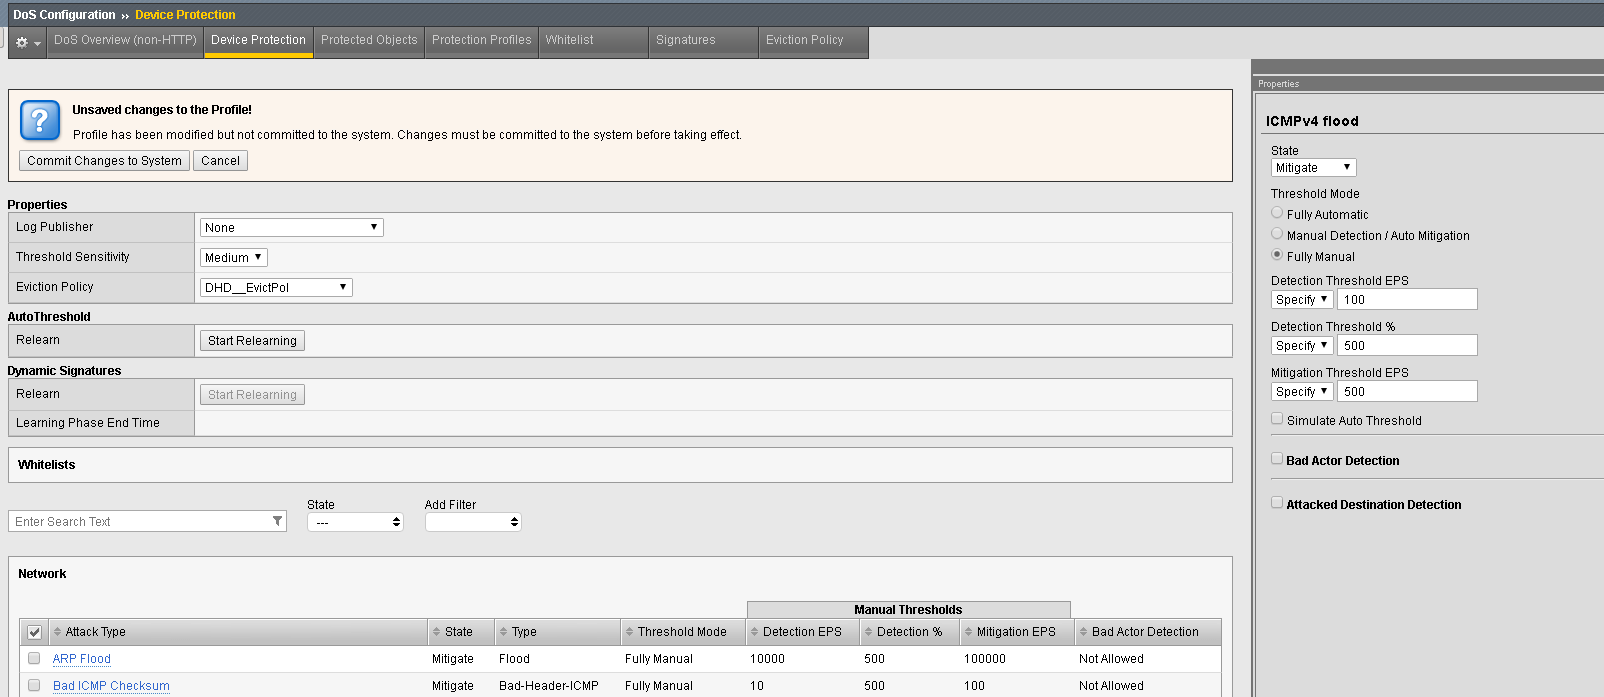
- In the Configuration Utility, open the DoS Configuration >> Device Protection page. Scroll down in the Network section to ICMPv4 flood. Click ICMPv4 flood.
Note
The new fly out page.
- Manually Set The Detection Threshold PPS to 100 and the Mitigation Threshold EPS to 500. Scroll up and Commit Changes to System
- Relaunch the Attack from the Attacker CLI.
- In the Configuration Utility, open the DoS Configuration >> DoS Overview (non HTTP) page.
- Make sure the Filter Type is “Dos Attack”. See the Dropped traffic with the new thresholds. Alternatively, you can go “Device DoS”, scroll down to ICMPv4 Flood and see the same information.”
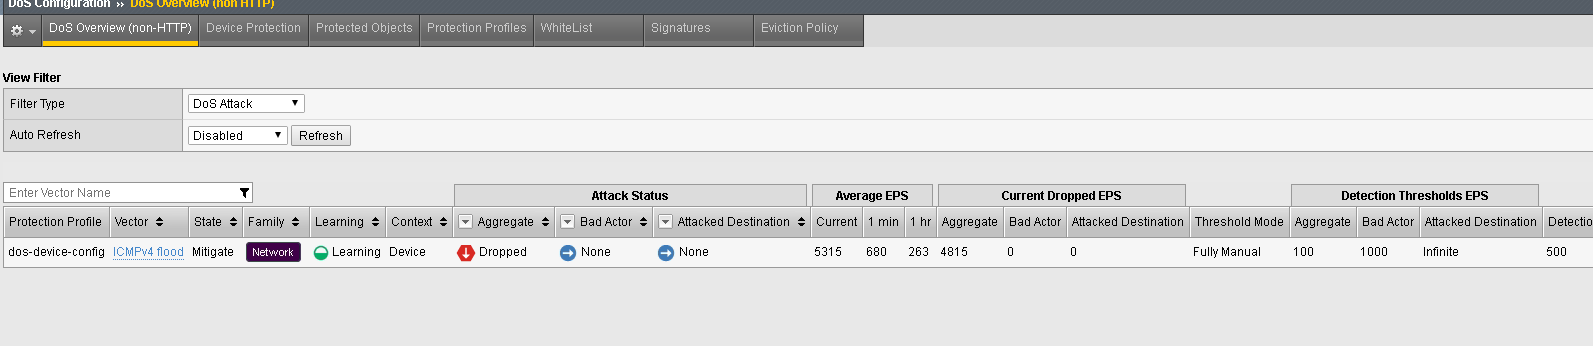
- Look at the Protection Profile: dos-device, attack status and various rates.
- You can terminate the Attack with Ctrl+C when finished.
This concludes this section where we looked at setting manual thresholds to mitigate attacks that might not have been mitigated with the default settings.
Note
We did this to only one vector. These same procedure can be applied to all the vectors or selected vectors, depending on your environment.