NGINX Modern Apps > Class 1 - Intro to NGINX Plus > Module 3: Introduction to the NGINX Plus API Source | Edit on
NGINX Plus API Dynamic Configuration
Introduction
NGINX Plus enables configuration of upstream servers in a server group to be modified on-the-fly without reloading the NGINX servers and its configuration files. This is useful for:
- Autoscaling, when you need to add more servers
- Maintenance, when you need to remove a server, specify a backup server, or take a server down temporarily
- Quick setup, when you need to change upstream server settings such as server weight, active connections, slow start, failure timeouts.
- Monitoring, when you get the state of the server or server group with one command
All these changes are made with the NGINX Plus REST API. By default changes made with the API are only stored only in the shared memory zone and so the changes are discarded when the NGINX Plus configuration file is reloaded.
In this Module we will configure upstream servers and upstream server groups dynamically (on-the-fly) with the NGINX Plus REST API and use the state directive so on-the-fly configurations persistent through NGINX reloads.
Learning Objectives
By the end of the lab you will be able to:
Exercise 1: Dynamic Configuration of an Upstream using the NGINX API using Postman
In this section, we will use Postman to interact with the NGINX API. In the Optional section below, we can reproduce the same steps using curl
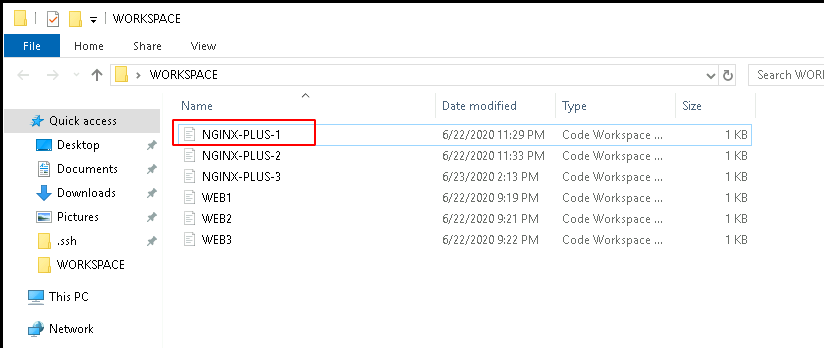
In the WORKSPACE folder found on the desktop, double click the NGINX-PLUS-1 workspace shortcut to open Visual Studio Code
In the VSCode, open a terminal window, by selecting View > Terminal. You will now be able to both run NGINX commands and edit NGINX Plus configuration files via the VSCode Console and terminal.

Now inspect the /etc/nginx/conf.d/upstreams.conf file. Note the following:
The zone directive configures a zone in the shared memory and sets the zone name and size. The configuration of the server group is kept in this zone, so all worker processes use the same configuration. In our example, the zone is also named dynamic and is 64k in size.
The state directive configures Persistence of Dynamic Configuration by writing the state information to a file that persists during a reload. The recommended path for Linux distributions is /var/lib/nginx/state/
# /etc/nginx/conf.d/upstream.conf

upstream dynamic {
    # Specify a file that keeps the state of the dynamically configurable group:
    state /var/lib/nginx/state/servers.conf;

    zone dynamic 64k;

    # Including keep alive connections are bonus points
    keepalive 32;
}

In the Terminal window, on the NGINX plus instance, ensure that the state file is at a empty state for this demo. Delete the file (if exists), then create an empty file:
rm /var/lib/nginx/state/servers.conf
Note
You may receive the following if the file doesn’t exist
rm: cannot remove ‘/var/lib/nginx/state/servers.conf’: No such file or directory
Then run:
touch /var/lib/nginx/state/servers.conf
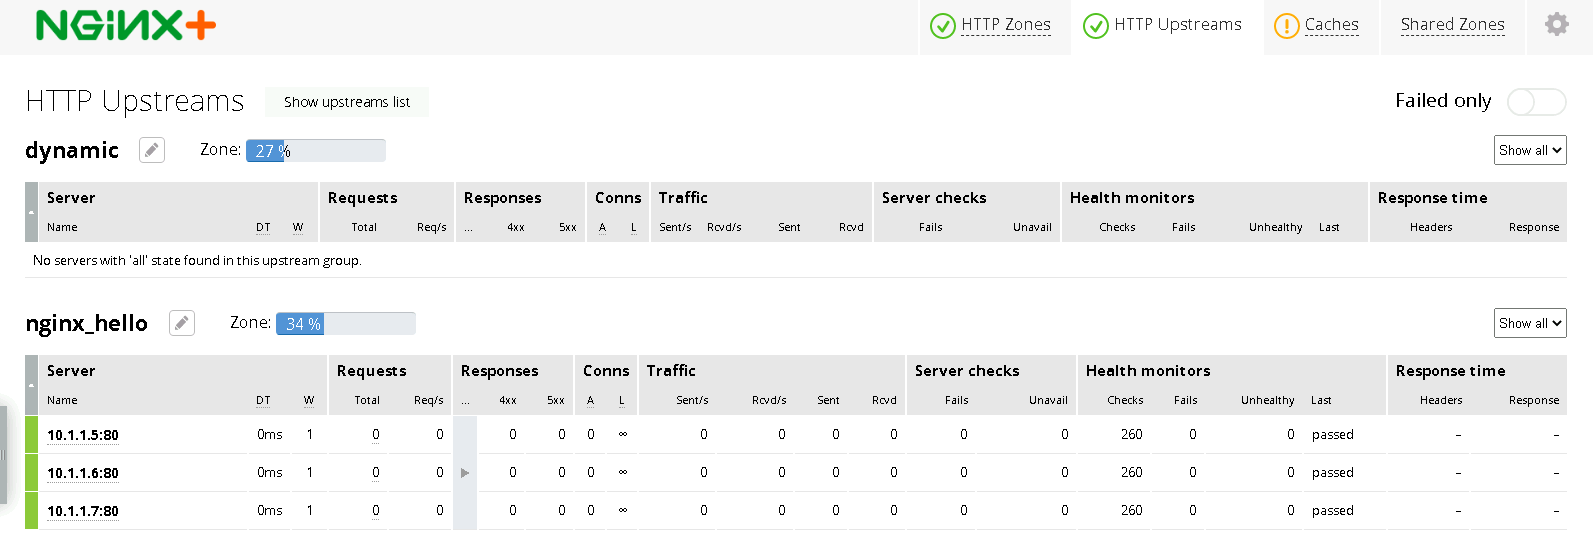
In a Web Browser, open the NGINX dashboard on http://www.example.com:8080/dashboard.html. There is a bookmark in the Chrome Web Browser Nginx+ Dashboard. Navigate to HTTP Upstreams, and note that the dynamic is empty.
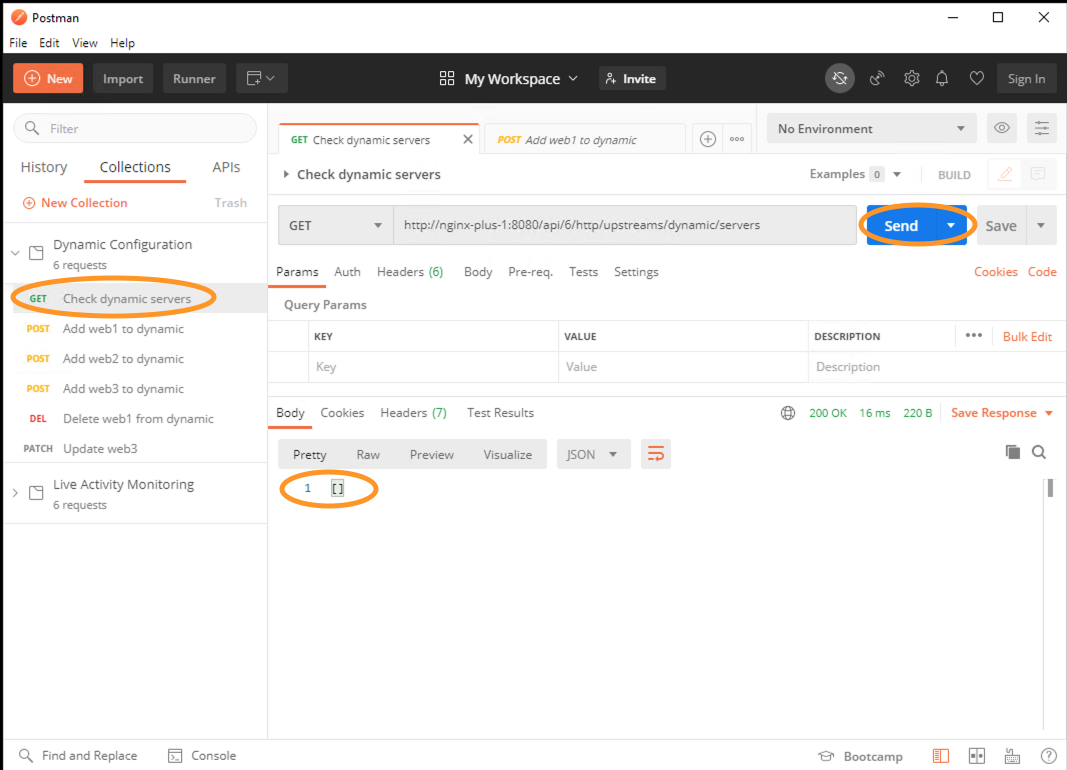
Open Postman found on the desktop. For this demo we would will make use of the Dynamic Configuration collection.
Open Check dynamic servers request and execute the call by clicking on the Send button. We can confirm the empty state of our upstream, dynamic, from the response that we receive from the NGINX API.
- Let’s add two servers, web1 (
10.1.1.5:80) and web2 (
10.1.1.6:80) to the dynamic upstream group using the API.Open Add web1 to dynamic and Add web2 to dynamic requests and run them as shown below.
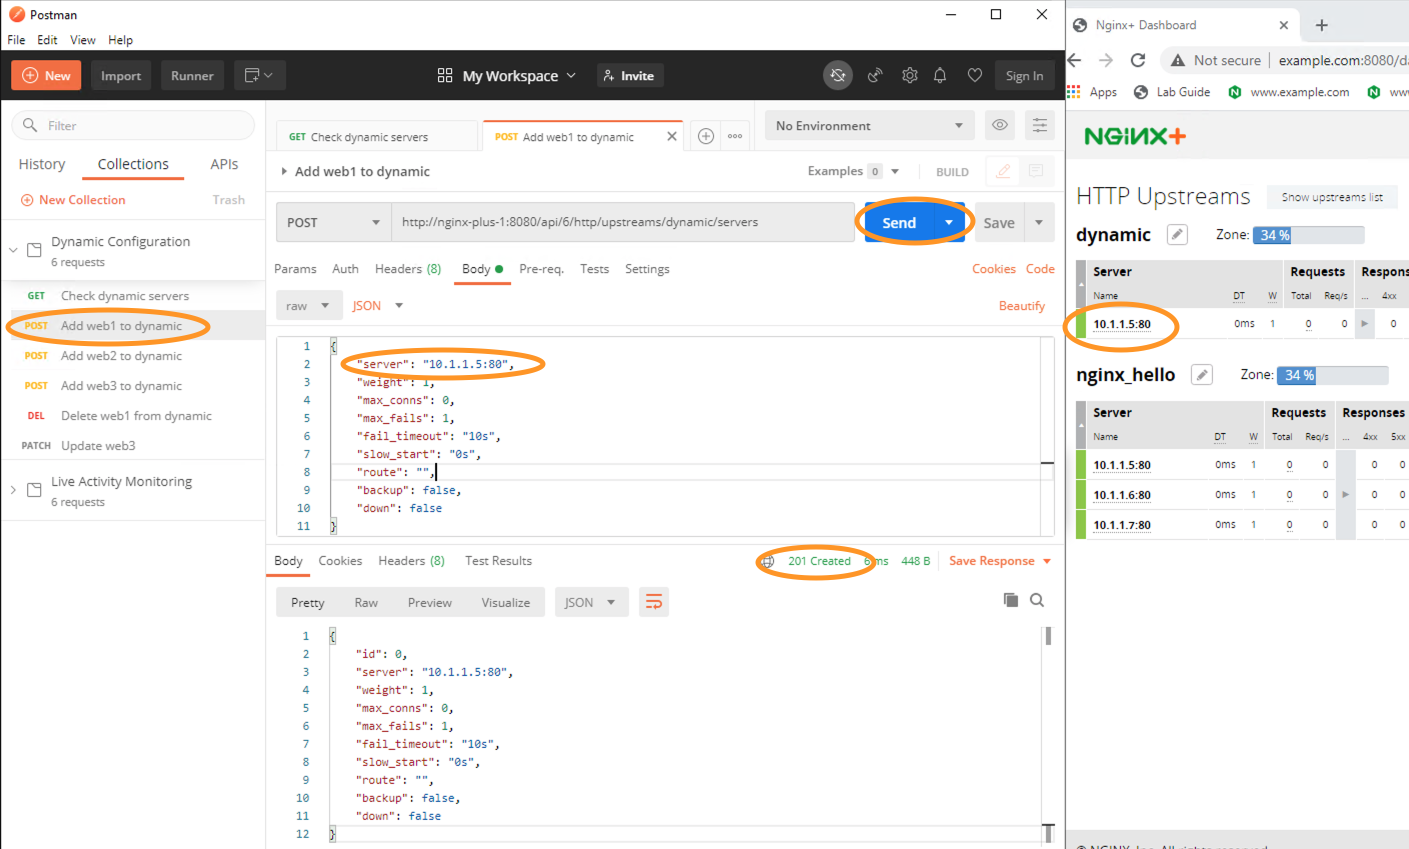
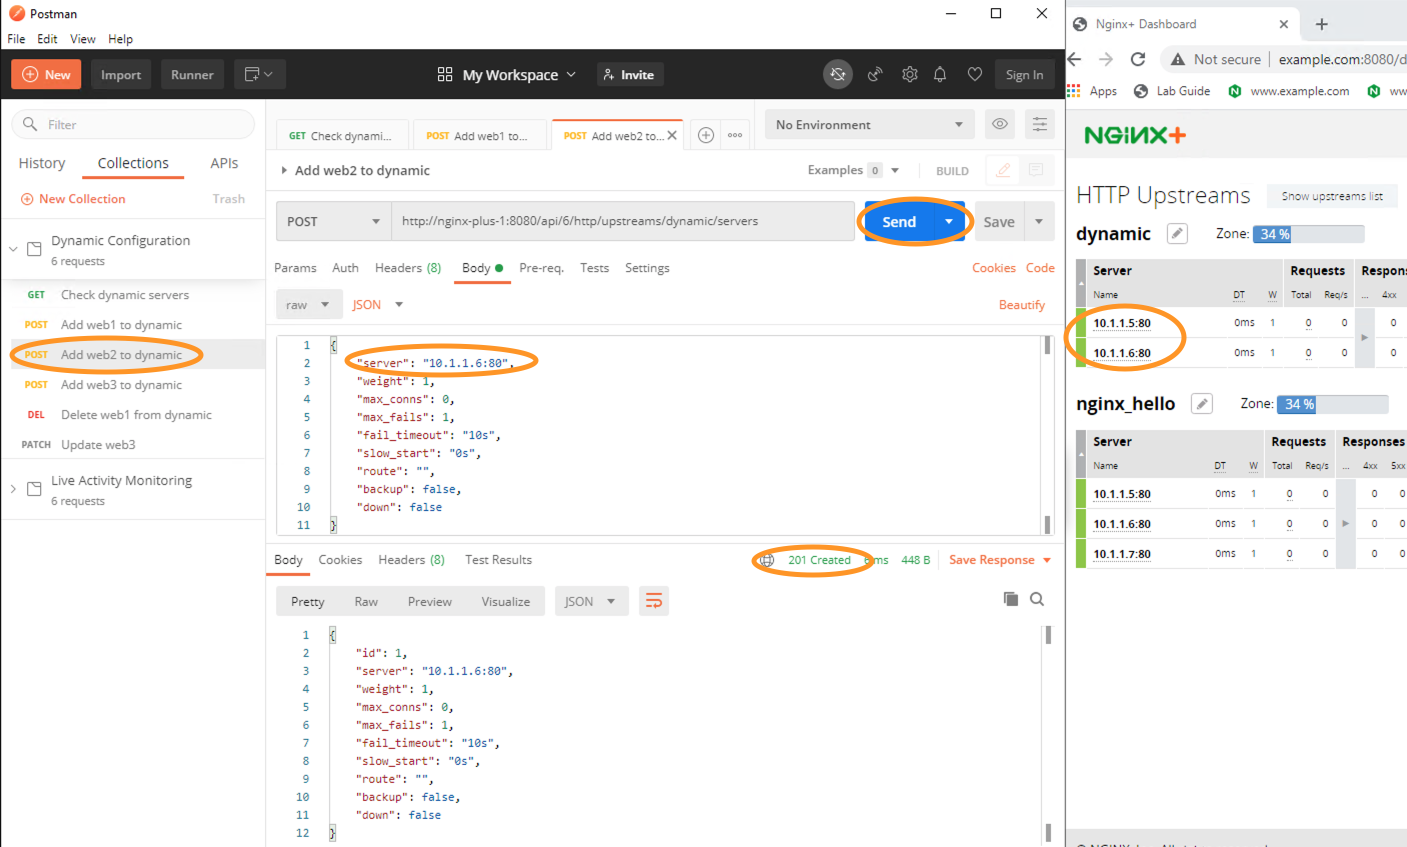
- Let’s add two servers, web1 (
Lets now add web3 (
10.1.1.7:80), marked as down, to the dynamic upstream group using the API.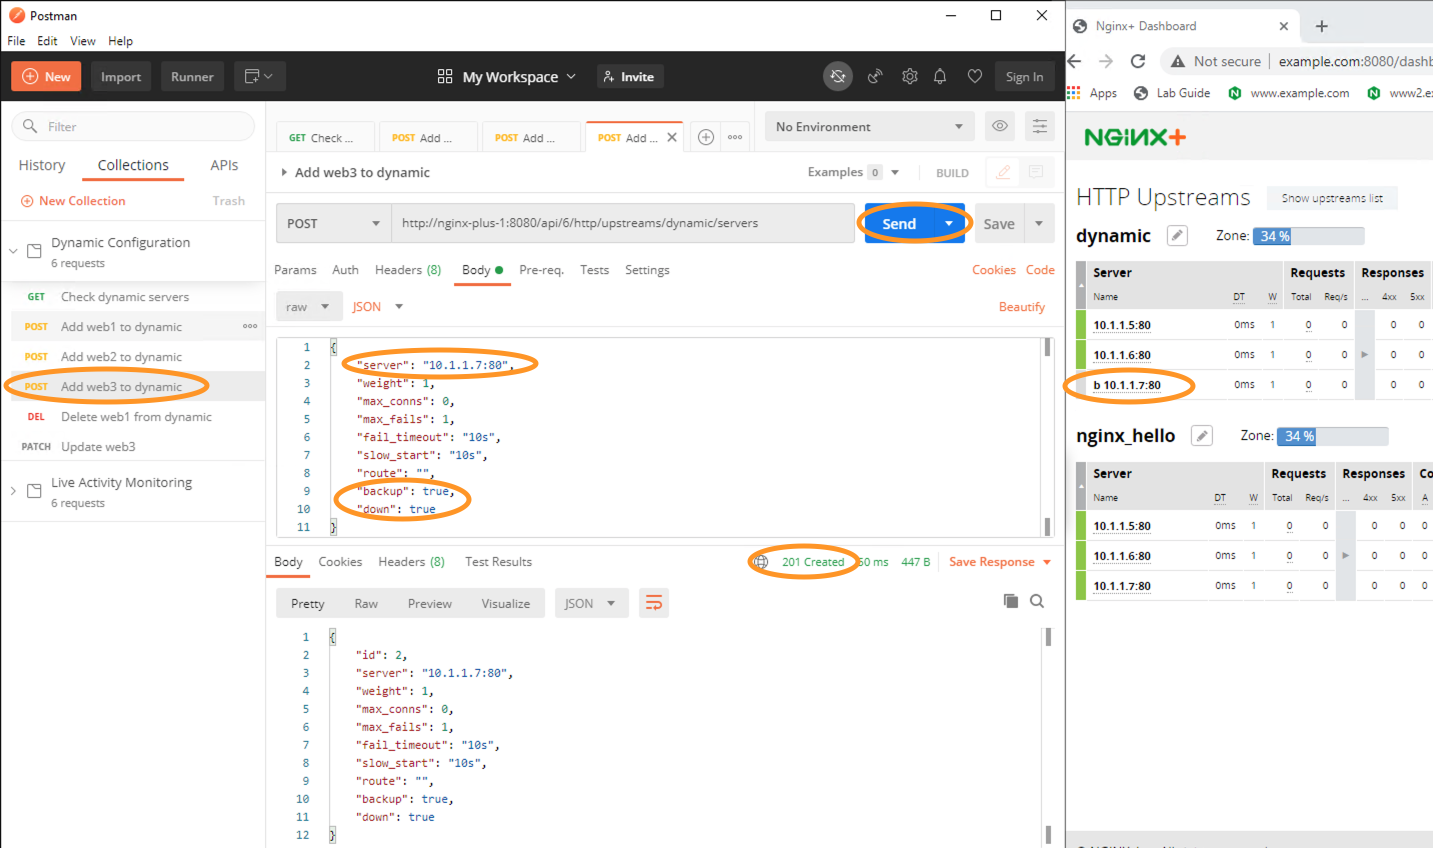
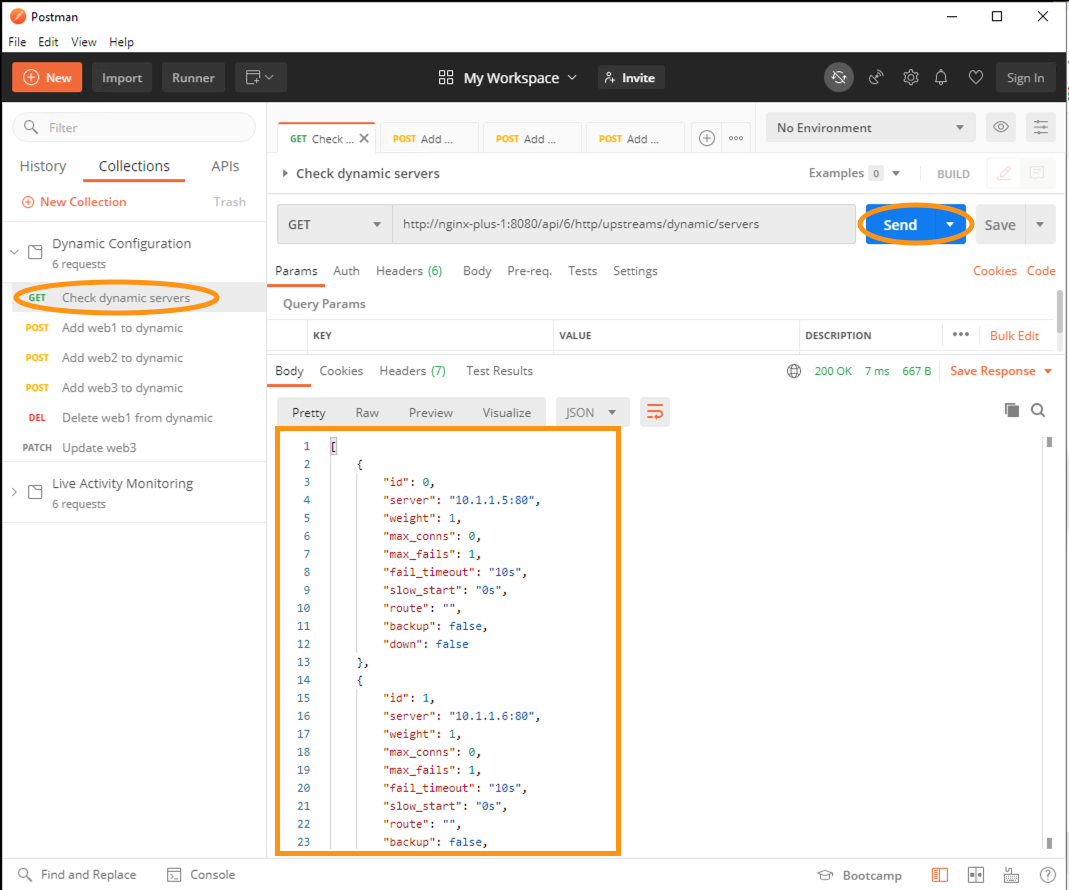
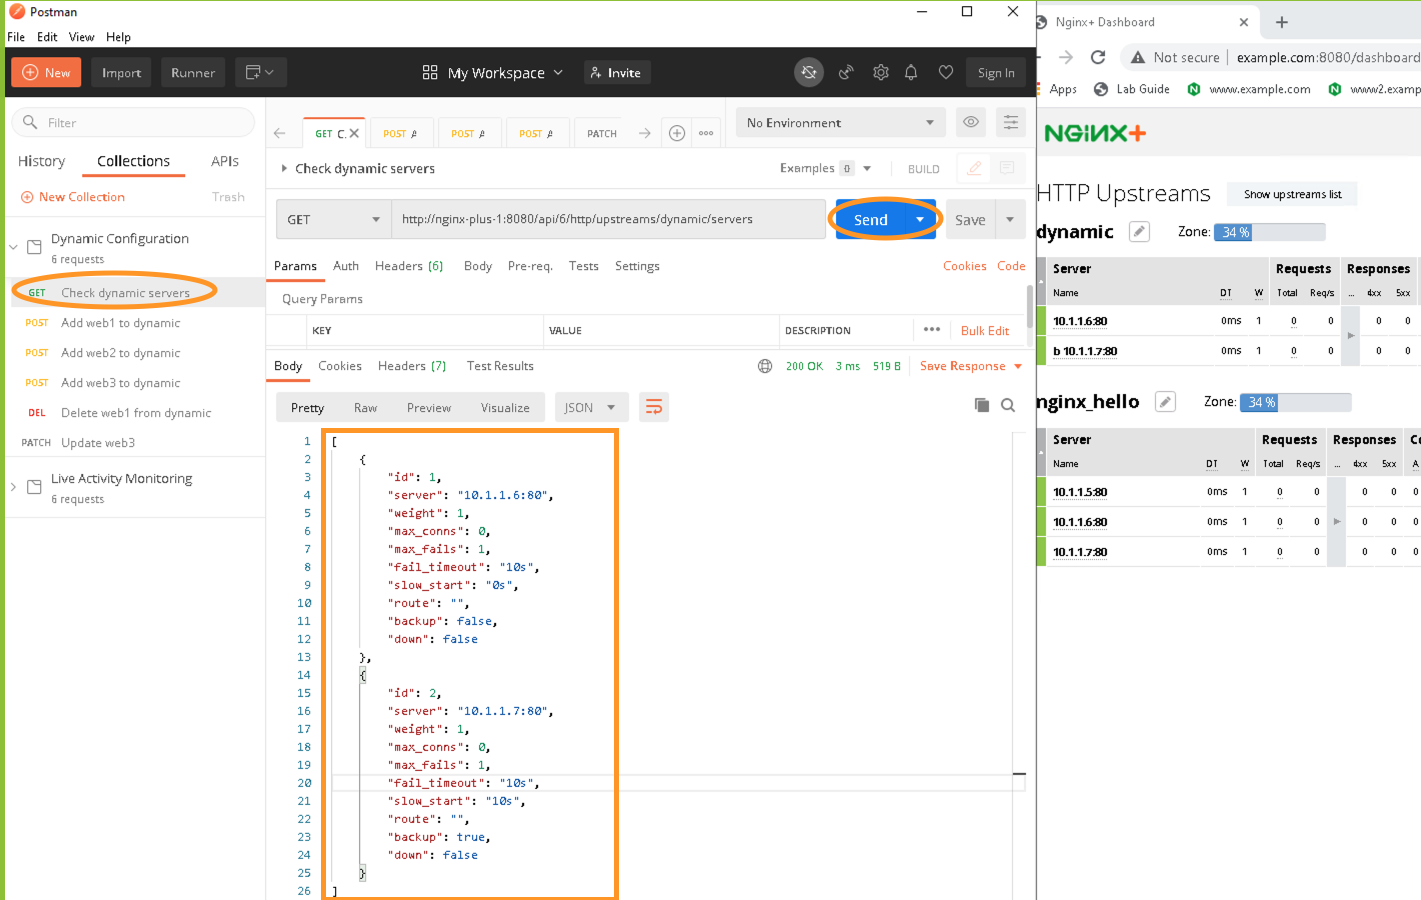
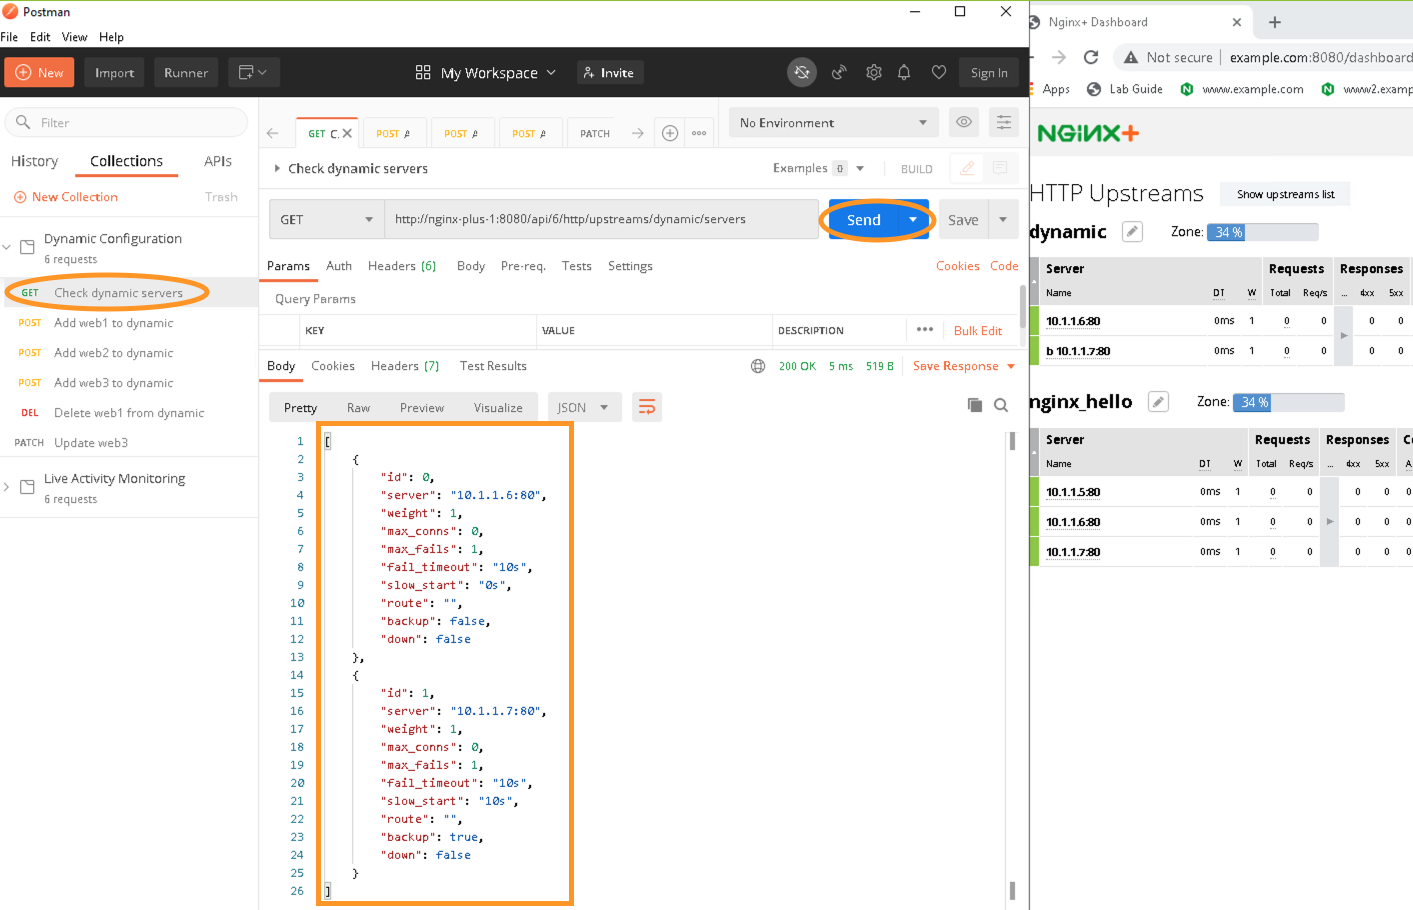
- Once again, we can list the servers in our upstream, dynamic, and
view the changes made. Run the Check dynamic servers collection in Postman to view the changes.
We can also confirm that the state file has been updated:
cat /var/lib/nginx/state/servers.conf
Note
You should see output similar to the following
server 10.1.1.5:80;server 10.1.1.6:80;server 10.1.1.7:80 slow_start=10s backup down;It is possible to also remove a server from the upstream group:

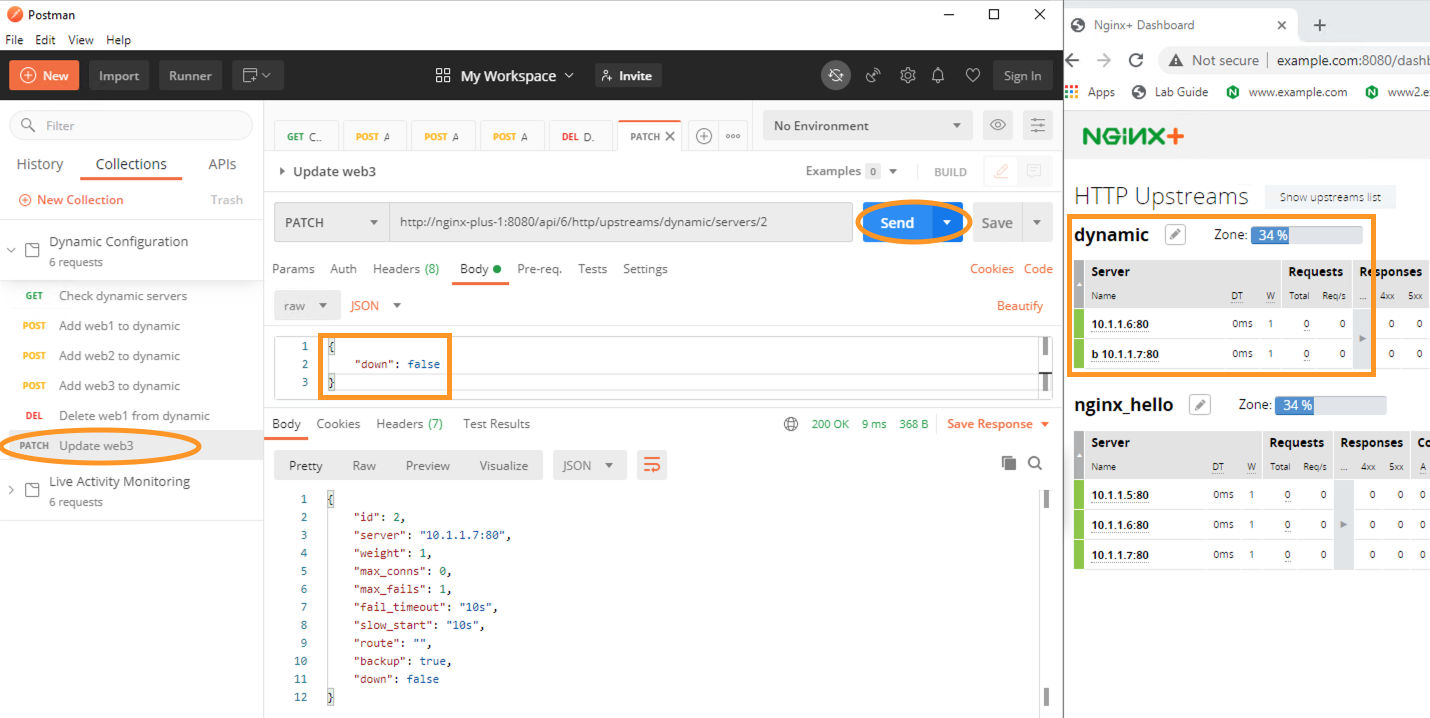
- To add our down server back to the rotation and accept live
traffic, we need to change the server parameter from down: true to down: false. First, we must find the server ID:
Run the Check dynamic servers request to get the list of servers. From the response body note down the id value for the block that has the server parameter down: true

Now that we have identified the server id, (e.g. “id: 2”) we can modify the down parameter:
Click the Update web3 patch request. Before sending the request take a look at the Body of the request in Postman by clicking the Body link just below the PATCH request. Afterweards, click Send to modify the Down parameter.
Once again, list our servers in our upstream, dynamic
We can check that the state file is making our upstream changes persistent by reloading NGINX and checking the dashboard and API.
cat /var/lib/nginx/state/servers.conf
Note
You should see output similar to the following
server 10.1.1.5:80;
server 10.1.1.6:80;
server 10.1.1.7:80 slow_start=10s backup;
# Reload NGINX
nginx -s reload
Note
After a NGINX reload, the server id is reset to start at 0:
Optional: Dynamic Configuration of an Upstream using the NGINX API using cURL
In this section, we will use curl to interact with the NGINX API.
- In the WORKSPACE folder found on the desktop, open NGINX-PLUS-1 in Visual Studio Code
In VSCode, open a terminal window by selecting View > Terminal command. You will now be able to both run NGINX commands and edit NGINX Plus configuration files via the VSCode Console and terminal.
Now inspect the /etc/nginx/conf.d/upstreams.conf file. Note the following:
The zone directive configures a zone in the shared memory and sets the zone name and size. The configuration of the server group is kept in this zone, so all worker processes use the same configuration. In our example, the zone is also named dynamic and is 64k megabyte in size.
The state directive configures Persistence of Dynamic Configuration by writing the state information to a file that persists during a reload. The recommended path for Linux distributions is /var/lib/nginx/state/
# /etc/nginx/conf.d/upstream.conf

upstream dynamic {
    # Specify a file that keeps the state of the dynamically configurable group:
    state /var/lib/nginx/state/servers.conf;

    zone dynamic 64k;

    # Including keep alive connections are bonus points
    keepalive 32;
}
In the Terminal window, on the NGINX plus instance, ensure that the state file is at a empty state for this demo. Delete the file (if exists), then create an empty file:
rm /var/lib/nginx/state/servers.conf
Note
You may receive the following if the file doesn’t exist
rm: cannot remove ‘/var/lib/nginx/state/servers.conf’: No such file or directory
Next, lets restart NGINX to make sure changes are reflected in the UI:
nginx -s reload
Then run:
touch /var/lib/nginx/state/servers.conf
In a Web Browser, open the NGINX dashboard on http://www.example.com:8080/dashboard.html. There is a bookmark in the Chrome Web Browser Nginx+ Dashboard. Navigate to HTTP Upstreams, and note that the dynamic is empty.
In the Terminal window, we can also confirm the empty state of our upstream, dynamic, using a curl command to retrieve this information from the NGINX API.
curl -s http://nginx-plus-1:8080/api/6/http/upstreams/dynamic/servers | jq
Note
Am empty array should return
[]
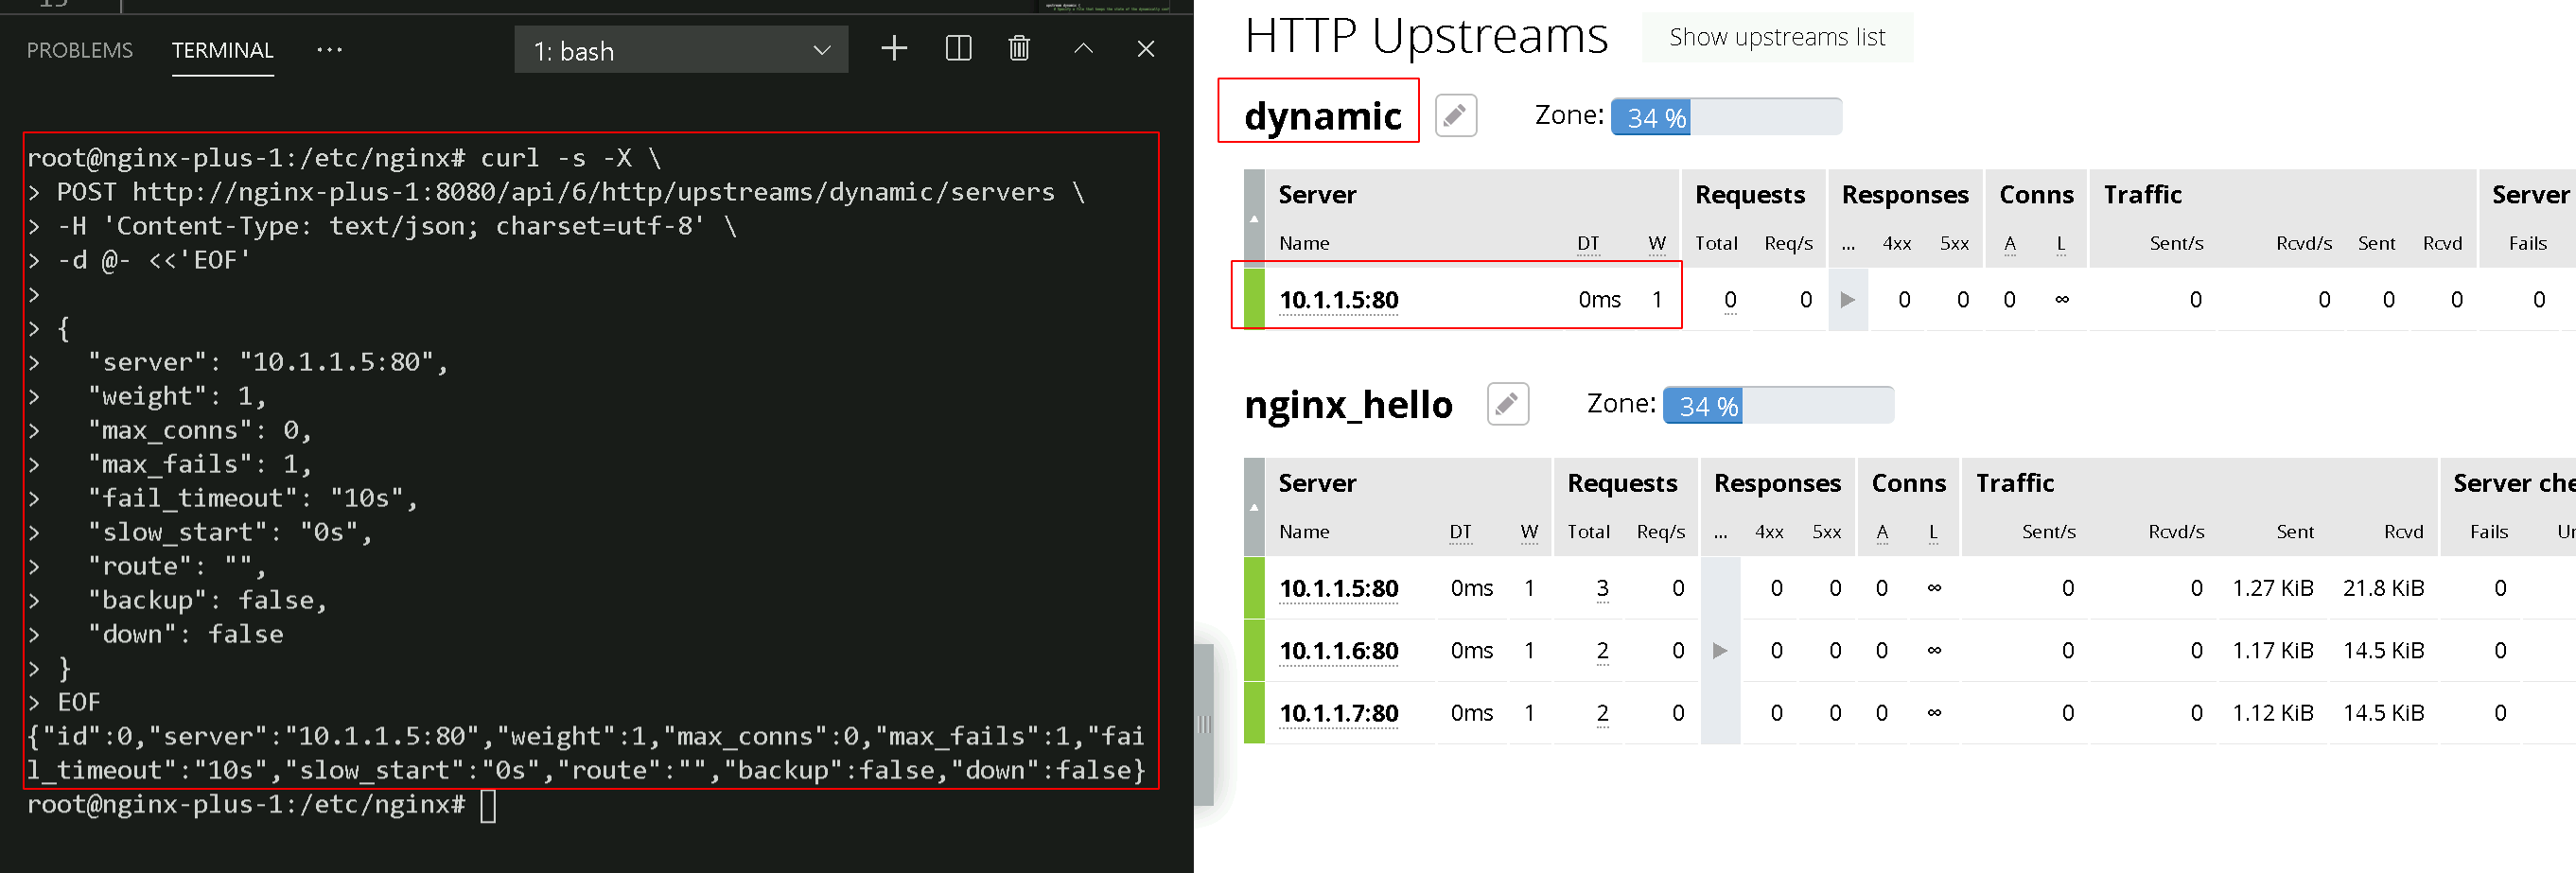
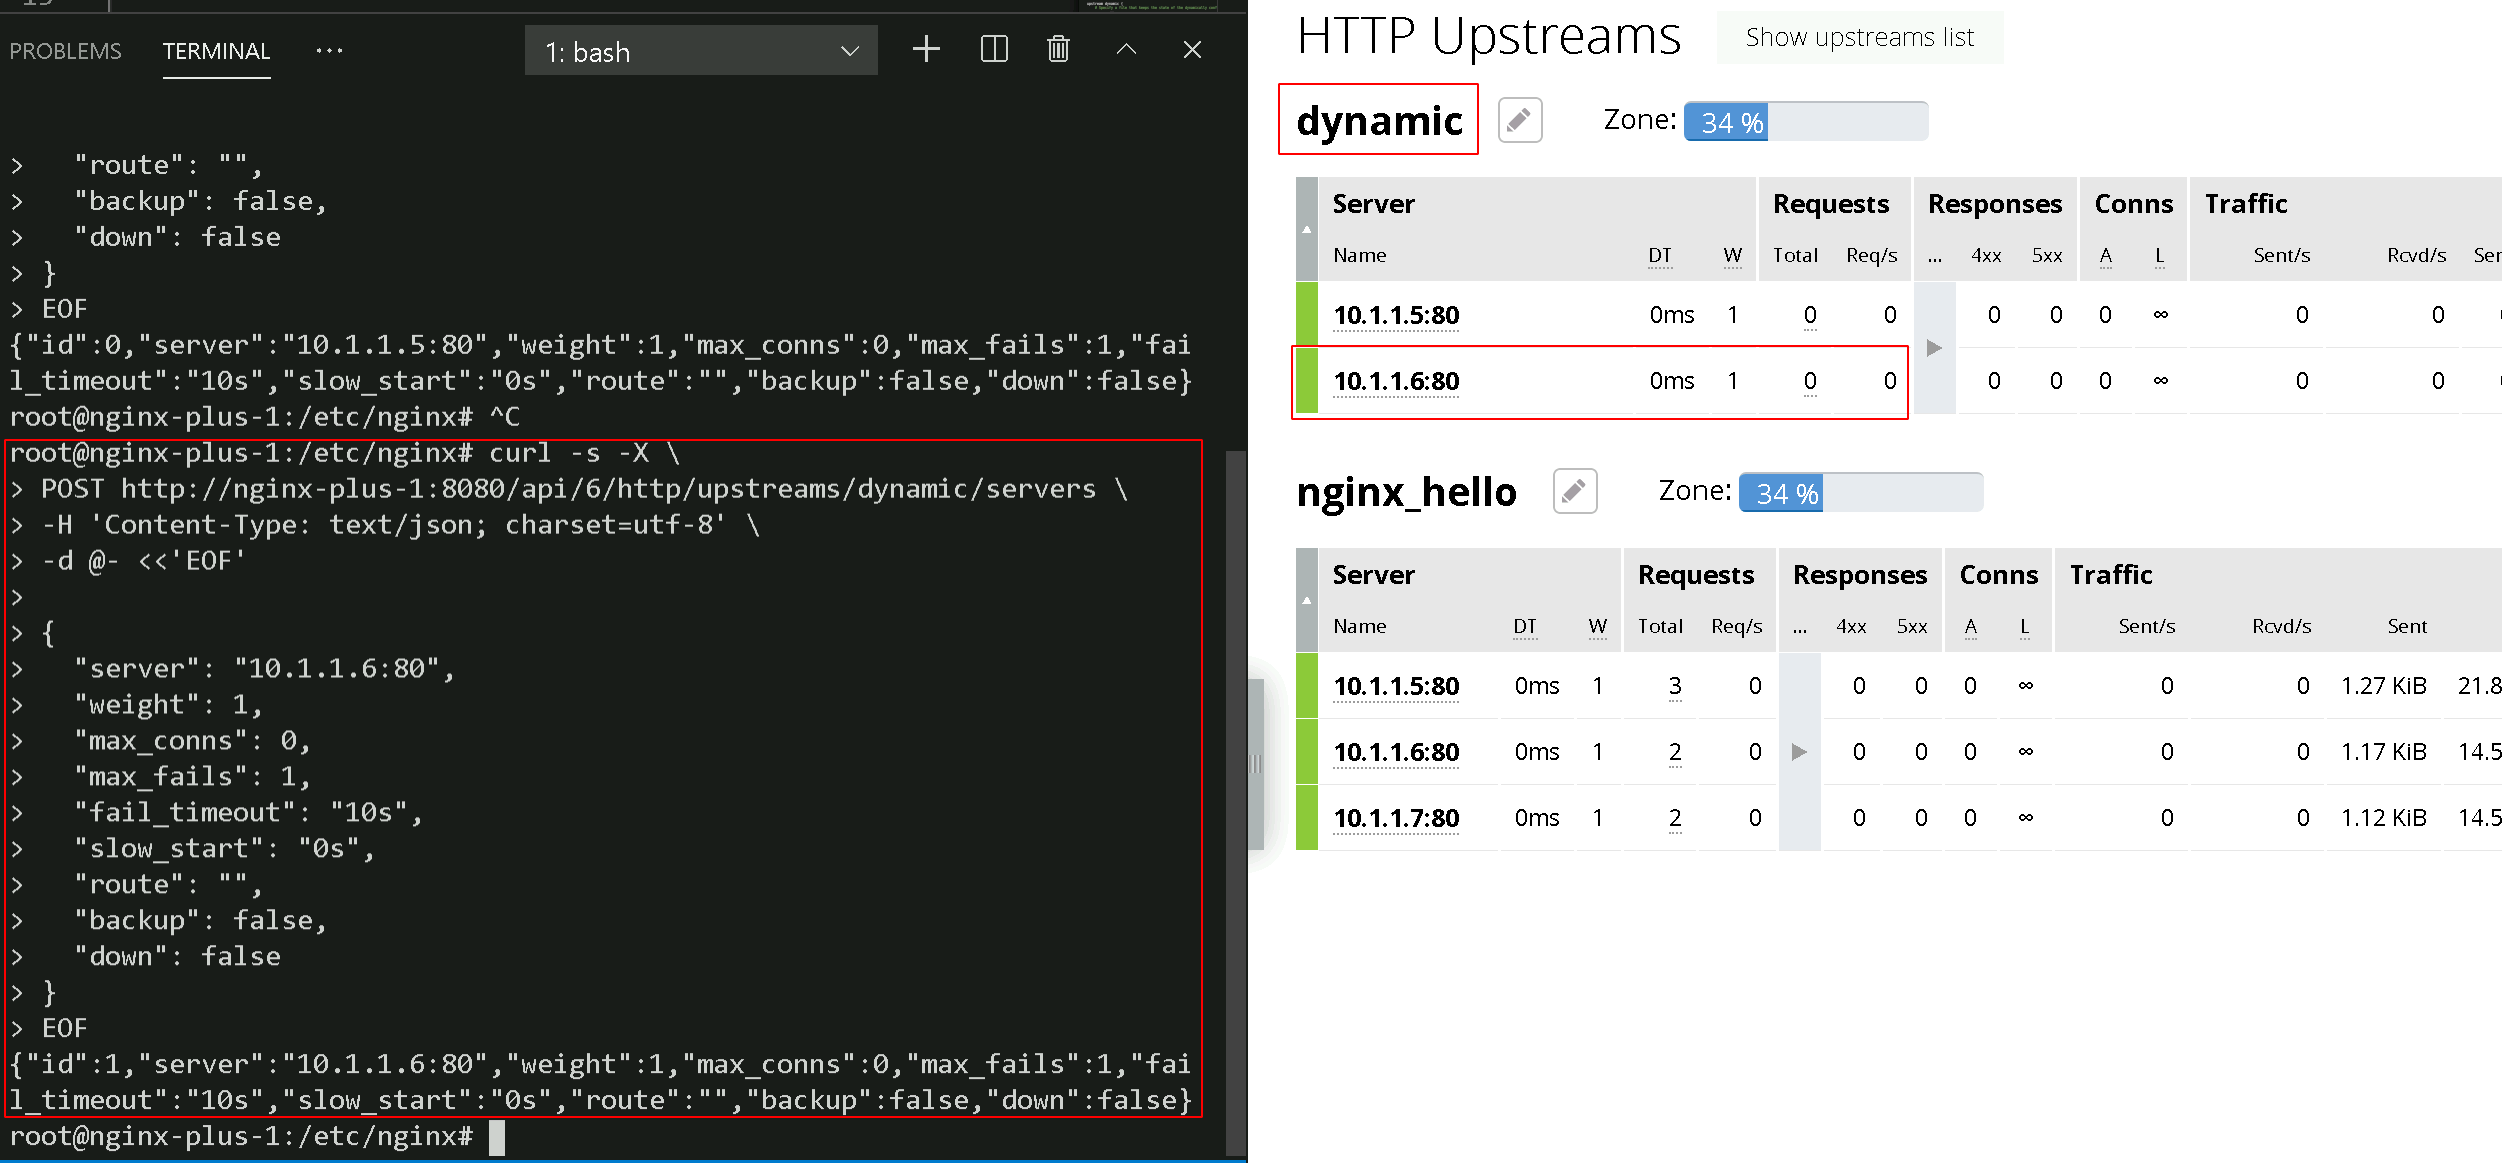
- Let’s add two servers, web1 (
10.1.1.5:80) and web2 (
10.1.1.6:80) to the dynamic upstream group using the APIcurl -s -X \ POST http://nginx-plus-1:8080/api/6/http/upstreams/dynamic/servers \ -H 'Content-Type: text/json; charset=utf-8' \ -d '{ "server": "10.1.1.5:80", "weight": 1, "max_conns": 0, "max_fails": 1, "fail_timeout": "10s", "slow_start": "0s", "route": "", "backup": false, "down": false }'
curl -s -X \
POST http://nginx-plus-1:8080/api/6/http/upstreams/dynamic/servers \
-H 'Content-Type: text/json; charset=utf-8' \
-d '{
  "server": "10.1.1.6:80",
  "weight": 1,
  "max_conns": 0,
  "max_fails": 1,
  "fail_timeout": "10s",
  "slow_start": "0s",
  "route": "",
  "backup": false,
  "down": false
}'
- Let’s add two servers, web1 (
Lets now add web3 (
10.1.1.7:80), marked as down, to the dynamic upstream group using the API.curl -s -X \ POST http://nginx-plus-1:8080/api/6/http/upstreams/dynamic/servers \ -H 'Content-Type: text/json; charset=utf-8' \ -d '{ "server": "10.1.1.7:80", "weight": 1, "max_conns": 0, "max_fails": 1, "fail_timeout": "10s", "slow_start": "10s", "route": "", "backup": true, "down": true }'
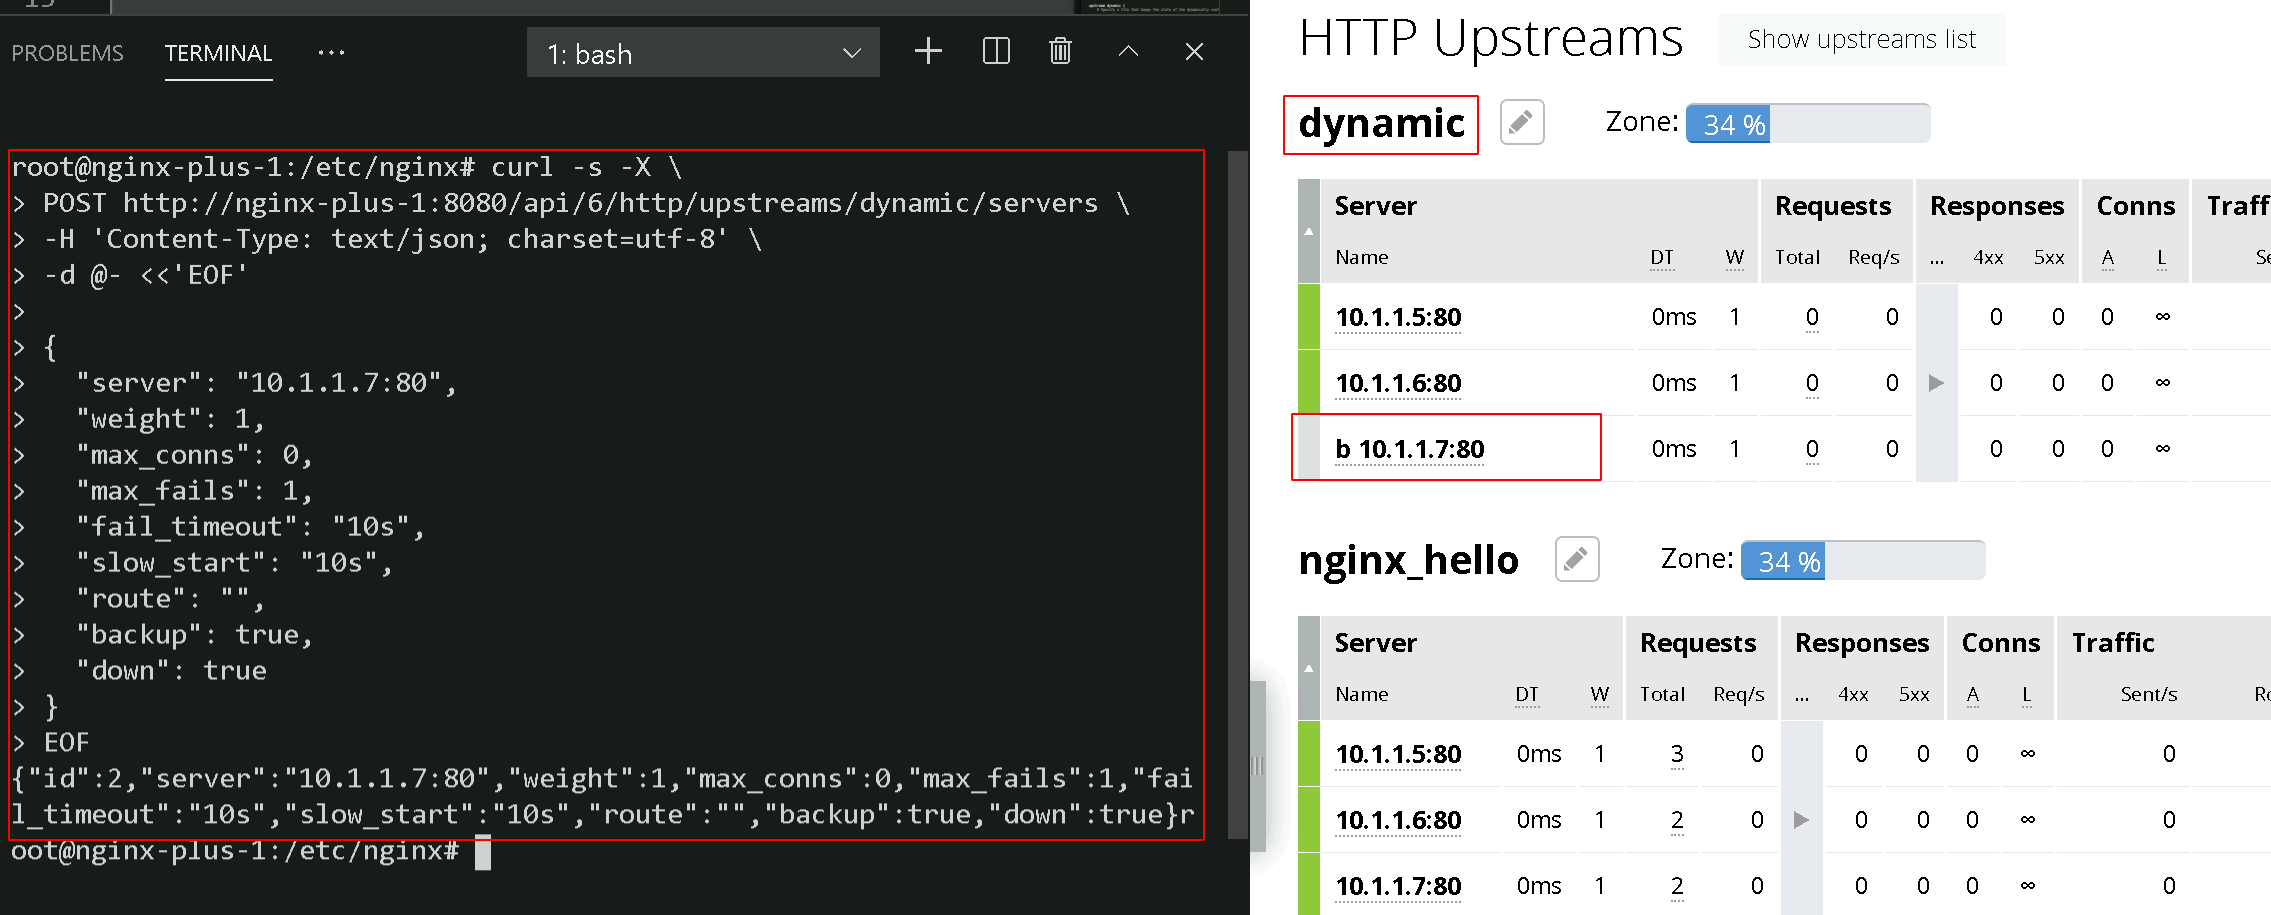
Once again, we can list the servers in our upstream, dynamic, and view the changes made.
curl -s http://nginx-plus-1:8080/api/6/http/upstreams/dynamic/servers | jq
[
   {
      "id": 0,
      "server": "10.1.1.5:80",
      "weight": 1,
      "max_conns": 0,
      "max_fails": 1,
      "fail_timeout": "10s",
      "slow_start": "0s",
      "route": "",
      "backup": false,
      "down": false
   },
   {
      "id": 1,
      "server": "10.1.1.6:80",
      "weight": 1,
      "max_conns": 0,
      "max_fails": 1,
      "fail_timeout": "10s",
      "slow_start": "0s",
      "route": "",
      "backup": false,
      "down": false
   },
   {
      "id": 2,
      "server": "10.1.1.7:80",
      "weight": 1,
      "max_conns": 0,
      "max_fails": 1,
      "fail_timeout": "10s",
      "slow_start": "10s",
      "route": "",
      "backup": true,
      "down": true
   }
]
We can also confirm that the state file has been updated:
cat /var/lib/nginx/state/servers.conf
Note
You should receive output similar to the following
server 10.1.1.5:80; server 10.1.1.6:80; server 10.1.1.7:80 slow_start=10s backup down;
It is possible to also remove a server from the upstream group:
curl -X DELETE -s http://nginx-plus-1:8080/api/6/http/upstreams/dynamic/servers/0 | jq
[
   {
      "id": 1,
      "server": "10.1.1.6:80",
      "weight": 1,
      "max_conns": 0,
      "max_fails": 1,
      "fail_timeout": "10s",
      "slow_start": "0s",
      "route": "",
      "backup": false,
      "down": false
   },
   {
      "id": 2,
      "server": "10.1.1.7:80",
      "weight": 1,
      "max_conns": 0,
      "max_fails": 1,
      "fail_timeout": "10s",
      "slow_start": "10s",
      "route": "",
      "backup": true,
      "down": true
   }
]

- To add our down server back to the rotation and accept live
traffic, we need to change the server parameter from down: true to down: false. First, we must find the server ID:
curl -s http://nginx-plus-1:8080/api/6/http/upstreams/dynamic/servers | jq '.[] | select(.down==true)'
{
   "id": 2,
   "server": "10.1.1.7:80",
   "weight": 1,
   "max_conns": 0,
   "max_fails": 1,
   "fail_timeout": "10s",
   "slow_start": "10s",
   "route": "",
   "backup": true,
   "down": true
}
- Now that we have identified the server id, (e.g. “id: 2”) we can
modify the down parameter:
curl -X PATCH -d '{ "down": false }' -s 'http://nginx-plus-1:8080/api/6/http/upstreams/dynamic/servers/2'
{"id":2,"server":"10.1.1.7:80","weight":1,"max_conns":0,"max_fails":1,"fail_timeout":"10s","slow_start":"10s","route":"","backup":true,"down":false}
Once again, list our servers in our upstream, dynamic
curl -s http://nginx-plus-1:8080/api/6/http/upstreams/dynamic/servers | jq
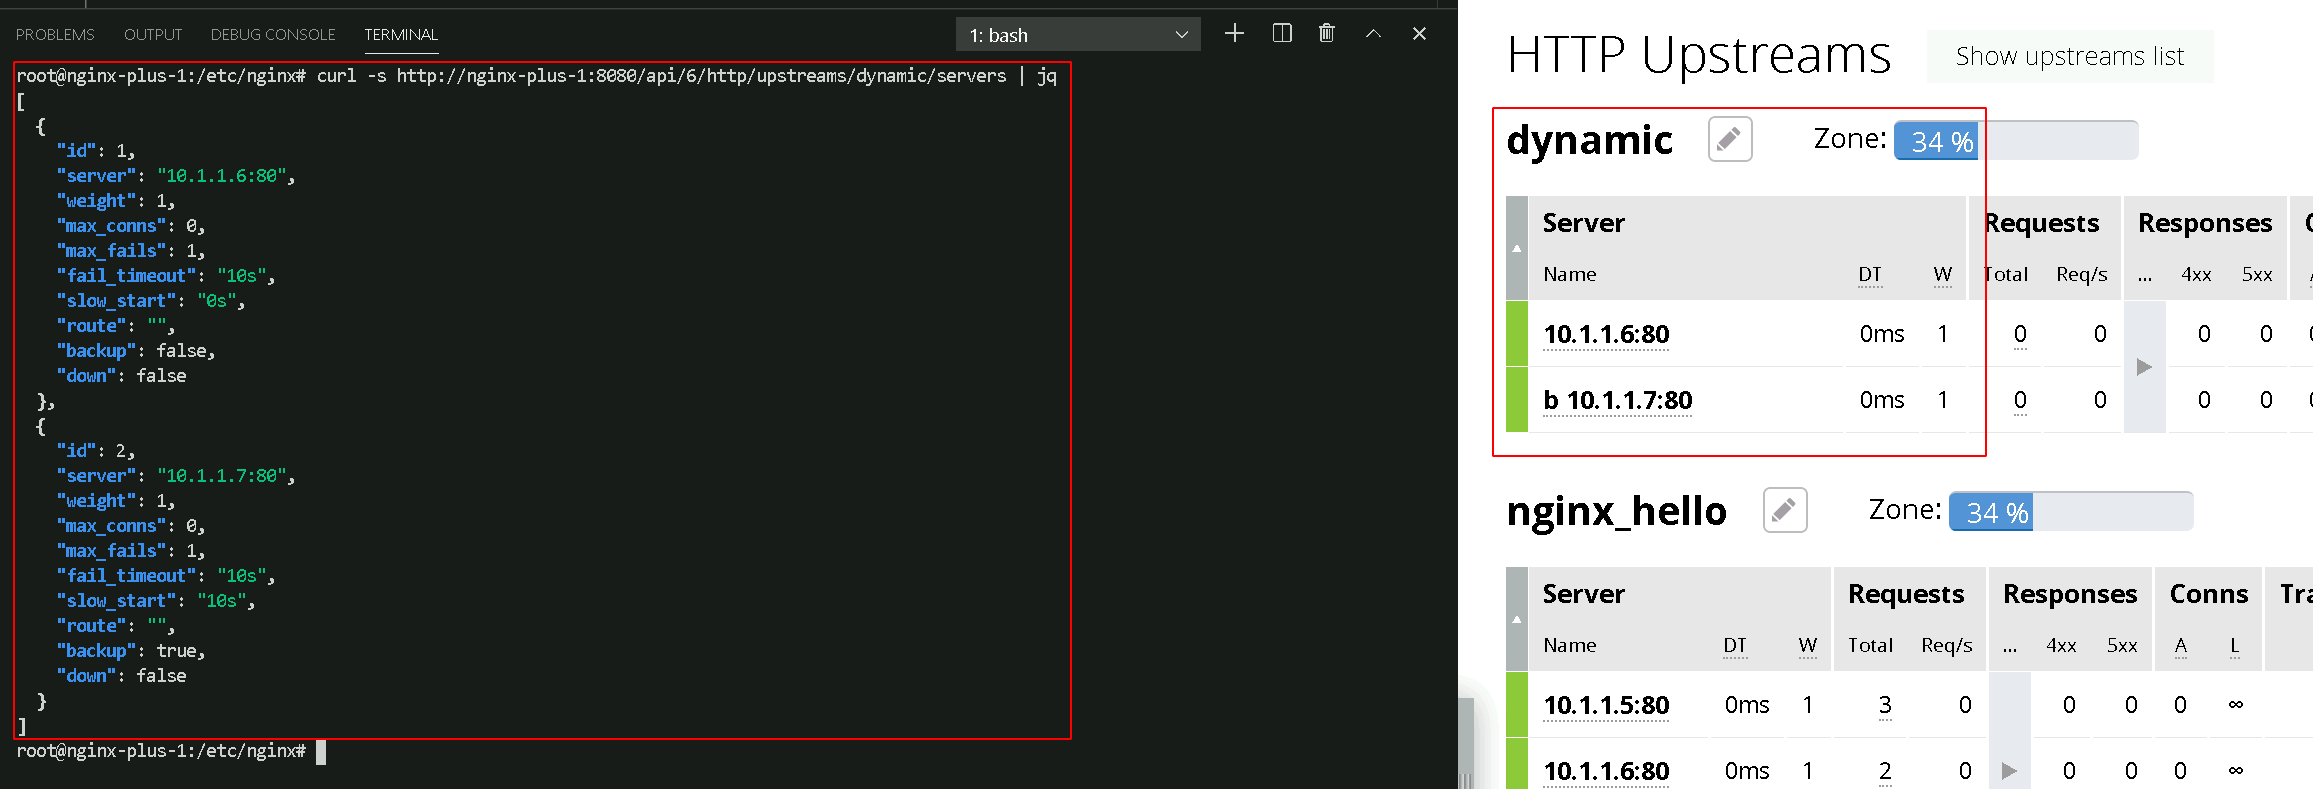
We can check that the state file is making our upstream changes persistent by reloading NGINX and checking the dashboard and API.
cat /var/lib/nginx/state/servers.conf
Note
You sould receive output similar to the following
server 10.1.1.6:80;
server 10.1.1.7:80 slow_start=10s backup;
# Reload NGINX
nginx -s reload
Note
After a NGINX reload, the server id is reset to start at 0:
Lastly, list our servers in our upstream, dynamic
curl -s http://nginx-plus-1:8080/api/6/http/upstreams/dynamic/servers | jq
Note
You should receive output similar to the following:
[
   {
      "id": 1,
      "server": "10.1.1.6:80",
      "weight": 1,
      "max_conns": 0,
      "max_fails": 1,
      "fail_timeout": "10s",
      "slow_start": "0s",
      "route": "",
      "backup": false,
      "down": false
   },
   {
      "id": 2,
      "server": "10.1.1.7:80",
      "weight": 1,
      "max_conns": 0,
      "max_fails": 1,
      "fail_timeout": "10s",
      "slow_start": "10s",
      "route": "",
      "backup": true,
      "down": false
   }
]