F5 BIG-IP SSL Orchestrator Training Lab > All SSL Orchestrator Lab Guides > [Archived] SSL Orchestrator v5 (Ravello | 4 hours) > Module 5 - Manage the SSLO Security Policy Source | Edit on
Lab 5.1: Create, Review, and Edit a Security Policy
Review and edit the existing security policy rules
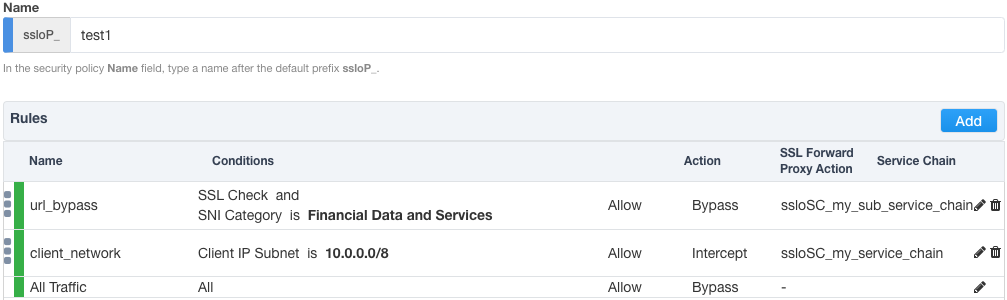
In the SSLO dashboard view, navigate to the Security Policies tab and click on a security policy (Name). The Guided Configuration will present the rules engine previously seen as part of the topology workflow. New rules can be added, and existing rules edited. Notice also that the "All Traffic" rule is anchored to the security policy and cannot be moved or removed. This is the default action rule for the policy, similar to a default deny rule in a firewall policy. By default, it Intercepts (decrypts) traffic, but does not send traffic to any service chain. This can be edited to Intercept, bypass or block (reject), and to send traffic to a service chain.
Additional rules can use AND (Match All) or OR (Match Any) logic to create complex decisions. Review the Conditions options to see the possibilities.
Review and edit the visual per-request policy
To view the underlying visual security policy, in the SSLO dashboard view, navigate to the Security Policies tab and click on a security policy (Per Request Policies). This will open a new tab with a view of the visual per-request policy. By default, the security policy is locked and prevents any changes to the visual per-request policy. To edit the visual policy, first unlock the policy in the SSLO dashboard, Security Policies tab.
Keep in mind, however, that the rules engine converts rules to visual elements in one direction only. It cannot convert visual elements back to rules, therefore once the visual per-request policy has been manipulated, the Guided Configuration security policies user interface will no longer be available.
Practice creating Security Policies
The following are a few examples of security policy use cases:
Create a new security policy that matches source addresses in the outbound desktop client's subnet, intercepts SSL, and sends to a service chain. All other traffic is bypassed with no service chain.

Add a rule to the above security policy that matches a specific URL category, bypasses SSL and sends to a service chain. Move this rule to the top of the list.
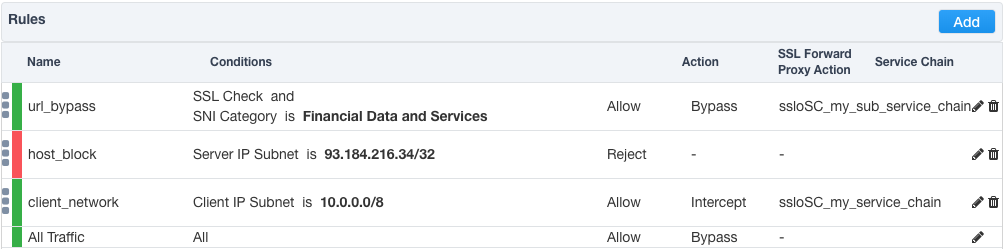
Add a new rule to the above security policy that matches a specific destination IP and blocks this traffic. Move this rule below the URL category rule, but above the client network rule.
Click Deploy, then navigate to the Security Policies tab in the SSL Orchestrator UI. For the newly-created security policy, click the link under the Per Request Policies header. This will open a new tab to the visual per-request policy.
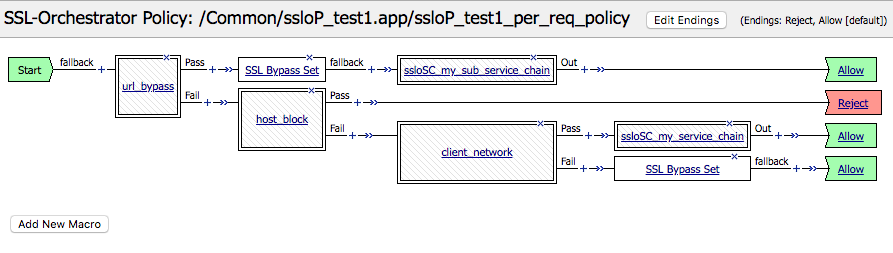
Notice that the visual policy elements are nested in accordance with the ordered set of rules,
- If the URL category is "Financial Data and Services" (urlf_bypass), bypass SSL and send to a service chain.
- Otherwise, if the destination IP is 93.184.216.34/32 (host_block), reject the traffic.
- Otherwise, if the client IP matches 10.0.0.0/8 (client_network), send to a service chain (SSL interception implied).
- Otherwise, bypass SSL and do not send to a service chain.
Note
The L7 Protocol Lookup and URL Match options must assume that incoming traffic is either unencrypted or decrypted, therefore any rules that use these, and any rules after these cannot select to intercept or bypass the SSL.
Apply the new rule to an existing outbound topology and test that:
- financial sites are bypassed.
- https://www.example.com is blocked.
- and all other client traffic flows through the defined service chain.
View the APM log to follow the policy logic:
tail -f /var/log/apm | grep 'Following rule'