Manage shared network resources from any tenant
You can use the F5 Agent to manage shared, or “common”, network objects across Neutron tenants.
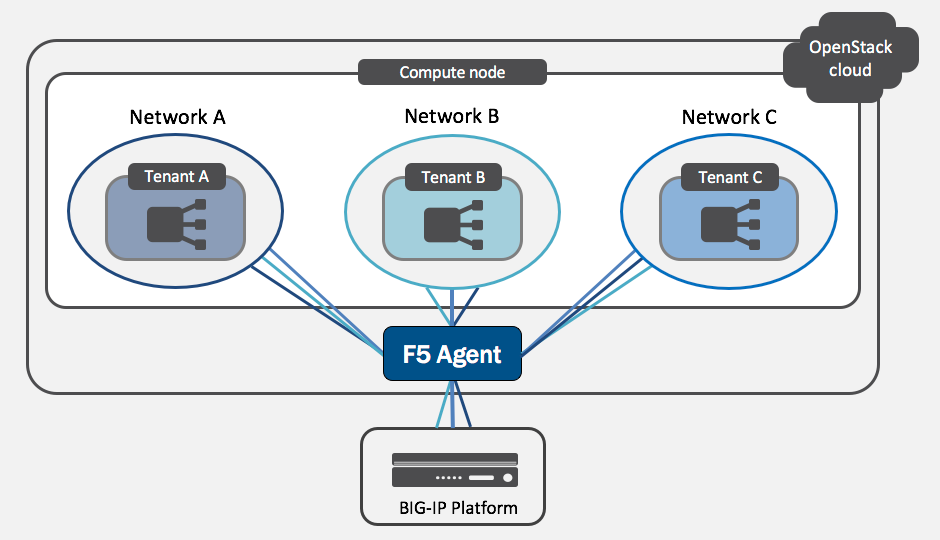
When using common networks, all network objects live in the /Common partition on the BIG-IP system.
The /Common partition has its own route domain, which provides Layer 2 isolation between /Common and the tenants.
When using common networks, no isolation exists between the tenants themselves.
Warning
Although the F5 common networks functionality is similar to OpenStack Neutron’s shared networks, F5 does not support the use of Neutron RBAC.
Turn on common networks if you want to:
- orchestrate a set of shared network objects from any Neutron tenant, and/or
- share network resources across multiple Neutron tenants.
You can use common networks in L2-adjacent mode or Global routed mode.
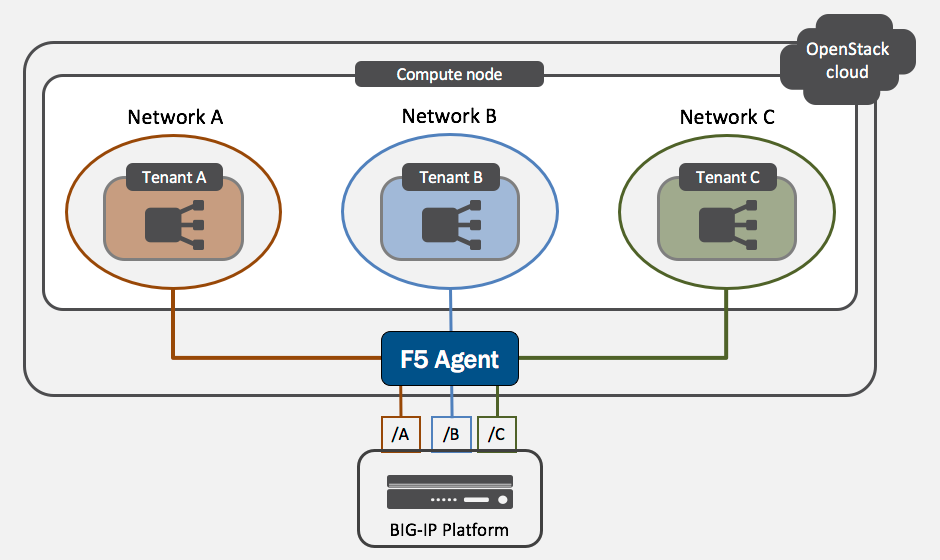
As demonstrated in the diagram below, each Neutron tenant normally has a separate network, route domain, and partition on the BIG-IP system. In this type of setup, no tenant can control network or LTM objects in any other tenant’s partition. If you attempted, for example, to modify Tenant B’s network objects from Tenant A, the requested task would fail. Tenant A’s Neutron loadbalancer would display a provisioning status error because it was unable to complete the task.
When using common networks, the following network objects live in the BIG-IP /Common partition:
- Networks (VLANs, tunnels, disconnected network PPP)
- Route Domains
- Routes
- Self IP’s
- SNAT Pools
- SNAT Translation Addresses
The following BIG-IP Local Traffic Manager (LTM) objects are tenant-specific:
- Virtual Addresses
- Virtual Servers
- Health Monitors
- Pools
- Pool Members
Because all network objects are in the /Common partition, network changes made on Tenant A do affect Tenants B and C.
For example, if you delete a route or SNAT pool in Tenant A, it disappears from Tenants B and C as well.
Set-up
Warning
When f5_common_networks = True, it overrides all other common network settings.
f5_common_external_networkscommon_networkscommon_network_ids
Whether you’re installing the F5 Agent for the first time or updating an existing Agent, turning on common networks has the same effect.
After the F5 Agent restarts, it reads information about the network from the Neutron database and populates objects in the BIG-IP /Common partition accordingly.
Fresh installation
If this is your first time setting up the F5 Agent in OpenStack:
Edit the F5 Agent configuration file using your text editor of choice.
Set the desired F5 Agent configuration parameter(s).
f5_common_networks = True
Restart the F5 Agent service.
CENTOS¶systemctl restart f5-openstack-agentUBUNTU¶service f5-oslbaasv2-agent restart
Update an existing F5 agent
To update the configuration for an F5 Agent that’s already running:
Stop the F5 Agent service.
CENTOS¶systemctl stop f5-openstack-agentUBUNTU¶service f5-oslbaasv2-agent stopUse the built-in F5 Agent cleanup utility to clear each BIG-IP partition associated with a Neutron loadbalancer.
Pass in the name of the partition as the
--partitionargument.Provide the correct path and filename for your F5 Agent configuration file. [1]
python ./f5-openstack-agent/utils/clean_partition.py \\
--config-file /etc/neutron/services/f5/f5-openstack-agent.ini \\
-–partition Test_openstack-lb1
Complete steps 3-5 in the Fresh installation section.
- Edit the F5 Agent configuration file.
- Set
f5_common_networks = True. - Restart the F5 Agent.
What’s next
- Learn more about the F5 Agent modes of operation.
Footnotes
| [1] | The name of your F5 Agent configuration file may differ from the example if you’re using differentiated service environments. |