Linux KVM: BIG-IP VE Setup
To deploy BIG-IP Virtual Edition (VE) on KVM, you will perform these tasks.
| Step | Details |
|---|---|
| 1 | Choose the license you want to buy, the BIG-IP VE modules you want, and the throughput you need. See K14810: Overview of BIG-IP VE license and throughput limits on the AskF5 Knowledge Base for details. |
| 2 | Confirm that you are running a hypervisor version that is compatible with a BIG-IP VE release. See BIG-IP Virtual Edition Supported Platforms for details. |
| 3 | Verify that the host hardware meets the recommended requirements. |
| 4 | If you plan to use SR-IOV, enable it on the hypervisor. |
| 5 | Download a BIG-IP VE image and deploy it. |
| 6 | If you are running a multi-NIC configuration without DHCP, manually assign an IP address for the BIG-IP Config Utility. |
After you complete these tasks, you can log in to the BIG-IP VE system and run the Setup utility to perform basic network configuration.
About single NIC and multi-NIC configurations
A typical BIG-IP VE configuration can include four NICs: one for management, one for internal, one for external, and one for high availability.
However, if you want to create a VM for a quick test, you can create a configuration with just one NIC. In this case, BIG-IP VE creates basic networking objects for you.
When BIG-IP VE first boots, it determines the number of active NICs. If BIG-IP VE detects one NIC, then:
Networking objects (vNIC 1.0, a VLAN named Internal, and an associated self IP address) are created automatically for you.
The port for the Configuration utility is moved from 443 to 8443.
Note
If there is no DHCP server in your environment and no IP address automatically assigned, then the networking objects will not be created and the port will not be moved. As an example, do the following, which uses the same IP address 192.168.80.53/24 for management and self IP:
- Disable DHCP and enable setting a static address,
tmsh modify sys global-settings mgmt-dhcp disabled. See this routes topic for more information. - Disable single NIC auto-config,
tmsh modify sys db provision.1nicautoconfig value disable. See this KVM topic for BIG-IP VE 13.1.X for more information. - Ensure management route will persist,
tmsh modify sys db provision.1nic value forced_enable. - Move management port,
tmsh modify sys httpd ssl-port 8443. See this K31003634 article for more information. - Add TCP port to the default port lockdown protocols and services,
tmsh modify net self-allow defaults add { tcp:8443 }. - Configure static management IP address,
tmsh create sys management-ip 192.168.80.53/24 description 'provisioned by tmos_static_mgmt' - Create and attach internal VLAN to interface 1.0,
tmsh create net vlan internal { interfaces replace-all-with { 1.0 { } } tag 4094 mtu 1450 }. Be aware that this configuration my already exist and can produce the following error: “The requested VLAN (/Common/internal) already exists in partition Common.” - Create self IP, assign the same IP as the management IP, and assign internal VLAN to default port lockdown policy,
tmsh create net self self_1nic { address 192.168.80.53/24 allow-service default vlan internal }. - Create management route gateway,
tmsh create sys management-route default gateway 192.168.80.1. - Define the TMM default route,
tmsh create net route default network default gw 192.168.80.1. - Save the configuration,
tmsh save sys config base.
- Disable DHCP and enable setting a static address,
High availability (failover) is not supported, but config sync is supported.
VLANs must have untagged interface.
If BIG-IP VE detects multiple NICs, then you create the networking objects manually:
- The port for the Configuration utility remains 443.
- You can change the number of NICs after first boot and move from single to multi-NIC and vice versa.
- VLANs can have tagged interfaces.
Prerequisites for BIG-IP Virtual Edition
Host CPU requirements
The host hardware CPU must meet the following requirements.
- The CPU must have 64-bit architecture.
- The CPU must have virtualization support (AMD-V or Intel VT-x) enabled in the BIOS.
- The CPU must support a one-to-one, thread-to-defined virtual CPU ratio, or on single-threading architectures, support at least one core per defined virtual CPU.
- If your CPU supports the Advanced Encryption Standard New Instruction (AES-NI), SSL encryption processing on BIG-IP VE will be faster. Contact your CPU vendor for details about which CPUs provide AES-NI support.
- Set CPU appropriately for the required MHz per core. For example, if the hypervisor has 2.0GHz cores, and the VE is set to 4 cores, you will need 4x2.0GHz reserved for 8GHz (or 8000MHz).
Host memory requirements
| Number of cores | Memory required |
|---|---|
| 1 | 2 Gb |
| 2 | 4 Gb |
| 4 | 8 Gb |
| 8 | 16 Gb |
Virtual machine memory requirements
The guest should have a minimum of 4 GB of RAM for the initial 2 virtual CPUs. For each additional CPU, you should add an additional 2 GB of RAM.
If you license additional modules, you should add memory.
| Provisioned memory | Supported modules | Details |
|---|---|---|
| 4 GB or fewer | Two modules maximum. | AAM can be provisioned as standalone only. |
| 4-8 GB | Three modules maximum. | BIG-IP DNS does not count toward the module limit. Exception: Application Acceleration Manager (AAM) cannot be provisioned with any other module; AAM is standalone only. |
| 8 GB | Three modules maximum. | BIG-IP DNS does not count toward the module-combination limit. |
| 12 GB or more | All modules. | N/A |
Important
To achieve licensing performance limits, all allocated memory must be reserved.
Virtual machine storage requirements
The amount of storage you need depends on the BIG-IP modules you want to use, and whether or not you intend to upgrade.
| Provisioned storage | Supported modules | Details |
|---|---|---|
| 9 GB (LTM_1SLOT) | Local Traffic Manager (LTM) module only; no space for LTM upgrades. | You can increase storage if you need to upgrade LTM or provision additional modules. |
| 40 GB (LTM) | LTM module only; space for installing LTM upgrades. | You can increase storage if you decide to provision additional modules. You can also install another instance of LTM on a separate partition. |
| 60 GB (ALL_1SLOT) | All modules except Secure Web Gateway (SWG); no space for installing upgrades. | The Application Acceleration Manager (AAM) module requires 20 GB of additional storage dedicated to AAM. If you are not using AAM, you can remove the datastore disk before starting the VM. |
| 82 GB (ALL) | All modules except SWG and space for installing upgrades. | The Application Acceleration Manager (AAM) module requires 20 GB of additional storage dedicated to AAM. If you are not using AAM, you can remove the datastore disk before starting the VM. |
For production environments, virtual disks should be deployed Thick (allocated up front). Thin deployments are acceptable for lab environments.
Note
To change the disk size after deploying the BIG-IP system, see Increase disk space for BIG-IP VE.
Virtual machine network interfaces
When you deploy BIG-IP VE, a specific number of virtual network interfaces (vNICs) are available.
Each virtual machine can have a maximum of 28 NICs.
Configure SR-IOV on the hypervisor
To increase performance, do the following:
- Enable Single Root I/O Virtualization (SR-IOV). You need an SR-IOV-compatible network interface card (NIC) installed and the SR-IOV BIOS enabled.
- In order to automatically load the customized high speed DPDK drivers within BIG-IP VE, you must use SR-IOV-based Virtual Functions (VF) for the network interfaces. This is a requirement on any NIC larger than 10 GB. Using the Physical Functions (PF) BIG-IP VE will report a 40 GB or 100 GB interface as only 10 GB, as it’s loaded the default sock driver.
- Consult the following example setup documentation for SR-IOV:
- Mellanox
- Intel X710-E810 series NIC (consult the Intel X710 and Intel E810 configuration guides for complete manufacturer’s details).
- To complete SR-IOV configuration, after you deploy BIG-IP VE, add three PCI device NICs and map them to your networks.
Deploy BIG-IP VE in KVM
To deploy BIG-IP VE, download an image from F5 and deploy it in your environment.
Important
- Do not change the configuration (CPU, RAM, and network adapters) of the KVM guest environment with settings less powerful than those recommended and described here.
- i440FX and Q35 QEMU machine types are supported. For more details, refer F5 BIG-IP Virtual Edition Supported Platforms.
- In a browser, open the F5 Downloads page and log in.
- On the Downloads Overview page, do the following:
- Click Find a Download.
- Under Product Line, click the link similar to BIG-IP v.x/Virtual Edition.
- If the End User Software License is displayed, click I Accept.
- Download the BIG-IP VE file package ending with qcow2.zip.
- Extract the file from the Zip archive and save it where your qcow2 files reside on the KVM server.
- Use VNC to access the KVM server, and then start Virt Manager.
Warning
If you are using QEMU v8.1.0 or later, there have been identified issues with System Management BIOS (SMBIOS) v3.x (64-bit entry point). It is recommended to downgrade SMBIOS to v2.x (32-bit entry point). When configuring a virtual machine (VM), use the following command to enforce the 32-bit entry point:
-machine smbios-entry-point-type=32
Right-click localhost (QEMU), and on the popup menu, select New.
The Create a new virtual machine, Step 1 of 4 dialog box opens.
In the Name field, enter a name for the connection.
Select the import existing disk image method for installing the operating system, and then click Forward.
Enter the path to the extracted qcow file, or click Browse and navigate to the file.
Select the file, and then click Choose Volume.
Expand OS type, select Linux, expand Version, select Red Hat Enterprise Linux 6, and then click Forward.
In the Memory (RAM), enter the appropriate amount of memory (in megabytes) for your deployment (for example
4096for a 4GB deployment).In the CPUs list, select the number of CPU cores appropriate for your deployment, and click Forward.
Select Customize configuration before installing, and then click Advanced options.
Select the network interface adapter that corresponds to your management IP address, and click Finish.
The Virtual Machine configuration dialog box opens.
Click Add Hardware.
The Add New Virtual Hardware dialog box opens. Do one of the following:
If SR-IOV is NOT required, select Network.
- In the Host device list, select the network interface adapter for your external network, in the Device model list, select virtio, and then click Finish.
- Repeat the previous step for your internal and HA networks.
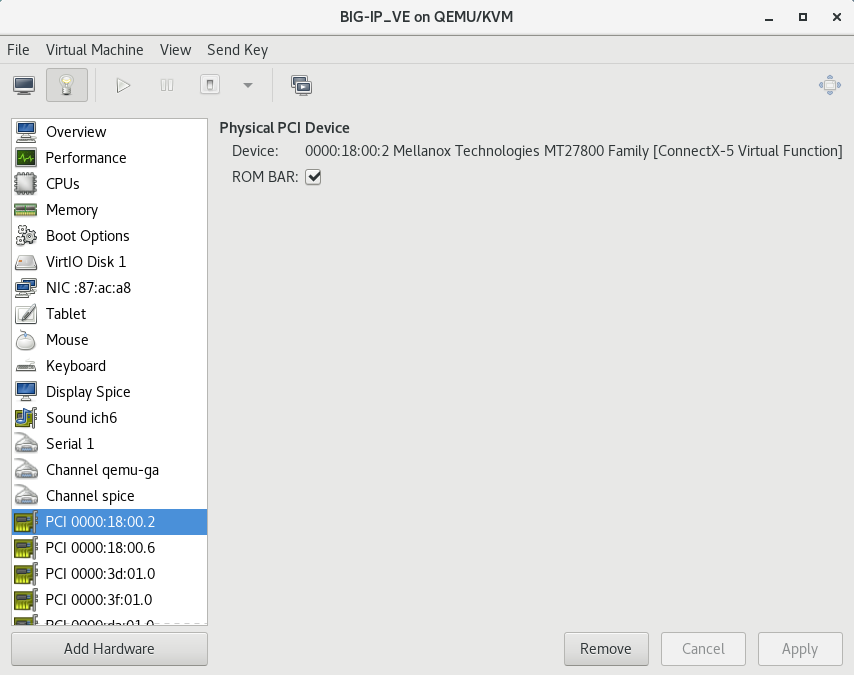
If SR-IOV is required, select PCI Host Device.
Select the PCI device for the virtual function that is mapped to your host device’s external VLAN, and then click Finish.
Tip
Be sure to use the Virtual Function (VF) PCI Host Device instead of the Physical Function (PF) to take advantage of VE high-speed drivers.
The following image illustrates adding a PCI VF Network Interface within the Virtual Machine Manager:
Repeat the previous step for your host device’s internal VLAN and HA VLAN.
In the left pane, select Disk 1, and then click Advanced options.
- From the Disk bus list, select Virtio.
- In the Storage format list, select qcow2.
- Click Apply.
Click Begin Installation.
The Virtual Machine Manager creates the virtual machine configured as you defined.
Use BIG-IP configuration utility tool to set management IP address
If your network has DHCP, an IP address is automatically assigned to BIG-IP VE during deployment. You can use this address to access the BIG-IP VE Configuration utility or tmsh command-line utility.
If no IP address was assigned, you can assign one by using the BIG-IP Configuration utility tool.
Connect to the virtual machine by using the hypervisor’s console.
At the login prompt, type
root.At the password prompt, type
default.Note
If prompted, change your password.
Type
configand press Enter.The F5 Management Port Setup screen opens.
Click OK.
Select No and follow the instructions for manually assigning an IP address and netmask for the management port.
You can use a hypervisor generic statement, such as
tmsh show sys management-ipto confirm that the management IP address was set properly.You can now log into the BIG-IP VE Config utility using a browser, and license and provision BIG-IP VE.
See Also