ConfigMap
Overview of ConfigMap
In Kubernetes, ConfigMap is an API object used to store non-confidential data in key-value pairs.
ConfigMap allows users to decouple configuration artifacts from image content to keep containerized applications portable. Pods can consume ConfigMaps as environment variables, command line arguments, or as configuration files in a volume.
In CIS, Configuration artifacts of ConfigMap are agent-specific, meaning that configuration in ConfigMap differs from agent to agent. CIS v2.0 operates in two different agent modes: AS3 or CCCL.
CIS supports two types of AS3 ConfigMaps, more details explained in subsequent sections:
- User-defined AS3 ConfigMap
- Override AS3 ConfigMap
What is AS3
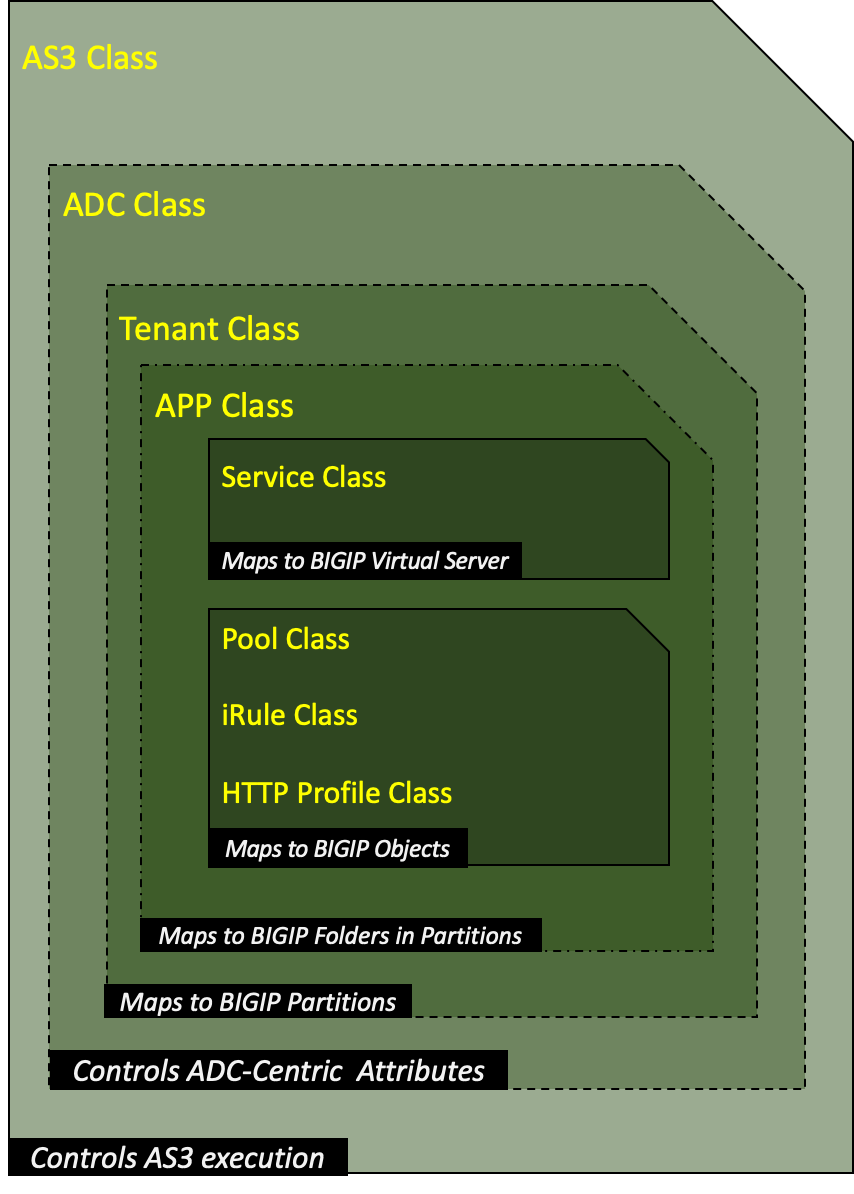
F5 Application Services (AS3) Extensions use a declarative API, meaning AS3 Extension declarations describe the desired configuration state of a BIG-IP system.
When using AS3 Extensions, CIS sends declaration files using a single Rest API call.
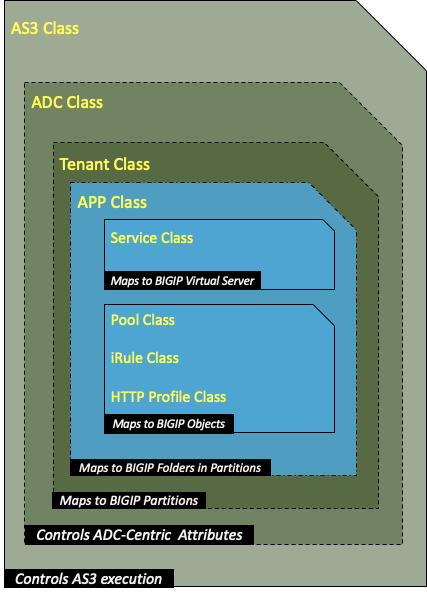
The diagram below depicts the basic data model of the AS3 artifact.
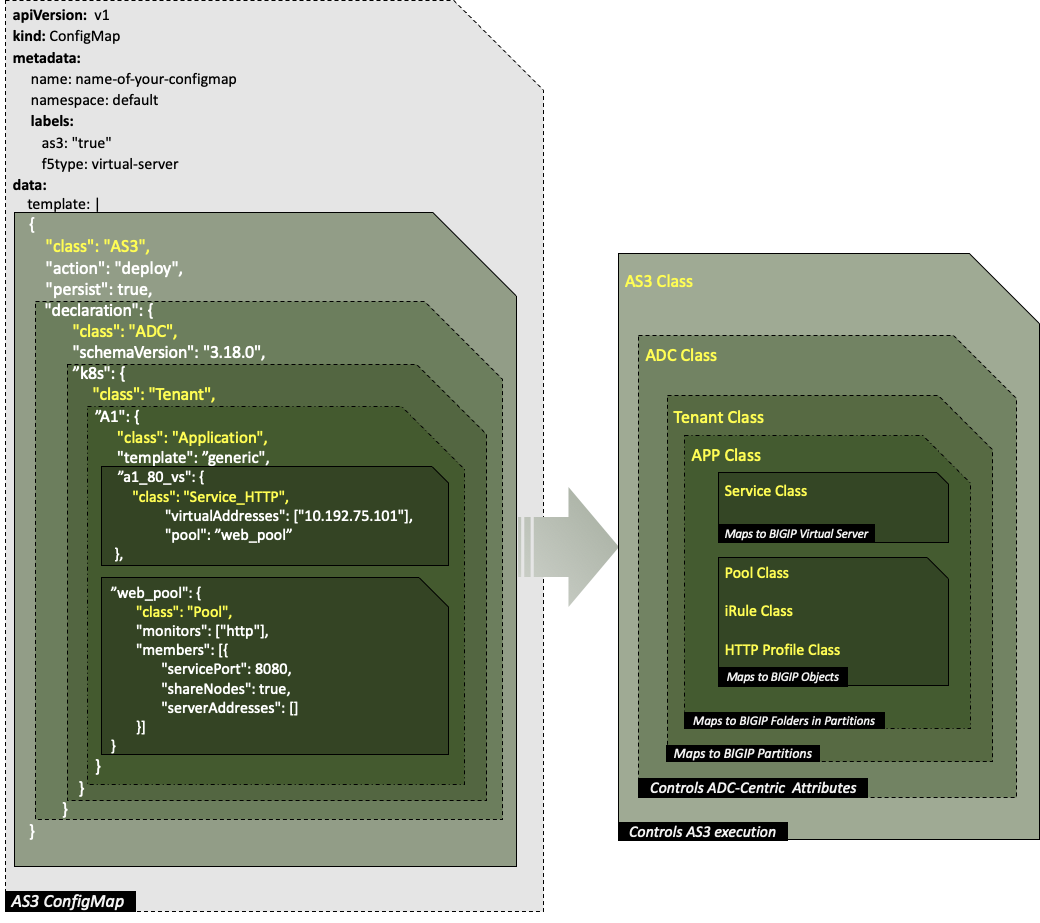
What is AS3 ConfigMap
The AS3 ConfigMap hosts AS3 extensions, in JSON format, as a configuration artifact. CIS can manage and orchestrate BIG-IP declaratively through this ConfigMap.
In agent AS3 mode, CIS handles Ingress or Route resources by converting them into AS3 declarations before posting to BIG-IP. When AS3 ConfigMap is configured along with Ingress or Routes, CIS manages ConfigMap and Ingress (or) Routes AS3 declarations separately. While sending an AS3 declaration to BIG-IP, CIS will combine both of these AS3 declarations as a single declaration and POST it to BIG-IP.
Important
Ingress or Routes will always use the single partition (CIS-managed partition configured through deployment args) in CIS. But AS3 ConfigMap can have more than one partition, except CIS-managed partition and Common partition. CIS will not process AS3 ConfigMap if configured in CIS-managed partition. BIG-IP AS3 does not write to the Common partition for LTM configurations to ensure there is no impact to an existing device configuration where both BIG-IP AS3 and legacy configuration methods are being used. However, AS3 can reference profiles/policies from Common partition.
1 2 3 4 5 6 7 8 9 10 11 12 13 14 15 16 17 18 19 20 21 22 23 24 25 26 27 28 29 30 31 32 33 34 35 36 37 38 39 40 41 42 43 44 45 46 47 | kind: ConfigMap
apiVersion: v1
metadata:
name: name-of-your-configmap
namespace: default
labels:
f5type: virtual-server
as3: "true"
data:
template: |
{
"class": "AS3",
"declaration": {
"class": "ADC",
"schemaVersion": "3.18.0",
"id": "urn:uuid:33045210-3ab8-4636-9b2a-c98d22ab915d",
"label": "http",
"remark": "A1 Template",
"k8s": {
"class": "Tenant",
"A1": {
"class": "Application",
"template": "generic",
"a1_80_vs": {
"class": "Service_HTTP",
"remark": "a1",
"virtualAddresses": [
"10.192.75.101"
],
"pool": "web_pool"
},
"web_pool": {
"class": "Pool",
"monitors": [
"http"
],
"members": [
{
"servicePort": 8080,
"serverAddresses": []
}
]
}
}
}
}
}
|
The image below depicts the example AS3 ConfigMap and its mapping with AS3 objects.
Processing AS3 ConfigMap in CIS
As mentioned in the above figure, for CIS to process AS3 ConfigMap, ensure that below AS3 labels are populated.
| Label | Value | Description |
|---|---|---|
| as3 | true (or) false | When set to true, this tells CIS that this is a AS3 ConfigMap and processes it. When set to false, this tells CIS that you don’t want to usee AS3 ConfigMap, meaning you do not want CIS to process this ConfigMap temporarily until you reset this flag to true. If AS3 ConfigMap exists with flag flase, CIS will remove the respective configuration from BIG-IP. Meanwhile, you can make the necessary changes and save the ConfigMap within the K8S system. |
| f5type | virtual-server | This tells CIS that you want to create a virtual server on the BIG-IP device. |
Important
Staging is not equivalent to deleting ConfigMap in CIS. CIS will save the previous active copy of ConfigMap before the ConfigMap AS3 label was set to false.
Note
Along with the above labels, to process an AS3 declaration, CIS uses goJsonSchema to validate AS3 declarations. If the JSON data structure does not conform with the schema, an error is logged.
To process AS3 ConfigMap, the highlighted CIS deployment configurations are required.
1 2 3 4 5 6 7 | args: [ "--bigip-username=$(BIGIP_USERNAME)", "--bigip-password=$(BIGIP_PASSWORD)", "--bigip-url=10.10.10.10", "--bigip-partition=CIS-Partition", "--pool-member-type=cluster", ] |
How to deploy ConfigMap
Prerequisites
- CIS version 2.0 or newer
- CIS uses AS3 declarative API. You will need the AS3 extension v3.18 or newer installed on BIG-IP before using the AS3 extension of CIS.
You can find the required YAML files in the user-defined-configmap respository on GitHub.
CIS uses the partition defined in the CIS configuration by default to communicate with the BIG-IP system when adding static ARPs and forwarding entries for VXLAN. CIS managed partitions <partition> and should not be used in ConfigMap as tenants. If CIS is deployed with --bigip-partition=cis, then <cis> and is not supposed to be used as a tenant in the AS3 declaration.
CIS Service Discovery
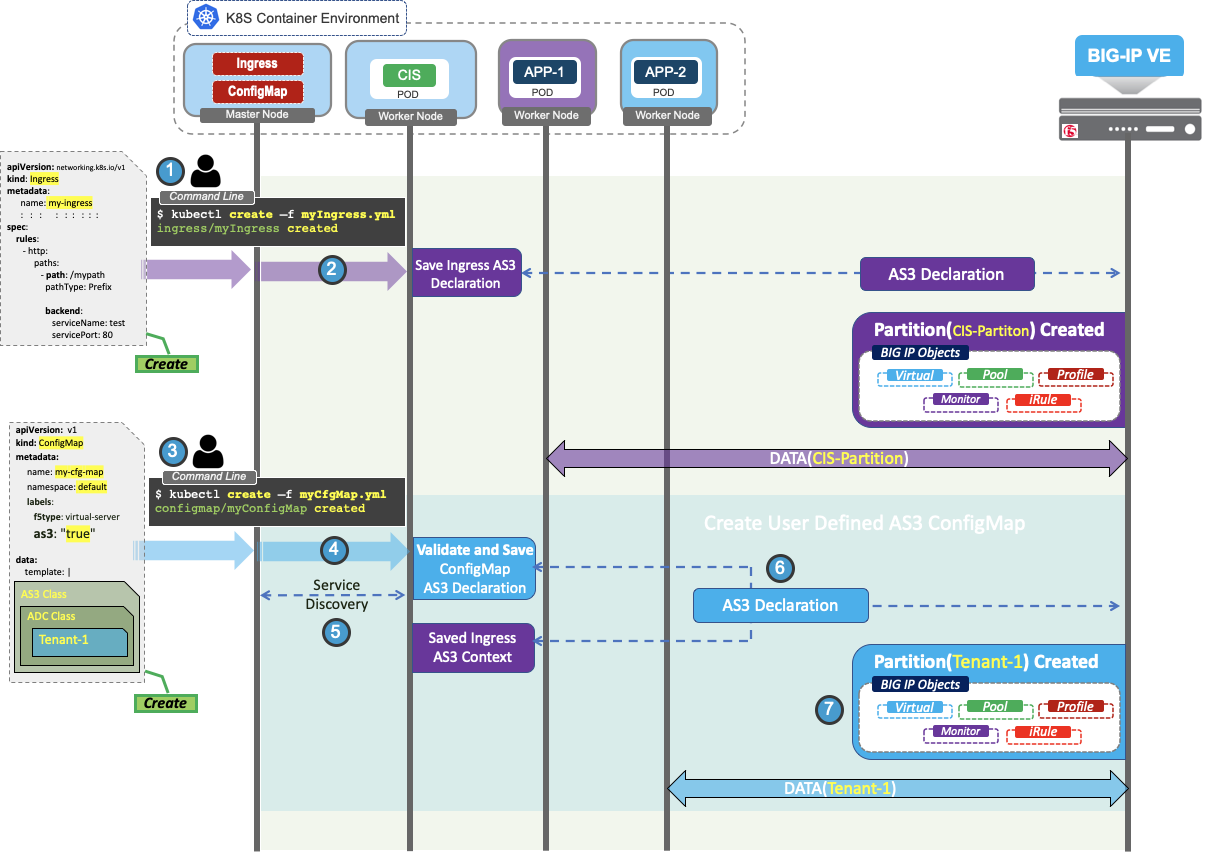
This procedural diagram depicts Service Discovery while processing ConfigMap in CIS:

Important
From the above figure, for ConfigMap to properly function in CIS, configure the same tenant, application, and pool details for steps 1 and 3.
- Prepare and deploy the desired service (Nodeport in this example) in Kubernetes. Make sure the below labels are configured:
cis.f5.com/as3-tenant: Tenant-1cis.f5.com/as3-app: APP1cis.f5.com/as3-pool: web_pool
- Prepare and deploy the backend application deployment that is going to be served by BIG-IP.
- Prepare and deploy the AS3 deployment inside an AS3 ConfigMap template in Kubernetes. Make sure the tenant, application, and pools are configured with the same values as in Step 1.
Tenant Class: Tenant-1Application Class: APP1Pool Class: web_pool
- After the AS3 ConfigMap becomes available for processing, CIS decodes the AS3 declaration and extracts tenant (
Tenant-1), Application (APP1) and Pool (web_pool) details. - CIS performs service discovery using extracted tenant (
Tenant-1), Application (APP1) and Pool (web_pool) details, and fetches service endpoints. If servicePort, defined in the AS3 ConfigMap, matches the actual servicePort in the service we add the members using targetPort in cluster mode. If servicePort, defined in the AS3 ConfigMap, does not match the actual servicePort in the service, we add the service’s corresponding endpoint and the resource’s port on index 0 to support backward compatibility. - After completing Service discovery, CIS modifies the AS3 declaration by appending the discovered endpoints. CIS only modifies these two values in the AS3 declaration:
- serverAddresses array
- servicePort value
- CIS posts the generated AS3 declaration to the BIG-IP system to begin processing traffic.
Important
From the above figure, for ConfigMap to properly function in CIS, configure the same tenant, application, and pool details for step 1 and step 3.
Supported operations of AS3 ConfigMap in CIS
CIS processes when a ConfigMap is created, modified, or deleted in Kubernetes.
The sections below explain the detailed operations of AS3 ConfigMap in CIS for creation, modification, and deletion.
Create AS3 ConfigMap
This section uses the command $ kubectl apply -f <as3_configmap_file_in_yaml> to create ConfigMap.
- Use the following command to create the ConfigMap:
$ kubectl create configmap my-config --from-file=template=./my/file_name.json
- Submit the Ingress resource, and deploy it in Kubernetes.
- CIS processes the Ingress resource, saves Ingress context, and sends the AS3 Declaration to BIG-IP to begin processing traffic.
- Prepare and deploy the AS3 deployment inside an AS3 ConfigMap template.
- After the AS3 ConfigMap becomes available for processing, CIS performs AS3 Validation followed by service discovery as described in the Service Discovery section.
- After completing Service Discovery, CIS modifies the AS3 declaration by appending the discovered endpoints to it.
- CIS posts the generated AS3 declaration to BIG-IP to begin processing traffic.
Now you will be able to see the BIG-IP objects under partition (Tenant-1) along with CIS Managed Partition (CIS-Partition).
Modify AS3 ConfigMap
This section uses the command $ kubectl apply -f <as3_configmap_file_in_yaml> to Modify ConfigMap.
There are three other ways to modify ConfigMap by using the “kubectl apply configmap” command:
- Use the contents of an entire directory:
$ kubectl apply configmap my-config --from-file=./my/dir/path/
- Use the contents of a file or specific set of files:
$ kubectl apply configmap my-config --from-file=./my/file_name.json
- Use literal key-value pairs defined on the command line:
$ kubectl apply configmap my-config --from-literal=key1=value1 --from-literal=key2=value2
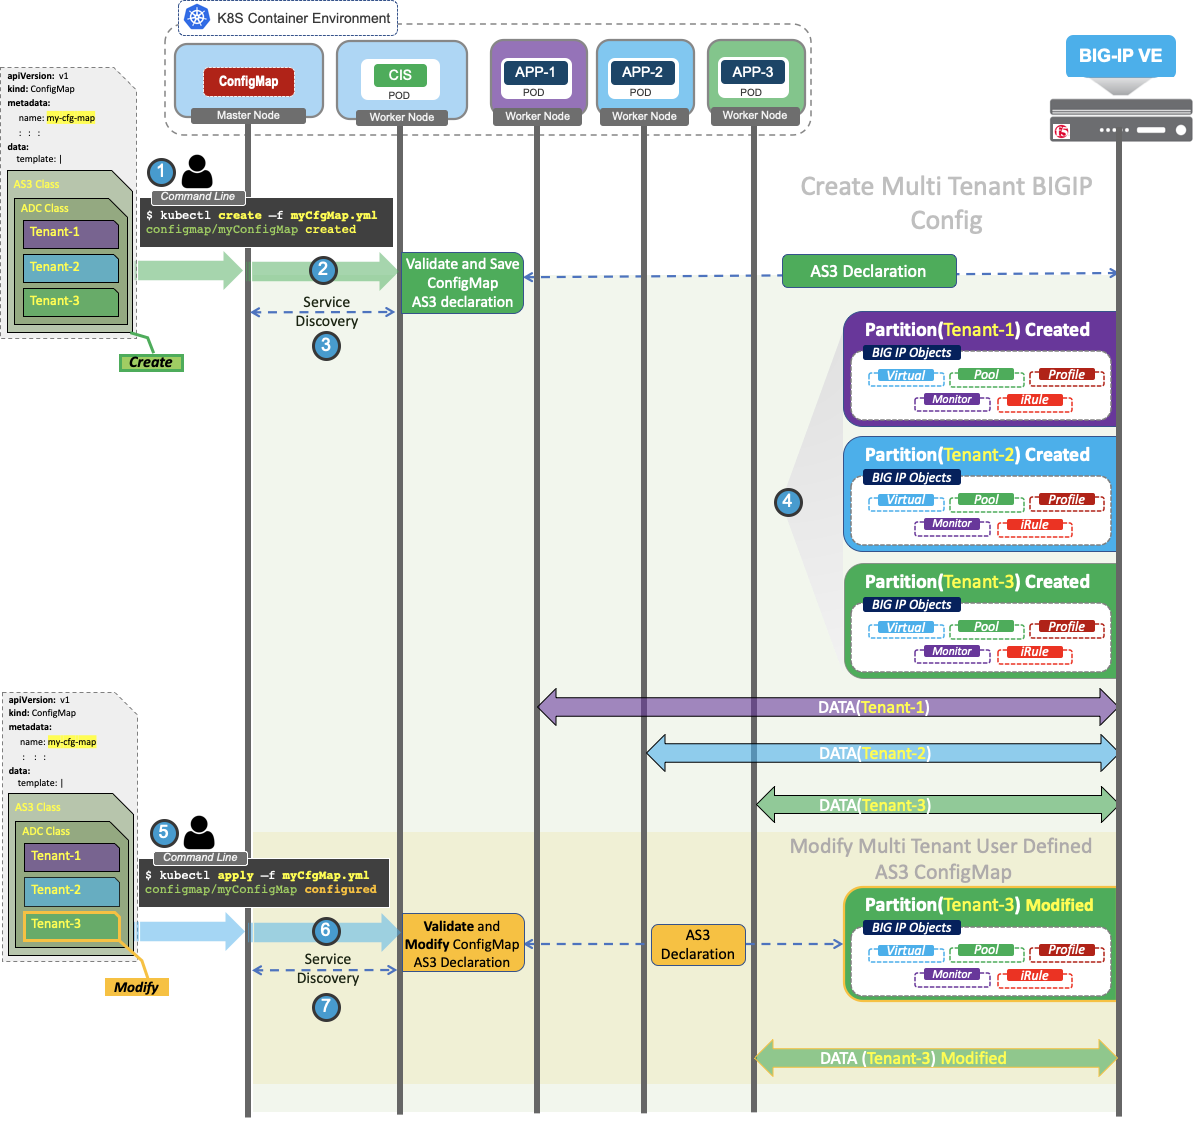
This example uses ConfigMap with multiple tenants (Tenant-1, Tenant-2, and Tenant-3)
- Submit the multiple tenant AS3 template inside the AS3 ConfigMap, and deploy it in Kubernetes.
- After the AS3 ConfigMap becomes available for processing, CIS performs Service Discovery.
- After Service Discovery, CIS modifies the AS3 declaration by appending the discovered endpoints to it.
- CIS posts the generated AS3 declaration to BIG-IP to begin processing traffic. You will be able to see the BIG-IP objects under partitions (Tenant-1, Tenant-2, and Tenant-3).
- Modify
Tenant-3objects in ConfigMap and deploy them in Kubernetes. - After the modified AS3 ConfigMap becomes available for processing, CIS again performs validation and service discovery procedures.
- After Service Discovery, CIS modifies the AS3 declaration by appending the discovered endpoints to it and posts the generated AS3 declaration to the BIG-IP system to begin processing traffic.
Along with modified objects in Tenant-3, you will be able to see the BIG-IP objects under partition (Tenant-1 and Tenant-2).
The diagram below is the continuation of ConfigMap Modification. In this case, you will understand the procedure when one of the Tenants is removed in the ConfigMap’s AS3 Declaration.
This operation is still a modify operation on ConfigMap but results in the deletion of AS3 partition in BIG-IP.
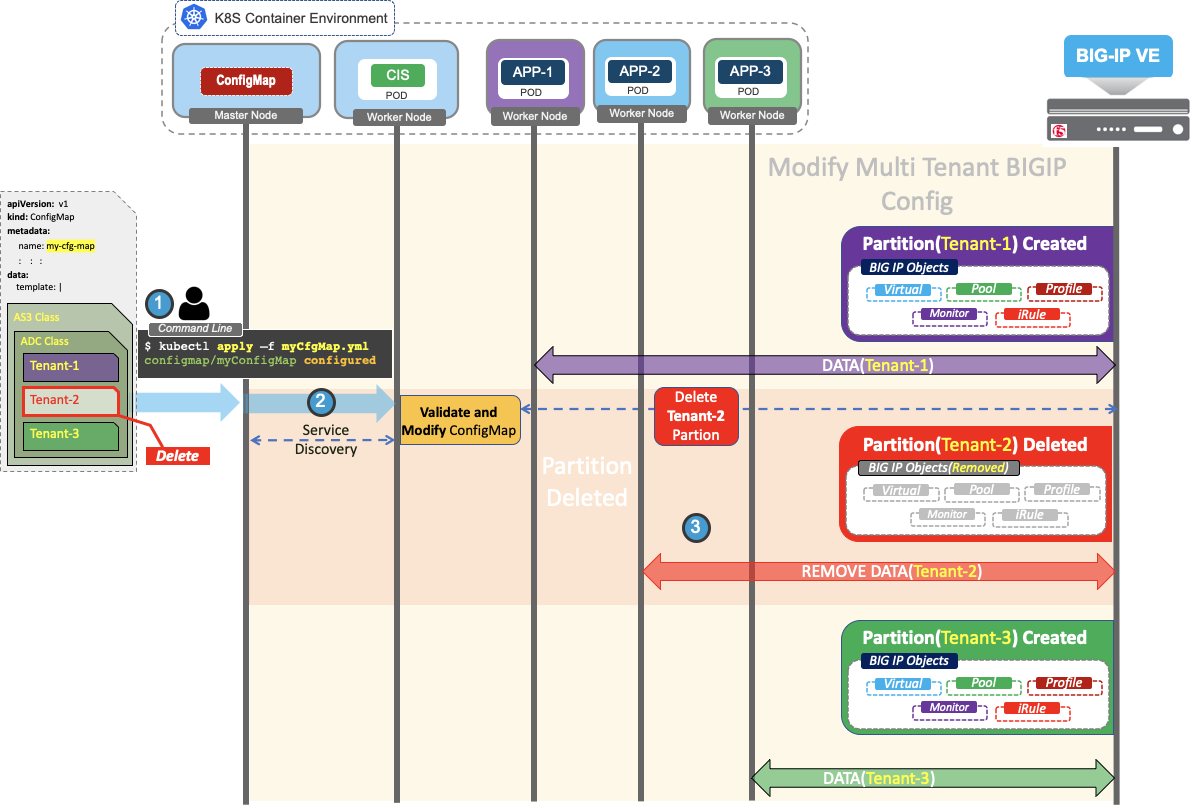
- Modify ConfigMap by removing the
Tenant-2section in ConfigMap and deploy them in Kubernetes. - After the modified AS3 ConfigMap becomes available for processing, CIS again performs validation and service discovery procedures.
- After completion of Service discovery, CIS deletes the
Tenant-2partition by posting delete partition request to BIG-IP.
After CIS processes the modification of ConfigMap, you can see the BIG-IP objects under partitions Tenant-1 and Tenant-3 only.
Certificate Passphrase
Use ignoreChanges as true for user-defined AS3 ConfigMap, while using certificate passphrase in AS3 declaration.
If set to false (default), the system updates the ciphertext in every AS3 declaration deployment. If set to true, AS3 creates the ciphertext on first deployment, and leaves it untouched afterwards.
See also
See the AS3 Schema Reference for Certificate_passphrase.
Example:
// AS3 Declaration
{
   "$schema": "https://raw.githubusercontent.com/F5Networks/f5-appsvcs-extension/master/schema/3.18.0/as3-schema-3.18.0-4.json",
   "class": "AS3",
   "declaration": {
      "c4355808_tnt_0": {
         "c4355808_tnt_0_https0": {
         "c4355808_tnt_0_https0_cert_0": {
            "certificate": "-----BEGIN CERTIFICATE----------END CERTIFICATE-----",
            "class": "Certificate",
            "passphrase": {
               "ciphertext": "ZjVmNQ==",
               "protected": "eyJhbGciOiJkaXIiLCJlbmMiOiJub25lIn3",
               "ignoreChanges": true
            },
            "privateKey": "-----BEGIN RSA PRIVATE KEY----------END RSA PRIVATE KEY-----",
            "remark": "in practice we recommend using a passphrase"
         },
         "c4355808_tnt_0_https0_p0": {
            "class": "Pool",
            "members": [
               {
               "serverAddresses": [
                  "10.244.1.58",
                  "10.244.1.59"
               ],
               "servicePort": 80,
               "shareNodes": false
               }
            ],
            "monitors": [
               "http"
            ]
         },
         "c4355808_tnt_0_https0_ssl_0": {
            "certificates": [
               {
               "certificate": "c4355808_tnt_0_https0_cert_0"
               }
            ],
            "class": "TLS_Server"
         },
         "class": "Application",
         "serviceMain": {
            "class": "Service_HTTPS",
            "persistenceMethods": [

            ],
            "pool": "c4355808_tnt_0_https0_p0",
            "serverTLS": "c4355808_tnt_0_https0_ssl_0",
            "virtualAddresses": [
               "172.16.3.14"
            ]
         },
         "template": "https"
         },
         "c4355808_tnt_0_https1": {
         "c4355808_tnt_0_https1_cert_0": {
            "certificate": "-----BEGIN CERTIFICATE----------END CERTIFICATE-----",
            "class": "Certificate",
            "passphrase": {
               "ciphertext": "ZjVmNQ==",
               "protected": "eyJhbGciOiJkaXIiLCJlbmMiOiJub25lIn0",
               "ignoreChanges": true
            },
            "privateKey": "-----BEGIN RSA PRIVATE KEY----------END RSA PRIVATE KEY-----",
            "remark": "in practice we recommend using a passphrase"
         },
         "c4355808_tnt_0_https1_p0": {
            "class": "Pool",
            "members": [
               {
               "serverAddresses": [
                  "10.244.1.60",
                  "10.244.2.98"
               ],
               "servicePort": 80,
               "shareNodes": false
               }
            ],
            "monitors": [
               "http"
            ]
         },
         "c4355808_tnt_0_https1_ssl_0": {
            "certificates": [
               {
               "certificate": "c4355808_tnt_0_https1_cert_0"
               }
            ],
            "class": "TLS_Server"
         },
         "class": "Application",
         "serviceMain": {
            "class": "Service_HTTPS",
            "persistenceMethods": [

            ],
            "pool": "c4355808_tnt_0_https1_p0",
            "serverTLS": "c4355808_tnt_0_https1_ssl_0",
            "virtualAddresses": [
               "172.16.3.15"
            ]
         },
         "template": "https"
         },
         "class": "Tenant"
      },
      "class": "ADC",
      "controls": {
         "class": "Controls",
         "userAgent": "CIS/v2.1.0-WIP K8S/v1.18.2"
      },
      "id": "urn:uuid:85626792-9ee7-46bb-8fc8-4ba708cfdc1d",
      "label": "CIS Declaration",
      "remark": "Auto-generated by CIS",
      "schemaVersion": "3.18.0",
      "test": {
         "Shared": {
         "class": "Application",
         "template": "shared"
         },
         "class": "Tenant"
      }
   }
}
Delete AS3 ConfigMap
This section uses the command $ kubectl delete -f <as3_configmap_file_in_yaml> to delete ConfigMap.
There are three other ways to delete ConfigMap by using the kubectl delete configmap command:
- Use the contents of an entire directory:
$ kubectl delete configmap my-config --from-file=./my/dir/path/
- Use the contents of a file or specific set of files:
$ kubectl delete configmap my-config --from-file=./my/file_name.json
- Use literal key-value pairs defined on the command line:
$ kubectl delete configmap my-config --from-literal=key1=value1 --from-literal=key2=value2
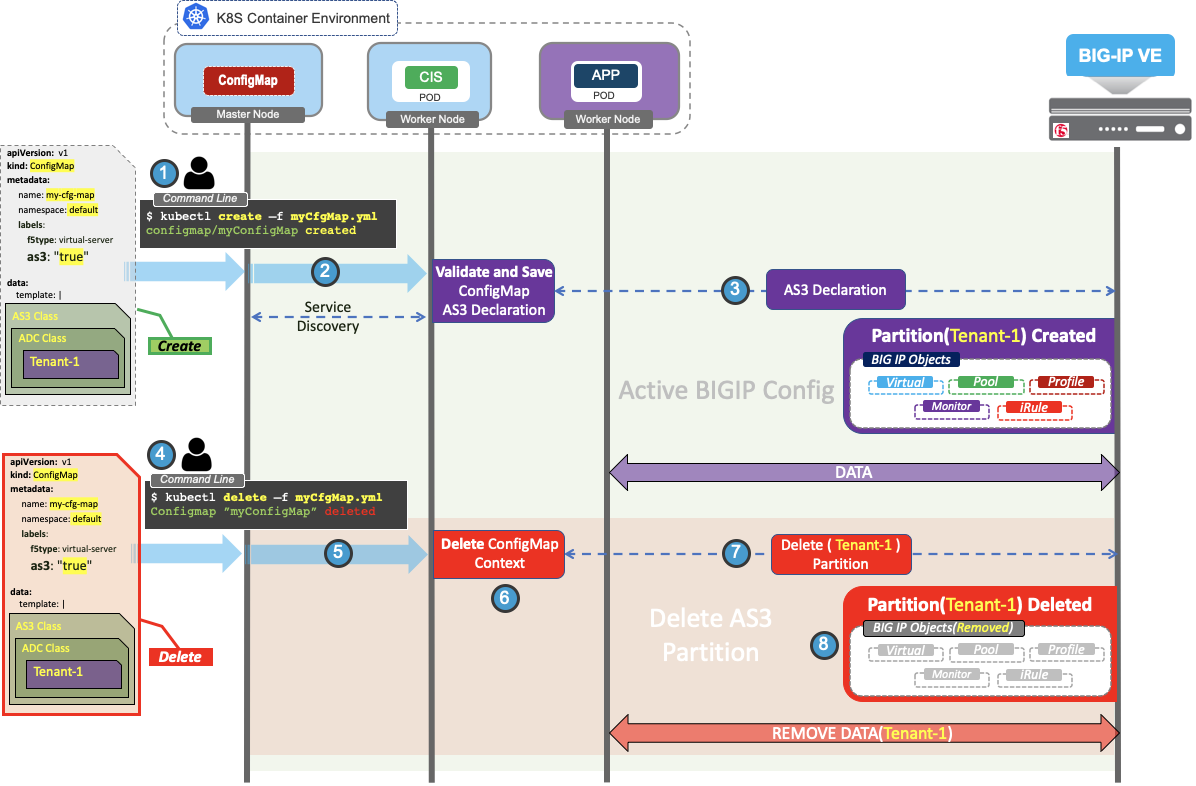
- Submit the AS3 template inside the AS3 ConfigMap, and deploy it in Kubernetes.
- After the AS3 ConfigMap becomes available for processing, CIS performs service discovery.
- CIS modifies the AS3 template, appends the discovered endpoints, and posts the AS3 declaration to the BIG-IP system to begin processing traffic.
- Perform delete ConfigMap operation in Kubernetes.
- CIS receives the delete ConfigMap request through ConfigMap informers.
- CIS sends the delete ConfigMap partition request to BIG-IP.
- BIG-IP removes the associated ConfigMap partition and cleans up its Data Path.
Important
When CIS deployed with --agent=as3 and --as3-validation=true, CIS does AS3 schema validation on AS3 ConfigMaps. Users must validate AS3 JSON data in the ConfigMap. Invalid data in AS3 JSON will block posting of unified AS3 declaration to BIG-IP.
HubMode Support for AS3 ConfigMap
Configure CIS with --hubmode=true to processes ConfigMap monitored services within the same and in different namespaces.
This configuration option is available on CIS version 2.5.0+ and is valid for CIS using --agent=as3.
When --hubmode=true, configuration --periodic-sync-interval is ignored and configMaps resources are monitored every 30 seconds.
Important
The isTenantNameServiceNamespace label is supported from CIS version 2.17.1 onwards.
1 2 3 4 5 6 7 8 9 10 11 12 13 14 15 16 17 18 19 20 21 22 23 24 25 26 27 28 29 30 31 32 33 34 35 36 37 38 39 40 41 42 43 44 45 46 47 48 49 | kind: ConfigMap
apiVersion: v1
metadata:
name: name-of-your-configmap
namespace: default
labels:
f5type: virtual-server
as3: "true"
# Optional: If you want to use the tenant name as the service namespace, set this to "true" for improved performance
#isTenantNameServiceNamespace: "true"
data:
template: |
{
"class": "AS3",
"declaration": {
"class": "ADC",
"schemaVersion": "3.18.0",
"id": "urn:uuid:33045210-3ab8-4636-9b2a-c98d22ab915d",
"label": "http",
"remark": "A1 Template",
"k8s": {
"class": "Tenant",
"foo_ns_app": {
"class": "Application",
"template": "generic",
"foo_ns_vs": {
"class": "Service_HTTP",
"remark": "foo ns app",
"virtualAddresses": [
"10.192.75.101"
],
"pool": "foo-ns-pool"
},
"foo_ns_pool": {
"class": "Pool",
"monitors": [
"http"
],
"members": [
{
"servicePort": 8080,
"serverAddresses": []
}
]
}
}
}
}
}
|
"members": [
                         {
                             "servicePort": 80,
                             "serverAddresses": [],
                             "shareNodes": true     <---------- Configure shareNodes as required.
                         }
                     ]
                 },
Filter Tenant support for AS3 ConfigMap
Configure CIS with deployment parameter --filter-tenants=true to use tenant filtering API for an AS3 declaration. This allows CIS to process each AS3 Tenant separately.
Without filter-tenants enabled, CIS posts a single unified declaration to <BIG-IP IP address>/mgmt/shared/appsvcs/declare/ AS3 API and all tenants present in the declaration are processed.
With filter-tenants enabled, CIS processes the AS3 ConfigMap per tenant and posts the individual declaration to each AS3 partition with <BIG-IP IP address>/mgmt/shared/appsvcs/declare/<tenant> AS3 API. This helps in better handling the event changes specific to tenants.
CIS only posts AS3 declarations to the corresponding tenant when it detects create/update/delete event. In other words, CIS does not post AS3 declarations to unaffected/unchanged tenants, and only posts to the affected tenants.
Note
- CIS only supports schema validation for AS3 configmaps when enabled with
--as3-validation=true. Data and semantic validations are handled by AS3 as CIS handles only schema validation. - CIS only processes AS3 ConfigMap resources if the filter-tenant feature is enabled. In other words, CIS will not monitor ingress/routes/CRD resources in combination with the filter-tenant feature starting with CIS v2.7.1.
kind: ConfigMap
apiVersion: v1
metadata:
  name: tenant1-configmap
  namespace: default
  labels:
    f5type: virtual-server
    as3: "true"
data:
  template: |
    {
        "class": "AS3",
        "declaration": {
            "class": "ADC",
            "schemaVersion": "3.18.0",
            "id": "urn:uuid:33045210-3ab8-4636-9b2a-c98d22ab915d",
            "label": "Tenant1 As3Configmap",
            "remark": "filter tenant cm",
            "Tenant-1": {
              "class": "Tenant",
              "tenant1_http0": {
                "class": "Application",
                "template": "http",
                "serviceMain": {
                  "class": "Service_HTTP",
                  "virtualAddresses": [
                    "10.8.0.5"
                  ],
                  "pool": "tenant1_http0_p0",
                  "persistenceMethods": []
                },
                "tenant1_http0_p0": {
                  "class": "Pool",
                  "monitors": [
                    "http"
                  ],
                  "members": [
                    {
                      "servicePort": 80,
                      "shareNodes": false,
                      "serverAddresses": []
                    }
                  ]
                }
              }
            }
        }
    }
kind: ConfigMap
apiVersion: v1
metadata:
  name: tenant2-configmap
  namespace: default
  labels:
    f5type: virtual-server
    as3: "true"
data:
  template: |
    {
        "class": "AS3",
        "declaration": {
            "class": "ADC",
            "schemaVersion": "3.18.0",
            "id": "urn:uuid:33045210-3ab8-4636-9b2a-c98d22ab915d",
            "label": "Tenant2 As3Configmap",
            "remark": "filter tenant cm",
            "Tenant-2": {
              "class": "Tenant",
              "tenant2_http0": {
                "class": "Application",
                "template": "http",
                "serviceMain": {
                  "class": "Service_HTTP",
                  "virtualAddresses": [
                    "10.8.0.6"
                  ],
                  "pool": "tenant2_http0_p0",
                  "persistenceMethods": []
                },
                "tenant2_http0_p0": {
                  "class": "Pool",
                  "monitors": [
                    "http"
                  ],
                  "members": [
                    {
                      "servicePort": 80,
                      "shareNodes": false,
                      "serverAddresses": []
                    }
                  ]
                }
              }
            }
        }
    }
CIS posts the AS3 declaration per tenant. In other words, CIS overall posts two AS3 declarations (one per tenant) when filter-tenant is enabled, as in this example:
2022/02/04 04:10:13 [DEBUG] [AS3] posting request to https://<BIGIP_Address>/mgmt/shared/appsvcs/declare/Tenant-1
2022/02/04 04:10:22 [DEBUG] [AS3] Response from BIG-IP: code: 200 --- tenant:Tenant-1 --- message: success
2022/02/04 04:10:22 [DEBUG] [AS3] posting request to https://<BIGIP_Address>/mgmt/shared/appsvcs/declare/Tenant-2
2022/02/04 04:10:31 [DEBUG] [AS3] Response from BIG-IP: code: 200 --- tenant:Tenant-2 --- message: success
Disable PoolMembers support for AS3 ConfigMap
The disableMembers feature in AS3 ConfigMap allows users to disable pool members by providing the deployment names associated with the pool members. You should use the cis.f5.com/disableMembers annotation to stop the traffic for the specified pool members/applications on the cluster.
To enable this feature, please add the following RBAC rule to the service account used by the CIS controller and provide cis.f5.com/disableMembers annotation with the deployment names as its values in the AS3 configMap:
- apiGroups: ["apps"]
  resources: ["deployments"]
  verbs: ["get", "list"]
- See `sample-as3-cm-with-pool-member-disable.yaml
- <https://github.com/F5Networks/k8s-bigip-ctlr/blob/2.x-master/docs/config_examples/configmap/user-defined-configmap/sample-as3-cm-with-pool-member-disable.yaml>`_
Override AS3 ConfigMap
The Override AS3 ConfigMap hosts a part of AS3 as a configuration to be overridden. Using this ConfigMap, CIS implements the AS3 override functionality.
AS3 override functionality allows users to alter the existing BIG-IP configuration using AS3 with a ConfigMap without affecting the existing Kubernetes resources. The administrator can modify the existing BIG-IP configuration incrementally without having to overwrite/delete the existing one.
Important
Override functionality can be applied only on Routes or Ingress resources, but not on AS3 ConfigMap. This also means that the scope of override functionality is limited to CIS-managed partitions in BIG-IP.
In order to deploy override AS3 ConfigMap, you will need to add a new argument to the deployment file. Apply the following optional configuration on CIS deployment to enable AS3 override functionality:
--override-as3-declaration=<namespace>/<as3_configmap_name>
args: [
"--bigip-username=$(BIGIP_USERNAME)",
"--bigip-password=$(BIGIP_PASSWORD)",
"--bigip-url=10.10.10.10",
"--bigip-partition=CIS-Partition",
"--pool-member-type=cluster",

"--as3-validation=true"

"--override-as3-declaration=default/cm227"

]
CIS can still process override AS3 ConfigMap, even though this configuration is not present. It is the responsibility of the user to always maintain a single valid AS3 Override ConfigMap in the system to avoid discrepancies.
Warning
When CIS is configured without the --override-as3-declaration option, and if more than one override AS3 ConfigMap is present, CIS will throw an error, and behavior can be unpredictable.
How to apply override functionality on an AS3 Declaration
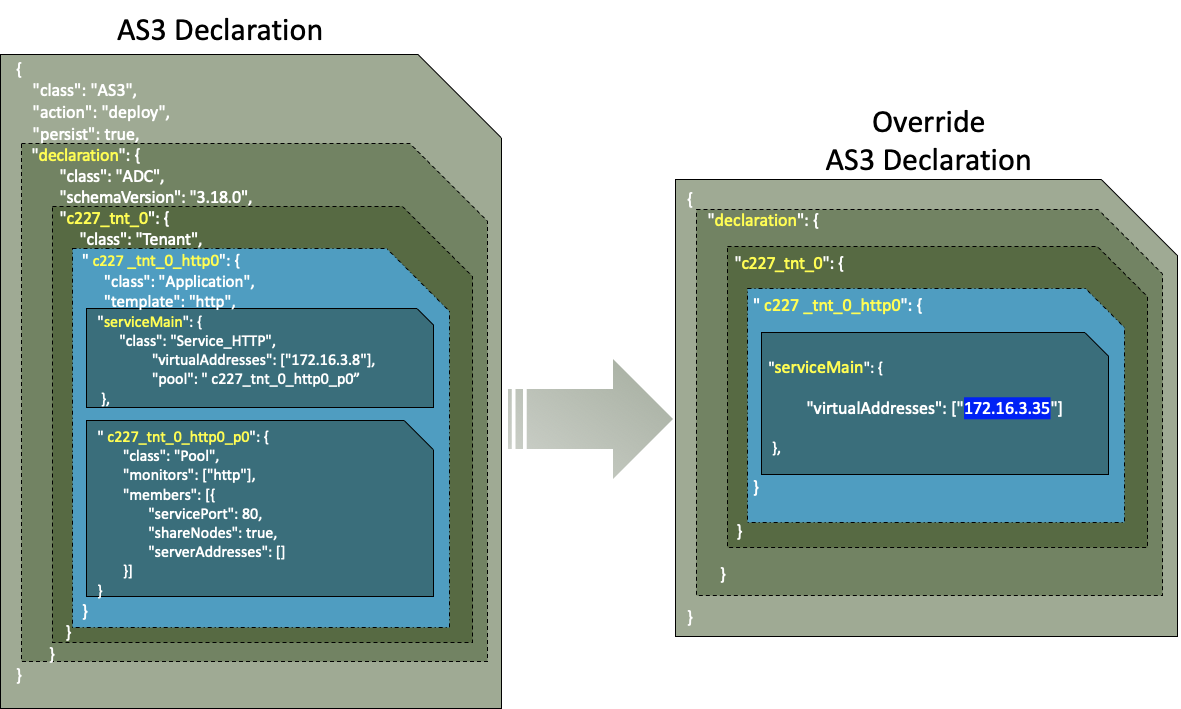
AS3 override cannot be applied to all of the objects in the AS3 declaration, only the components under the Tenant Class section should be overridden in CIS.
The image below depicts the scope of override AS3 declarations in CIS. Blocks in blue are only allowed to override:
Warning
From the above figure, you should only override the configuration in blue blocks. CIS does not prevent you from overriding the configuration of other blocks like AS3 Class or ADC Class.
How to deploy Override AS3 ConfigMap
CIS processes when Override AS3 ConfigMap is created, modified, or deleted in Kubernetes.
1 2 3 4 5 6 7 8 9 10 11 12 13 14 15 16 17 18 19 20 21 22 23 | kind: ConfigMap apiVersion: v1 metadata: name: example-vs namespace: default labels: f5type: virtual-server overrideAS3: "true" data: template: | { "declaration": { "test": { "Shared": { "ingress_172_16_3_23_80": { "virtualAddresses": [ "172.16.3.111" ] } } } } } |
Create Override AS3 ConfigMap
This section uses the command $ kubectl apply -f <override_as3_configmap_file_in_yaml> to create ConfigMap.
- Use the following command to create the ConfigMap:
$ kubectl create configmap my-config --from-file=template=./my/file_name.json
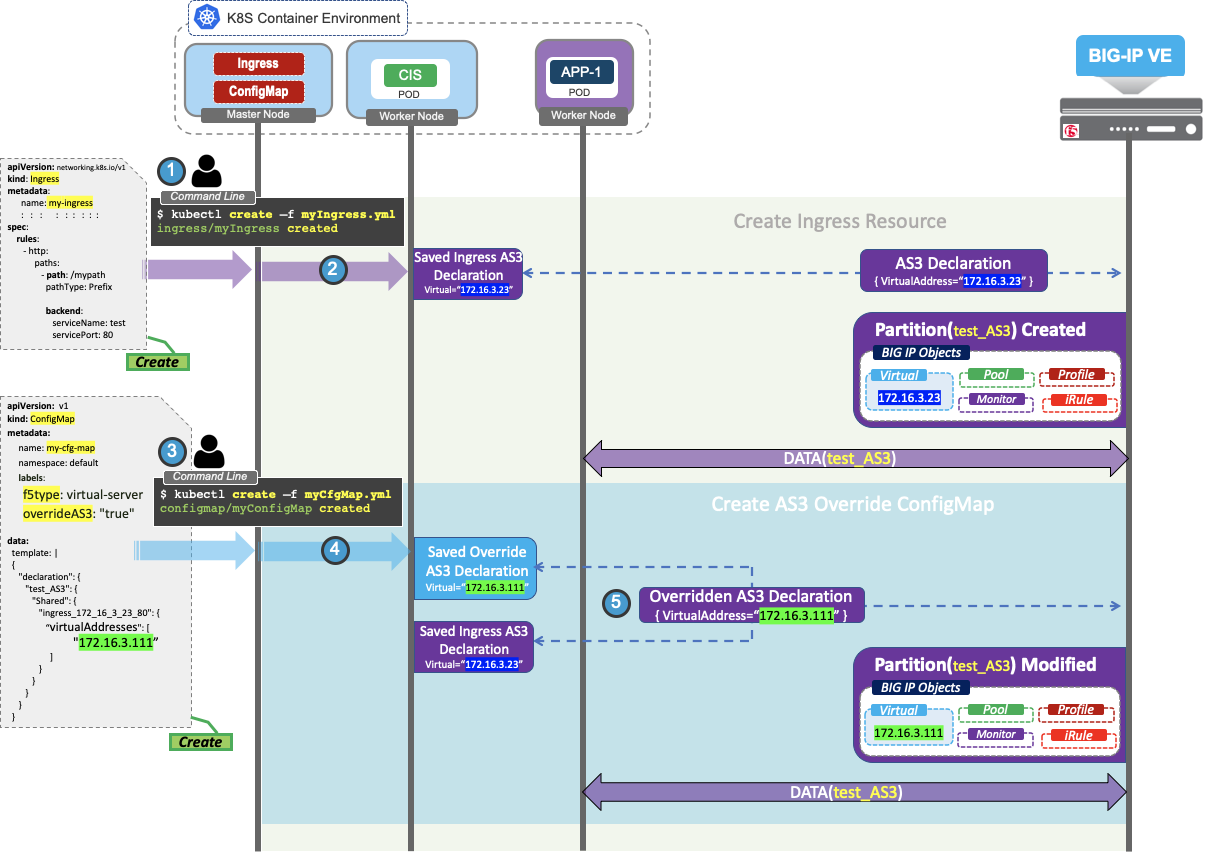
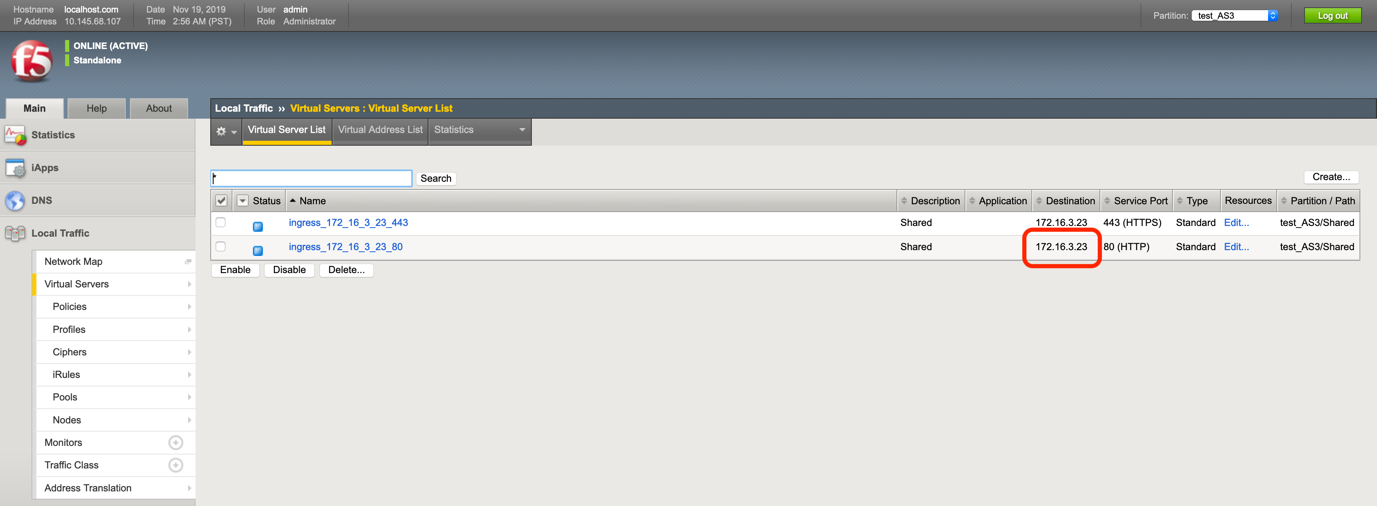
Submit the Ingress resource, and deploy it in Kubernetes.

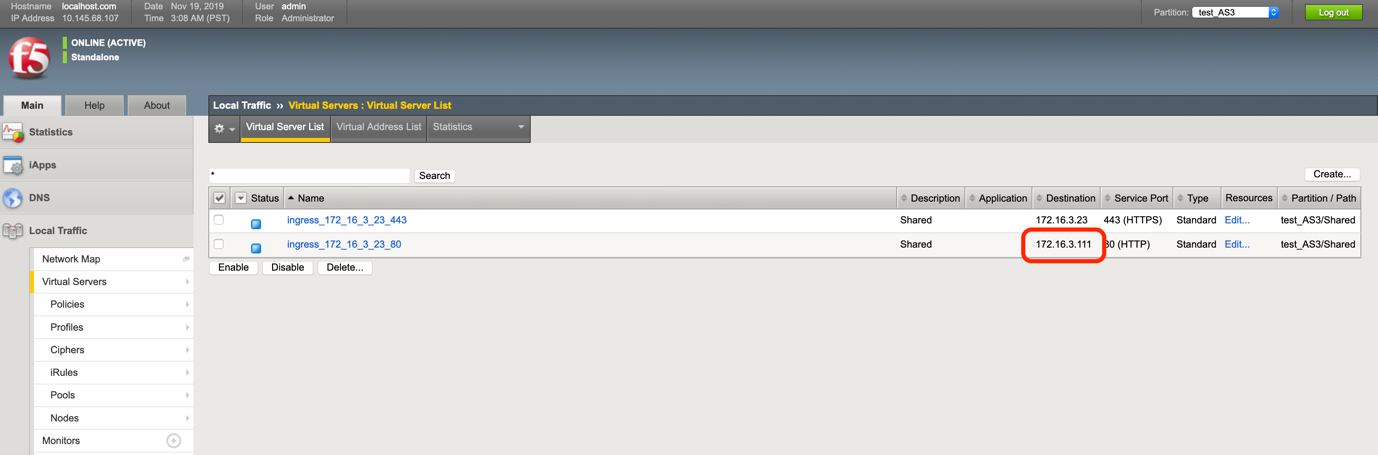
Later sections show how to change the virtual server address with AS3 override functionality. In the above screenshot, you can see a virtual server
ingress_172_16_3_23_80and the destination IP172.16.3.23.CIS will process the Ingress resource, save Ingress context, and send the AS3 declaration to BIG-IP to begin processing traffic.
Prepare and deploy the AS3 deployment inside an Override AS3 ConfigMap template.
After the Override AS3 ConfigMap becomes available for processing, CIS performs the AS3 Override operation on the saved Ingress AS3 declaration.
CIS will post the Overriden AS3 declaration to BIG-IP.
Now you can see the BIG-IP objects with Virtual being overridden under partition (test_AS3).
Modify Override AS3 ConfigMap
This section uses the command $ kubectl apply -f <override_as3_config_map_file_in_yaml> to modify ConfigMap.
There are three other ways to modify ConfigMap by using the kubectl apply configmap command:
- Use the contents of an entire directory:
$ kubectl apply configmap my-config --from-file=./my/dir/path/
- Use the contents of a file or specific set of files:
$ kubectl apply configmap my-config --from-file=./my/file_name.json
- Use literal key-value pairs defined on the command line:
$ kubectl apply configmap my-config --from-literal=key1=value1 --from-literal=key2=value2
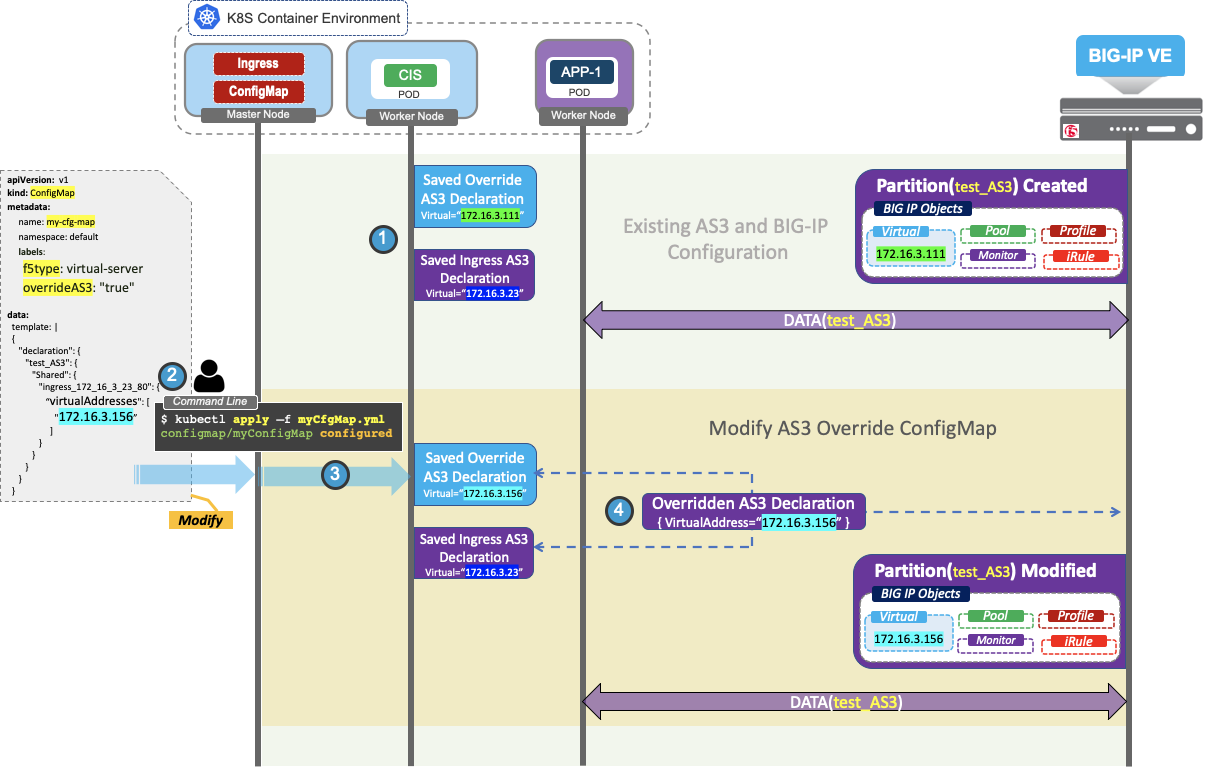
This is the continuation of the previous Create Override ConfigMap.
- After the successful creation of Override ConfigMap, CIS will save and manage the Override AS3 declaration along with Ingress AS3 Declaration.
- Modify the Virtual address to the new value as mentioned in the above figure.
- CIS will verify and save the Override AS3 ConfigMap when available for processing.
- CIS performs AS3 Override operation on the saved Ingress AS3 declaration and posts the Overriden AS3 declaration to the BIG-IP.
Delete Override AS3 ConfigMap
This section uses the command $ kubectl delete -f <as3_configmap_file_in_yaml> to delete ConfigMap.
There are three other ways to delete ConfigMap by using the kubectl delete configmap command:
- Use the contents of an entire directory:
$ kubectl delete configmap my-config --from-file=./my/dir/path/
- Use the contents of a file or specific set of files:
$ kubectl apply configmap my-config --from-file=./my/file_name.json
- Use literal key-value pairs defined on the command line:
$ kubectl apply configmap my-config --from-literal=key1=value1 --from-literal=key2=value2
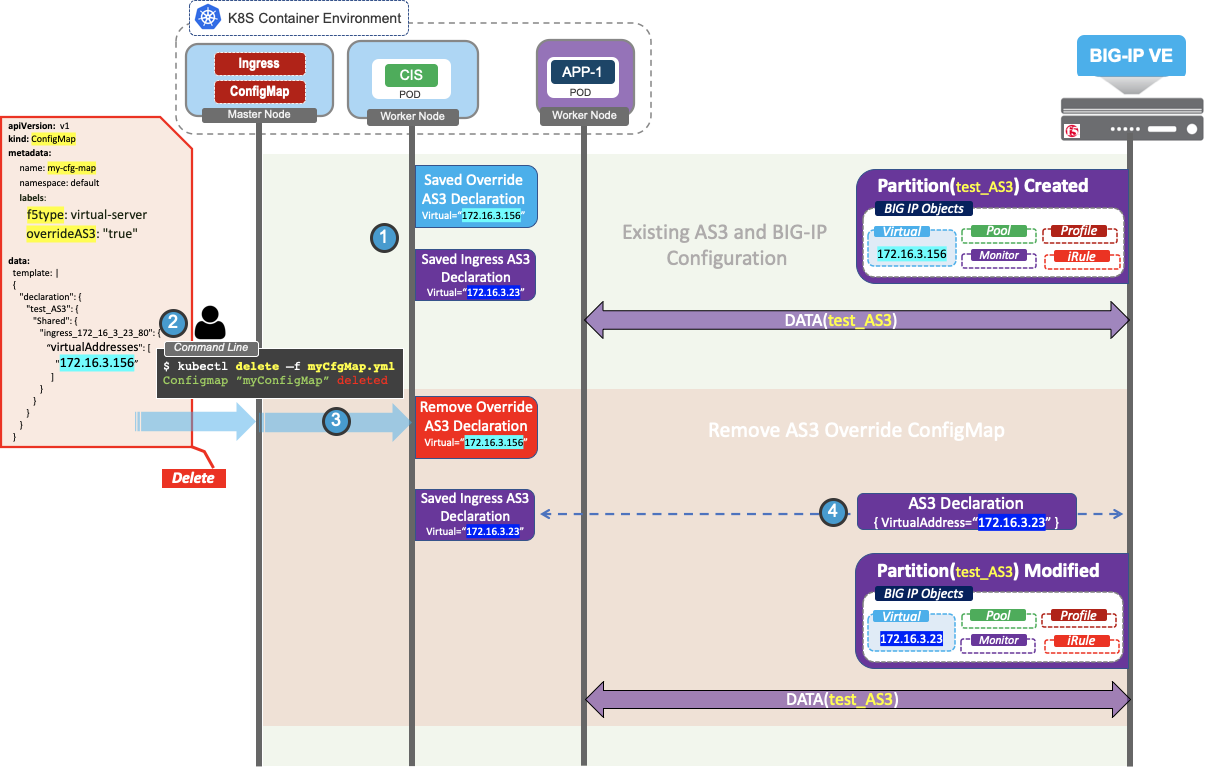
This is the continuation of the previous Modify Override ConfigMap.
- After the successful modification of Override ConfigMap, CIS will save and manage the modified AS3 declaration along with ingress AS3 Declaration.
- Delete the Override ConfigMap from Kubernetes.
- CIS will receive the delete ConfigMap request and remove the Override ConfigMap AS3 declaration context from CIS.
- CIS finds there is no override AS3 declaration to override saved Ingress AS3 Declaration, so it will send the Ingress AS3 declaration as is.
Now you will see the Ingress specific Virtual address that was configured on the BIG-IP.
Examples Repository
Note
To disable managing ConfigMaps, set manage-configmaps to false in the CIS deployment.
Note
To provide feedback on Container Ingress Services or this documentation, please file a GitHub Issue.