Automation, Orchestration & DevOps > Class 1: Programmability BIG-IP Rest Structure and Concepts Documentation! > Module 2: Abstracting Services using the App Services 3 Extension Source | Edit on
Lab 2.3: Application Service Deployments with AS3
Now that AS3 has been installed on your BIG-IP device, we can deploy new Layer 4 to 7 App Services. First, we will review the structure of an AS3 declaration. Then we will Create a Basic HTTP Service, demonstrate two ways to Modify/Mutate the service by changing the pool member states and adding pool members, and finally Delete the service. Once we have demonstrated these tasks, we will introduce more complex deployment options with iRules, Custom Profiles, Certificates, and an ASM Policy.
AS3 Declaration Structure
Note
This lab covers a minimal subset of the schema AS3 implements. The complete AS3 schema is documented in the AS3 Schema Reference
The AS3 declaration is a JSON-based schema document. The schema implements variously nested class attributes that define the acceptable input attributes and values. The simplest useful representation of an AS3 declaration can be depicted as:
Let us start by defining out outermost AS3 class:
1 2 3 4 5 6 7 | { "class": "AS3", "action": "deploy", "declaration": { "class": "ADC" } } |
The AS3 class defines various parameters that control how AS3 executes.
Note
The available attributes for the AS3 class are documented in the AS3 Class section of the schema reference.
In the example above, the declaration attribute is highlighted. Since the AS3 class is the top-level class this attribute is special; it is a container used to specify our next class, ADC:
1 2 3 4 5 6 7 8 9 10 11 12 13 14 15 16 17 18 | { "class": "AS3", "action": "deploy", "declaration": { "class": "ADC", "schemaVersion": "3.0.0", "id": "Super-NetOps Class 1 AS3 Schema Example" "Tenant1": { "class": "Tenant" }, "Tenant2": { "class": "Tenant" }, "TenantN": { "class": "Tenant" } } } |
The ADC class defines various parameters that control how ADC-centric Application Centric services are configured. This is the first time we have seen the schemaVersion attribute. As mentioned previously, AS3 implements robust versioning to preserve backward compatibility while still allowing rapid updates and schema extensions. The schemaVersion is de-coupled with the Release Version of AS3. This allows you to use the latest released versions of AS3 while still ensuring that existing declarations continue to function. Schema changes and additions are always implemented in a new schemaVersion and can be migrated to in a controlled manner. To highlight this, notice that the schemaVersion is 3.0.0 while the installed release of AS3 is 3.16.0.
Note
The available attributes for the ADC class are documented in the ADC Class section of the schema reference.
The second group of highlighted lines in the example above are containers used to define tenants. Note that there are multiple tenant containers in this example. AS3 is inherently multi-tenant and AS3 Tenants map to Partitions on a BIG-IP system. In this case, the Partition names on BIG-IP would be the same as the name of the attributes: Tenant1, Tenant2 and TenantN. This class is an introduction, so we will only deploy a single tenant.
Note
The available attributes for the Tenant class are documented in the Tenant Class section of the schema reference.
Next, let us populate our tenant Tenant1 with our next class,
Application:
1 2 3 4 5 6 7 8 9 10 11 12 13 14 15 16 17 18 19 20 21 | { "class": "AS3", "action": "deploy", "declaration": { "class": "ADC", "schemaVersion": "3.0.0", "id": "Super-NetOps Class 1 AS3 Schema Example" "Tenant1": { "class": "Tenant" "App1": { "class": "Application" }, "App2": { "class": "Application" }, "AppN": { "class": "Application" } } } } |
As you can see, we have defined three applications, App1, App2 and AppN. Inside each Application container, we will populate more objects that define the specific configuration for an Application Service. Adding new applications is as simple as adding a new object with a Application class. This pattern can be repeated for as many applications as required.
Note
The available attributes for the Application class are documented in the Application Class section of the schema reference.
Now that we see how our declaration is structured, let us show an example that defines a simple HTTP Application Service that implements Load Balancing:
1 2 3 4 5 6 7 8 9 10 11 12 13 14 15 16 17 18 19 20 21 22 23 24 25 26 27 28 29 30 31 32 33 34 35 36 | { "class": "AS3", "action": "deploy", "declaration": { "class": "ADC", "schemaVersion": "3.0.0", "id": "Super-NetOps Class 1 AS3 Schema Example" "Tenant1": { "class": "Tenant", "HTTP_Service": { "class": "Application", "template": "http", "serviceMain": { "class": "Service_HTTP", "virtualAddresses": [ "10.1.20.121" ], "pool": "Pool1" }, "Pool1": { "class": "Pool", "monitors": [ "http" ], "members": [ { "servicePort": 80, "serverAddresses": [ "10.1.10.100", "10.1.10.101" ] } ] } } } } } |
The highlighted lines implement a Virtual Server listening on 10.1.20.121:80 with a single pool that contains two pool members. It is crucial to note the use of the template attribute. In this case, we are using the http template provided by AS3 to set various defaults for this service. Some of those defaults include:
- Listen on
TCP/80 - Cookie persistence
- Default HTTP Profile w/ the
X-Forwarded-Forheader inserted - See the reference for full details
Now that we understand how declarations are defined, let us go through some examples. While completing the following tasks, be sure to review the JSON Body of the requests to how the declaration is defined.
Task 1 - View Deployed Services
Note
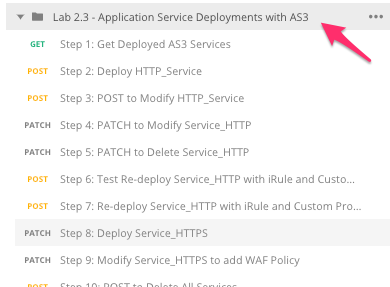
This lab work will be performed from Lab 2.3 - Application Service Deployments with AS3 folder in the Postman Collection
Perform the following steps to complete this task:
Send the
Step 1: Get Deployed AS3 Servicesrequest to view current declarations on the BIG-IP device:
Review the JSON Response Body. AS3 does not currently have any declarations deployed on the BIG-IP device. This is indicated in the
messageattribute:
Task 2 - Deploy HTTP_Service
Perform the following steps to complete this task:
Click
Step 2: Deploy HTTP_Service. Review the Request JSON Body. The JSON body of the POST contains the declaration AS3 uses to deploy the service.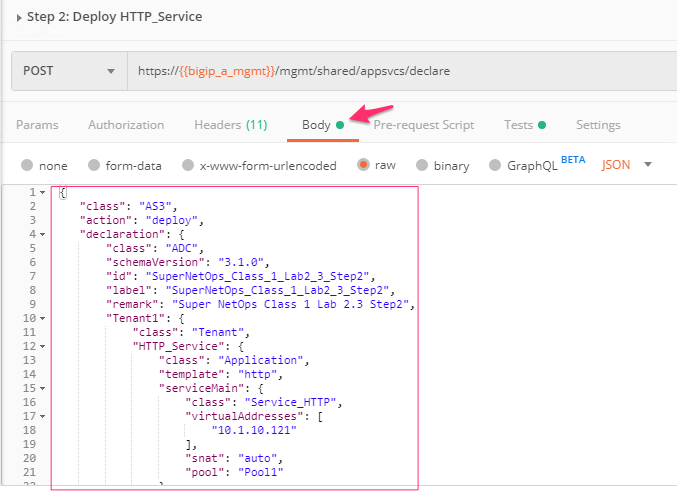
Click the Send button to Create HTTP_Service:

Review the Response JSON Body to verify if the Service has been deployed. AS3 will return status for each Tenant in the declaration along with various statistics. Pay special attention to the
messageattribute. In this case, the value issuccess, indicating that the configuration was deployed to the BIG-IP device successfully. Additionally, the implemented declaration is echoed back so it can be used to auditing and verification as needed: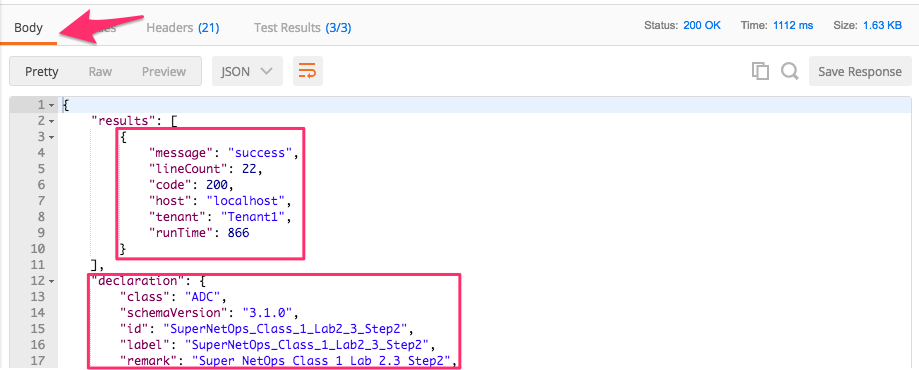
Note
We have just progressed into a Declarative instantiation by defining the end state and relying on the AS3 to handle the order of operations and configuration of specific objects. By doing this, we have drastically reduced the amount of Domain-Specific Knowledge required to interact with the device. In the next module, we will combine this concept with Abstraction to further simplify the interface the service consumer has to interact with.
To demonstrate Idempotency, let us repeat this operation. Click the Send button again to Create HTTP_Service. Review the Response JSON Body and notice that this time the
messageattribute has a value ofno change. Because the input declaration did not change, AS3 simply validated the declaration but did not perform any operations on the BIG-IP device.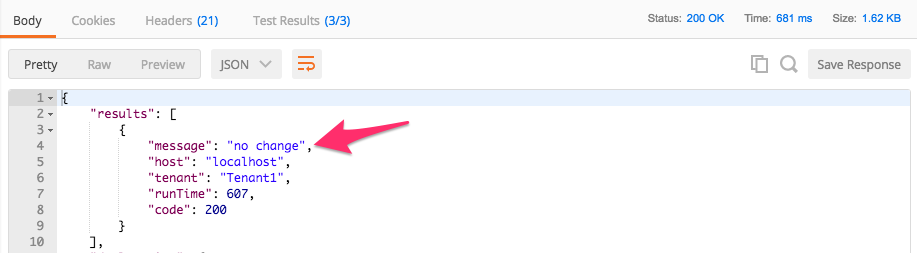
Now that the service has been deployed let us review the BIG-IP configuration. You can validate by sending the
Step 1: Get Deployed AS3 Servicesrequest again.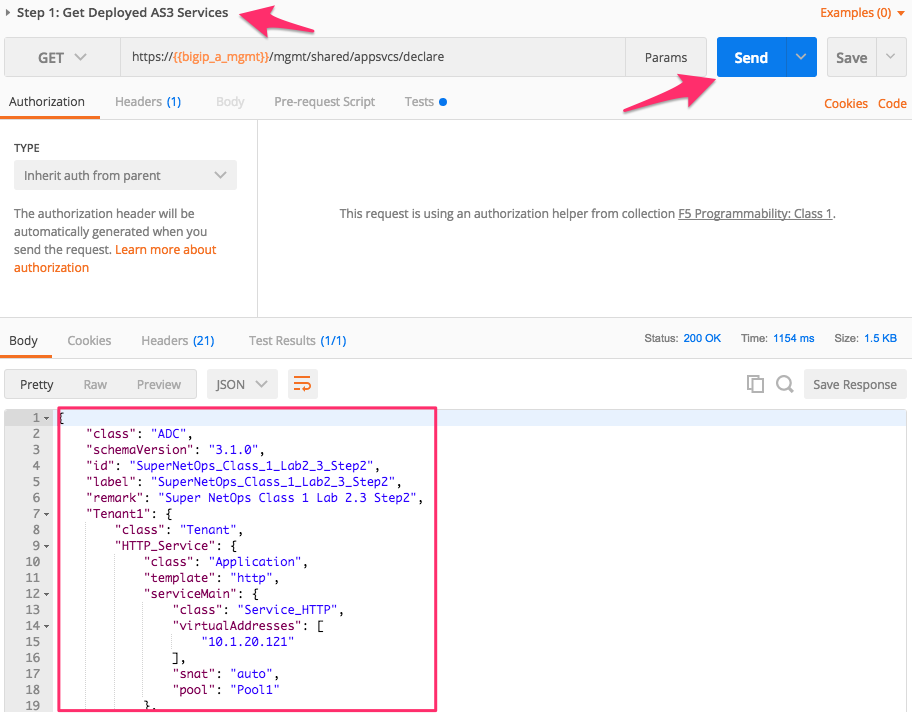
In the TMUI GUI, you will now see a Partition has been created that corresponds to the
Tenant1tenant in our declaration. We must first select this partition in TMUI to view objects associated with it:
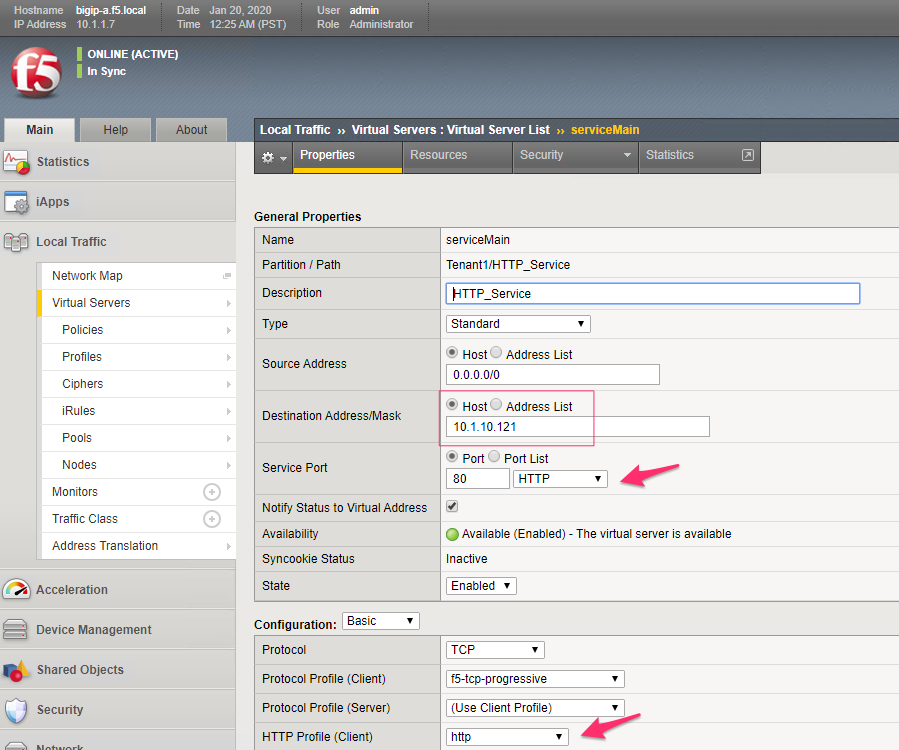
Examine the Virtual Server that was created by clicking . The configuration is simple, but it does contain the key components for an HTTP service (Listener, HTTP Profile, Monitor, Pool, and Pool Members):
The service is available and active; you can connect to the Virtual Server using the Chrome web browser at
http://10.1.20.121or theModule 2 VIP 01bookmark and examine its responses: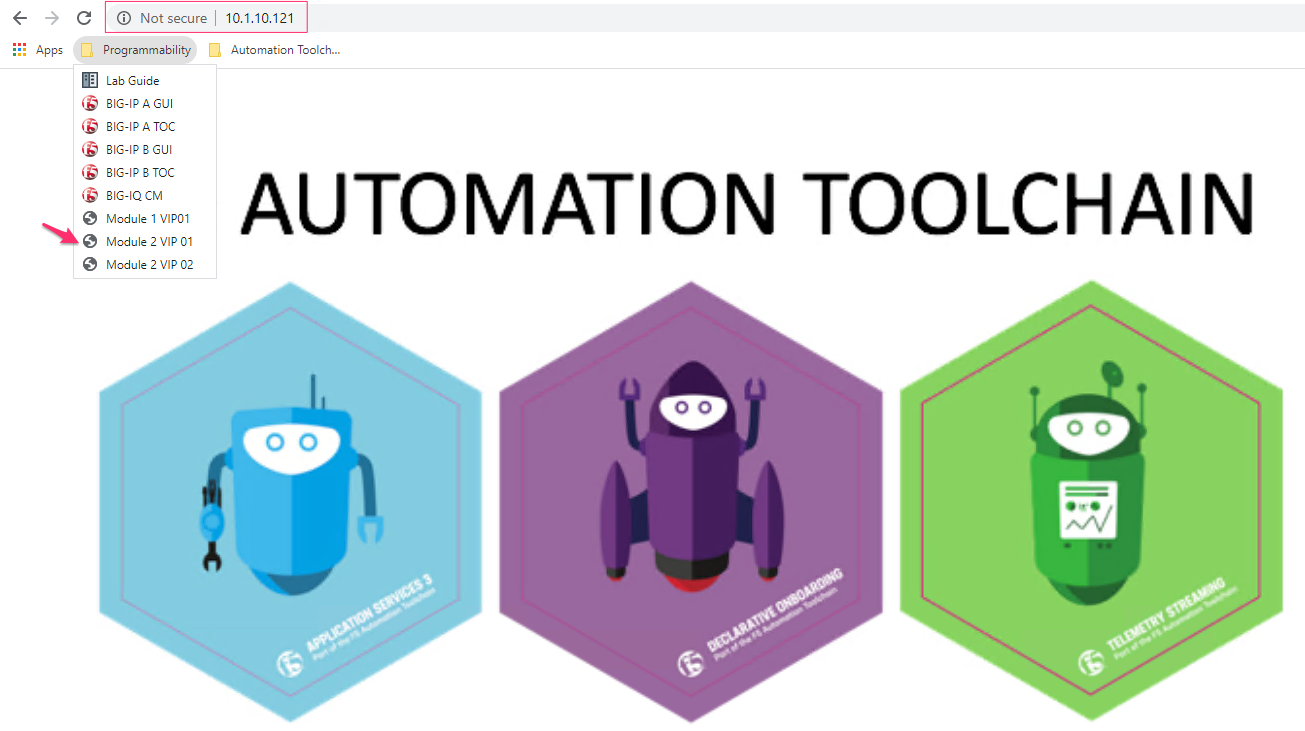
Note
The colors of the text, images, and borders may vary depending on the backend server selected during the load balancing process.
Task 3 - Modify our Deployed Service
In this task, we will show how deployments can be modified with AS3. It is essential to understand that AS3 acts on the Full declaration for each tenant. Updates to deployments can be achieved in two ways:
Update the full declaration document and
POSTthe entire declaration to /mgmt/shared/appsvcs/declare. AS3 will perform a diff operation and apply delta changes to the BIG-IP system to achieve the desired state.Update an existing declaration by using the
PATCHmethod along withRFC6902JSON patch commands. This allows you to edit the most recent declaration AS3 has deployed. Once the RFC6902PATCHis applied, the resulting full declaration is processed using the same diff operation as above.Note
For more information on RFC6902 JSON Patching see http://jsonpatch.com
Warning
Using the PATCH mechanism can result in a source-of-truth violation if upstream orchestration systems are not updating their stored version of the declaration document. The implications of this should be fully understood and accounted for if using PATCH as part of a larger orchestrated workflow.
First, let us use the POST method to update our service:
Click on
Step 3: POST to Modify HTTP_Service. Review the Request URL and JSON Body. Notice that we are sending aPOSTto the/mgmt/shared/appsvcs/declareendpoint. We will send the Full declaration document with the pool members updated to so they are NOT enabled: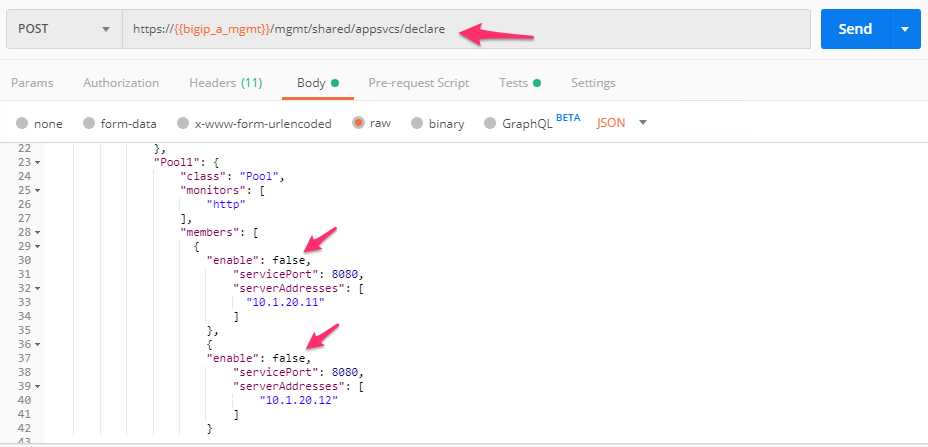
Click the Send button to Modify the previously deployed HTTP_Service:

In the BIG-IP GUI click . Notice that there are no members listed in the table. Since AS3 is a fully declarative interface, it does not configure pool members when their
enablestate isfalseas we specified in the declaration. The Virtual Server is no longer passing traffic athttp://10.1.20.121because no Members are available in the Pool: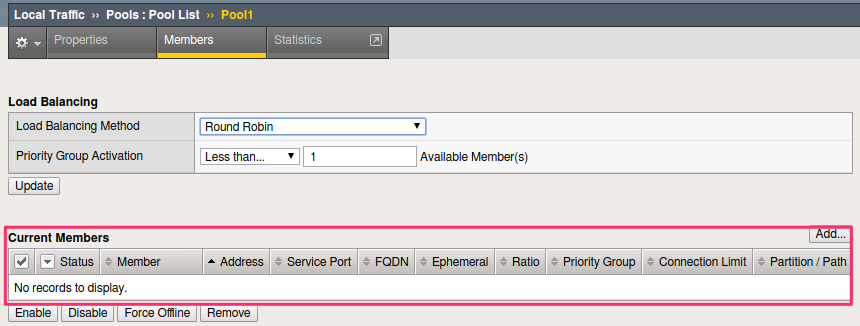
Next, let us use the PATCH method to update our service:
Click on
Step 4: PATCH to Modify Service_HTTP. Notice that we are using thePATCHmethod to the/mgmt/shared/appsvcs/declareendpoint. Review the JSON Body. Notice that we are sending an array of three operations using the RFC6902 JSON Patch format. The first two operations in the array will update theenablestate totruefor our existing pool members. The third operation adds a new Member to the Pool: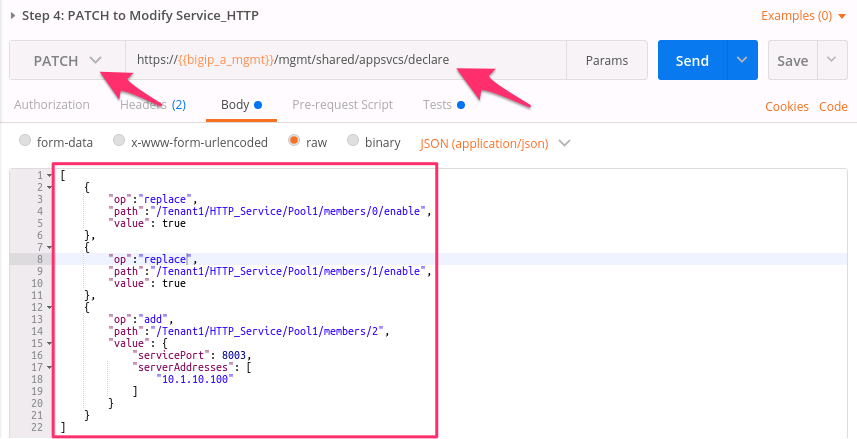
Click the Send button to update HTTP_Service. Review the Response Body and review the
declarationto see how it was updated.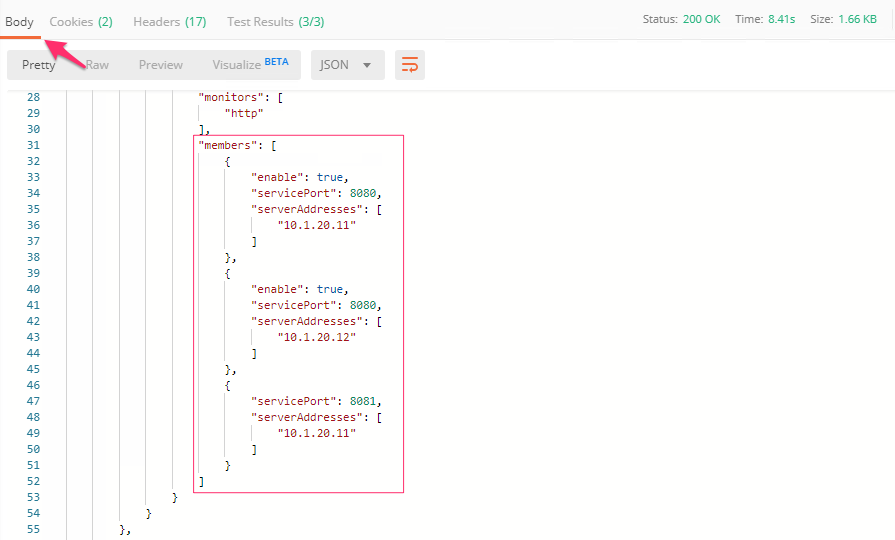
In the BIG-IP GUI click . Notice that there are now three members listed in the table. The Virtual Server is now available again at
http://10.1.20.121.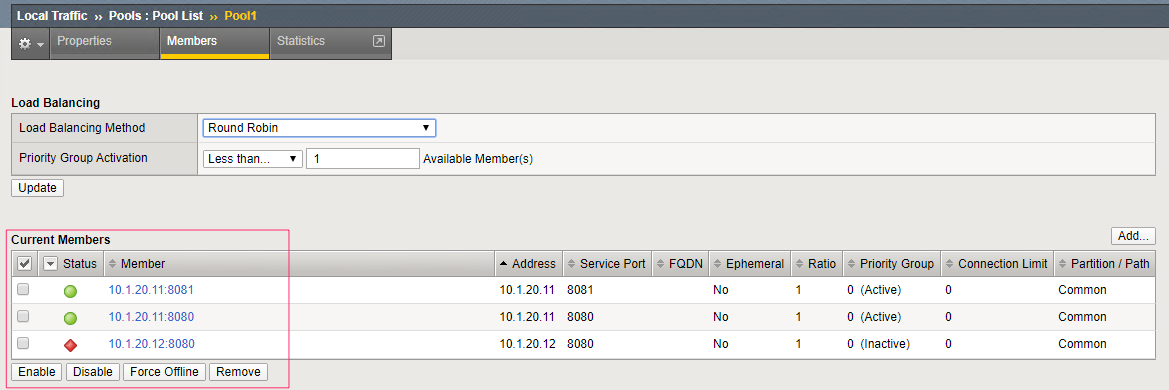
Task 4 - Delete our Deployed Service
The lifecycle of a service also includes service removal. We will now delete an existing service.
Perform the following steps to complete this task:
Click the
Step 5: PATCH to Delete Service_HTTPrequest and review the JSON Body. Notice the operation willremovethe/Tenant1/HTTP_Serviceobject from the declaration.
Click the Send button to send the request.
Now that the service has been deleted let us review the BIG-IP configuration. You can review via REST by sending the
Step 1: Get Deployed AS3 Servicesrequest again, or you can log in to the BIG-IP A GUI to verify the objects have been removed.Note
Since
HTTP_Servicewas the only service in our tenant, AS3 will automatically remove theTenant1partition from the BIG-IP since it is no longer required.
Task 5 - Deploy an HTTP Service with Custom created Profile and a referenced iRule
In this task, we will demonstrate the dry-run mode of AS3. This mode allows you to test the declaration but not apply ANY changes to the BIG-IP system. This functionality is critical for integration into production automation pipelines.
Perform the following steps to complete this task:
Click the
Step 6: Test Re-deploy Service_HTTP with iRule and Custom Profilesrequest. Review the JSON Body. Notice that ouractionisdry-run. Click the Send button to send the request: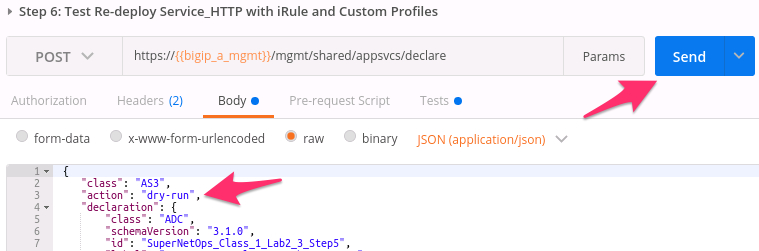
Review the Response Body. Notice that the
dryRunattribute is set and themessageindicates the test was successful: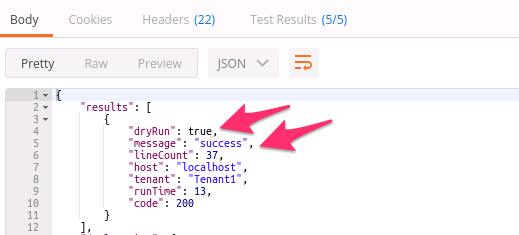
Click the
Step 7: Re-deploy Service_HTTP with iRule and Custom Profilesrequest. Review the JSON Body and notice theactionis set todeploy. Click the Send button to deploy the service.AS3 can Create or Reference various objects. In this deployment, we perform two actions:
Create custom profiles on the BIG-IP device with various options specified. These profiles do not exist on the BIG-IP but are created dynamically during the deployment.
Create an iRule on the BIG-IP device by using a URL Reference. AS3 downloads the iRule resource from the URL and then creates a new iRule object on the system. The iRule object is then automatically linked to the Virtual Server.
Warning
When using URL references, it is important to properly secure the repository which hosts the resource(s). The example in this lab uses a publicly readable repository. However, most environments should use a private repository with appropriate access control.
Review the Request JSON Body to see how the desired outcomes above were declared:
Custom Profiles:
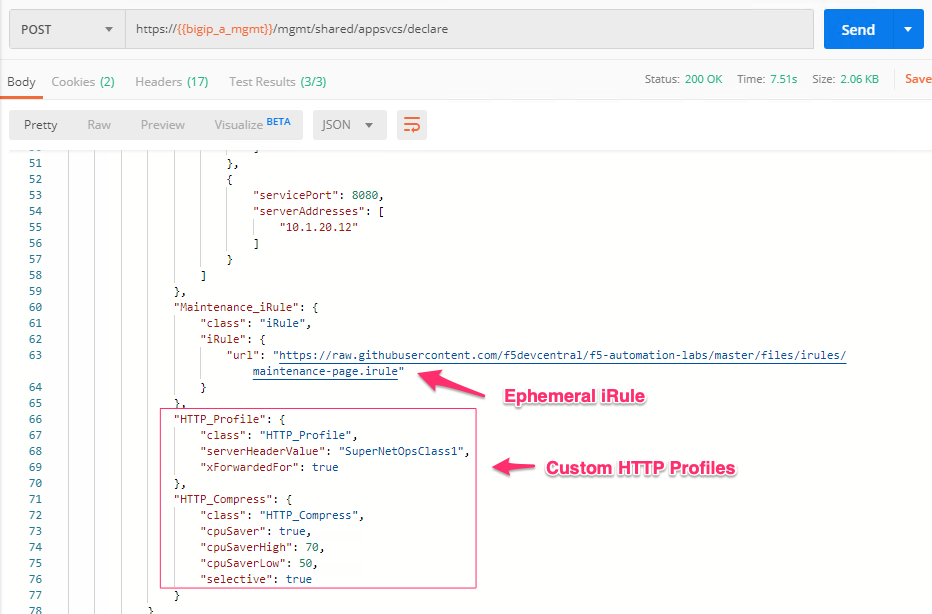
URL Referenced iRule:
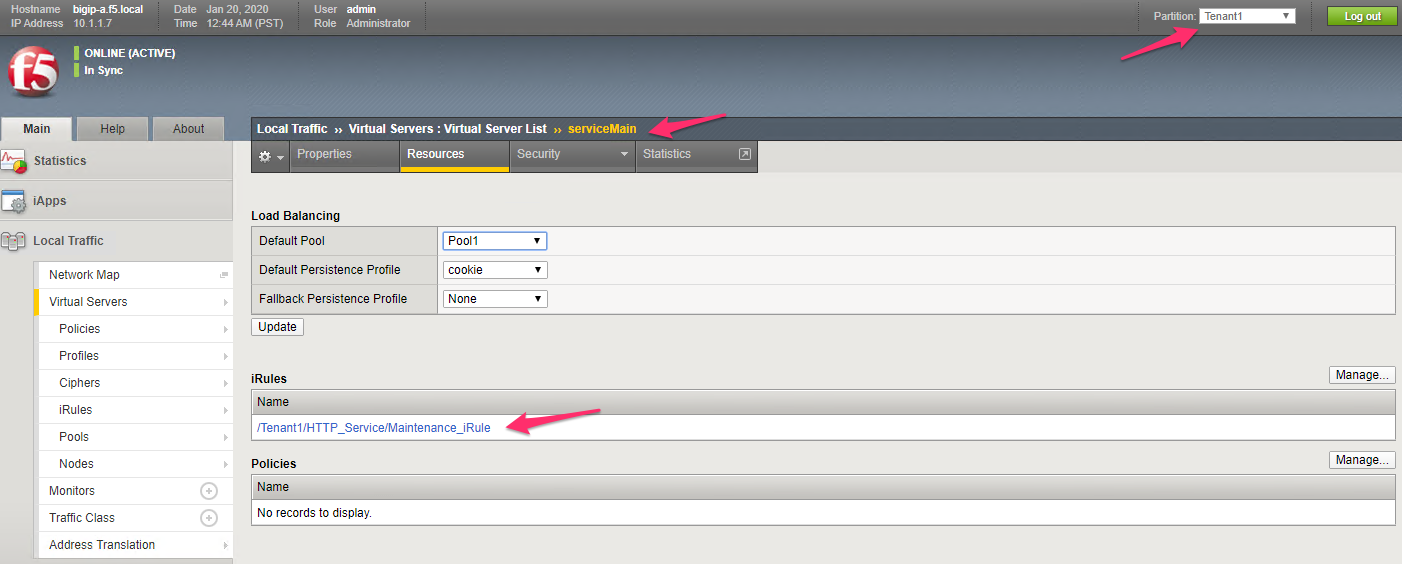
iRule linked to Virtual Server:
Open Chrome and connect to the Virtual Server at
http://10.1.10.121. The iRule that was attached to the service contains anHTTP_RESPONDevent, which response with a simple Maintenance Page.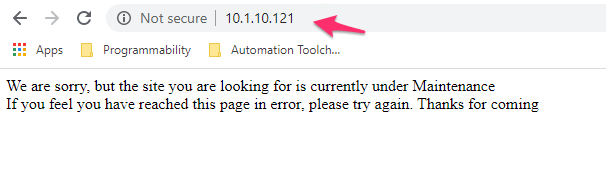
Task 6 - Deploy an HTTPS Service
Perform the following steps to complete this task:
Click the
Step 8: Deploy Service_HTTPSrequest and review the Request JSON Body to see how the service was declared. Notice that we are performing aPATCHto the declaration and with anaddoperation: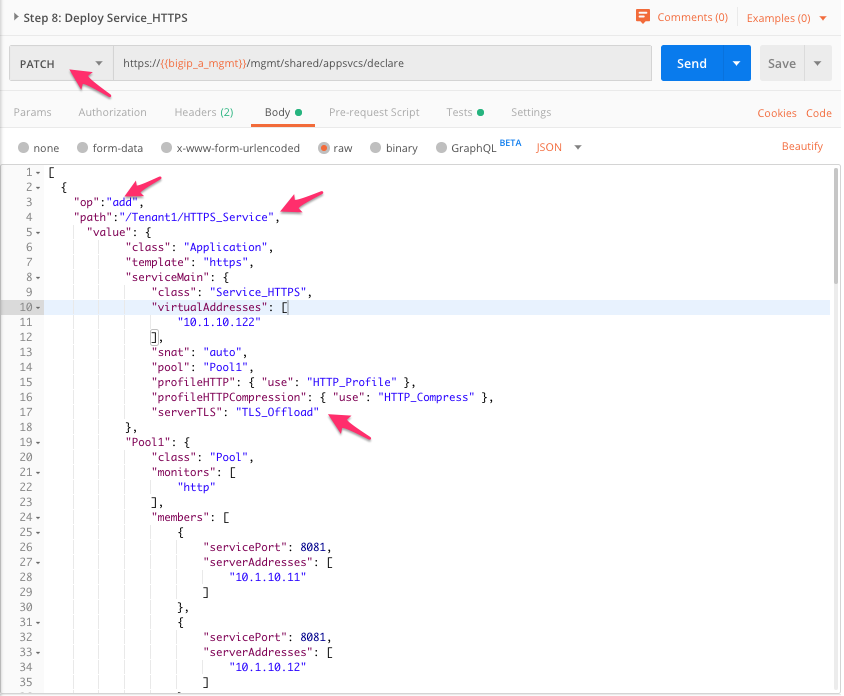
Send the
Step 8: Deploy Service_HTTPSrequest to deploy an HTTPS Service with an SSL/TLS Key, Certificate, and Certificate Bundle specified in the declaration.Review the configured Virtual Servers in the TMUI GUI. AS3 created a new Virtual Server to redirect
TCP/80traffic toTCP/443and configured the Virtual Server to listen onTCP/443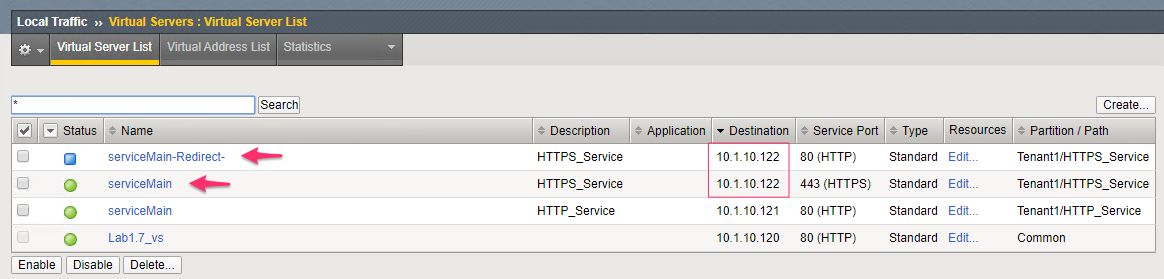
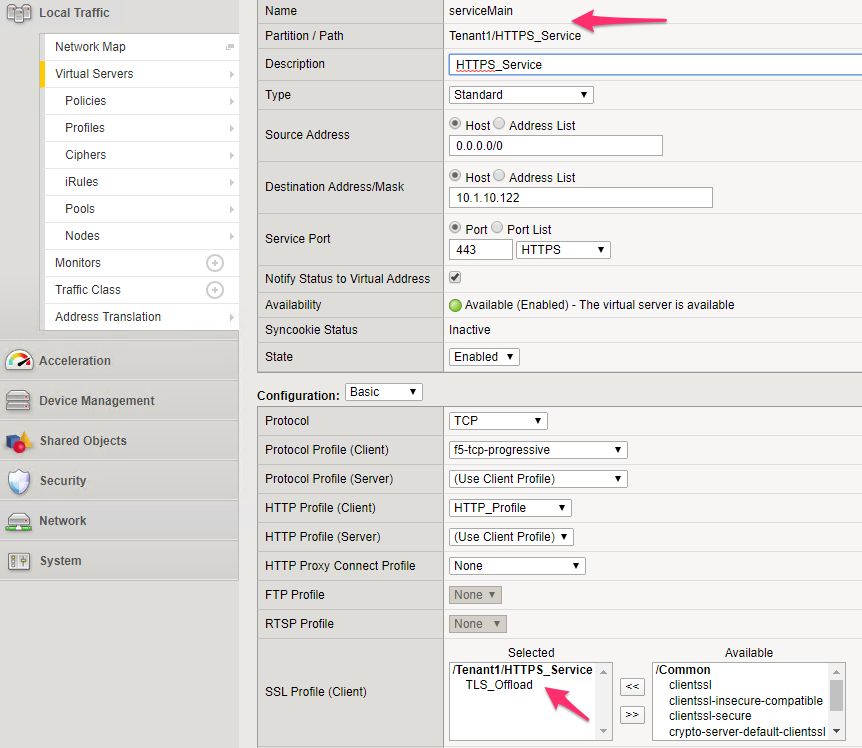
The configuration of the Virtual Server now uses an SSL/TLS Client profile. The deployment is now providing SSL Offload for the backend compute nodes.
Open Chrome and access the service with
http://10.1.10.122. It should redirect you tohttps://10.1.10.122.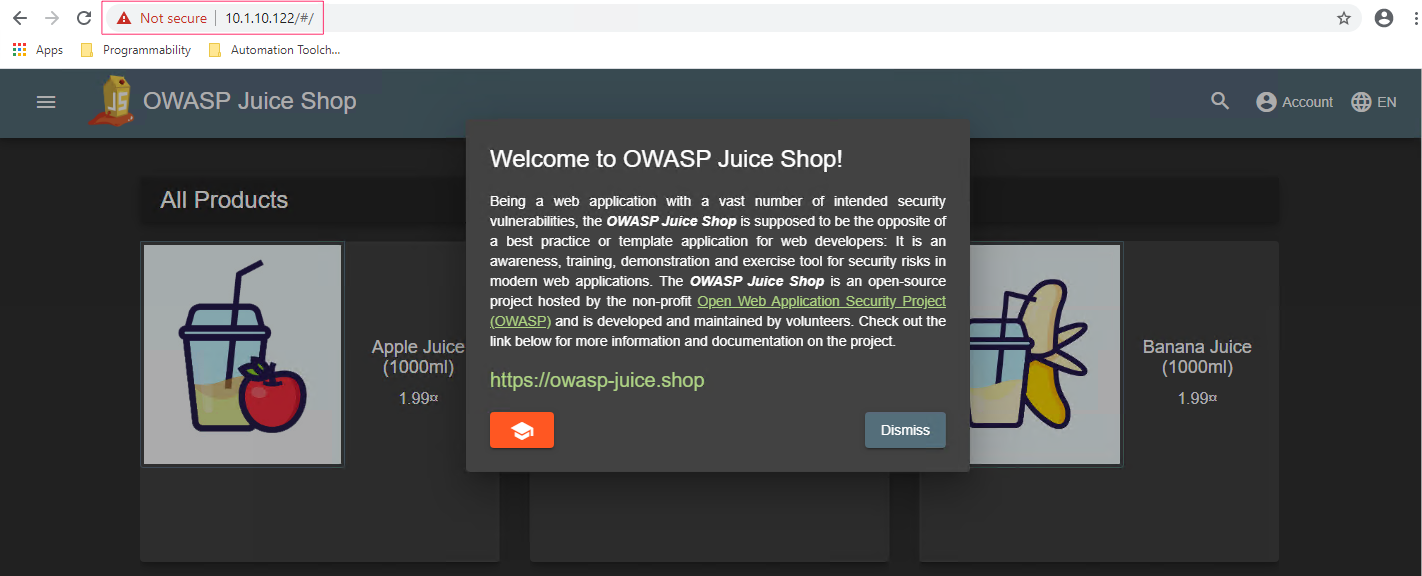
Task 7 - Deploy an HTTPS Service with a Web Application Firewall Policy
Another advantage of Service Deployment using AS3 is that they can
deploy advanced Layer 4-7 services using policies from various F5 modules. In this task, we will update Service_HTTPS to include a Web Application Firewall policy.
Perform the following steps to complete this task:
Send the
Step 9: Modify Service_HTTPS to add WAF Policyrequest to link a policy that will be used with the Application Security Manager (ASM) module. Review the JSON Body to see how the policy was attached: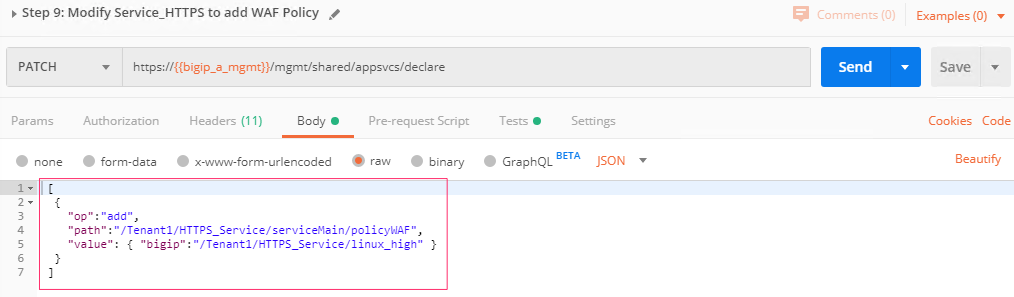
This deployment recognizes the need for Security from the beginning of the application lifecycle. It lays the groundwork for Continuous Improvement by having the policy reside in a repository. It allows us to treat resources as code leading to an Infrastructure as Code (IaC) methodology. As the policy is updated in the repository, additional automation and orchestration can be enabled to deploy the policy into the environment. The result is an ability to build rapidly, test, and iterate Layer 7 security policies and guarantee deployment into the environment.
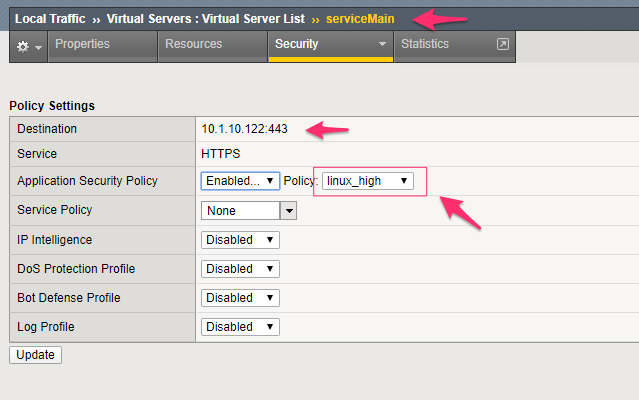
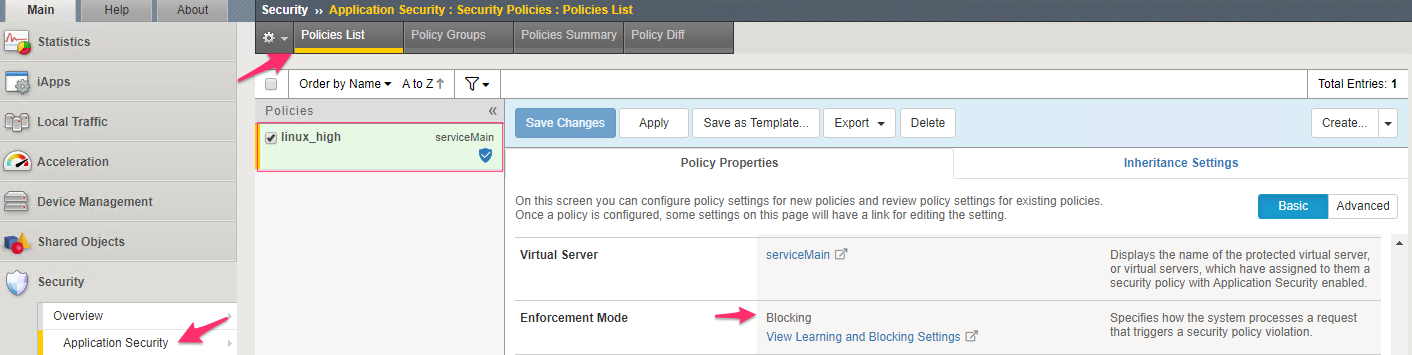
In the TMUI GUI, you will notice an ASM policy has been applied to the Virtual Server. In Application Security, we will be able to observe that the policy is applied and set to Blocking mode.
ASM Policy attached to Virtual Server:
ASM WAF Policy:
Task 8 - Remove all Deployed Services
We will now clean up the configuration of our BIG-IP by removing all the
services we have deployed in this lab. To accomplish this, we will use the POST method and simply declare an empty Tenant. AS3 will remove all the config on the device, including the associated partition.
Perform the following steps to complete this task:
Click the
Step 10: POST to Delete All Servicesrequest. Review the JSON Body and notice that we have declared an empty tenant: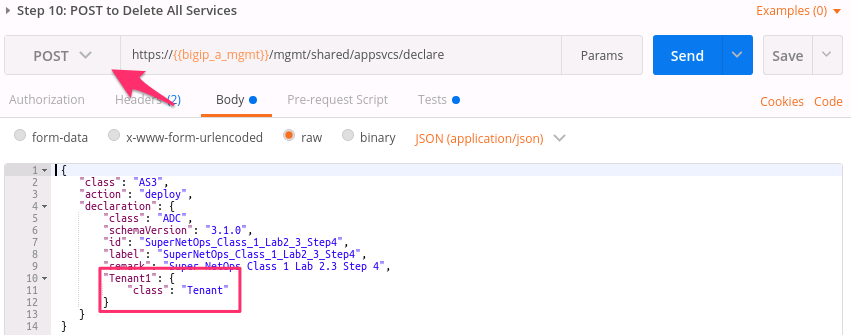
Click the Send button to remove all services and the
Tenant1partition.Send the
Step 11: Get Deployed AS3 Servicesrequest. Notice you receive a 204 No Content status code indicating no declaration was found.