Automation, Orchestration & DevOps > Class 2: A&O Toolchain 211: BIG-IP Deployments with Declarative Onboarding (DO) > Module 1: Programmability - Introduction to F5 Declarative Onboarding Concepts Source | Edit on
Lab 1 Configure Standalone BIG-IP with Declarative Onboarding
In this lab we will use the F5 VSCode extenion to install Declarative Onboarding (DO). For other installation options please see appendix A.
Before we jump into Declarative Onboarding (DO) lets take a look at the current state of one of our BIG-IP appliances.
Select the Firefox access method on the client Ubuntu server, login to BIG-IP-01 and notice that it is not licensed and nothing has been provisioned. Also notice the hostname in the upper left hand corner.
Note
URL: https://10.1.1.6Username: adminPassword: @gi1ity2022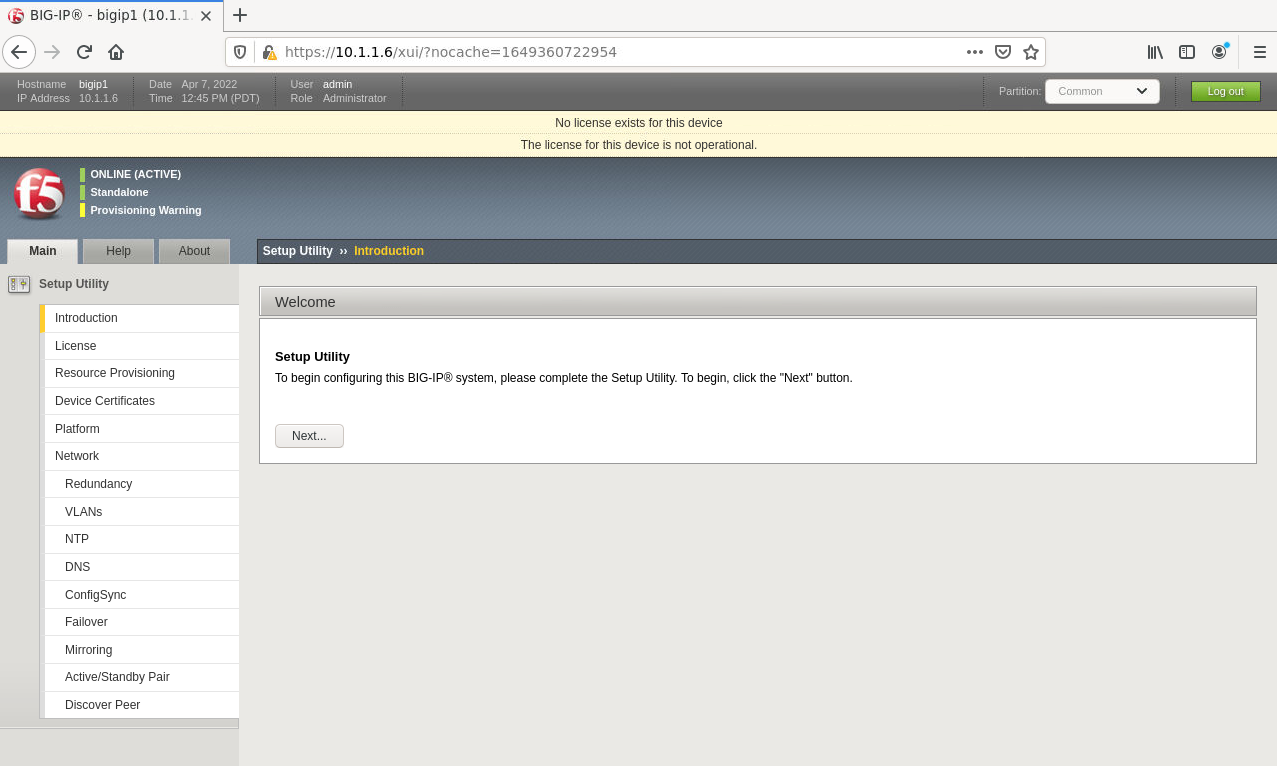
In order to install Declarative Onboarding using the VSCode extension we need to add our BIG-IP devices to VSCode.
Select the VS Code access method on the Client Ubuntu server. Within the VSCode window click on the
F5 Extension iconthen click the+in theF5 HOSTSwindow.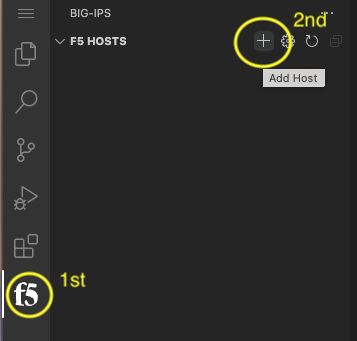
Within the add host prompt add each BIG-IP using the username@hostname format and press enter.
Note
Username: adminPassword: @gi1ity2022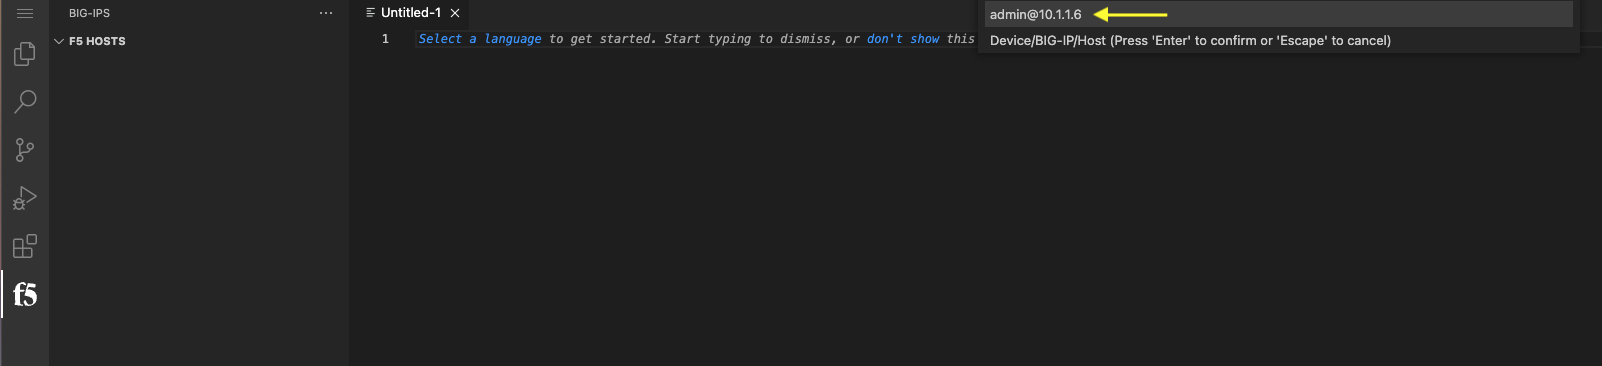
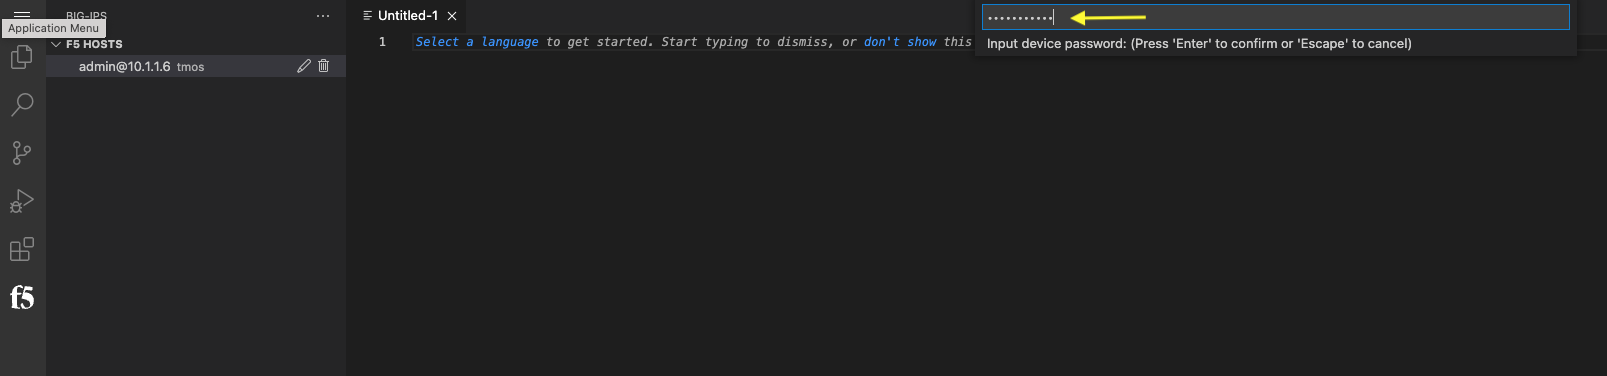
Lastly, click the device you just added enter in the password to connect to the device.
Note
If the password popup doesn't appear, refresh the VSCode's browser tab.
Note
If you enter the password incorrectly, wait for the login attempts to time out. Then right-click on the host, choose
Clear Passwordand then click on the host to re-enter the correct password.Note
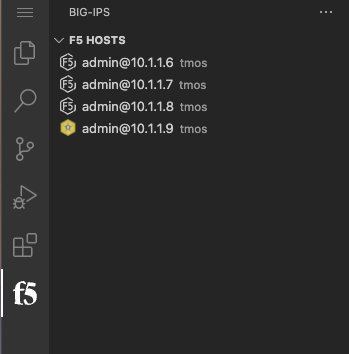
Be sure to add all three BIG-IPs and the BIG-IQ to the F5 VSCode extension. Once complete, your list of hosts in VSCode should look like this:
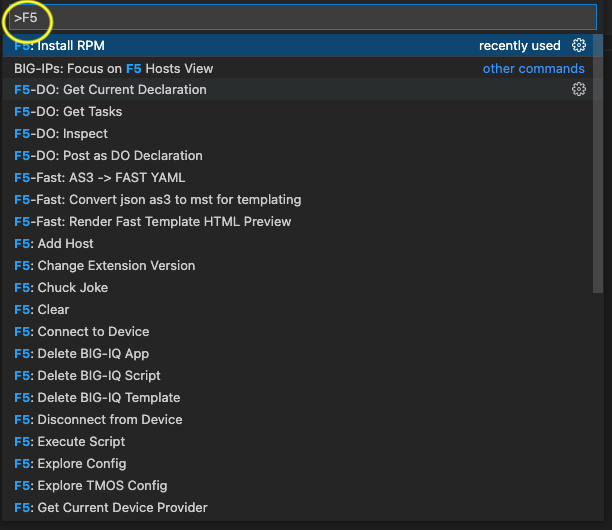
- Once the device has been added, select BIG-IP-01 (10.1.1.6).
- Press F1 your keyboard (this opens the command palette).
- Type F5 (this will filter the F5 commands)
- Select Install RPM
- Proceed to install DO on the other three BIG-IPs. BIG-IQ already has DO installed.
Note
If you are having trouble getting the command palette to function correctly on your computer, you can alternatively expand the ATC section in the BIG-IP menu located below the F5 HOSTS list. Expand DO and click on the latest version.
Note
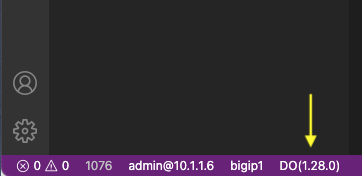
Once you have successfully installed DO on the BIG-IP device you will notice that the bottom of your VSCode window will show the version of Declarative Onboarding that is installed (as well as other ATC components that may be installed).
Attention
The BIG-IQ device already has DO installed, theres no need to attempt to install DO on the BIG-IQ device.
With the Declarative Onboarding (DO) package now installed on BIG-IP, we are ready to build out our first BIG-IP.
The desired end state of these DO declarations is to configure the objects below, built on the BIG-IPs with a single call in a single file. This declarative solution allows us to compose configurations that are reusable with templating technologies and storable in Source Control.
We will use VSCode to send our declaration to BIG-IP-01.
In our first declaration we will configure the following items on the BIG-IP:
- Licensing
- Credentials
- Provisioning
- DNS
- NTP
- Self-IPs
- Vlans
Copy the Declarative Onboarding (DO) declaration below. Use the copy button in the upper right hand corner of the declaration.
{
    "$schema": "https://raw.githubusercontent.com/F5Networks/f5-declarative-onboarding/master/src/schema/latest/base.schema.json",
    "schemaVersion": "1.9.0",
    "class": "Device",
    "async": true,
    "label": "my BIG-IP declaration for declarative onboarding",
    "Common": {
        "class": "Tenant",
        "hostname": "bigip-01.compute.internal",
        "myLicense": {
            "class": "License",
            "licenseType": "regKey",
            "regKey": "E7135-74831-26771-18995-6988851",
            "overwrite": false
        },
        "myDns": {
            "class": "DNS",
            "nameServers": [
                "10.1.255.254",
                "8.8.8.8",
                "2001:4860:4860::8844"
            ],
            "search": [
                "us-west-2-compute.internal",
                "f5.com"
            ]
        },
        "myNtp": {
            "class": "NTP",
            "servers": [
                "0.pool.ntp.org",
                "1.pool.ntp.org",
                "2.pool.ntp.org"
            ],
            "timezone": "UTC"
        },
        "anotheradmin": {
            "class": "User",
            "userType": "regular",
            "password": "Fu11Pr0%y",
            "shell": "bash"
        },
        "guestUser": {
            "class": "User",
            "userType": "regular",
            "password": "Fu11Pr0%y",
            "partitionAccess": {
                "Common": {
                    "role": "guest"
                }
            }
        },
        "anotherUser": {
            "class": "User",
            "userType": "regular",
            "password": "Fu11Pr0%y",
            "shell": "none",
            "partitionAccess": {
                "all-partitions": {
                    "role": "guest"
                }
            }
        },
        "myProvisioning": {
            "class": "Provision",
            "ltm": "nominal",
            "gtm": "minimum"
        },
        "internal": {
            "class": "VLAN",
            "tag": 4093,
            "mtu": 1500,
            "interfaces": [
                {
                    "name": "1.1",
                    "tagged": false
                }
            ],
            "cmpHash": "dst-ip"
        },
        "internal-self": {
            "class": "SelfIp",
            "address": "10.1.10.100/24",
            "vlan": "internal",
            "allowService": "default",
            "trafficGroup": "traffic-group-local-only"
        },
        "internal-floating": {
            "class": "SelfIp",
            "address": "10.1.10.120/24",
            "vlan": "internal",
            "allowService": "default",
            "trafficGroup": "traffic-group-1"
        },
        "external": {
            "class": "VLAN",
            "tag": 4094,
            "mtu": 1500,
            "interfaces": [
                {
                    "name": "1.2",
                    "tagged": false
                }
            ],
            "cmpHash": "src-ip"
        },
        "external-self": {
            "class": "SelfIp",
            "address": "10.1.20.100/24",
            "vlan": "external",
            "allowService": "none",
            "trafficGroup": "traffic-group-local-only"
        },
        "external-floating": {
            "class": "SelfIp",
            "address": "10.1.20.120/24",
            "vlan": "external",
            "allowService": "default",
            "trafficGroup": "traffic-group-1"
        },
        "default": {
            "class": "Route",
            "gw": "10.1.10.1",
            "network": "default",
            "mtu": 1500
        },
        "configsync": {
            "class": "ConfigSync",
            "configsyncIp": "/Common/internal-self/address"
        },
        "failoverAddress": {
            "class": "FailoverUnicast",
            "address": "/Common/internal-self/address"
        },
        "failoverGroup": {
            "class": "DeviceGroup",
            "type": "sync-failover",
            "members": [
                "bigip-01.compute.internal",
                "bigip-02.compute.internal"
            ],
            "owner": "/Common/failoverGroup/members/0",
            "autoSync": true,
            "saveOnAutoSync": false,
            "networkFailover": true,
            "fullLoadOnSync": false,
            "asmSync": false
        },
        "trust": {
            "class": "DeviceTrust",
            "localUsername": "admin",
            "localPassword": "@gi1ity2021",
            "remoteHost": "/Common/failoverGroup/members/0",
            "remoteUsername": "admin",
            "remotePassword": "@gi1ity2021"
        }
    }
}
Note
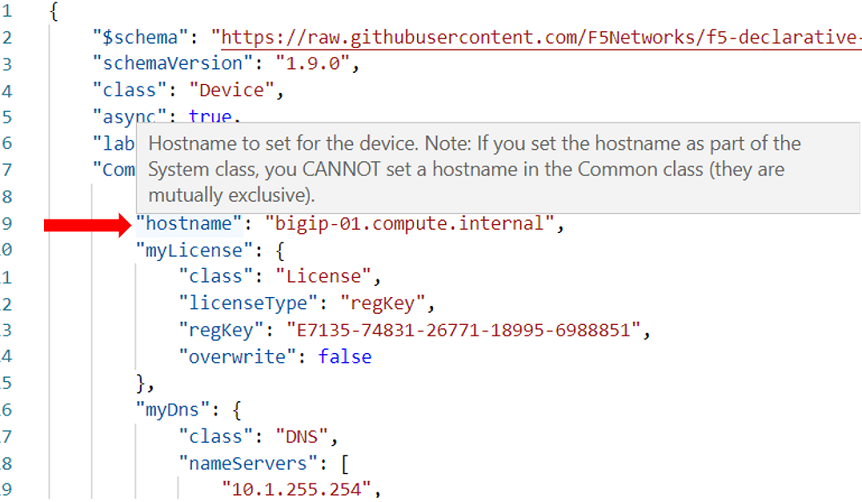
F5 publishes a schema for each of the Automation Toolchain items. This published schema can be used in Visual Studio Code allowing you to see context and find errors within your different declarations. The schema reference is added at the top of your declaration, and requires vscode to know the language is JSON.
We wiil now use Visual Studio Code to validate our declaraion.
Open Visual Studio Code on and open a New File. To open a new file click the hamburger icon, hover over
Fileand selectNew File.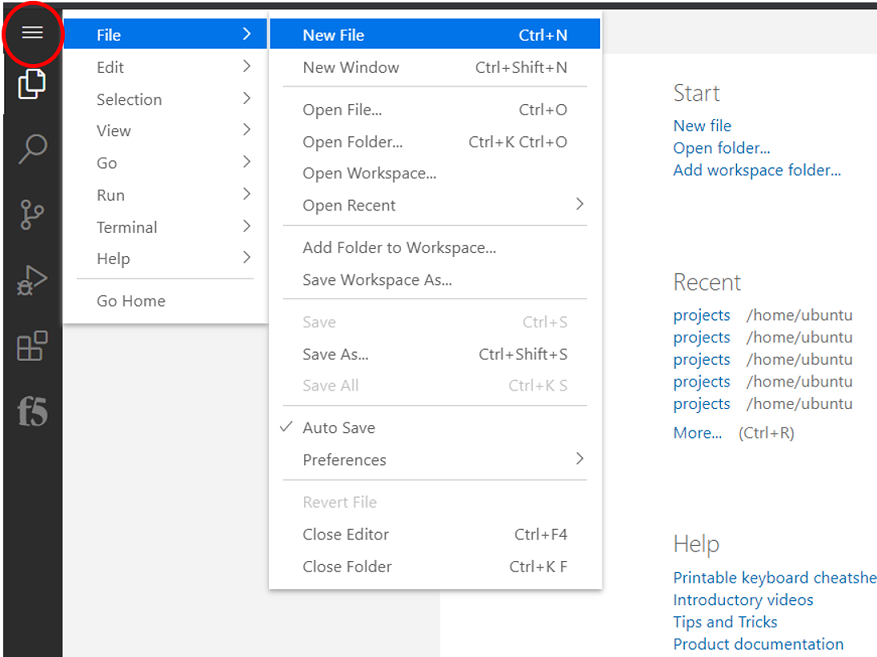
Attention
Once you have a new file open paste all of the DO declaration contents. Additionally, the language setting in VSCode must be set to JSON. In the bottom right on the VSCode screen, click
plain text. Then in the language mode screen typeJSON.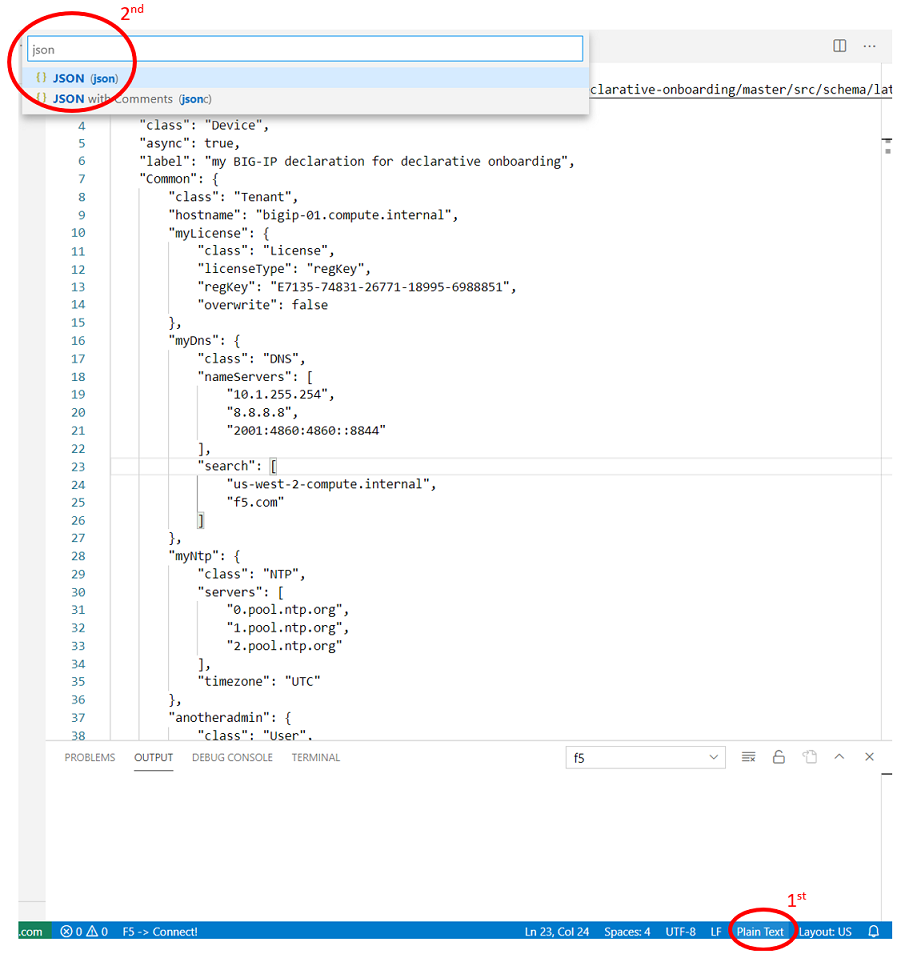
Once the declaration and language are set, you can highlight over sections of the code to see context and errors
Note
Now that you've added the schema validation to your JSON declaration you can try misspelling some of the declaration objects to see errors, remember to revert your changes.
We are now ready to send our declaration to BIG-IP-01
Select the admin@10.1.1.6 host from the F5 HOSTS list. Then, right click in the file editor of VSCode and select
Post DO Declaration.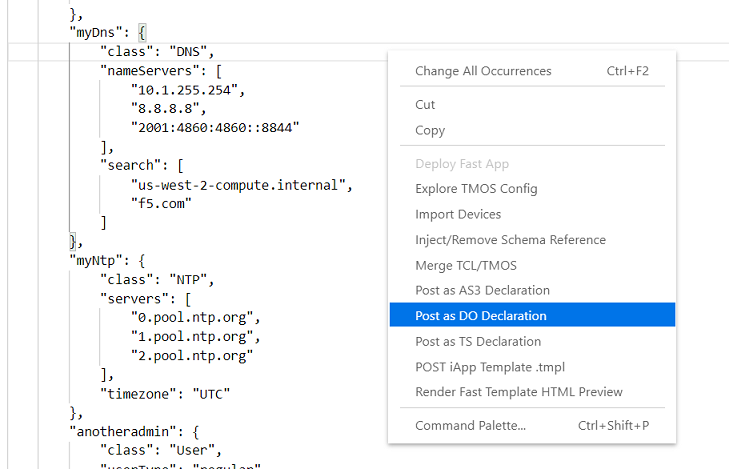
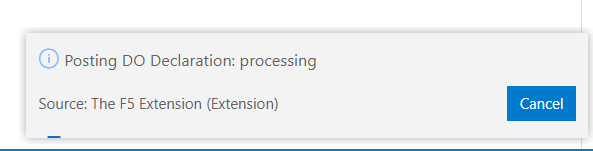
Note
In the bottom right hand corner of VSCode you should see that the DO declaration is processing. If this does not appear, click on the admin@10.1.1.6 host again to reconnect, and try posting the declaration again.
After a few moments you will begin seeing output in the bottom VSCode window that shows that the
declaration is running. You will see a periodic get request being sent to admin@10.1.1.6 to poll for the completion of the processing.

When the BIG-IP is finished processing the declaration, another window will open in VSCode showing the result and the complete declaration. You should see a 200 response code, a status of OK and a message of success.

Once the BIG-IP has finished processing the declaration, login to BIG-IP-01 and notice the host name has changed and the device is now licensed.
Note
URL: https://10.1.1.6Username: adminPassword @gi1ity2022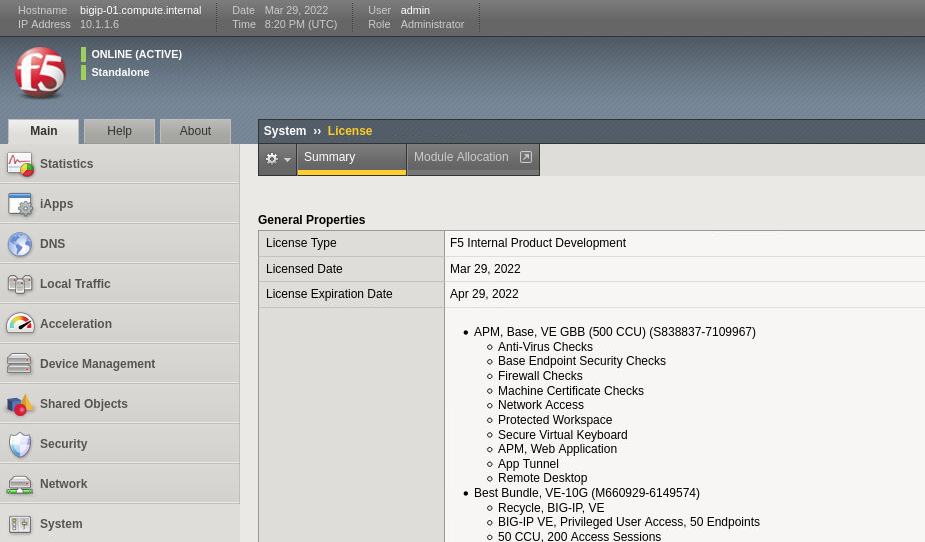
Note
You may need to browse to System->License to see the screen shot above, and your Licensed Date may differ.
Futhermore, take a look at the following System and Network settings on BIG-IP-01 to see everything that was configured with Declarative Onboarding (DO):
- Credentials
- Provisioning
- DNS
- NTP
- Self-IPs
- Vlans