F5 BIG-IQ Centralized Management Lab > BIG-IQ All Labs > Class 1: BIG-IQ Application Management and AS3 > Module 3: BIG-IQ Application Templates & Deployment with AS3 using the UI Source | Edit on
Lab 3.5: AS3 Switch Template: add a Firewall Policy to an existing Application Service
Note
Estimated time to complete: 15 minutes
Lab environment access
If you have not yet visited the page Getting Started, please do so.
Workflow
- Paula creates her application service using the template given by david.
- Larry create the AFM policy (Advanced Firewall Manager).
- David clone the template used by Paula and add firewall policy to it.
- David assigns the new AS3 template to Paula.
- Paula use the switch template functionality to move her app service to the new template.
- Larry looks at the Firewall dashboard available on BIG-IQ.
Prerequisites
1. First make sure your device has AFM module discovered and imported for SEA-vBIGIP01.termmarc.com under Devices > BIG-IP DEVICES.
2. Check if the AFM Statistics Collection Statistics Collection is turned on for SEA-vBIGIP01.termmarc.com under Devices > BIG-IP DEVICES.
3. Check if the Network Security service is Active under System > BIG-IQ DATA COLLECTION > BIG-IQ Data Collection Devices.
AS3 application service deployment (Paula)
Follow Lab 3.2 to deploy the application service as Paula.
AFM Policy creation (Larry)
Let’s first create and deploy the AFM policy in BIG-IQ to SEA-vBIGIP01.termmarc.com.
- Login to BIG-IQ as larry .
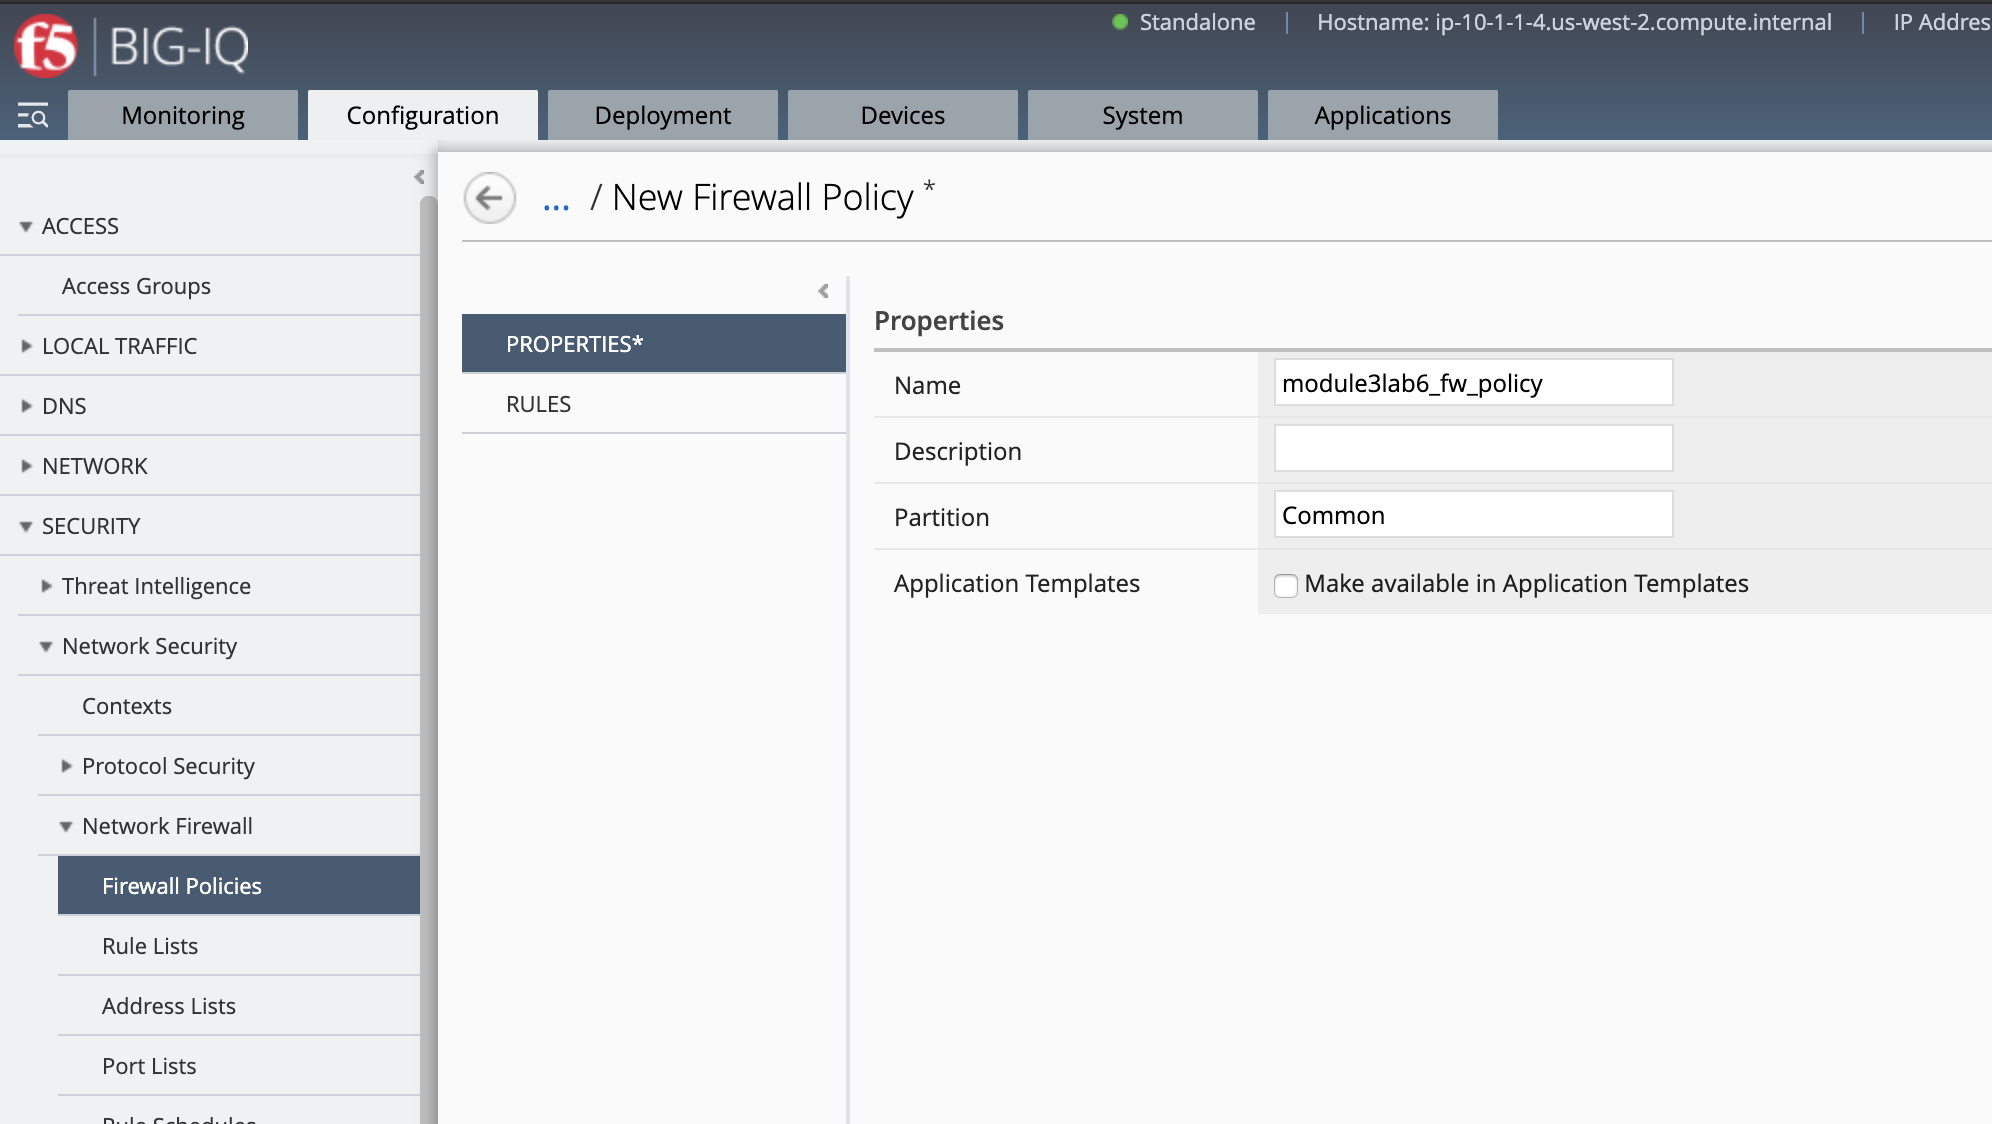
- Go to Configuration > Security > Network Security > Network Firewall > Firewall Policies and
create a new policy called
module3lab6_fw_policy.
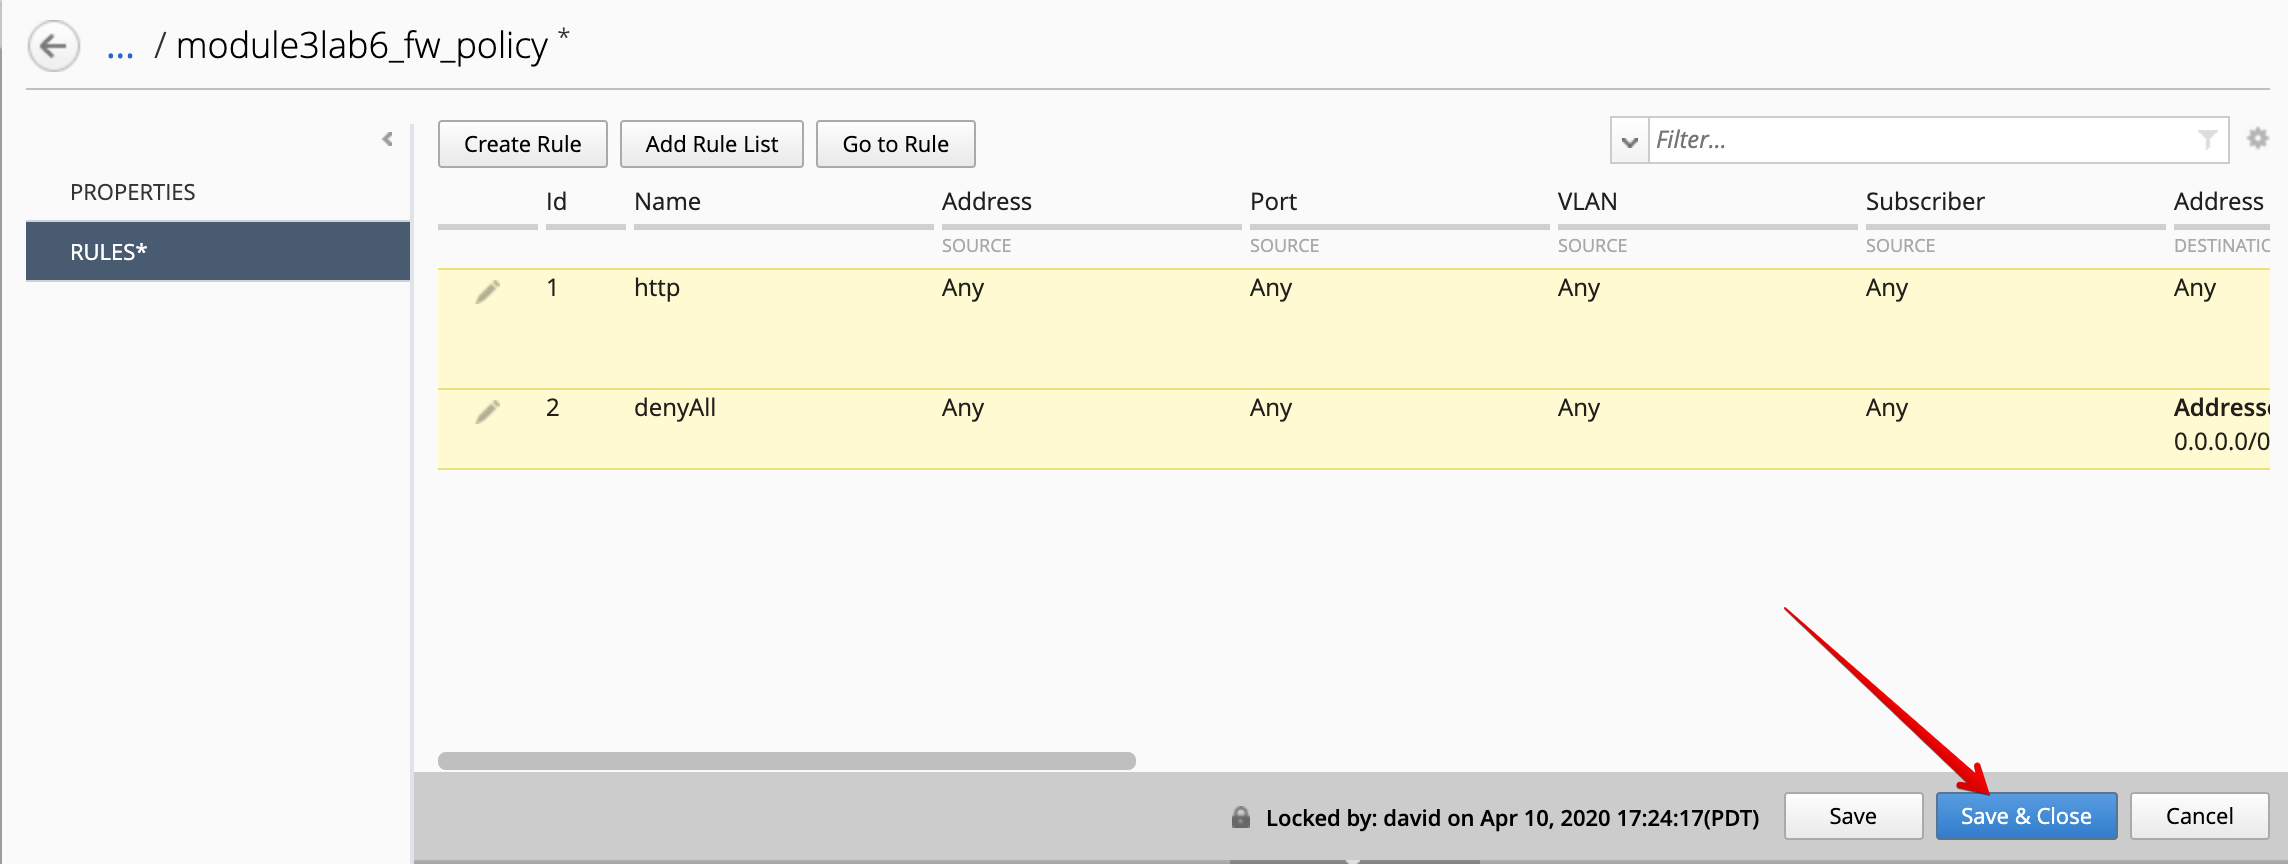
Under Rules, create the 1st rule allowing traffic to destination port 443 and 80, protocol TCP, action accept.
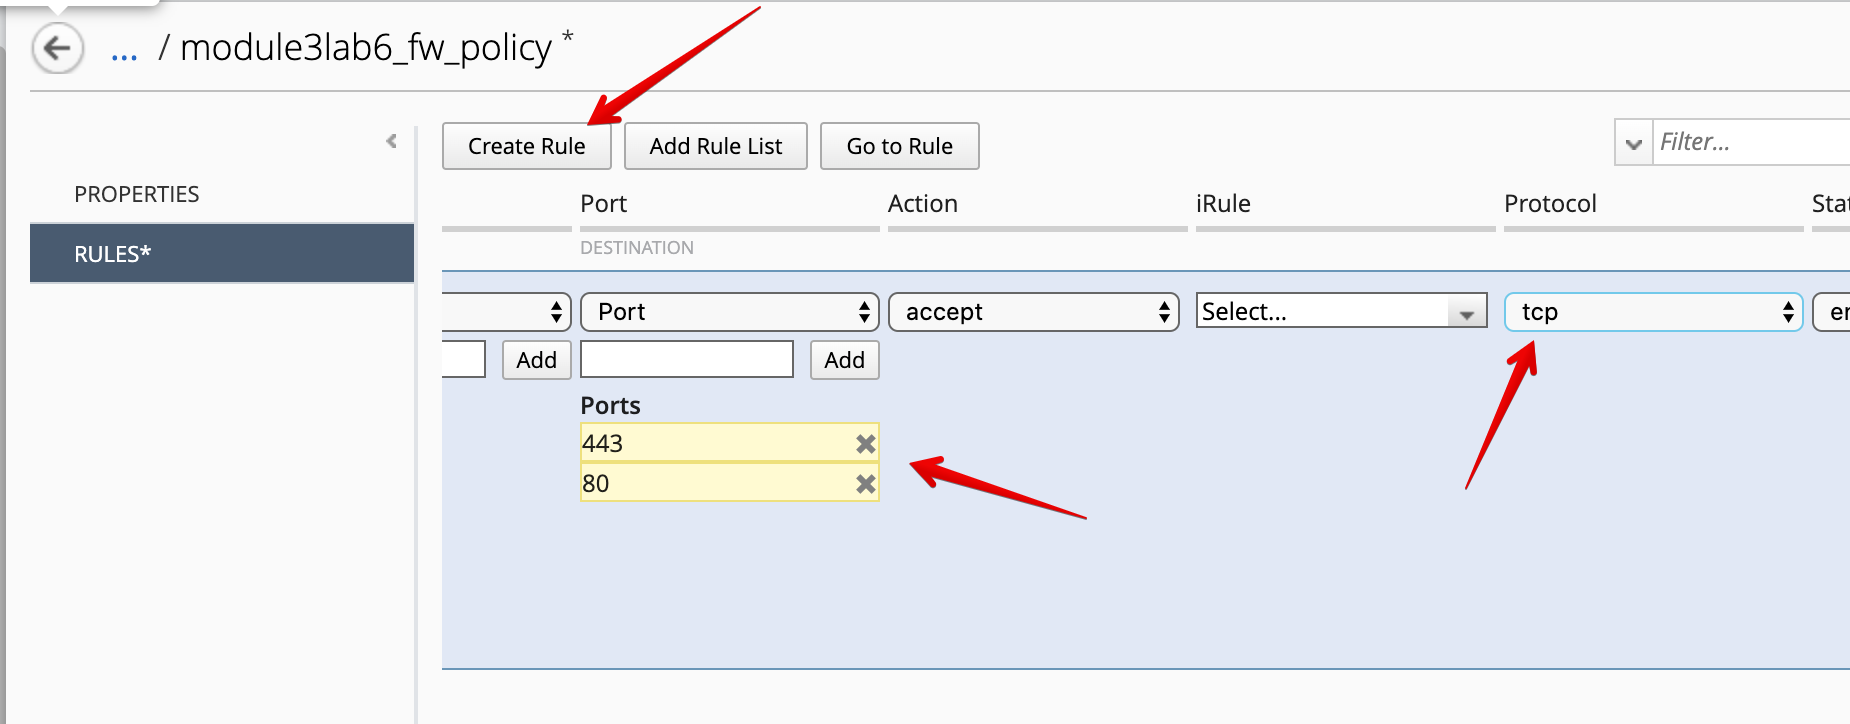
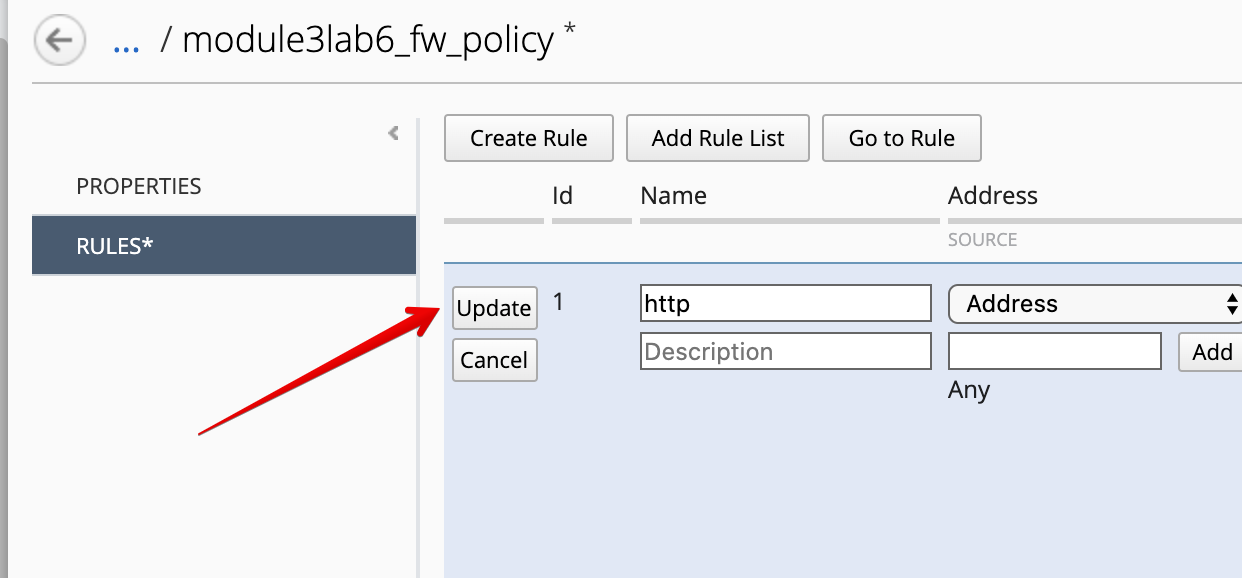
Name the Rule (here we call it http) and click on Update to save it.
Create the 2nd rule rejecting all traffic, set destination address to 0.0.0.0/0, action reject.
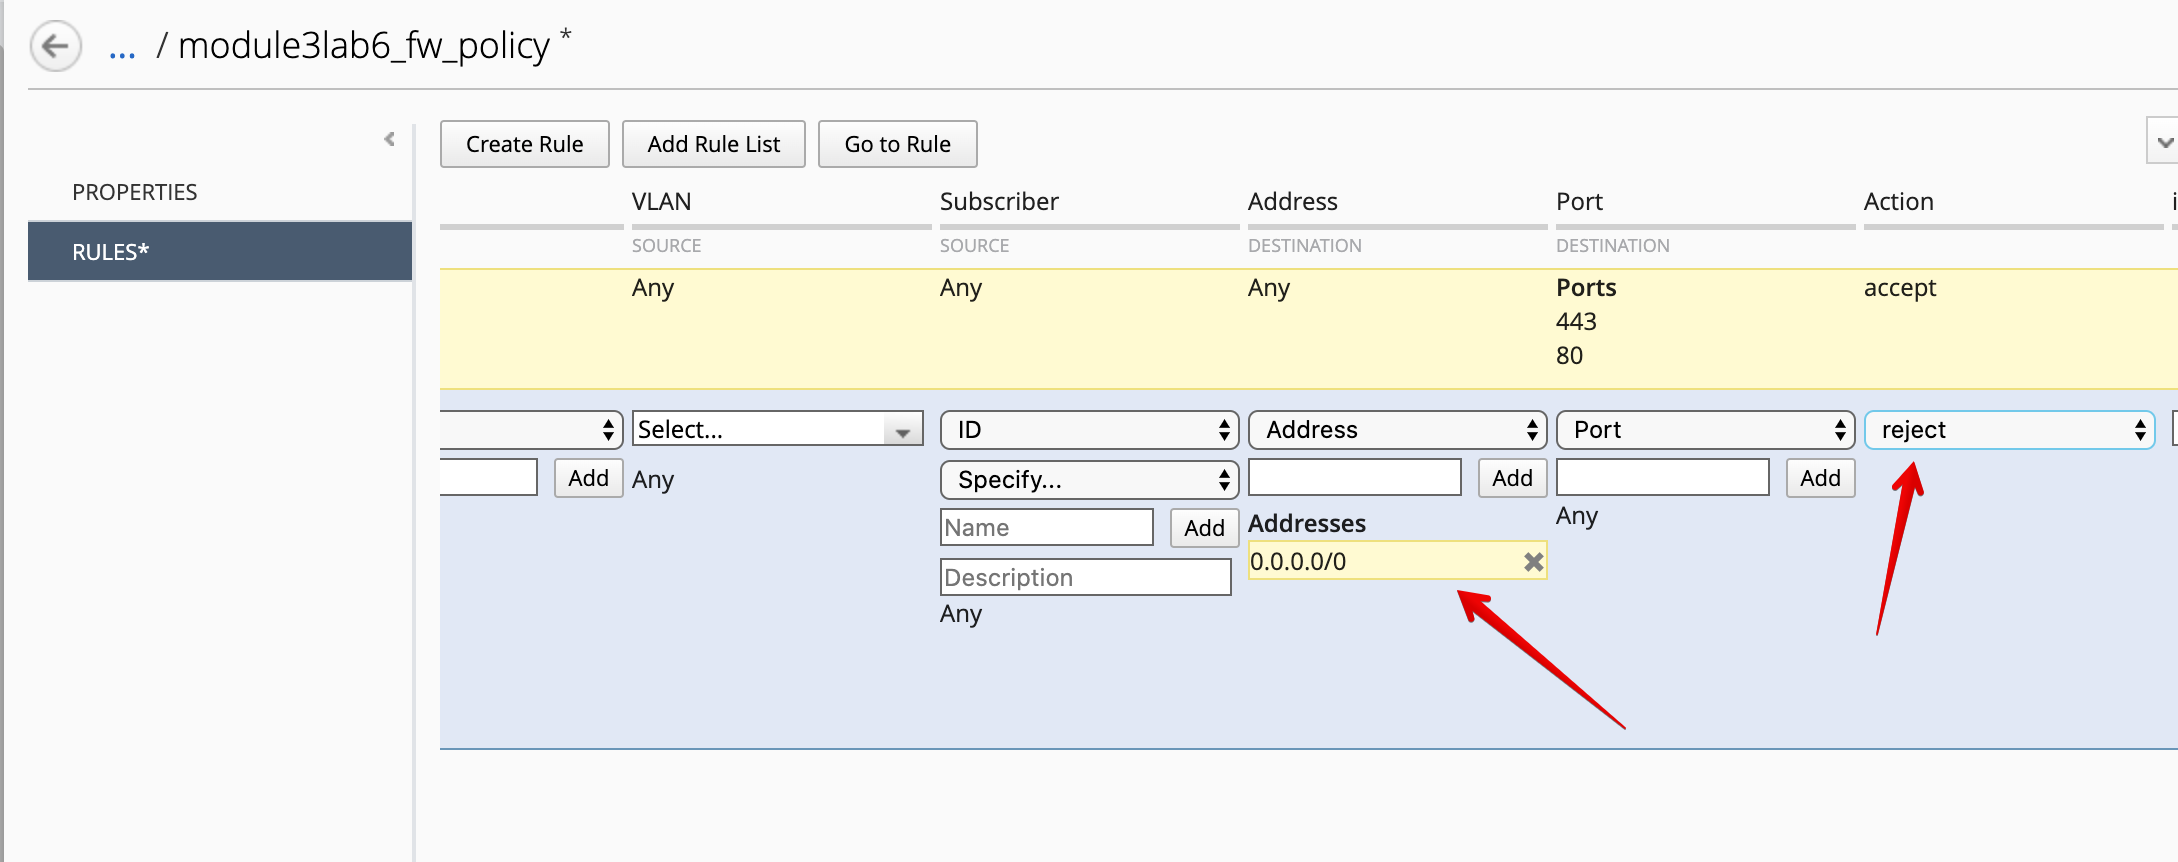
Click on Save & Close.
- Under Pinning Policies, click on the SEA-vBIGIP01.termmarc.com device.
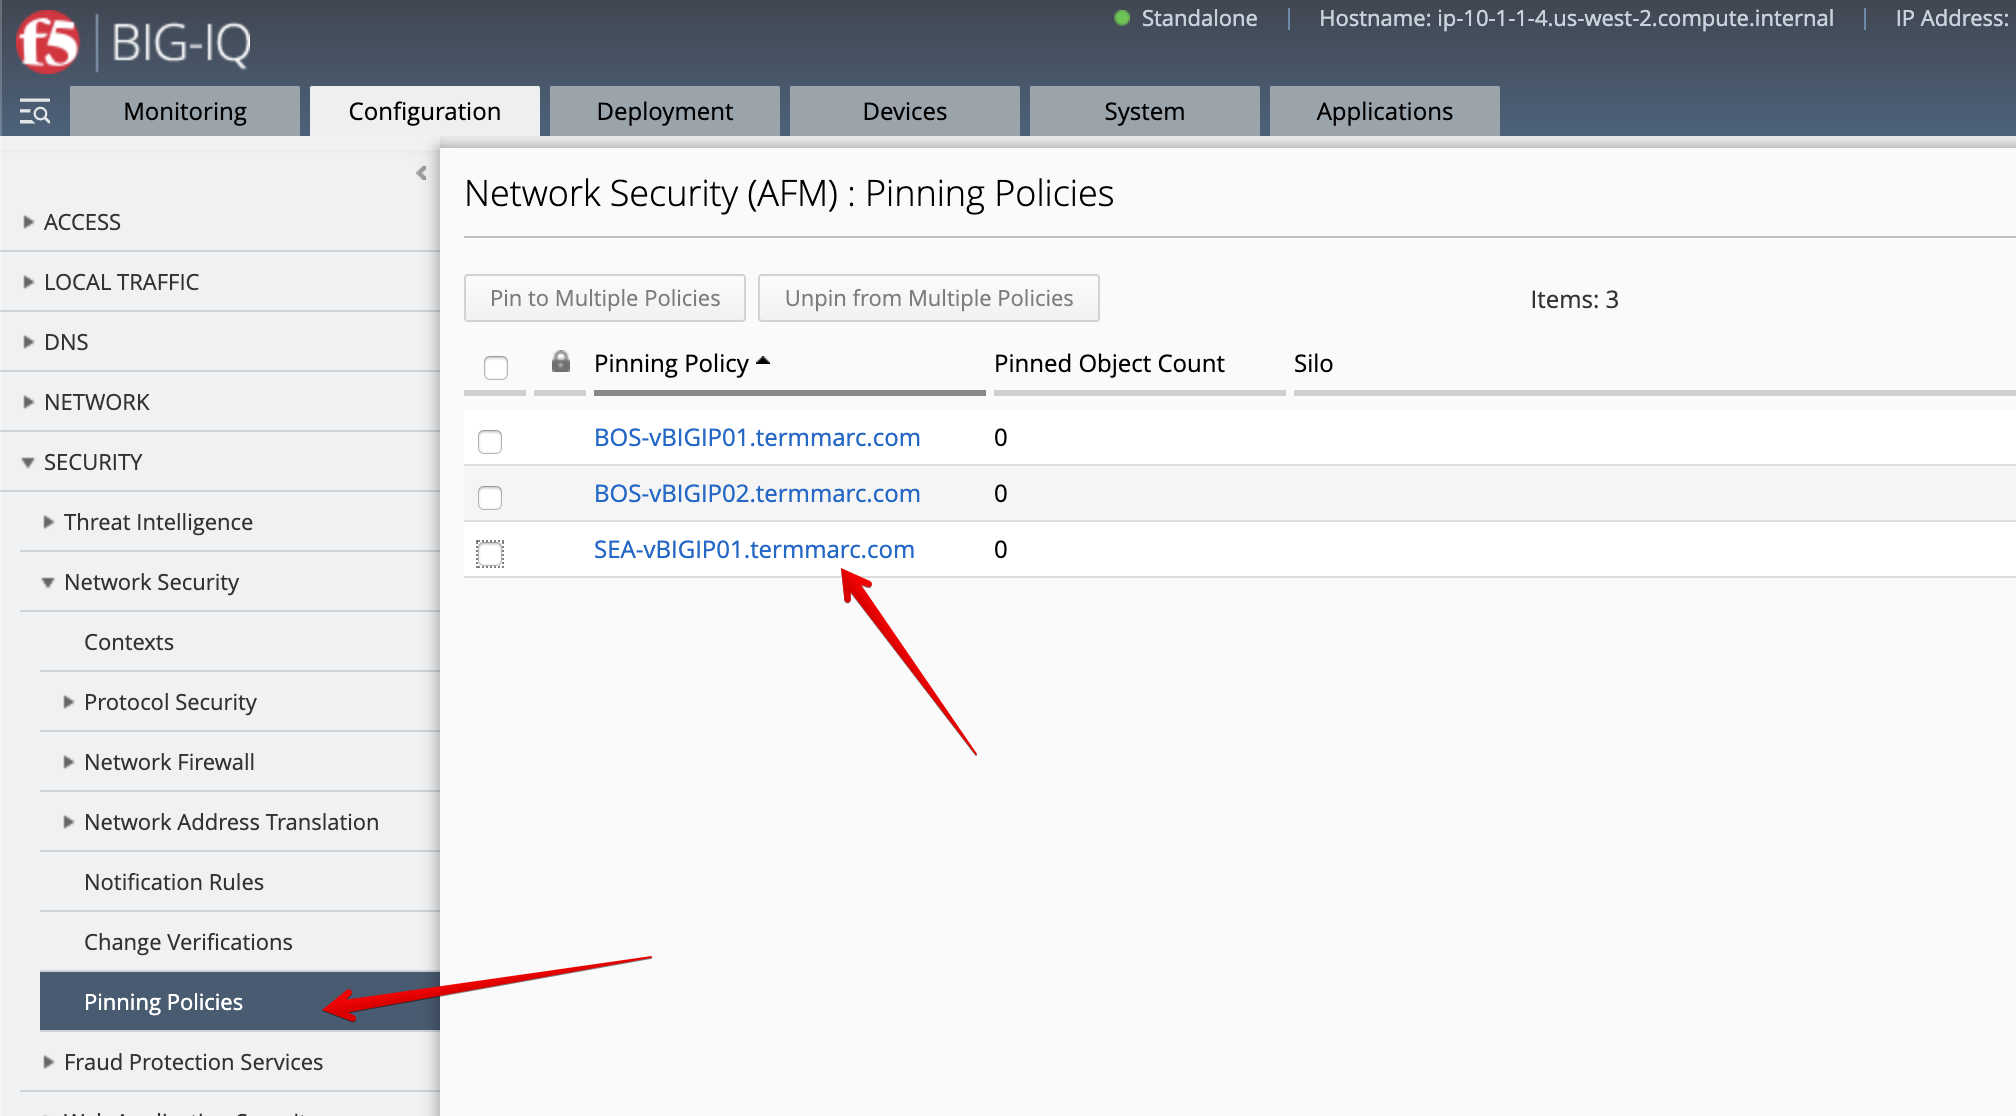
Select the /Common/module3lab6_fw_policy and add it to the device, then click on Save & Close.

- Select the
/Common/module3lab6_fw_policy, click on Deploy.
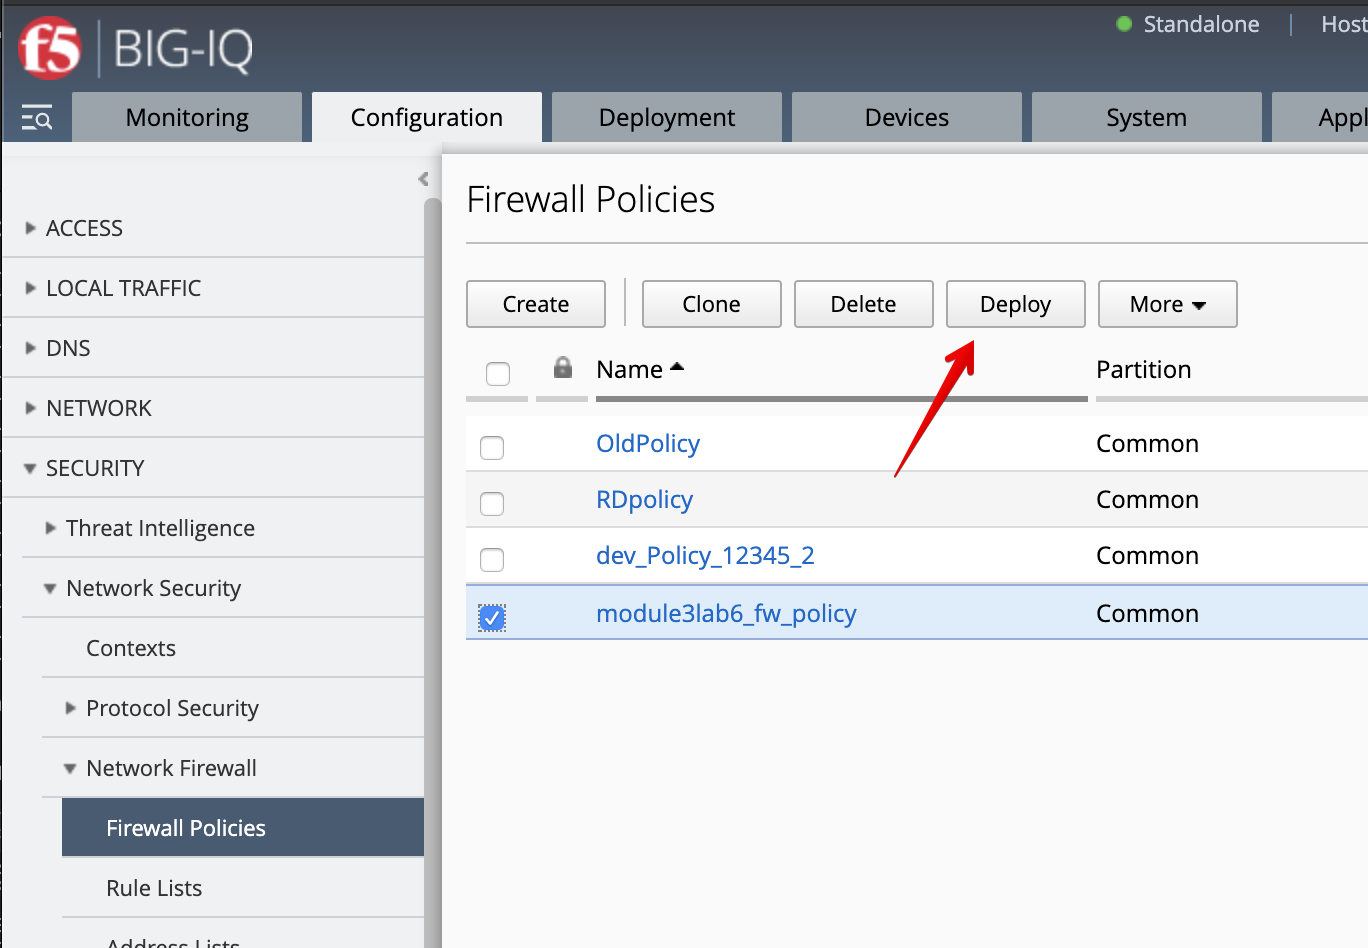
The deployment window opens. Type a name, select Deploy immediately for the Method.
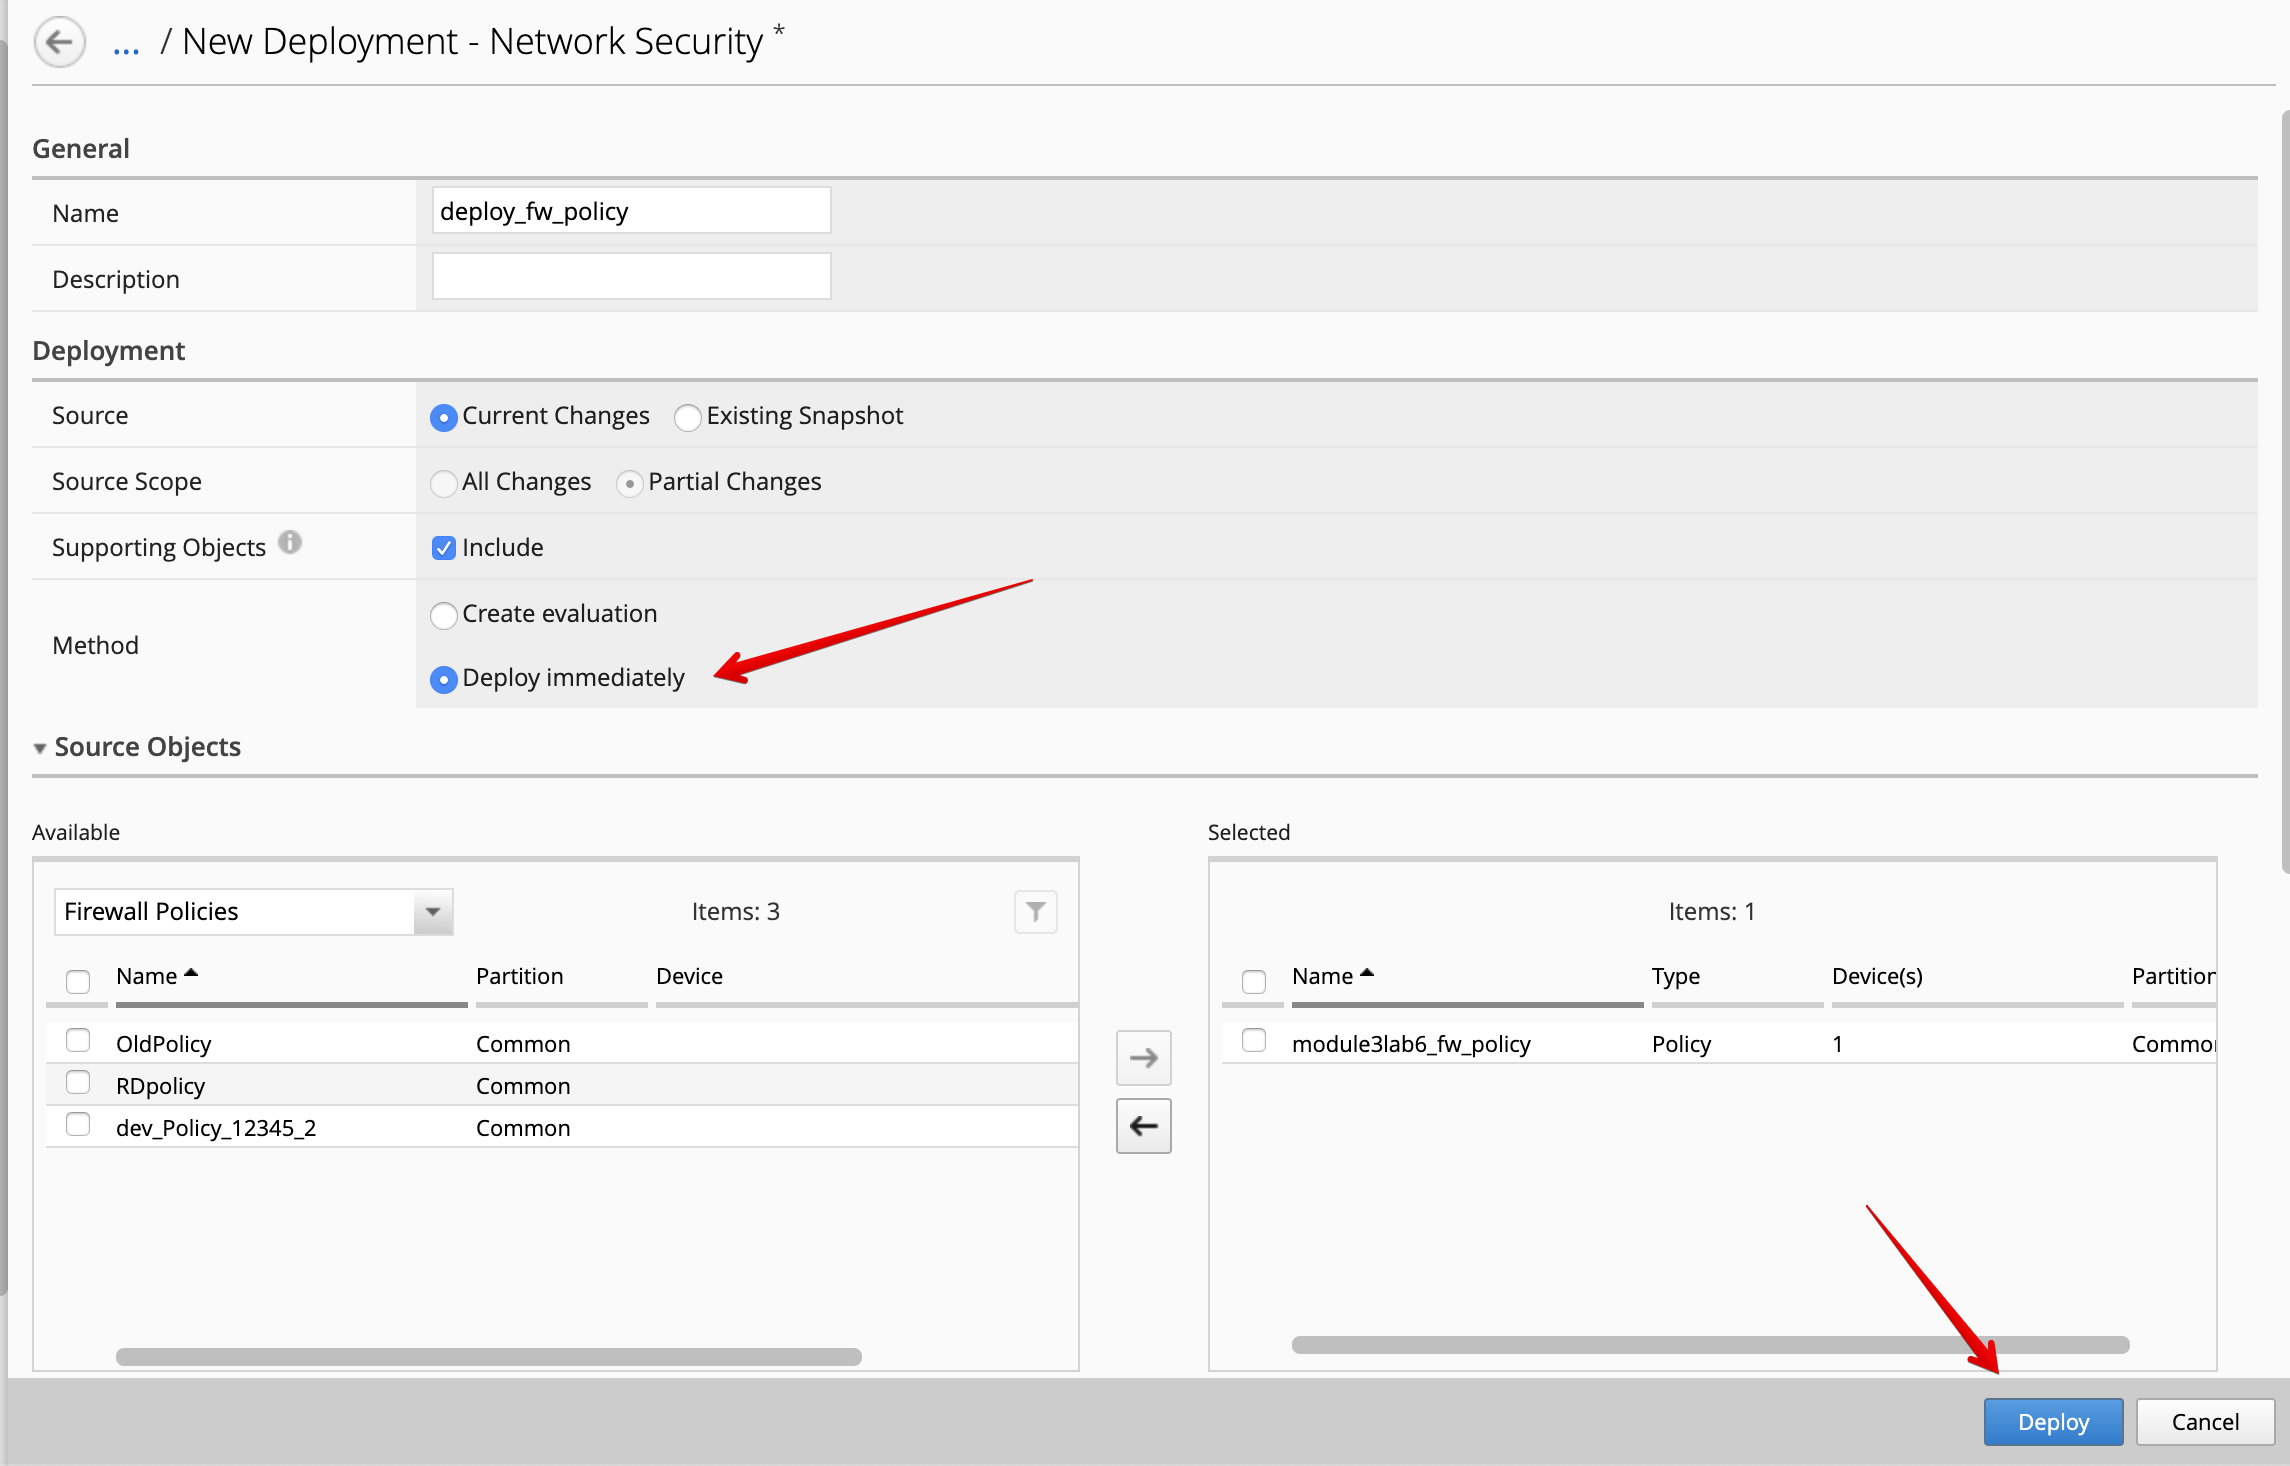
Under the Target Device(s) section, click on Find Relevant Devices
and select the SEA-vBIGIP01.termmarc.com. Then, click on Deploy.
AS3 clone template to add firewall rules (David)
- Login as david and Go to the Applications tab > Applications Templates and
select
AS3-F5-HTTPS-offload-lb-existing-cert-template-big-iq-default-<version>and press Clone. - Give the cloned template a name:
AS3-LAB-HTTPS-custom-firewall-templateand click Clone. - Open the template you just cloned and select the
Service_HTTPSAS3 class. Set propertyFirewall policy (enforced)to/Common/module3lab6_fw_policyand change it to Override.
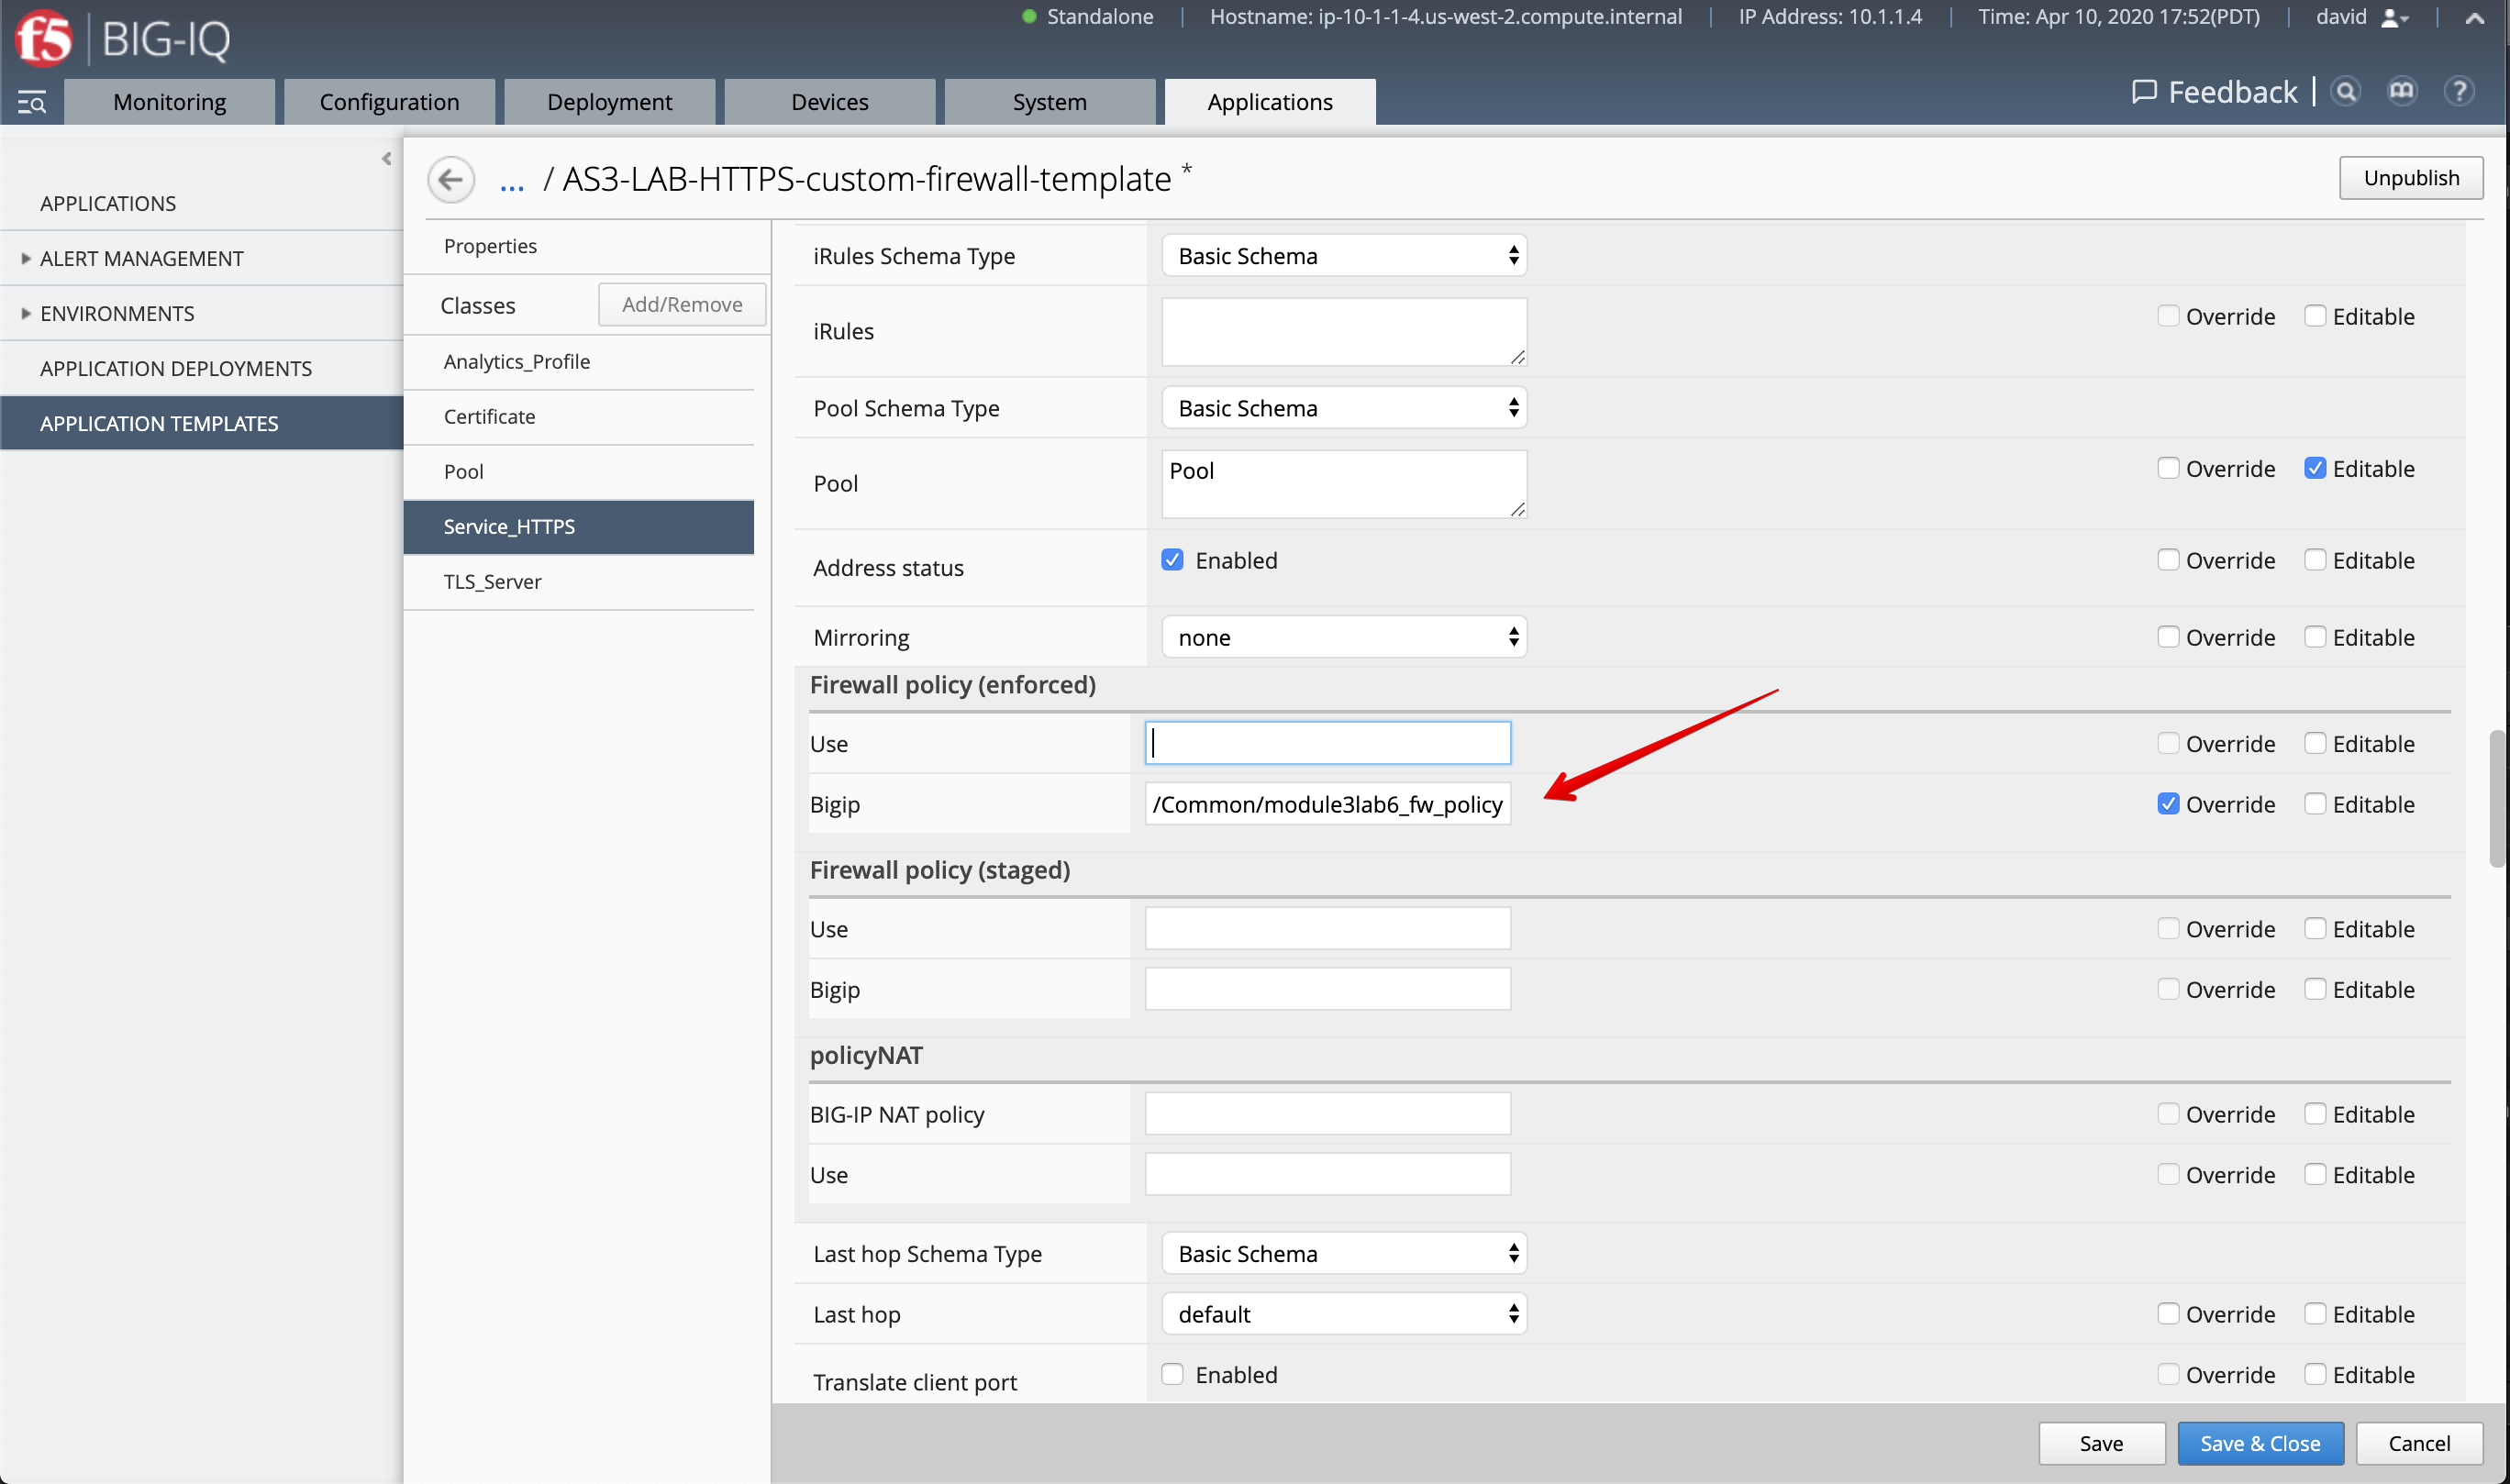
Note
The firewall policy will be hidden from the application owner, Paula, as we set the policy with option Override.
- Click Save & Close.
- Select
AS3-LAB-HTTPS-WAF-custom-templateand click Publish. - Before paula can use this AS3 template, david needs to update her role.
Use the previous steps in Lab 3.2 to add AS3 Template
AS3-LAB-HTTPS-custom-firewall-templatetoApplication Creator VMwarecustom role assigned to paula.
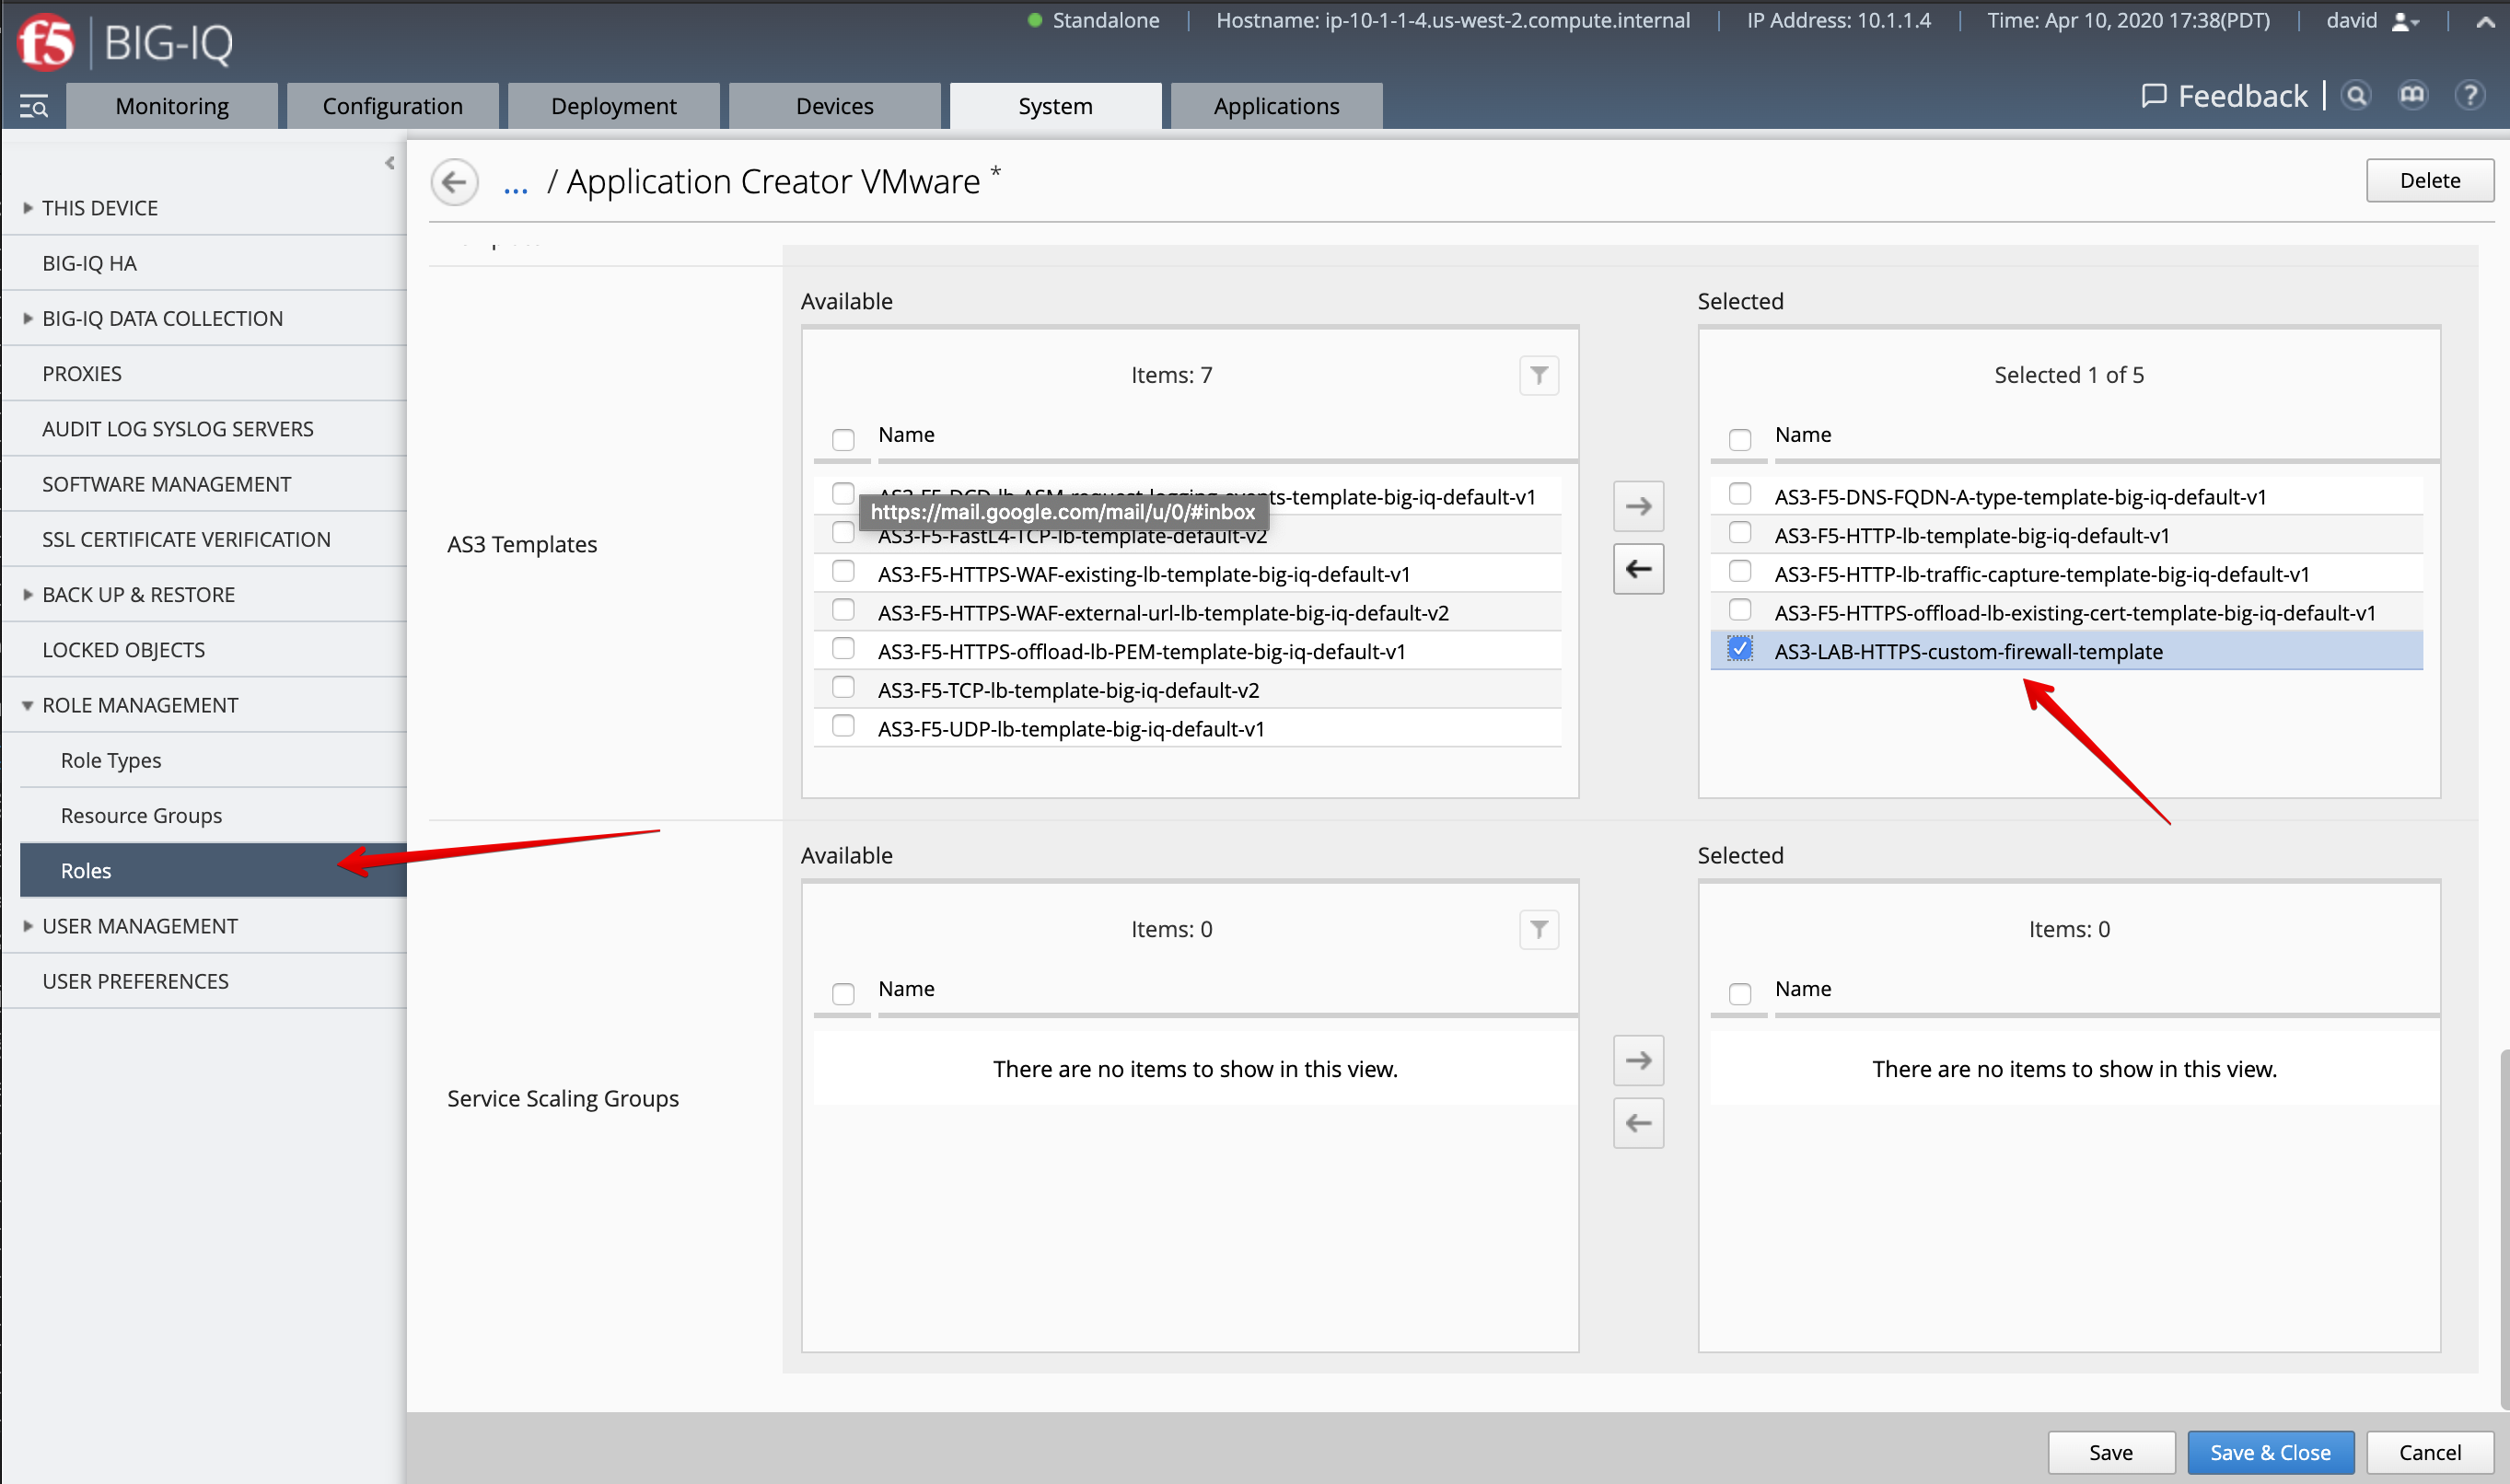
Warning
Manually select and remove the undefined [API only] entries from the Selected column if needed.
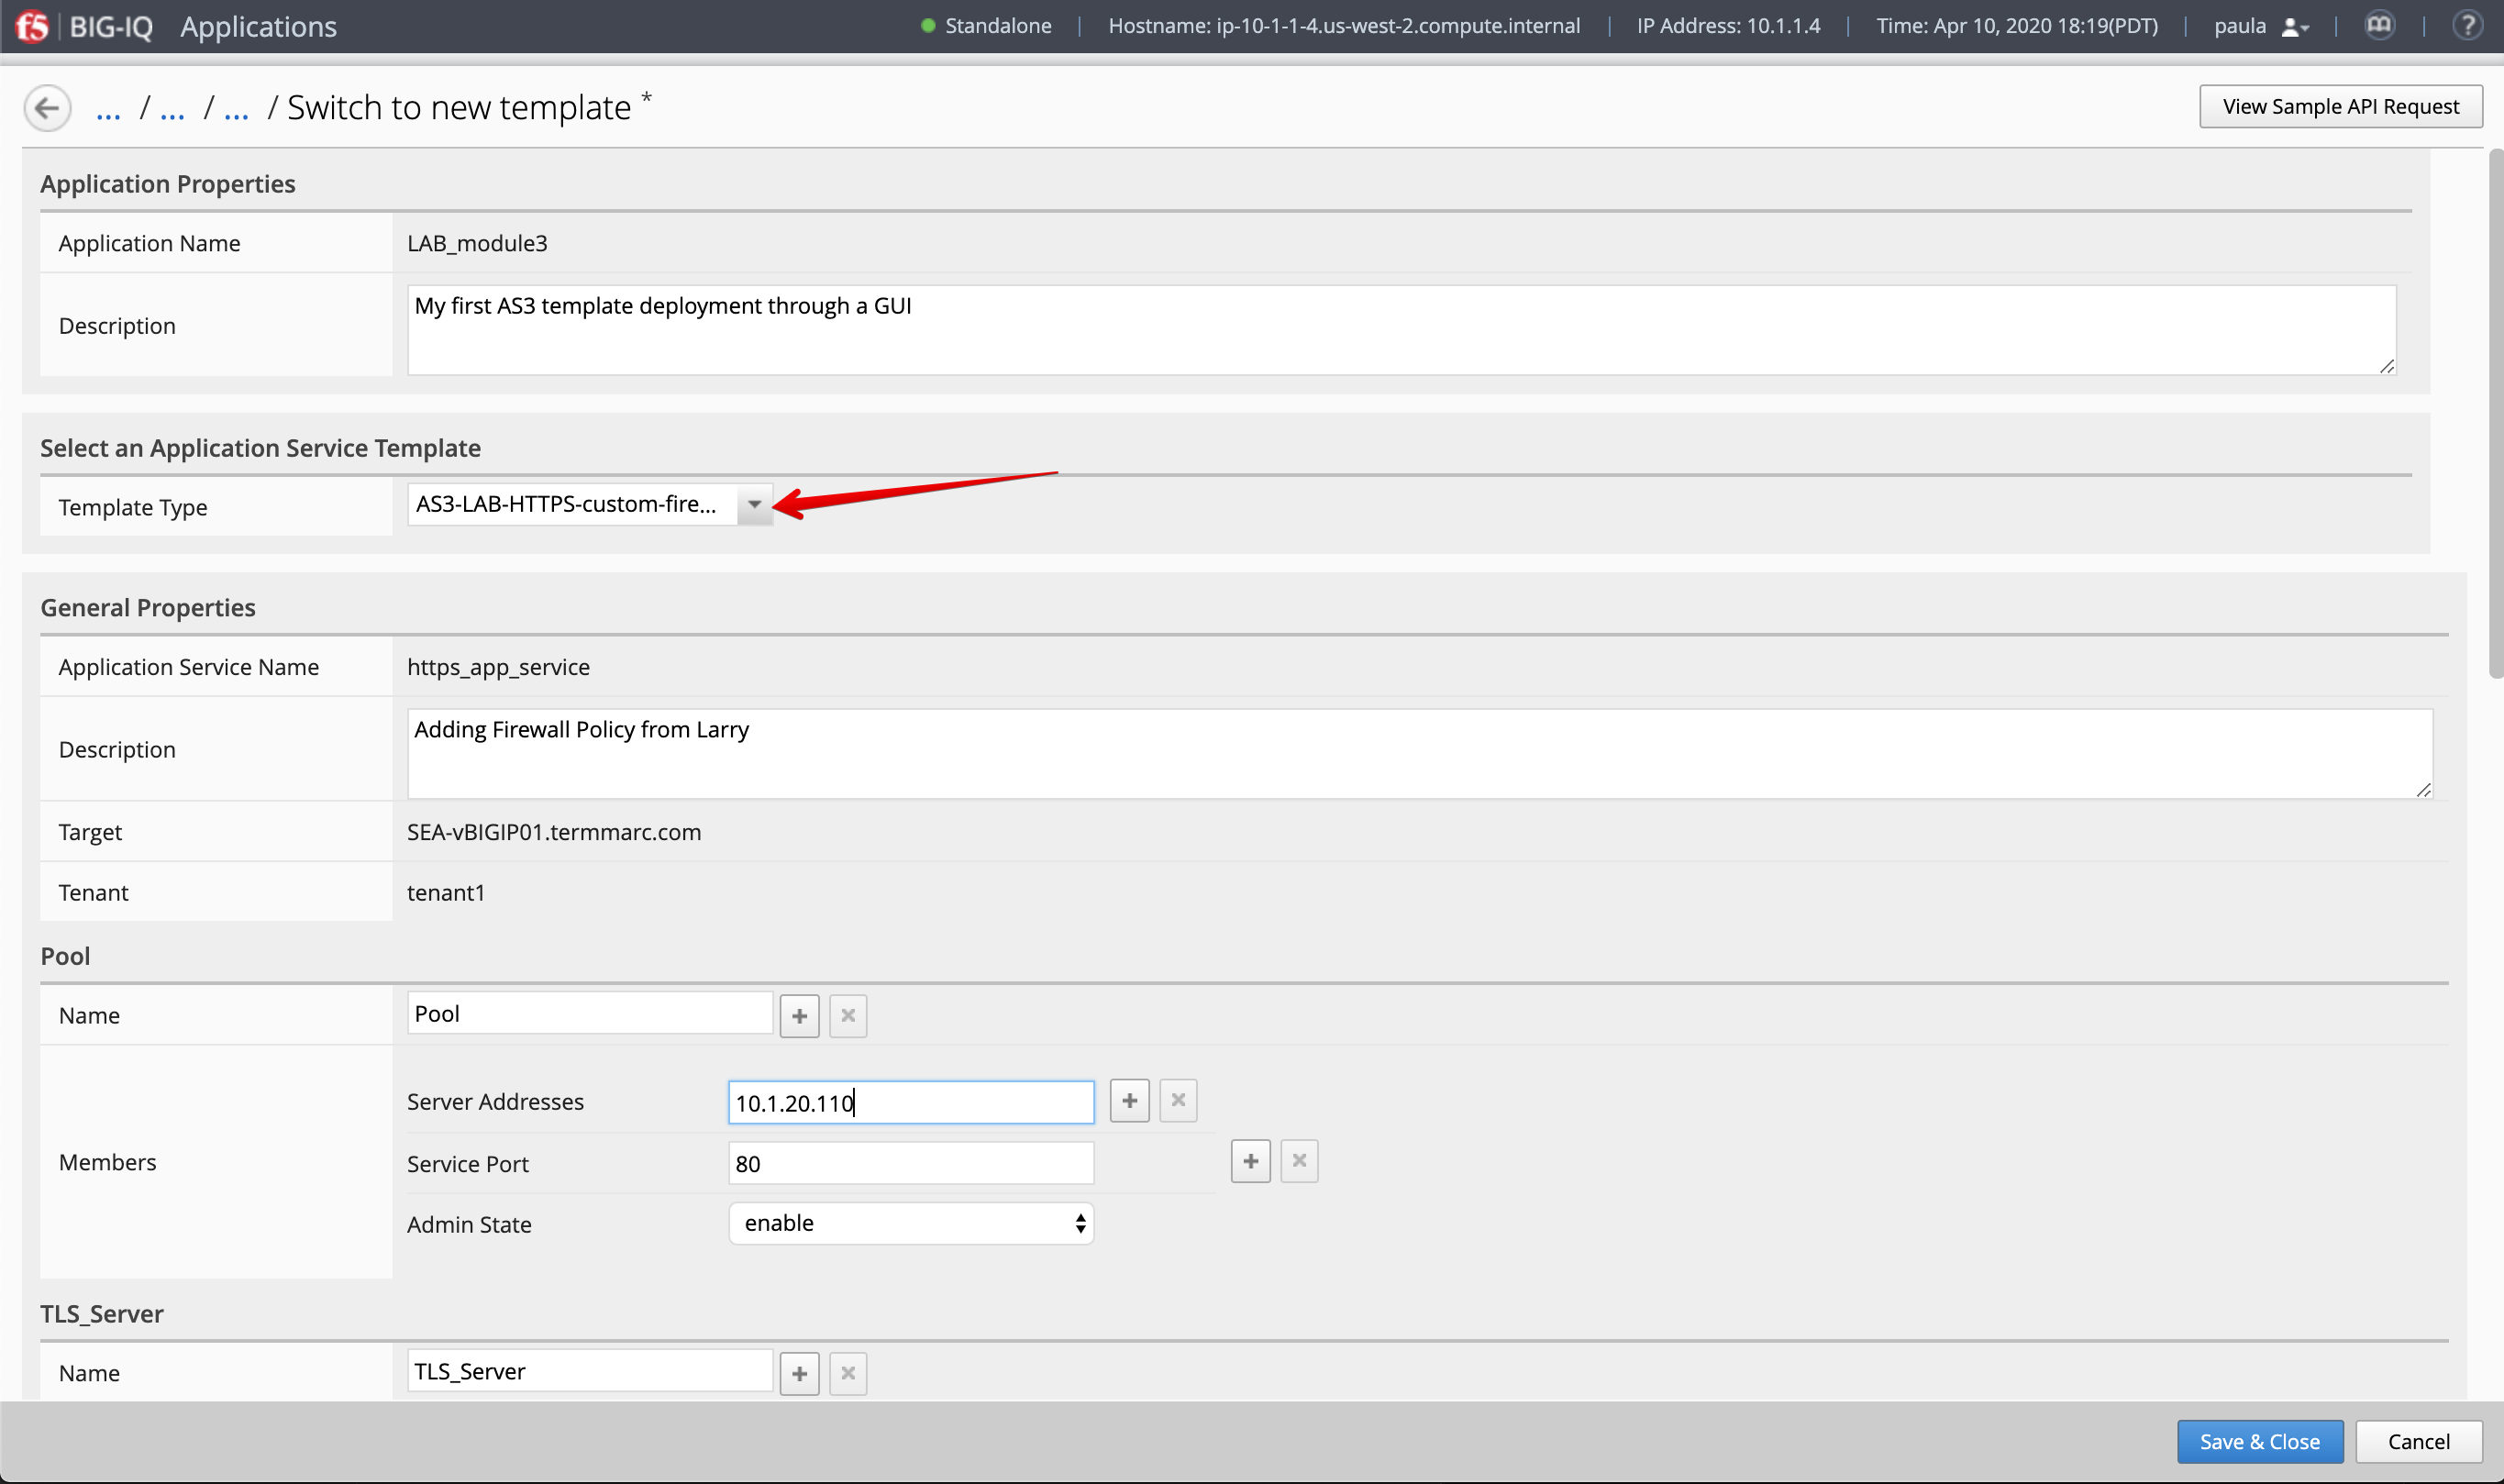
AS3 Application Service Update using Switch Template (Paula)
Now AFM policy is available on BIG-IP and new AS3 HTTPS firewall template available on BIG-IQ, let’s use the switch template feature to add the firewall policy to Paula’s existing application service.
- Login as paula and select previously created
https_app_serviceApplication Service underLAB_module3(created in Lab 3.2).
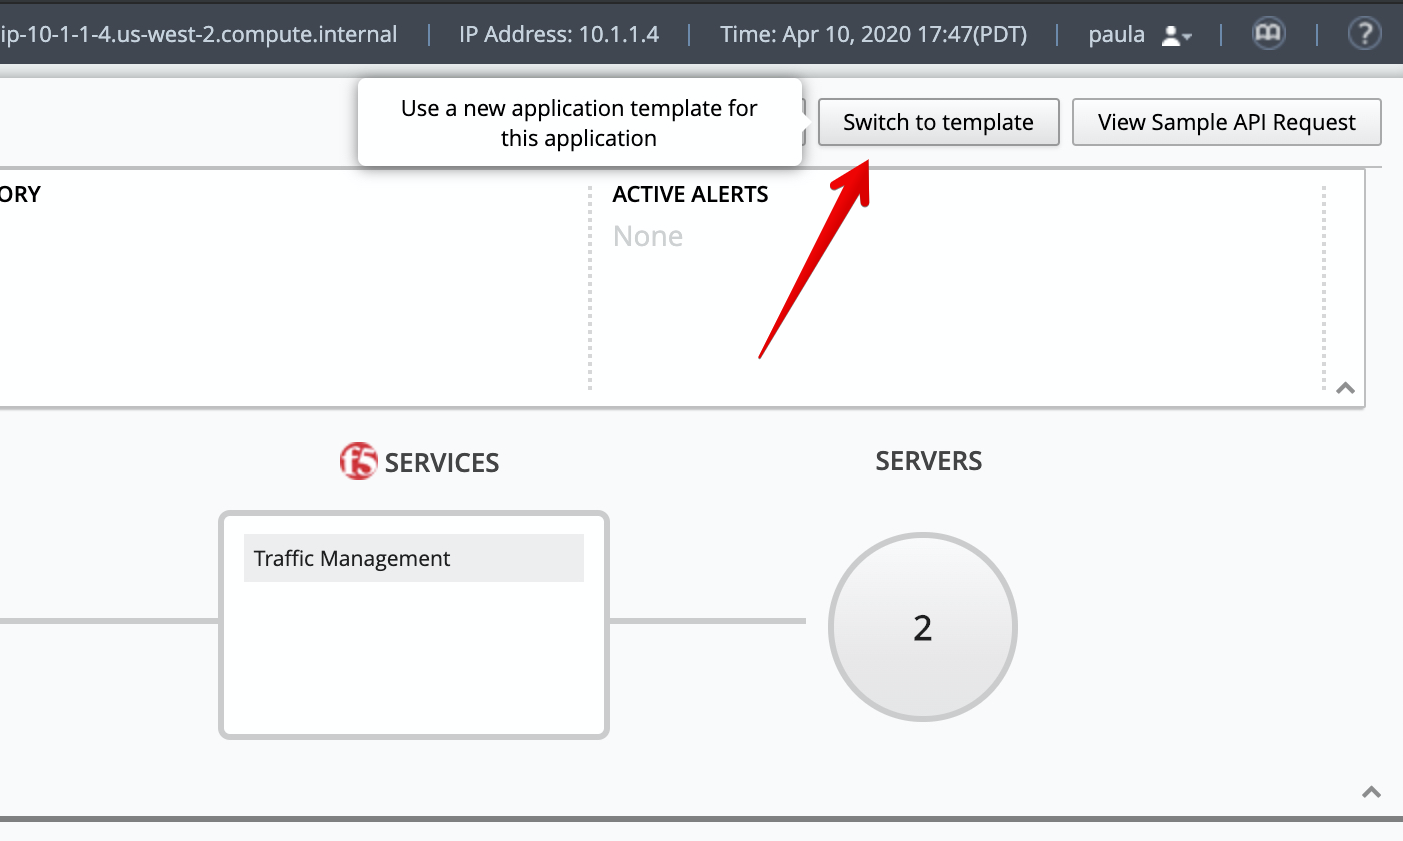
- In order to save the properties of the application service, click on the top right corner of the dashboard, click on View Sample API Request and save the API call in a text editor.

- Then click on Switch to template/
4. Select AS3-LAB-HTTPS-custom-firewall-template for Template Type.
Using the information saved in step 2, fill necessary fields (Server Addresses, Virtual Server Addresses).
- Now, let’s change the virtual server port to
444instead of 443.
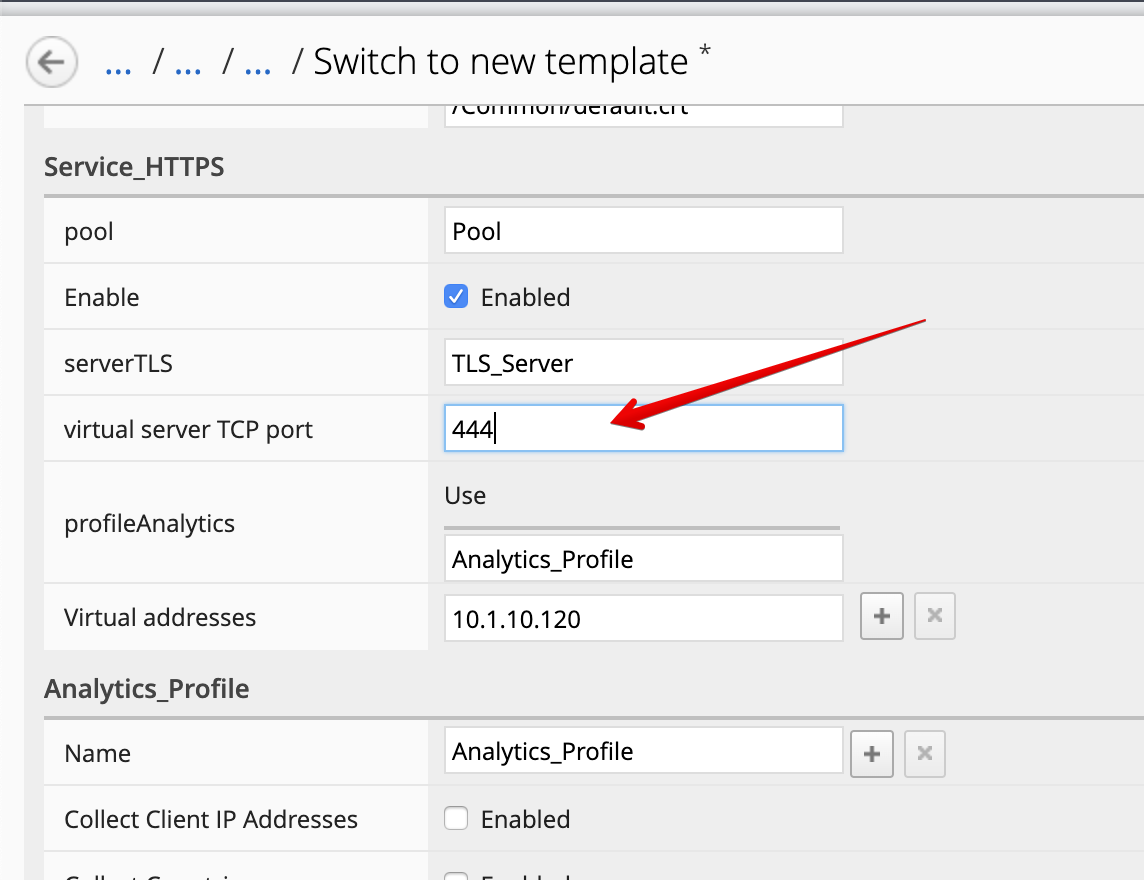
- Click Save & Close.
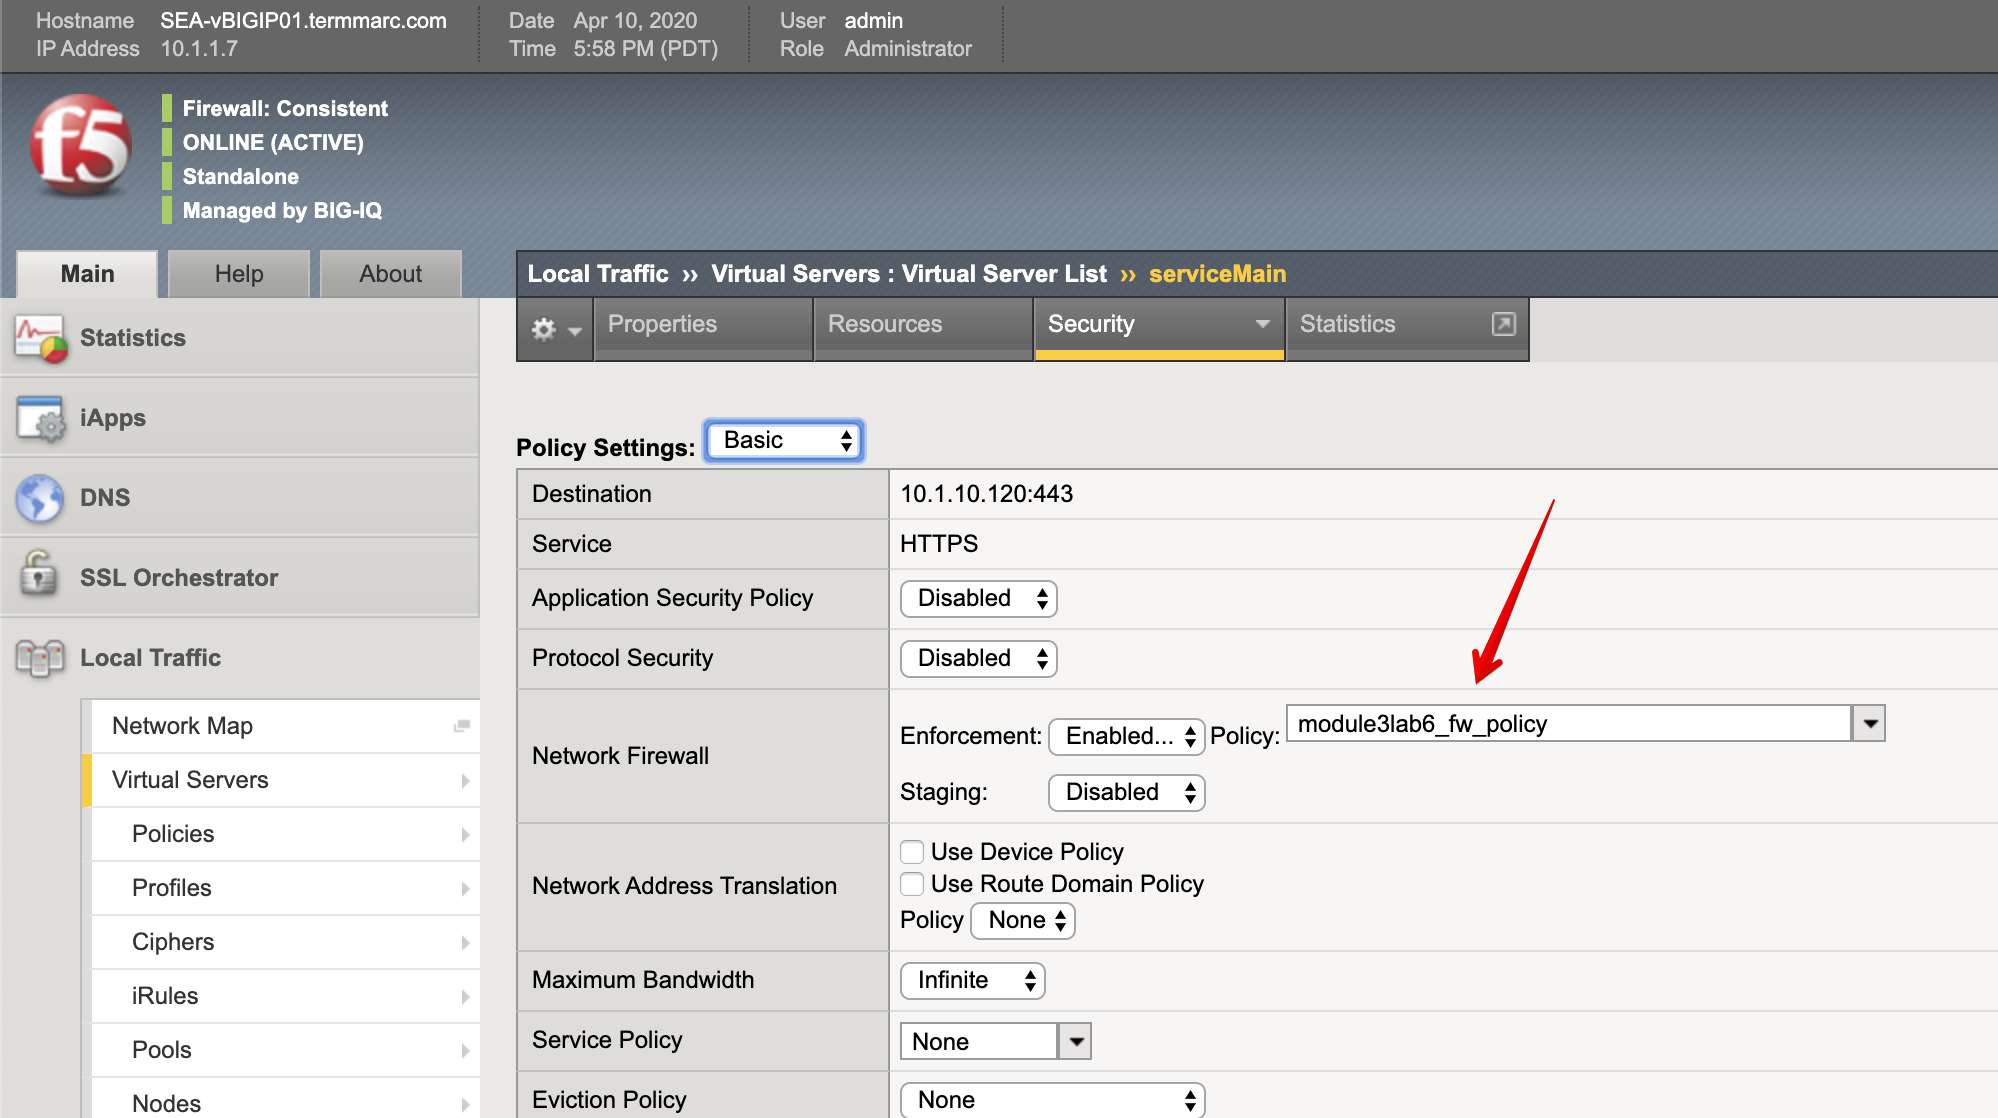
7. Now, let’s look on the BIG-IP and verify the Firewall policy has been correctly applied to the application service.
Login to SEA-vBIGIP01.termmarc.com BIG-IP from lab environment.
Select the partition tenant1 and look at the security resources attached to the virtual server ServiceMain.
- From the lab environment, launch a remote desktop session to have access to the Ubuntu Desktop.
Open a terminal and run the following commands:
f5student@ip-10-1-1-5:~$ nmap -F 10.1.10.120
Starting Nmap 7.80 ( https://nmap.org ) at 2020-04-11 01:12 UTC
Nmap scan report for site20.example.com (10.1.10.120)
Host is up (0.00036s latency).
Not shown: 98 filtered ports
PORT    STATE  SERVICE
80/tcp  open   http
444/tcp closed snpp

Nmap done: 1 IP address (1 host up) scanned in 1.73 seconds

f5student@ip-10-1-1-5:~$ curl -k https://10.1.10.120:444
curl: (7) Failed to connect to 10.1.10.120 port 444: Connection refused
Notice the port 444 shows closed and when trying to run a curl against the virtual IP address on port 444, it shows connection refused.
Run above commands few times, then go back to the BIG-IQ Application Dashboard and
change the virtual server TCP port back to 443.
Back on the Ubuntu Jump host on the terminal, and run the following commands:
f5student@ip-10-1-1-5:~$ nmap -F 10.1.10.120
Starting Nmap 7.80 ( https://nmap.org ) at 2020-04-11 01:23 UTC
Nmap scan report for site20.example.com (10.1.10.120)
Host is up (0.00037s latency).
Not shown: 98 filtered ports
PORT    STATE SERVICE
80/tcp  open  http
443/tcp open  https

Nmap done: 1 IP address (1 host up) scanned in 1.74 seconds

f5student@ip-10-1-1-5:~$ curl -s -k https://10.1.10.120:443 | tail -3
setTimeout(f5_cspm.wait_perf_data,100);return;},go:function(){var chunk=window.document.cookie.split(/\s*;\s*/);for(var i=0;i<chunk.length;++i){var pair=chunk[i].split(/\s*=\s*/);if(pair[0]=='f5_cspm'&&pair[1]=='1234')
{var d=new Date();d.setTime(d.getTime()-1000);window.document.cookie='f5_cspm=;expires='+d.toUTCString()+';path=/;';setTimeout(f5_cspm.wait_perf_data,100);}}}}
f5_cspm.go();}());</script>
Notice now the port 443 shows open and when trying to run a curl against the virtual IP address on port 443, the page is loading correctly and showing in the terminal. Run above commands few times.
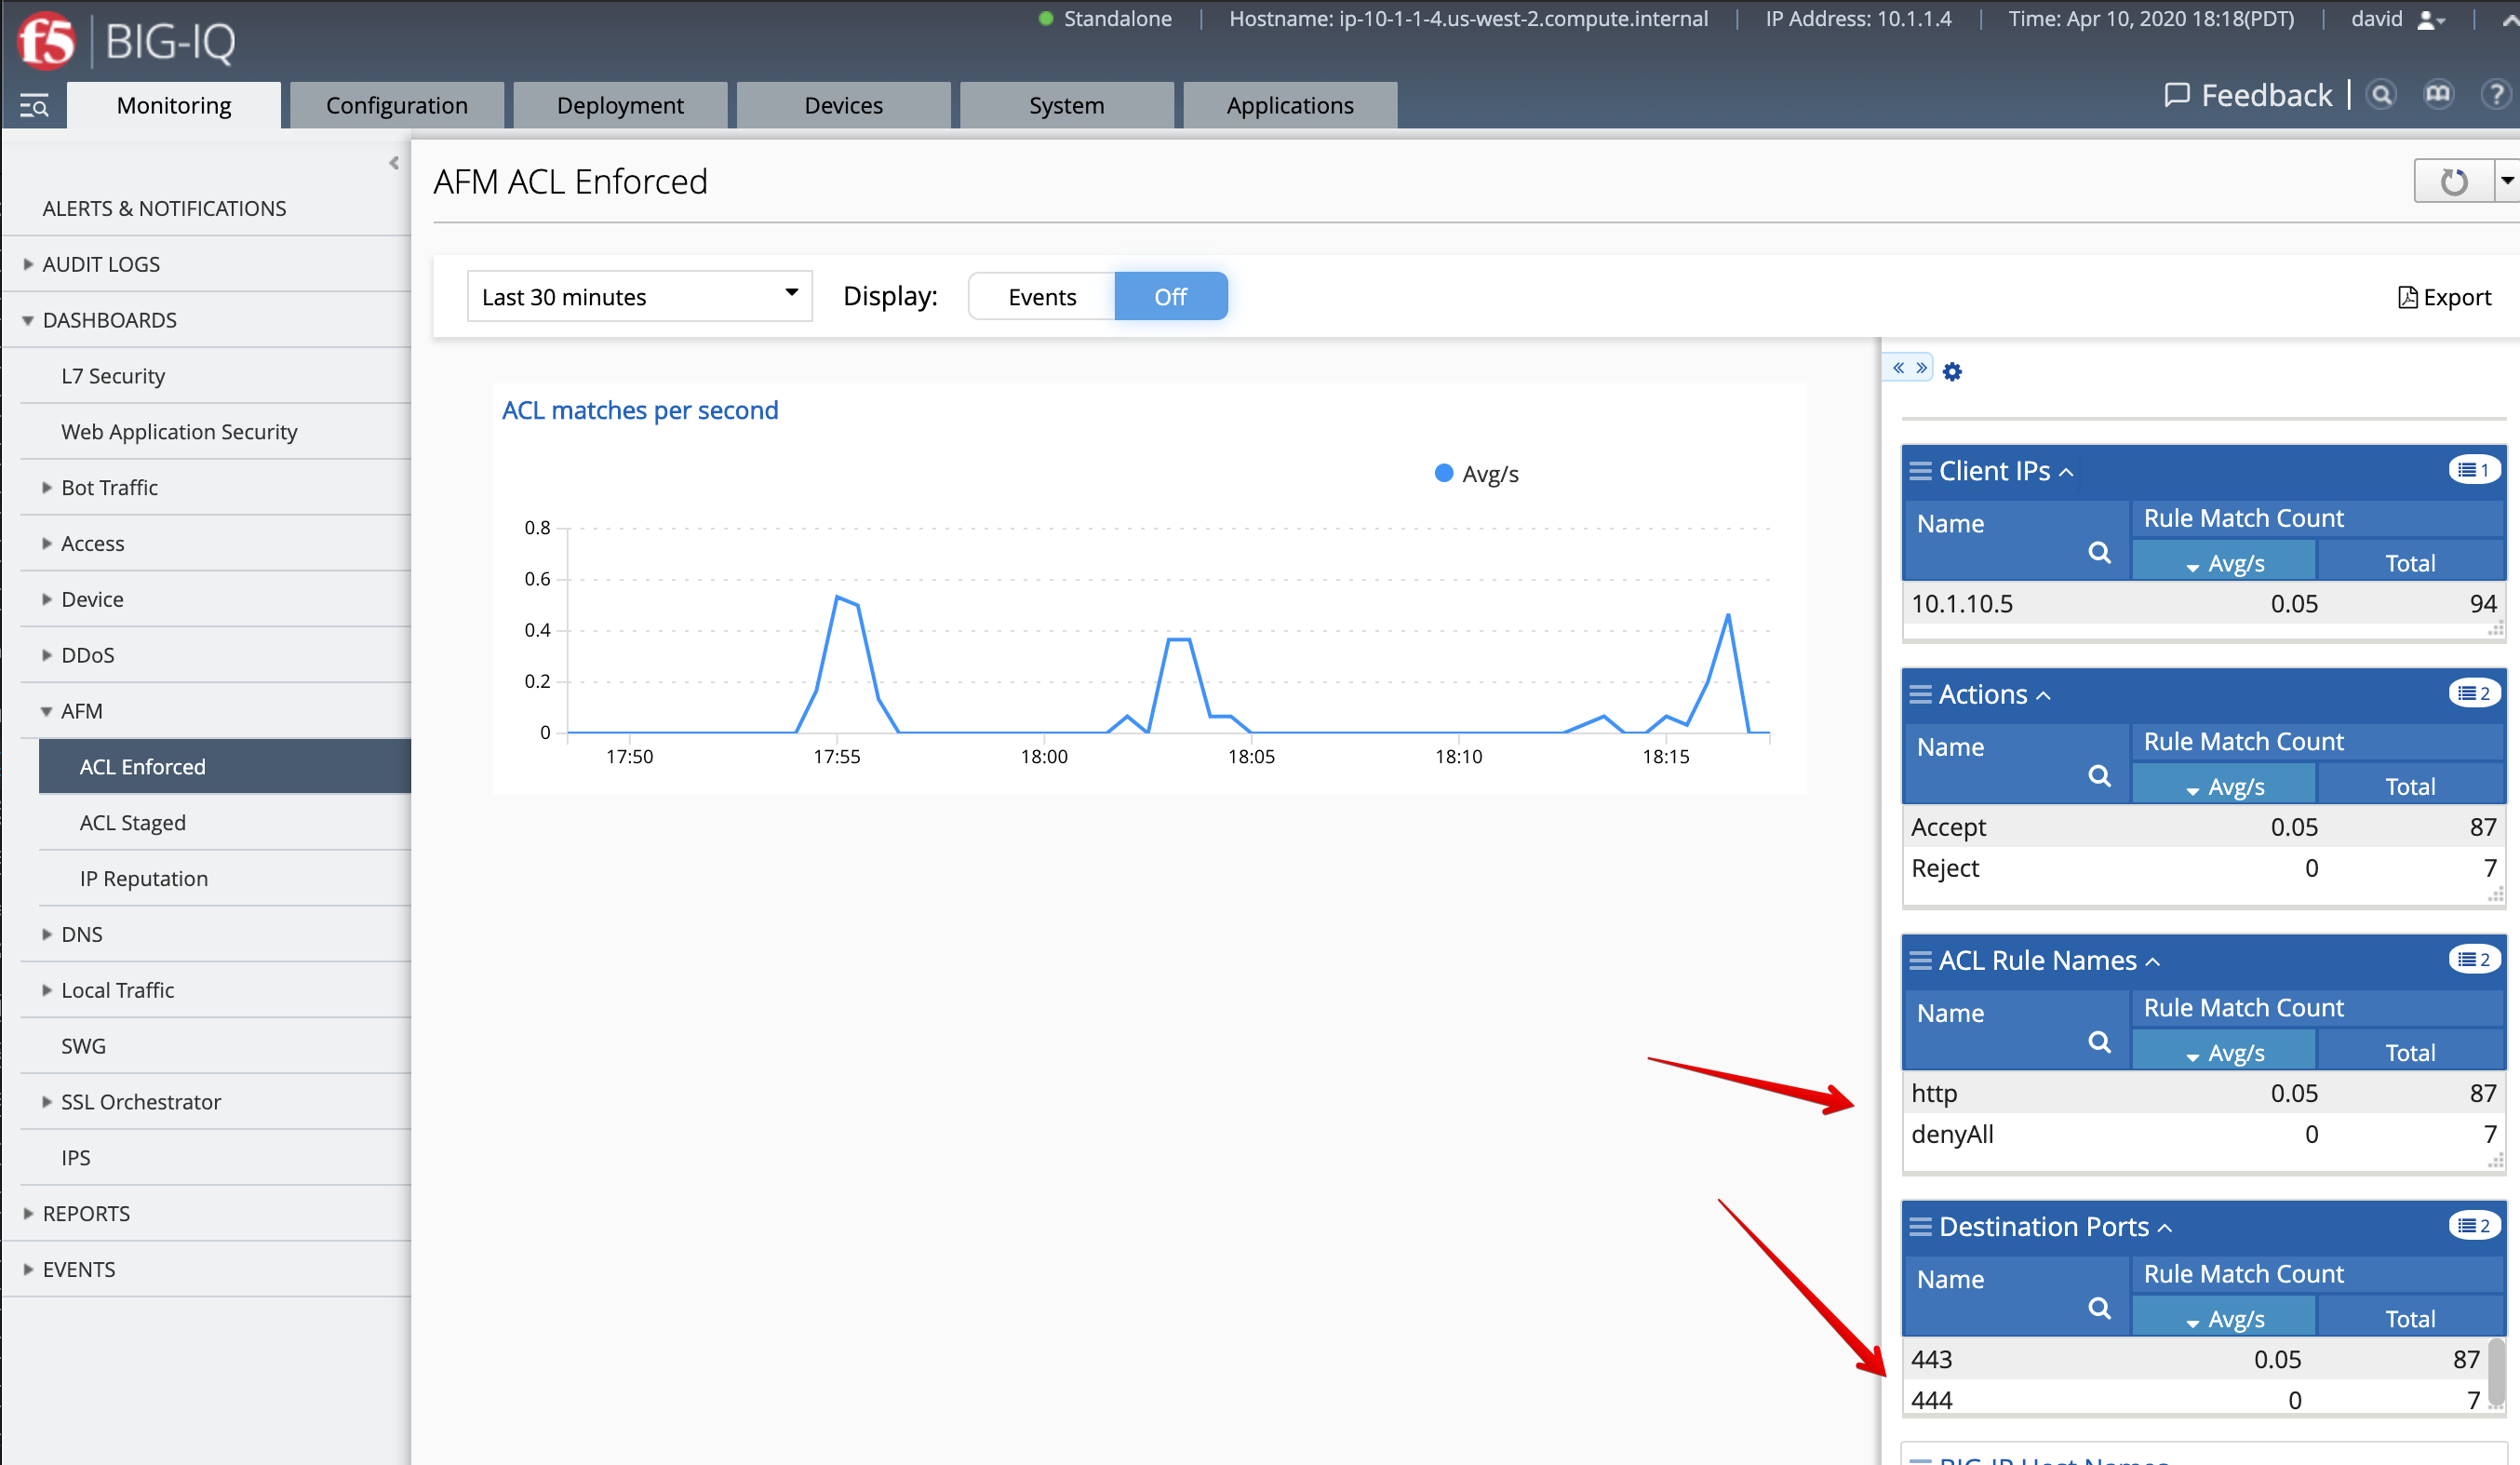
AFM Policy Dashboard (Larry)
1. Login as larry and go to Monitoring > Dashboards > AFM > ACL Enforced. Acknowledge the various attempts made by Paula when trying to reach her Application Services on port 444 and port 443.