F5 BIG-IQ Centralized Management Lab > BIG-IQ All Labs > Class 8: BIG-IQ Web Application Security > Module 1: Advanced Web Application Firewall (WAF) on BIG-IQ Source | Edit on
Lab 1.1: Proactive Bot Defense Configuration and Monitoring (new 7.1)
Note
Estimated time to complete: 30 minutes
BIG-IP Bot protection protects apps from automated attacks by bots and other malicious tools.
The goal of this lab is to show how to use BIG-IQ to configure the Bot protection to an HTTP Application Service and how to use BIG-IQ Bot Dashboards to monitors the Bot traffic.
Note
This lab requires BIG-IP 14.1 and BIG-IQ 7.0 minimum. AVR also needs to be provisioned on the device. See more details K12121934.
Official documentation can be found on the BIG-IQ Knowledge Center and see DevCentral article on this subject.
Lab environment access
If you have not yet visited the page Getting Started, please do so.
Workflow
- David creates the Bot Log Destinations and Publisher either using the UI or the API/AS3
- Larry creates the Bot Defense & Logging Profile
- David creates the AS3 template and reference Bot & Logging profile created by Larry
- David creates the application service using the template created previously
- Larry looks at the BIG-IQ Bot dahsboards
Prerequisites
Login as david on BIG-IQ.
1. First make sure your device has ASM module discovered and imported for SEA-vBIGIP01.termmarc.com under Devices > BIG-IP DEVICES.
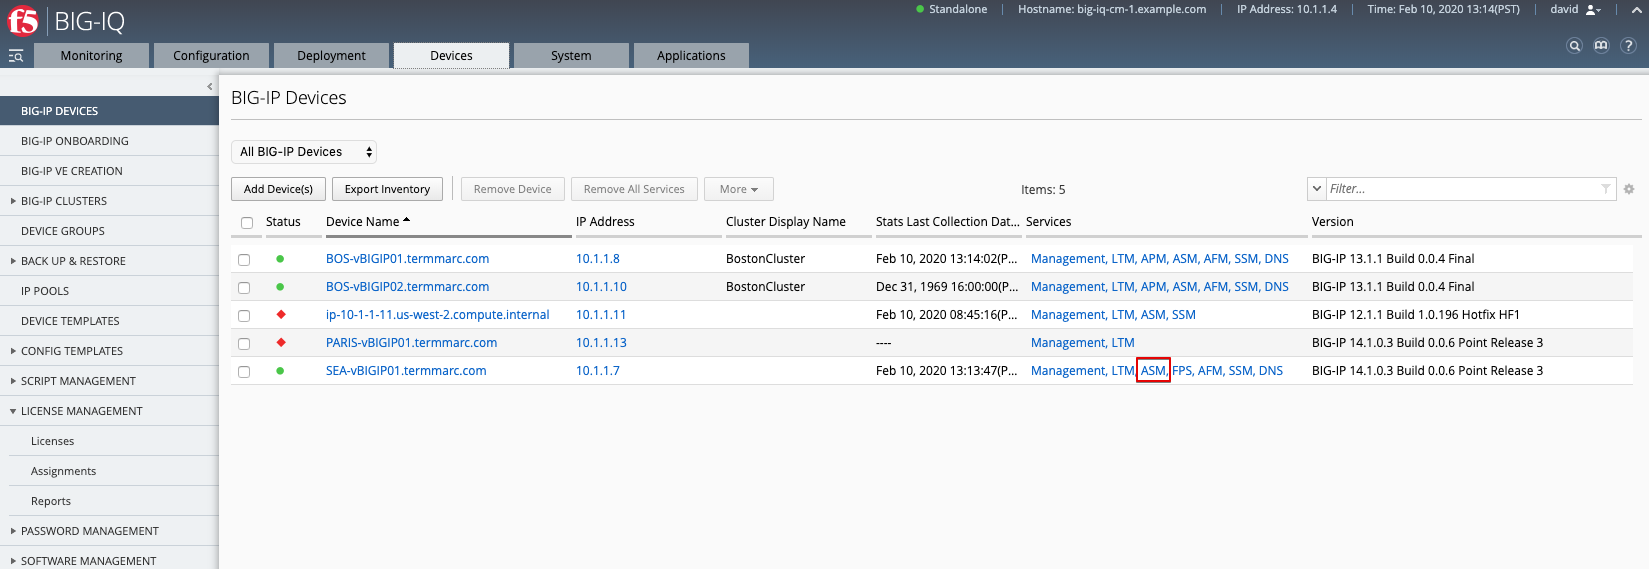
2. Check if the Web Application Security service is Active under System > BIG-IQ DATA COLLECTION > BIG-IQ Data Collection Devices.

ASM Bot Log Destinations and Publisher creation using UI
Warning
If you want to use API to create those objects, skip this part and go to the next one.
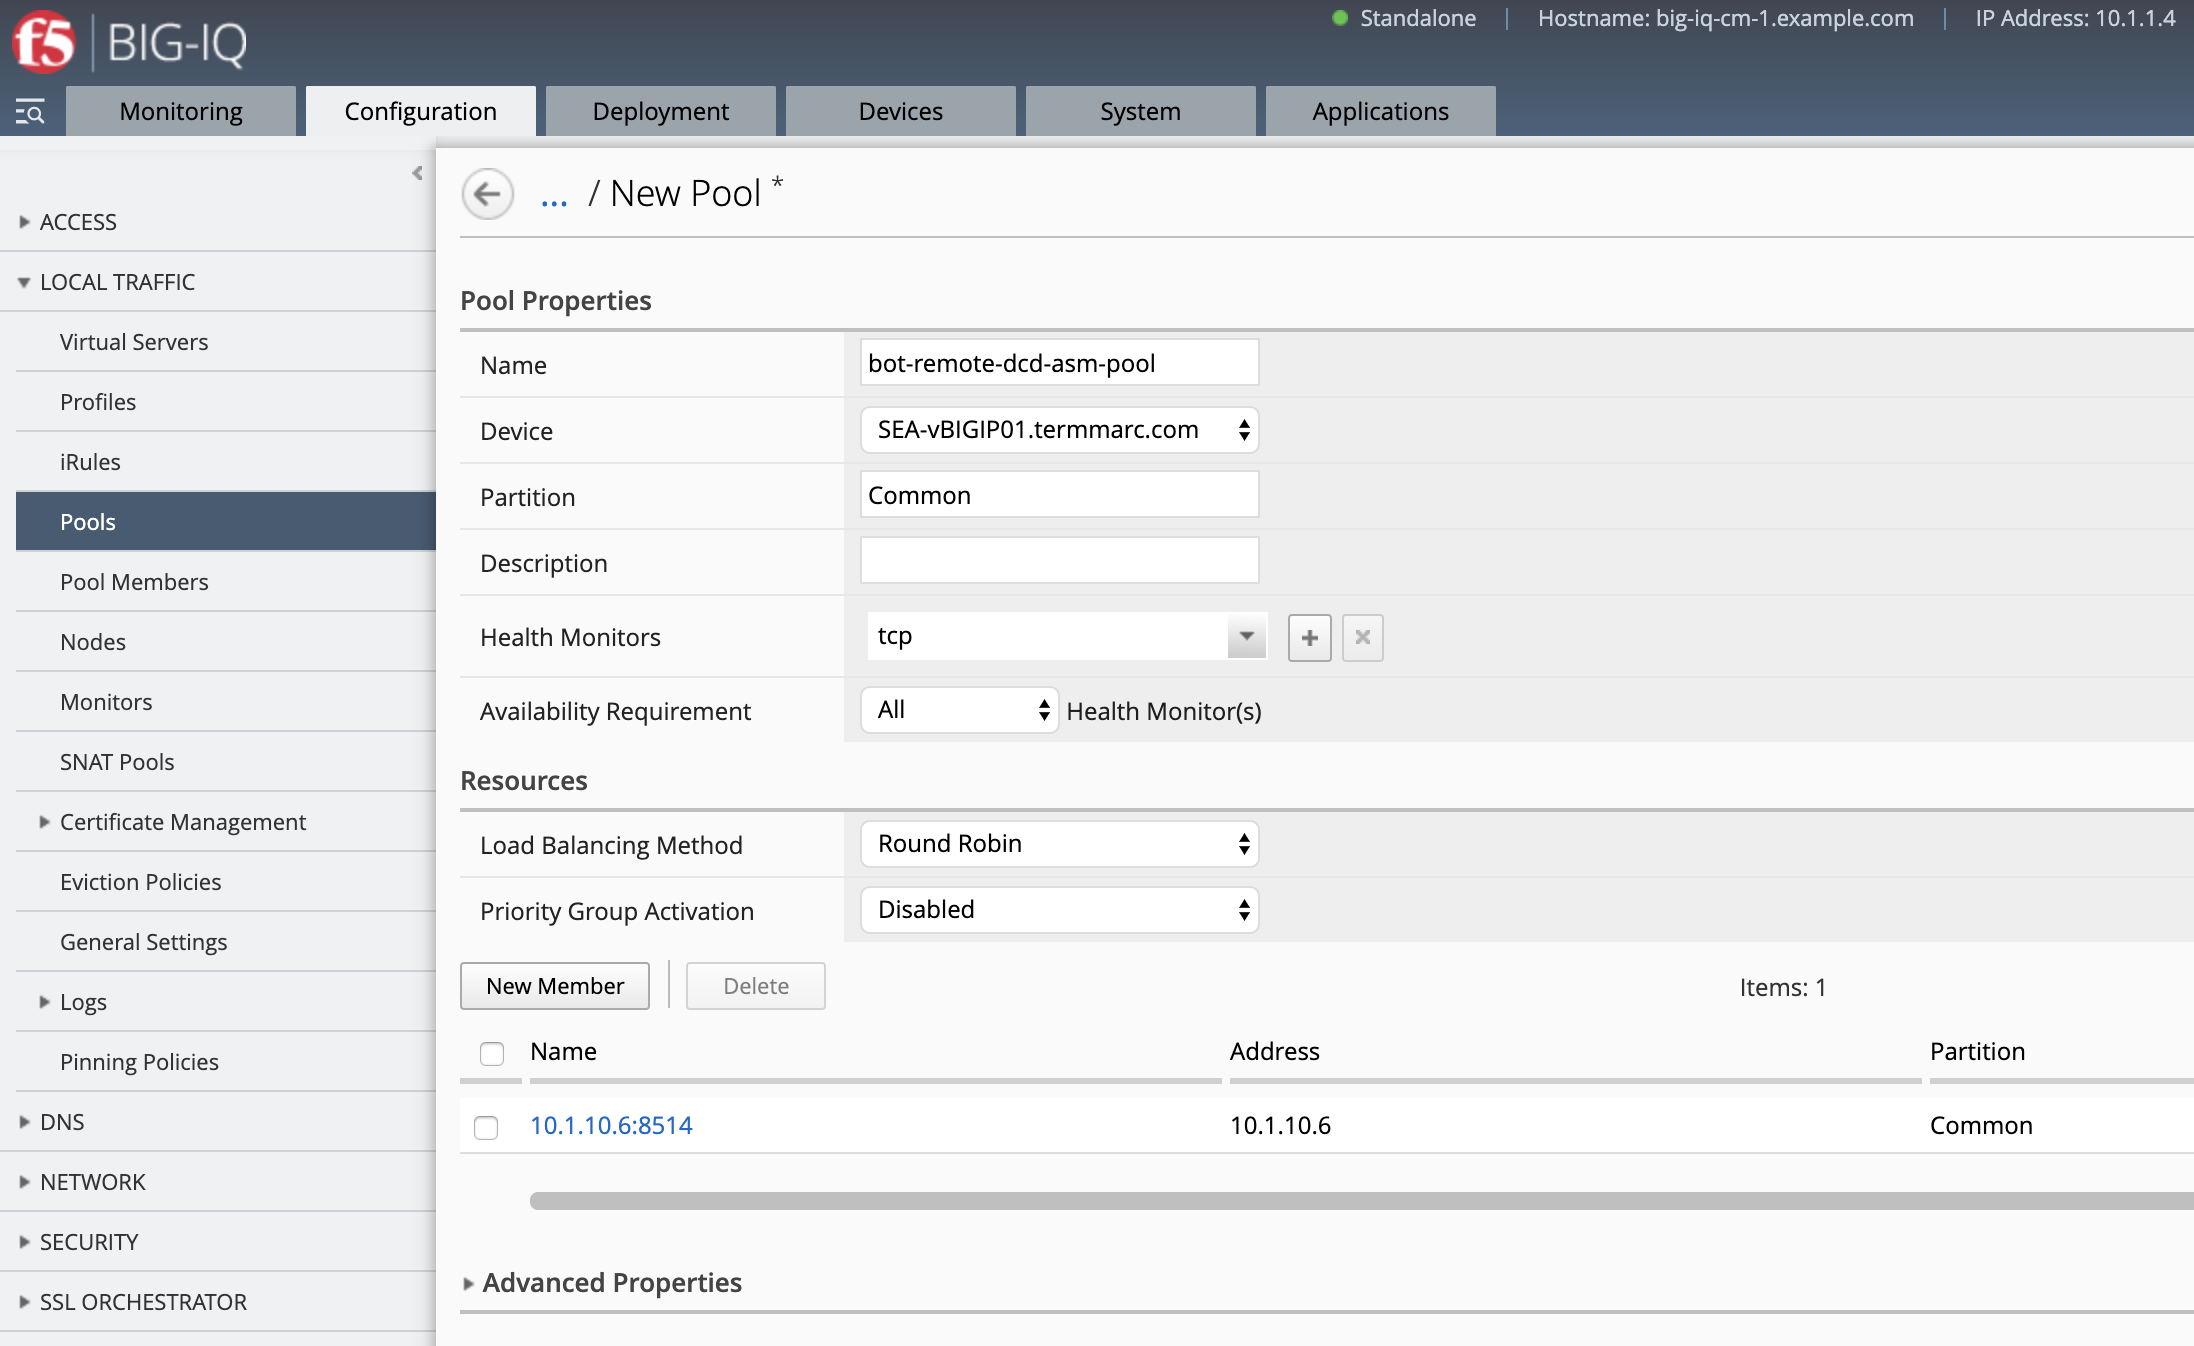
- Create the DCD Pool and Log Destination. Navigate to Configuration Tab > LOCAL TRAFFIC > Pools, click Create.
- Name:
bot-remote-dcd-asm-pool - Silo:
Default - Device
SEA-vBIGIP01.termmarc.com - Health Monitors:
tcp - Pool Member/Port:
10.1.10.6:8514 - Save and close
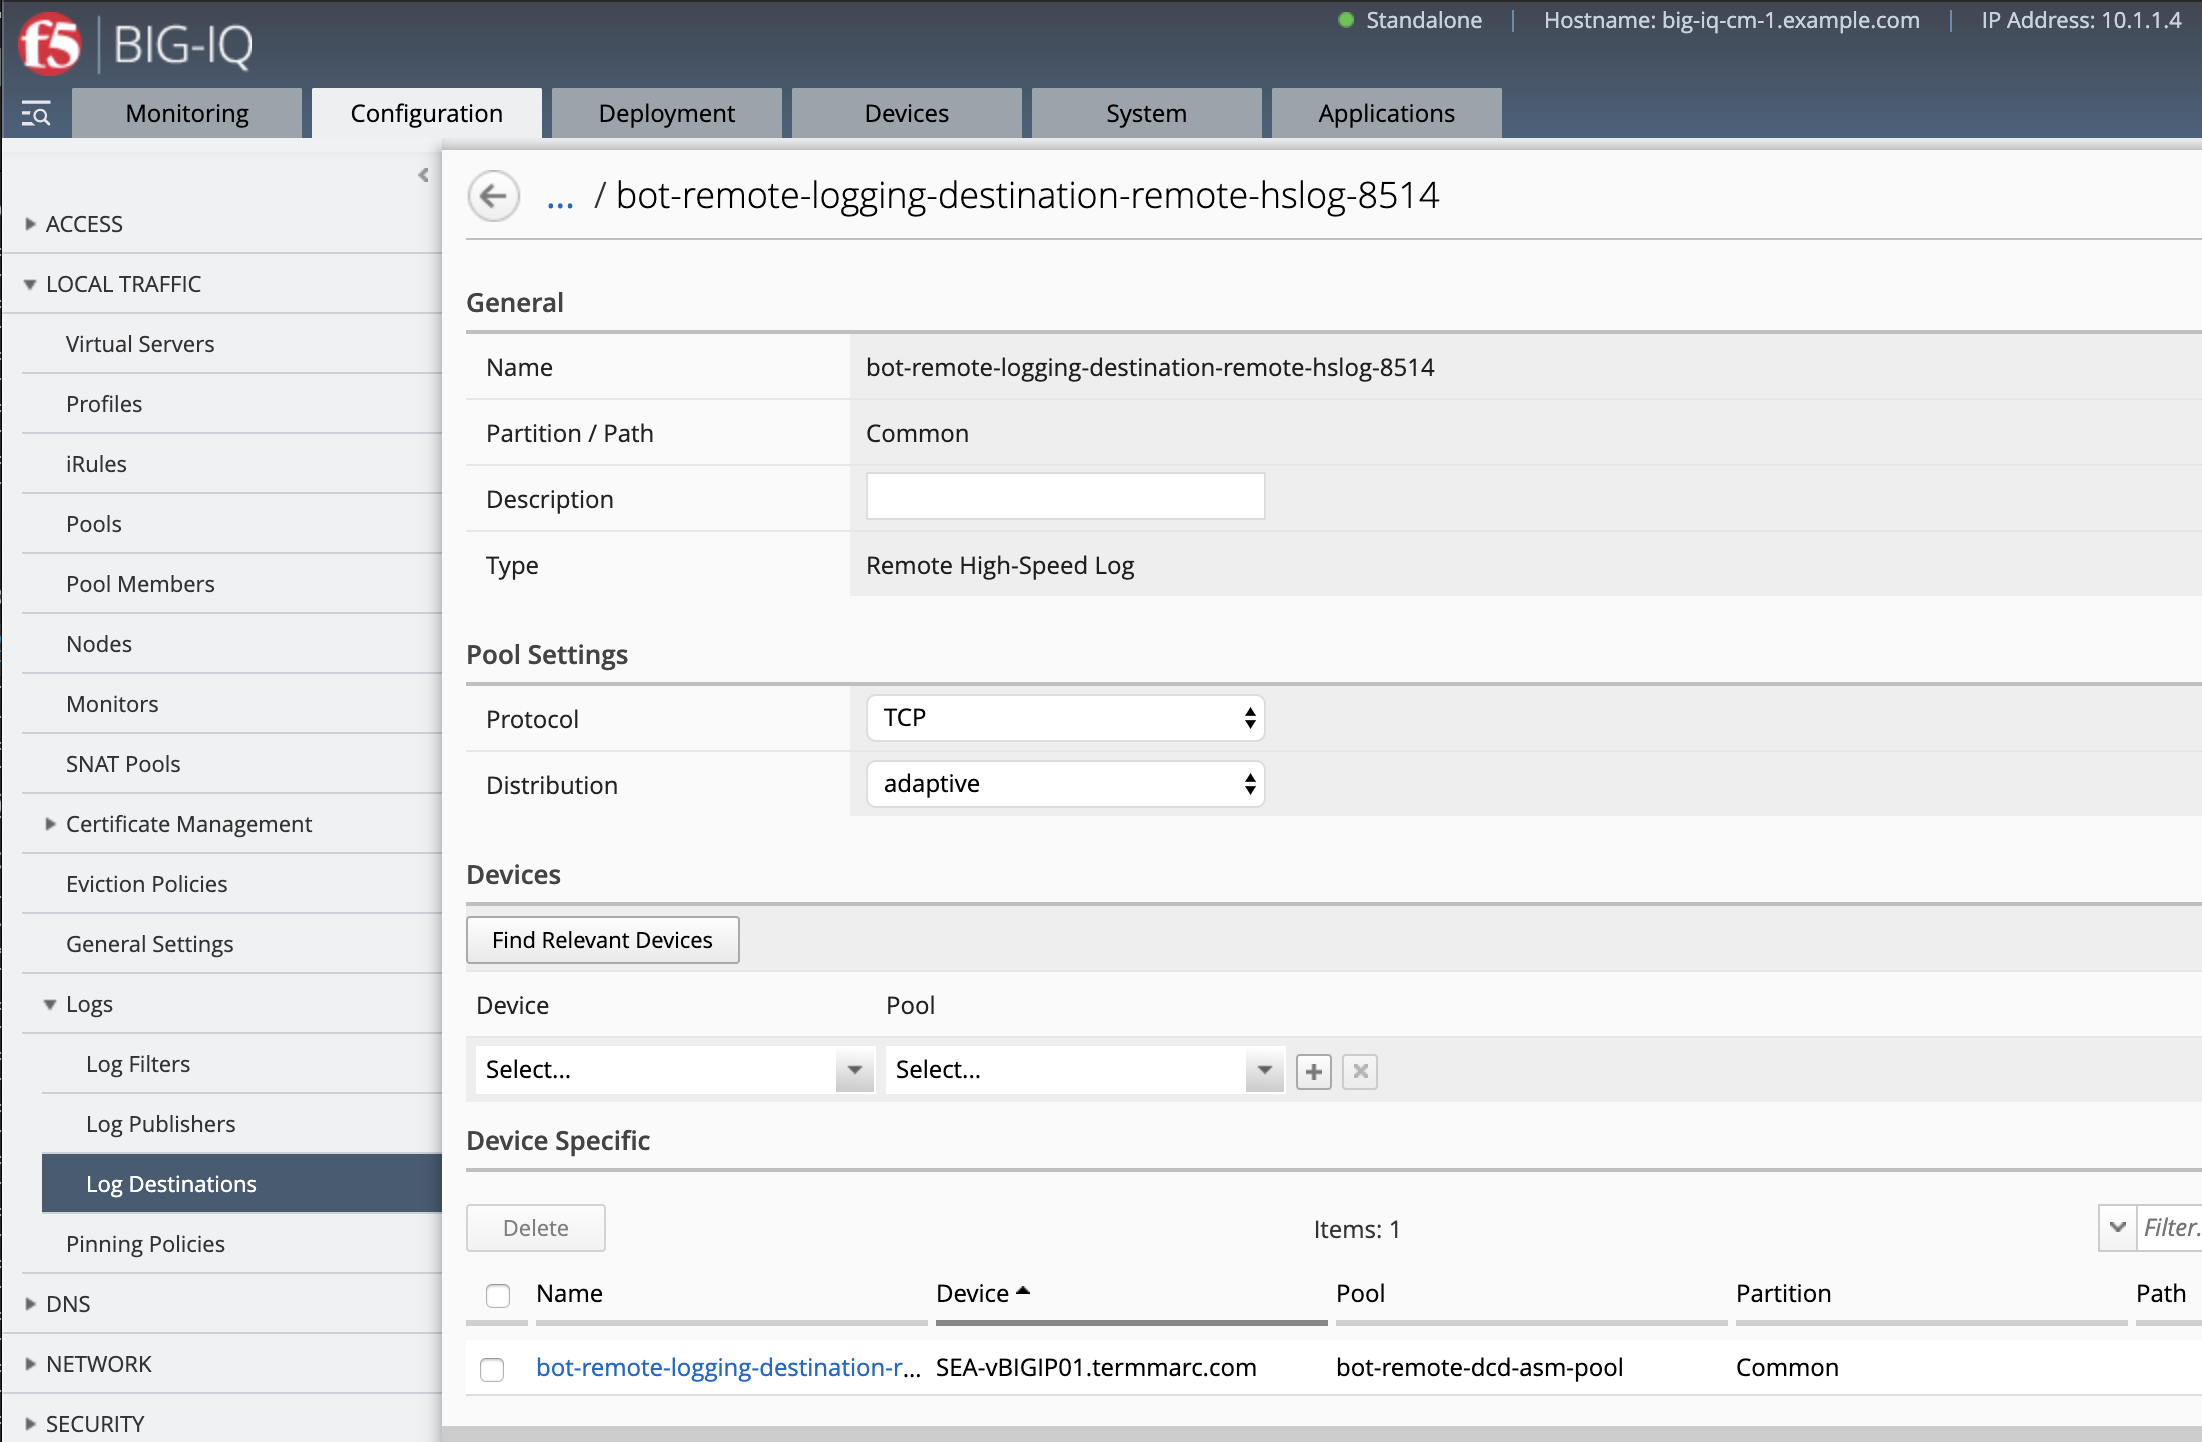
- Navigate to Configuration Tab > LOCAL TRAFFIC > Logs > Log Destinations, click Create.
- Name Log Destination hslog:
bot-remote-logging-destination-remote-hslog-8514 - Type:
Remote High-Speed Log - Device:
SEA-vBIGIP01.termmarc.com - Pool:
bot-remote-dcd-asm-poolpreviously created - Save and close
- Navigate to Configuration Tab > LOCAL TRAFFIC > Logs > Log Destinations, click Create.
- Name Log Destination Splunk:
bot-remote-logging-destination-splunk-8514 - Type:
Splunk - Forward To:
Remote High Speed Log-bot-remote-logging-destination-remote-hslog-8514previously created - Save and close

Note
This is to add the formatting supported by BIG-IQ
- Create the Log Publisher. Navigate to Configuration Tab > LOCAL TRAFFIC > Logs > Log Publisher. click Create.
- Name:
bot-remote-logging-publisher-8514 - Log Destinations:
bot-remote-logging-destination-splunk-8514previously created - Save and close

- Pin the new Log Publisher to the SEA-vBIGIP01.termmarc.com device. Navigate to Pinning Policies and add the Log Publisher previously created to SEA-vBIGIP01.termmarc.com. Save and close.

- Deploy the Pool, Log Destinations, Log Publisher. Go to Deployment > EVALUATE & DEPLOY > Local Traffic & Network.
Create a Deployment to deploy the Remote Logging Changes on the SEA BIG-IP.
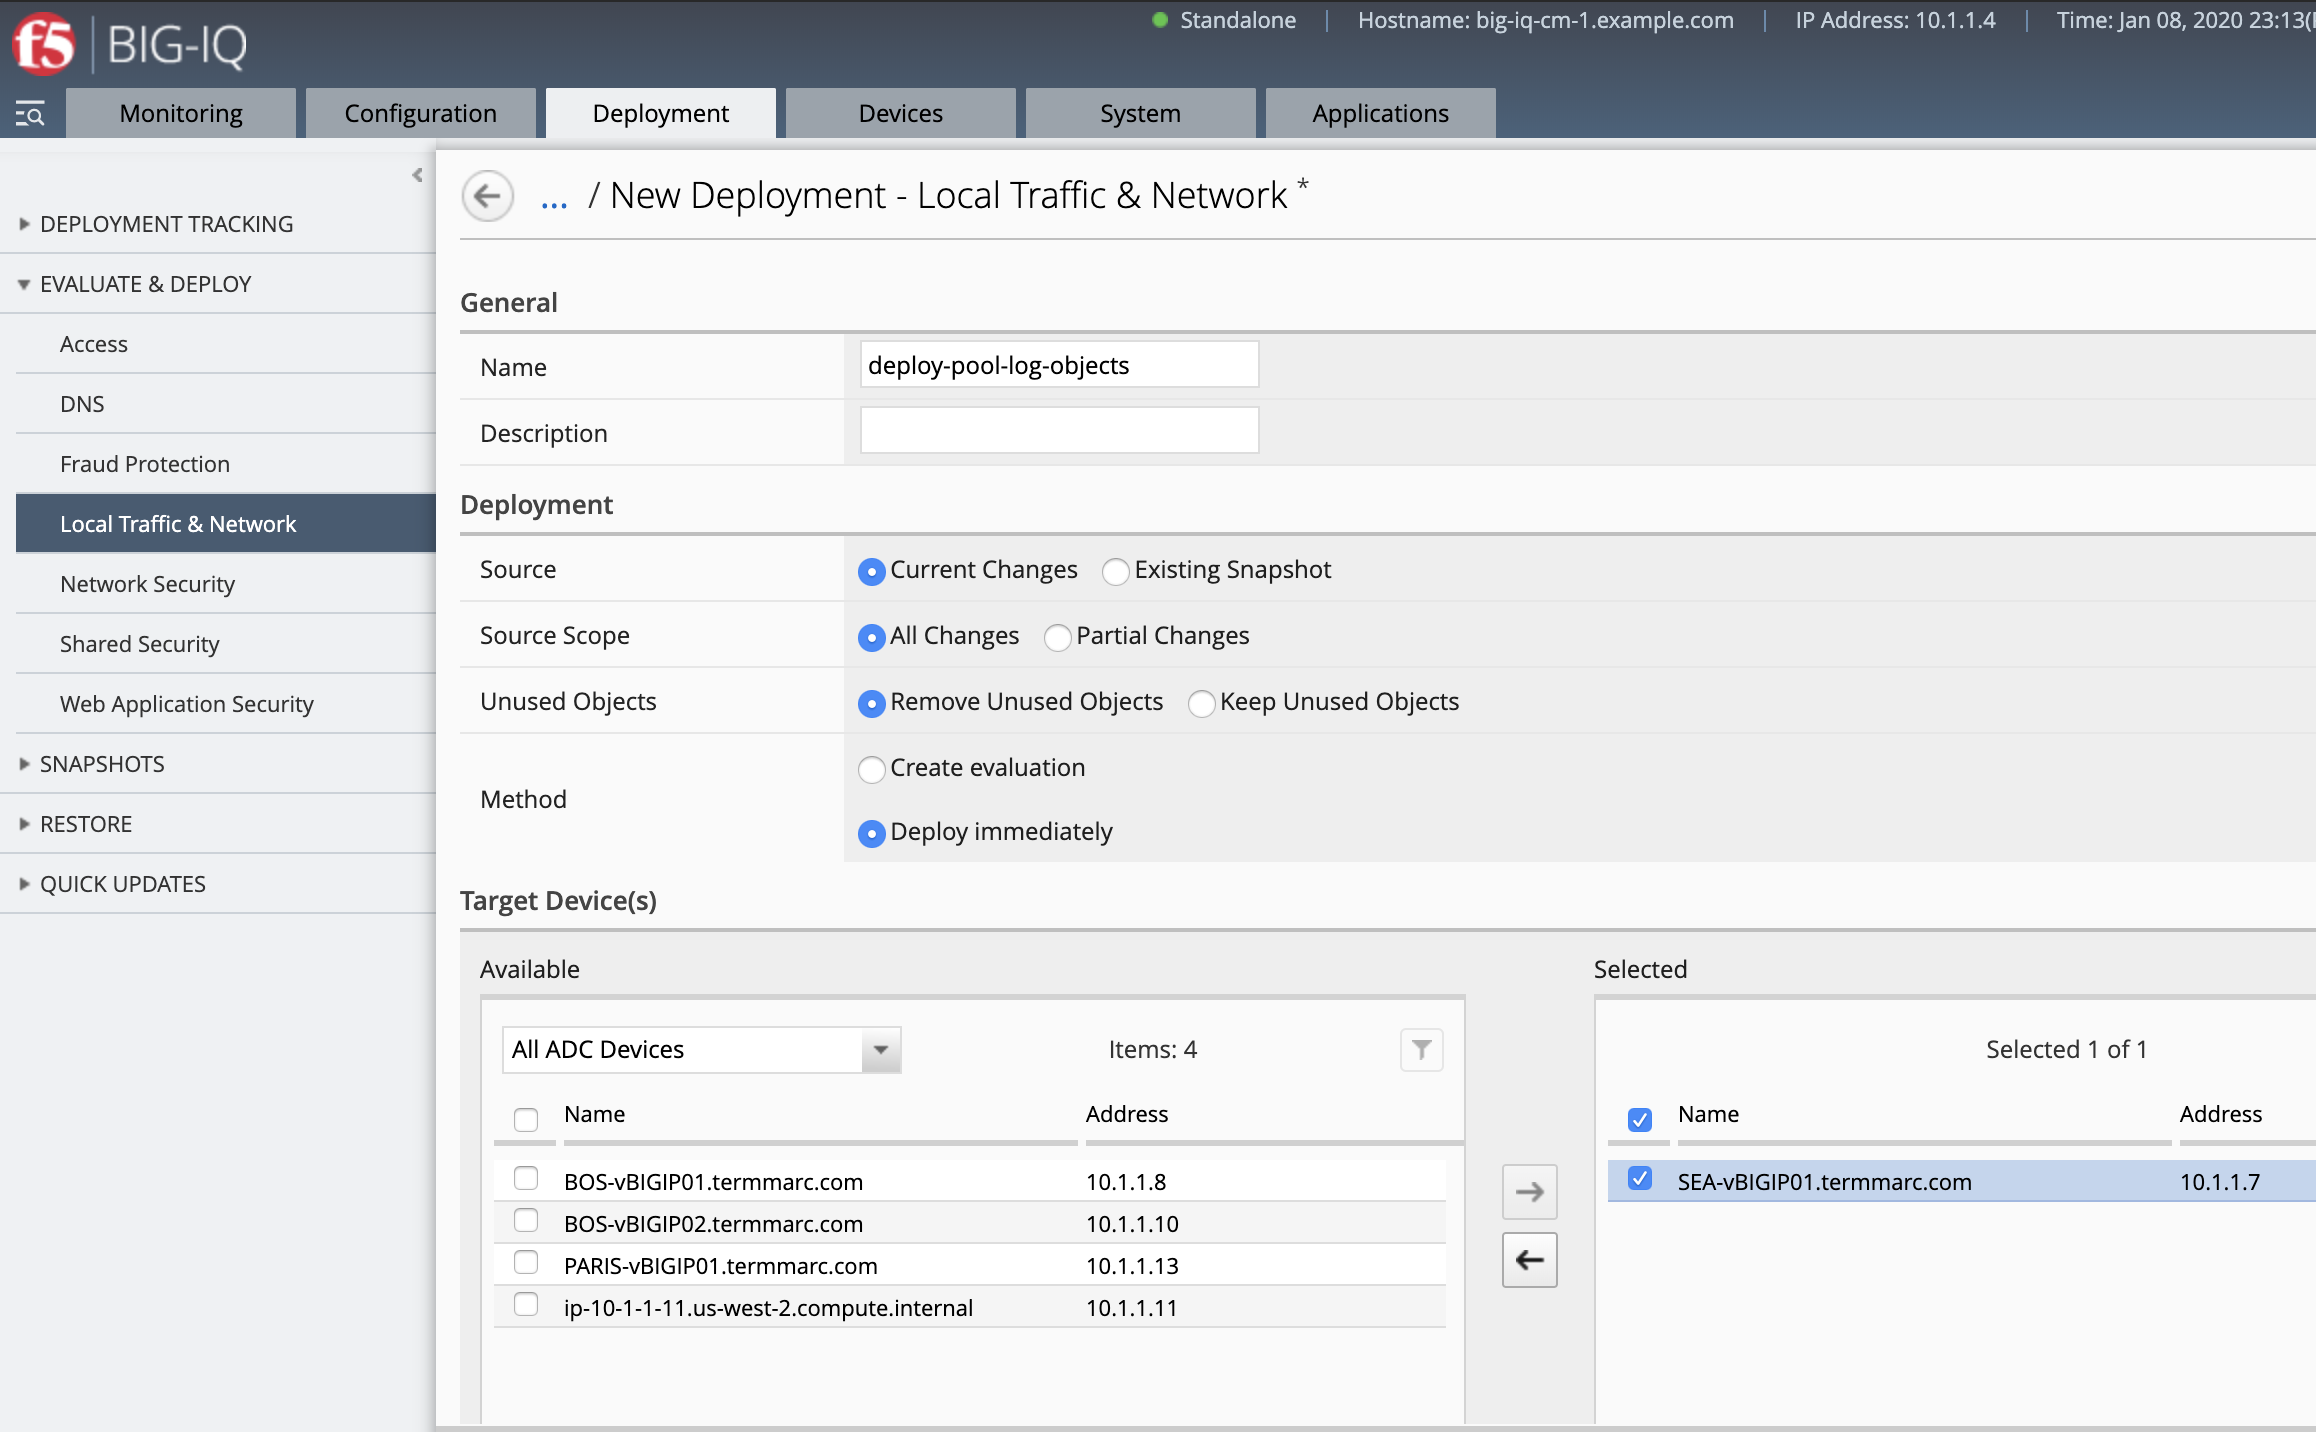
Make sure the deployment is successful.
Note
More information Managing Logging Profiles in Shared Security.
ASM Bot Log Destinations and Publisher creation using API/AS3
- Open Visual Studio Code, then use the Visual Studio code REST client extension and authenticate to BIG-IQ (follow instructions).
Copy below AS3 declaration into the body of the BIG-IQ AS3 Declaration call in order to create the service on the BIG-IP through BIG-IQ:
POST https://10.1.1.4/mgmt/shared/appsvcs/declare
1 2 3 4 5 6 7 8 9 10 11 12 13 14 15 16 17 18 19 20 21 22 23 24 25 26 27 28 29 30 31 32 33 34 35 36 37 38 39 40 41 42 43 44 45 46 47 48 49 50 51 52 53 | {
"class": "AS3",
"action": "deploy",
"persist": true,
"declaration": {
"class": "ADC",
"schemaVersion": "3.12.0",
"target": {
"address": "10.1.1.7"
},
"bot": {
"class": "Tenant",
"security-log-profile": {
"class": "Application",
"template": "generic",
"bot-remote-dcd-asm-pool": {
"class": "Pool",
"members": [
{
"servicePort": 8514,
"serverAddresses": [
"10.1.10.6"
],
"shareNodes": true
}
]
},
"bot-remote-logging-destination-remote-hslog-8514": {
"class": "Log_Destination",
"type": "remote-high-speed-log",
"pool": {
"use": "bot-remote-dcd-asm-pool"
}
},
"bot-remote-logging-destination-splunk-8514": {
"class": "Log_Destination",
"type": "splunk",
"forwardTo": {
"use": "bot-remote-logging-destination-remote-hslog-8514"
}
},
"bot-remote-logging-publisher-8514": {
"class": "Log_Publisher",
"destinations": [
{
"use": "bot-remote-logging-destination-splunk-8514"
}
]
}
}
}
}
}
|
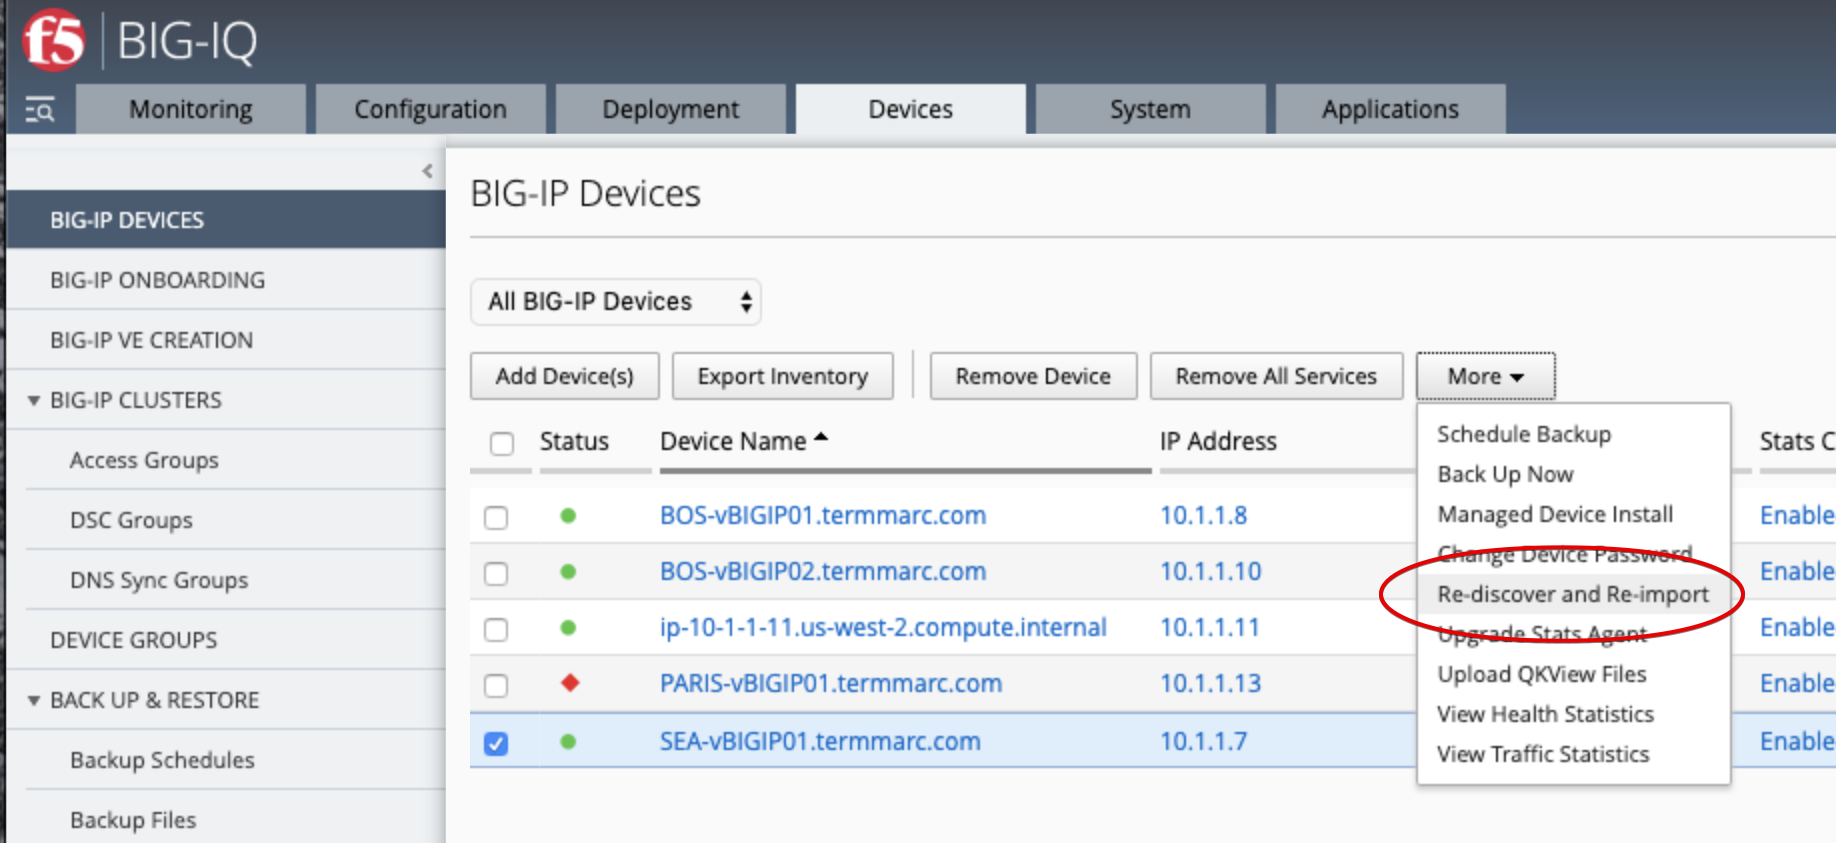
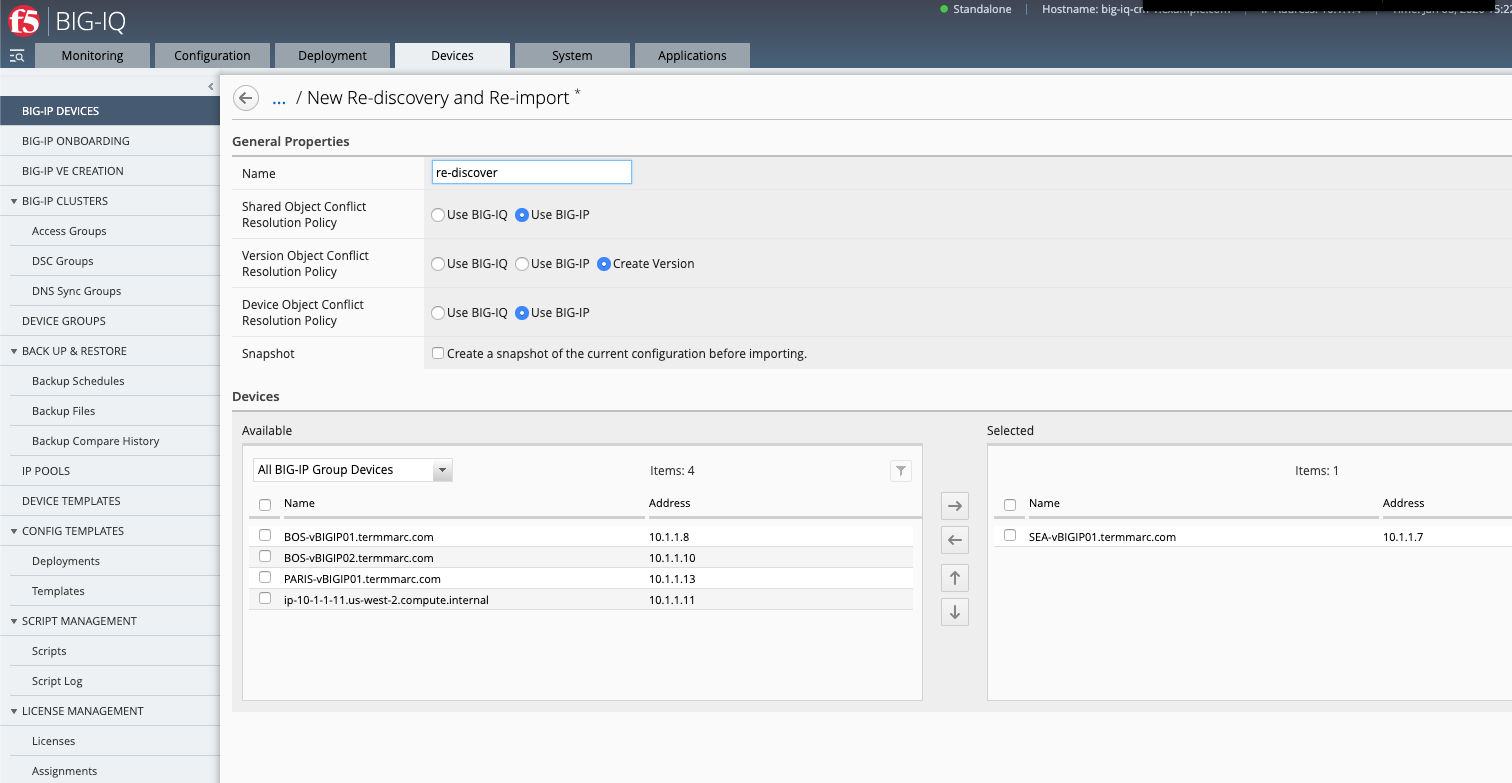
- Navigate to Devices tab and re-discover/re-import SEA-vBIGIP01.termmarc.com.
ASM Bot Logging Profile creation
Warning
This step is only for BIG-IQ => 7.1, go see the Annex at the end if you are using a lower version.
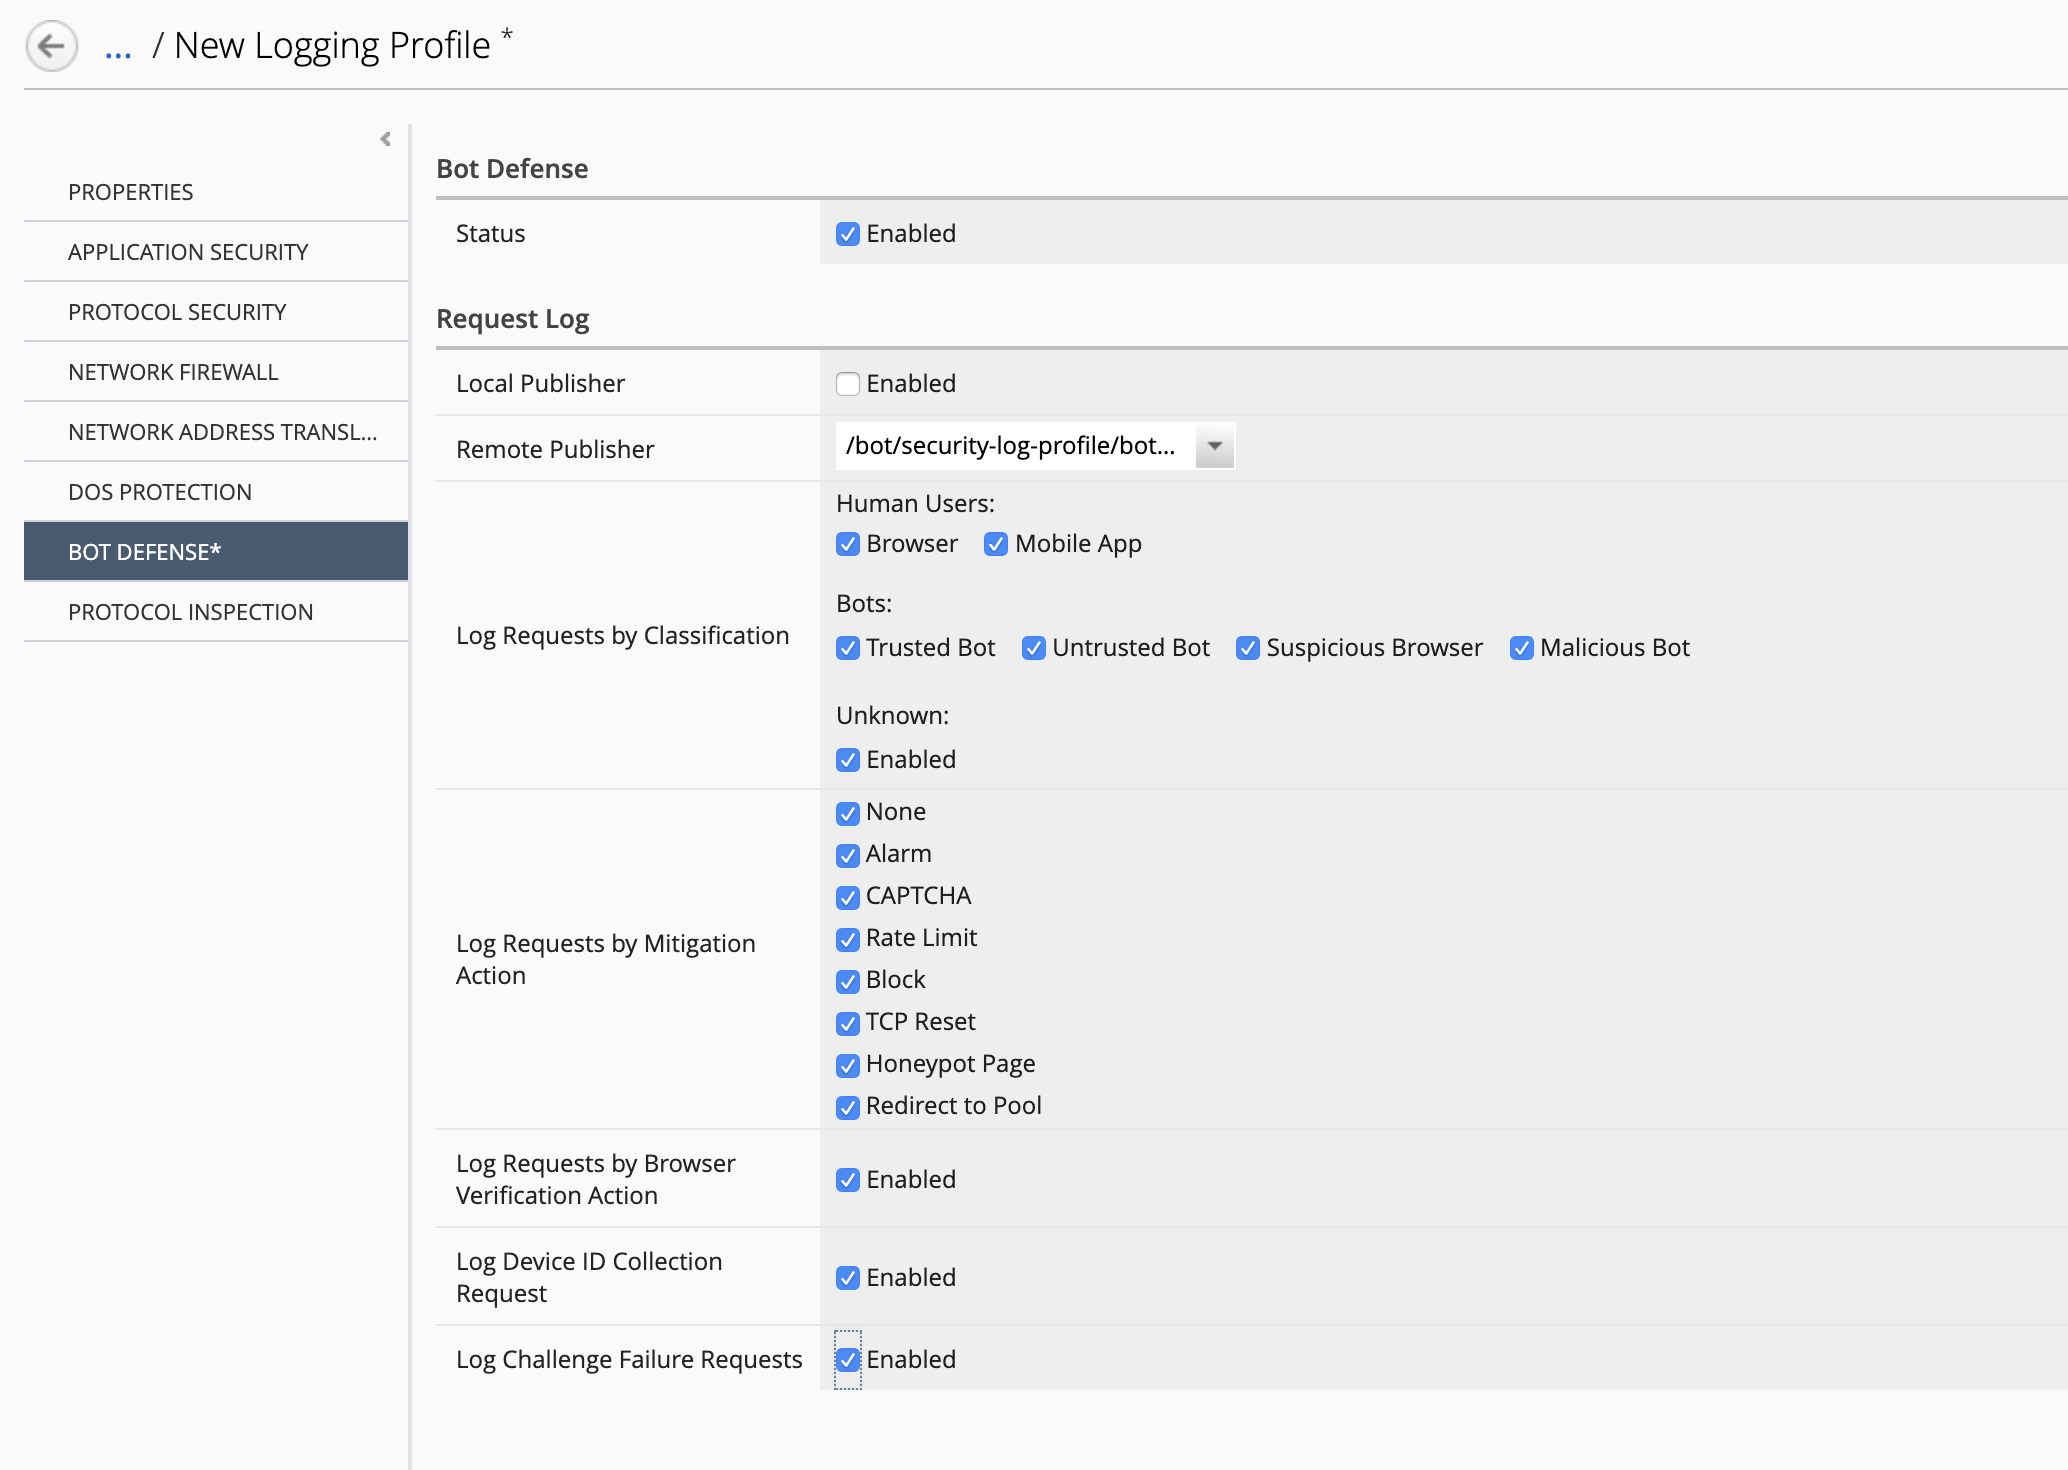
- While logged in as larry, create a new BOT Logging profile. Navigate to Configuration > SECURITY > Shared Security > Logging Profiles. Click Create.
- Name:
lab-bot-logging-profile - Properties: select
Bot Defense - Remote Publisher:
bot-remote-logging-publisher-8514 - Logs Requests: select all options (Human Users, Bots, etc…)]
- Save and close.

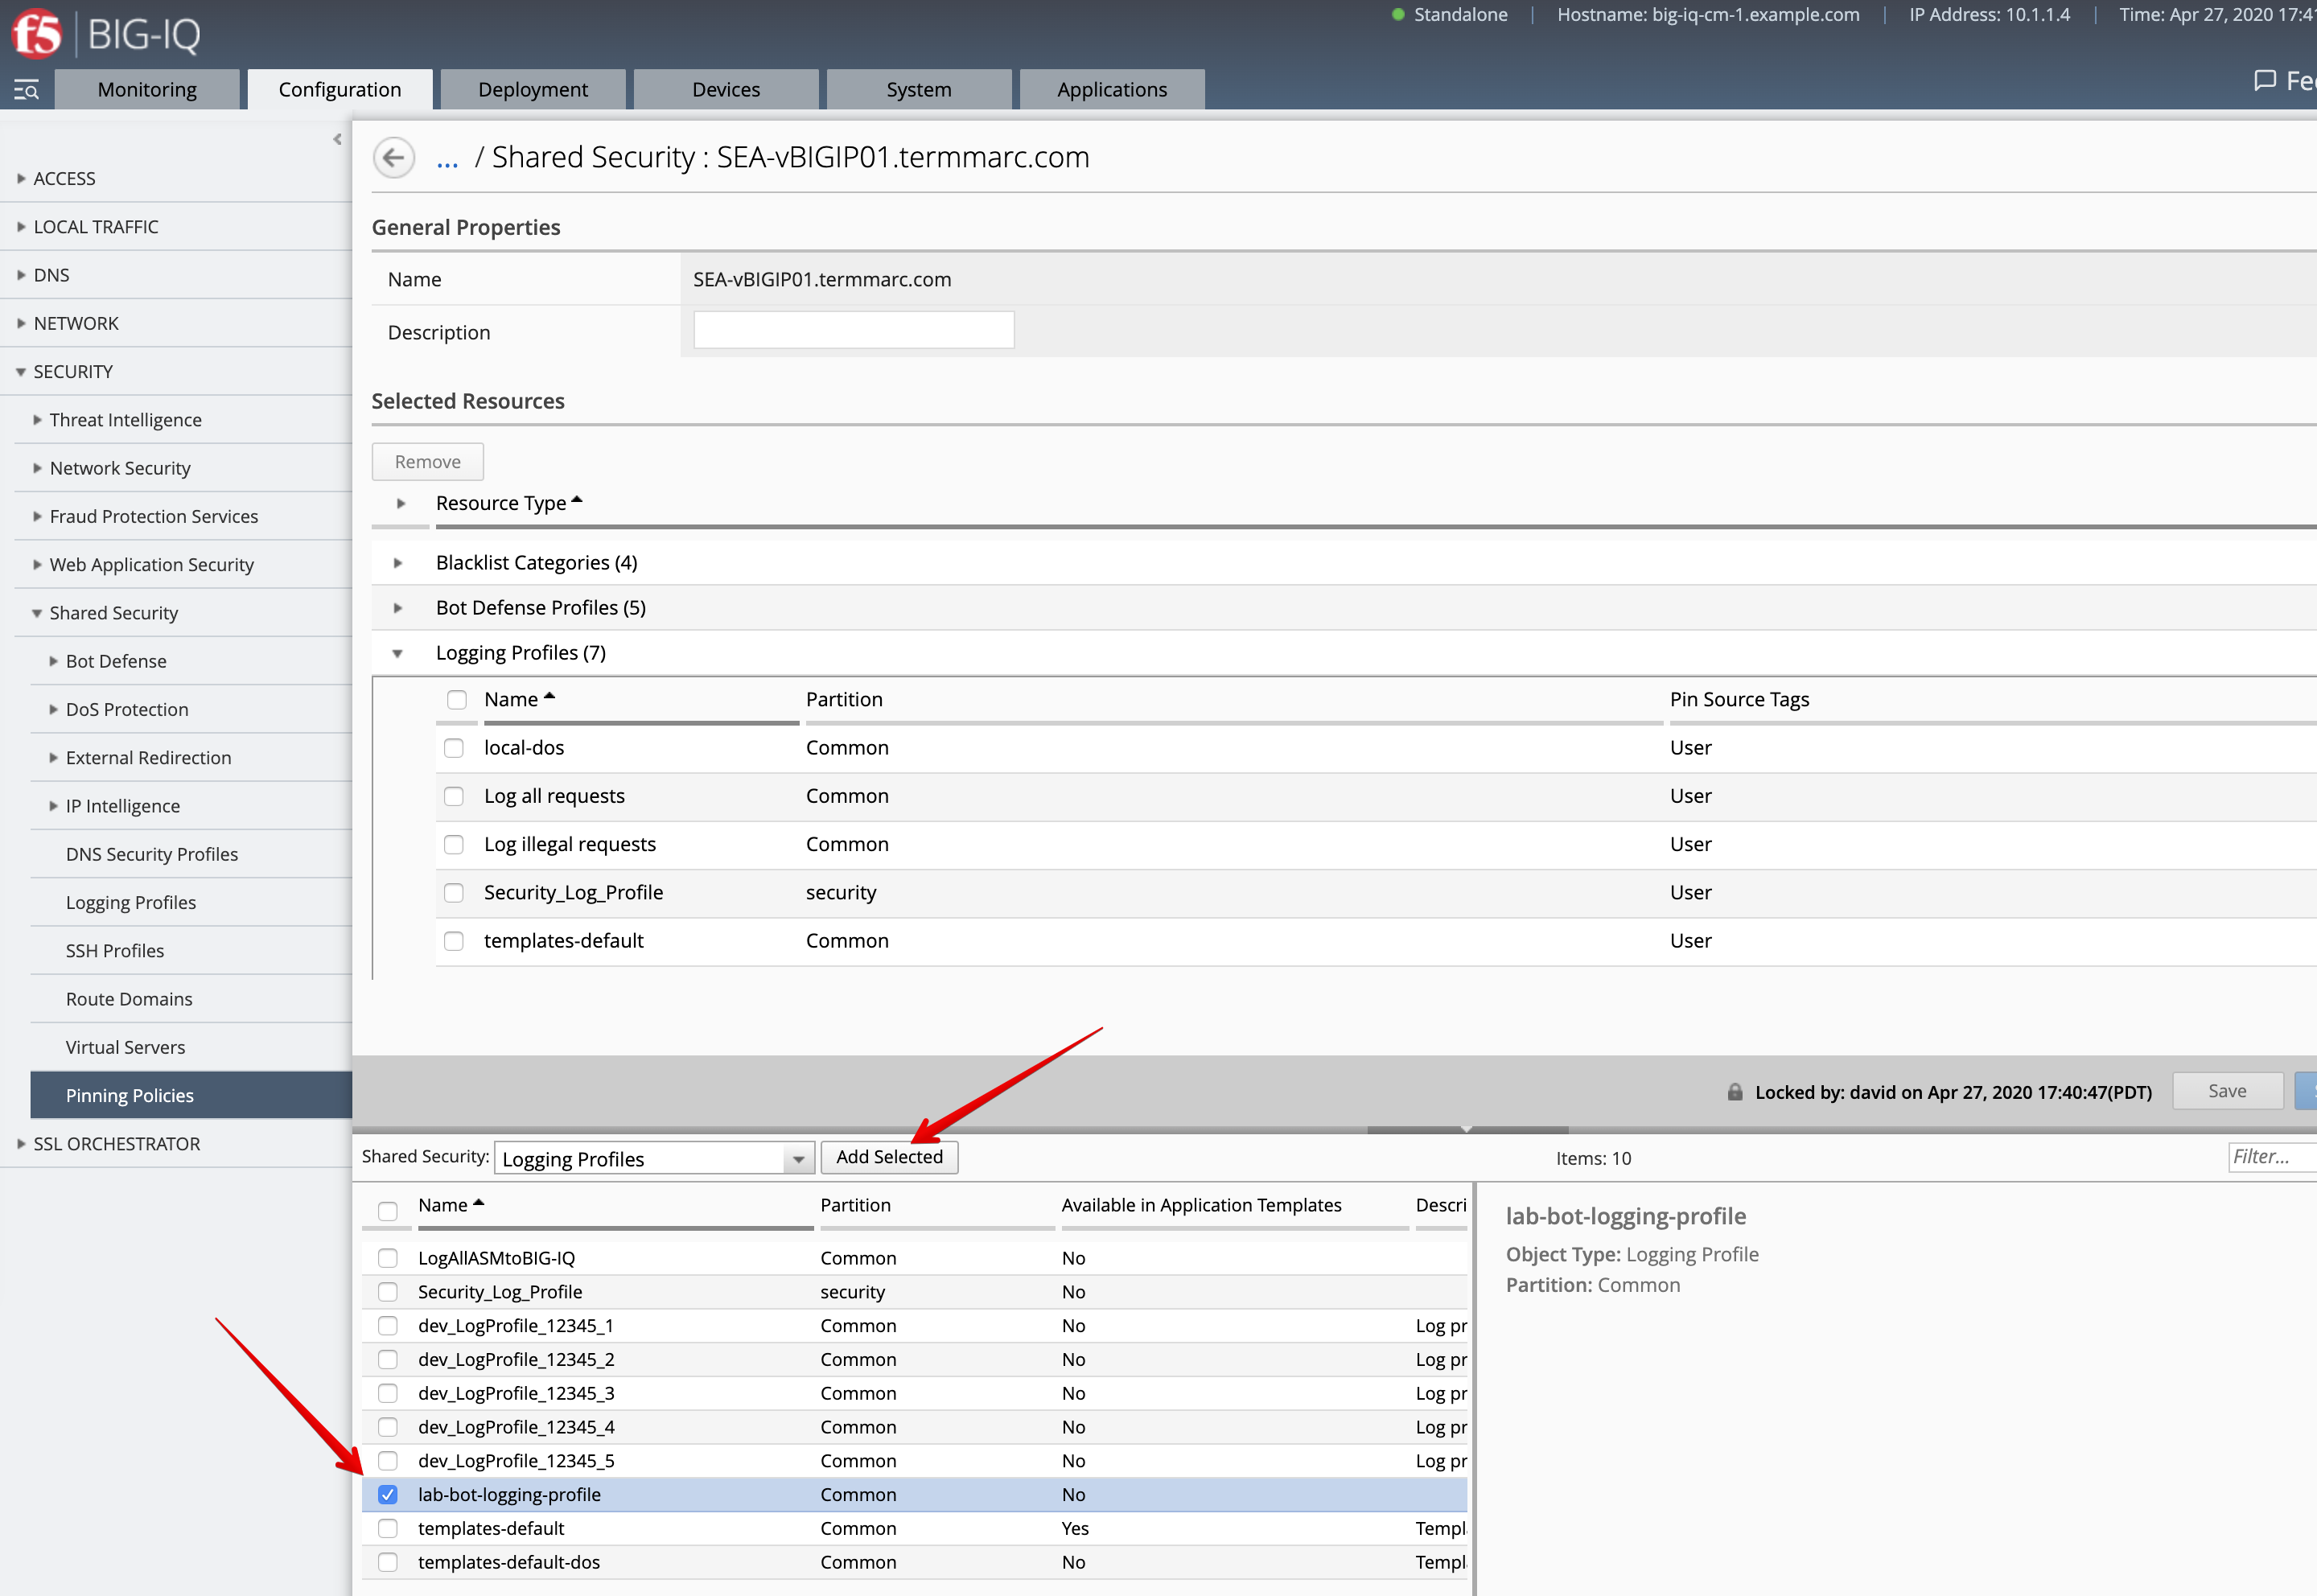
- Pin the new Bot logging profile to the SEA-vBIGIP01.termmarc.com device. Navigate to Pinning Policies and add it to SEA-vBIGIP01.termmarc.com.
ASM Bot Defense Profile creation
Warning
This step is only for BIG-IQ => 7.1, go see the Annex at the end if you are using a lower version.
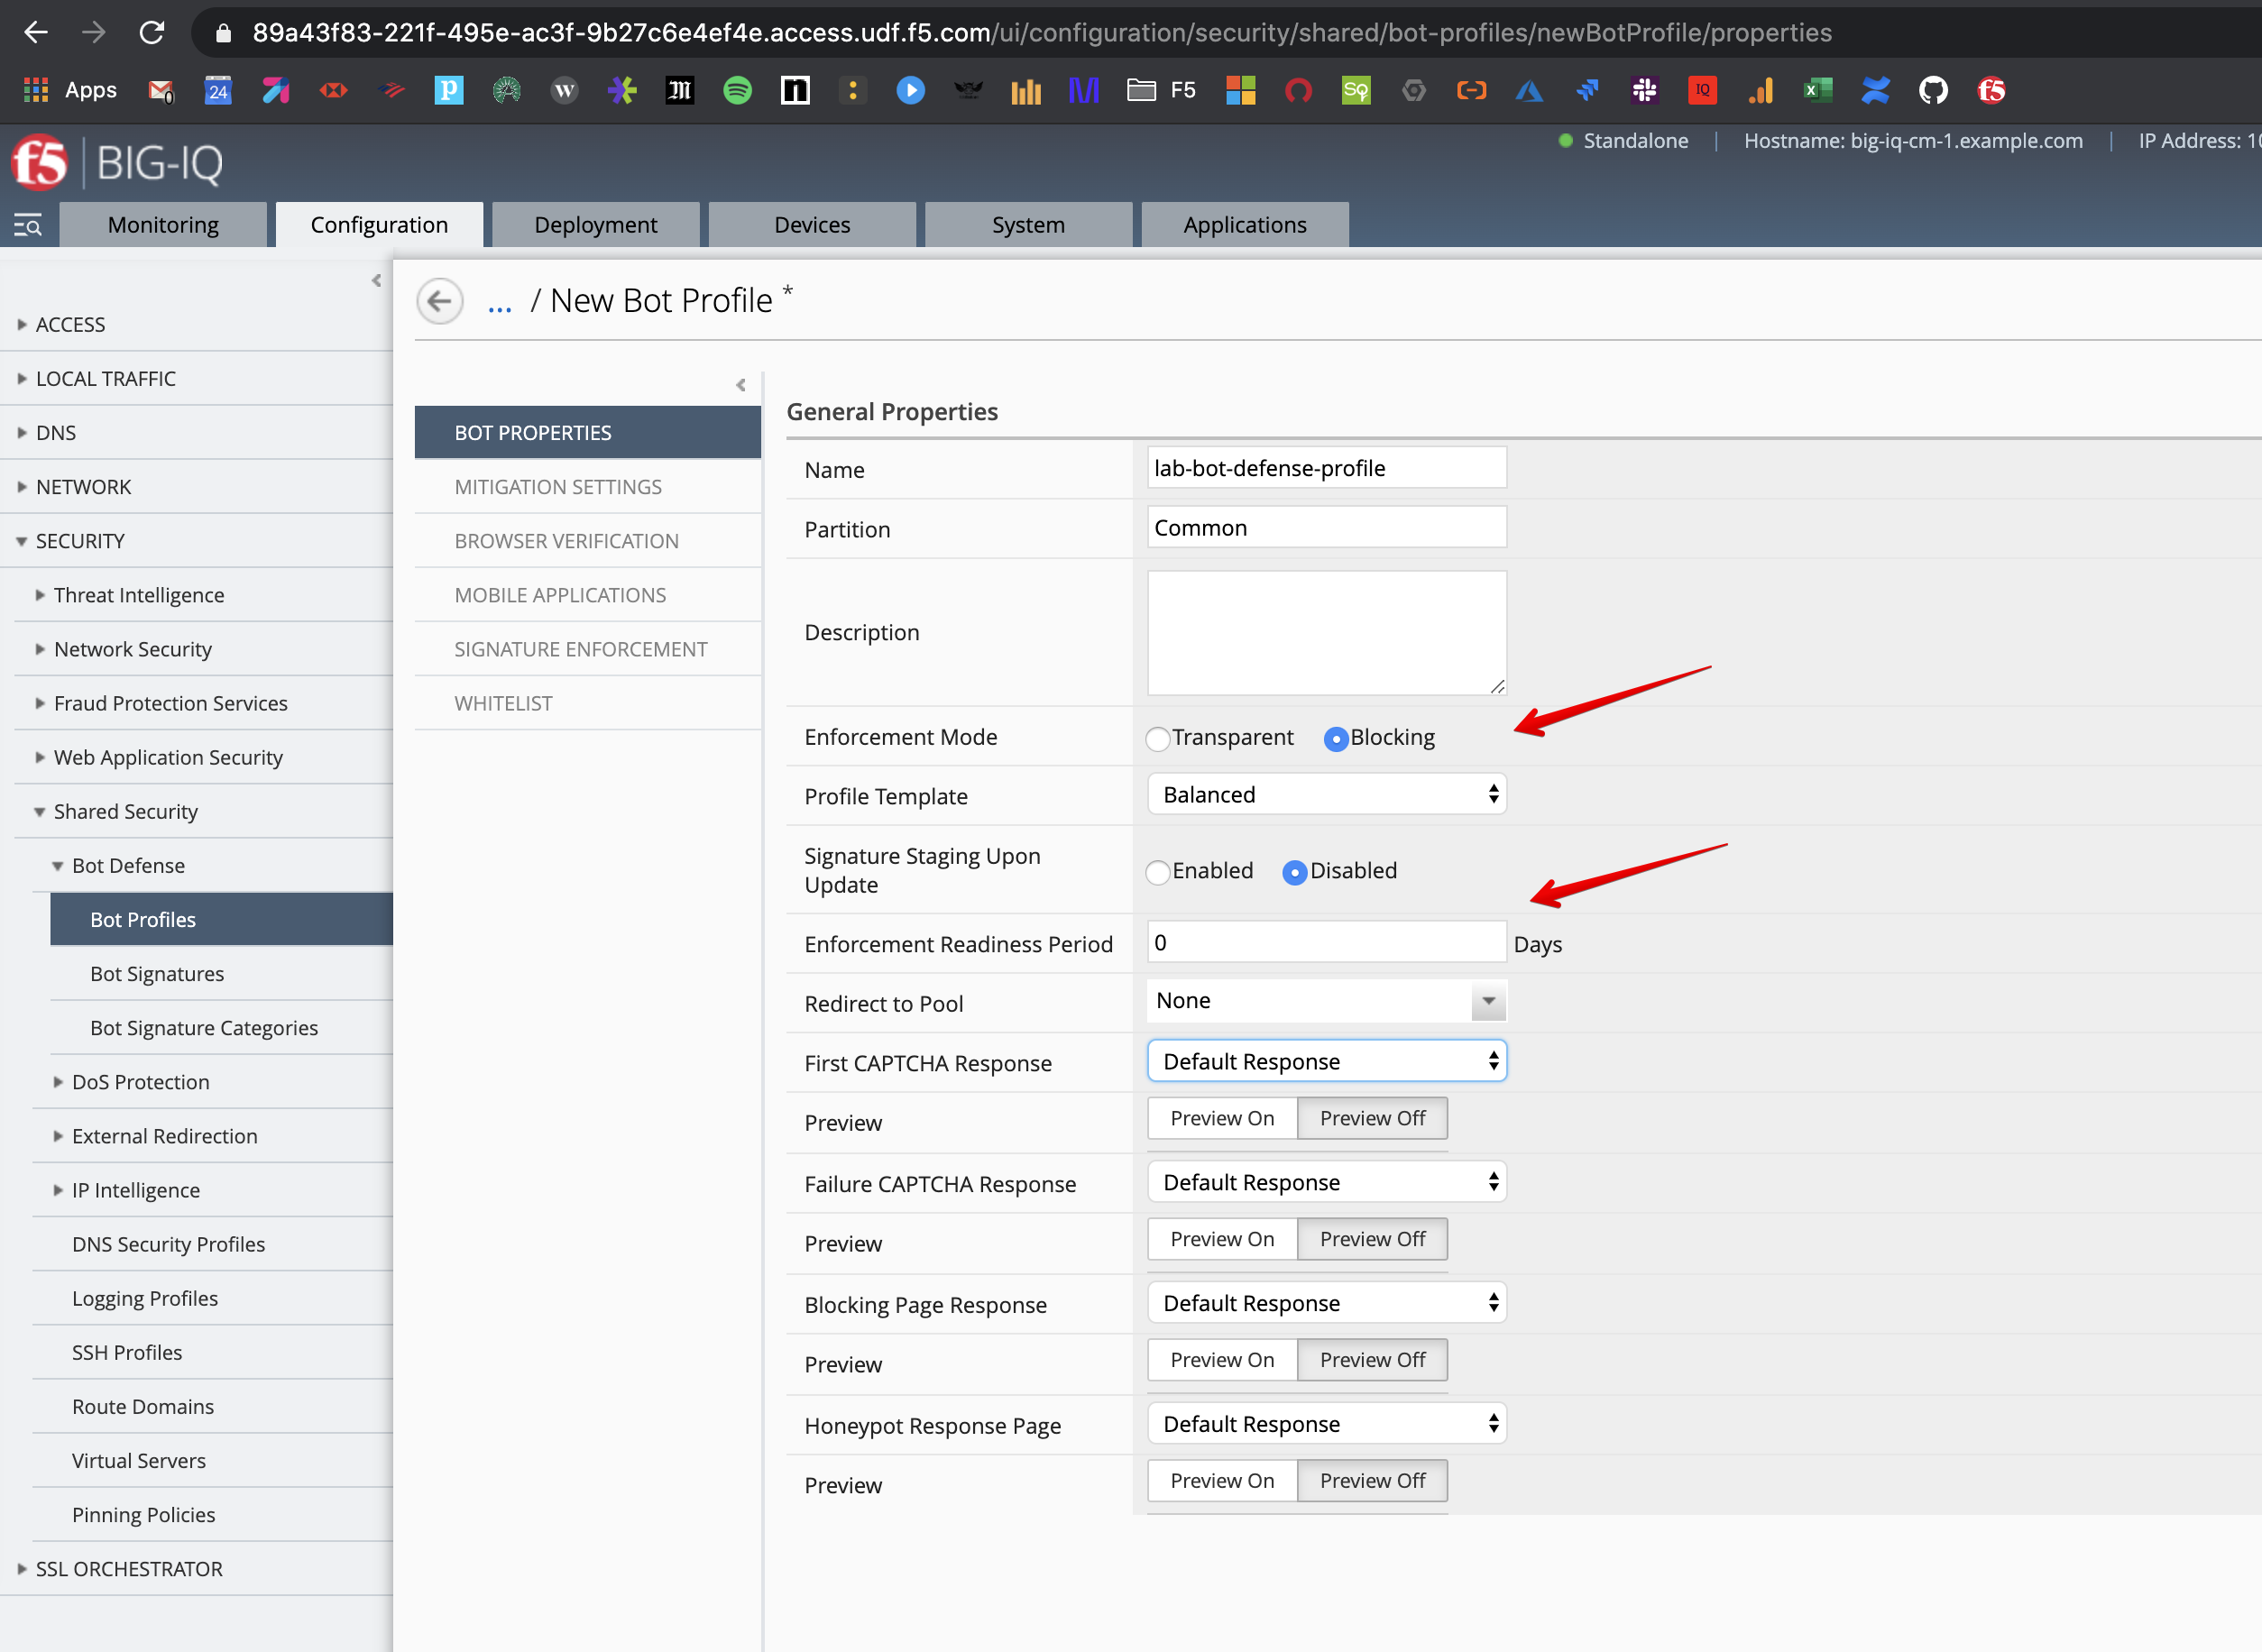
- While logged in as larry, go to Configuration > SECURITY > Shared Security > Bot Defense > Bot Profiles, click Create and fill in the settings:
- Name:
lab-bot-defense-profile - Enforcement Mode:
Blocking - Enforcement Readiness Period:
0(lab only)
BROWSER VERIFICATION:
- Browser Access:
Allowed - Browser Verification:
Verify After Access (Blocking)
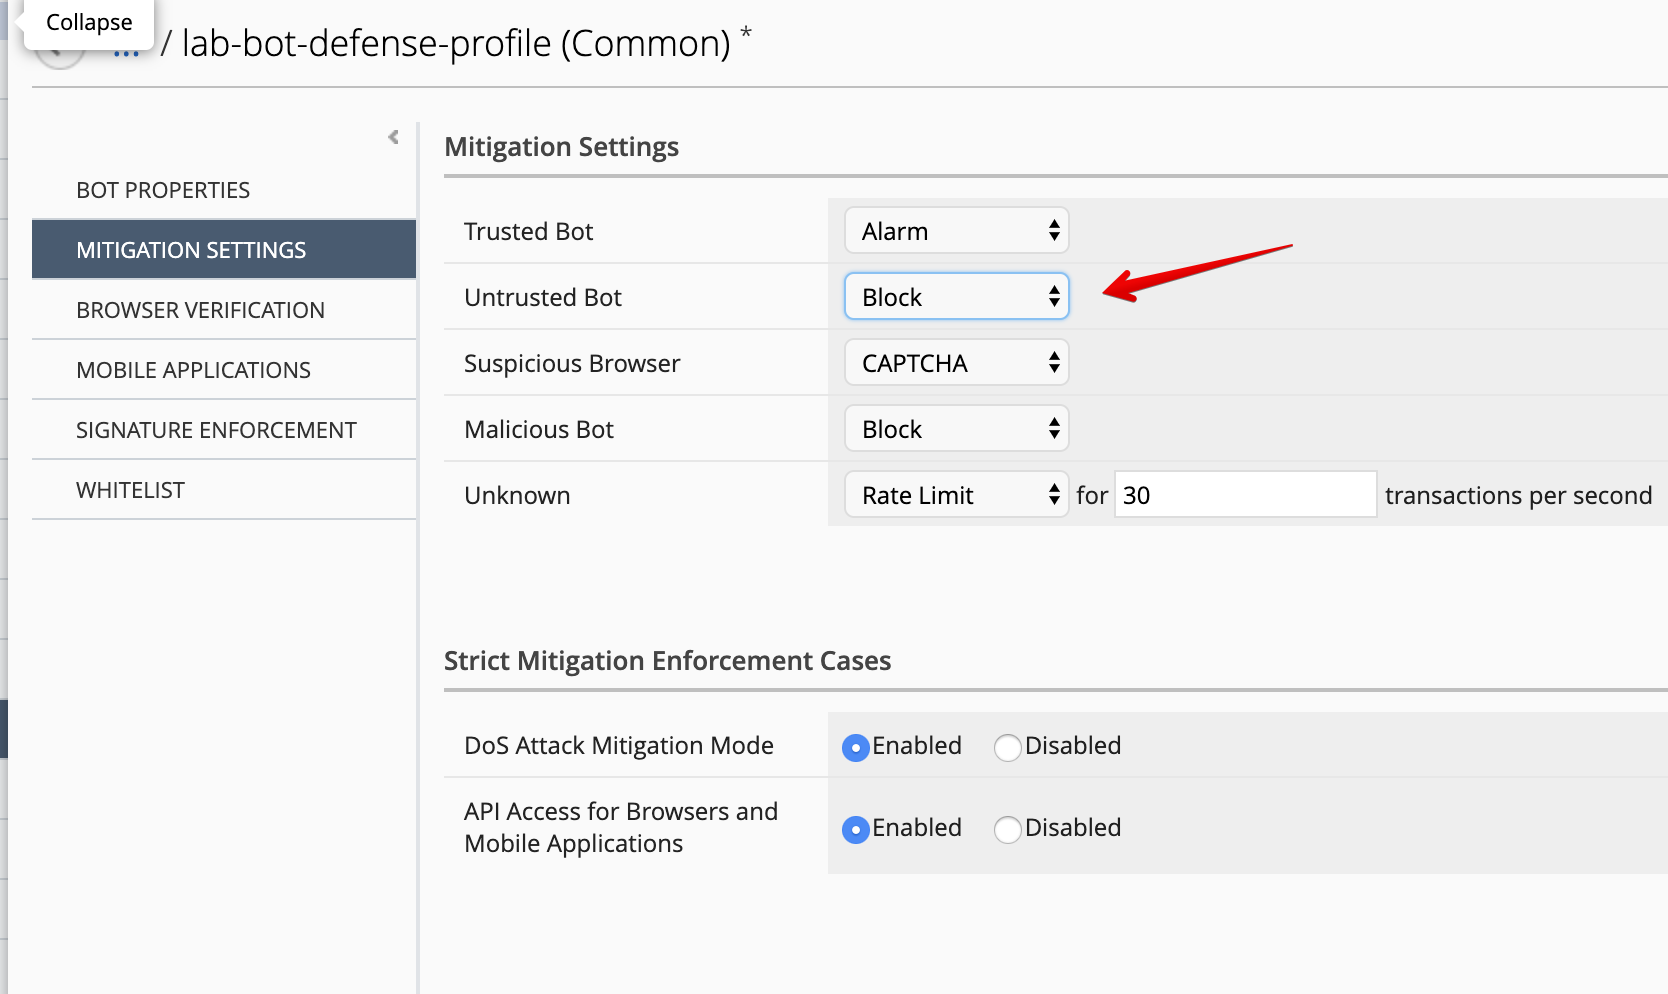
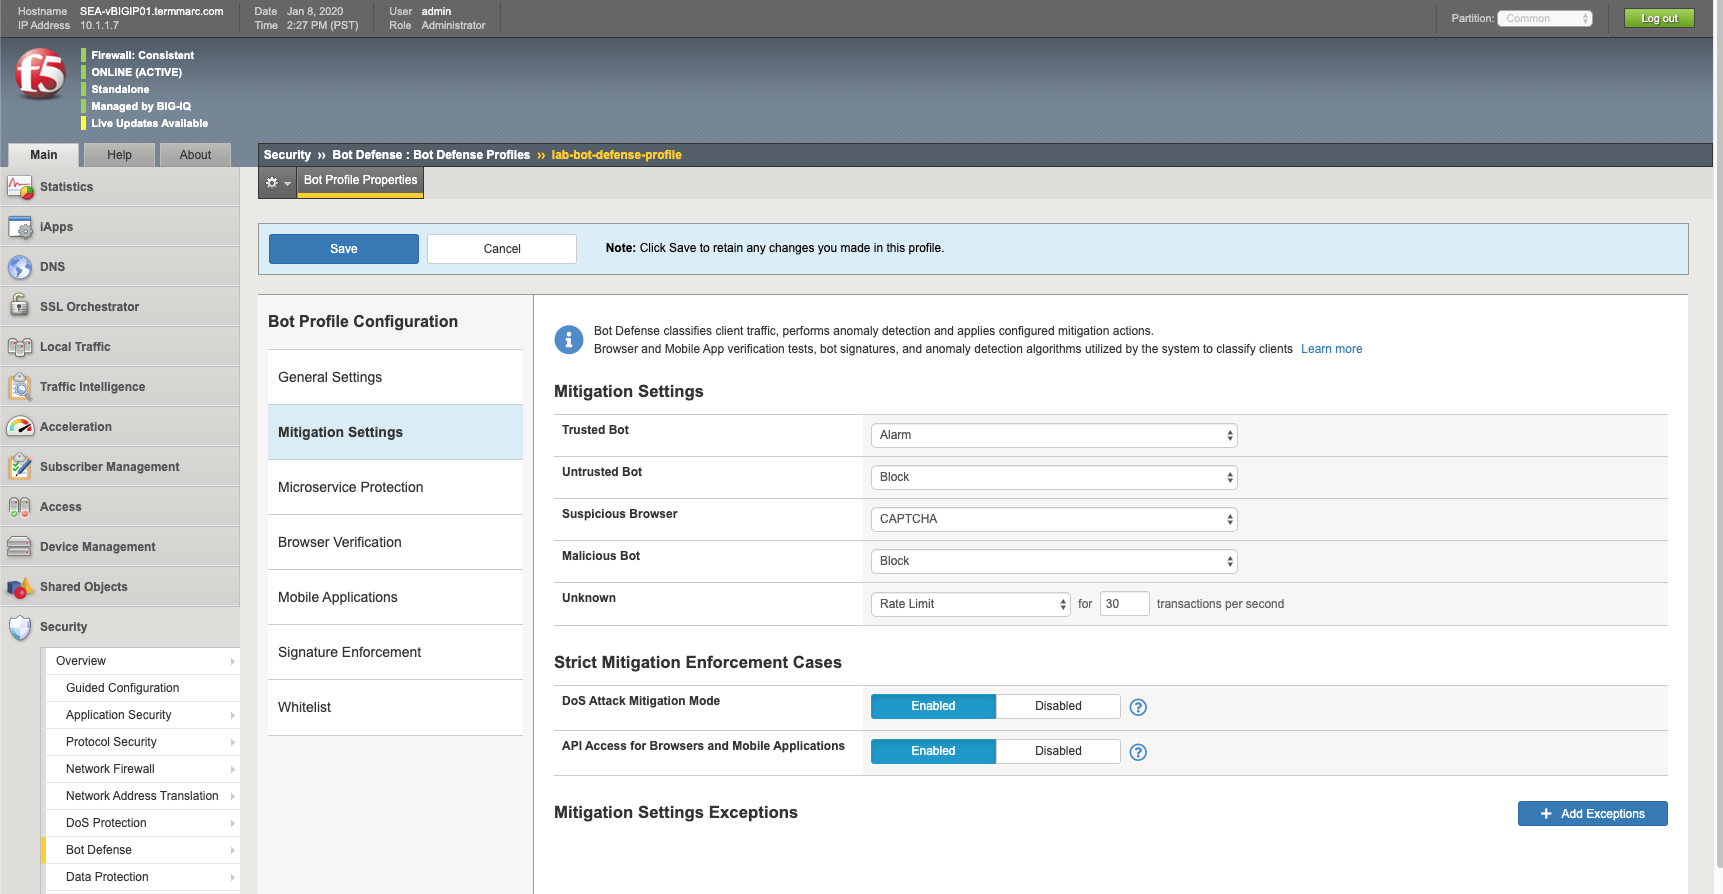
MITIGATION SETTINGS:
- Untrusted bot:
Block
Note
As per K42323285: Overview of the unified Bot Defense profile the available options for the configuration elements.
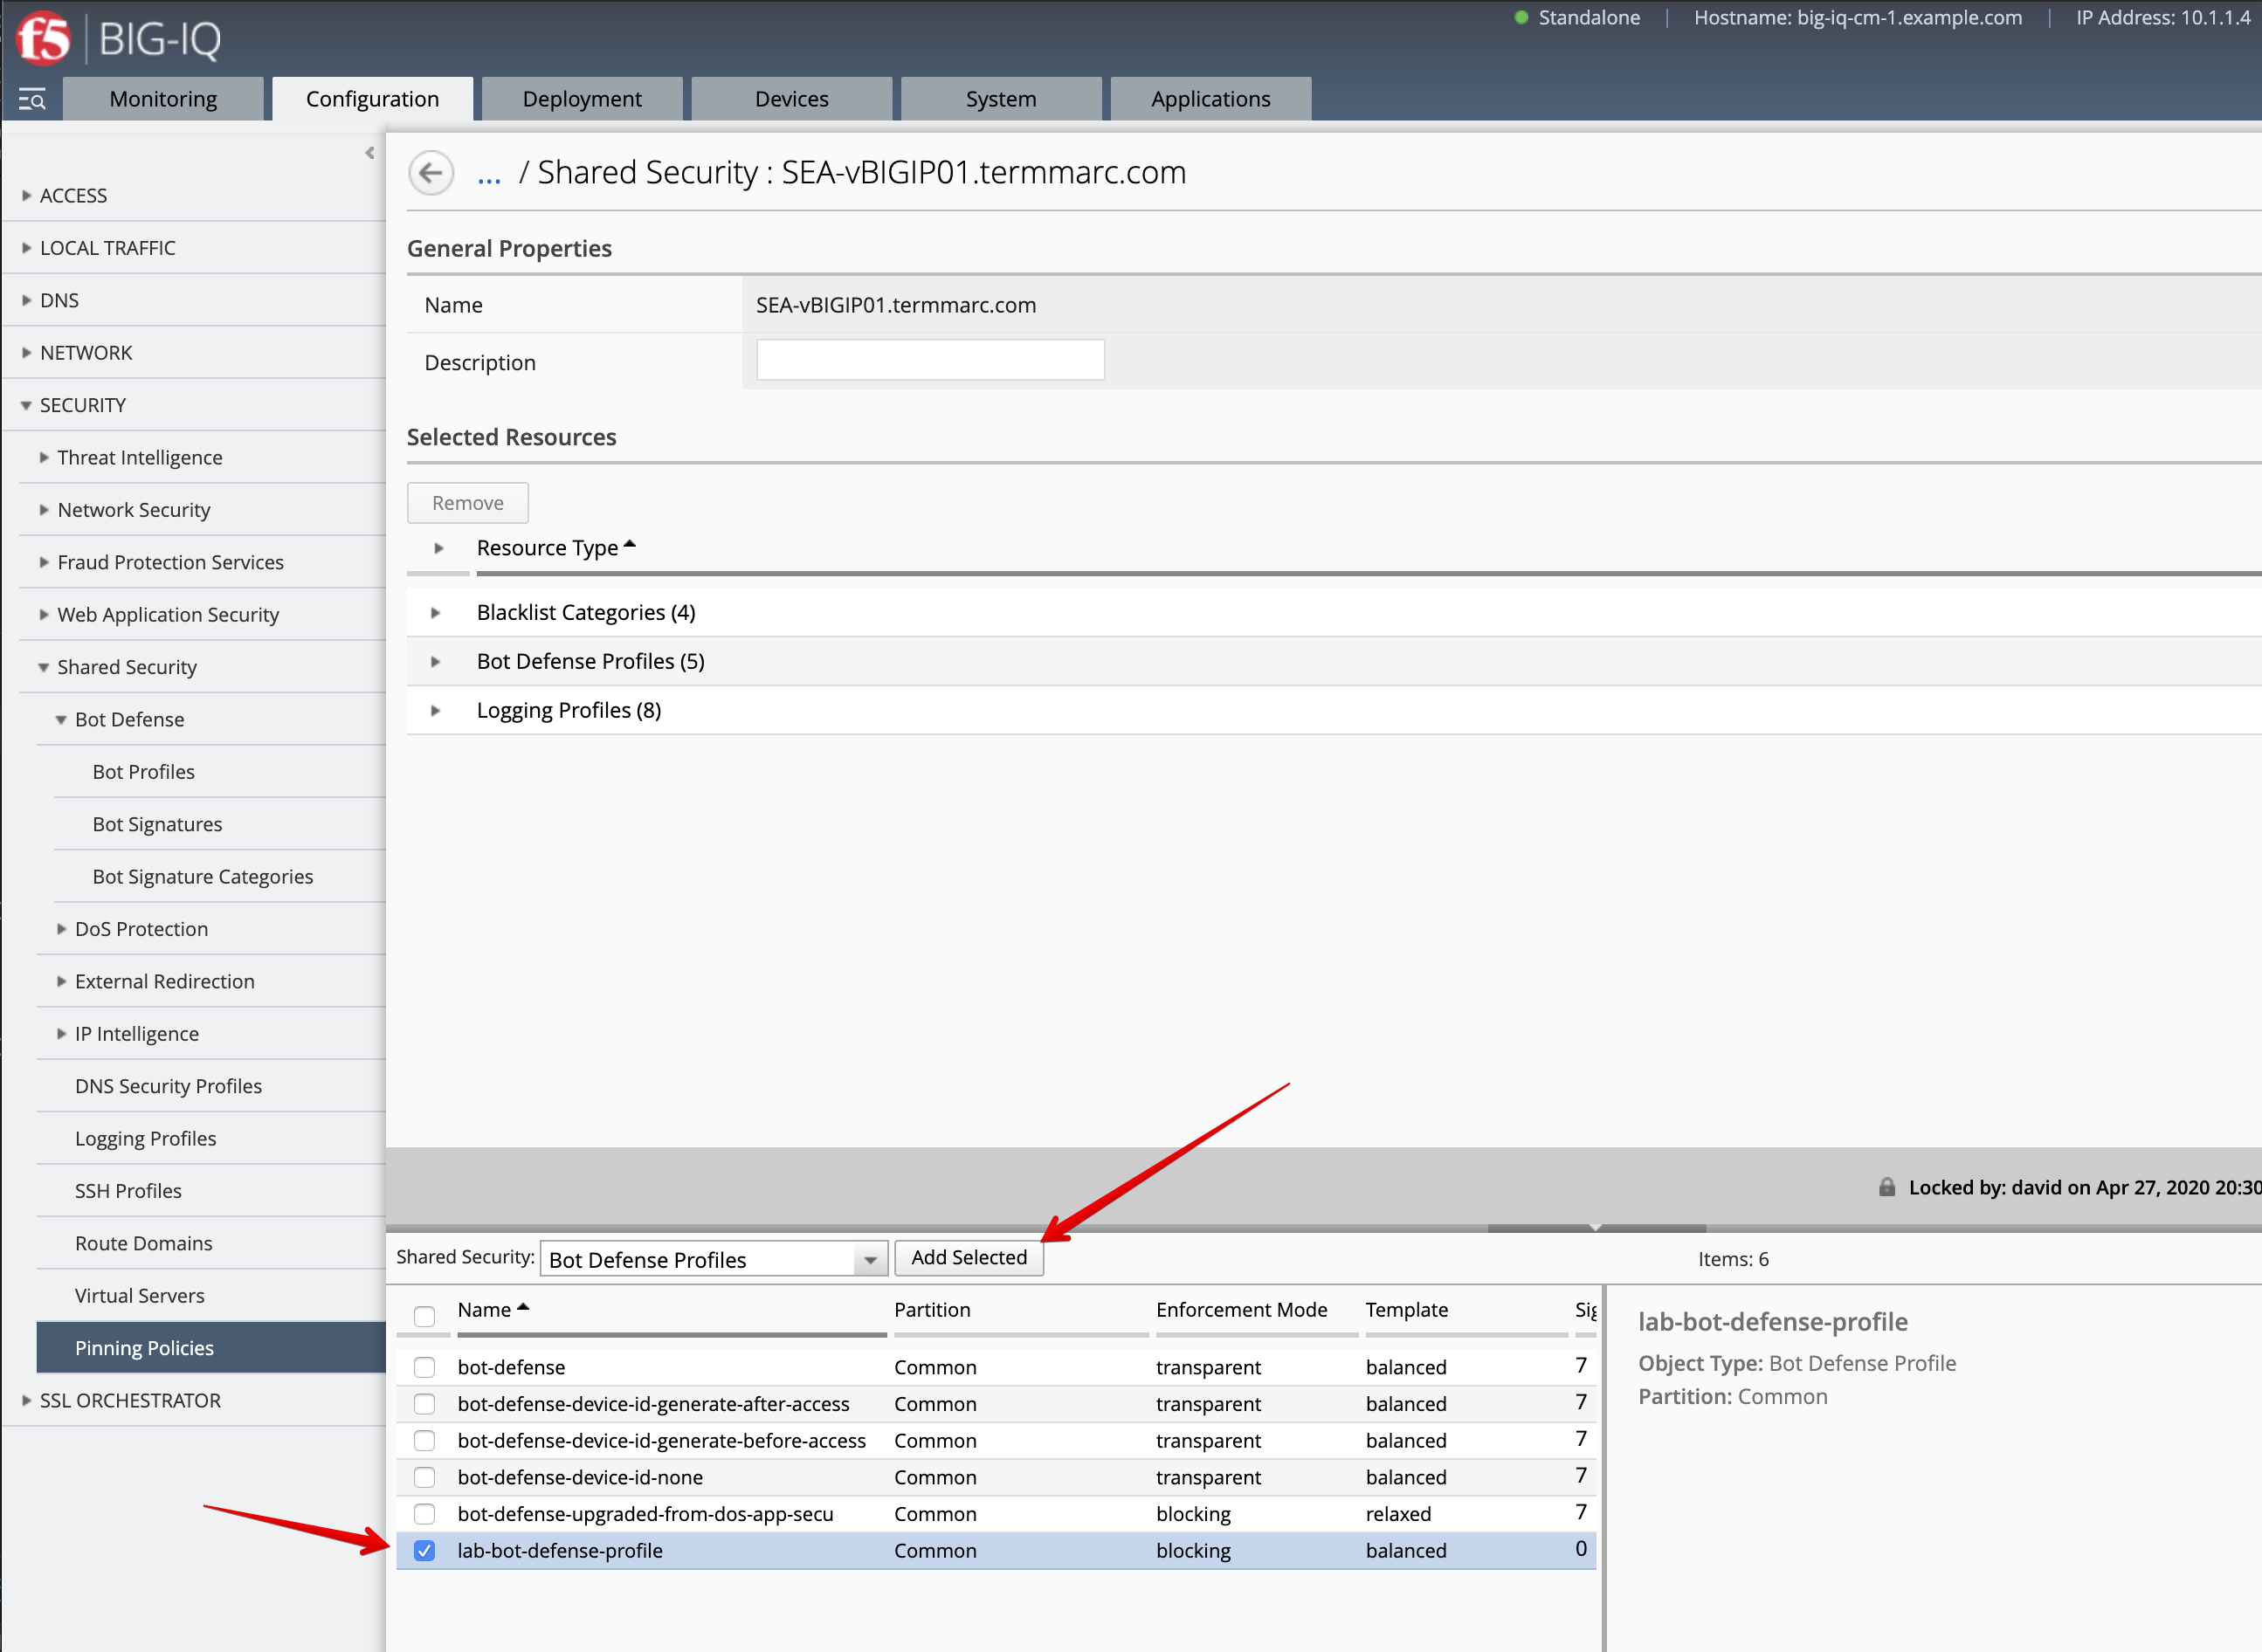
- Pin the new BOT Defense Profile to the SEA-vBIGIP01.termmarc.com device. Navigate to Pinning Policies and add the Bot Defense Profile previously created to SEA-vBIGIP01.termmarc.com.
- Deploy the Bot Defense profile along with the Bot Logging Profile. Go to Deployment > EVALUATE & DEPLOY > Shared Security.
Create a Deployment to deploy the Remote Logging Changes on the SEA BIG-IP.
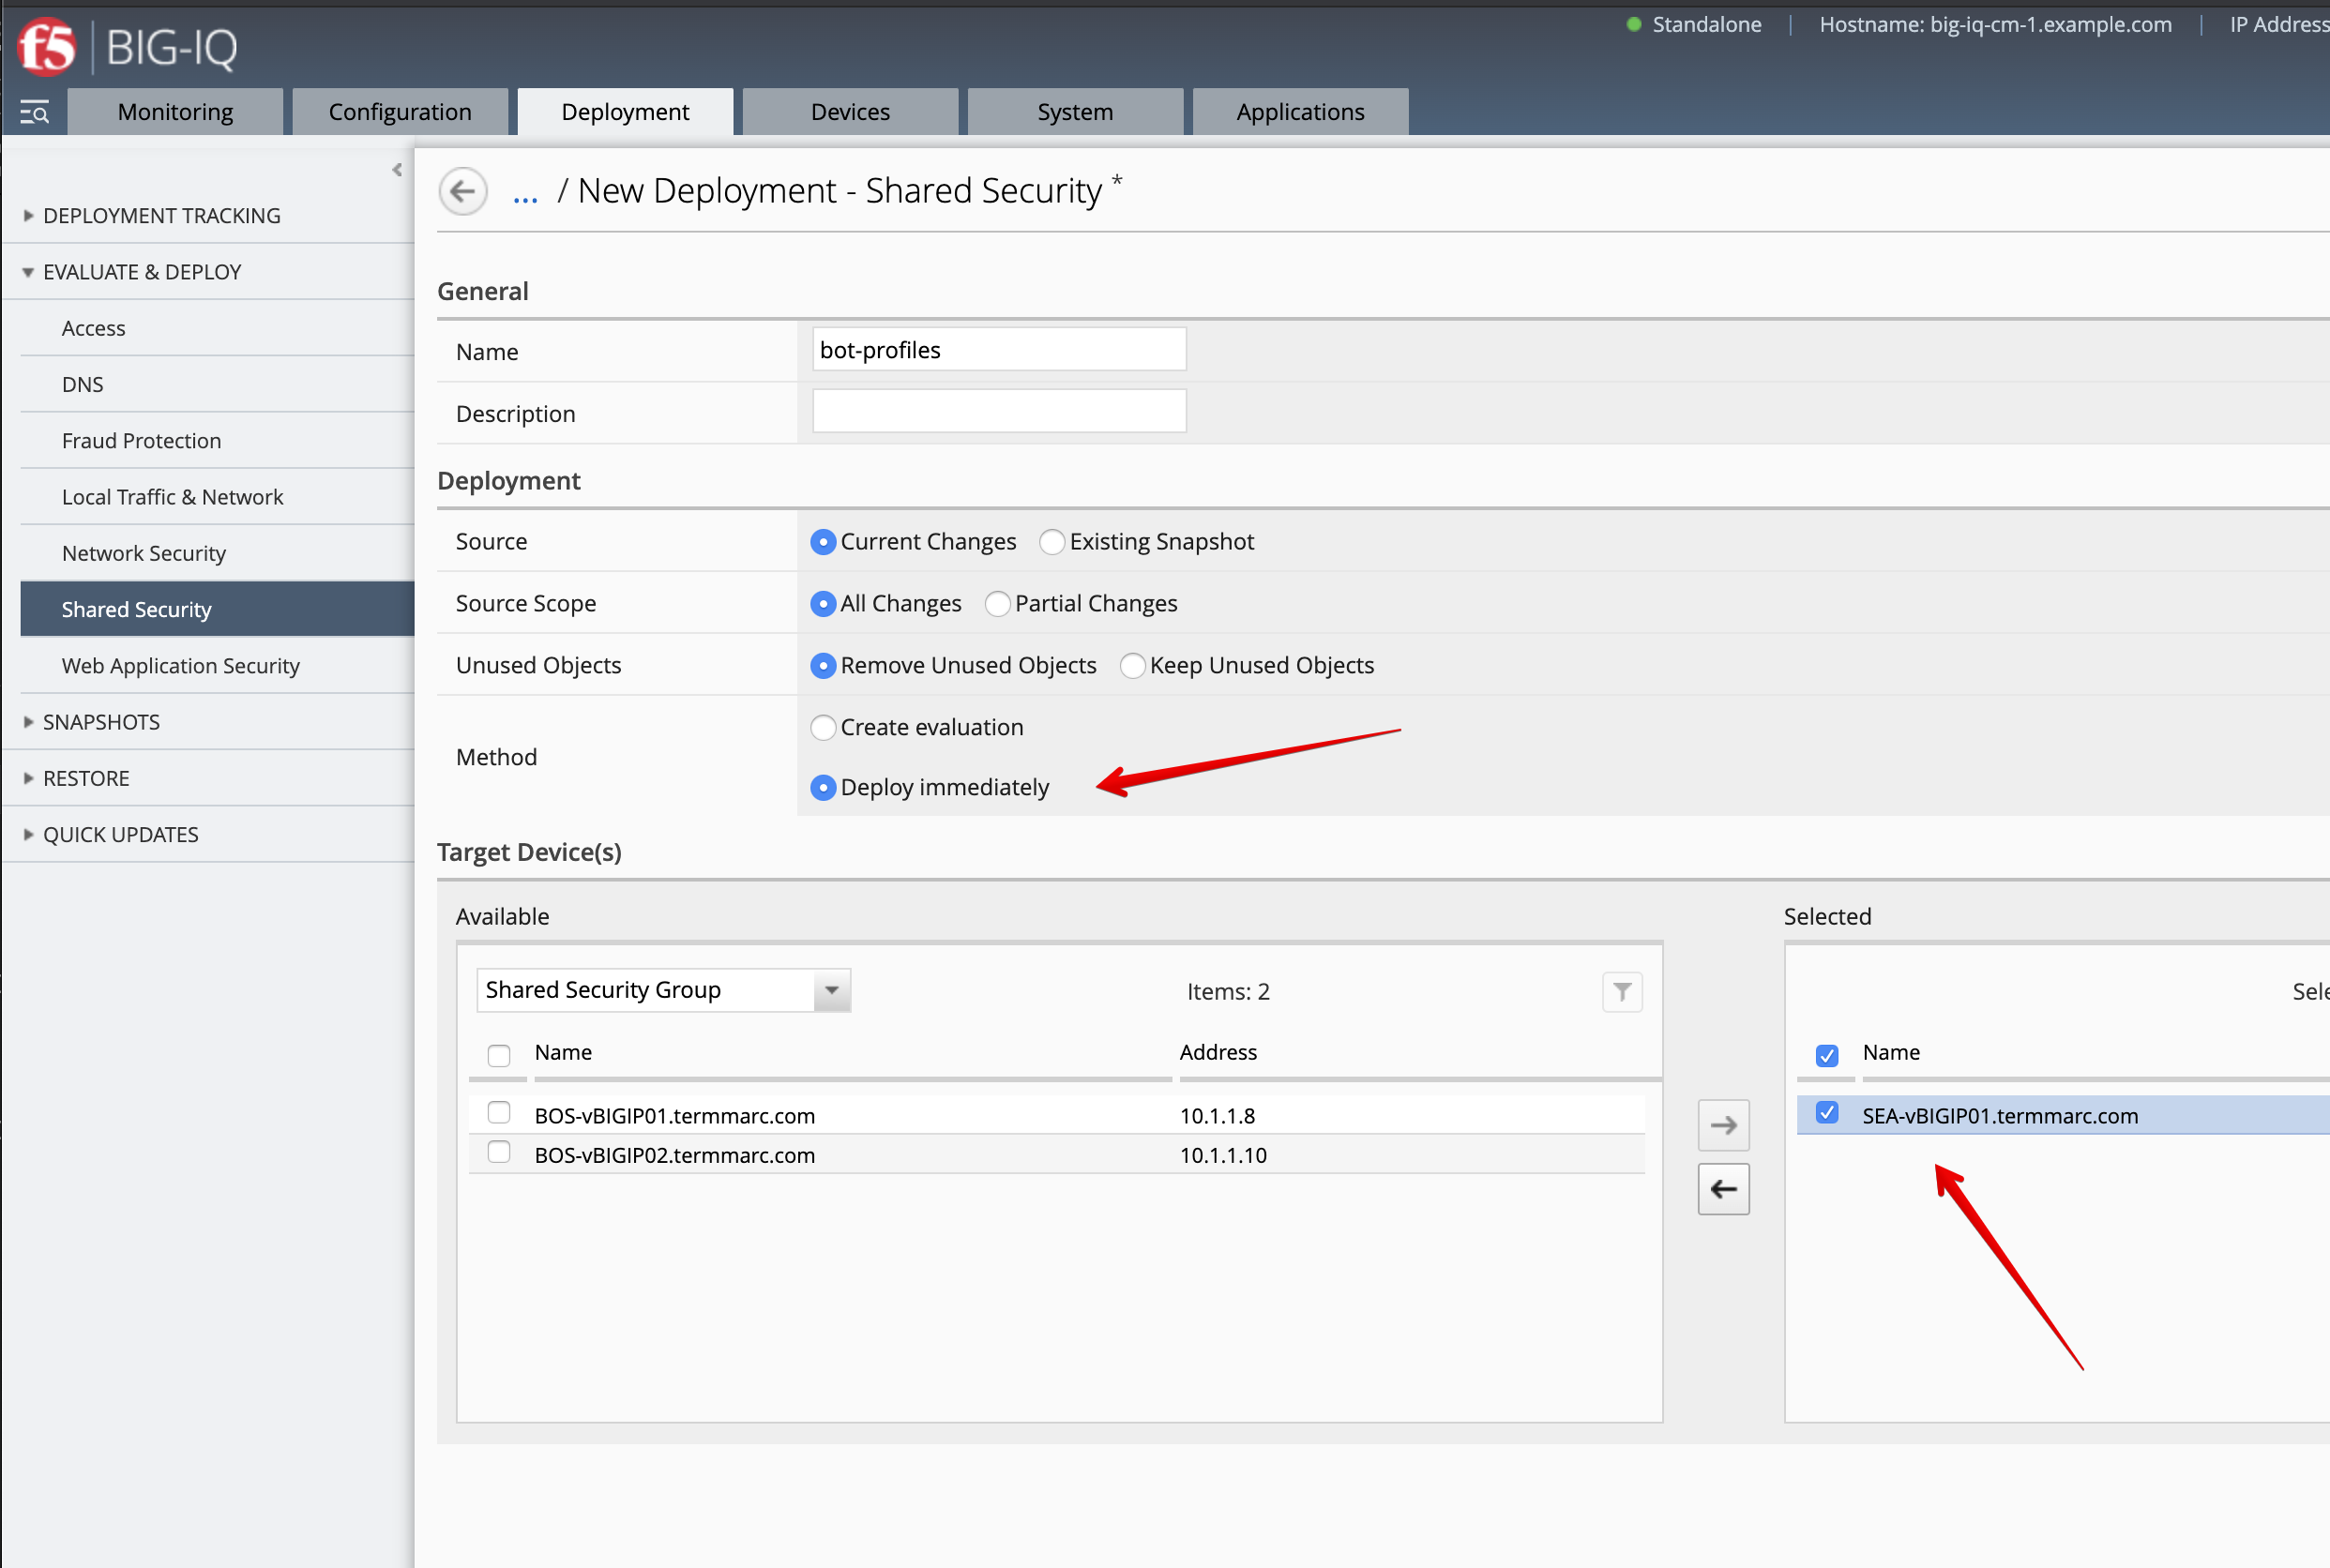
Make sure the deployment is successful.
AS3 Bot Template creation and application service deployment
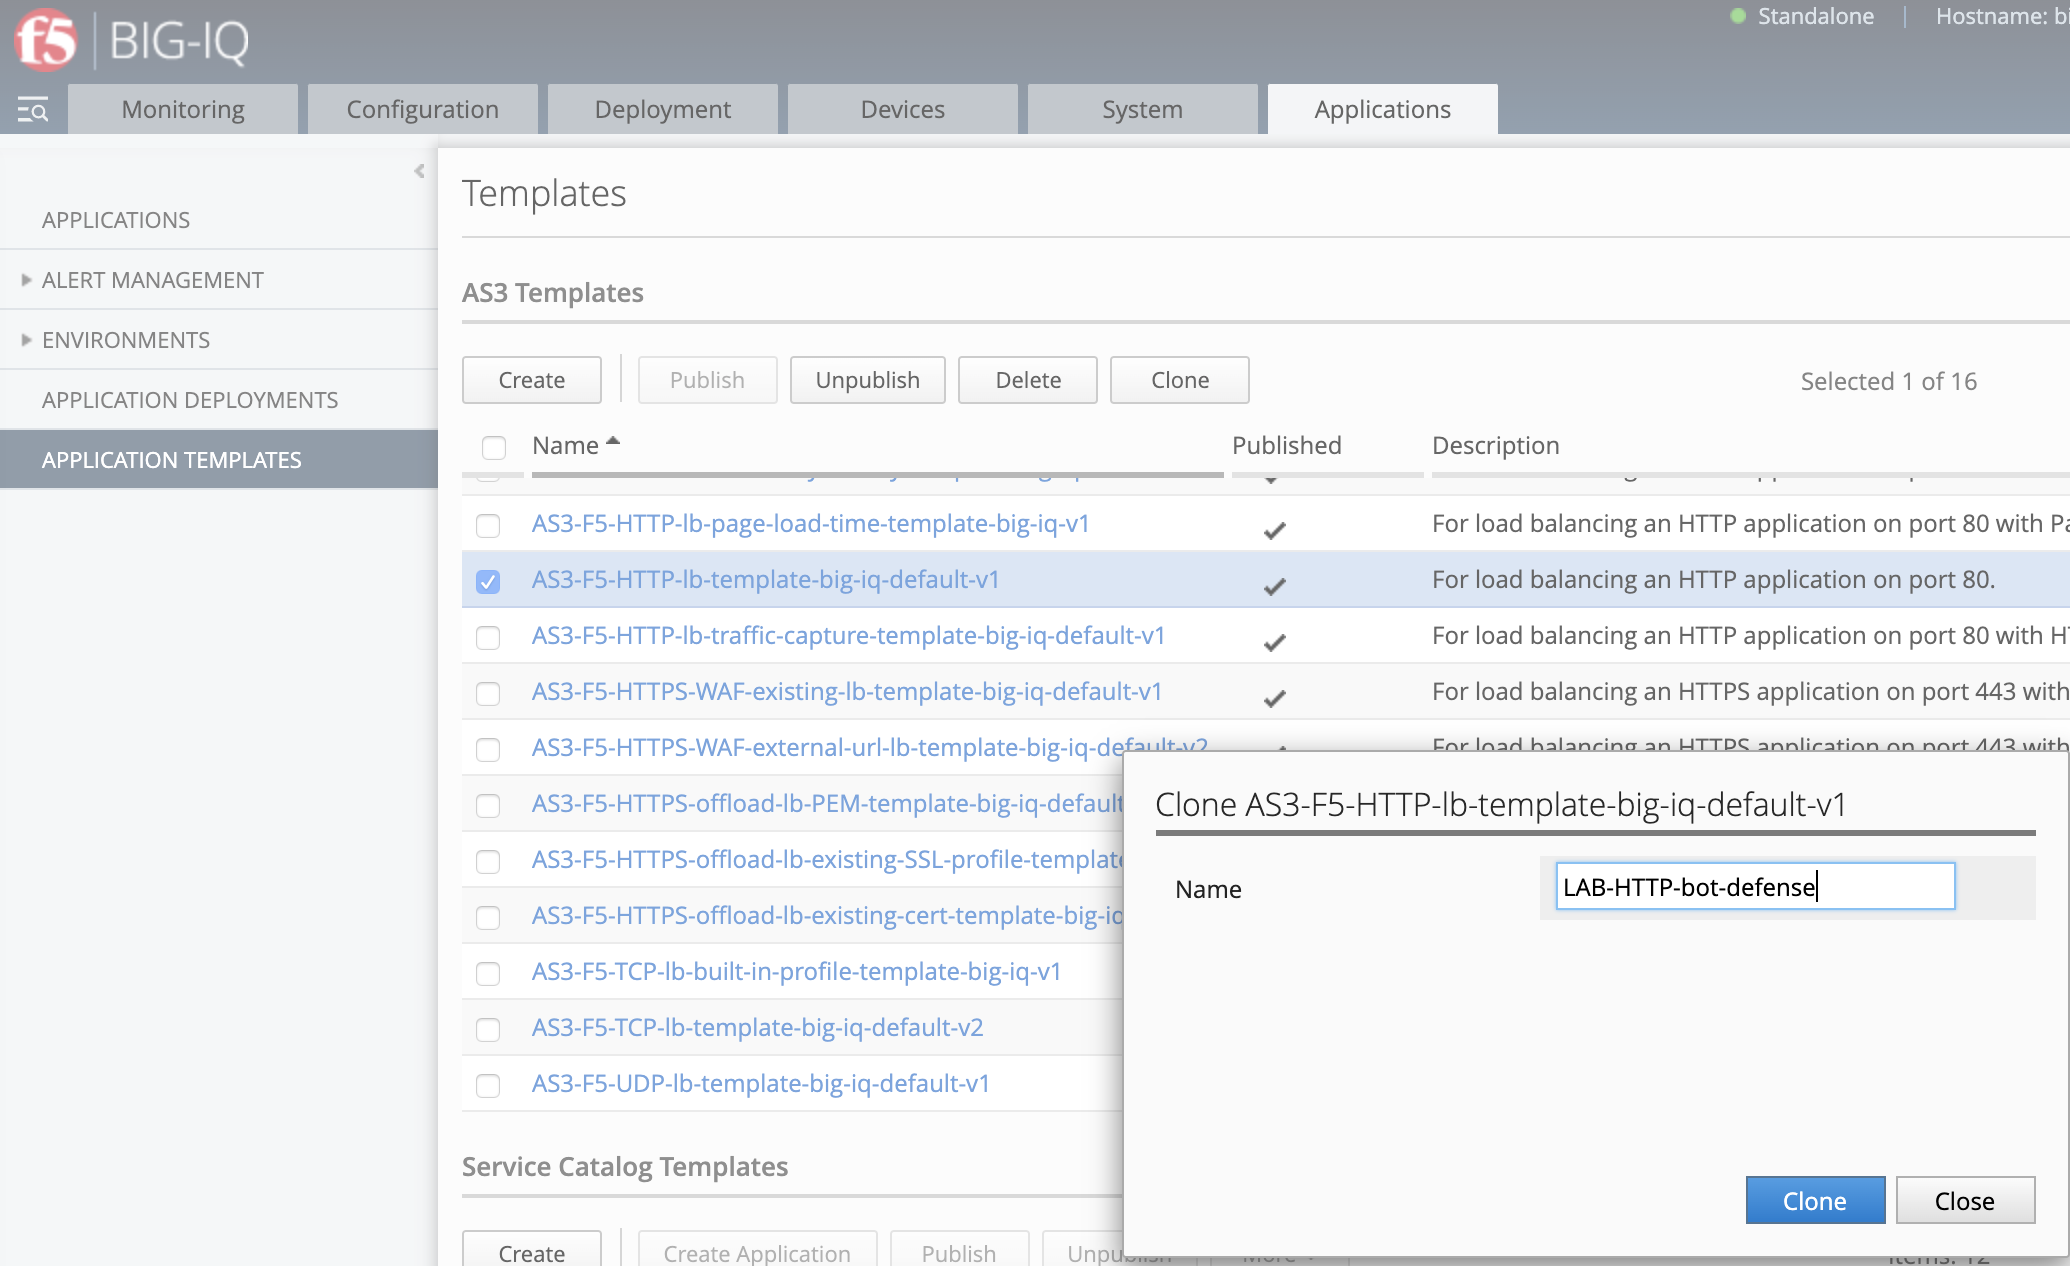
- While logged in as david, navigate to the Applications tab > APPLICATION TEMPLATES.
Select the AS3-F5-HTTP-lb-template-big-iq-default-<version> AS3 Template and clone it.
Rename it LAB-HTTP-bot-defense.
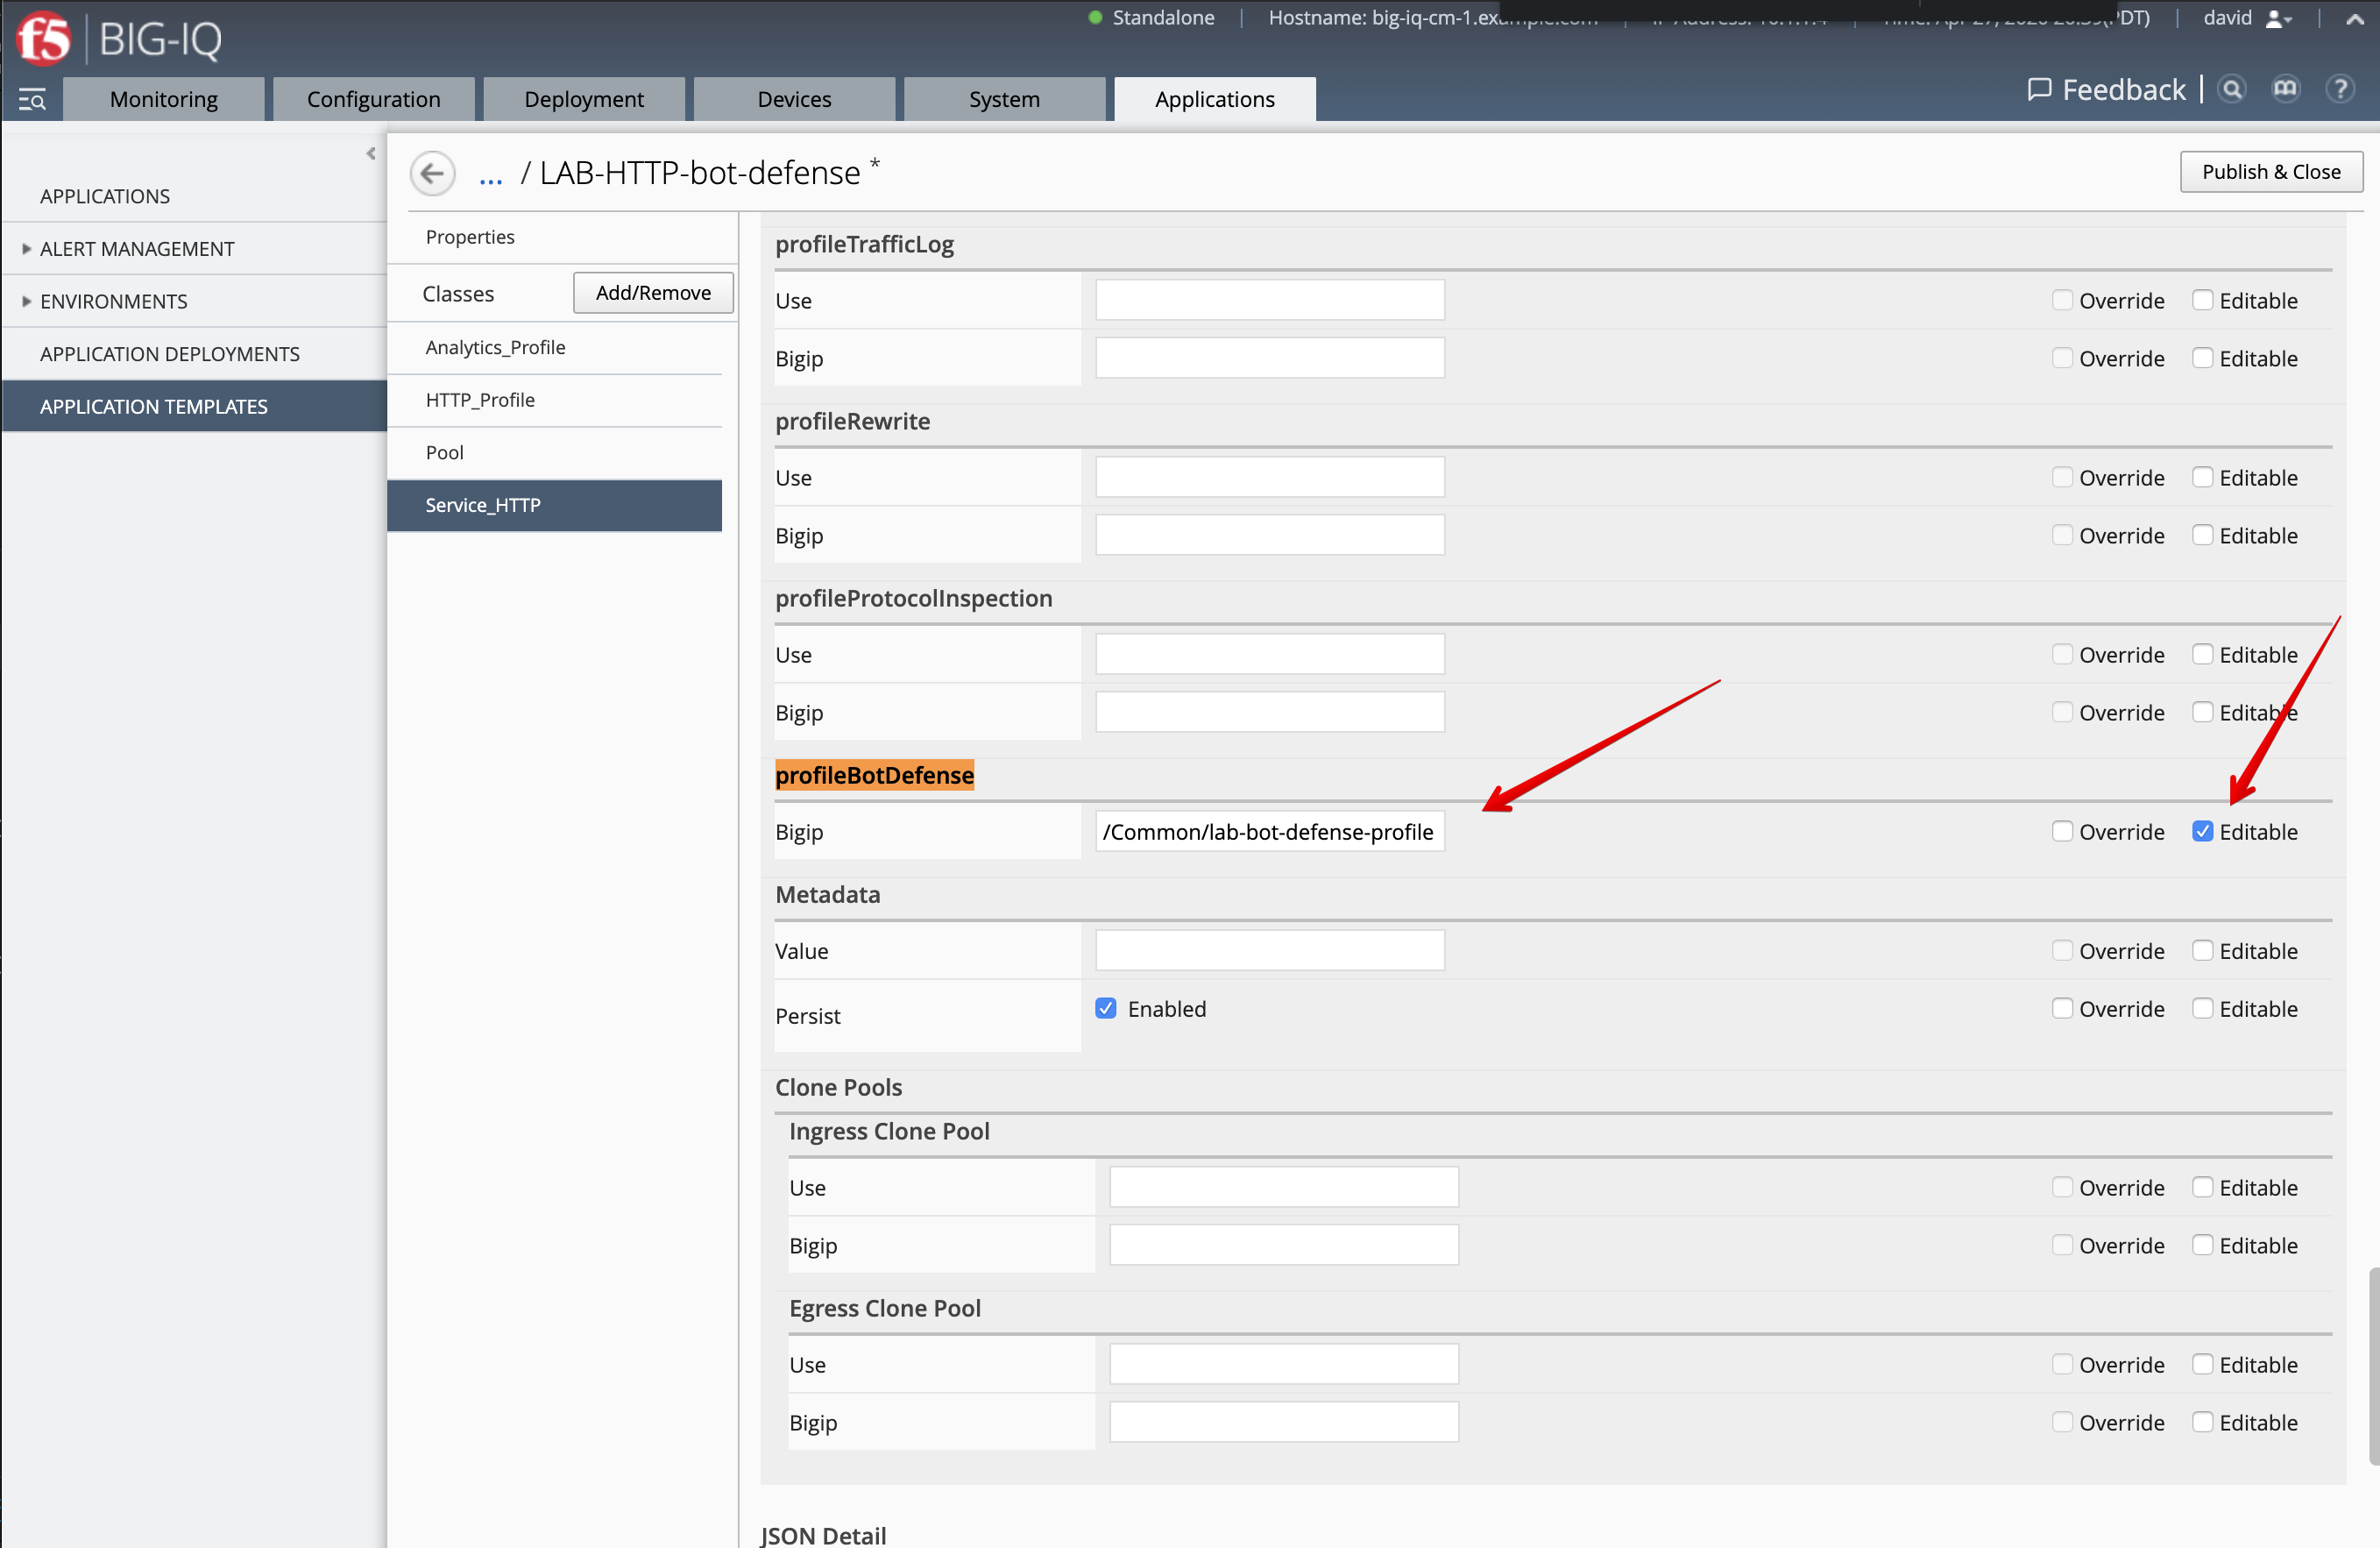
Edit the new cloned template and select the Service_HTTP class.
- Look for the attribute called
profileBotDefenseand set it to/Common/lab-bot-defense-profile. - Check the
Editabletick box
- Look for the attribute called
Security Log Profilesand set it to/Common/lab-bot-logging-profile. - Check the
Editabletick box
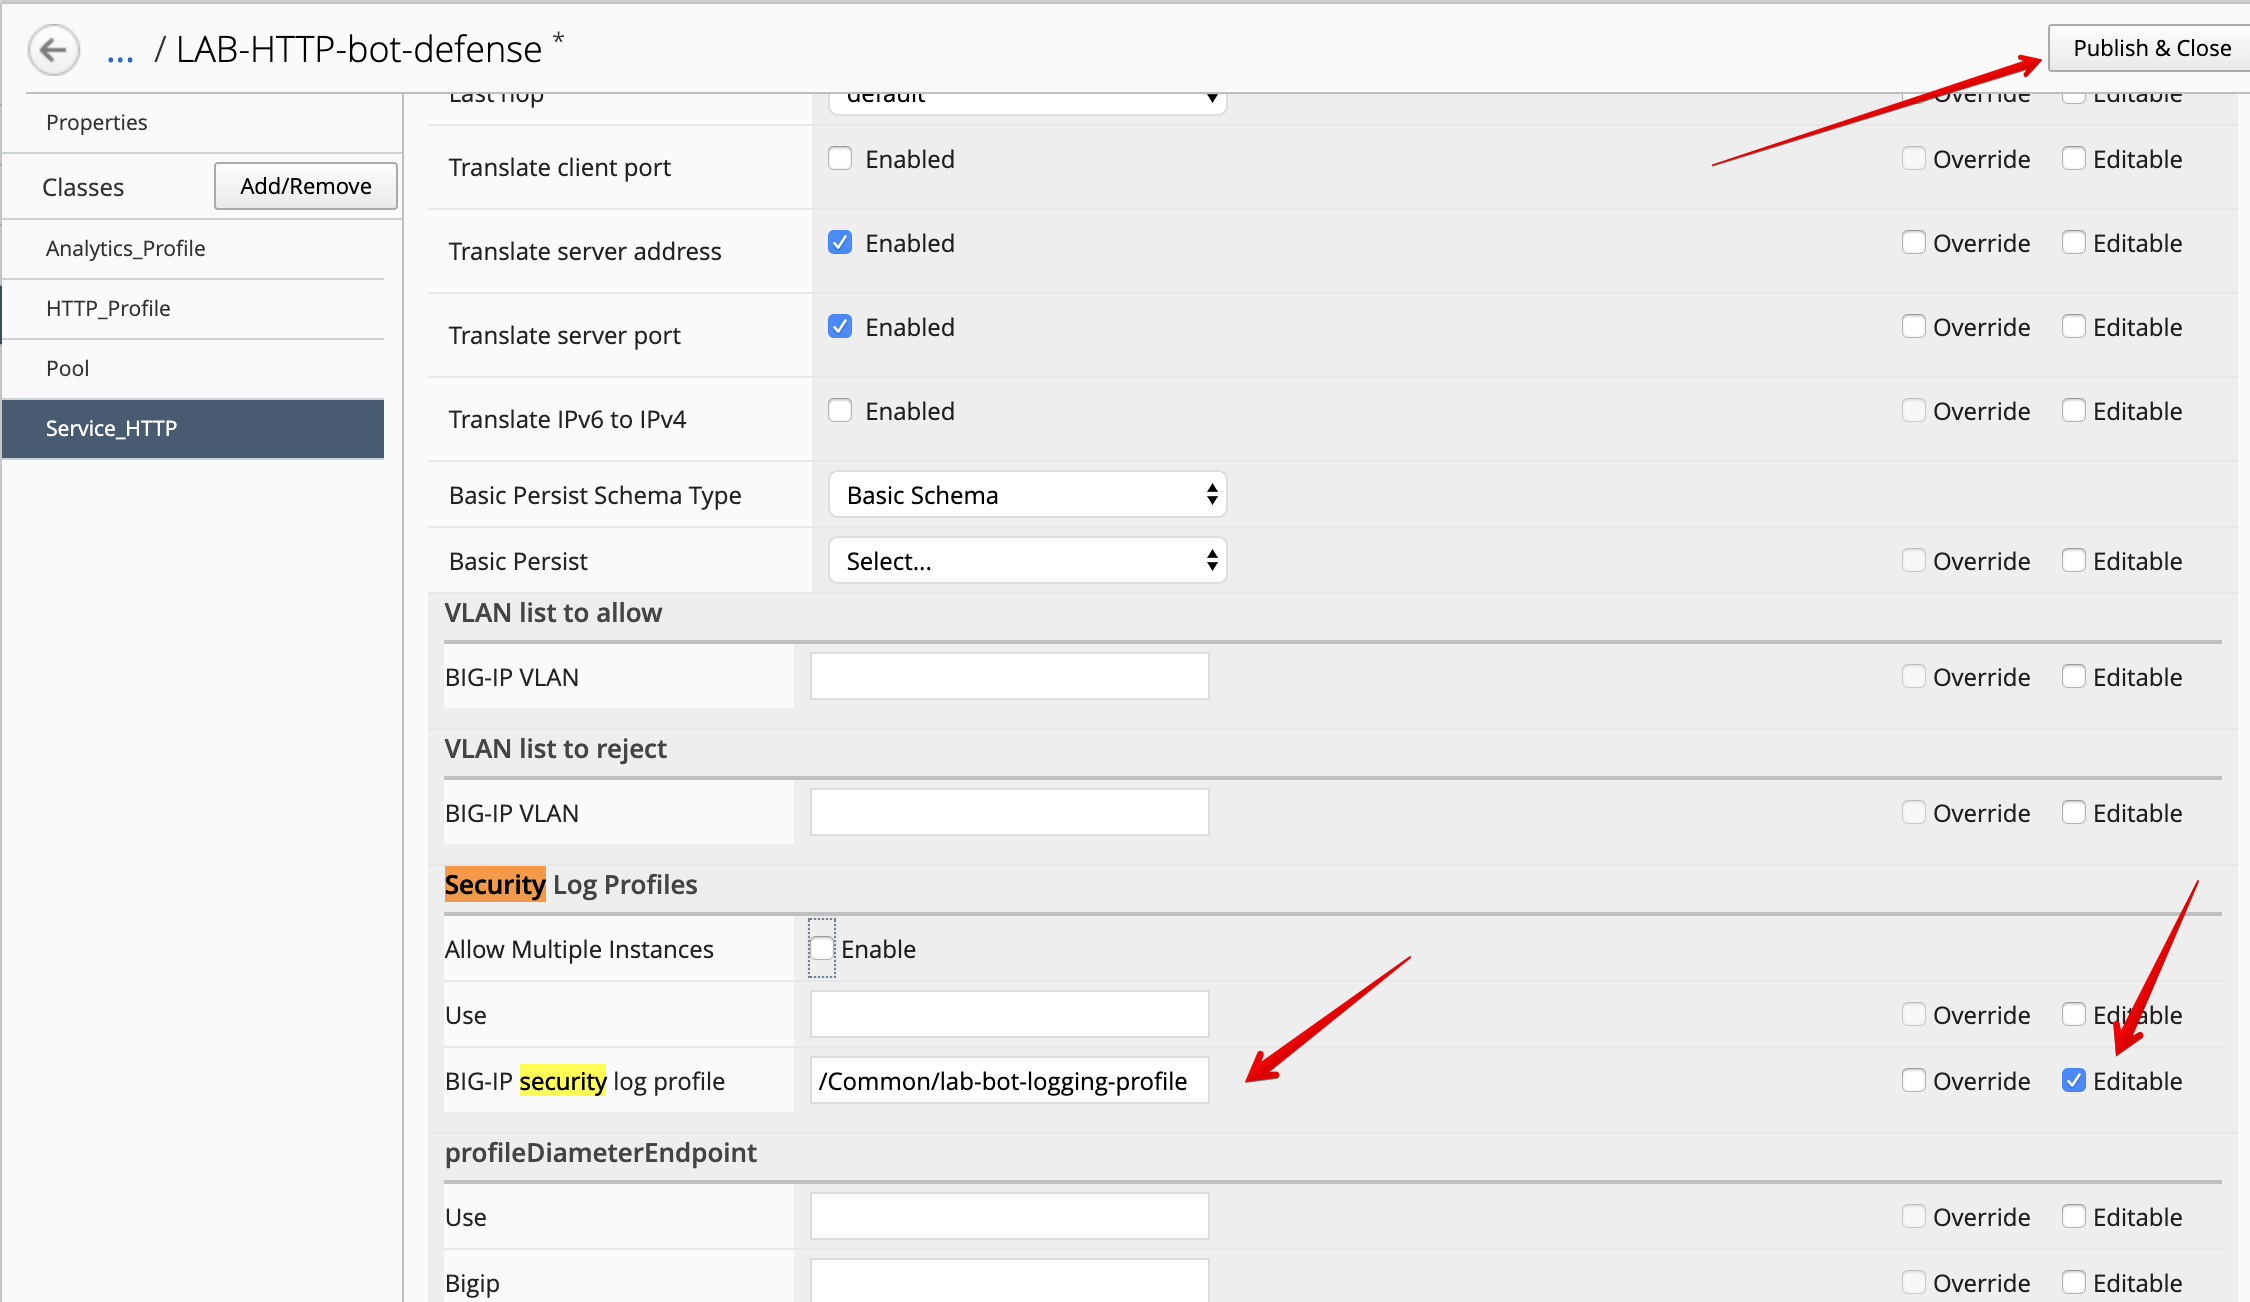
At the top right corner, click on Publish and Close
- Navigate to the APPLICATION menu, click on Create
Assign the Bot Defense Profile and the Log Profile previously created.
| Application properties: |
|
| Select an Application Service Template: |
|
| General Properties: |
|
| Pool |
|
| HTTP_Profile. Keep default. |
| Service_HTTP |
|
| Analytics_Profile. Enable all options. |
Note
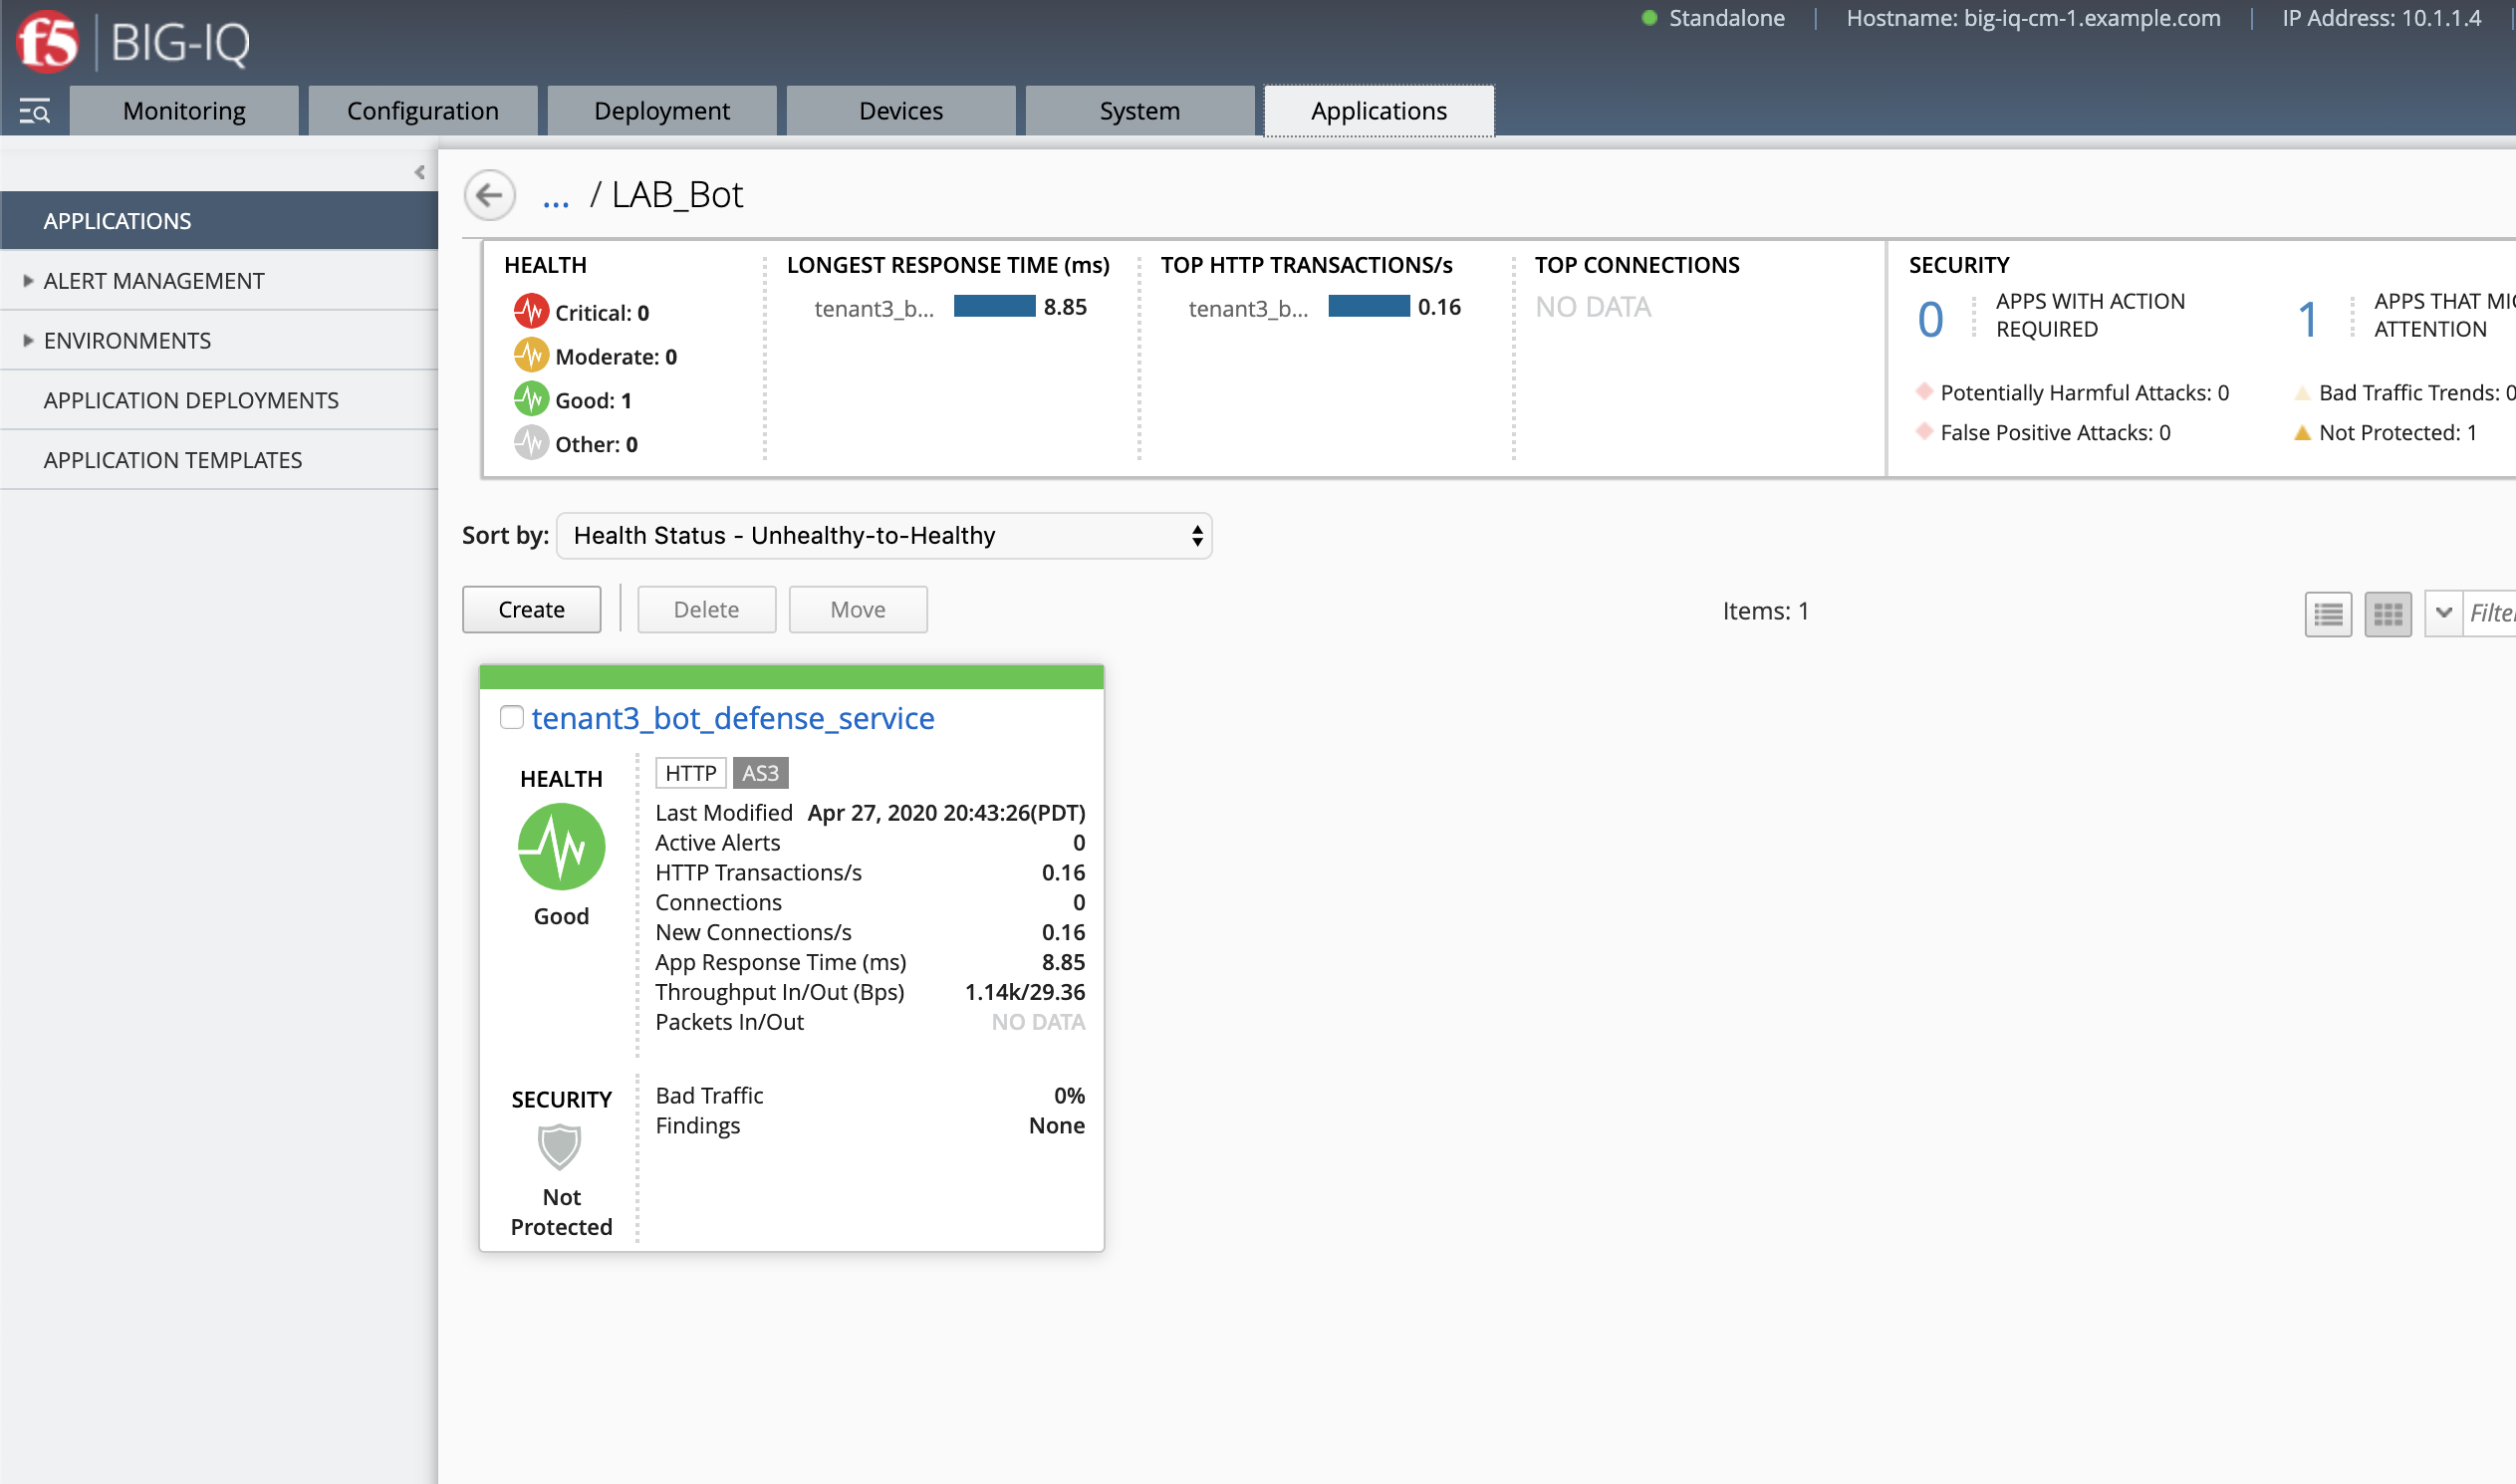
You are attaching the bot defense and logging profiles to the VIP using AS3.
The application service called tenant3_bot_defense_service is now created on the BIG-IQ dashboard
under the application called LAB_Bot.
Traffic simulation and Dashboard/Events
- On Lamp server, generate HTTP traffic from a browser and CLI.
Connect via SSH or Web Shell to the system Ubuntu Lamp Server. (if you use the Web Shell, login as f5student first: su - f5student) and run:
while true; do curl http://10.1.10.126; sleep 1; done
From the lab environment, launch a remote desktop session to have access to the Ubuntu Desktop.
- Open Chrome and Navigate to the URL http://10.1.10.126.
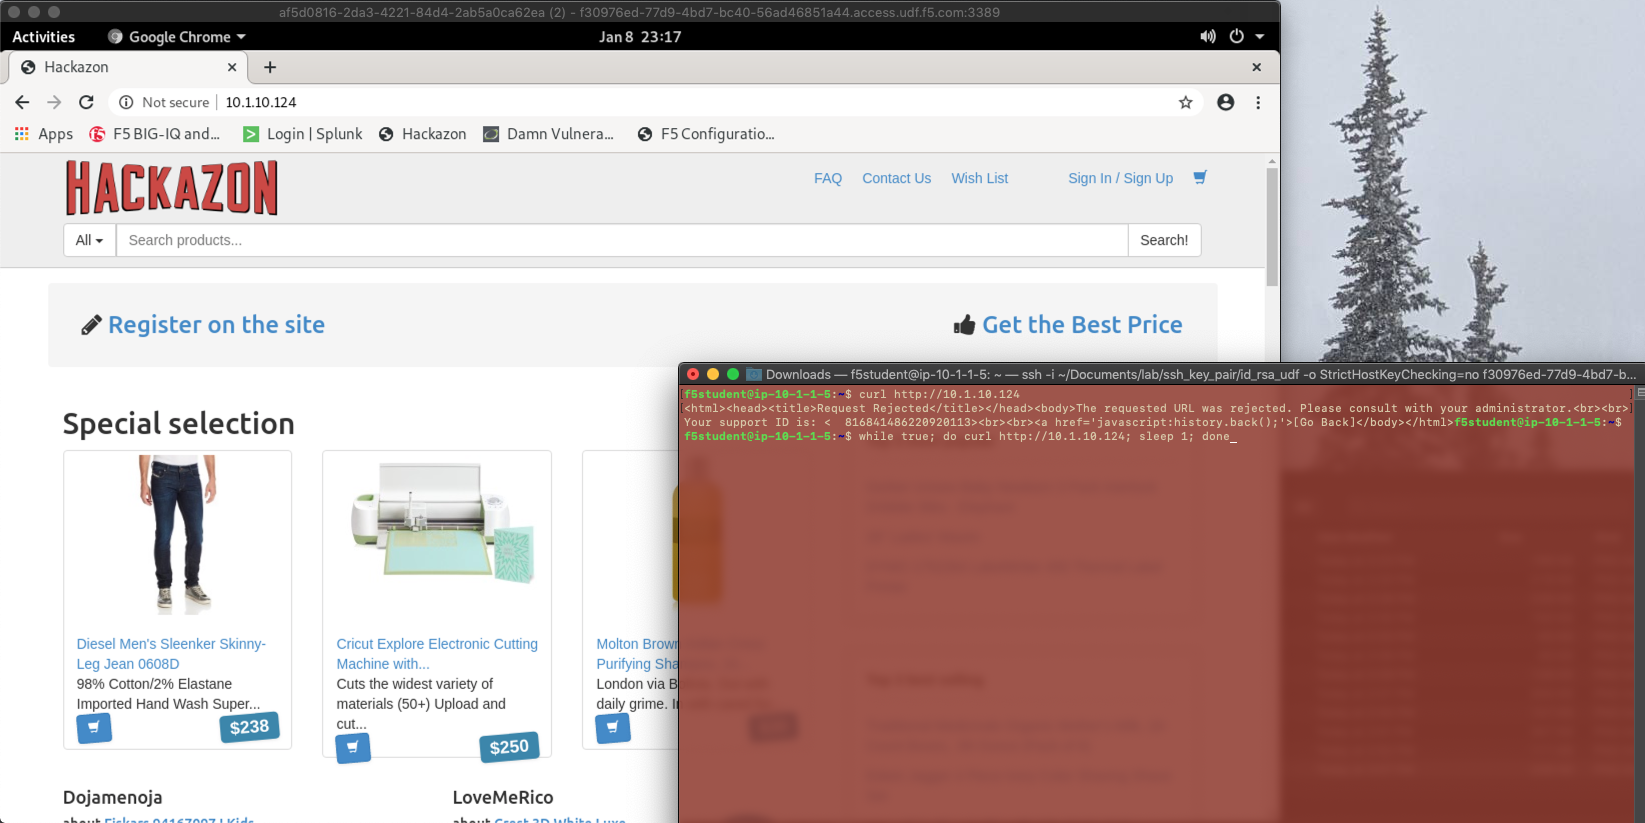
Notice the HTTP requests are going through when using a real browser but are blocked when using curl.
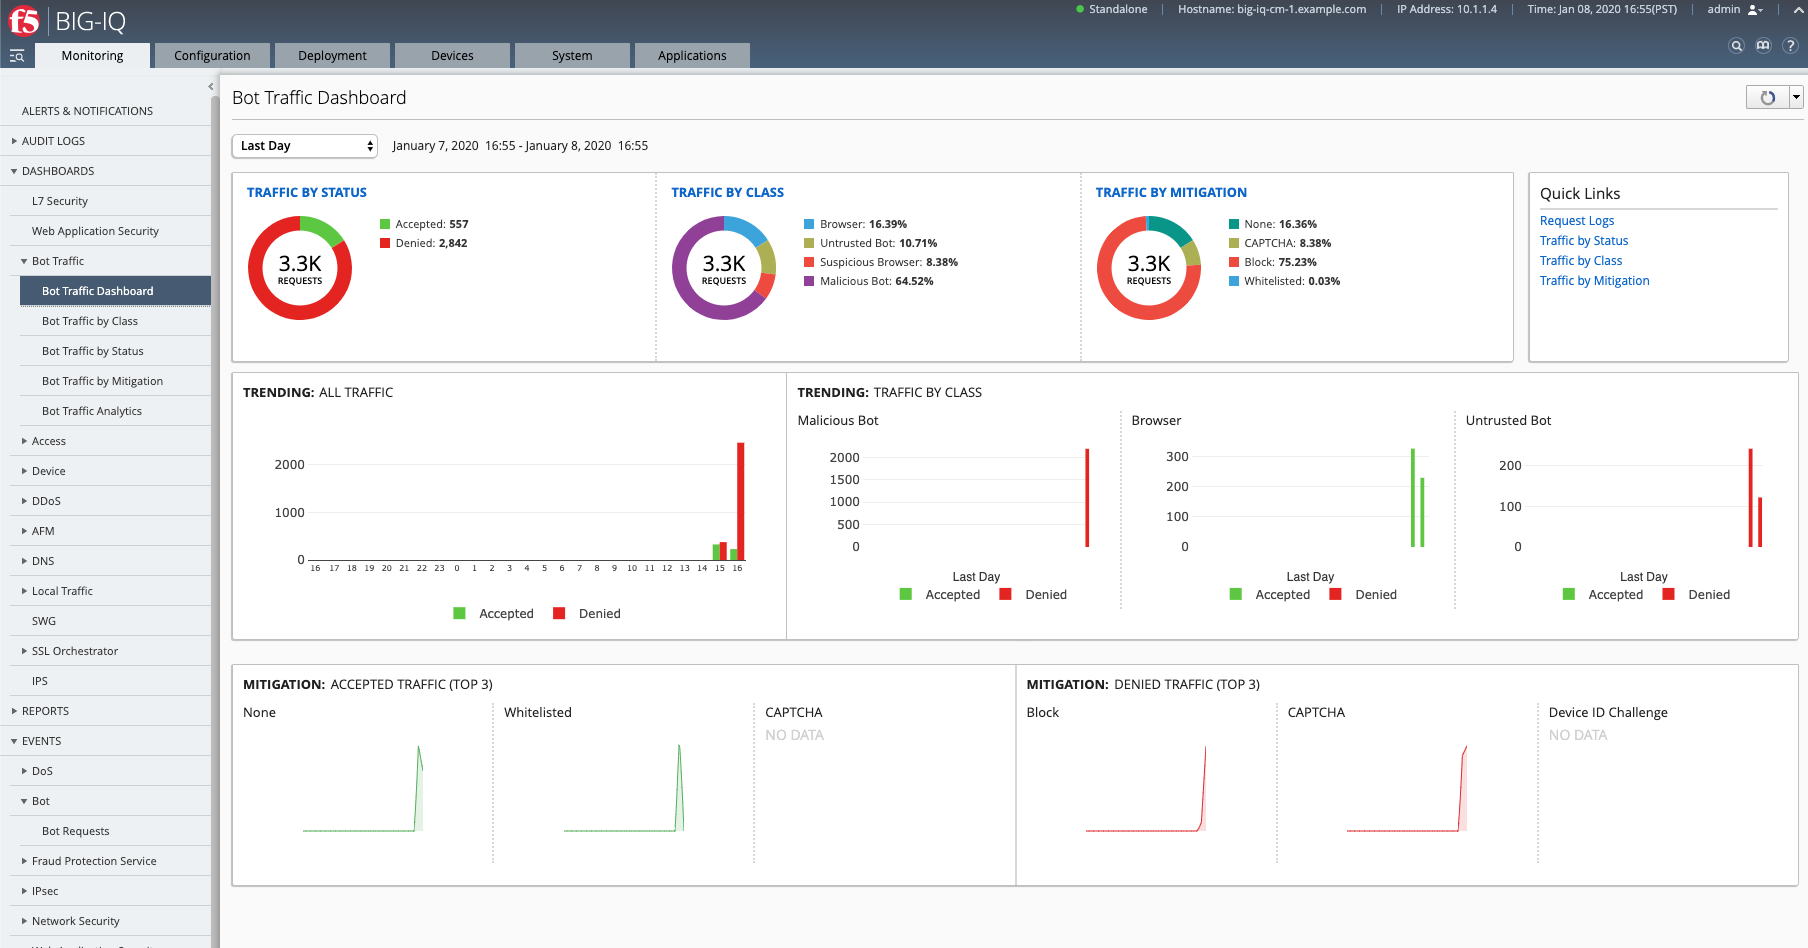
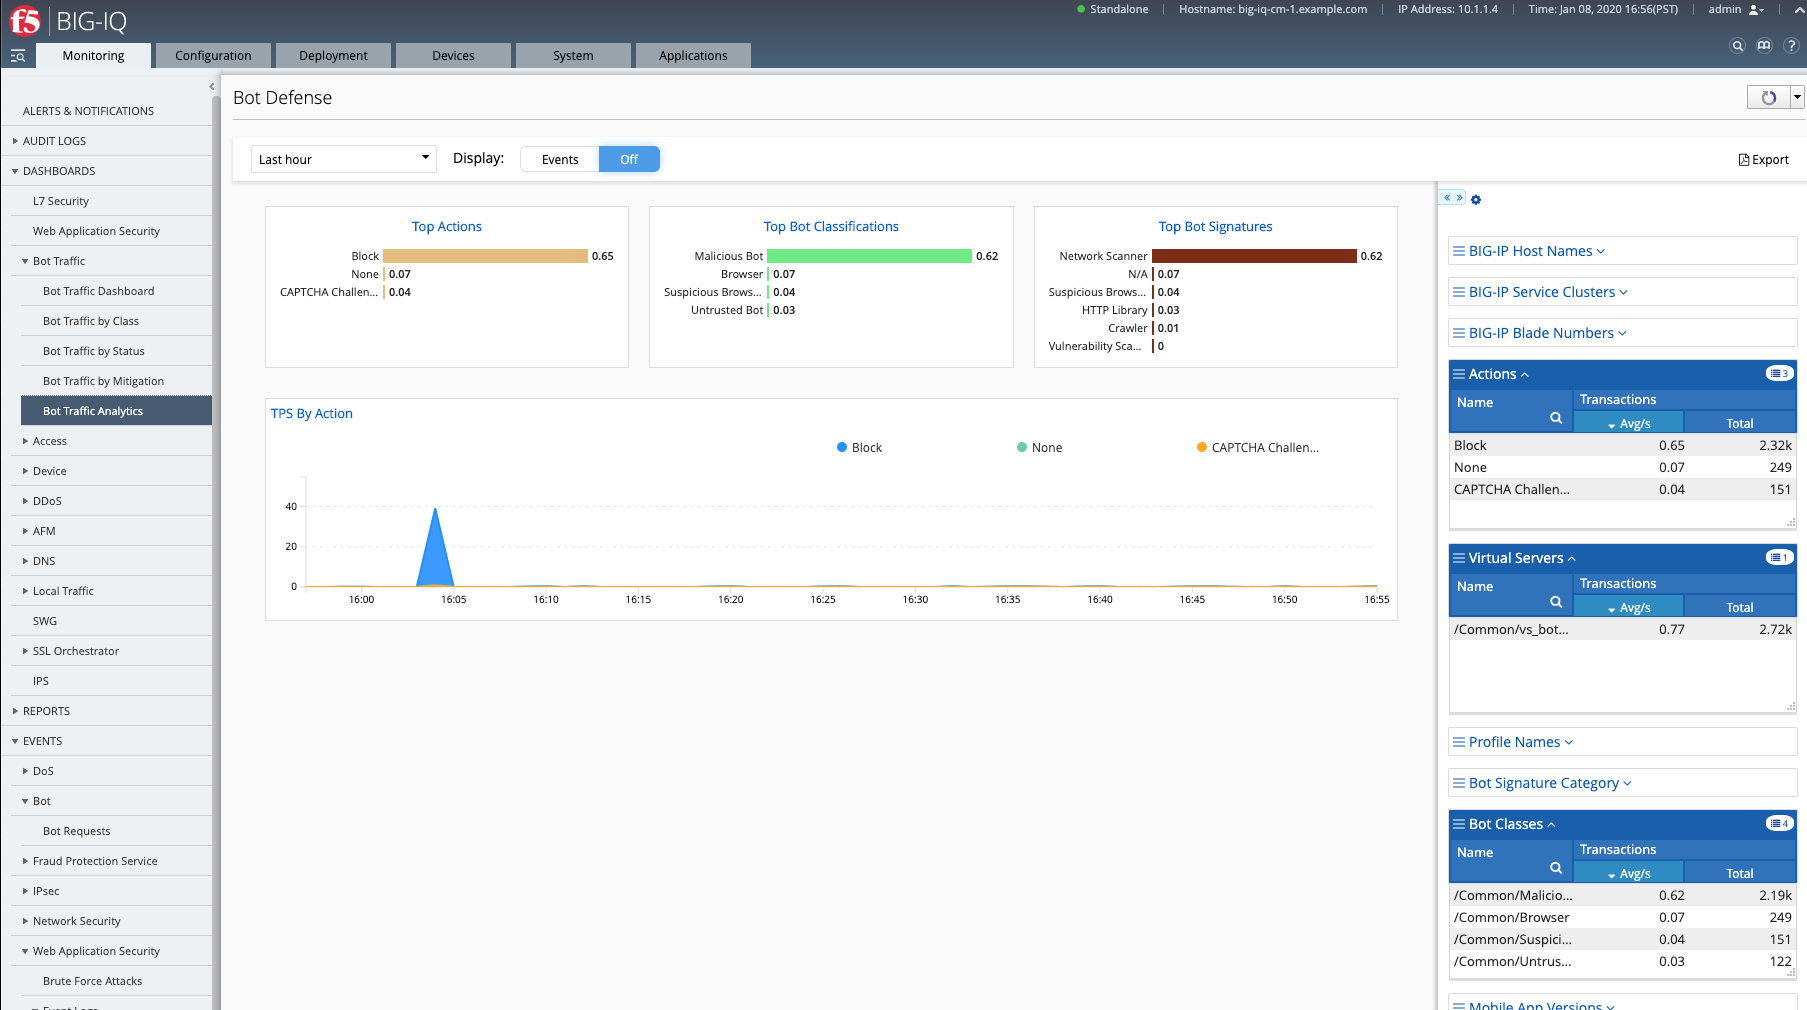
- Now, have a look at the BIG-IQ Bot Dashboard available on BIG-IQ under Monitoring > DASHBOARDS > Bot Traffic.
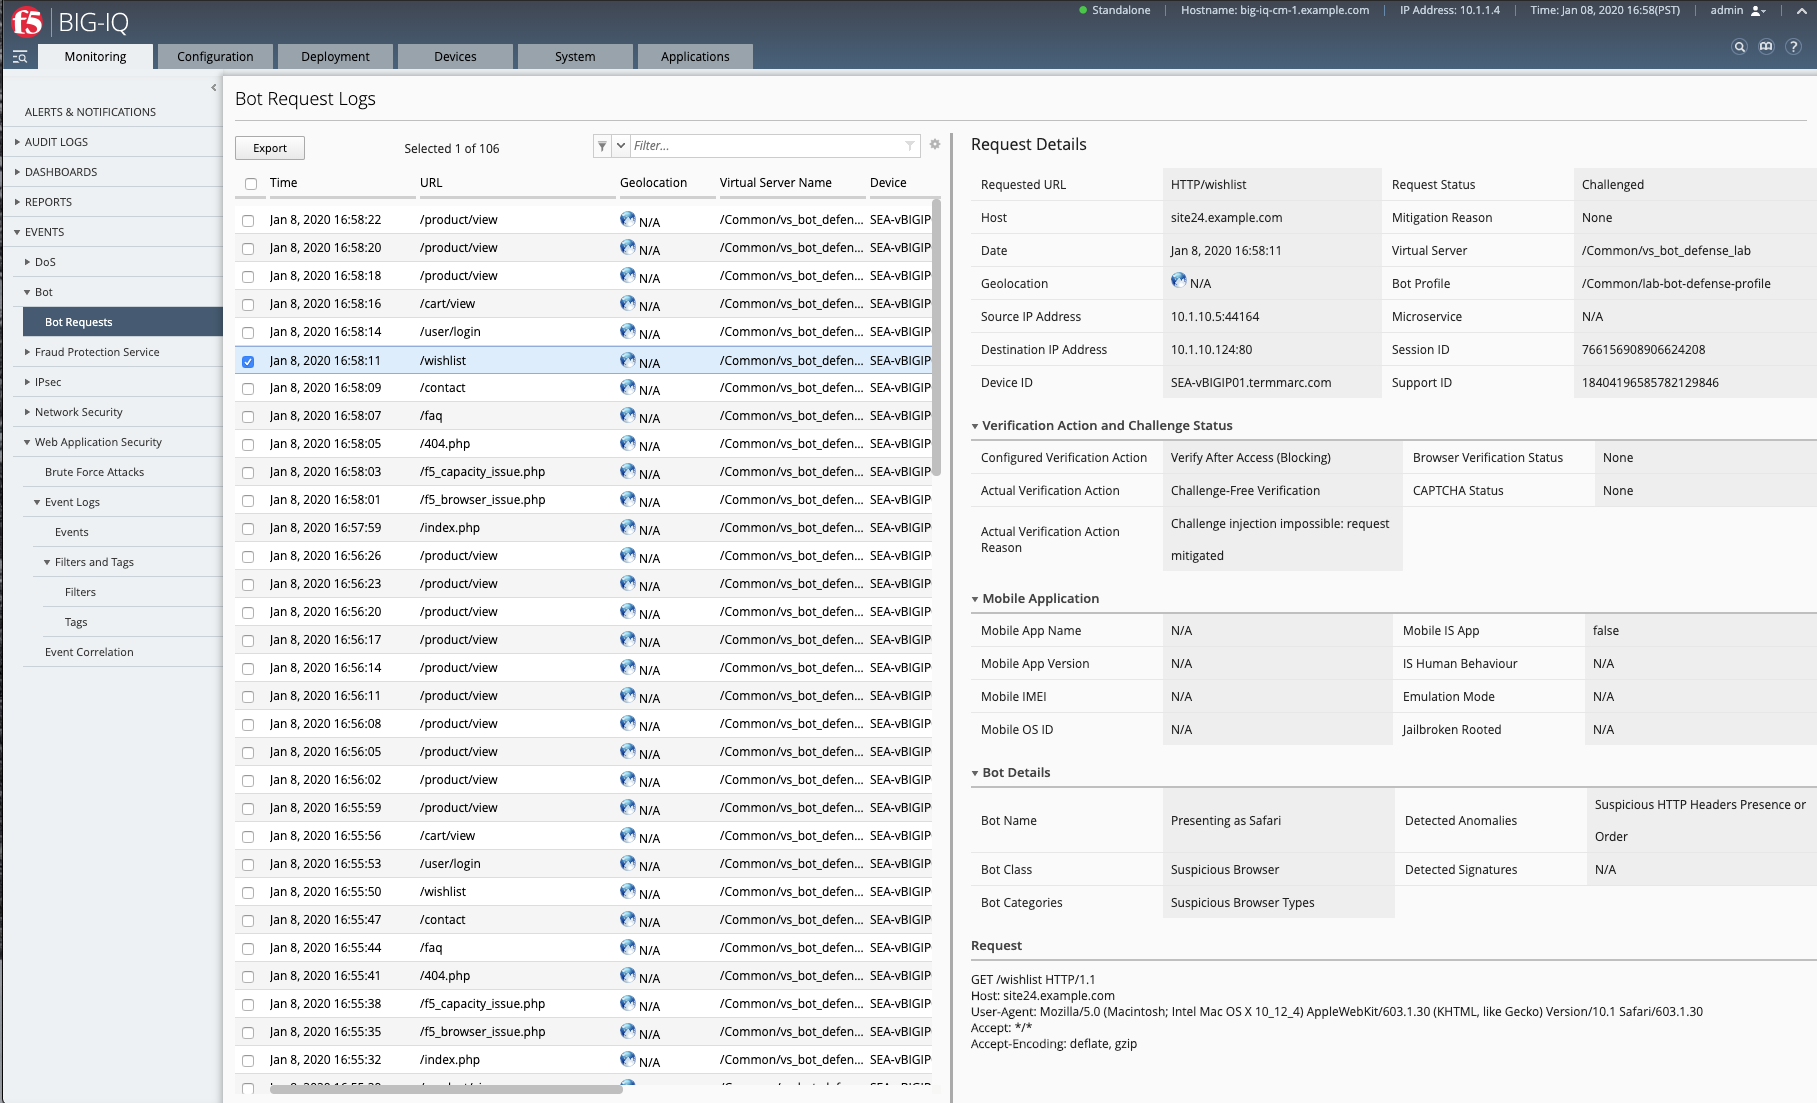
You can also see the details of each request logged under Monitoring > EVENTS > Bot > Bot Requests.
Annex | ASM Bot Defense & Logging Profiles creation from BIG-IP
Warning
This part is only for BIG-IQ <= 7.0. It can be done from BIG-IQ UI starting BIG-IQ 7.1.
- Login as admin on BIG-IP SEA-vBIGIP01.termmarc.com.
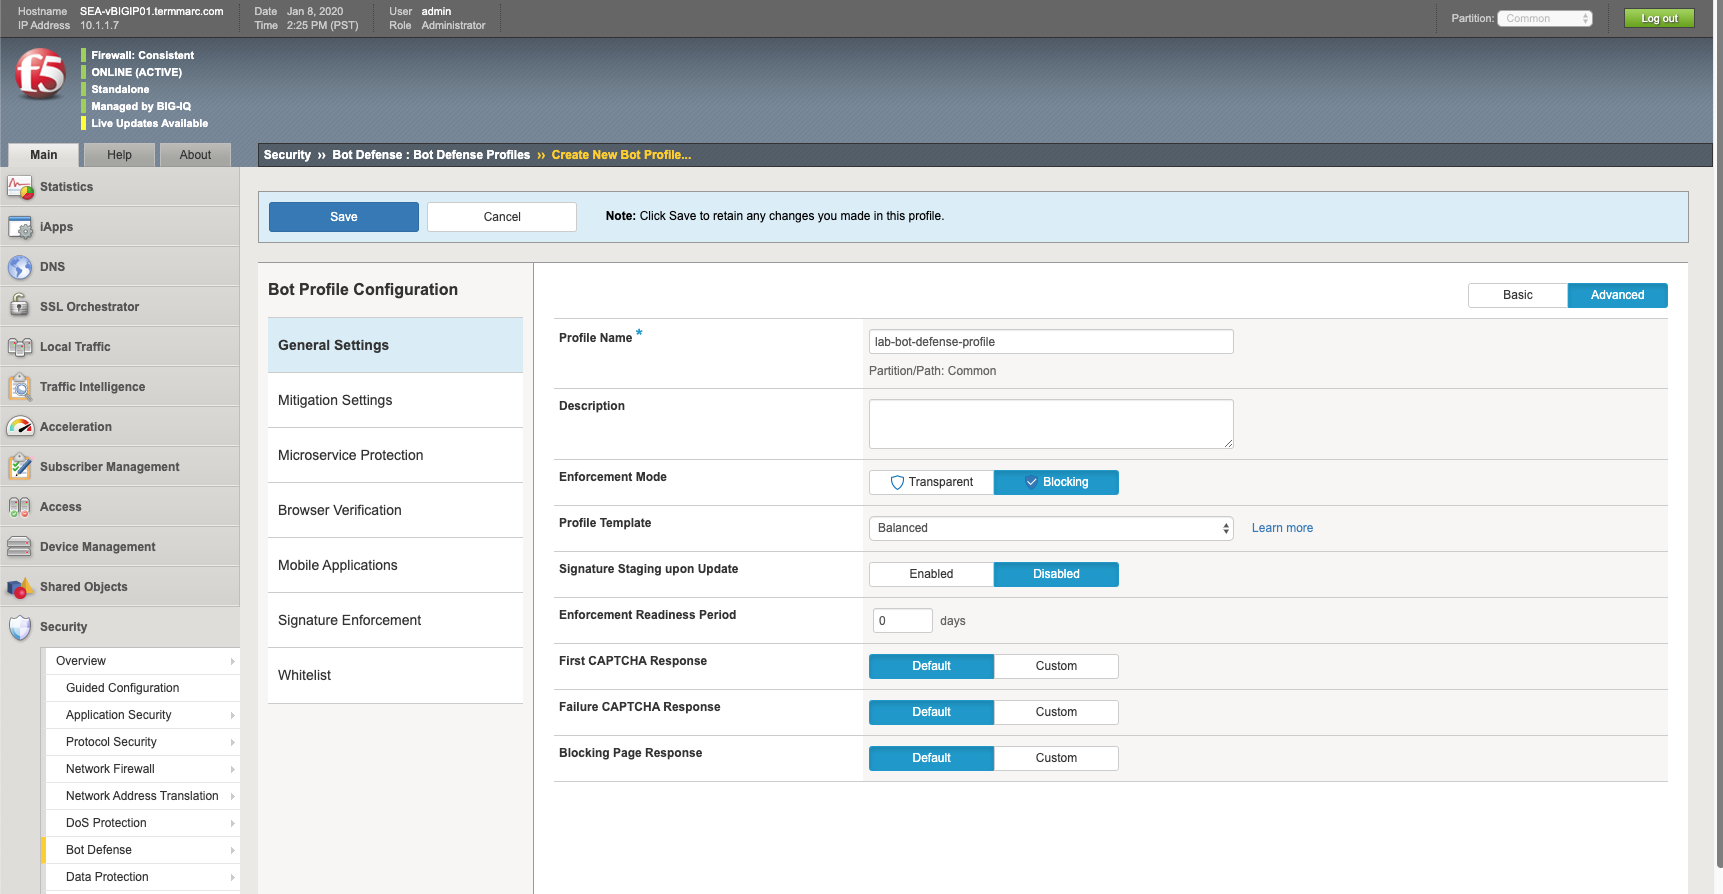
- Create the Bot Defense Profile. Navigate to Security > Bot Defense. Click Create.
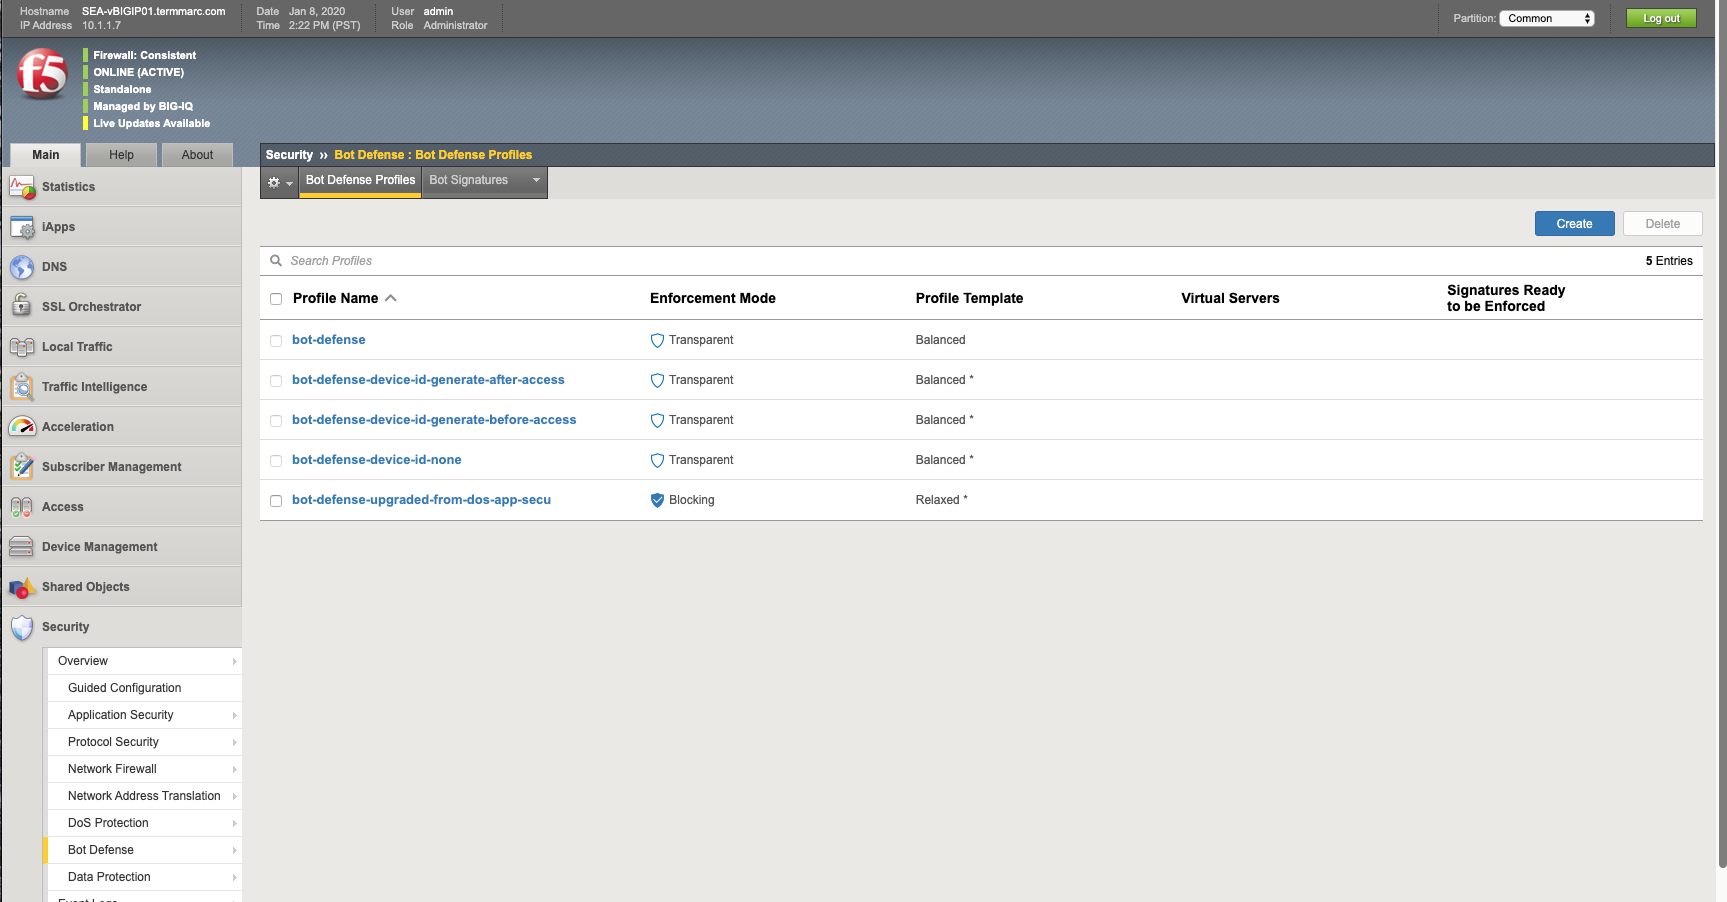
- Name:
lab-bot-defense-profile - Enforcement Mode:
Blocking - Enforcement Readiness Period:
0(lab only)
- Untrusted Bot:
Block
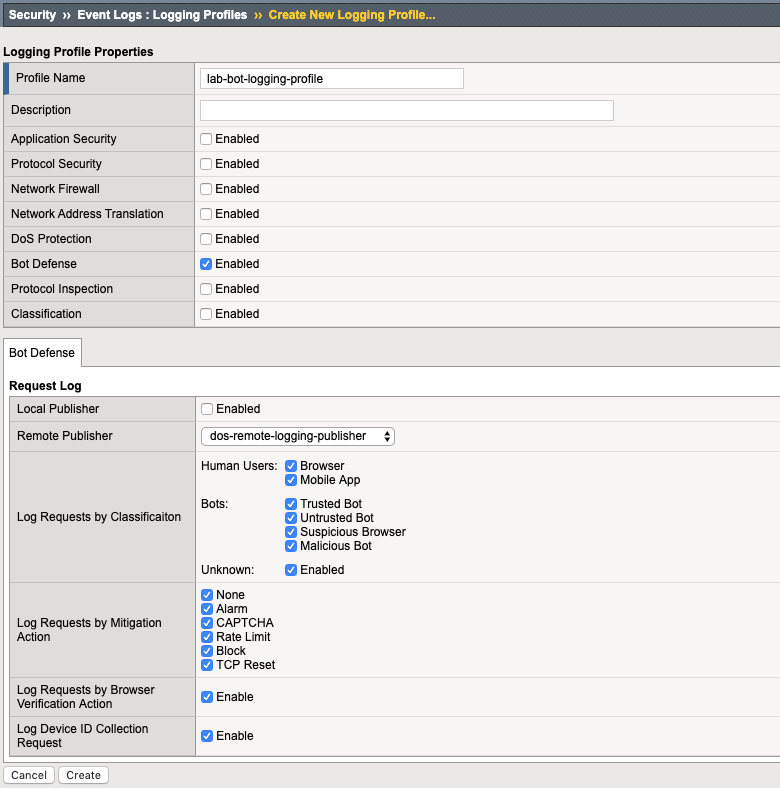
- Create a new Bot Logging profile. Navigate to Security > Event Logs > Logging Profiles. Click Create.
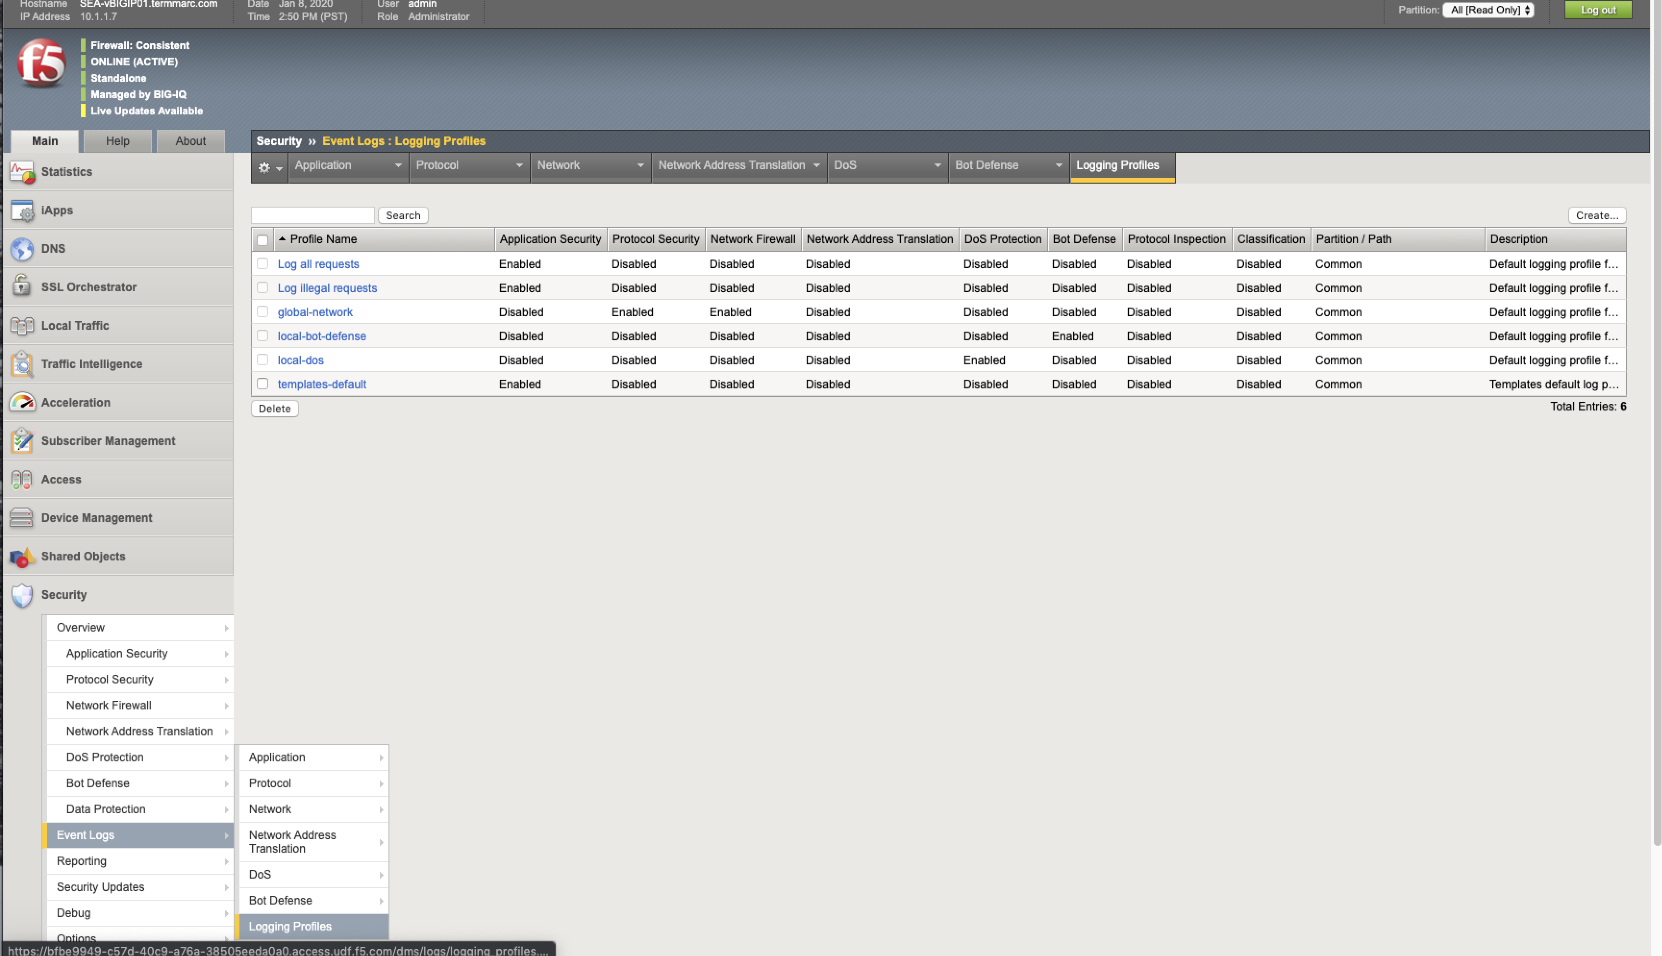
- Name:
lab-bot-logging-profile - Properties: select
Bot Defense - Remote Publisher: select previously Remote Publisher previously created either using the UI or API.
- Logs Requests: select all options (Human Users, Bots, etc…)]
- Navigate to Devices tab and re-discover/re-import SEA-vBIGIP01.termmarc.com.