F5 BIG-IQ Centralized Management Lab > BIG-IQ All Labs > Class 8: BIG-IQ Web Application Security > Module 1: Advanced Web Application Firewall (WAF) on BIG-IQ Source | Edit on
Lab 1.2: Configuring L7 Behavioral DoS Protection (new 7.1)
Note
Estimated time to complete: 30 minutes
A denial-of-service attack (DoS attack) or distributed denial-of-service attack (DDoS attack) makes a victim’s resource unavailable to its intended users, or obstructs the communication media between the intended users and the victimized site so that they can no longer communicate adequately.
Perpetrators of DoS attacks typically target sites or services, such as banks, credit card payment gateways, and e-commerce web sites.
L7 Behavioral DoS (BaDOS) provides automatic protection against DDoS attacks by analyzing traffic behavior using machine learning and data analysis. Behavioral DoS examines traffic flowing between clients and application servers in data centers, automatically establishes the baseline traffic/flow, then dynamically builds signatures and implements various protections as needed based on the behavior of the application and the attackers, reducing false positives and providing quicker time to mitigation.
BIG-IQ Centralized Management allows the centralized management of BaDOS profiles, providing enhanced reporting and event correlation.
This lab will guide you through the configuration of BaDOS profiles using BIG-IQ CM User Interface.
Official documentation can be found on the BIG-IQ Knowledge Center and see DevCentral article on this subject.
Lab environment access
If you have not yet visited the page Getting Started, please do so.
Workflow
- David creates the DoS Log Destinations and Publisher either using the UI or the API/AS3
- Larry creates the L7 Behavioral DoS & Logging Profiles
- David creates the AS3 template and reference L7 Behavioral DoS & Logging profile created by Larry
- David creates the application service using the template created previously
- Larry looks at the BIG-IQ dahsboards and monitor the DoS attacks
Prerequisites
- Navigate to the Devices tab and complete Discovery & Import on SJC-vBIGIP01.termmarc.com. Choose Create Version for default LTM profiles and Set all BIG-IP for other objects.
Note
It is recommended to use latest version of BIG-IP. In this lab SJC BIG-IP has 15.1 and will be used.
- Once LTM module import is completed, Discover & Import Shared Security (SSM) and Web Application Security (ASM) modules. Choose Set all BIG-IP when conflict resolution open.
- Check if the DoS Protection service is Active under System > BIG-IQ DATA COLLECTION > BIG-IQ Data Collection Devices.
DoS Log Destinations and Publisher creation using UI
Warning
If you want to use API to create those objects, skip this part and go to the next one.
- As David, create the DCD Pool and Log Destination. Navigate to Configuration Tab > LOCAL TRAFFIC > Pools, click Create.
- Name:
dos-remote-dcd-pool - Device:
SJC-vBIGIP01.termmarc.com - Health Monitors:
tcp - Pool Member/Port:
10.1.10.6:8020
- Navigate to Configuration Tab > LOCAL TRAFFIC > Logs > Log Destinations, click Create.
- Name Log Destination hslog:
dos-remote-logging-destination-remote-hslog-8020 - Type:
Remote High-Speed Log - Device:
SJC-vBIGIP01.termmarc.com - Pool:
dos-remote-dcd-poolpreviously created
- Navigate to Configuration Tab > LOCAL TRAFFIC > Logs > Log Destinations, click Create.
- Name Log Destination Splunk:
dos-remote-logging-destination-splunk-8020 - Type:
Splunk - Forward To:
Remote High Speed Log-dos-remote-logging-destination-remote-hslog-8020previously created
Note
This is to add the formatting supported by BIG-IQ
- Create the Log Publisher. Navigate to Configuration Tab > LOCAL TRAFFIC > Logs > Log Publisher. click Create.
- Name:
dos-remote-logging-publisher-8020 - Log Destinations:
dos-remote-logging-destination-splunk-8020previously created
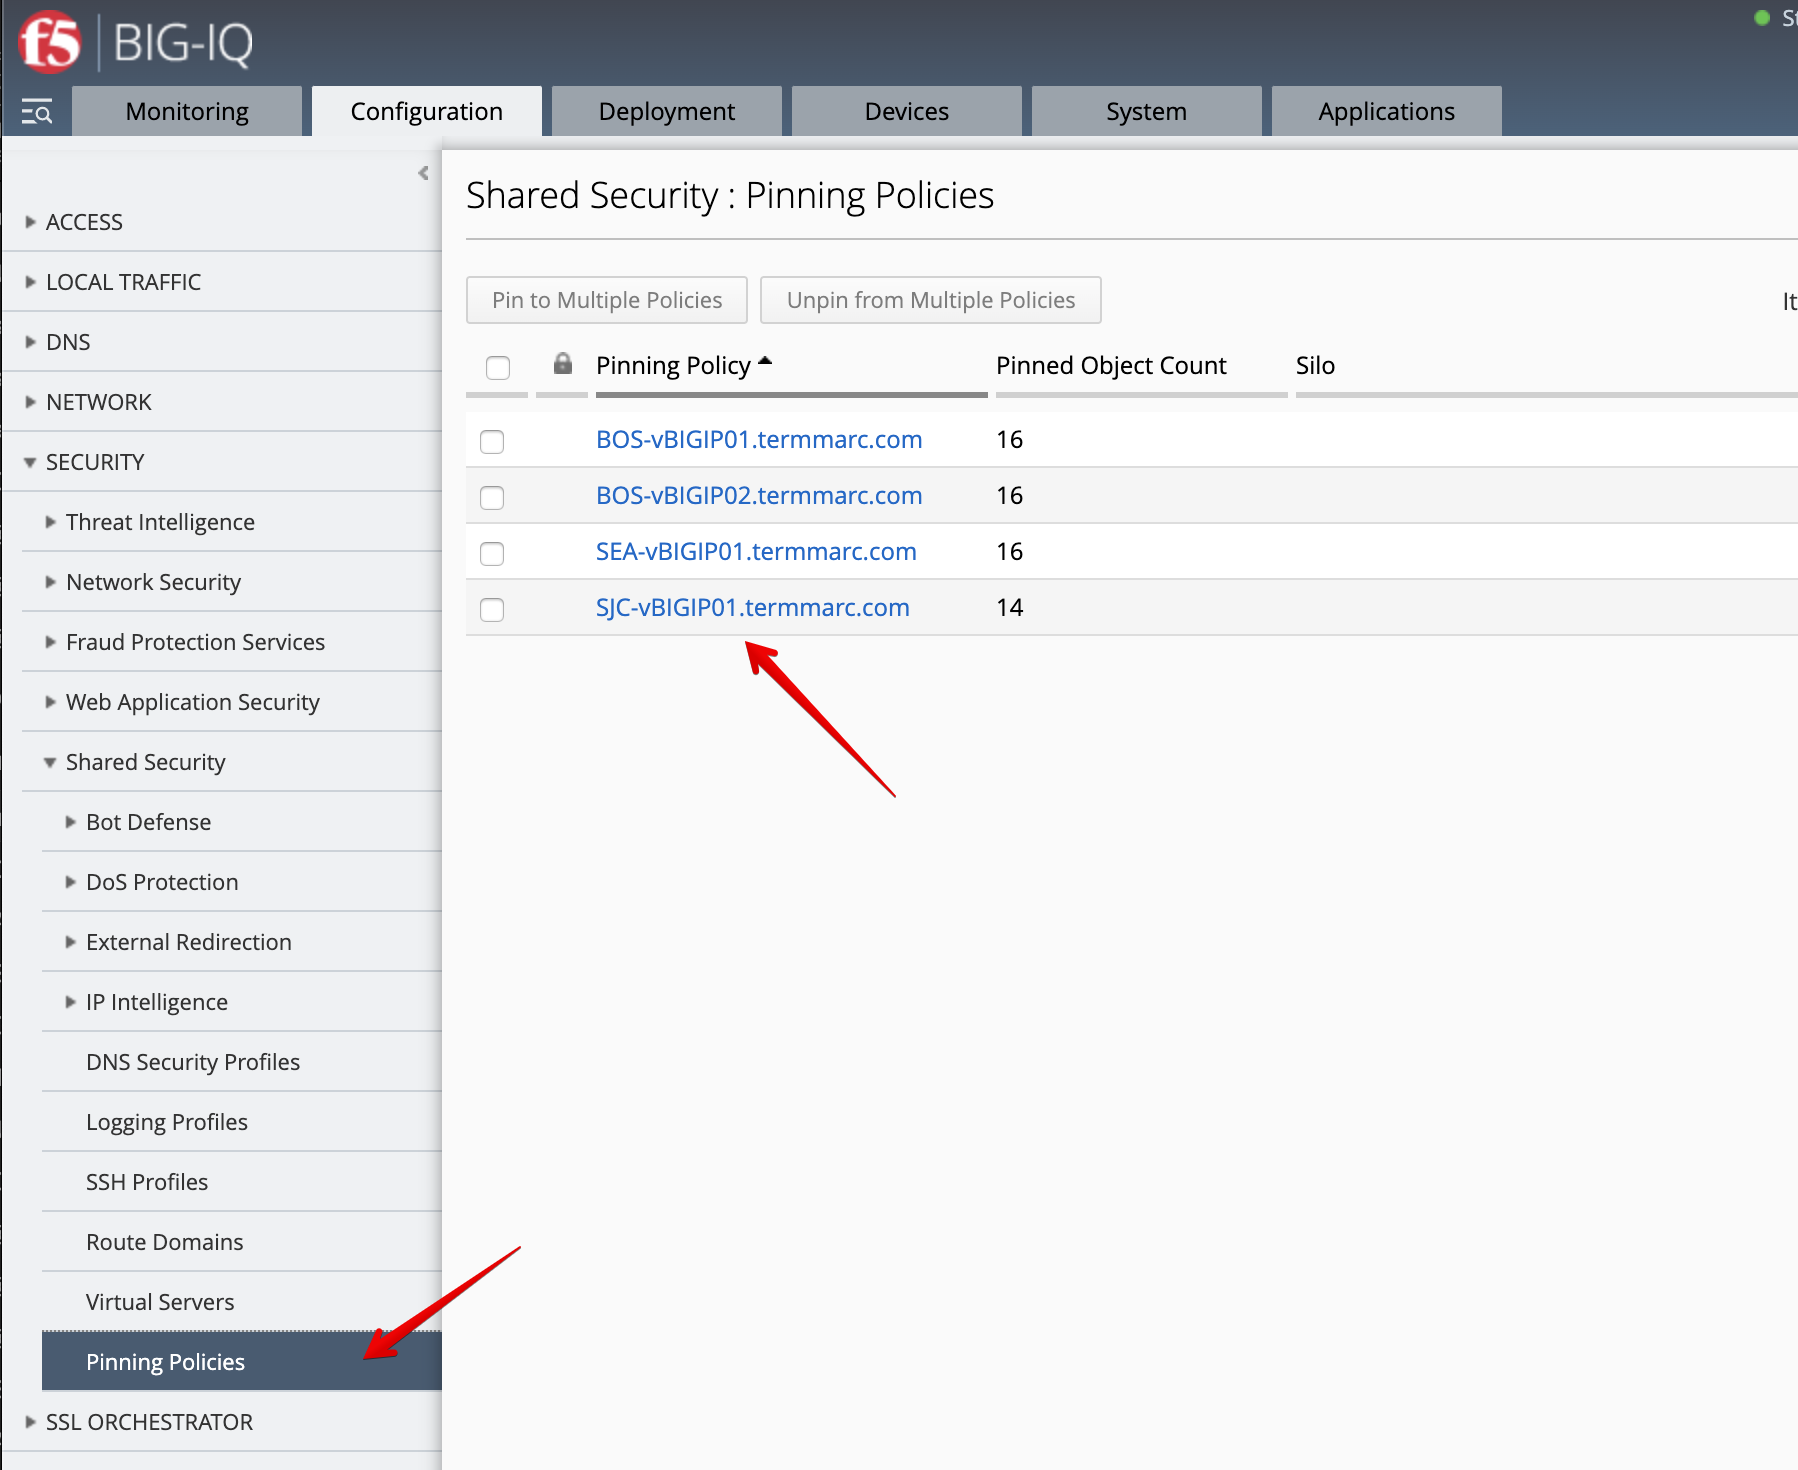
- Pin the new Log Publisher to the SJC-vBIGIP01.termmarc.com device. Navigate to Pinning Policies and add the Log Publisher previously created to SJC-vBIGIP01.termmarc.com.
- Deploy the Pool, Log Destinations, Log Publisher. Go to Deployment > EVALUATE & DEPLOY > Local Traffic & Network.
Create a Deployment to deploy the Remote Logging Changes on the SJC BIG-IP.
Make sure the deployment is successful.
Note
More information Managing Logging Profiles in Shared Security.
DoS Log Destinations and Publisher creation using API/AS3
- Open Visual Studio Code, then use the Visual Studio code REST client extension and authenticate to BIG-IQ (follow instructions).
- Copy below AS3 declaration into the body of the BIG-IQ AS3 Declaration call in order to create the service on the BIG-IP through BIG-IQ:
POST https://10.1.1.4/mgmt/shared/appsvcs/declare?async=true
1 2 3 4 5 6 7 8 9 10 11 12 13 14 15 16 17 18 19 20 21 22 23 24 25 26 27 28 29 30 31 32 33 34 35 36 37 38 39 40 41 42 43 44 45 46 47 48 49 50 51 52 53 | {
"class": "AS3",
"action": "deploy",
"persist": true,
"declaration": {
"class": "ADC",
"schemaVersion": "3.12.0",
"target": {
"address": "10.1.1.11"
},
"dos": {
"class": "Tenant",
"security-log-profile": {
"class": "Application",
"template": "generic",
"dos-remote-dcd-pool": {
"class": "Pool",
"members": [
{
"servicePort": 8020,
"serverAddresses": [
"10.1.10.6"
],
"shareNodes": true
}
]
},
"dos-remote-logging-destination-remote-hslog-8020": {
"class": "Log_Destination",
"type": "remote-high-speed-log",
"pool": {
"use": "dos-remote-dcd-pool"
}
},
"dos-remote-logging-destination-splunk-8020": {
"class": "Log_Destination",
"type": "splunk",
"forwardTo": {
"use": "dos-remote-logging-destination-remote-hslog-8020"
}
},
"dos-remote-logging-publisher-8020": {
"class": "Log_Publisher",
"destinations": [
{
"use": "dos-remote-logging-destination-splunk-8020"
}
]
}
}
}
}
}
|
- Navigate to Devices tab and re-discover/re-import SJC-vBIGIP01.termmarc.com.
DoS Logging Profile creation
- As Larry, create a new DoS Logging profile. Navigate to Configuration > SECURITY > Shared Security > Logging Profiles. Click Create.
- Name:
lab-dos-logging-profile
DOS PROTECTION:
- Dos Protection > Status:
Enabled - DoS Application Protection > Remote Publisher:
dos-remote-logging-publisher-8020
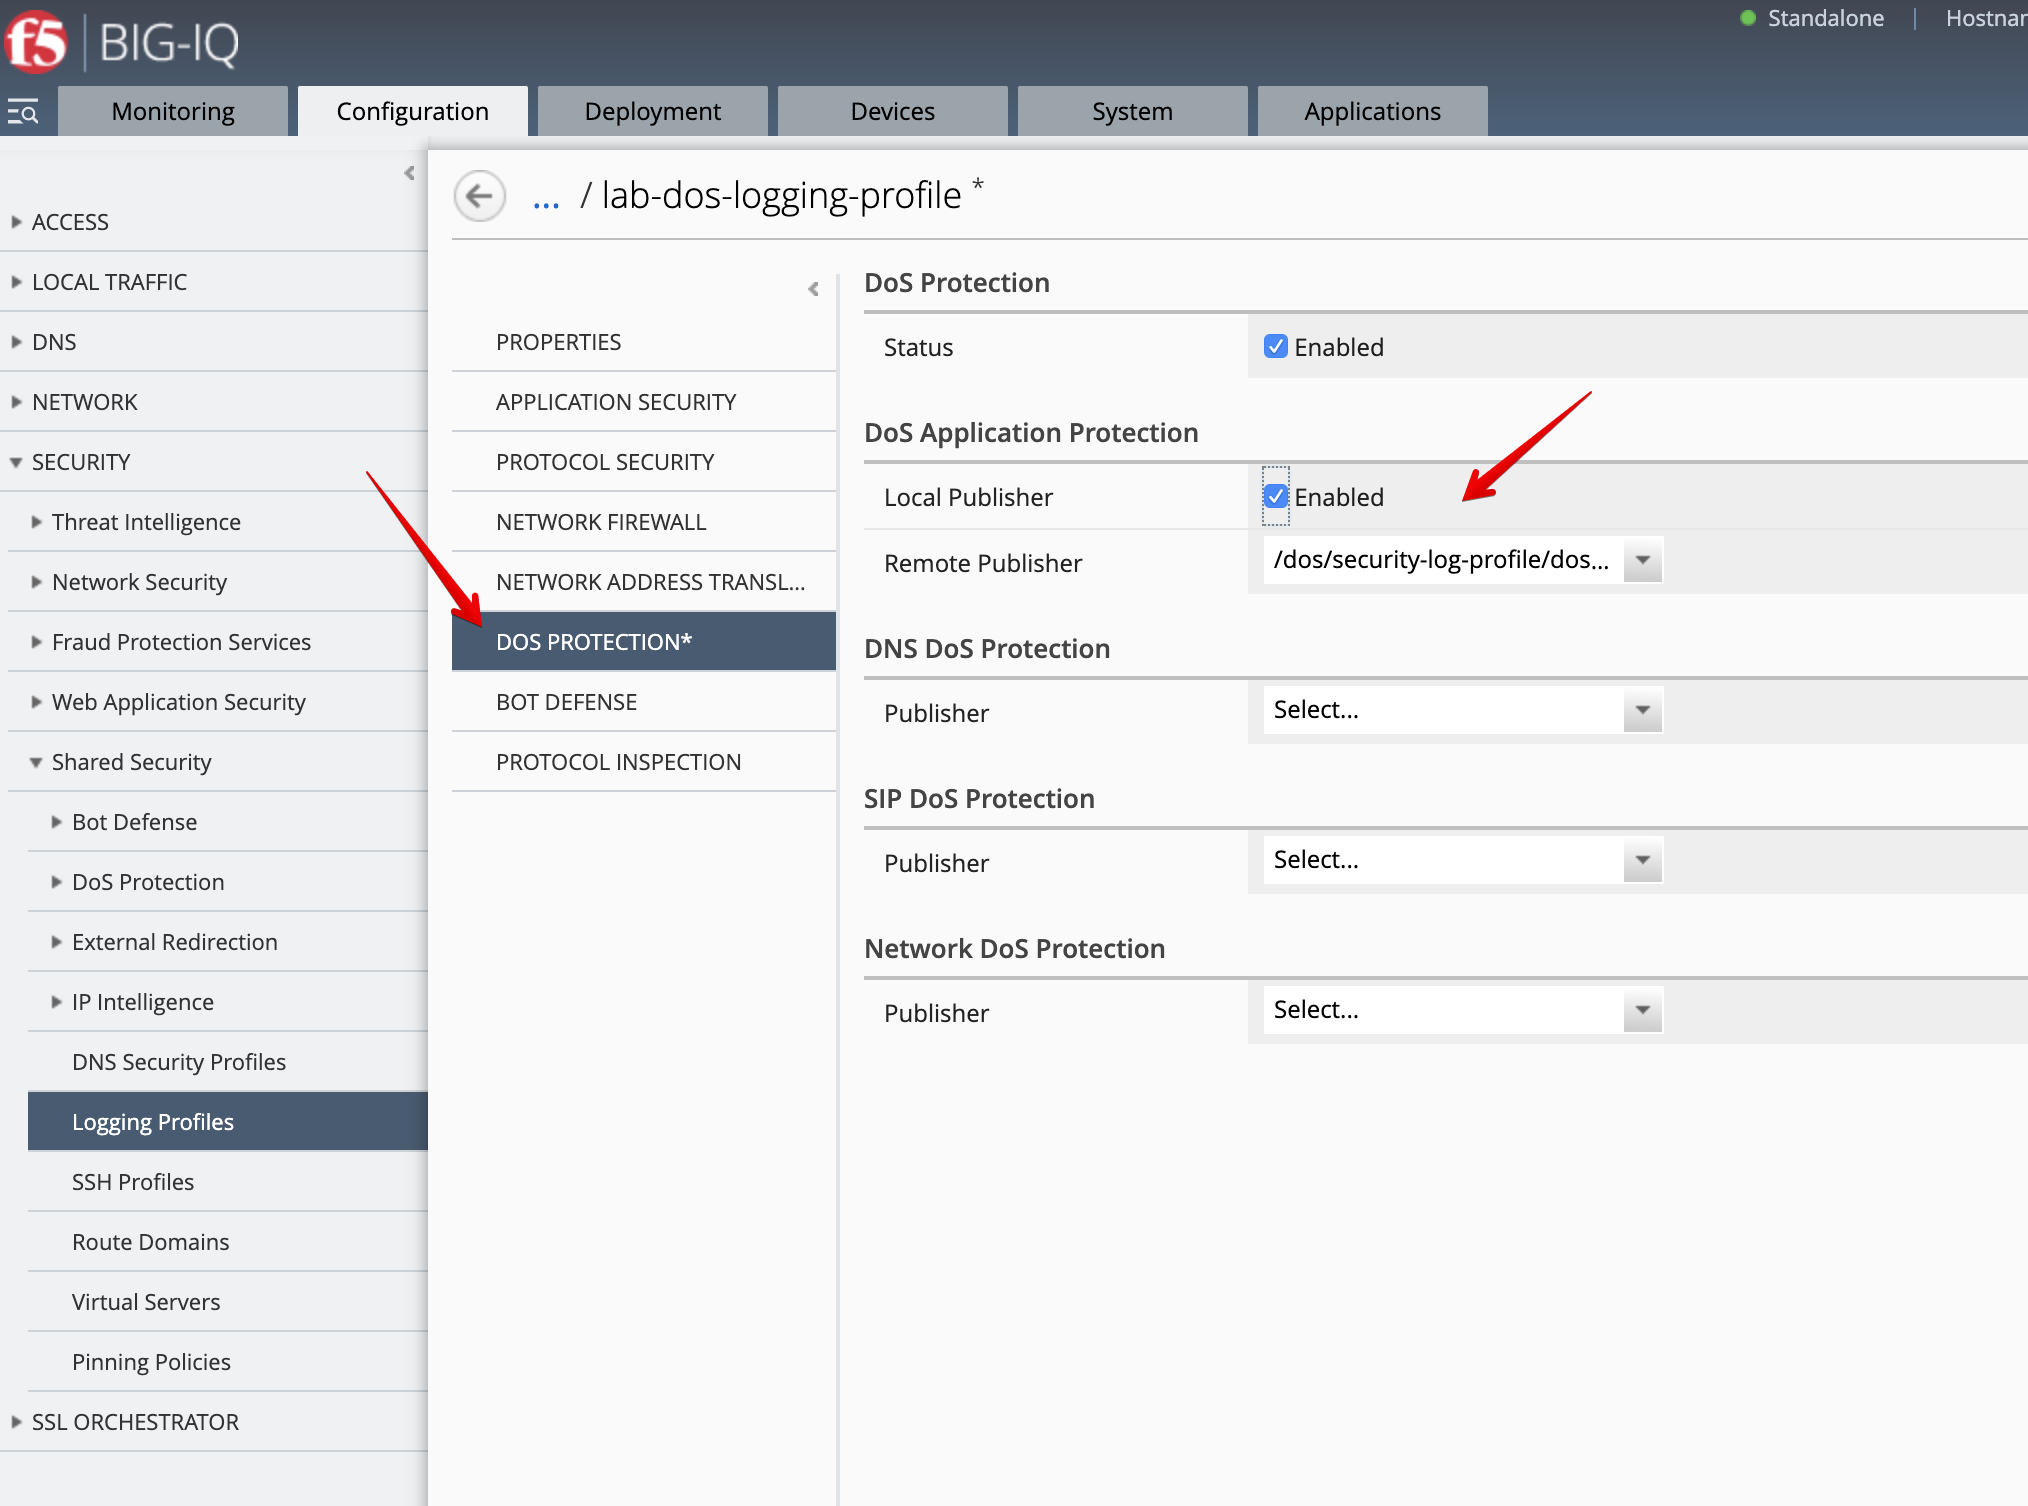
- Pin the new DoS Logging profile to the SJC-vBIGIP01.termmarc.com device. Navigate to Pinning Policies and add it to SJC-vBIGIP01.termmarc.com.

L7 Behavioral DoS Profile creation with Signature Detection
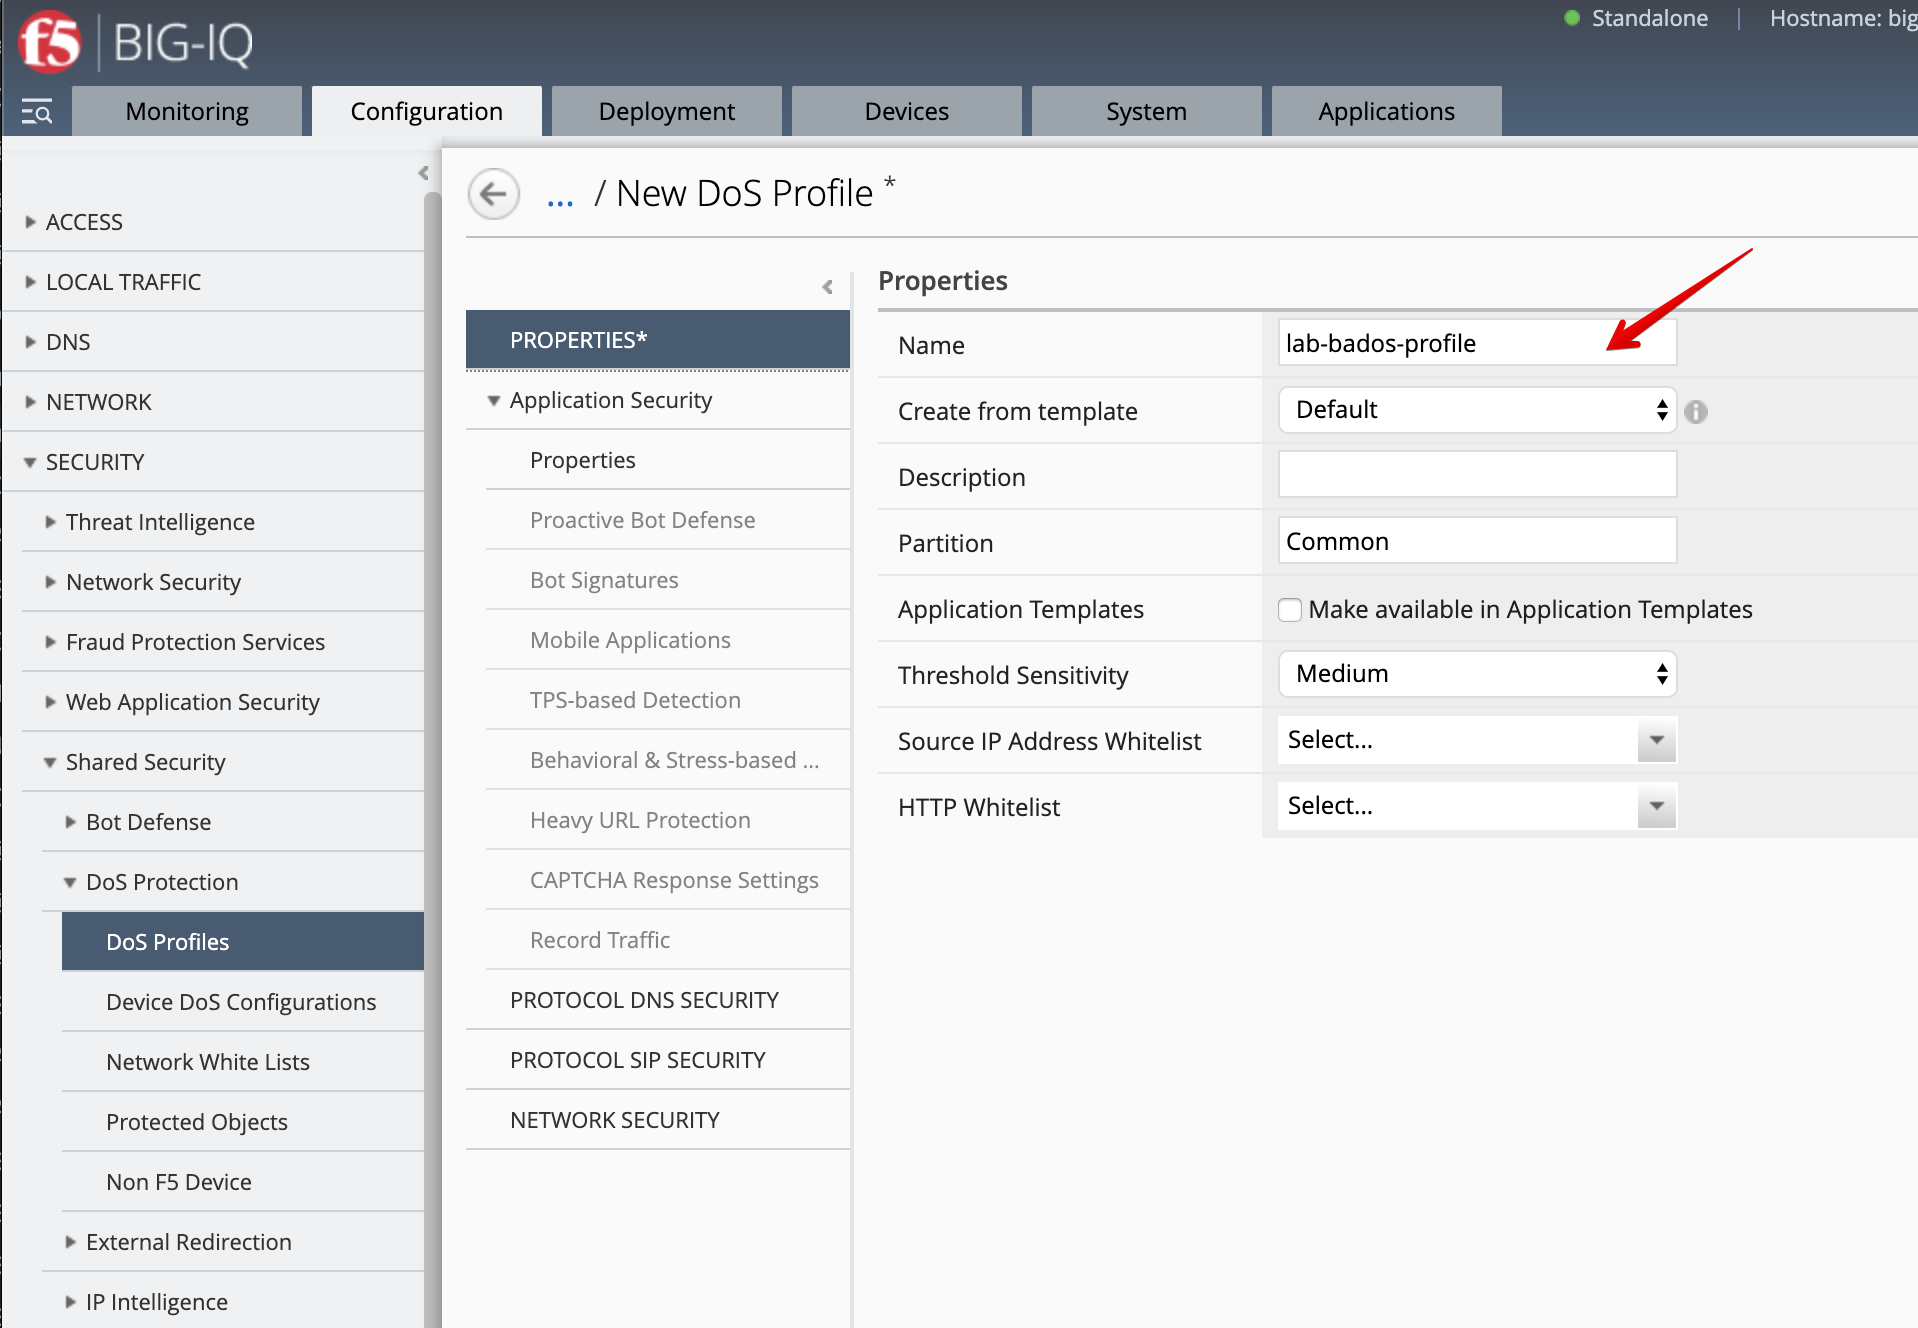
- As David, go to Configuration > SECURITY > Shared Security > DoS Protection > DoS Profiles, click Create and configure Behavioral & Stress-based Detection:
- Name:
lab-bados-profile
Application Security:
- Application Security:
Enabled
Behavioral & Stress-based Detection:
- Operation Mode:
Blocking - Thresholds Mode:
Automatic - Signature Detection:
Enable - Mitigation:
Standard protection
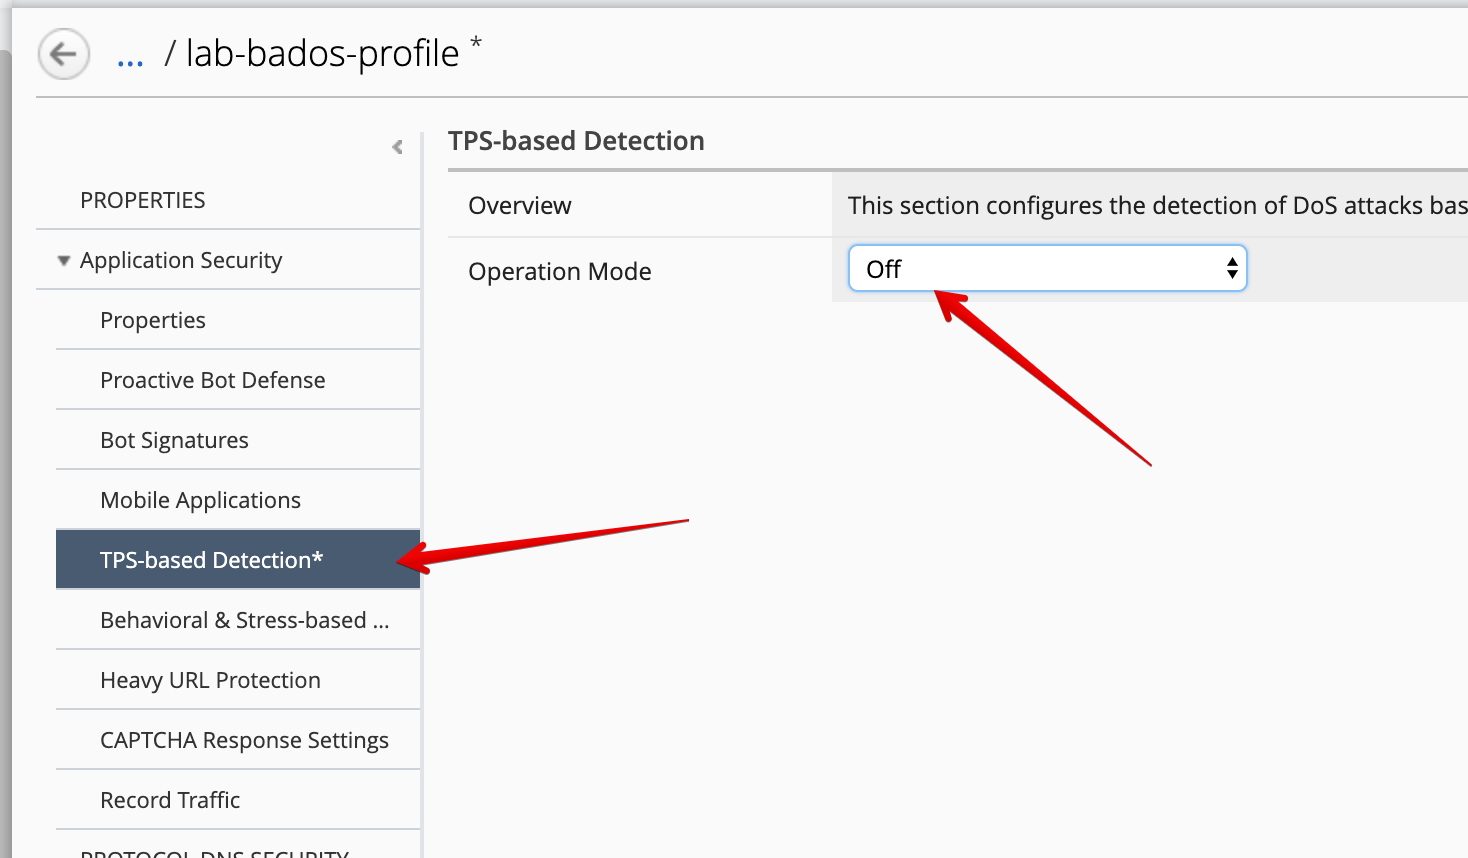
TPS-based Detection
- Operation Mode:
Off

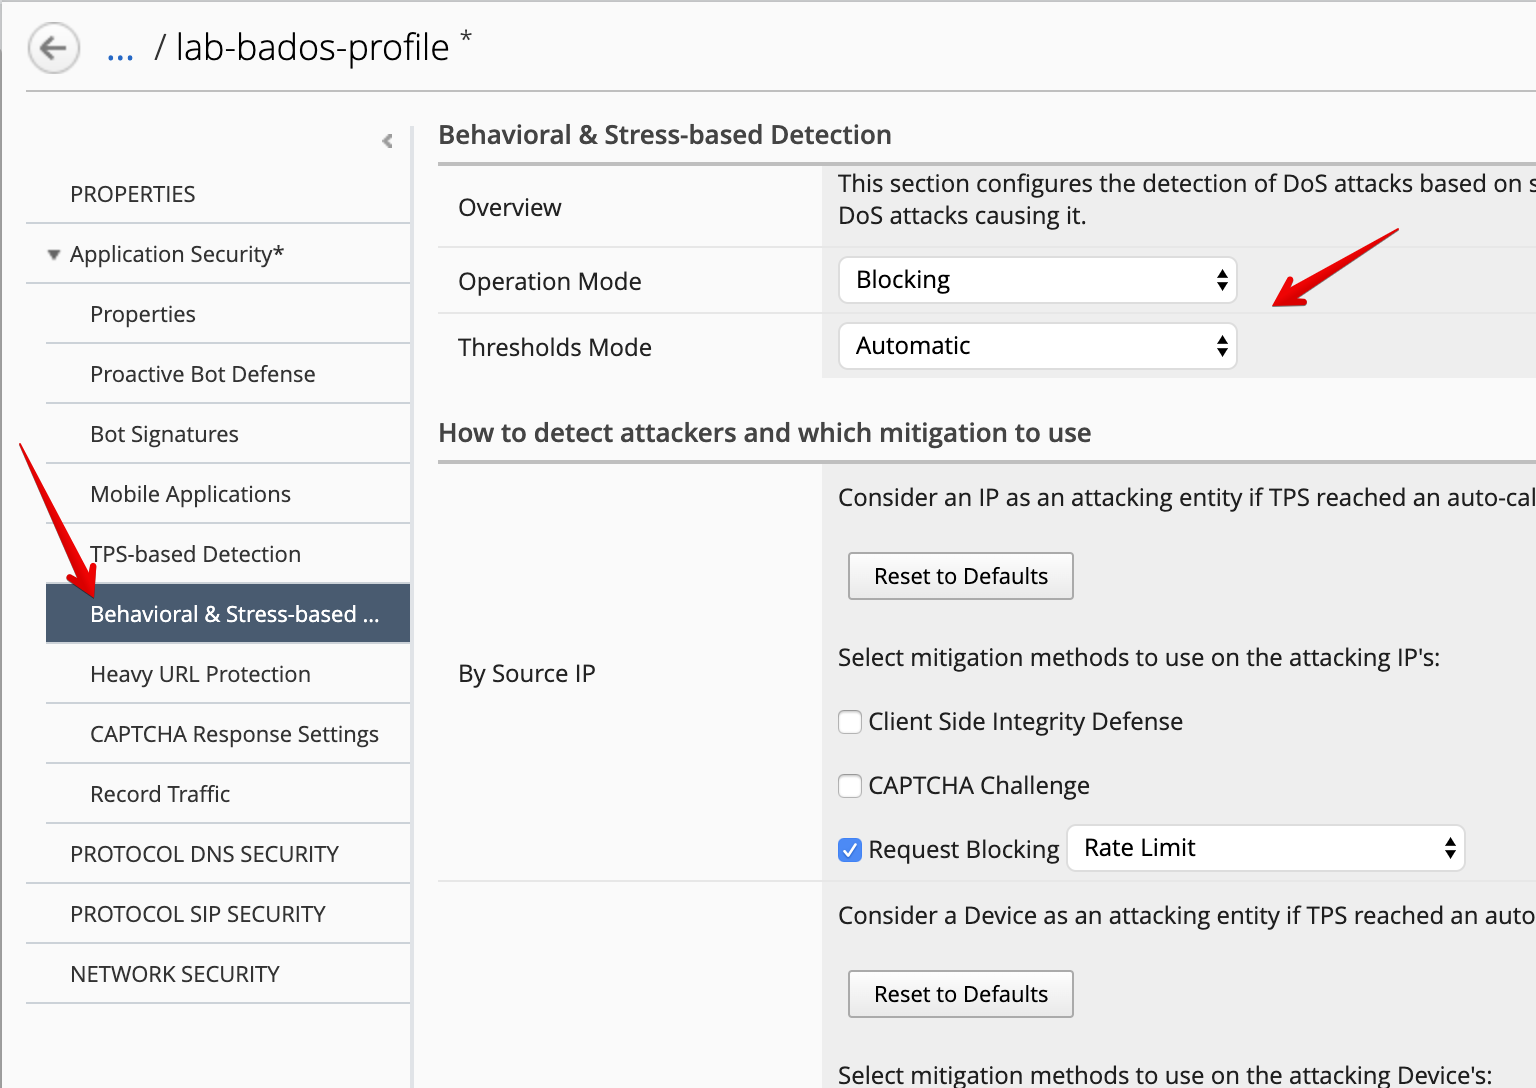
Make sure you disable TPS-based Detection in the DoS profile by setting Operation Mode: Off.
Note
More details in BIG-IP ASM - Preventing DoS Attacks on Applications v15.1 ,
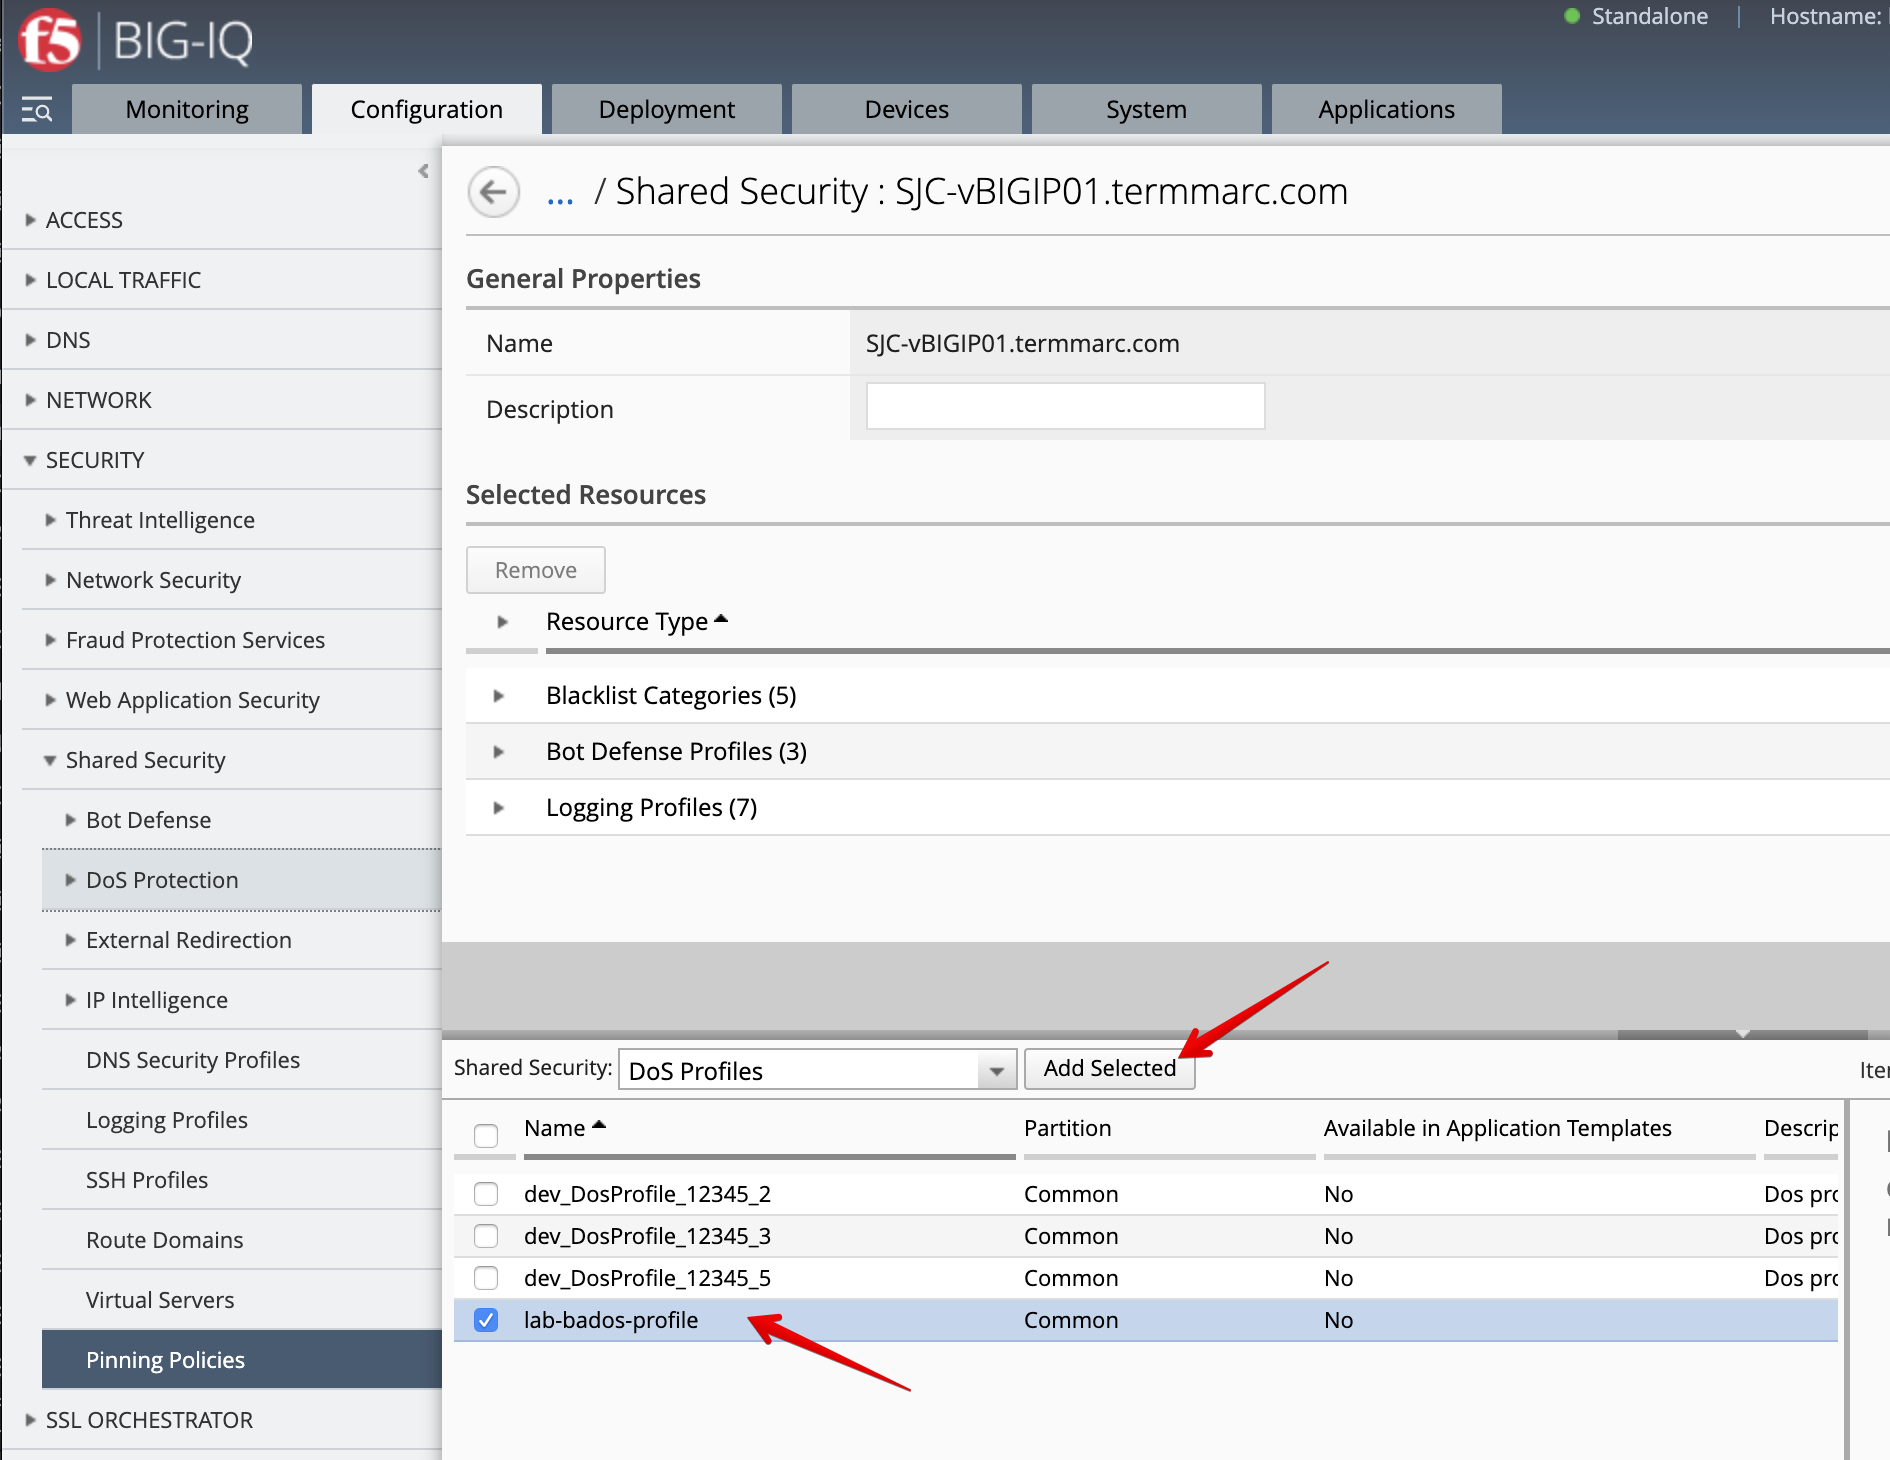
- Pin the new DoS profile to the SJC-vBIGIP01.termmarc.com device. Navigate to Pinning Policies and add the DoS Profile previously created to SJC-vBIGIP01.termmarc.com.
- Deploy the DoS profile. Go to Deployment > EVALUATE & DEPLOY > Shared Security.
Create a Deployment to deploy the DoS Profile & Remote Logging changes on the SJC BIG-IP.
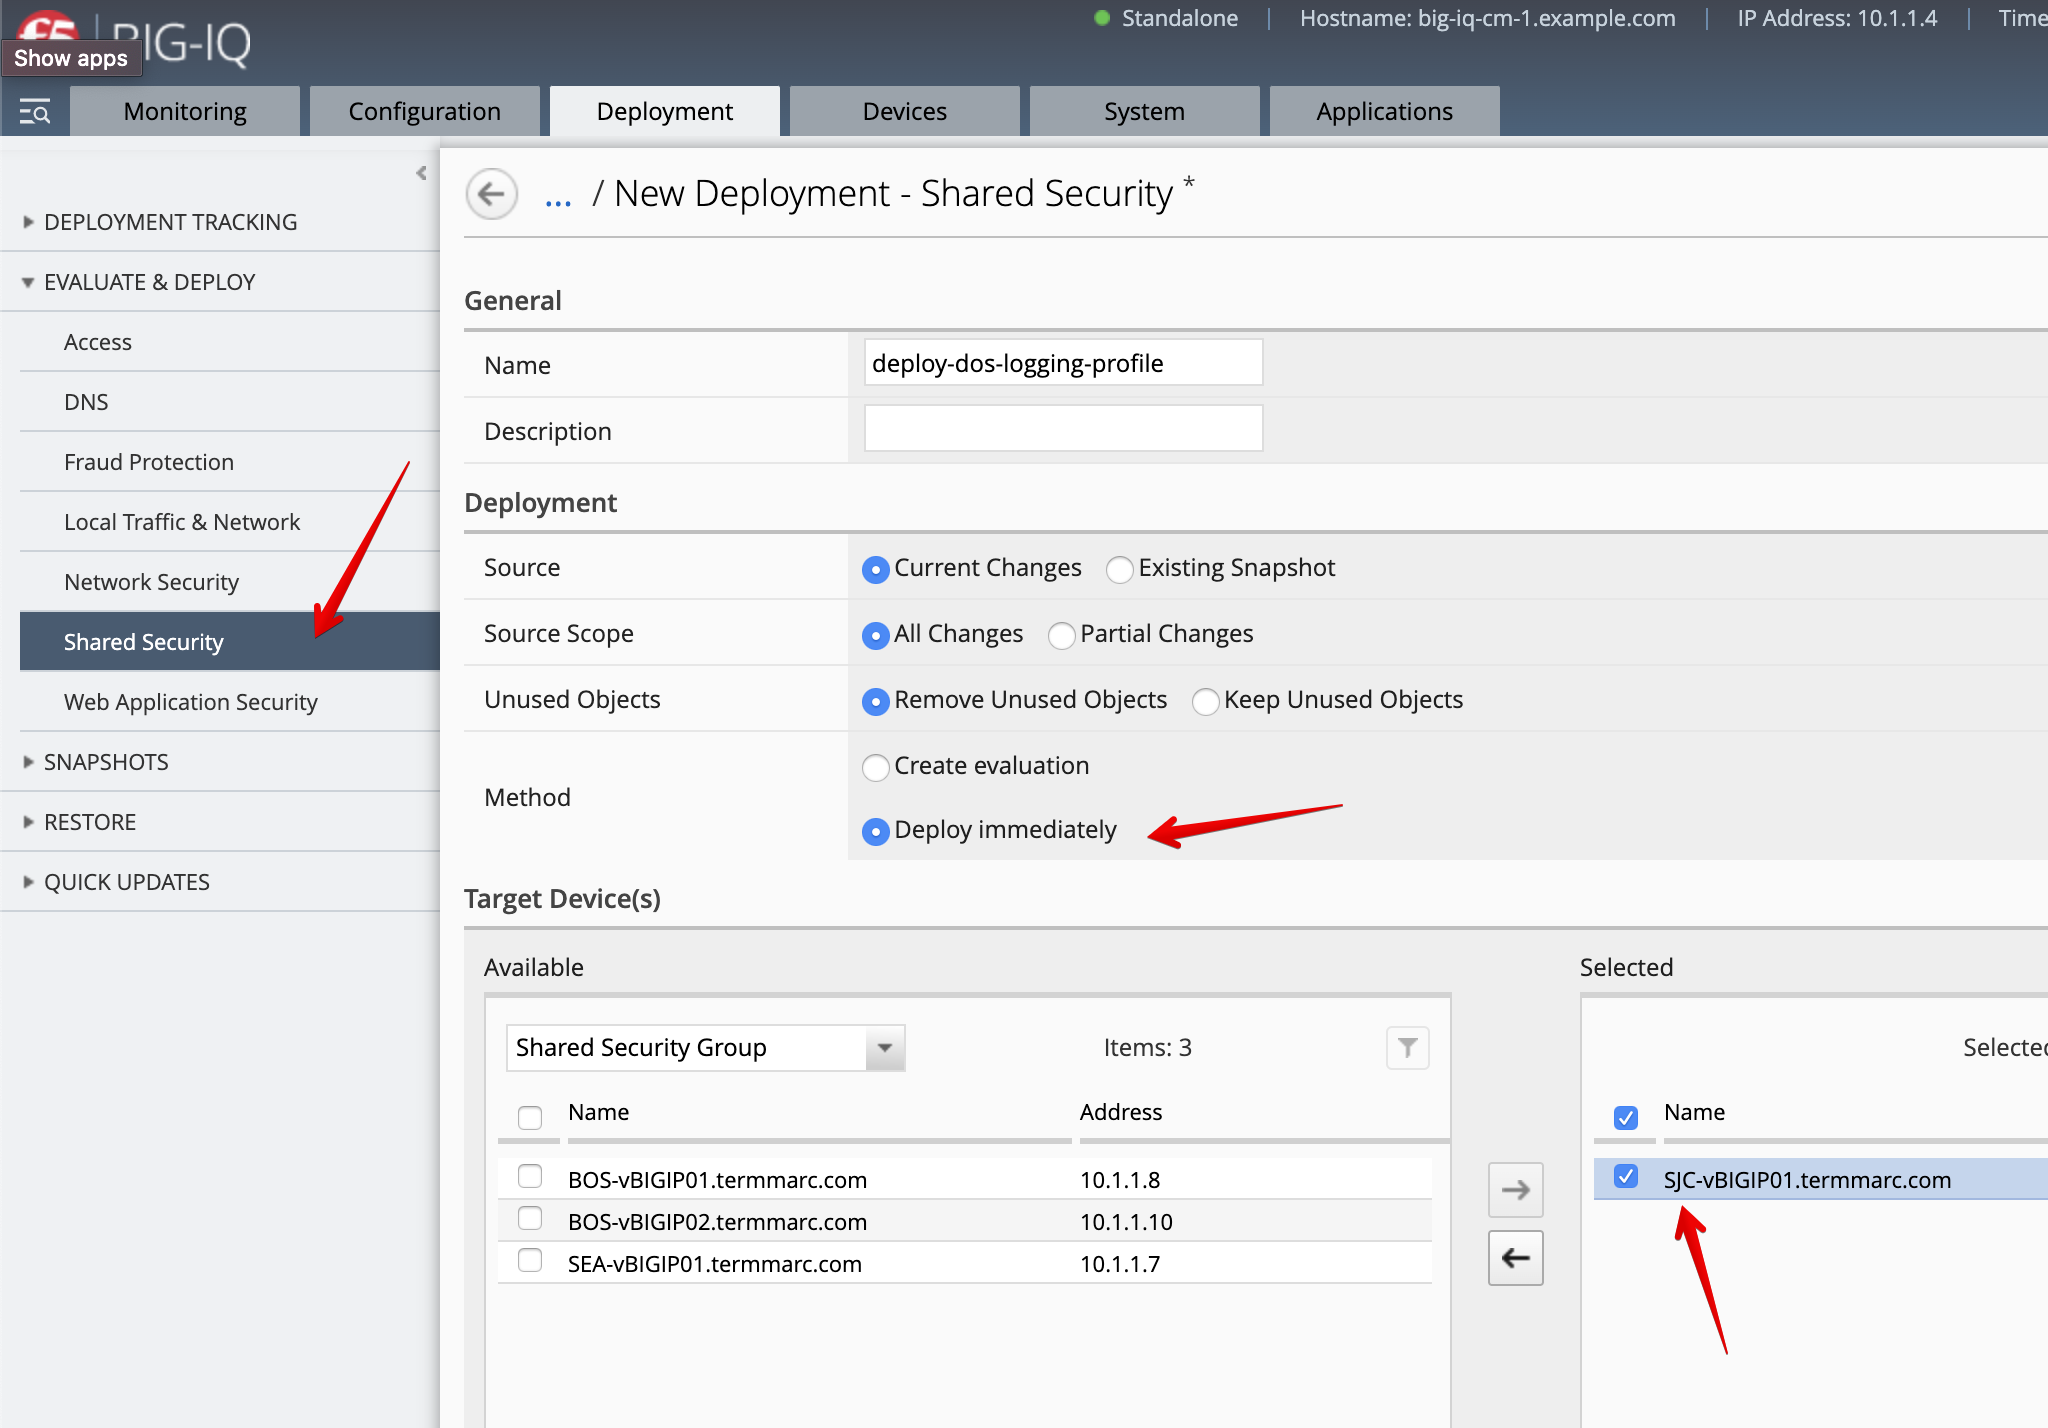
Make sure the deployment is successful.
AS3 BaDoS Template creation and application service deployment
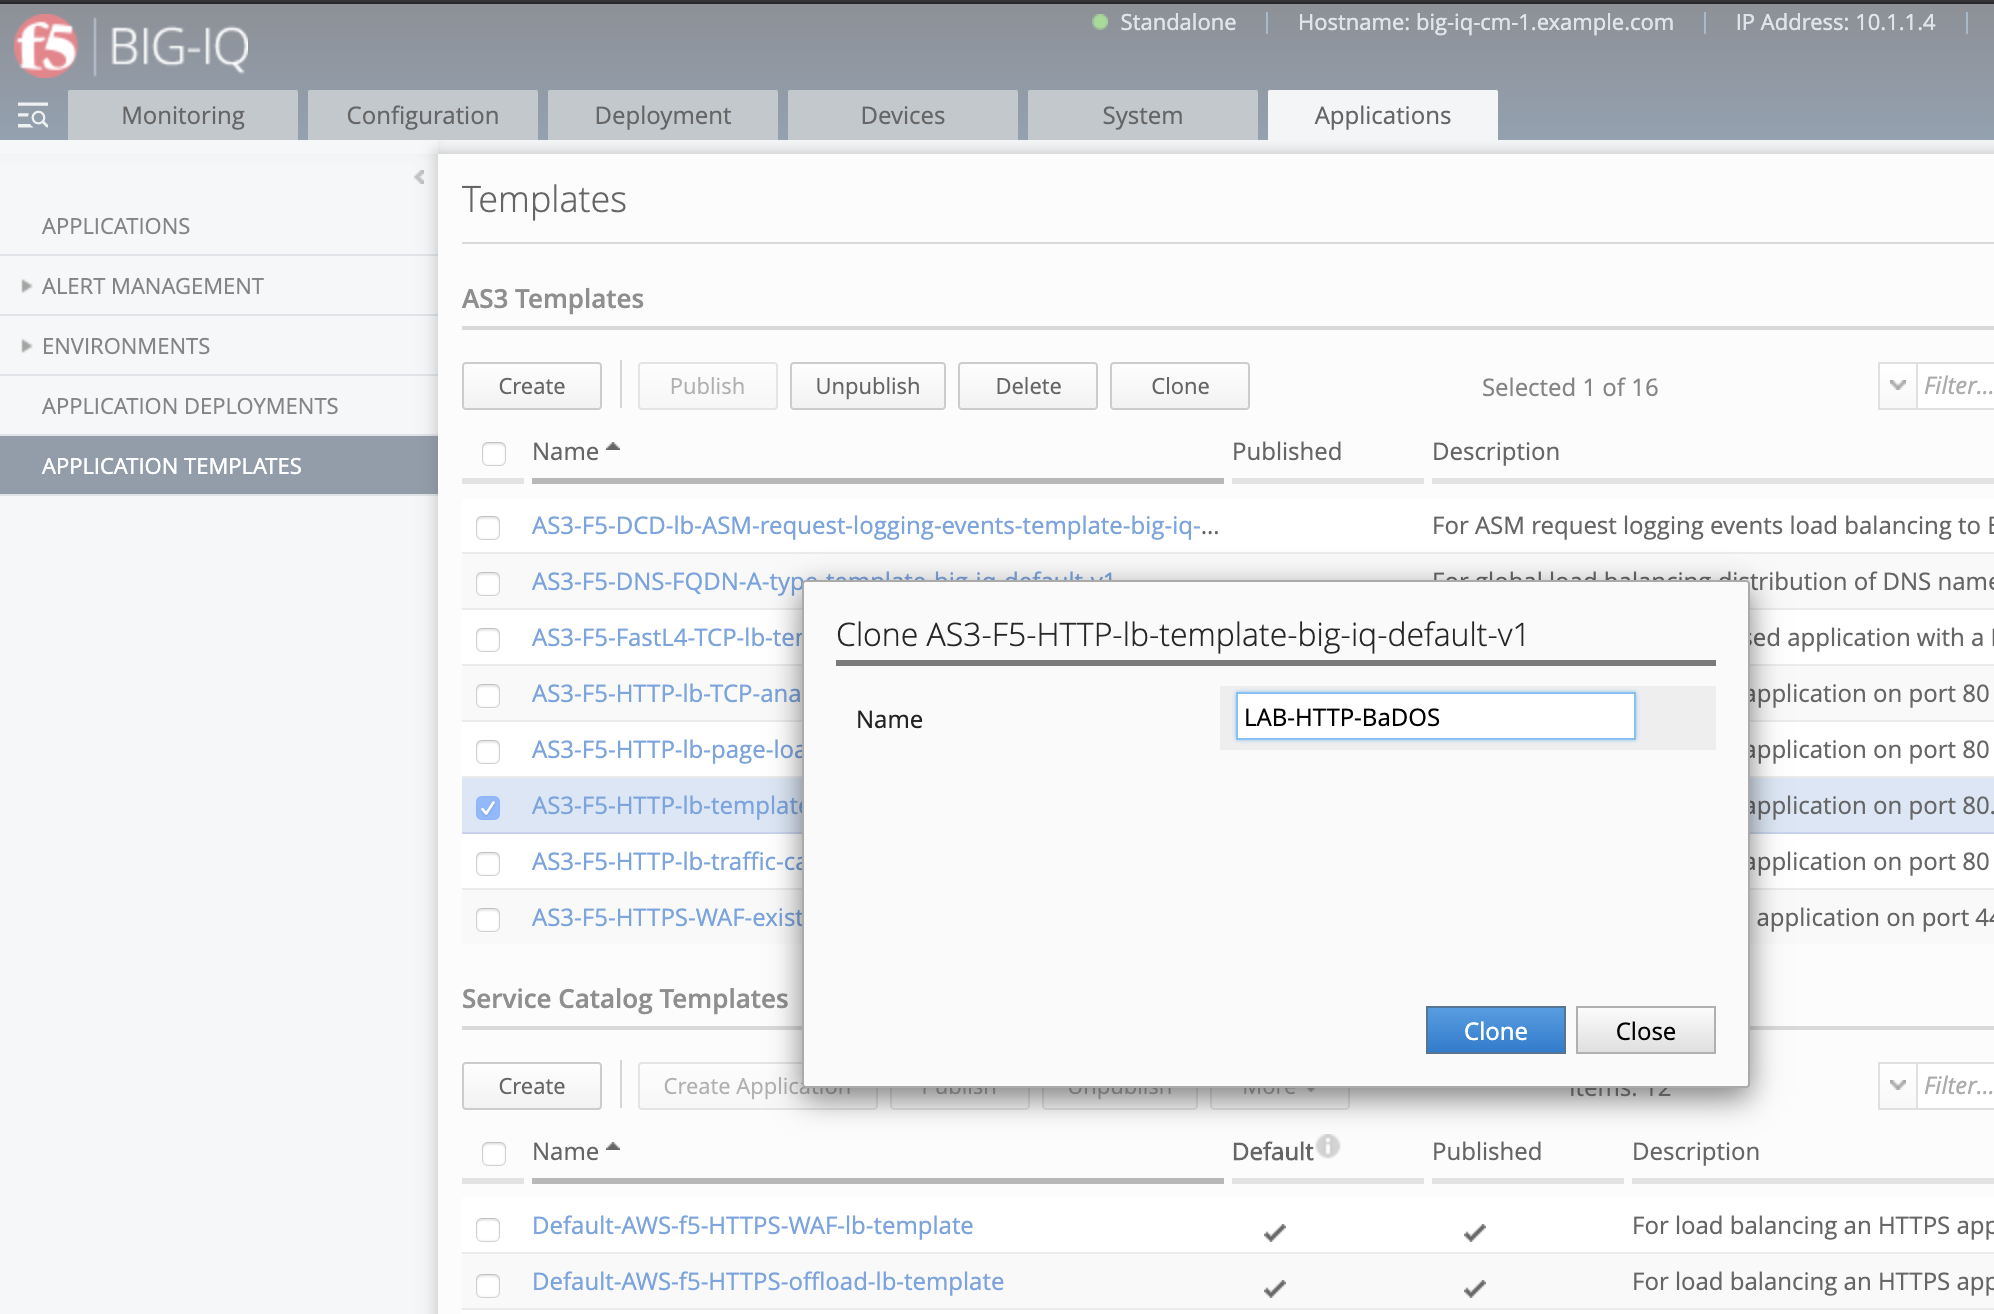
- Navigate to the Applications tab > APPLICATION TEMPLATES.
Select the AS3-F5-HTTP-lb-template-big-iq-default-<version> AS3 Template and clone it.
Rename it LAB-HTTP-BaDOS.
Edit the new cloned template and select the Service_HTTP class.
- Look for the attribute called
profileDOS, set it to/Common/lab-bados-profile, and mark it asEditable.
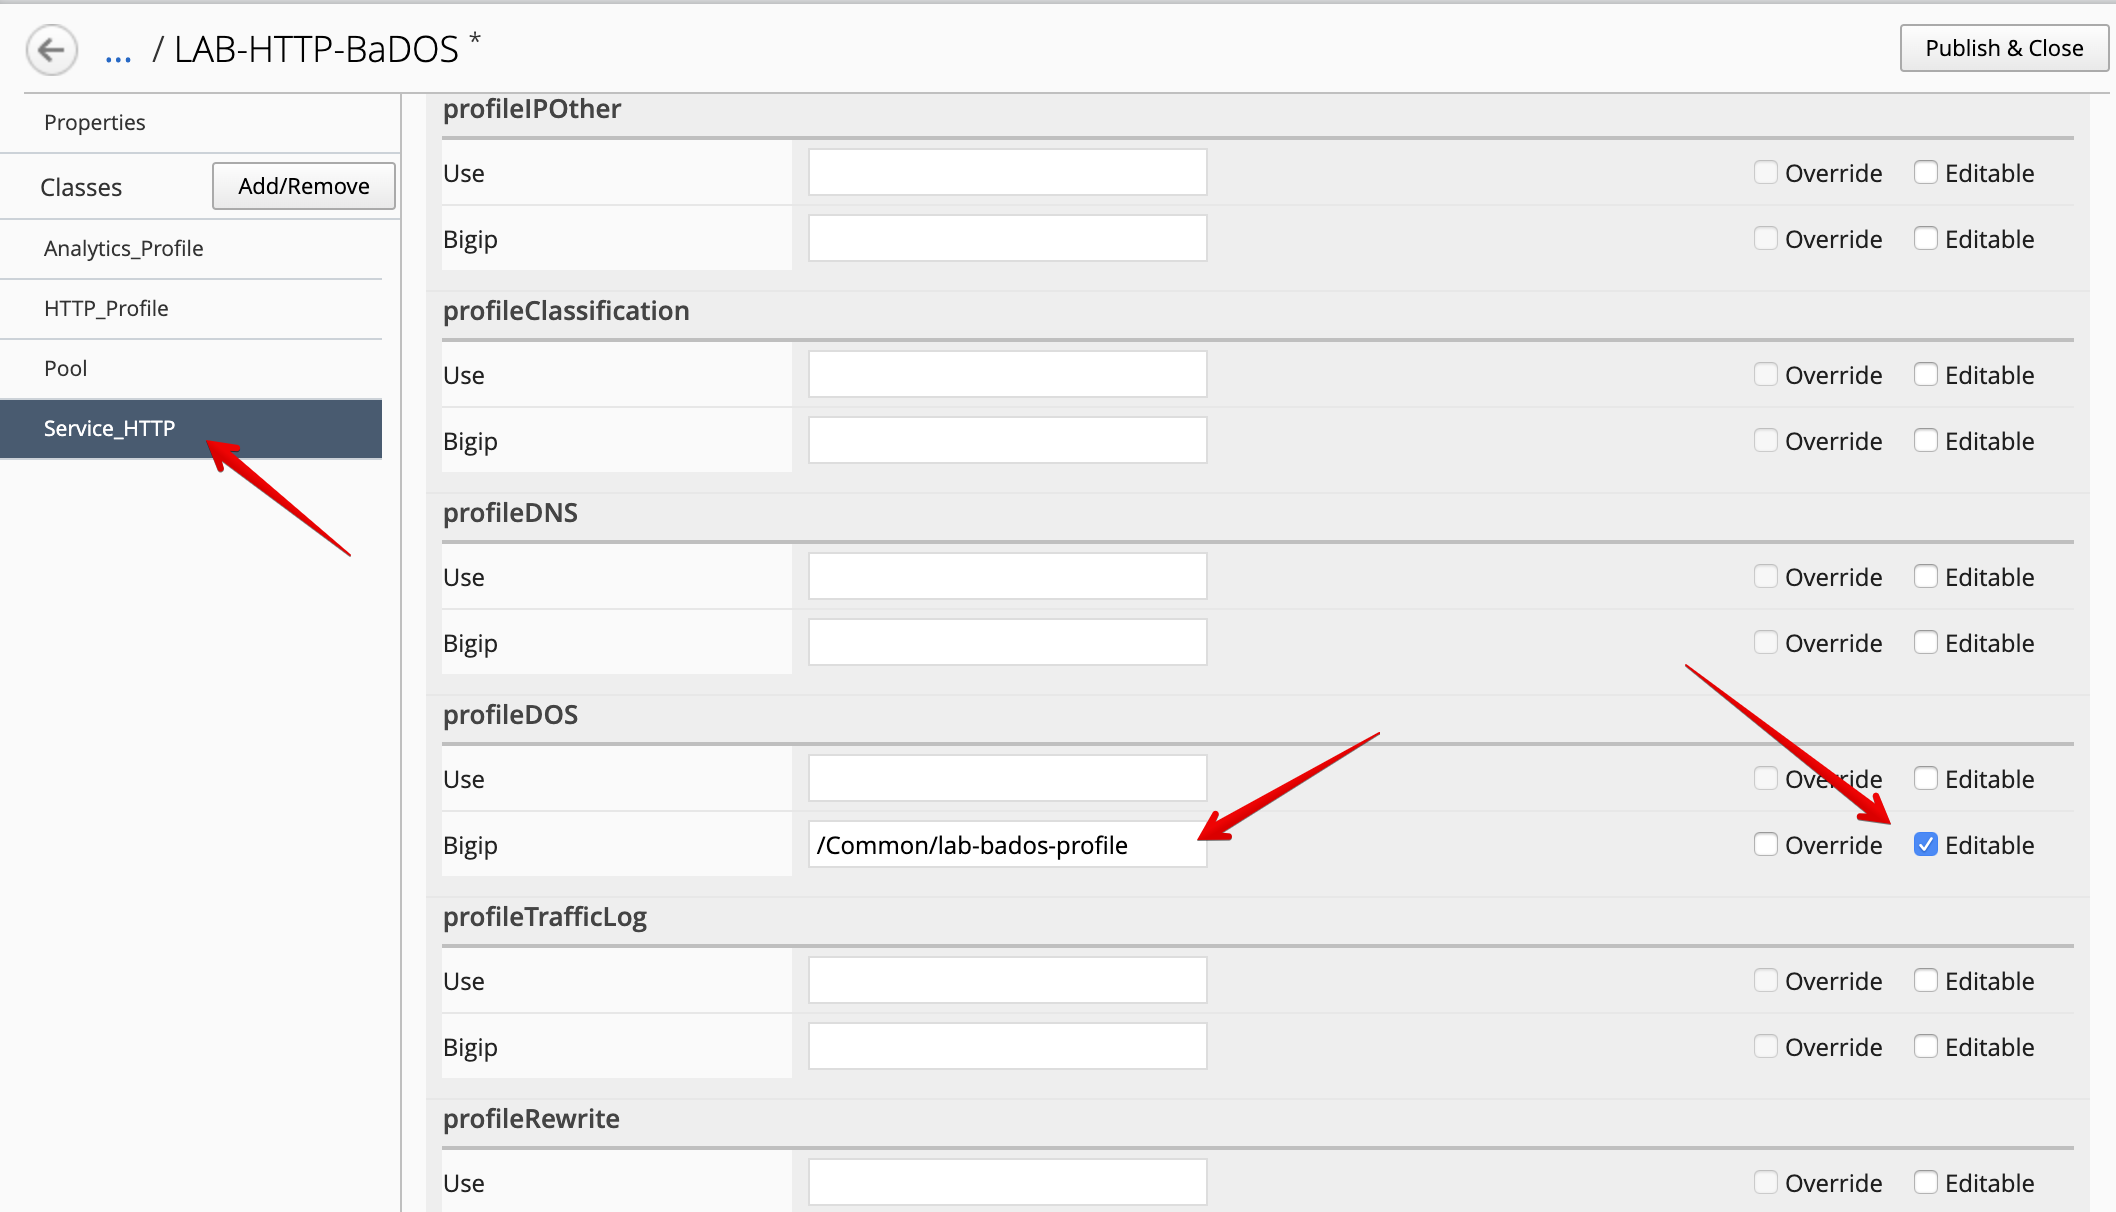
- Look for the attribute called
Security Log Profiles, set it to/Common/lab-dos-logging-profile, and mark it asEditable.
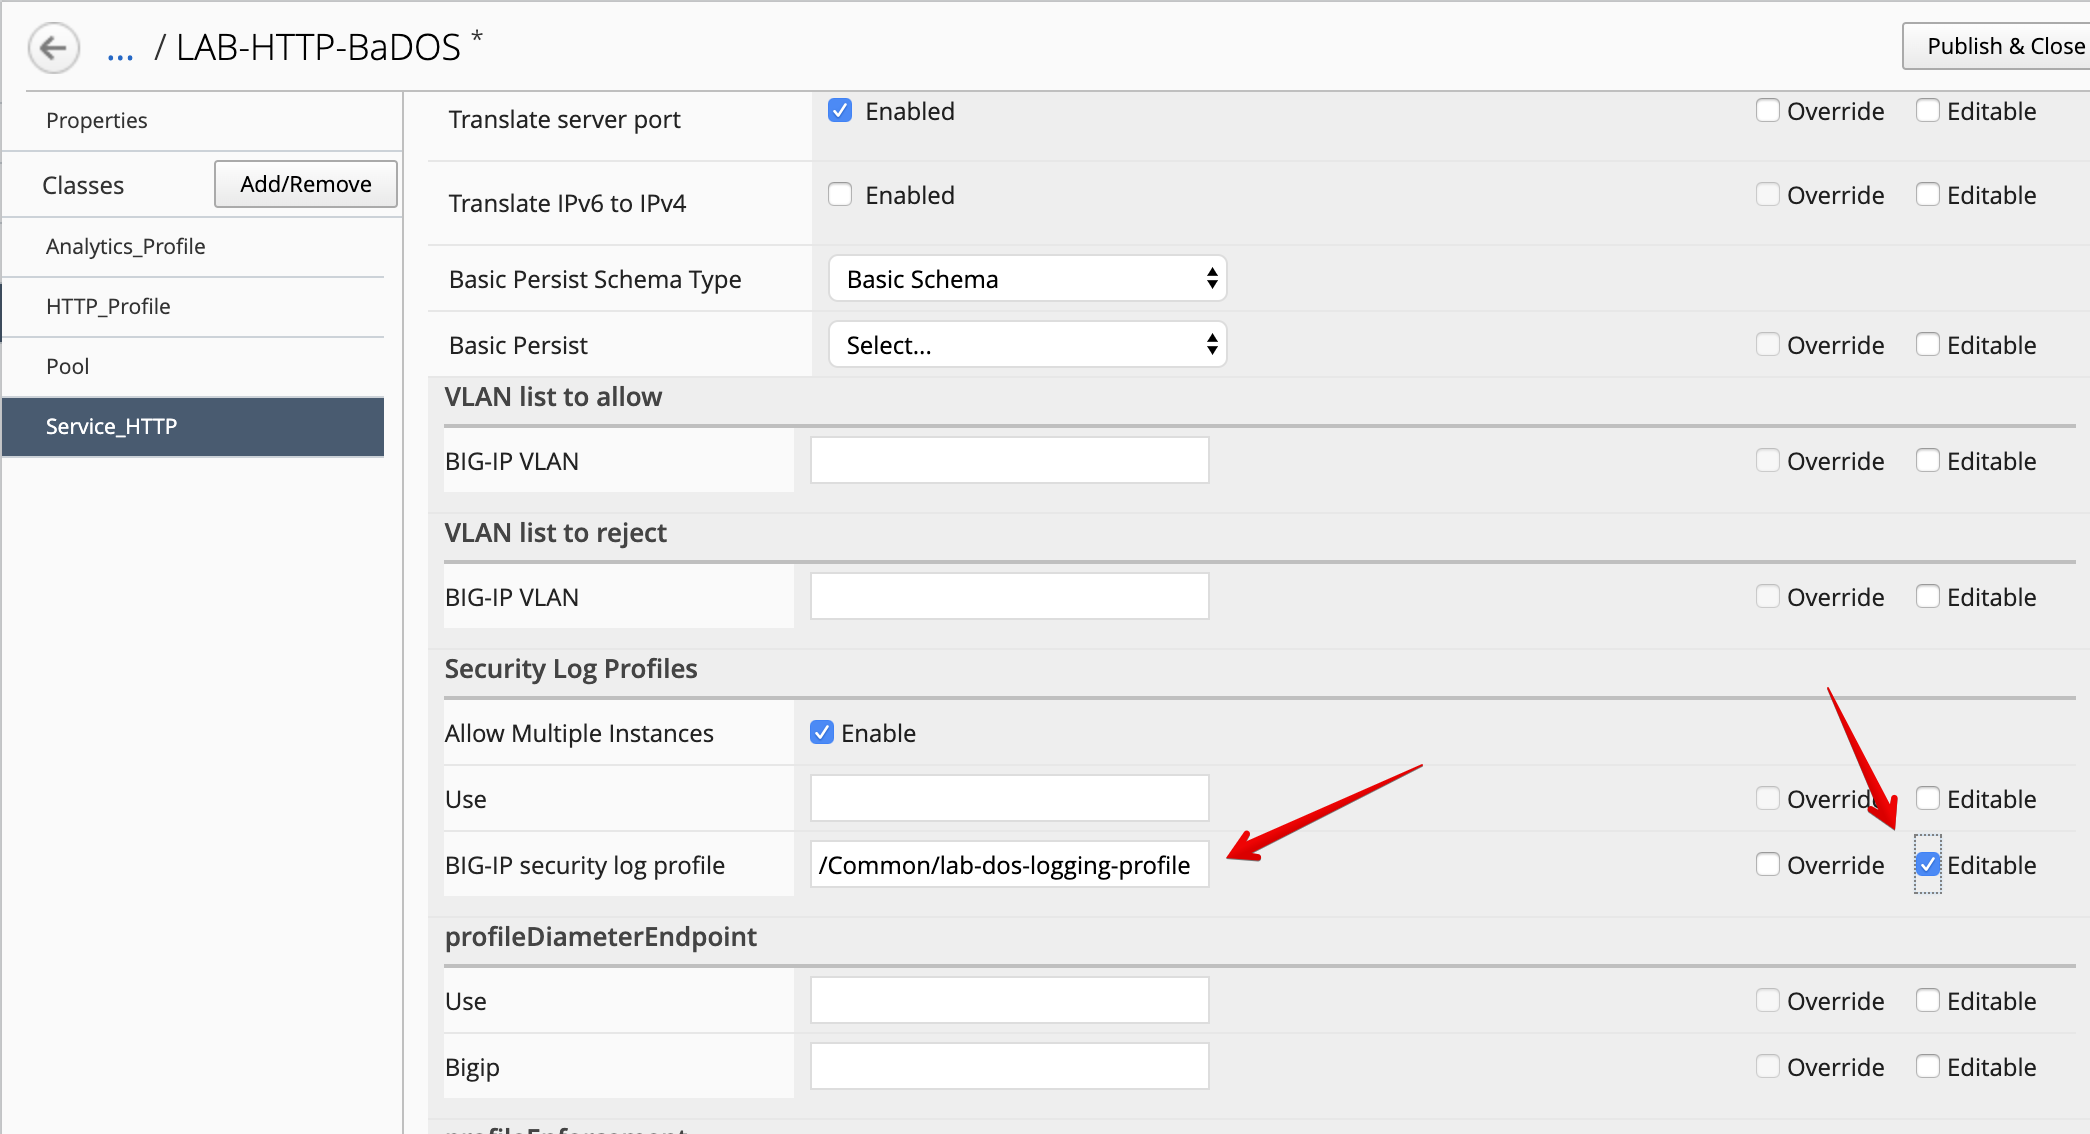
Then, select the HTTP_Profile class.
- Look for the attributes called
Trust X-Forwarded-For, set it toEnabled, and mark it asEditable.
At the top right corner, click on Publish and Close
- Navigate to the APPLICATION menu, click on Create
Assign the Bot Defense Profile and the Log Profile previously created.
| Application properties: |
|
| Select an Application Service Template: |
|
| General Properties: |
|
| Pool |
|
| HTTP_Profile. Keep default. |
| Service_HTTP |
|
| Analytics_Profile. Enable all options. |
Note
You are attaching the DoS and logging profiles to the VIP using AS3.
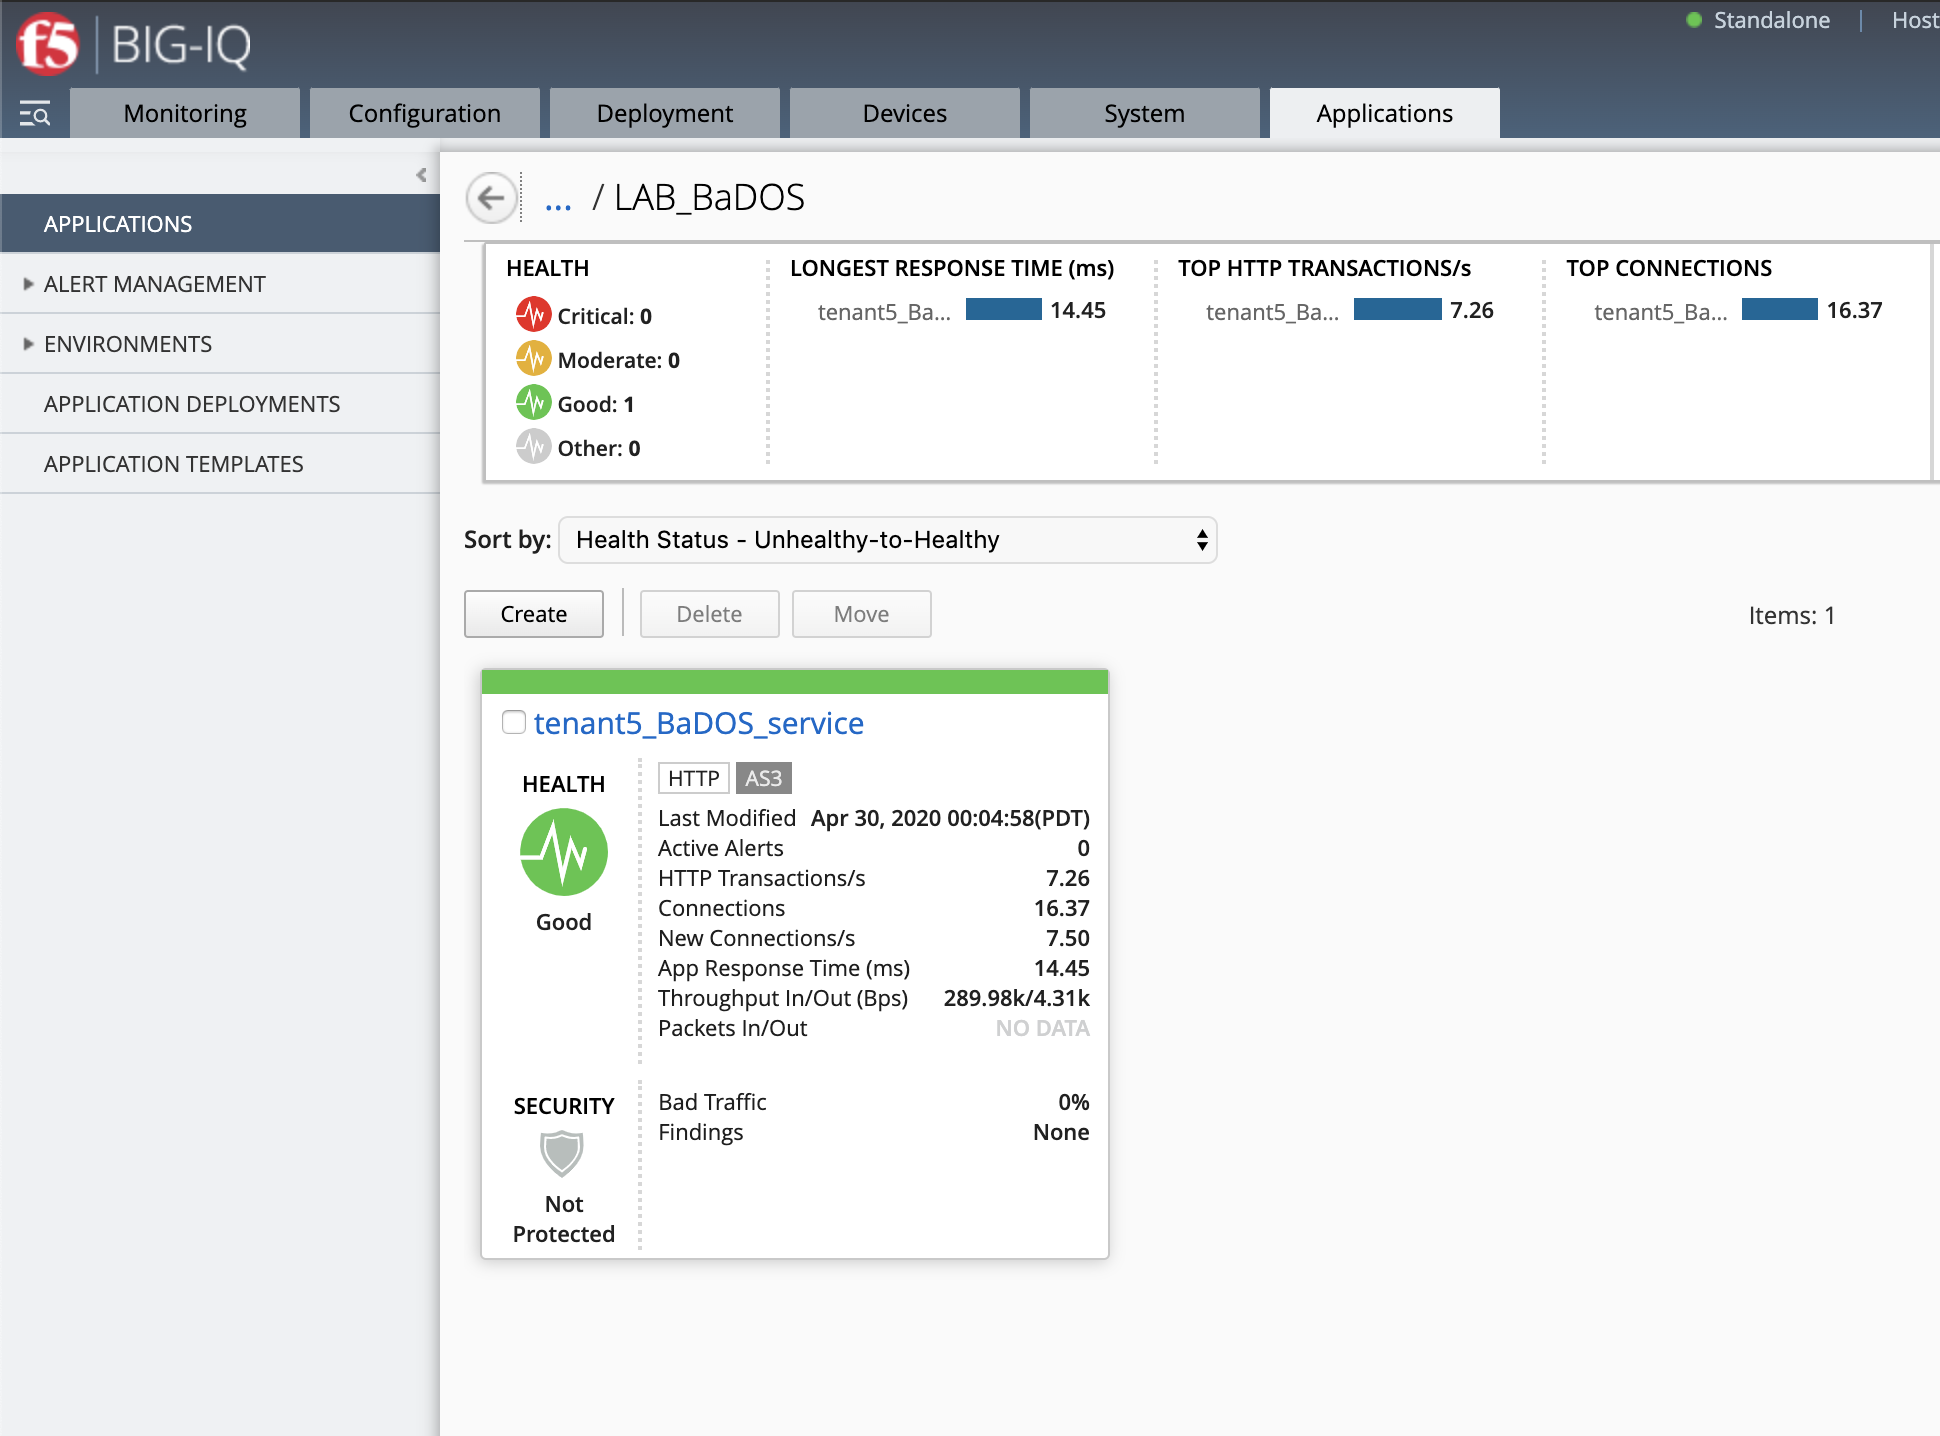
The application service called tenant5_BaDOS_service is now created on the BIG-IQ dashboard
under the application called LAB_BaDOS.
Generate baseline legitimate traffic and trigger the DoS attacks
Note
Both legitimate and attack traffic will have XFF header inserted in the request to simulate geografically distributed clients. The source IP is also updated on the Lamp server used to generate the traffic.
- Generate baseline legitimate traffic. On Lamp server, generate HTTP traffic from a browser and CLI.
Connect via SSH or Web Shell to the system Ubuntu Lamp Server. (if you use the Web Shell, login as f5student first: su - f5student) and run:
/home/f5/traffic-scripts/behavioral-DoS/baseline_baddos.sh
Choose 1) increasing.
- Wait for the machine learning algorithm to learn traffic behavior. SSH to the SJC-vBIGIP01.termmarc.com device and run:
admd -s vs./tenant5/BaDOS_service/serviceMain+/Common/lab-bados-profile.info.learning
The output looks like that:
vs./tenant5/BaDOS_service/serviceMain+/Common/lab-bados-profile.info.learning:[80.5464, 697, 26450, 100]
- 80.5464 is the average approximation to the learned baselines (confidence in the machine learning algorithm, wait until this number reaches 95% before starting the attack traffic)
- 667 is the number of bins to be measured
- 26450 is the number if learned unique suggestions
- 100 is the number of good signatures dataset which are ready
- Start the attack traffic, open a different SSH session on the lamp server and run:
/home/f5/traffic-scripts/behavioral-DoS/attack_baddos.sh
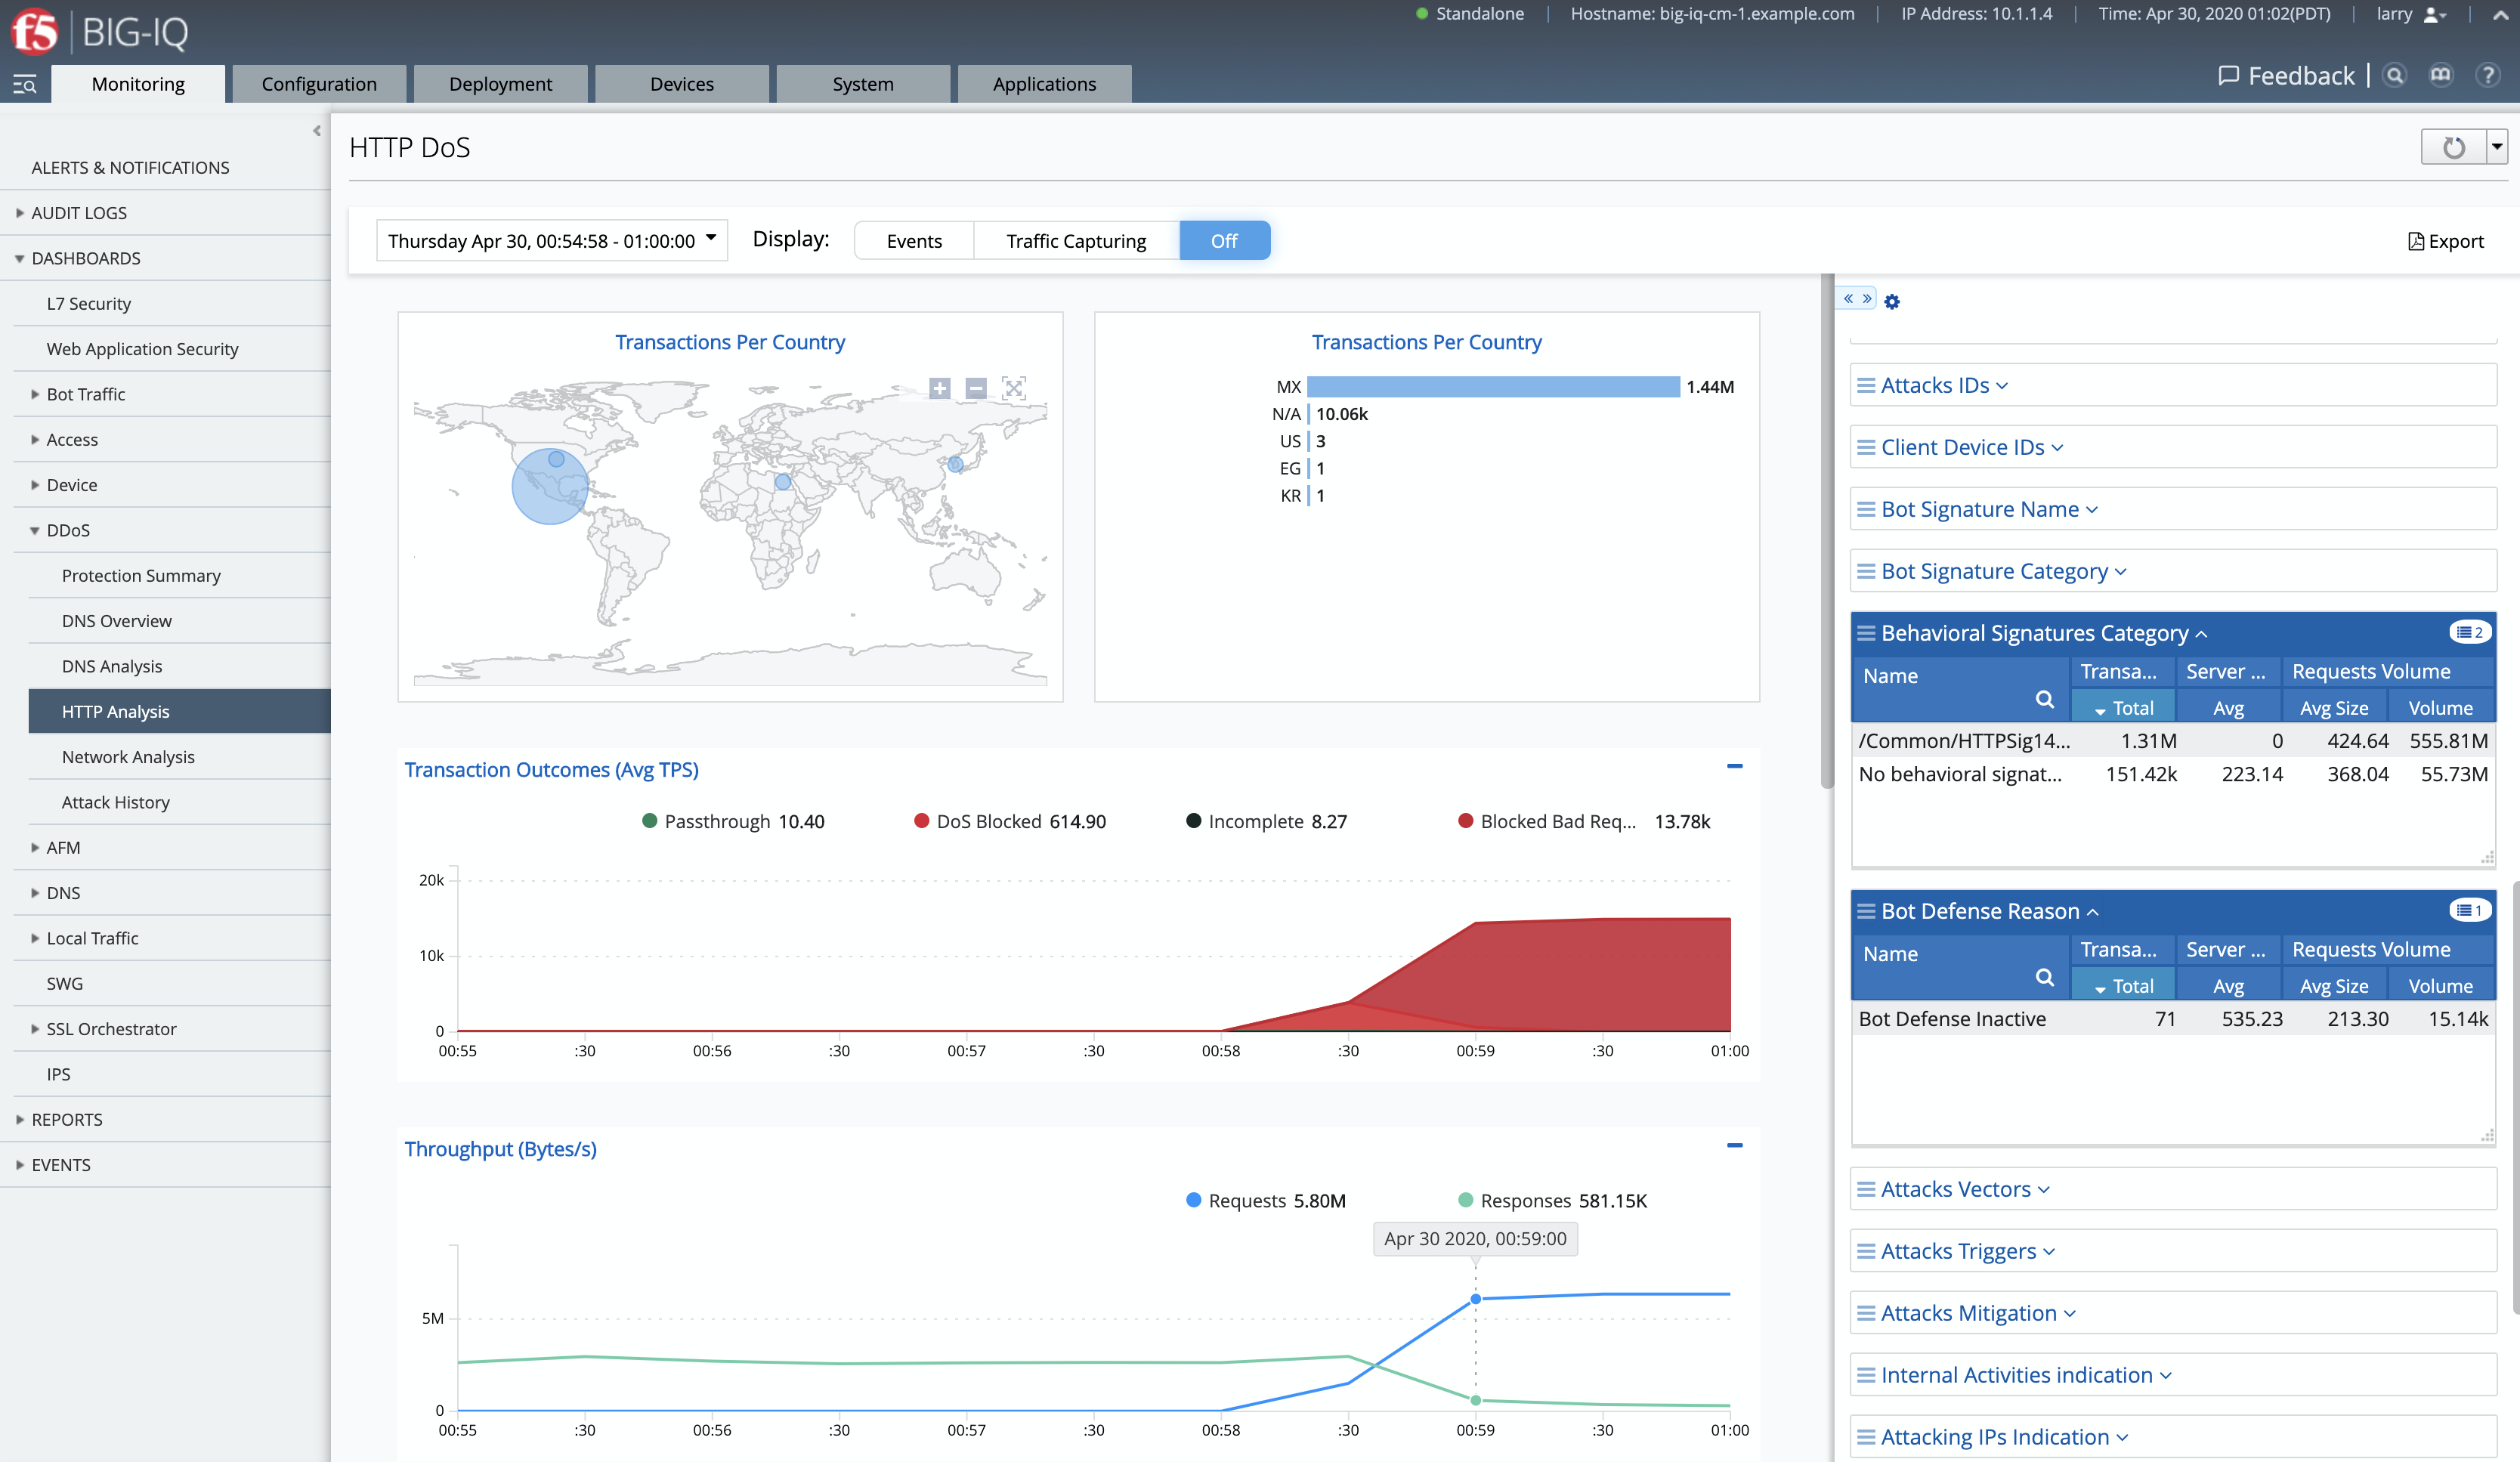
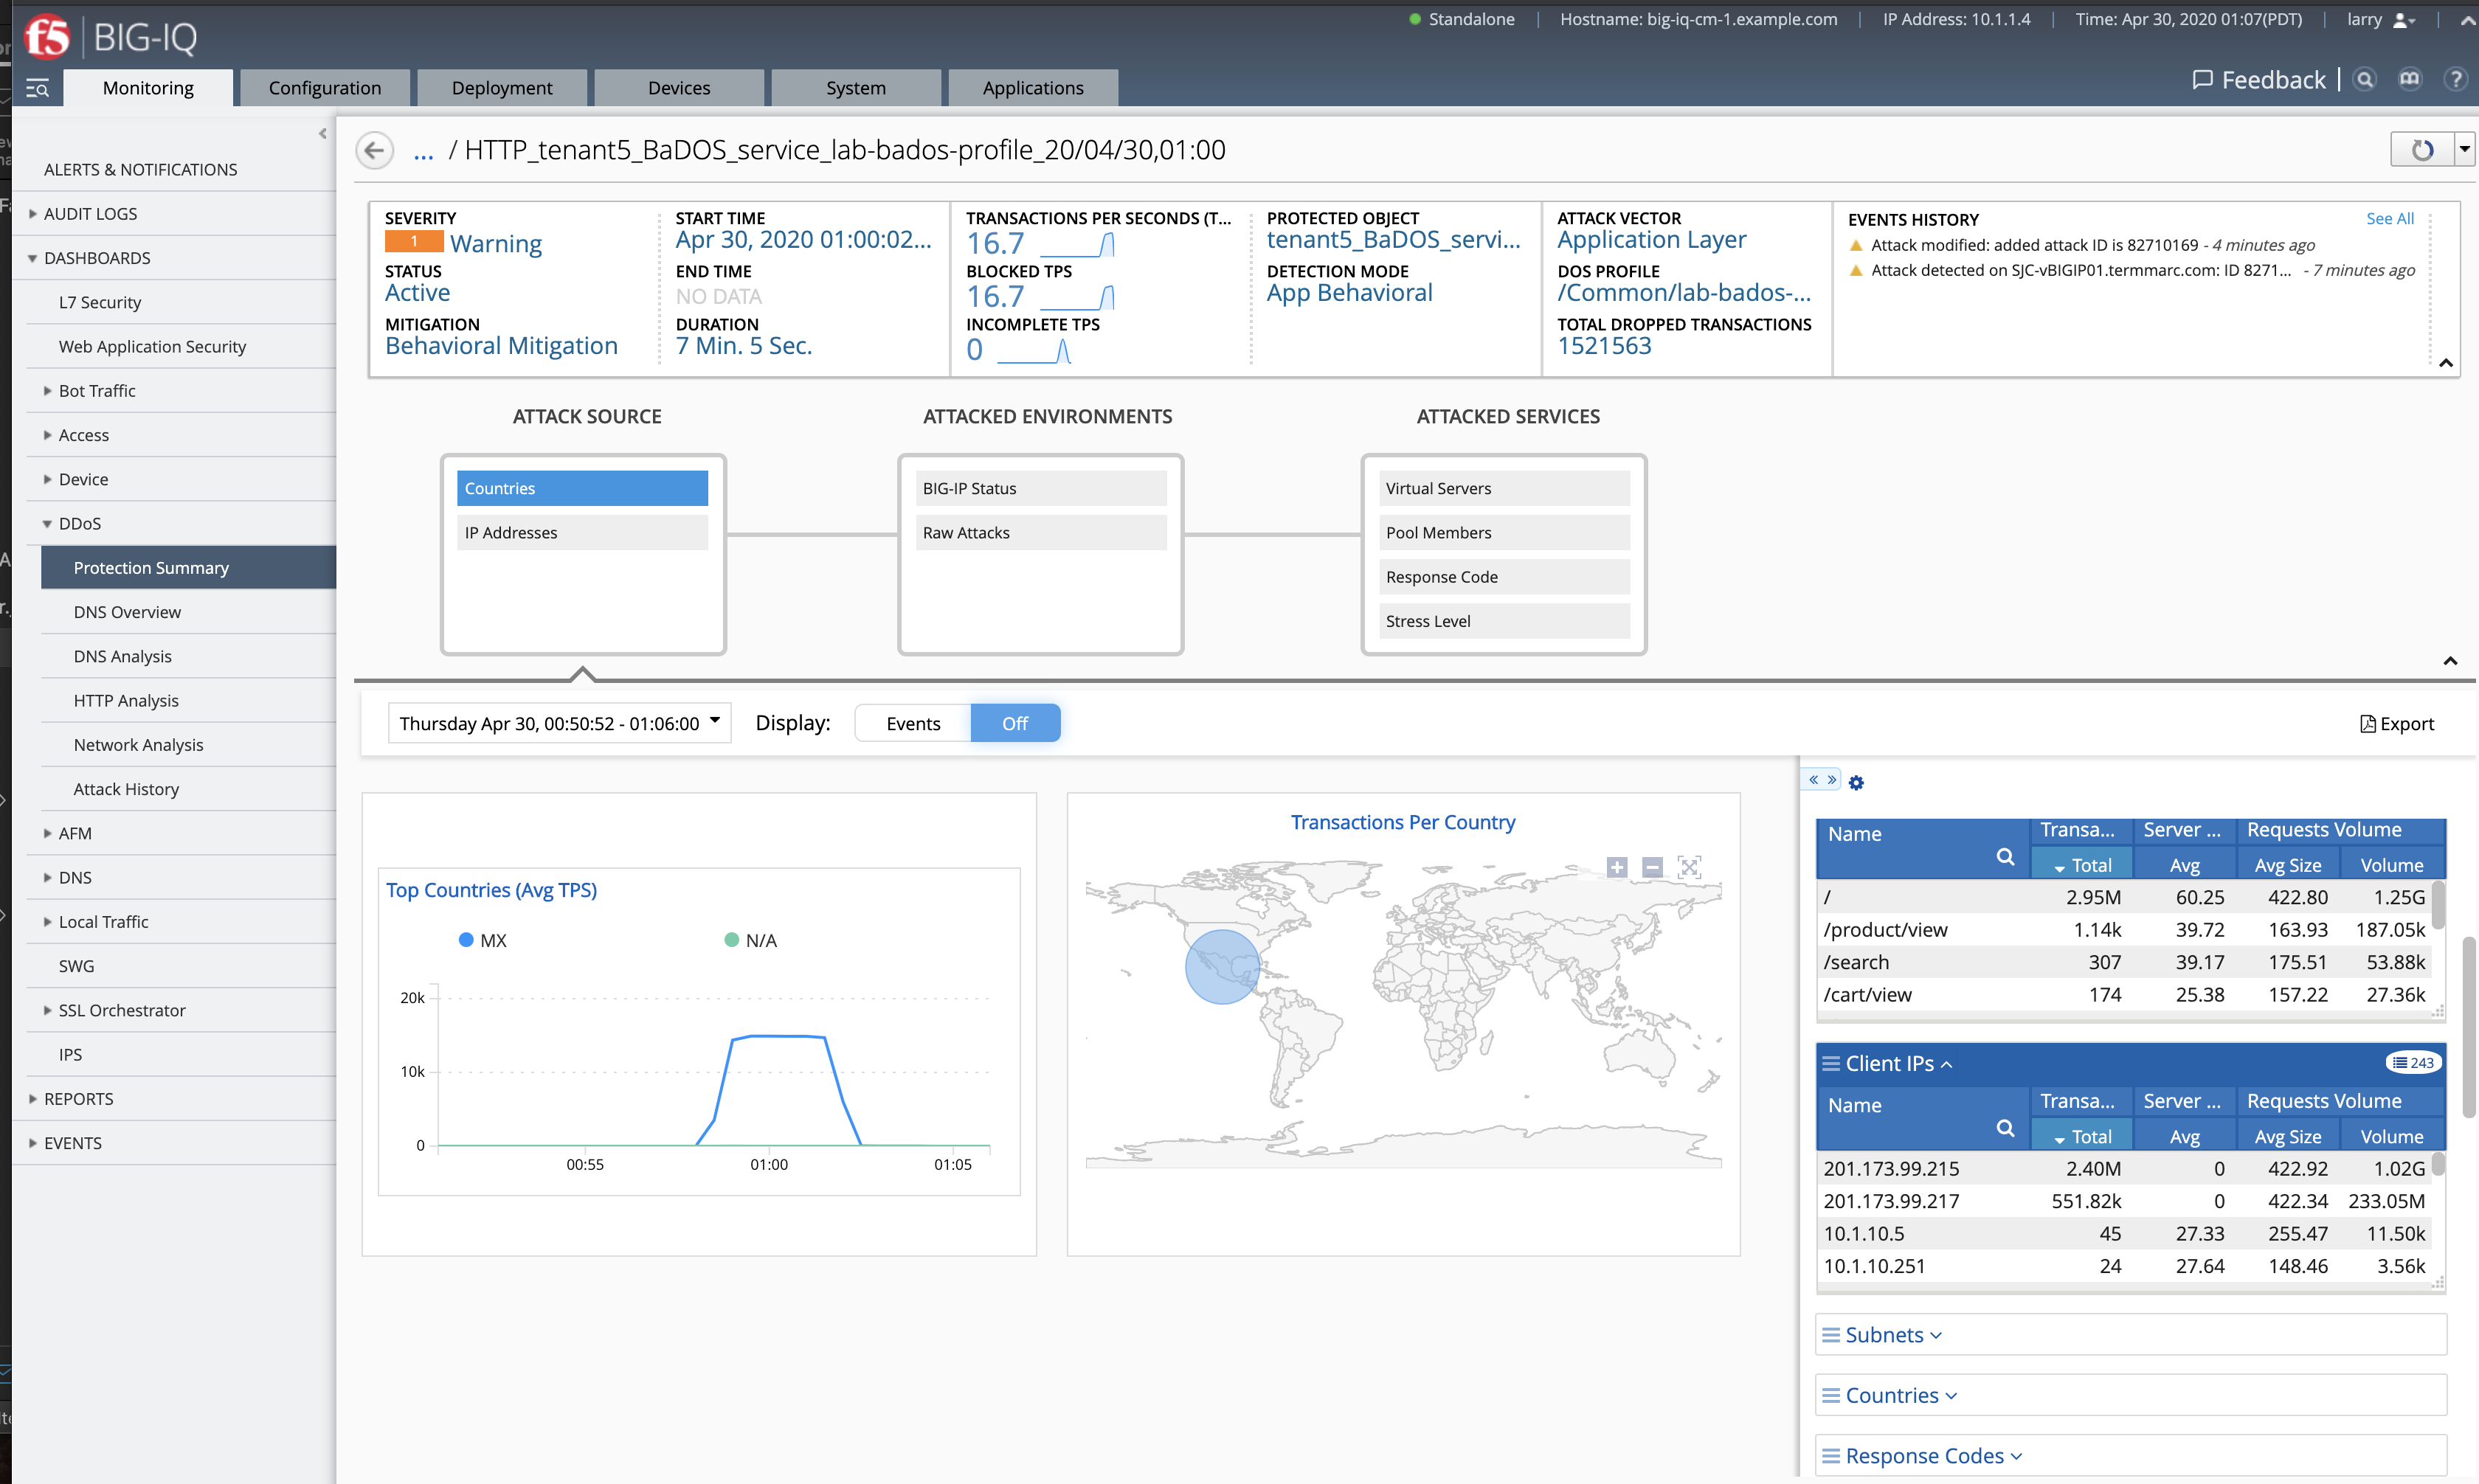
- Now, have a look at the BIG-IQ DoS Dashboard available on BIG-IQ under Monitoring > DASHBOARDS > DDoS > HTTP Analysis.
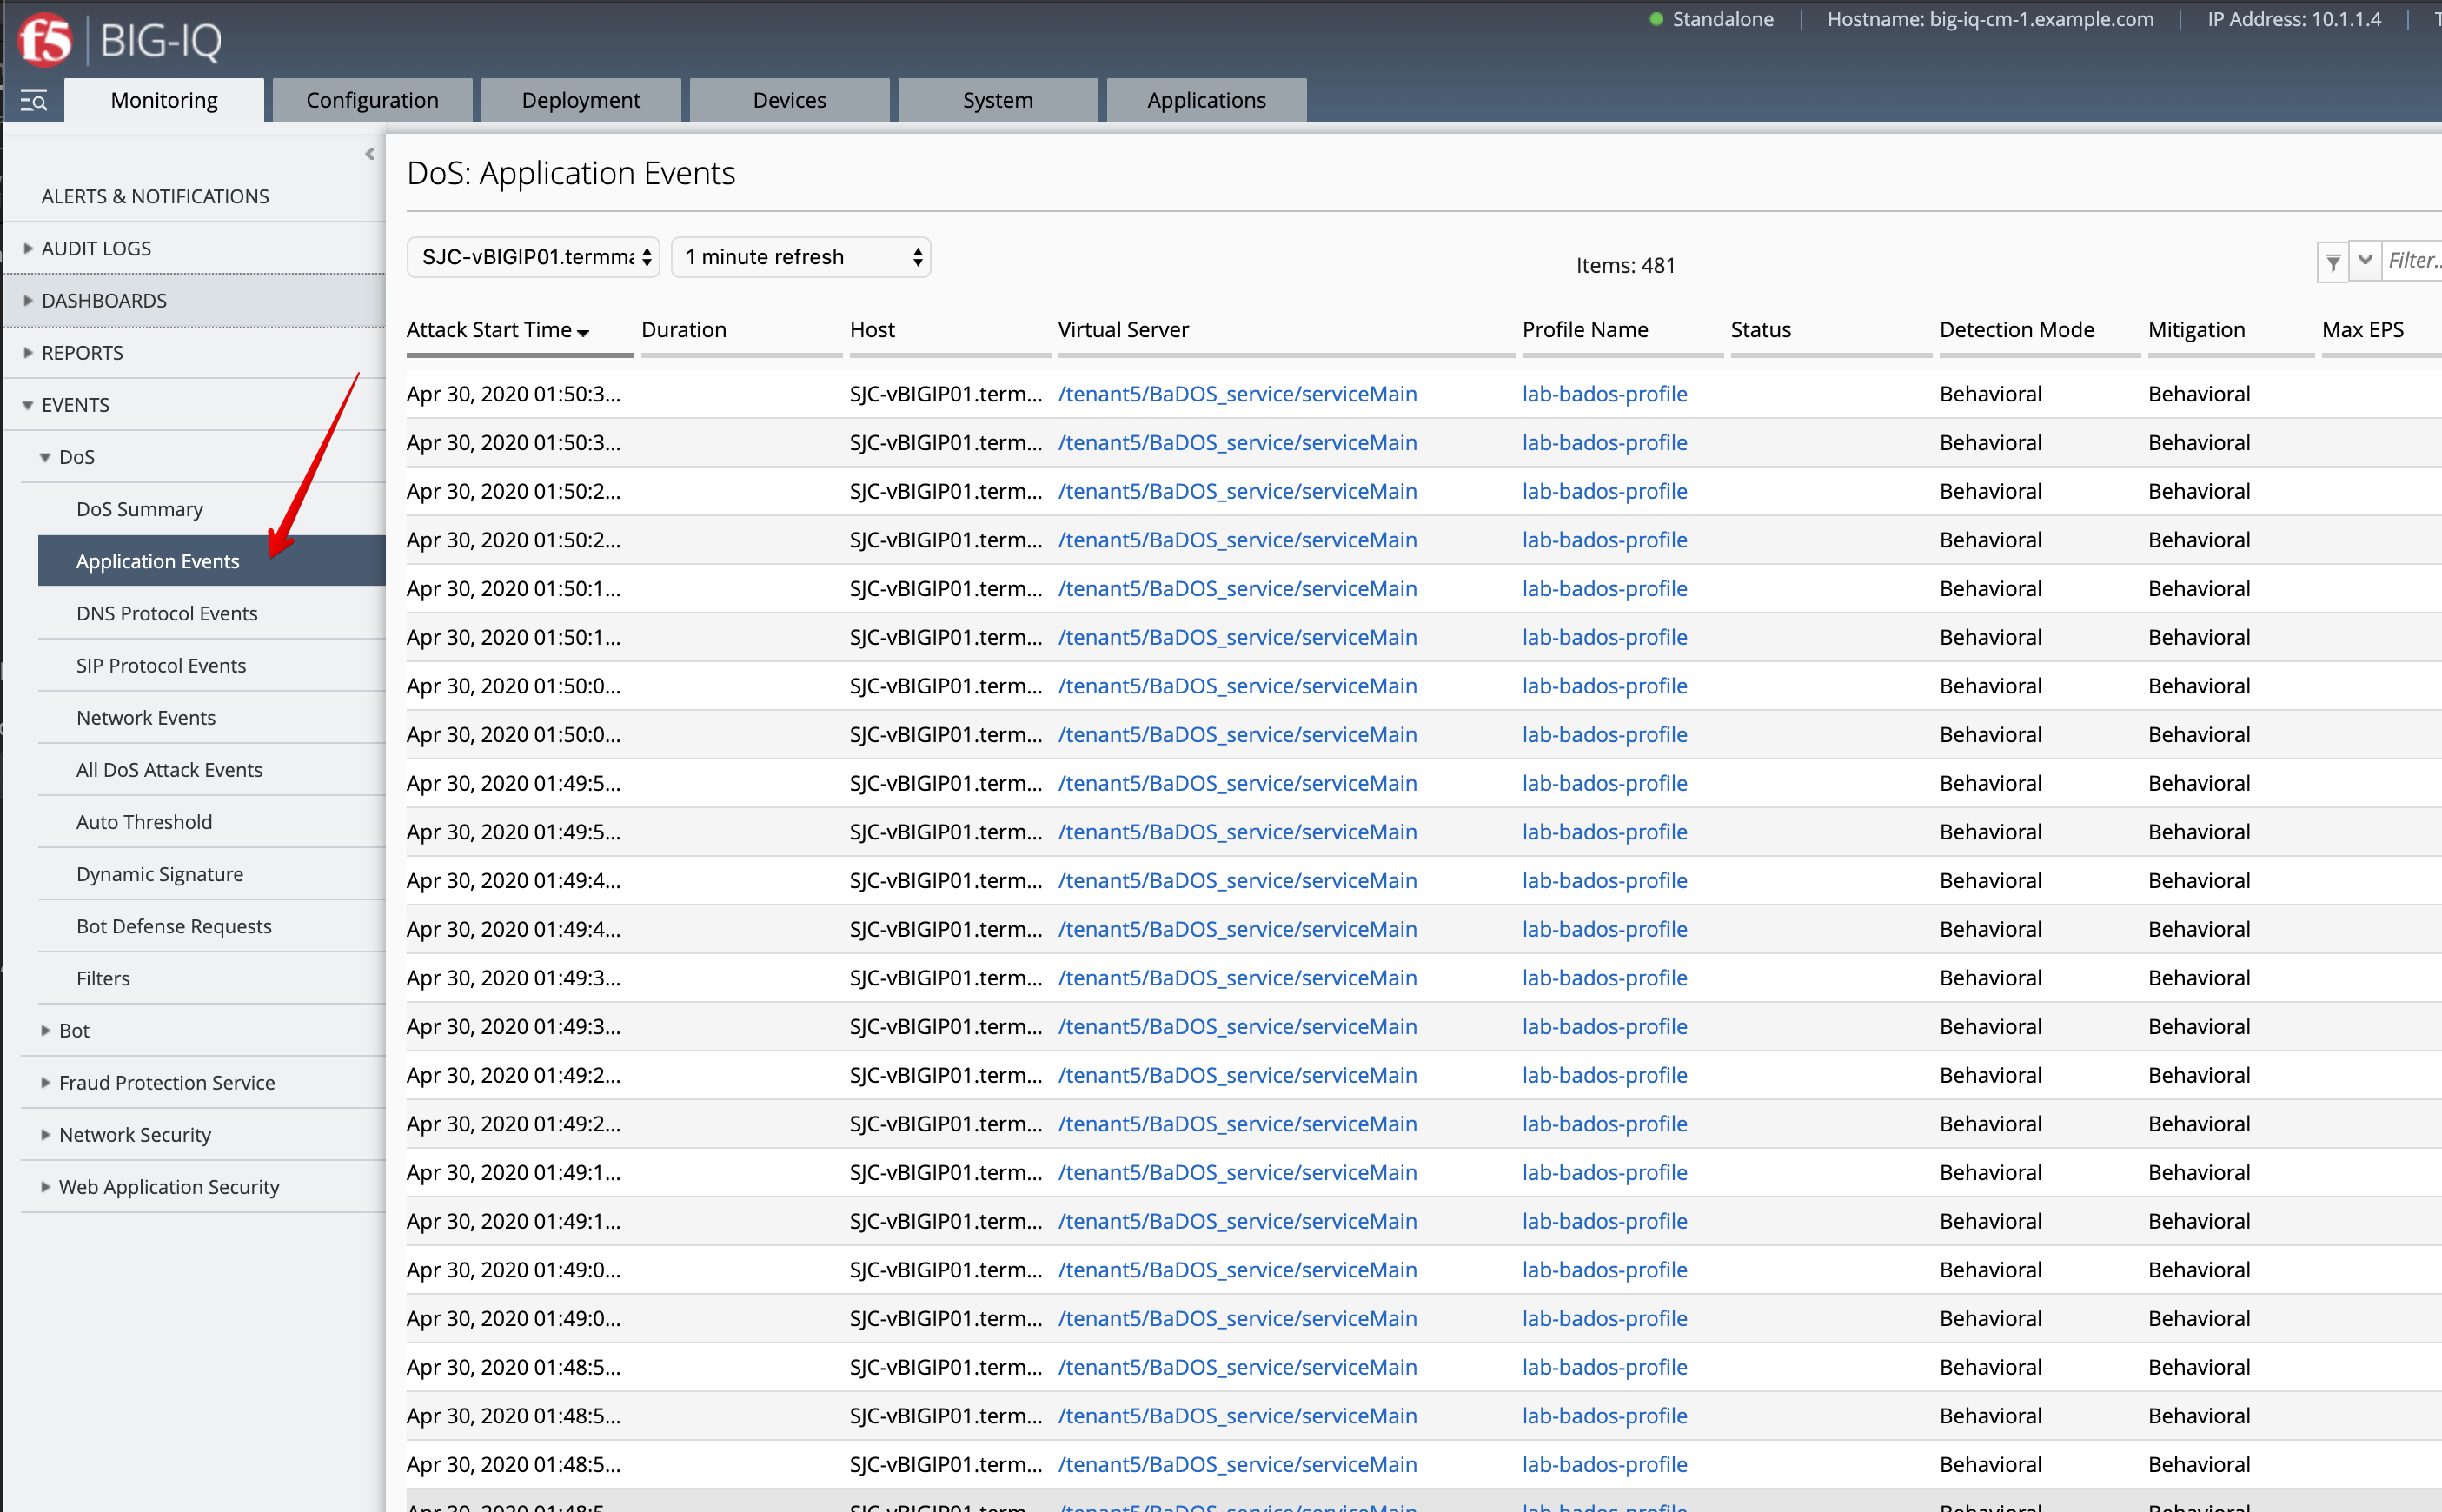
Open the Monitoring > EVENTS > DoS > Application Events and look at the event logs.
The behavior observed in this example is that at the beginning of a DoS attack, BaDoS first protects by blocking all DoS traffic, incrementing “DoS Blocked” counter.
Once the BaDoS dynamic signatures have been computed, BaDoS blocks only the traffic matching the dynamic signatures, incrementing the “Blocked Bad request” counter.
Note
In this lab, BaDoS is slowing down legitimate traffic, this is due to the fact we are using the same system to generate both good and bad traffic.
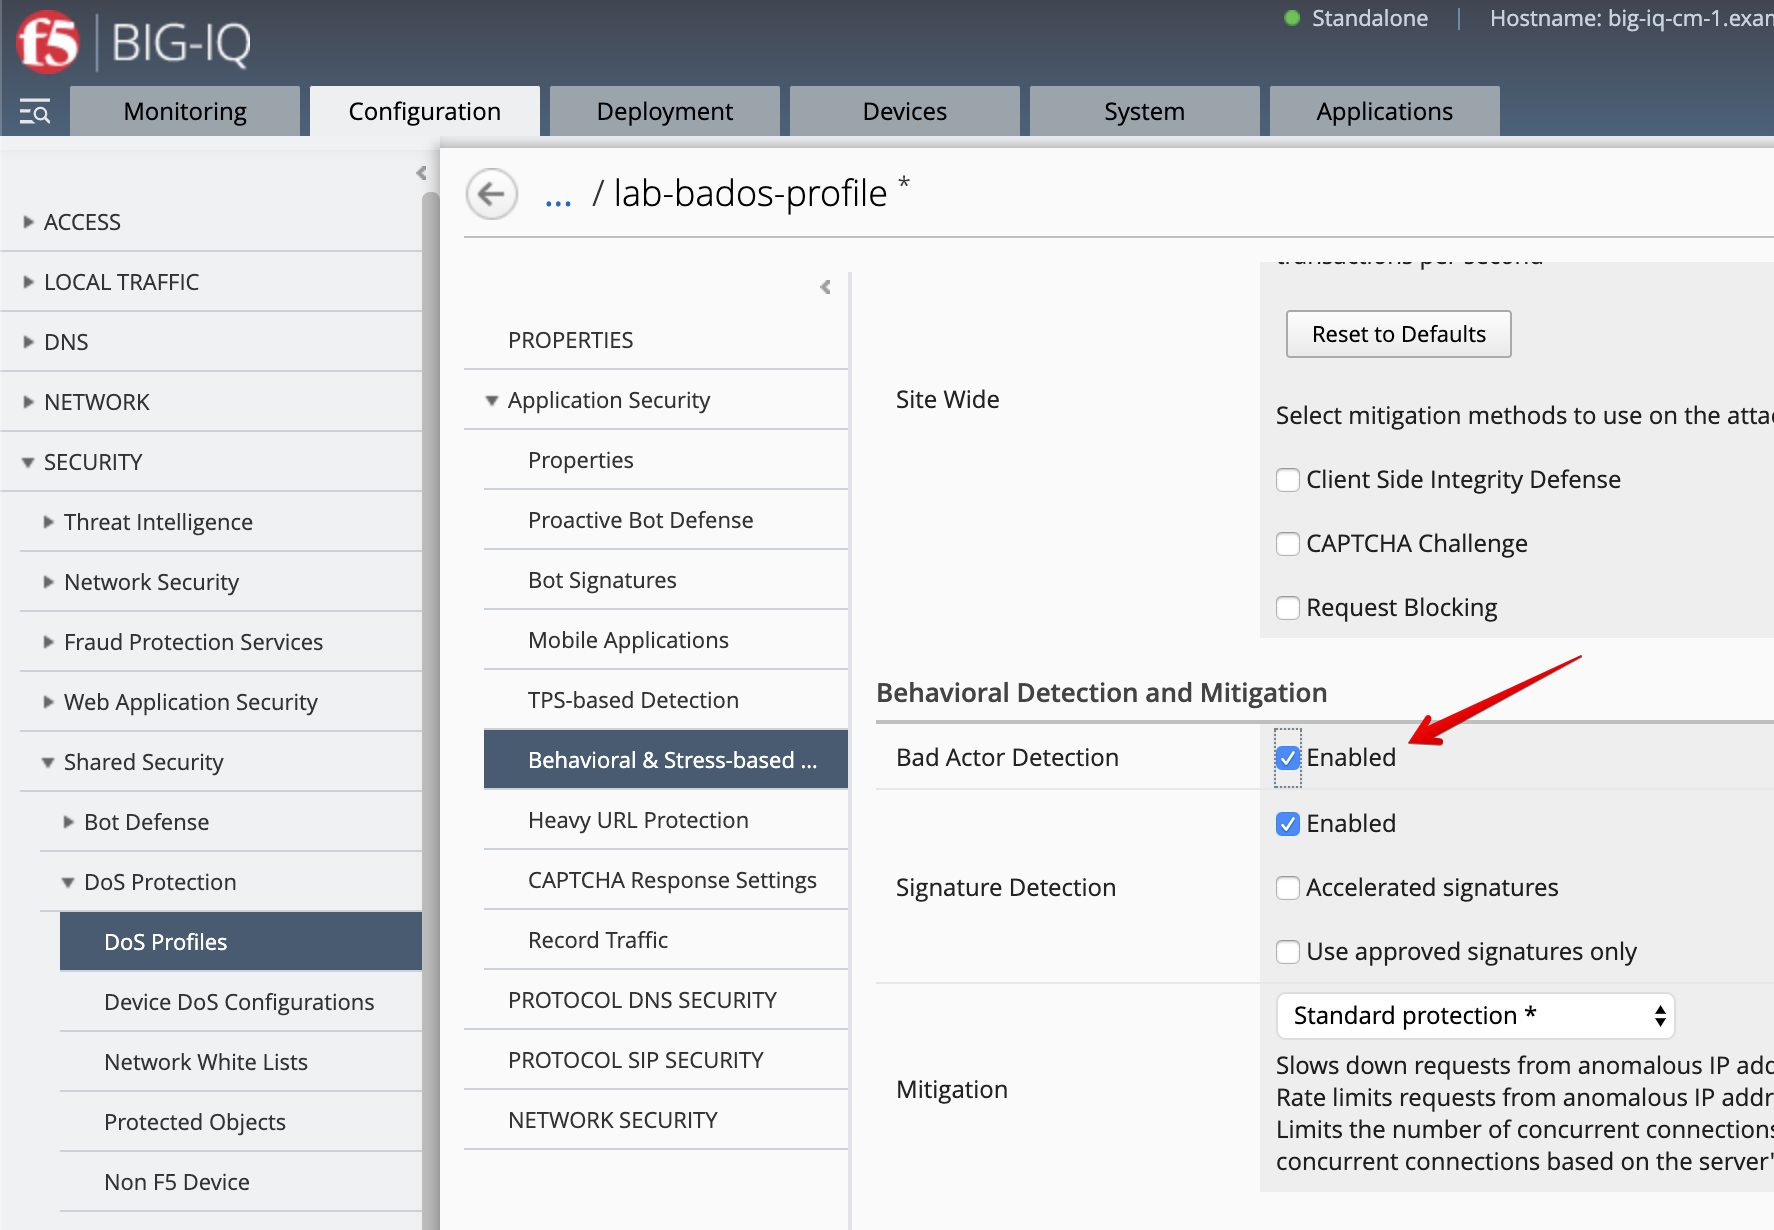
L7 Behavioral DoS Profile update with Bad Actor Detection
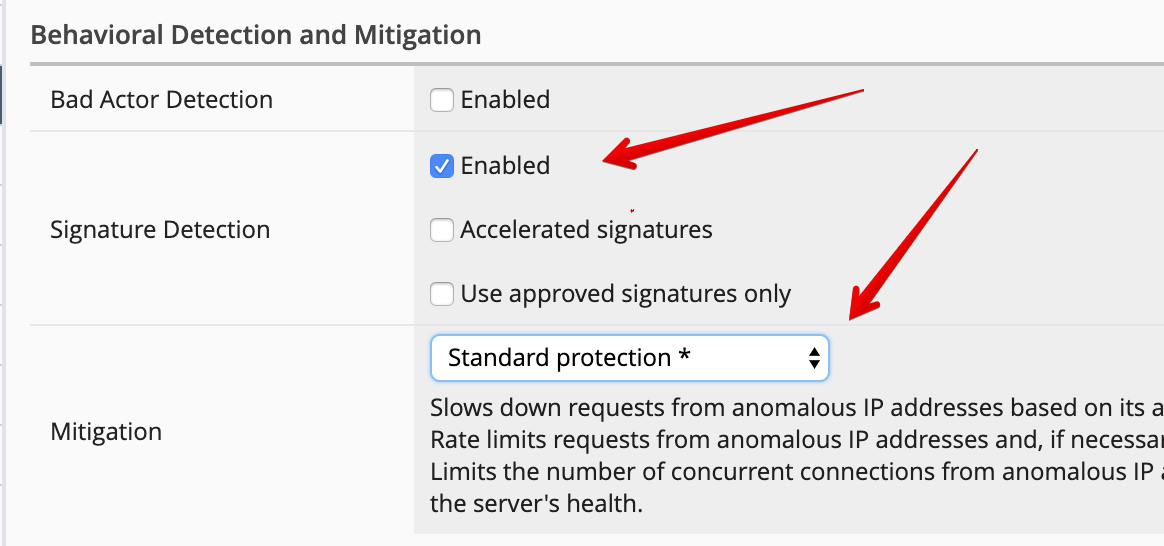
To observe the change in BaDoS profile behavior when individual bad actors are detected, let’s modify the BaDoS profile by enabling Bad Actor Detection under the Behavioral Detection and Mitigation.
- Go to Configuration > SECURITY > Shared Security > DoS Protection > DoS Profiles and open
lab-bados-profile.
- Mitigation:
Bad Actor Detection
- Deploy the updated DoS profile. Select the profile and click Deploy.
Create a Deployment to deploy the Remote Logging Changes on the SJC BIG-IP.
Make sure the deployment is successful.
- Back on the BIG-IQ DoS Dashboard under Monitoring > DASHBOARDS > DDoS > HTTP Analysis.
On the HTTP Analysis DDoS Dashboard, you can observe the Blocked Bad Actor counter being incremented while Blocked Bad Requests stop incrementing as a result of bad actors being identified and being added to the grey list.
Expand the dimmensions to show Transaction Outcomes and Client IPs.

Note
Examine the list of detected bad actor IP addresses on the BIG-IP: ipidr -l /tenant5/BaDOS_service/serviceMain+/Common/lab-bados-profile
- Stop the attack traffic by stoping the
attack_baddos.shscript with CTRL+C - BIG-IQ also offer other ook under Monitoring > DASHBOARDS > DDoS > Protection Summary.
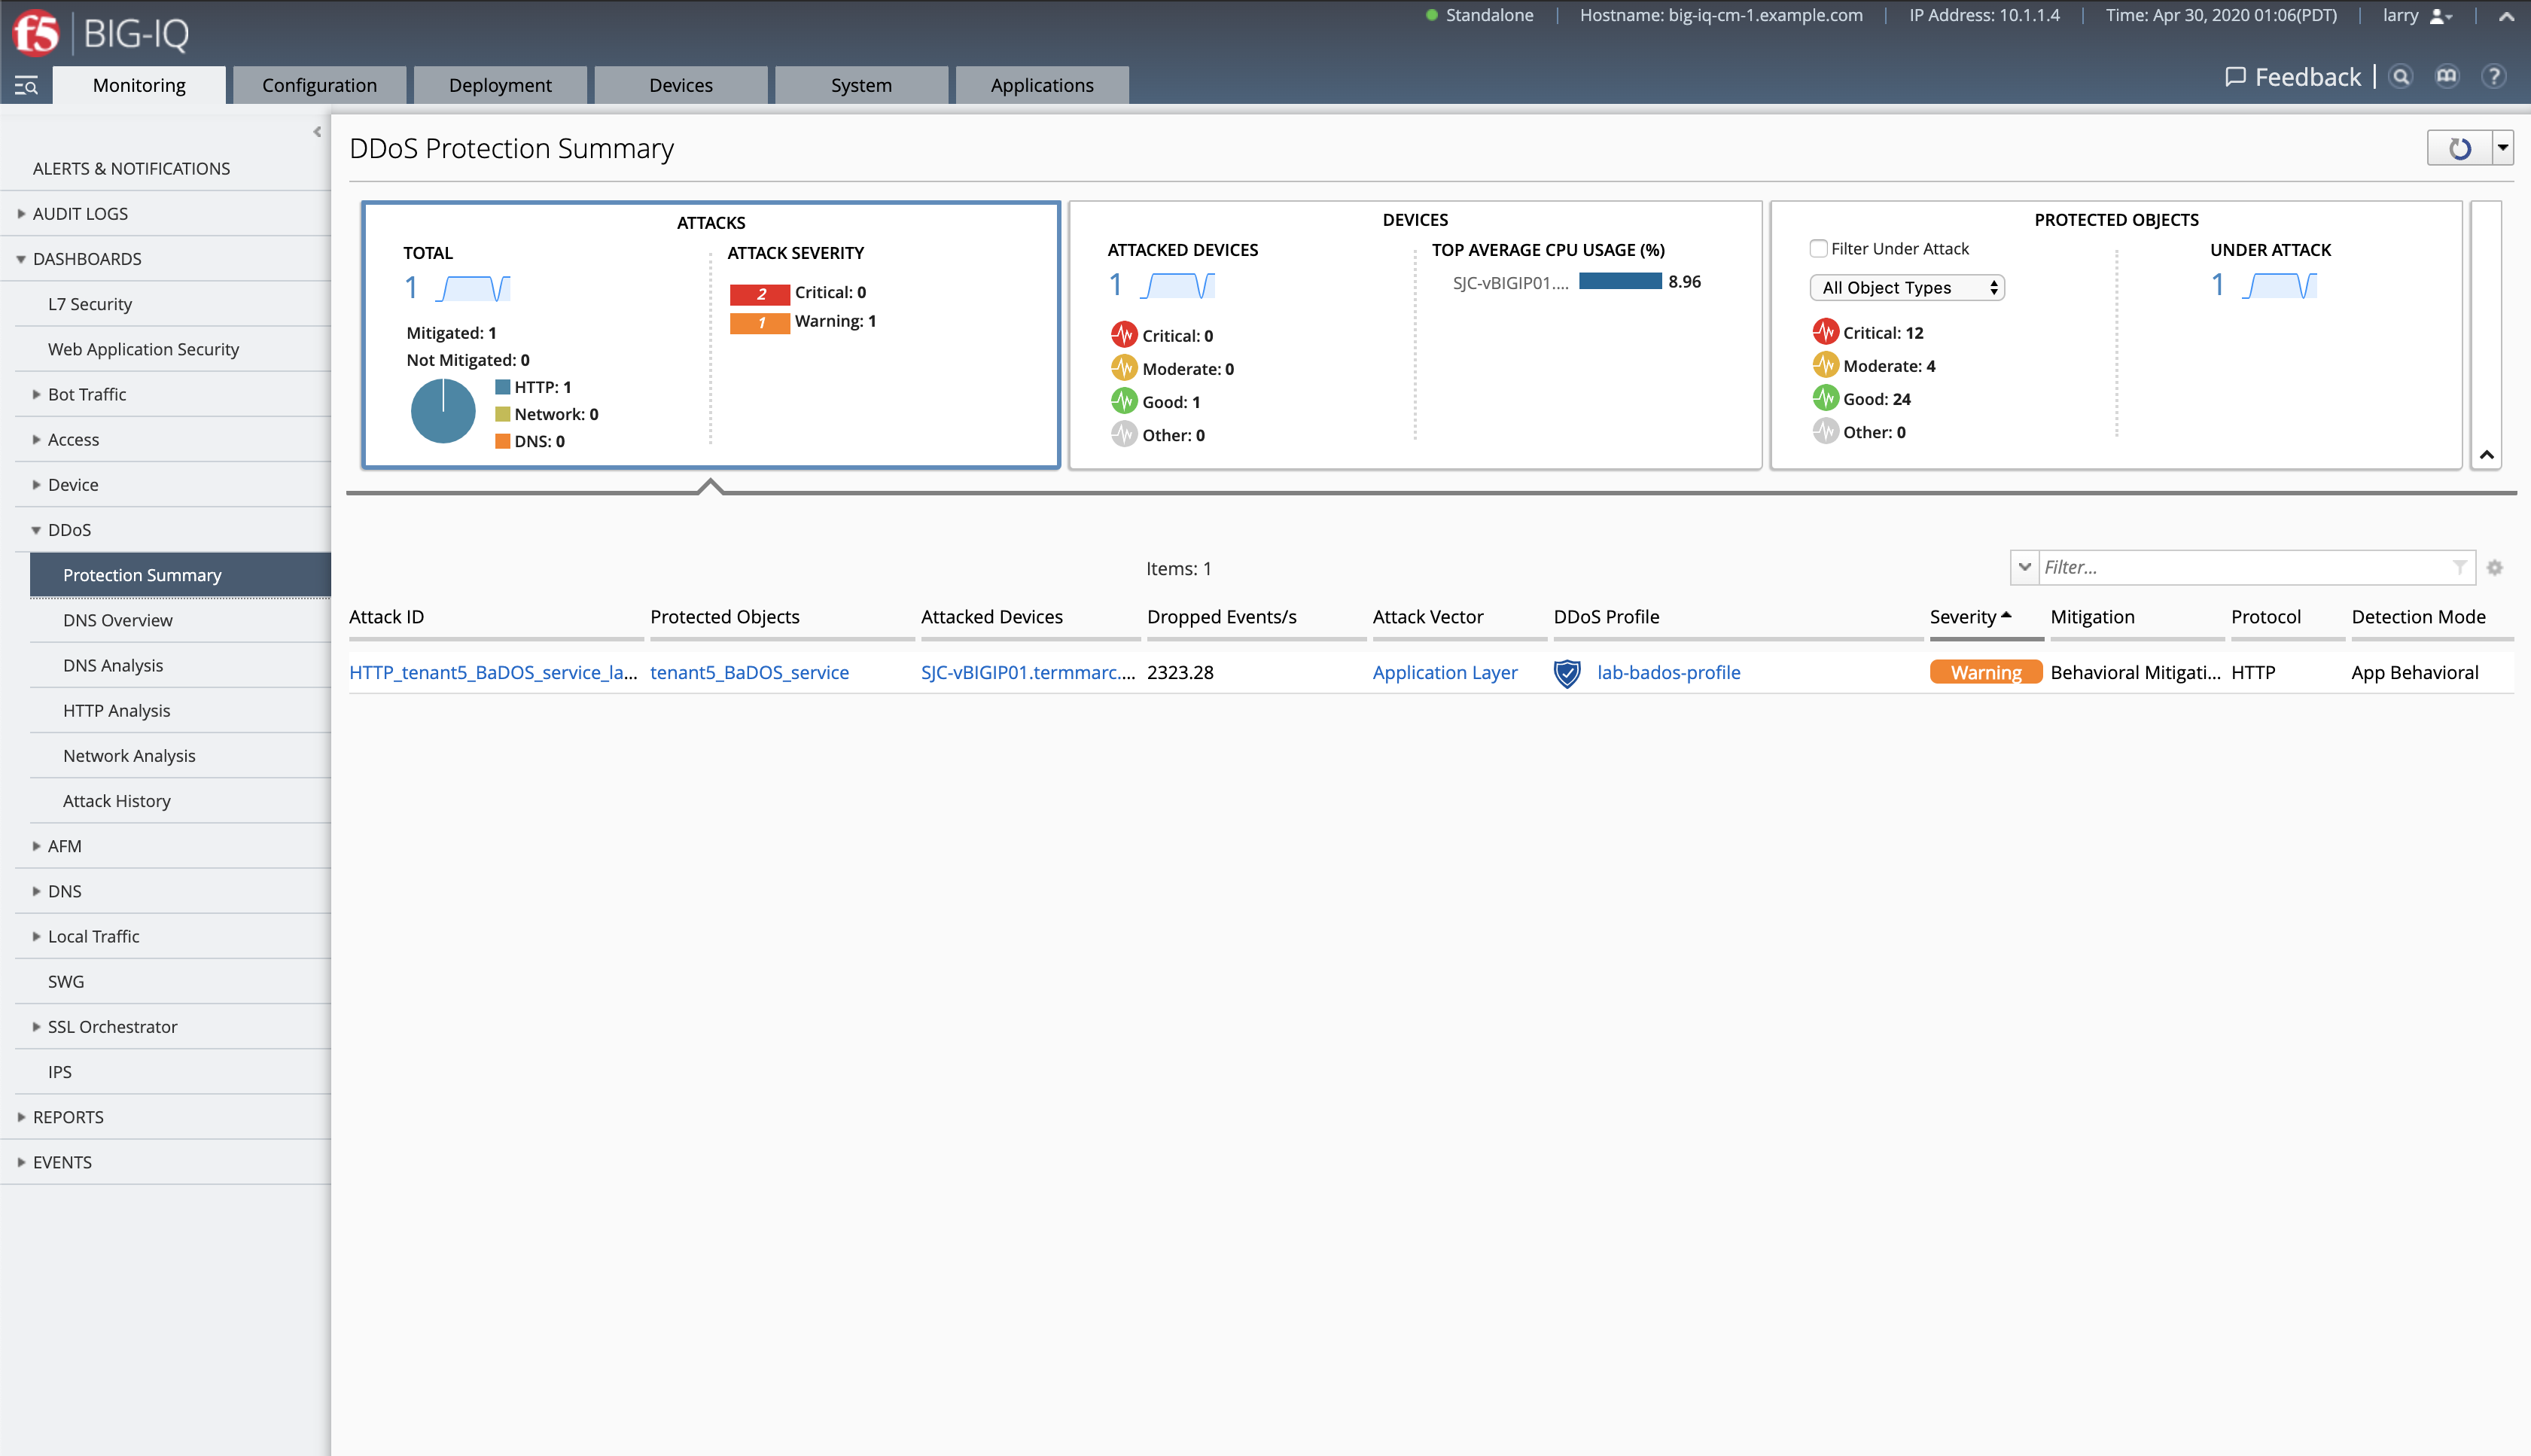
- After some time, look under Monitoring > DASHBOARDS > DDoS > Attack History.
- Navigate to the Applications tab > APPLICATION > LAB_BaDOS > tenant5_BaDOS_service. Can you see the Behavioral DoS attack?
Annex | Run the entire lab configuration part with 1 single API call using AS3
- Open Visual Studio Code, then use the Visual Studio code REST client extension and authenticate to BIG-IQ (follow instructions).
- Copy below AS3 declaration into the body of the BIG-IQ AS3 Declaration call in order to create the service on the BIG-IP through BIG-IQ:
POST https://10.1.1.4/mgmt/shared/appsvcs/declare
1 2 3 4 5 6 7 8 9 10 11 12 13 14 15 16 17 18 19 20 21 22 23 24 25 26 27 28 29 30 31 32 33 34 35 36 37 38 39 40 41 42 43 44 45 46 47 48 49 50 51 52 53 54 55 56 57 58 59 60 61 62 63 64 65 66 67 68 69 70 71 72 73 74 75 76 77 78 79 80 81 82 83 84 85 86 87 88 89 90 91 92 93 94 95 96 97 98 99 100 101 102 103 104 105 106 107 108 109 110 111 112 113 114 115 116 117 118 119 120 121 122 123 124 125 126 127 128 129 130 131 132 133 134 135 136 137 138 | {
"class": "AS3",
"action": "deploy",
"persist": true,
"declaration": {
"class": "ADC",
"schemaVersion": "3.12.0",
"target": {
"address": "10.1.1.11"
},
"tenant5": {
"class": "Tenant",
"BaDOS_service": {
"class": "Application",
"template": "http",
"serviceMain": {
"class": "Service_HTTP",
"virtualPort": 80,
"virtualAddresses": [
"10.1.10.138"
],
"profileAnalytics": {
"use": "Analytics_Profile"
},
"pool": "Pool",
"profileDOS": {
"use": "lab-bados-profile"
},
"profileHTTP": {
"use": "HTTP_Profile"
},
"securityLogProfiles": [
{
"use": "lab-dos-logging-profile"
}
]
},
"HTTP_Profile": {
"class": "HTTP_Profile",
"xForwardedFor": true,
"trustXFF": true
},
"Analytics_Profile": {
"class": "Analytics_Profile",
"collectClientSideStatistics": true,
"collectOsAndBrowser": false,
"collectMethod": false,
"collectResponseCode": true,
"collectIp": true,
"collectGeo": true,
"collectUrl": true
},
"Pool": {
"members": [
{
"serverAddresses": [
"10.1.20.123"
],
"servicePort": 80,
"monitors": [
"http"
],
"adminState": "enable",
"shareNodes": true
}
],
"class": "Pool",
"monitors": [
"http"
]
},
"dos-remote-dcd-pool": {
"class": "Pool",
"members": [
{
"servicePort": 8020,
"serverAddresses": [
"10.1.10.6"
],
"shareNodes": true
}
]
},
"dos-remote-logging-destination-remote-hslog-8020": {
"class": "Log_Destination",
"type": "remote-high-speed-log",
"pool": {
"use": "dos-remote-dcd-pool"
}
},
"dos-remote-logging-destination-splunk-8020": {
"class": "Log_Destination",
"type": "splunk",
"forwardTo": {
"use": "dos-remote-logging-destination-remote-hslog-8020"
}
},
"dos-remote-logging-publisher-8020": {
"class": "Log_Publisher",
"destinations": [
{
"use": "dos-remote-logging-destination-splunk-8020"
}
]
},
"lab-dos-logging-profile": {
"class": "Security_Log_Profile",
"dosApplication": {
"remotePublisher": {
"use": "dos-remote-logging-publisher-8020"
}
}
},
"lab-bados-profile": {
"class": "DOS_Profile",
"application": {
"stressBasedDetection": {
"badActor": {
"detectionEnabled": false,
"mitigationMode": "standard",
"signatureDetectionEnabled": true
},
"operationMode": "blocking",
"thresholdsMode": "automatic",
"sourceIP": {
"rateLimitingEnabled": true,
"rateLimitingMode": "rate-limit"
},
"url": {
"rateLimitingEnabled": true
}
}
}
}
}
}
}
}
|
- Navigate to Devices tab and re-discover/re-import SJC-vBIGIP01.termmarc.com.
- Run section Generate baseline legitimate traffic and trigger the DoS attacks
Use following admd command to monitor the learning:
admd -s vs./tenant5/BaDOS_service/serviceMain+/tenant5/BaDOS_service/lab-bados-profile.info.learning
- Run section L7 Behavioral DoS Profile update with Bad Actor Detection
Update AS3 declaration with "detectionEnabled": true.